- Page 1 and 2: BREAKERSinePower MSI912, MSI924, MS
- Page 3 and 4: BREAKERBREAKERSinePower112132325 cm
- Page 5 and 6: SinePower7MSI1800T18ONOFFREMOTE23LO
- Page 7 and 8: SinePower0aENBGNDON:INV.OFF:INV.ONO
- Page 9 and 10: SinePowerBitte lesen Sie diese Anle
- Page 11 and 12: SinePowerAllgemeine Sicherheitshinw
- Page 13 and 14: SinePowerLieferumfang3 Lieferumfang
- Page 15 and 16: SinePowerTechnische Beschreibung7 T
- Page 17 and 18: SinePowerTechnische Beschreibung7.1
- Page 19 and 20: SinePowerWechselrichter montieren8
- Page 21 and 22: SinePowerWechselrichter anschließe
- Page 23 and 24: SinePowerWechselrichter anschließe
- Page 25 and 26: SinePowerWechselrichter anschließe
- Page 27 and 28: SinePowerWechselrichter benutzen10.
- Page 29 and 30: SinePowerWechselrichter pflegen und
- Page 31 and 32: SinePowerGewährleistungLED-Anzeige
- Page 33 and 34: SinePowerTechnische DatenMSI1312MSI
- Page 35 and 36: SinePowerTechnische DatenÜberspann
- Page 37 and 38: SinePower1 Explanation of symbolsEx
- Page 39 and 40: SinePowerScope of delivery2.3 Opera
- Page 41 and 42: SinePowerTechnical description7 Tec
- Page 43 and 44: SinePowerTechnical descriptionMSI90
- Page 45: SinePowerFitting the inverter8 Fitt
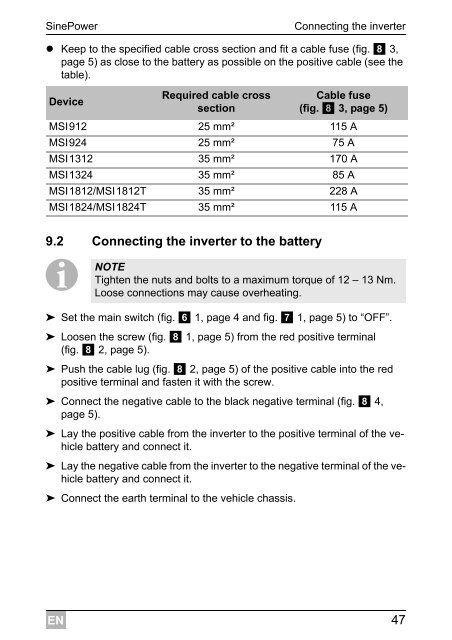
- Page 49 and 50: SinePowerConnecting the inverter!WA
- Page 51 and 52: SinePowerConnecting the inverter9.9
- Page 53 and 54: SinePowerUsing the inverter10.2 Sta
- Page 55 and 56: SinePowerCleaning and caring for th
- Page 57 and 58: SinePowerWarranty13 WarrantyThe sta
- Page 59 and 60: SinePowerTechnical dataMSI1312MSI13
- Page 61 and 62: SinePowerTechnical dataOvervoltage
- Page 63 and 64: SinePower1 Explication des symboles
- Page 65 and 66: SinePowerConsignes générales de s
- Page 67 and 68: SinePowerGroupe cible de cette noti
- Page 69 and 70: SinePowerDescription technique• P
- Page 71 and 72: SinePowerDescription techniqueMSI 1
- Page 73 and 74: SinePowerRaccordement de l'onduleur
- Page 75 and 76: SinePowerRaccordement de l'onduleur
- Page 77 and 78: SinePowerRaccordement de l'onduleur
- Page 79 and 80: SinePowerUtilisation de l'onduleur1
- Page 81 and 82: SinePowerUtilisation de l'onduleur1
- Page 83 and 84: SinePowerEntretien et nettoyage de
- Page 85 and 86: SinePowerCaractéristiques techniqu
- Page 87 and 88: SinePowerCaractéristiques techniqu
- Page 89 and 90: SinePowerLea detenidamente estas in
- Page 91 and 92: SinePowerIndicaciones generales de
- Page 93 and 94: SinePowerVolumen de entrega3 Volume
- Page 95 and 96: SinePowerDescripción técnica7 Des
- Page 97 and 98:
SinePowerDescripción técnica7.1 E
- Page 99 and 100:
SinePowerMontar el inversor8 Montar
- Page 101 and 102:
SinePowerConectar el inversor• Re
- Page 103 and 104:
SinePowerConectar el inversor!¡ADV
- Page 105 and 106:
SinePowerConectar el inversor9.9 As
- Page 107 and 108:
SinePowerUsar el inversor10.2 Indic
- Page 109 and 110:
SinePowerMantenimiento y limpieza d
- Page 111 and 112:
SinePowerGarantía legal13 Garantí
- Page 113 and 114:
SinePowerDatos técnicosMSI1312MSI1
- Page 115 and 116:
SinePowerDatos técnicosProtección
- Page 117 and 118:
SinePower1 Spiegazione dei simboliS
- Page 119 and 120:
SinePowerIndicazioni di sicurezza g
- Page 121 and 122:
SinePowerDestinatari del presente m
- Page 123 and 124:
SinePowerDescrizione tecnica• Pro
- Page 125 and 126:
SinePowerDescrizione tecnicaMSI 180
- Page 127 and 128:
SinePowerCollegamento dell'inverter
- Page 129 and 130:
SinePowerCollegamento dell'inverter
- Page 131 and 132:
SinePowerCollegamento dell'inverter
- Page 133 and 134:
SinePowerImpiego dell'inverter10 Im
- Page 135 and 136:
SinePowerImpiego dell'inverterImpos
- Page 137 and 138:
SinePowerEliminazione dei guasti12
- Page 139 and 140:
SinePowerSpecifiche tecniche15 Spec
- Page 141 and 142:
SinePowerSpecifiche tecnicheMSI1812
- Page 143 and 144:
SinePowerLees deze handleiding voor
- Page 145 and 146:
SinePowerAlgemene veiligheidsinstru
- Page 147 and 148:
SinePowerOmvang van de levering3 Om
- Page 149 and 150:
SinePowerTechnische beschrijving7 T
- Page 151 and 152:
SinePowerTechnische beschrijving7.1
- Page 153 and 154:
SinePowerOmvormer monteren8 Omvorme
- Page 155 and 156:
SinePowerOmvormer aansluiten• Hou
- Page 157 and 158:
SinePowerOmvormer aansluiten!WAARSC
- Page 159 and 160:
SinePowerOmvormer aansluiten9.9 Pin
- Page 161 and 162:
SinePowerOmvormer gebruiken10.2 Bed
- Page 163 and 164:
SinePowerOmvormer gebruikenEnergieb
- Page 165 and 166:
SinePowerGarantieLED-indicatie Oorz
- Page 167 and 168:
SinePowerTechnische gegevensMSI1312
- Page 169 and 170:
SinePowerTechnische gegevensOverspa
- Page 171 and 172:
SinePower1 Forklaring af symbolerne
- Page 173 and 174:
SinePowerLeveringsomfang2.3 Sikkerh
- Page 175 and 176:
SinePowerTeknisk beskrivelse7 Tekni
- Page 177 and 178:
SinePowerTeknisk beskrivelseMSI900,
- Page 179 and 180:
SinePowerMontering af inverteren8 M
- Page 181 and 182:
SinePowerTilslutning af inverteren
- Page 183 and 184:
SinePowerTilslutning af inverteren!
- Page 185 and 186:
SinePowerTilslutning af inverteren9
- Page 187 and 188:
SinePowerAnvendelse af inverteren10
- Page 189 and 190:
SinePowerVedligeholdelse og rengør
- Page 191 and 192:
SinePowerGaranti13 GarantiDen lovbe
- Page 193 and 194:
SinePowerTekniske dataMSI1312MSI132
- Page 195 and 196:
SinePowerTekniske dataOverspænding
- Page 197 and 198:
SinePower1 Förklaring till symbole
- Page 199 and 200:
SinePowerLeveransomfattning2.3 Säk
- Page 201 and 202:
SinePowerTeknisk beskrivning7 Tekni
- Page 203 and 204:
SinePowerTeknisk beskrivning7.1 Reg
- Page 205 and 206:
SinePowerMontera växelriktare8 Mon
- Page 207 and 208:
SinePowerAnsluta växelriktaren•
- Page 209 and 210:
SinePowerAnsluta växelriktaren9.6
- Page 211 and 212:
SinePowerAnvända växelriktaren10
- Page 213 and 214:
SinePowerAnvända växelriktaren10.
- Page 215 and 216:
SinePowerFelsökning12 Felsökning!
- Page 217 and 218:
SinePowerTekniska data15 Tekniska d
- Page 219 and 220:
SinePowerTekniska dataMSI1812 MSI18
- Page 221 and 222:
SinePowerLes bruksanvisningen nøye
- Page 223 and 224:
SinePowerGenerelle sikkerhetsregler
- Page 225 and 226:
SinePowerTilbehør4 TilbehørBetegn
- Page 227 and 228:
SinePowerTeknisk beskrivelseIMERKDu
- Page 229 and 230:
SinePowerTeknisk beskrivelseMSI 180
- Page 231 and 232:
SinePowerKoble til vekselretteren8.
- Page 233 and 234:
SinePowerKoble til vekselretteren9.
- Page 235 and 236:
SinePowerKoble til vekselretteren9.
- Page 237 and 238:
SinePowerBruk av vekselretteren10 B
- Page 239 and 240:
SinePowerBruk av vekselretteren10.3
- Page 241 and 242:
SinePowerFeilsøking12 Feilsøking!
- Page 243 and 244:
SinePowerTekniske data15 Tekniske d
- Page 245 and 246:
SinePowerTekniske dataMSI1812 MSI18
- Page 247 and 248:
SinePowerLue tämä ohje huolellise
- Page 249 and 250:
SinePowerYleisiä turvallisuusohjei
- Page 251 and 252:
SinePowerLisävarusteet4 Lisävarus
- Page 253 and 254:
SinePowerTekninen kuvaus• Napaisu
- Page 255 and 256:
SinePowerTekninen kuvausMSI 1800TVa
- Page 257 and 258:
SinePowerVaihtosuuntaajan liittämi
- Page 259 and 260:
SinePowerVaihtosuuntaajan liittämi
- Page 261 and 262:
SinePowerVaihtosuuntaajan liittämi
- Page 263 and 264:
SinePowerVaihtosuuntaajan käyttäm
- Page 265 and 266:
SinePowerVaihtosuuntaajan käyttäm
- Page 267 and 268:
SinePowerVianetsintä12 Vianetsint
- Page 269 and 270:
SinePowerTekniset tiedot15 Tekniset
- Page 271 and 272:
SinePowerTekniset tiedotMSI1812 MSI
- Page 273 and 274:
SinePowerPor favor, leia atentament
- Page 275 and 276:
SinePowerIndicações de segurança
- Page 277 and 278:
SinePowerMaterial fornecido3 Materi
- Page 279 and 280:
SinePowerDescrição técnica7 Desc
- Page 281 and 282:
SinePowerDescrição técnica7.1 El
- Page 283 and 284:
SinePowerMontar o conversor8 Montar
- Page 285 and 286:
SinePowerConetar o conversor• Man
- Page 287 and 288:
SinePowerConetar o conversor!AVISO!
- Page 289 and 290:
SinePowerConetar o conversor9.9 Ocu
- Page 291 and 292:
SinePowerUtilizar o conversor10.2 I
- Page 293 and 294:
SinePowerConservar e limpar o conve
- Page 295 and 296:
SinePowerGarantia13 GarantiaÉ vál
- Page 297 and 298:
SinePowerDados técnicosMSI1312MSI1
- Page 299 and 300:
SinePowerDados técnicosProteção
- Page 301 and 302:
SinePower1 Пояснение си
- Page 303 and 304:
SinePowerОбщие указани
- Page 305 and 306:
SinePowerЦелевая групп
- Page 307 and 308:
SinePowerТехническое о
- Page 309 and 310:
SinePowerТехническое о
- Page 311 and 312:
SinePowerМонтаж инверт
- Page 313 and 314:
SinePowerПодключение и
- Page 315 and 316:
SinePowerПодключение и
- Page 317 and 318:
SinePowerПодключение и
- Page 319 and 320:
SinePowerИспользование
- Page 321 and 322:
SinePowerИспользование
- Page 323 and 324:
SinePowerГарантияСвето
- Page 325 and 326:
SinePowerТехнические д
- Page 327 and 328:
SinePowerТехнические д
- Page 329 and 330:
SinePower1 Objaśnienie symboliObja
- Page 331 and 332:
SinePowerOgólne zasady bezpieczeń
- Page 333 and 334:
SinePowerOdbiorcy instrukcji5 Odbio
- Page 335 and 336:
SinePowerOpis techniczny• Zabezpi
- Page 337 and 338:
SinePowerOpis technicznyMSI1800TPrz
- Page 339 and 340:
SinePowerPodłączanie przetwornicy
- Page 341 and 342:
SinePowerPodłączanie przetwornicy
- Page 343 and 344:
SinePowerPodłączanie przetwornicy
- Page 345 and 346:
SinePowerUżywanie przetwornicy10 U
- Page 347 and 348:
SinePowerUżywanie przetwornicy10.3
- Page 349 and 350:
SinePowerUsuwanie usterek12 Usuwani
- Page 351 and 352:
SinePowerDane techniczne15 Dane tec
- Page 353 and 354:
SinePowerDane techniczneMSI1812 MSI
- Page 355 and 356:
SinePowerPřed zahájením instalac
- Page 357 and 358:
SinePowerVšeobecné bezpečnostní
- Page 359 and 360:
SinePowerRozsah dodávky3 Rozsah do
- Page 361 and 362:
SinePowerTechnický popisMěnič je
- Page 363 and 364:
SinePowerMontáž měničeMSI1800TM
- Page 365 and 366:
SinePowerPřipojení měniče9 Při
- Page 367 and 368:
SinePowerPřipojení měniče9.5 P
- Page 369 and 370:
SinePowerPřipojení měniče9.9 Za
- Page 371 and 372:
SinePowerPoužívání měniče10.2
- Page 373 and 374:
SinePowerČištění a péče o mě
- Page 375 and 376:
SinePowerZáruka13 ZárukaNa výrob
- Page 377 and 378:
SinePowerTechnické údajeMSI1312MS
- Page 379 and 380:
SinePowerTechnické údajePřepěť