Cnm Touchpad II User Manual - KMS Components
Cnm Touchpad II User Manual - KMS Components
Cnm Touchpad II User Manual - KMS Components

You also want an ePaper? Increase the reach of your titles
YUMPU automatically turns print PDFs into web optimized ePapers that Google loves.
CnM <strong>Touchpad</strong> <strong>II</strong><br />
<strong>User</strong> <strong>Manual</strong><br />
1
Table of Contents<br />
1. Preface<br />
2. Safety Notices<br />
3. Getting your device ready for use<br />
3.1 Packing List<br />
3.2 Products Appearance<br />
3.3 Key for Controls and Connectors<br />
3.4 Technical Specifications<br />
3.5 Features Overview<br />
4. Quick Guide<br />
4.1 Touch Panel Calibration<br />
4.2 Switch On / Off<br />
4.3 Battery management and charging<br />
4.4 Operation of the functions icons<br />
4.5 Wireless Wi-Fi Settings<br />
4.6 USB HOST Function<br />
4.7 HDMI Function<br />
4.8 micro SD (Trans Flash) Card Storage<br />
4.9 APK Installer<br />
5. Operation Details<br />
5.1 Desktop<br />
5.1.1 Audio Player<br />
5.1.2 Video Player<br />
5.1.3 Photo Browser<br />
5.1.4 Sound Recorder<br />
5.1.5 Explorer<br />
5.2 Web Browser<br />
5.3 Email<br />
5.4 Calendar<br />
5.5 Calculator<br />
5.6 Alarm Clock<br />
6. Firmware Update<br />
7. Troubleshooting<br />
8. Warranty Information<br />
9. Copyright<br />
10. Support<br />
11. Licencing<br />
2
1. Preface<br />
This device has a built-in high performance WiFi receiver module,<br />
and supports external 3G USB Dongles* supporting broadband<br />
wireless networks. This allows it to break through the restraint of<br />
fixed network cables; bringing you into the portable media player<br />
world and fulfilling your entertainment needs. It also supports picture<br />
browsing, video playback, e-book readers, games, online chat and<br />
other functionality.<br />
To help with your understanding of how to use this touchpad device,<br />
please read this <strong>User</strong> <strong>Manual</strong> before using the device for the first<br />
time.<br />
CnM will not be held responsible for any loss of personal data or<br />
damage caused by incorrect operation of this Software / Hardware,<br />
accidental damage, replacement of battery or any other accident. To<br />
avoid loss of your data, please ensure you backup your data to a<br />
computer as often as necessary.<br />
The information in this manual is subject to change without any prior<br />
notice. The functionality of this product can differ from the<br />
information given in this manual, because new functions can be<br />
added to this product.<br />
This manual is protected by copyright and any part is not allowed to<br />
be copied or reproduced in any way without prior written permit of<br />
CnM.<br />
Note: When compiling this manual, we have been very careful and<br />
precise to provide completely reliable information. However, it is<br />
possible that an error and oversight has occurred. If you experience<br />
any problems during your usage of this product, please contact CnM<br />
Support (see the support section for details).<br />
* see chapter 4.6 for a list of supported 3G USB Dongles.<br />
3
2. Safety Notices<br />
1 ) Please keep the device away from strong magnetic fields in order<br />
to avoid the damage to the product.<br />
2 ) Please do not let the device to fall onto, rub against or knock<br />
against hard objects during using, because this may cause surface<br />
scratches on the device, battery damage, date loss or other damage<br />
to the hardware.<br />
3 ) Never let this product be exposed to a humid environment or rain<br />
as the water leaking into the device could disable it to the extent of<br />
being beyond repair.<br />
4 ) Never clean the device with any chemicals or detergent, these<br />
will damage the product surface and corrode the finish.<br />
5 ) You are recommended not to use the headset with the volume at<br />
its highest settings, please adjust the volume to an appropriate safe<br />
level and limit the amount of time you spend using headphones to<br />
avoid possible damage to your hearing. Excessive volume will cause<br />
permanent hearing damage.<br />
6 ) Please do not cut off the power abruptly during software updates<br />
or downloading, because this may cause date loss or system errors.<br />
7 ) Over-voltage, power cable strain and bending or squeezing of the<br />
power cable by heavy objects must be avoided to prevent the<br />
possibility of overheating or fire.<br />
8 ) In order to eliminate the risk of electric shock, do not touch the<br />
cable power plug with wet hands.<br />
9 ) Some movie, music and pictures are under the protection of<br />
copyright, unauthorized usage is deemed as an infringement to the<br />
laws of copyright.<br />
4
10 ) Please don’t turn on the device on in locations where wireless<br />
equipment is forbidden or when the usage of the device will cause<br />
interference and possible danger.<br />
11 ) All the wireless equipment is subject to external interference<br />
and this can affect its performance.<br />
12 ) Please comply with any related restrictions and rules, wireless<br />
equipment can influence the flight of the plane; please consult the<br />
relevant airline company if you intend to use the device on the plane.<br />
13 ) Please don’t use the device in a petrol station, or near to fuel or<br />
chemicals.<br />
14 ) Please comply with any related restrictions and rules; don’t use<br />
the device where blasting operations are in progress<br />
15 ) Only qualified maintenance personnel can install or repair the<br />
device. Opening the device in any way will invalidate the warranty.<br />
16 ) Please use the original accessories and battery provided with<br />
the device, don’t use the incompatible products.<br />
17 ) The device is not waterproof, please keep it dry.<br />
18 ) For the sake of data safety, please back up any important<br />
information on the device, or keep a handwritten record.<br />
19 ) When connecting with other devices, please read the user<br />
manual for detailed safety instructions. Don’t connect the device to<br />
incompatible products.<br />
5
3. Getting your device ready for use<br />
3.1 Packing List<br />
3.2 Product Appearance<br />
<strong>Components</strong> Quantity<br />
MID Device 1<br />
Handwriting Pen 1<br />
Charger 1<br />
Headphones 1<br />
USB Cable 1<br />
<strong>User</strong> <strong>Manual</strong> 1<br />
Driver Disk 1<br />
6
3.3 Key for Controls and Connectors<br />
Key Name Description<br />
A RESET<br />
B POWER<br />
C MENU<br />
D ESC<br />
E<br />
Trackball<br />
Navigation/<br />
Indication light<br />
Press this button to reset the system when<br />
the device is halted.<br />
Press this button for a short time to enter<br />
sleeping / wake up mode, press it for a long<br />
time to switch ON / OFF.<br />
Press this button for a short time to enter<br />
the submenu.<br />
Press this button for a short time to return to<br />
a previous screen. Press this button for a<br />
long time to start touch screen calibration.<br />
Trackball navigation button and indication<br />
light.<br />
F TF Card Slot Micro SD (Trans Flash) Card Slot.<br />
G HDMI HDMI Connector.<br />
H<br />
Stereo<br />
Earpieces Jack<br />
7<br />
Stereo Headphone Jack.<br />
I DC Socket Connect with 5V DC charger.<br />
J Mini USB Port Mini 5 PIN USB Port.<br />
K USB Host Port<br />
Port for external USB Device, 3G Dongle,<br />
Mouse, etc.<br />
L Display Display area.
3.4 Technical Specifications<br />
LCD Display<br />
Size<br />
8<br />
7.0” TFT touch panel LCD<br />
display, 160k colours<br />
Resolution 800 * 480<br />
PC interface High speed USB2.0(FS)<br />
Built-in Flash 4GB<br />
Built-in RAM DDR<strong>II</strong> 256MB<br />
Capacity Expansion Support TF Card,capacity 128MB~16GB<br />
Power Supply<br />
Music Function<br />
Video Function<br />
Built-in 3.7V@3200mAH Lithium rechargeable battery<br />
AC charger:Input:AC110V~240V,Output:DC 5V@2A<br />
Max. 6h playing time(factory default)<br />
MP3、WMA、OGG、APE、<br />
Supported formats<br />
FLAC、AAC、WAV<br />
Headset max. output 2 x 5mW(32Ohm)<br />
MP3 Bit rate 8Kbps ~ 392 Kbps<br />
WMA、WMV、Bit rate 5Kbps ~ 192 Kbps<br />
Frequency response 20Hz to 20KHz<br />
SN ratio 90dB<br />
Distortion
3.5 Features Overview<br />
� Supports HD 720P MKV, AVI, RM, RMVB, MP4, MOV, VOB,<br />
DAT, FLV, 3GP, H.246 etc. formats, supporting a maximum<br />
resolution of 1280 * 720.<br />
� Supports JPG, JPEG, BMP, GIF etc. picture formats.<br />
� Supports MP3, WMA, OGG, APE, FLAC, AAC, WAV audio<br />
formats, multi EQ modes.<br />
� Supports TXT, LRC, PDF, Html, Htm, EPUB file formats,<br />
support auto-browse, zoom, bookmarks, and flip over<br />
functions.<br />
� Supports built-in microphone record function.<br />
� Supports USB-HOST and external U-disk, MP3, MP4, Mouse<br />
etc.<br />
� Supports external 3G USB Dongles.<br />
� Supports HDMI output.<br />
� Support G-sensor screen rotation function.<br />
� Supports Stereo Headphones and speaker.<br />
� Supports multiple languages.<br />
� Can be used as USB portable hard disk, driver not needed for<br />
Windows 2000 or above.<br />
9
4. Quick Guide<br />
4.1 Touch Panel Calibration<br />
Before using the device for the first time, you should check that the<br />
screen is calibrated correctly. Press and hold the “ESC” key for 3<br />
seconds to log into the interface of the Touch Panel Calibration. Tap<br />
the center of the “Cross” indicated by the red circle once, and the<br />
screen will display the "Calibration Successful" message when<br />
calibration has been completed, see the figure below.<br />
Note: It is best to use the stylus provided or the tip of a finger nail to<br />
control this device. Using your figure tips to control the device is not<br />
as accurate and may not perform the action you require.<br />
10
4.2 Switch On / Off<br />
Switch ON and Unlock: When the device is in its OFF mode, press<br />
and hold the “Power” key for 3 seconds to enter the Android startup<br />
process. The device will take about 100 seconds to enter the system<br />
desktop, with the LCD in locked mode, please press and pull the<br />
icon to the green point, and the LCD will unlocked automatically, see<br />
the image below:<br />
When the device is in use, it is recommended that it isn’t powered<br />
OFF after use, but is put into SLEEP mode instead, so that it is ready<br />
to be used almost instantly without having to start the Android<br />
Operating System.<br />
Power Saving Mode and Locked Mode: Pressing the “POWER”<br />
key when the device is in use will result in the system entering<br />
SLEEP power save and locked mode. Pressing the “POWER” key or<br />
tapping the touch screen for 3 seconds, will return the system to<br />
locked mode within 1 second.<br />
Note: The primary operation of the device will not stop under the<br />
power saving mode, it is just the LCD that is turned off, showing a<br />
black screen. This means that playing music, movies etc. will still<br />
continue to run.<br />
11
Switch OFF: When the device is in use, press and hold the<br />
“POWER” key for 3 seconds, the screen will display the power off<br />
interface, choose the power off option to confirm your selection and<br />
the system will shut automatically.<br />
Note: When the device is running low on battery power, it will sound<br />
an alarm and then shut down automatically if it isn’t plugged into<br />
mains power to start charging. If the device can not start up please<br />
check if the battery power I too low by charging the device.<br />
4.3 Battery management and charging<br />
a. Charge the battery for about 8-12 hours to make sure the battery<br />
is fully charged for the first time.<br />
b. Insert the micro port of the battery adaptor into DC slot on the<br />
device, and connect the other side to a power socket. The Power<br />
indication lamp of the device will light up with a light blue color. If the<br />
device is on, the desktop icon of the battery will animate, which<br />
shows that the device is charging. Please wait until the battery is<br />
fully charged, don’t disconnect the power when charging. Once the<br />
battery is fully charged, the indication lamp will change into dark blue<br />
and the Icon on the desktop will stop animating. When the<br />
battery is exhausted completely, please charge the device for at<br />
least one minute before starting it up.<br />
Note: In order to keep the battery working to its full potential, please<br />
pay attention to the following advice:<br />
� Don’t charge the device in excessively high temperatures.<br />
� There is no need to run down the power for this Li-ion battery, you<br />
can charge the battery even when there is still power left in the<br />
battery without it affecting the lifespan of the battery.<br />
� In order to keep the battery in good condition, make sure you<br />
charge it at least once every two weeks, if the device hasn’t been<br />
used for a long time.<br />
12
4.4 Operation of the Function Icons.<br />
Icon Function Icon Function<br />
Back to<br />
main menu<br />
Current<br />
power status<br />
System Time<br />
Back<br />
Menu<br />
Google Search<br />
New Mail<br />
Music playing<br />
toolbar<br />
13<br />
System has found a<br />
new device.<br />
Set the alert time<br />
Reduce the volume<br />
Increase the volume<br />
Applications<br />
Switch desktop<br />
WIFI On / Off<br />
Update icon for<br />
Music audio /<br />
inventory
4.5 Wireless Wi-Fi Settings<br />
a. Turning on Wi-Fi: Tap the applications menu icon , to show<br />
the Applications menu; press “Settings”, to enter into the setting<br />
interface; press “Wireless and networks” to enter the setup screen.<br />
Tick the Wi-Fi box to enable it as shown below:<br />
b. Connecting to a network: Press “Wi-Fi settings” to enter this<br />
menu. The system will find any wireless networks in the vicinity<br />
automatically. Please refer to the figure below, which shows two<br />
Wi-Fi networks have been found:<br />
After selecting the network you would like to connect to, the system<br />
will either connect to the network or if the network is secured and<br />
requires a security key to be entered, selecting it, will popup a<br />
Connection window, where you can input the correct security code<br />
and press “Connect”.<br />
14
The system will connect to the network automatically, and once<br />
connected will show a Status of “Connected”. You can see the<br />
network connection status by pressing the network name, see the<br />
figure below:<br />
Connection information<br />
c. IP address setting and connection: There are two setting<br />
methods to allow the IP address to be set. Whether the IP Address is<br />
distributed automatically or not, is dependant on the Wi-Fi Router’s<br />
settings.<br />
1. DHCP - IP Address is assigned automatically:<br />
By default this device is setup to be assigned an IP Address<br />
automatically.<br />
If the wireless network you want to connect to, assigns the IP<br />
Address automatically, but the settings have been changed to a<br />
Static IP Address, use the following procedure to change the settings.<br />
Press the top right corner of the screen “ ” and then press<br />
“Advanced”.<br />
15
Un-tick the selection in the “Use static IP” box.<br />
Press the right top menu “ ” on the screen and press “Save” to<br />
complete this change, see the figure below:<br />
Press the “back” icon once complete, this will return you to the Wi-Fi<br />
settings screen.<br />
16
2. <strong>Manual</strong> Setup - Static IP Address:<br />
If the Wi-Fi network you are connecting to requires a Static IP<br />
Address, use the following procedure to change the settings. Press<br />
the top right corner of the screen “ ” to enter into the “Advanced”<br />
settings. See the figure below:<br />
Select the “Use static IP” tick box, then set the IP address, Gateway<br />
and Netmask using the information you have for that Network.<br />
Press the in the right top of the screen and select “Save”, see<br />
the figure below:<br />
17
4.6 USB HOST Function:<br />
By default this device is setup to connect to a PC using its USB<br />
connection. If you would like to attach an external USB device such<br />
as a Keyboard, 3G Dongle or USB Storage Device, then please<br />
follow the procedure below.<br />
a. Turn on The USB- HOST:<br />
Press the menu icon , to enter into the Applications menu; press<br />
“Settings” to enter into the settings interface; press “USB Mode<br />
select” to select the “HOST MODE” as shown in the figure below:<br />
18
. Connecting USB Drives:<br />
Insert the USB Drive into the HOST port, press the “Explorer” icon<br />
on the desktop, press “USB” option to view the root of the USB Drive,<br />
see the figure as below:<br />
c. Connecting an External 3G USB Dongle:<br />
Insert the 3G USB Dongle in to the Host port, so that it is picked up<br />
by the system (for a list of all 3G Dongles which are compatible with<br />
this device see table below). Tap the applications menu icon , to<br />
show the Applications menu; press “Settings”, to enter into the<br />
setting interface; press “Wireless and networks” to enter the setup<br />
screen. Un-tick the Wi-Fi box to disable it (Wireless and Mobile<br />
networks can’t be enabled at the same time) as shown below:<br />
19
Tick the “Mobile network” box to enable mobile networking. If mobile<br />
networking won’t turn on, please check that the 3G Dongle that you<br />
are trying to use is in the compatibility table below.<br />
Manufacturer Model Performance Rating<br />
Longcheer HSPA USB Dongle ****<br />
Vtion E1916 ****<br />
HUAWEI EC122 ****<br />
HUAWEI EC1261 ****<br />
Longcheer HSPA USB Dongle ***<br />
HUAWEI E220 ***<br />
HUAWEI E182E ***<br />
Alter ZD6000 ***<br />
MobilePeak K80 ***<br />
Thinkwill UE800 ***<br />
HUAWEI E180 **<br />
HUAWEI E1750 **<br />
Once mobile networking has been enabled, select “Mobile network<br />
settings as shown below:<br />
20
Select “Access Point Names”, then press the in the right top of<br />
the screen and select “New APN”. On the Edit access point screen<br />
enter the settings shown below fore the network carrier you will be<br />
using. Note: If a setting isn’t mentioned, then leave it at its current<br />
default setting. These settings were correct when this<br />
manual was printed, if you have any connection issues, please<br />
check they are correct with your mobile operator.<br />
Name: 3 Services<br />
APN: three.co.uk<br />
MCC: 234<br />
MNC: 20<br />
Name: o2<br />
APN: mobile.o2.co.uk<br />
<strong>User</strong>name: vertigo<br />
Password: password<br />
MCC: 234<br />
MNC: 10<br />
Name: Vodaphone<br />
APN: internet<br />
<strong>User</strong>name: web<br />
Password: web<br />
MCC: 234<br />
MNC: 15<br />
Name: Orange Internet<br />
APN: orangeinternet<br />
MCC: 234<br />
MNC: 33<br />
Name: T-Mobile Internet<br />
APN: general.t-mobile.co.uk<br />
<strong>User</strong>name: t-mobile<br />
Password: tm<br />
MCC: 234<br />
MNC: 30<br />
APN type: * (Just an * in the field)<br />
Name: Virgin Mobile<br />
APN: goto.virginmobile.uk<br />
<strong>User</strong>name: user<br />
21
Once the correct details have been entered, press the in the<br />
right top of the screen and select “Save”.<br />
4.7 HDMI Function:<br />
You can enjoy high definition video playback on your HD Ready TV<br />
using the Video player function.<br />
� Connect the TV to the device using a high definition cable.<br />
� Press in the video play interface, to enter the Selection<br />
popup menu, and then select “HDMI”:<br />
Another popup allowing the HDMI output mode to be selected will<br />
appear, select the “Output to HDMI: 720p as shown below.<br />
22
You can enjoy high definition video playback on your TV.<br />
4.8 micro SD (Trans Flash) Card Storage<br />
There is a micro SD card slot in this device, it supports reading files<br />
on micro SD and Trans Flash cards. Ensure that you insert the card<br />
into the card slot, the correct way round. To remove the card, just<br />
push the card towards the slot, and this will automatically release the<br />
card. Please adhere to the following advice when using the card slot:<br />
a. Insert the memory card into the card slot on the right side.<br />
b. Don’t pull out the card when it is in use (reading, copying),<br />
otherwise, it may cause data errors.<br />
c. Don’t use the memory card in high temperature conditions.<br />
d. Keep the memory card away from the liquid and erosive materials.<br />
23
4.9 APK Installer<br />
This device supports installing third part applications programs<br />
designed to run on Android. Many Application Programs<br />
can be downloaded from internet and then installed using the APK<br />
Installer.<br />
• Press the APK installer icon and the APK installer interface will<br />
popup with the following icons: Install, Manage and Exit.<br />
• Install: Press install to access the APK installer interface.<br />
There are two locations that installation .apk files can be installed<br />
from: Internal Memory which means the built-in storage, SD Card<br />
which means a memory card inserted into the micro SD card slot.<br />
After entering, select the program to be installed from the right<br />
window, tap it to install and follow the prompts. Once the application<br />
has been installed you will be returned to the installer main screen.<br />
24
• Manage: Allows applications to be Launched, Exported or<br />
Uninstalled. The default view shows all the applications installed on<br />
the device, tap the icon for the application you would like to manage.<br />
- Launch: Run the software.<br />
- Export: Export the software to an expansion card.<br />
- Uninstall: Uninstall the software.<br />
- Cancel: Cancel the operation.<br />
There are a number of App Market Places where you can download<br />
useful applications for this device. The APKShare Market is already<br />
pre-loaded on to the system, but there are a few other markets that<br />
you might want to explore:<br />
http://slideme.org/<br />
http://freeandroidapplications.net/<br />
http://www.androidfreeware.net/<br />
http://andappstore.com/AndroidApplications/<br />
Note: Not all the apps available for Android on the Internet<br />
or App Sites will be compatible with this device.<br />
25
The following Apps have been pre-loaded, allowing them to be<br />
installed if you required:<br />
- Open APK Installer from the applications menu.<br />
- Tap the "Install" button.<br />
- Tap the "Internal Memory" folder.<br />
- Tap "<strong>KMS</strong> Apps" or "CnM Apps" (whichever folder is present).<br />
- Select the App you would like to install by tapping on it.<br />
Application File To Install Functionality<br />
Adobe Reader reader.apk Adobe PDF Viewer<br />
Air Control Lite Aircontrol.apk Air Traffic Game<br />
Aldiko RKEBookReader.apk eBook reader<br />
BBC News newswidget.apk BBC News Reader<br />
Documents To Go docstogo.apk Office Viewer<br />
Droid Security Antivirus antivirus.apk Anti Virus Package<br />
eBay mobile.apk eBay Client<br />
Gmail Gmail.apk Google Mail<br />
Google Listen listen.apk Audio Downloader<br />
Facebook katana.apk Facebook Client<br />
Kindle kindle.apk Amazon eBook reader<br />
MSN Talk jmsn.apk MSN Messenger<br />
Shelves shelves.apk eBook reader<br />
Skyfire browser.apk Web Browser (Flash support)<br />
SkyNews skynews.apk Sky News Reader<br />
Skype Raider.apk Skype Client<br />
Talk Talk.apk Google Talk<br />
TuneIn Radio player.apk Internet Radio<br />
Twitter twitter.apk Twitter Client<br />
For support on these applications please contact the developer<br />
directly.<br />
26
5 Operation Details<br />
5.1 Desktop<br />
5.1.1 Audio Player<br />
In the applications menu or on the desktop, click the icon to<br />
launch the audio player.<br />
� If there are no music files in the audio player playlist, the<br />
system will automatically load any music files from the micro<br />
SD card to the audio player playlist after the audio player is<br />
launched. The device supports the following audio file formats:<br />
mp3, wav, midi and wma.<br />
� If there are many songs in the Music playlist area, slide up /<br />
down using the touch screen or use the trackball.<br />
� Click on the track you want to play from the list as shown in the<br />
following picture.<br />
27
� In the music playing interface, tap to enter the audio<br />
playing list.<br />
� Drag the playback progress bar<br />
to adjust audio playback progress.<br />
Audio player control descriptions:<br />
Icon Function Icon Function<br />
Browse the playlist<br />
28<br />
Online music<br />
searching<br />
Artist Album<br />
Other audio<br />
New Playlist<br />
Quit<br />
View music files on<br />
disc<br />
Switch to audio<br />
playing<br />
EQ setting (normal,<br />
rock, classical, pop)<br />
A-B repeat Playing order mode<br />
Add to the playlist Pause playback<br />
Raise the volume Lower the volume<br />
Go to previous song Skip to next song<br />
Play audio<br />
Note:Audio player can play WAV record files.
5.1.2 Video Player<br />
In the applications menu or on the desktop, click the icon to<br />
enter the video player interface.<br />
� When no video files in the video player playlist, the system will<br />
automatically load any music files from the micro SD card to<br />
the video player playlist after the video player has been<br />
launched.<br />
� If there are many videos available, slide up / down the list using<br />
the touch screen or use the trackball.<br />
� To play video files, click the desired file in the list to play it as<br />
shown in the following pictures:<br />
� The device supports the following video file formats: MKV, AVI,<br />
RM, RMVB, MP4, MOV, VOB, DAT, FLV, 3GP.<br />
� Drag the playback progress bar to<br />
adjust video playback progress.<br />
29
Video player control descriptions:<br />
Icon Function Icon Function<br />
Adding video<br />
bookmarks<br />
Go to previous<br />
chapter<br />
Play and pause a<br />
video<br />
30<br />
Brightness Adjusting<br />
Skip to next chapter<br />
Video format 16:9 / 4:3<br />
Quit Menu<br />
Lower the volume Raise the volume<br />
� Click this button to Delete bookmark, Play mode, TV-Out,<br />
HDMI etc. See the figure as below:<br />
� Tap play mode to select one of the possible play modes: Single,<br />
Repeat one and Repeat all.
5.1.3 Photo Browser<br />
In the applications menu or on the desktop, click the icon to<br />
enter the picture browser.<br />
Picture Browser control descriptions:<br />
Icon Function Icon Function<br />
Previous image Zoom in<br />
Next image Zoom out<br />
Brightness Setup<br />
Rotate the image<br />
900 clockwise<br />
Image settings<br />
31<br />
Enter the Image Slide<br />
mode<br />
Rotate image 90 degree<br />
counterclockwise<br />
Quit the interface of<br />
Image Browser<br />
� If there are no files in the photo list, the system will<br />
automatically load the image files from the micro SD card to the<br />
photo browsing list after the photo browser has launched.<br />
� The device supports the following video picture formats: BMP,<br />
JPG, JPEG, PNG and GIF.
� To view a picture, navigate to the image you would like to view<br />
and select it.<br />
� To Delete, find Details or Set the image as wallpaper, tap on the<br />
image and hold the image until the File/directory Operations<br />
window pops up.<br />
5.1.4 Sound Recorder<br />
In the Applications menu, tap the Sound Recorder icon to enter<br />
the recording interface<br />
Tap the record button to start recording, tap the button to<br />
stop recording. Once you finish the recording, you will be asked if<br />
you want to “Use this recording” or “Discard” the recording.<br />
Recording playback: To playback a recording, use Explorer to find<br />
the Record folder on the Internal Memory storage,; select the<br />
recording to playback by clicking on it. For more details about<br />
playback please refer to 5.1.1(Audio Player).<br />
32
5.1.5 Explorer<br />
In the main menu or desktop, tap the explorer icon to enter the<br />
Management Interface, tap 【SD Card】、【Internal Memory】or【USB】<br />
to open the root directory of the appropriate storage. To navigate<br />
around the file system, you can tap on the folders name or use the<br />
“Back” and “Next” functions.<br />
Cutting and Copying Files<br />
� In the file browser, press and hold down on the icon of a file<br />
you want to manage.<br />
� A pop-up action menu, which includes Cut, Paste, Copy,<br />
Delete, Rename, New folder etc. will appear.<br />
� Tap “Cut” or “Copy”<br />
� Navigate to the folder where you want to paste the file, press a<br />
blank area or tap the “Menu” icon.<br />
� Tap “Paste”.<br />
Deleting files<br />
� In the file browser, press and hold down on a file icon you want<br />
to manage.<br />
� Tap “Delete”.<br />
� Tap “OK” to delete the file.<br />
Adding a folder<br />
� Tap on the “File Browser” icon on the home interface or from<br />
the Application list.<br />
� Navigate to where the new folder needs to be created.<br />
� Tap the “Menu” icon and tap “New Folder”<br />
� Type the new folder name in the text box provided.<br />
� Tap OK to set up a folder.<br />
33
5.2 Web Browser<br />
Note: For the Web Browser to view web sites, this device must be<br />
connected to a Wireless or 3G Network (for details refer to chapter<br />
4.5 Wi-Fi Settings).<br />
In the applications menu or on the desktop, click the icon to<br />
enter to the Web Browser interface; click the address bar and input<br />
the website address for the website you would like to view. Use the<br />
popup keyboards to enter the address and then click “Go”.<br />
Changing your Home Page<br />
� Open the Browser.<br />
� Tap the “Menu” icon to show the browser settings menu.<br />
� Tap “More”.<br />
� Tap “Settings”.<br />
� Tap “Set Home Page”.<br />
� Enter the URL of the web site to use as the homepage, and<br />
then tap “OK”.<br />
34
Zoom in or out of a website<br />
� When viewing a web page, drag your finger over the page, a<br />
zoom option box will appear in the bottom right hand corner of<br />
the screen. Press + to zoom in and – to zoom out.<br />
Search for words in a Webpage<br />
� Browse the web; tap the “Menu” icon and a pop-up<br />
menu will appear.<br />
� Tap “More”.<br />
� Tap “Find on page”.<br />
� Enter the words you want to search for.<br />
� Tap “Done”, the words being searched for in the webpage will<br />
be highlighted in green.<br />
� Tap the left and right arrows to the left of the Search Bar to<br />
move to the previous or next word on the page.<br />
Managing bookmarks<br />
Adding a bookmark<br />
� Open any web site.<br />
� Tap the “Menu” icon and tap “Bookmarks”, then tap “Add<br />
bookmark”.<br />
� Edit the Name if necessary and tap “OK”.<br />
Opening Bookmarks<br />
� In the browser interface, tap the “Menu” icon and tap<br />
“Bookmarks”.<br />
� Tap on the bookmark of the web site you want to open.<br />
Opening a new browser window<br />
� Open the web browser, tap the “Menu” icon and select “New<br />
Window”.<br />
� A new browser window will open, allowing you to visit another<br />
web site.<br />
� To navigate between browser windows, tap the “Menu” icon<br />
and select “Windows”. This will show all current browser<br />
windows and allow navigation to another window by tapping<br />
the window to view.<br />
35
Changing browser settings<br />
� In the browser interface, tap the “Menu” icon, then tap “More”,<br />
and then tap “Settings” to access all browser settings including:<br />
Page content settings, Privacy settings, Security settings and<br />
Advanced settings.<br />
Switching browser windows<br />
Switching between browser windows will only work if there is more<br />
than one browser window currently in use.<br />
� Open the web browser, tap the “Menu” icon and select<br />
“Windows”.<br />
� All current browser windows will be shown. Tap the browser<br />
window you want to open.<br />
5.3 Email<br />
Note: Please make sure your network connection is active and the<br />
time and date settings are correct before starting the Mailbox Setup<br />
Wizard.<br />
Mailbox Setup wizard<br />
� Either tap the “Email” icon on the desktop or select the “Email”<br />
application from the Application list and then the “Email” icon.<br />
� Tap the “Next” button.<br />
� Enter your e-mail address and password.<br />
� Tap the “Next” button, select if your mailbox type is POP3 or<br />
IMAP.<br />
� Then tap the “Next” button, and the setup wizard will check if it<br />
36
can automatically connect to the e-mail server for your email<br />
account.<br />
� If the automatic connection is successful, enter an account<br />
name and display name for outgoing messages, then tap<br />
“Done”.<br />
� As long as the the mailbox is available, it will connect<br />
automatically to your inbox.<br />
If the setup wizard hasn’t been able to connect automatically use the<br />
following procedure:<br />
� Tap the “<strong>Manual</strong> setup” button, select the mailbox type to be<br />
used (POP3 or IMAP) and manually enter all the account<br />
details.<br />
Example for a Windows Live Hotmail Account<br />
POP3 Account<br />
<strong>User</strong>name: emailaddress@hotmail.com<br />
Password: ********<br />
POP3 server: pop3.live.com<br />
Port: 995<br />
Security type: SSL (always)<br />
Delete email from server: Never<br />
� Tap “Next”.<br />
SMTP server: smtp.live.com<br />
Port: 25<br />
Security type: None<br />
Require sign-in: Make sure this is not ticked.<br />
� Tap “Next”.<br />
� Decide on the Email checking frequency, whether to set this as<br />
the default email account and whether to be notified when<br />
emails arrive. Tap “Next”.<br />
� Enter an account name and display name for outgoing<br />
messages, then tap “Done”.<br />
Viewing E-mail<br />
� Open the email application and select the email account you<br />
wish to send an email from by tapping the account name.<br />
� Tap the “Inbox” icon and the select the email you wish to view<br />
by tapping on it.<br />
37
Sending an E-mail<br />
� Open the email application and select the email account you<br />
wish to send an email from by tapping the account name.<br />
� Tap the “Menu” icon and select “Compose” from the<br />
“Menu” which appears at the bottom of the screen.<br />
� Enter the To, Subject and Compose Mail information to create<br />
the email. To add an attachment tap the “Menu” icon and<br />
select Add attachment, you can then browse for the file to<br />
attach.<br />
� When finished tap the “Send” button.<br />
5.4 Calendar<br />
In the applications menu, tap the Calendar icon to enter calendar<br />
interface:<br />
� In calendar mode, press and pull up/down the screen to<br />
reduce/increase the Months; or to turn the pages.<br />
� Auto adjusts Years when the month exceeds December or<br />
January.<br />
� Enter interface, the number in the orange form is the<br />
intraday date, you can change the date in setting function;<br />
details as the setting section.<br />
� Tap to return to main menu.<br />
38
5.5 Calculator<br />
In the applications menu, tap the Calculator icon to open<br />
calculator:<br />
5.6 Alarm Clock<br />
In the applications menu or on the desktop, tap the Alarm Clock<br />
icon to enter the setting interface, you can select the tick boxes to the<br />
right of the clock to set three alarms simultaneously.<br />
Tap any of the alarm tick boxes to set up an alarm. The time, bell,<br />
vibration, repeating and label can all be set.<br />
- Everyday: Setting repeat the bell at the same time everyday.<br />
- Monday to Sunday: You can choose the days and the time of each<br />
day.<br />
- No: to set up the bell for one time, no repeating.<br />
- Pattern: to choose the bell pattern.<br />
39
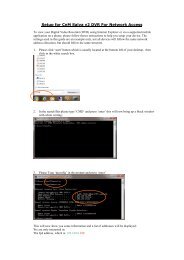
6. Firmware Update<br />
Note: Updating the Firmware will delete all downloaded<br />
applications and user settings, so all data will be lost,<br />
remember to back up your data before carrying out a factory<br />
restore.<br />
Before the firmware on the <strong>Touchpad</strong> <strong>II</strong> can be upgraded, it must be<br />
completely powered off. Press and hold the “Power” button for at<br />
least 6 seconds.<br />
Insert the Driver CD into your optical drive and the boot menu will<br />
autoplay. Select the “Update Tool” option which will run the “RK2818<br />
BatchUpgrade v1.23”<br />
Click button labeled “1” and choose “update.img” from the popup<br />
window, then click open, as shown in the picture below:<br />
Turn off the <strong>Touchpad</strong> <strong>II</strong> by Press and hold the “ESC” button<br />
Hold the “ESC” button on the <strong>Touchpad</strong> <strong>II</strong> down and without<br />
releasing it; connect the USB cable which is already attached to the<br />
PC to the device.<br />
Note: The USB port of the PC must be USB2.0, or it cannot be used<br />
to update the device.<br />
40
The “Found New Hardware Wizard” window will popup as shown<br />
below. Choose “Install from a list or specific location (Advanced)”,<br />
and then click “Next” to install the USB driver, see the picture below:<br />
On the next screen, select “Include this location in the search”, and<br />
navigate to the following folder “Update Software File” ><br />
“281xDriver” > “x86” > “XP” on the CD ROM, then click “OK”. The<br />
system will detect and install the driver automatically, finally click<br />
“Finish”, see the pictures as below:<br />
41
Click “Continue Anyway”.<br />
Click “Finish”<br />
Release the ESC key after icon labeled “1-4” has turned green, see<br />
the picture as below:<br />
Then click “Upgrade” to start the updating process. During this<br />
process lots of information will be shown in the update status box as<br />
shown in the image overleaf.<br />
Note: While the system is being updated, the <strong>Touchpad</strong> <strong>II</strong> must not<br />
be operated in any way.<br />
42
The system has been updated successfully when the “Upgrade<br />
end.1 OK, 0 Fail” notice appears in the status bar as shown below:<br />
The <strong>Touchpad</strong> <strong>II</strong> can be used normally once it has been turned on<br />
and finished booting up, which will take several minutes.<br />
Note: Please don’t disconnect the USB cable during the updating<br />
process because this will cause update failure or possible system<br />
failure of the <strong>Touchpad</strong> <strong>II</strong>.<br />
43
7. Troubleshooting<br />
7.1 Device cannot connect to Wi-Fi<br />
� Ensure the wireless network is working by testing it using<br />
another wireless device.<br />
� Ensure the device and the wireless router is within the range of<br />
the wireless network to be connected too. Walls or other<br />
obstructions will reduce the possible distances between<br />
wireless devices.<br />
� Ensure the security password being used is correct.<br />
7.2 Device doesn’t turn on.<br />
� You can not turn on the device when the battery charge is<br />
below the critical level, please charge the battery.<br />
� Press the RESET button on the top of the device and check if it<br />
is restarting is normally or not.<br />
� Check if the charger is connected correctly.<br />
7.3 Heat Issues<br />
When running multiple applications, using the screen on its brightest<br />
setting, or when being charged, this device can get quite hot. This is<br />
normal and should not cause any inconvenience when in use.<br />
7.4 System has anomalies and doesn’t work correctly<br />
Installing some third-party applications may cause the system not to<br />
operate correctly. To resolve this issue, press the reset button (next<br />
to power button) to perform a system reset.<br />
7.5 Cannot set e-mail or registration application<br />
� Ensure that the MID is connected to a Wi-Fi network and can<br />
connect to the Internet.<br />
� Ensure you E-mail settings have been entered correctly for the<br />
account being accessed.<br />
� Make sure your system time and local time are correct.<br />
7.6 Restoring factory settings<br />
If the MID appears to have a significant error or you forget the<br />
Unlock Password, you can use this procedure to restore the factory<br />
settings. Note: Restoring factory settings will delete all<br />
downloaded applications and user settings, so all data will be<br />
44
lost, remember to back up your data before carrying out a<br />
factory restore.<br />
� In the home interface, press the “Menu” key to pop-up the<br />
settings menu.<br />
� Tap “Settings”; Tap “SD card, U-disk & device store” and scroll<br />
to the bottom of the list.<br />
� Tap “Factory data reset”.<br />
� The system will enter an erasing data state and the screen will<br />
go off. This process takes around 10 seconds, after the<br />
erasing process, the system will automatically reboot.<br />
8. Warranty Information<br />
One year limited hardware warranty<br />
This product is covered by a one year warranty against defects in<br />
material and workmanship. This warranty excludes the battery,<br />
which is covered by a six month warranty.<br />
For all warranty issues please contact your place of purchase.<br />
Limitation of warranty<br />
The above warranty shall not apply to defects resulting from:<br />
misuse; unauthorized modification; opening for any reason;<br />
operation or storage outside the environmental specifications for the<br />
product; in-transit damage; improper maintenance; physical damage<br />
to the unit, such as a cracked or broken screen or defect resulting<br />
from use software, accessories, media, supplies, consumables, or<br />
such items not designed for use with the product.<br />
There is no other express warranty, whether written or oral, with<br />
respect to this product.<br />
Any implied warranty of merchantability or fitness for a particular<br />
purpose is limited to the one-year duration of this written warranty.<br />
Some states, provinces, or countries do not allow limitations on how<br />
long an implied warranty lasts, so the above limitation or exclusion<br />
may not apply to you.<br />
This warranty gives your specific legal rights, and you may also have<br />
other rights that vary from state to state, province to province, or<br />
country to country.<br />
All information is subject to change without notice.<br />
45
9. Copyright<br />
All rights reserved. No part of this manual may be reproduced,<br />
stored in a retrieval system, or transmitted in any form or by any<br />
means, electronic, mechanical, photocopying, recording or<br />
otherwise, without the prior written permission from the copyright<br />
holder. According to copyright law, no recorded data may be used for<br />
purposes other than personal enjoyment without permission from the<br />
copyright holder.<br />
10. Support<br />
For support on your CnM Lifestyle product please visit<br />
www.cnmlifestyle.com to find out about frequently asked questions.<br />
Alternatively you can call the CnM Lifestyle support line on<br />
09015565758. This support line is available between 9:30am and<br />
6:00pm, support calls will be charged at 50p per minute.<br />
Support issues can also be emailed to support@cnmlifestyle.com,<br />
please provide detailed information about the problem you are<br />
experiencing.<br />
11. Licencing<br />
Google Android is Licenced under the Apache Licence, Version 2.0.<br />
More information about this licence can be obtained from<br />
http://www.apache.org/licenses/LICENSE-2.0.<br />
The source code for the full Android stack is available from the<br />
Android Open Source Project site http://source.android.com/.<br />
Other mirrored GPL and LGPL'd components are available at<br />
http://code.google.com /p/android/downloads/list.<br />
Notices for other licenses can be found within the SDK.<br />
We hope you enjoy your CnM Lifestyle product.<br />
46