a b a b c d a b
a b a b c d a b
a b a b c d a b

Create successful ePaper yourself
Turn your PDF publications into a flip-book with our unique Google optimized e-Paper software.
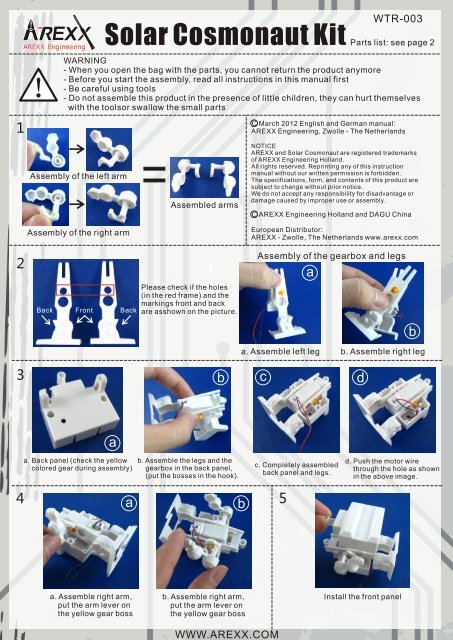
WWW.AREXX.COMAREXX EngineeringWTR-003Solar Cosmonaut Kit Parts list: see page 2WARNING- When you open the bag with the parts, you cannot return the product anymore!- Before you start the assembly, read all instructions in this manual first- Be careful using tools- Do not assemble this product in the presence of little children, they can hurt themselveswith the toolsor swallow the small partsC March 2012 English and German manual:AREXX Engineering, Zwolle - The NetherlandsAssembly of the left armAssembly of the right armBack Front BackAssembled armsPlease check if the holes(in the red frame) and themarkings front and backare asshown on the picture.NOTICEAREXX and Solar Cosmonaut are registered trademarksof AREXX Engineering Holland.All rights reserved. Reprinting any of this instructionmanual without our written permission is forbidden.The specifications, form, and contents of this product aresubject to change without prior notice.We do not accept any responsibility for disadvantage ordamage caused by improper use or assembly.C AREXX Engineering Holland and DAGU ChinaEuropean Distributor:AREXX - Zwolle, The Netherlands www.arexx.comAssembly of the gearbox and legsaa. Assemble left leg b. Assemble right legbb c daa. Back panel (check the yellowa. colored gear during assembly)b. Assemble the legs and thea. gearbox in the back panel,a. (put the bosses in the hook).c. Completely assembleda. back panel and legs.d. Push the motor wirea. through the hole as showna. in the above image.aba. Assemble right arm,a. put the arm lever ona. the yellow gear bossb. Assemble right arm,a. put the arm lever ona. the yellow gear bossInstall the front panel
a b a ba. – b. Screw the front and back panel together a. Install the back of the helmet b. Install the front of the helmeta b aa. Put the shrinking tubea. over the motor wiresb. Connect the motor anda. solar panel wirec. Put the shrinking tubea. over the wire connectionsa. and heat it with a lighterInstall the solar panelFunction testAfter you connect the solar panel with themotor, please check if the motor runs. Putthe solar panel in bright sun or lamplight.TroubleshootingMost likely there is a failure in the gearboxand gear assembly or with the wireconnections. In the worst caseyou have to disassemble and reassemble the kit.bcREADYParts list Solar CosmonautABEGCHIDFMNOJ K LPARTS LISTA. Helmet front side, B. Helmet back side, C. Front panel, D. Back panel,E. Gearbox, F. Screwdriver, G. Solar panel holder, H. Right arm, I. Left arm,J. Solar panel, K. Right leg, L. Left leg. M. Right and left lever,N. 2 pcs. Screw (M2x6), O. Shrinking tubeWWW.AREXX.COM