TARGA Binding - G3 Genuine Guide Gear
TARGA Binding - G3 Genuine Guide Gear
TARGA Binding - G3 Genuine Guide Gear

Erfolgreiche ePaper selbst erstellen
Machen Sie aus Ihren PDF Publikationen ein blätterbares Flipbook mit unserer einzigartigen Google optimierten e-Paper Software.
Telemark<br />
<strong>TARGA</strong> <strong>Binding</strong><br />
<strong>G3</strong> <strong>Genuine</strong> <strong>Guide</strong> <strong>Gear</strong> Inc.<br />
www.genuineguidegear.com 604.924.9048<br />
760-1482<br />
1<br />
ENGLISH<br />
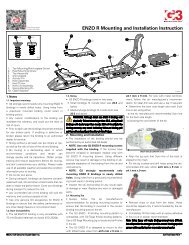
MINOR CABLE ADJUSTMENT<br />
CAUTION: Thread exposure indicates<br />
maximum cartridge adjustment (2). Additional<br />
adjustment is obtained via major cable<br />
adjustment settings.<br />
DO NOT OVERTIGHTEN!<br />
CARTRIDGE REPLACEMENT<br />
1 Unscrew both cartridges until free from<br />
front cable.<br />
2 Pull heel cable spring away from cartridge<br />
and release cartridge by sliding ball fitting out<br />
of the slotted groove.<br />
3 Attach new cartridges in reverse order.<br />
Screw cartridges onto front cable until<br />
threading is no longer visible. Sufficient<br />
threading must be engaged to prevent<br />
damage from high cable tension.<br />
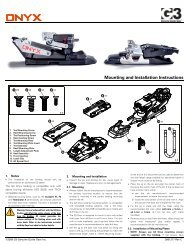
SMALL BOOTS MEDIUM BOOTS LARGE BOOTS<br />
PETITES CHAUSSURES MOYENNES CHAUSSURES GRANDES CHAUSSURES<br />
KLEINE SCHUHE MITTELGROßE SCHUHE GROßE SCHUHE<br />
<strong>TARGA</strong> & <strong>TARGA</strong> T/9<br />
MEN’S EUROPEAN 37 – 40 39.5 – 44 44 – 49<br />
MEN’S US 4.5 – 7.5 7.0 – 10.0 10.0 – 14.0<br />
ELLE & ELLE T/9<br />
WOMEN’S EUROPEAN < 35.5 35.5 – 39 38.5 ><br />
WOMEN’S US < 5.5 5.5 – 8.5 8.0 ><br />
2<br />
SHORTEN CABLE / RACCOUCIR LE CÂBLE / KABEL VERKÜRZEN<br />
LENGTHEN CABLE / RALLONGER LE CÂBLE / KABEL VERLÄNGERN<br />
GENUINE GUIDE GEAR CREATES BACKCOUNTRY SKI EQUIPMENT FOR GUIDES AND AVALANCHE<br />
PROFESSIONALS. <strong>G3</strong> IS ALL ABOUT HIGHER STANDARDS FOR GEAR PERFORMANCE AND RELIABILITY.<br />
WARRANTY<br />
<strong>G3</strong> warrants that the product will meet the<br />
specification stated in the instructions and <strong>G3</strong><br />
agrees to repair or replace the product free of<br />
charge if the product does not conform to the<br />
specifications. Notice for replacement must be<br />
given within 60 days of the discovery of the<br />
defect. ALL WARRANTIES OF MERCHANTABILITY OR OF<br />
FITNESS FOR A PARTICULAR PURPOSE ARE HEREBY<br />
EXCLUDED AND/OR WAIVED.<br />
For more warranty information and to register<br />
your product go to www.genuineguidegear.com.<br />
WARNING<br />
Skiing is dangerous. Skiing out of bounds has<br />
a greater degree of risk. There is the possibility<br />
of bodily injury or death. <strong>G3</strong> telemark bindings<br />
are not safety bindings, they do not release.<br />
You are solely responsible for learning good<br />
skiing techniques, understanding the use,<br />
function, capabilities and limitations of telemark<br />
bindings and related equipment, and exercising<br />
good and prudent judgment when skiing. Use<br />
these bindings and ski at your own risk.<br />
FRANÇAIS<br />
GENUINE GUIDE GEAR CRÉE L’ÉQUIPEMENT<br />
DE SKIS POUR LES GUIDES ET LES<br />
PROFESSIONNELS DE LA MONTAGNE. <strong>G3</strong> SE<br />
FIXE LES PLUS HAUTS STANDARTS EN<br />
MATIÈRE DE PERFORMANCE ET DE FIABILITÉ.<br />
RÉGLAGE SECONDAIRE DU CÂBLE<br />
ATTENTION : Si le filetage est visible<br />
cela indique que le réglage maximum de la<br />
cartouche est atteint. Un réglage additional<br />
est obtenu par les dispositifs de réglage<br />
principal du câble. NE SERREZ PAS TROP LE CÂBLE<br />
REMPLACEMENT DE LA CARTOUCHE<br />
1 Dévissez les deux cartouches jusqu’à les<br />
libérer du câble avant.<br />
2 Tirez le ressort du câble de talon en dehors de<br />
la cartouche et dégagez la cartouche en<br />
faisant glisser la boule de précision hors de la<br />
rainure de la cartouche.<br />
3 Fixez les nouvelles cartouches en sens<br />
inverse. Vissez les cartouches sur le câble<br />
avant jusqu’à ce que le filetage ne soit plus<br />
visible. Assurez-vous qu’il reste assez de<br />
filetage pour éviter des dégâts provoqués par<br />
une forte tension de câble.<br />
GARANTIE<br />
<strong>G3</strong> garantit que le produit répondra aux<br />
spécifications indiquées dans les instructions,<br />
et <strong>G3</strong> accepte de réparer ou remplacer le produit<br />
gratuitement si le produit n'est pas conforme<br />
aux spécifications. La notification pour le<br />
remplacement doit être donnée dans les 60<br />
jours de la découverte du défaut.<br />
TOUTES LES GARANTIES DE VALEUR MARCHANDE<br />
OU DE FORME PHYSIQUE POUR UNE UTILISATION<br />
PARTICULIERE SONT PAR CECI EXCLUES ET/OU ÉCARTÉES.<br />
Pour plus d'information sur la garantie et pour<br />
faire enregistrer votre produit <strong>G3</strong>, allez sur<br />
www.genuineguidegear.com.<br />
ATTENTION : MISE EN GARDE<br />
Le ski est une activité dangereuse. Le ski horspistes<br />
comporte un degré de risque plus élevé<br />
encore. Il existe un risque de blessure ou de<br />
décès. Les fixations de télémark <strong>G3</strong> ne sont pas<br />
des fixations de sécurité, elles ne déclenchent<br />
pas. Vous êtes seul responsable pour apprendre<br />
les techniques du ski, appréhender les capacités,<br />
les fonctions, et les limites d’une fixation de<br />
télémark et du matériel apparenté. L’utilisateur<br />
est le seul responsable de son jugement et de sa<br />
prudence quand il skie. Utilisez ces fixations et<br />
skiez sous votre propre responsabilité.<br />
DEUTSCH<br />
GENUINE GUIDE GEAR STELLT<br />
SKITOURENAUSRÜSTUNG FÜR BERGFÜHRER<br />
UND LAWINENSPEZIALISTEN HER. <strong>G3</strong> STEHT<br />
FÜR HÖHERE STANDARDS BEI FUNKTION UND<br />
HALTBARKEIT DER AUSRÜSTUNG.<br />
KABEL-FEINEINSTELLUNG<br />
ACHTUNG: Wenn das Gewinde außen aus<br />
der Federpatrone heraus kommt, haben Sie<br />
die obere Grenze der Feineinstellung erreicht.<br />
Sie müssen dann die Grundeinstellung ändern<br />
(siehe oben). NICHT ÜBERDREHEN!<br />
AUSWECHSELN DER<br />
FEDERKARTUSCHEN<br />
1 Drehen Sie beide Kartuschen heraus, bis<br />
sie von dem vorderen Kabel zu lösen sind.<br />
2 Ziehen Sie die dünne Feder des<br />
Fersenkabels von der Kartusche weg<br />
und lösen Sie die Kartusche, indem<br />
Sie das kugelförmige Ende des<br />
Fersenkabels aus dem Schlitz des<br />
Kartuschengehäuses ausfädeln.<br />
3 Befestigen Sie die neuen Kartuschen<br />
entsprechend in umgekehrter<br />
Reihenfolge. Drehen Sie die Kartuschen<br />
auf die vorderen Kabel bis das Gewinde<br />
nicht mehr zu sehen ist. Das Gewinde<br />
der Kartusche muss auf jeden Fall<br />
ausreichend mit dem Gewinde der<br />
vorderen Kabel überlappen. So wird ein<br />
Schaden der Kartuschen bei zu großer<br />
Kabelspannung vermieden.<br />
GARANTIE<br />
Alle <strong>G3</strong> Produkte werden mit der<br />
größtmöglichen Sorgfalt entwickelt und mit<br />
modernster Technik aus besten Materialien<br />
hergestellt. Sollten Sie mit einem <strong>G3</strong> Produkt<br />
dennoch nicht zufrieden sein, wenden Sie sich<br />
bitte an Ihren Händler<br />
oder direkt an den Importeur in ihrem Land.<br />
Für alle <strong>G3</strong>-Produkte gelten mindestens die<br />
nationalen Bestimmungen zur gesetzlichen<br />
Gewährleistungspflicht. Darüber hinaus<br />
garantieren wir Material und Verarbeitung von<br />
<strong>G3</strong>-Produkten für deren natürliche Lebensdauer.<br />
Ersatzansprüche müssen bis 60 Tage nach<br />
Feststellung des Defekts mitgeteilt werden.<br />
JEGLICHE ZUSICHERUNG ALLGEMEINER<br />
GEBRAUCHSTAUGLICHKEIT SOWIE TAUGLICHKEIT FÜR<br />
EINEN BESTIMMTEN ZWECK SIND HIERMIT<br />
AUSGESCHLOSSEN.<br />
Mehr Informationen über unsere<br />
Garantiebestimmungen sowie die Möglichkeit,<br />
ihr Produkt zu registrieren, finden Sie unter<br />
www.genuineguidegear.com.<br />
WARNUNG<br />
Skifahren ist gefährlich. Beim Skifahren abseits<br />
markierter Pisten ist das Risiko sich zu verletzen<br />
oder tödlich zu verunglücken noch höher. <strong>G3</strong><br />
Telemark-Bindungen sind KEINE Sicherheitsbindungen.<br />
Sie öffnen sich bei einem Sturz<br />
NICHT. Sie sind allein dafür verantwortlich, sicher<br />
Skifahren zu lernen, sowie die Anwendung,<br />
Funktion, Einsatzmöglichkeiten und Grenzen von<br />
Telemark-Bindungen und ähnlicher Ausrüstung<br />
zu verstehen. Üben Sie beim Skifahren einen<br />
sicheren und vernüftigen Umgang mit ihrer<br />
Ausrüstung. Sie verwenden diese Bindung<br />
und Ski auf eigene Gefahr!
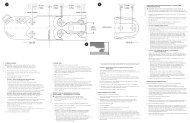
3 4<br />
26mm<br />
(1.02in)<br />
Tip of ski<br />
INSERT SCREW<br />
40.1mm<br />
(1.58in)<br />
INSTRUCTIONS<br />
TO MOUNT BINDING SHIM<br />
1 Mark Three-Pin line as per ski manufacturer’s<br />
recommendation.<br />
2 Center binding mounting template (3) on ski<br />
ENGLISHMOUNTING<br />
and align Three-Pin line with your mark.<br />
3 Mark and punch the four binding shim<br />
mounting holes.<br />
4 Mount the binding with the screws provided.<br />
Drill, tap and glue screw holes as<br />
recommended by the ski manufacturer.<br />
Generally, a 3.5mm (9/64in) drill bit (or for<br />
metal top sheet skis 4.1mm (5/32in) drill bit)<br />
works well. Drill to a depth of at least 9mm<br />
(11/32in). Use only Pozidriv ® #3 screwdriver.<br />
Tap metal top sheets for M5.5 screws.<br />
5 Perform cable adjustments (1) as outlined.<br />
6 Insert rear tab of anti-ice plate into ‘Insert Slot’<br />
and secure using the #8 machine screw<br />
provided. Be sure to match left and right antiice<br />
plates with left and right toe-plates.<br />
NOTE: Spare parts are found under anti-ice plates<br />
at the back of each shim (universal screw and<br />
nylock nut).<br />
THREE-PIN LINE<br />
71.1mm<br />
(2.80in)<br />
TO MOUNT HEEL SHIM<br />
7 Place boot properly in mounted toe-plate and<br />
engage binding heel throw.<br />
8 Center heel mounting template (4) under heel of<br />
boot with arrow pointing toward ski tip. Verify that<br />
the boot positions correctly on the heel shim.<br />
9 Mark and punch the two heel shim mounting holes.<br />
10 Mount the heel shim to the ski with the screws<br />
provided. Follow directions outlined in Step 4.<br />
11 Install the high performance heel plate using the<br />
#10 machine screw provided per heel.<br />
Use the cable lockdown feature for<br />
traveling convenience.<br />
Tail end of ski<br />
FRANÇAIS<br />
INSERT SLOT<br />
26mm<br />
(1.02in)<br />
INSTRUCTIONS DE MONTAGE<br />
POUR MONTER LA PLAQUE D’ÉLÉVATION<br />
DE L’ETRIER<br />
1 Tracez la ‘Three-Pin-Line’ selon la<br />
recommandation du fabricant de ski.<br />
2 Centrez le gabarit (3) sur le ski et alignez la<br />
‘Three-Pin-Line’ sur votre tracé.<br />
3 Centrez les quatre trous de montage de la<br />
plaque de l’étrier.<br />
4 Montez la fixation avec les vis fournies.<br />
Percez et encollez les trous pour les vis selon<br />
la recommandation du fabricant de ski.<br />
Généralement, une mèche de 3,5mm suffit<br />
(ou pour des skis dont la couche supérieure est<br />
faite de metal, utilisez une mèche de 4,1mm).<br />
Percez une profondeur minimale de 9mm.<br />
Utilisez uniquement un tournevis Pozidriv ® #3.<br />
Tapez les couches supérieures en metal pour<br />
les vis M5.5.<br />
5 Réglez les ajustements de câble comme<br />
décrit (1).<br />
6 Insérez la patte arrière de la plaque anti-glace<br />
dans la rainure (‘Insert Slot’) et bloquez-là<br />
en utilisant la vis spéciale # 8. Assurez-vous<br />
de faire correspondre les plaques anti-glace<br />
droite et gauche avec les plaques d’étrier droit<br />
et gauche.<br />
REMARQUE : Les pièces de rechange se<br />
situent sous les plaques anti-glace à l’arrière de<br />
chaque plaque d’élévation (vis universelle et<br />
écrou bloqueur).<br />
POUR MONTER LA PLAQUE D’ÉLÉVATION<br />
DU TALON<br />
7 Calez la chaussure correctement dans l’avant de la<br />
fixation, et placez le câble du talon de la fixation.<br />
8 Centrez le gabarit (4) sous le talon de la chaussure<br />
avec la pointe dirigée vers la pointe du ski. Vérifiez<br />
que la chaussure se positionne correctement sur<br />
la plaque d’élévation du talon.<br />
9 Marquez les deux trous de montage de la plaque<br />
d’élévation du talon.<br />
10 Fixez la plaque d’élévation du talon au ski avec les<br />
vis fournies. Suivez les indications données dans<br />
l’étape 4.<br />
11 Montez la plaque de talon de haute performance<br />
en utilisant la vis spéciale #10 fournie pour<br />
chaque talon.<br />
Utilisez la fonction de déblocage du câble pour<br />
le transport.<br />
DEUTSCH<br />
MONTAGEANLEITUNG<br />
BINDUNGSMONTAGE<br />
1 Markieren Sie die Montagelinie für die<br />
3-Pin-Linie, wie sie vom Skihersteller<br />
empfohlen wird.<br />
2 Richten Sie die Montageschablone auf<br />
den Ski mittig aus (3), so dass die 3-Pin-Linie<br />
(„Three-Pin Line“) auf der Schablone mit<br />
Ihrer Markierung auf dem Ski übereinstimmt.<br />
3 Markieren Sie die vier<br />
Bindungsmontagelöcher<br />
und körnen Sie sie mit einem Körner an.<br />
4 Montieren Sie die Bindung mit den<br />
mitgelieferten Schrauben. Befolgen Sie<br />
beim Bohren der Löcher, beim Schrauben<br />
und bei der Verwendung von Leim die<br />
Anweisungen des Skiherstellers. Im<br />
Allgemeinen funktioniert ein 3,5 mm<br />
Bohrer (oder für Ski mit Metall-Verstärkung<br />
im Bindungsbereich ein 4,1 mm Bohrer).<br />
Bohren Sie mindestens 9 mm tiefe Löcher.<br />
Drehen Sie die Schrauben mit einem<br />
Kreuzschlitzschraubendreher Nr. 3 ein.<br />
Bei Ski mit einer Lage Metall unter der<br />
Oberfläche sollten die Bohrlöcher<br />
angesenkt werden.<br />
5 Führen Sie die „Einstellung des<br />
Fersenkabels“ (1) wie aufgeführt durch.<br />
6 Schieben Sie den Steg am hinteren Ende der<br />
Anti-Eis-Platte (Kunststoffabdeckung des<br />
Vorderbacken) in die Nut an der Rückseite<br />
der Grundplatte. Klicken Sie dann die<br />
Aussparungen<br />
der Anti-Eis-Platte auf die Schraubenknöpfe<br />
und sichern die Platte mit der beiliegenden<br />
Gewindeschraube #8. Versichern Sie sich,<br />
dass jeweils die linke und rechte Anti-Eis-<br />
Platte mit dem jeweiligen (rechten bzw.<br />
linken) Bindungsgehäuse übereinstimmt.<br />
ANMERKUNG: Die extra Universal Schraube und<br />
passende Mutter im hinteren Teil der<br />
Grundplatte sind Ersatzteile für den Notfall.<br />
MONTAGE DER FERSENPLATTE<br />
7 Platzieren Sie den Schuh ordnungsgemäß in<br />
dem montierten Vorderbacken und schließen<br />
Sie den Fersenhebel der Bindung.<br />
8 Zentrieren Sie die Fersenmontageschablone (4)<br />
mit dem Pfeil in Richtung Skispitze zeigend<br />
unter der Ferse des Schuhs. Positionieren<br />
Sie die Schablone so, dass<br />
sich die Fersenplatte direkt unter dem Absatz<br />
des Schuhs befindet.<br />
9 Markieren Sie die beiden Montagepunkte<br />
und körnen Sie sie an.<br />
10 Montieren Sie die Fersenplatte mit den<br />
mitgelieferten Schrauben. Gehen Sie dabei<br />
wie in Schritt 4 vor.<br />
11 Montieren Sie die Fersen-Abdeckplatte mit<br />
Hilfe beiliegender Gewindeschraube #10 mit<br />
breitem Kopf.<br />
Verwenden Sie die Kabelsicherung für mehr<br />
Komfort beim Transport.