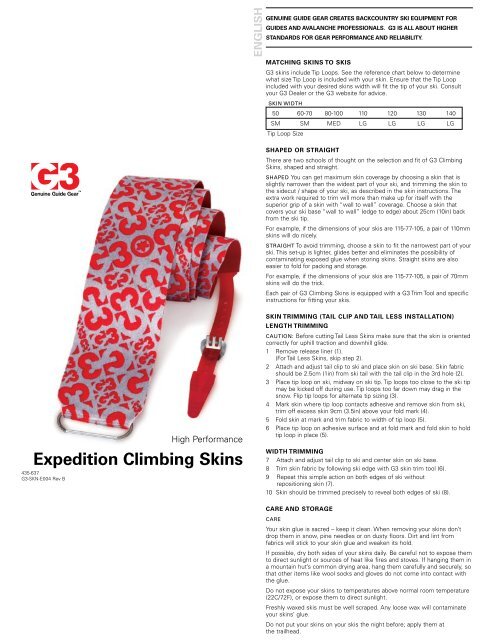
Expedition Climbing Skins Skins - G3 Genuine Guide Gear
Expedition Climbing Skins Skins - G3 Genuine Guide Gear
Expedition Climbing Skins Skins - G3 Genuine Guide Gear

Erfolgreiche ePaper selbst erstellen
Machen Sie aus Ihren PDF Publikationen ein blätterbares Flipbook mit unserer einzigartigen Google optimierten e-Paper Software.
<strong>G3</strong> <strong>Genuine</strong> <strong>Guide</strong> <strong>Gear</strong> Inc. www.genuineguidegear.com 604.924.9048<br />
High Performance<br />
<strong>Expedition</strong> <strong>Climbing</strong> <strong>Skins</strong><br />
435-637<br />
<strong>G3</strong>-SKN-E004 Rev B<br />
High Performance<br />
ENGLISH<br />
the sidecut / shape of your ski, as described in the skin instructions. The<br />
extra work required to trim will more than make up for itself with the<br />
superior grip of a skin with “wall to wall” coverage. Choose a skin that<br />
GENUINE<br />
covers<br />
GUIDE<br />
your<br />
GEAR<br />
ski<br />
CREATES<br />
base “wall<br />
BACKCOUNTRY<br />
to wall” (edge<br />
SKI<br />
to edge)<br />
EQUIPMENT<br />
about 25cm<br />
FOR<br />
(10in) back<br />
GUIDES AND from AVALANCHE the ski tip. PROFESSIONALS. <strong>G3</strong> IS ALL ABOUT HIGHER<br />
STANDARDS For example, FOR GEAR if PERFORMANCE the dimensions AND of your RELIABILITY. skis are 115-77-105, a pair of 110mm<br />
skins will do nicely.<br />
STRAIGHT To avoid trimming, choose a skin to fit the narrowest part of your<br />
MATCHING ski. This SKINS set-up TO is SKIS lighter, glides better and eliminates the possibility of<br />
contaminating exposed glue when storing skins. Straight skins are also<br />
<strong>G3</strong> skins<br />
easier<br />
include<br />
to<br />
Tip<br />
fold<br />
Loops.<br />
for packing<br />
See the<br />
and<br />
reference<br />
storage.<br />
chart below to determine<br />
what size Tip Loop is included with your skin. Ensure that the Tip Loop<br />
included with For example, your desired if the skins dimensions width will of fit your the skis tip of are your 115-77-105, ski. Consult a pair of 70mm<br />
your <strong>G3</strong> Dealer skins will or the do the <strong>G3</strong> website trick. for advice.<br />
SKIN WIDTH Each pair of <strong>G3</strong> <strong>Climbing</strong> <strong>Skins</strong> is equipped with a <strong>G3</strong> Trim Tool and specific<br />
50<br />
instructions for fitting your skis.<br />
60-70 80-100 110 120 130 140<br />
SM SKIN SMTRIMMING MED (TAIL LGCLIP AND LGTAIL LESS LG INSTALLATION)<br />
LG<br />
Tip Loop LENGTH Size TRIMMING<br />
CAUTION: Before cutting Tail Less <strong>Skins</strong> make sure that the skin is oriented<br />
SHAPED correctly OR STRAIGHT for uphill traction and downhill glide.<br />
There are 1two Remove schools release of thought liner on (1). the selection and fit of <strong>G3</strong> <strong>Climbing</strong><br />
<strong>Skins</strong>, shaped (For and Tail straight. Less <strong>Skins</strong>, skip step 2).<br />
SHAPED 2 You Attach can get and maximum adjust tail skin clip coverage to ski and by place choosing skin a on skin ski that base. isSkin<br />
fabric<br />
slightly narrower should than be the 2.5cm widest (1in) part from of ski your tail ski, with and the trimming tail clip the in the skin 3rd tohole<br />
(2).<br />
the sidecut 3 / Place shape tip of loop your on ski, ski, as midway described on in ski the tip. skin Tip instructions. loops too close Theto<br />
the ski tip<br />
extra work required may be to kicked trim will off during more than use. make Tip loops up for too itself far down with the may drag in the<br />
superior grip snow. of a skin Flip with tip loops “wall for to wall” alternate coverage. tip sizing Choose (3). a skin that<br />
covers your 4 ski Mark base skin “wall where to wall” tip loop (edge contacts to edge) adhesive about 25cm and remove (10in) back skin from ski,<br />
from the ski trim tip. off excess skin 9cm (3.5in) above your fold mark (4).<br />
For example, 5 Fold if the skin dimensions at mark and of your trim skis fabric are to 115-77-105, width of tip a loop pair (5). of 110mm<br />
skins will 6 do Place nicely. tip loop on adhesive surface and at fold mark and fold skin to hold<br />
STRAIGHT To tip avoid loop trimming, in place (5). choose a skin to fit the narrowest part of your<br />
ski. This set-up is lighter, glides better and eliminates the possibility of<br />
contaminating WIDTH exposed TRIMMING glue when storing skins. Straight skins are also<br />
easier to fold for packing and storage.<br />
7 Attach and adjust tail clip to ski and center skin on ski base.<br />
For example, 8 Trim if the skin dimensions fabric by following of your skis ski are edge 115-77-105, with <strong>G3</strong> skin a pair trim of tool 70mm (6).<br />
skins will do the trick.<br />
9 Repeat this simple action on both edges of ski without<br />
Each pair of <strong>G3</strong> repositioning <strong>Climbing</strong> <strong>Skins</strong> skin (7). is equipped with a <strong>G3</strong> Trim Tool and specific<br />
instructions 10 for Skin fitting should your be skis. trimmed precisely to reveal both edges of ski (8).<br />
SKIN TRIMMING CARE AND (TAIL STORAGE CLIP AND TAIL LESS INSTALLATION)<br />
LENGTH CARE TRIMMING<br />
CAUTION: Your Before skin cutting glue is Tail sacred Less – <strong>Skins</strong> keep it make clean. sure When that removing the skin is your oriented skins don’t<br />
correctly drop for uphill them traction in snow, and pine downhill needles glide. or on dusty floors. Dirt and lint from<br />
1 Remove fabrics release will stick liner (1). to your skin glue and weaken its hold.<br />
(For Tail Less <strong>Skins</strong>, skip step 2).<br />
If possible, dry both sides of your skins daily. Be careful not to expose them<br />
2 Attach to and direct adjust sunlight tail clip or to sources ski and of place heat skin like fires on ski and base. stoves. Skin If fabric hanging them in<br />
should a be mountain 2.5cm (1in) hut’s from common ski tail drying with area, the tail hang clip them in the carefully 3rd hole and (2). securely, so<br />
3 Place that tip loop other on items ski, midway like wool on socks ski tip. and Tip gloves loops do too not close come to the into ski contact tip with<br />
may be the kicked glue. off during use. Tip loops too far down may drag in the<br />
snow. Flip tip loops for alternate tip sizing (3).<br />
Do not expose your skins to temperatures above normal room temperature<br />
4 Mark (22C/72F), skin where or tip expose loop contacts them to adhesive direct sunlight. and remove skin from ski,<br />
trim off excess skin 9cm (3.5in) above your fold mark (4).<br />
5 Fold skin<br />
Freshly<br />
at mark<br />
waxed<br />
and<br />
skis<br />
trim<br />
must<br />
fabric<br />
be<br />
to<br />
well<br />
width<br />
scraped.<br />
of tip loop<br />
Any loose<br />
(5).<br />
wax will contaminate<br />
your skins’ glue.<br />
6 Place tip loop on adhesive surface and at fold mark and fold skin to hold<br />
tip loop Do in not place put (5). your skins on your skis the night before; apply them at<br />
the trailhead.<br />
WIDTH TRIMMING<br />
7 Attach and adjust tail clip to ski and center skin on ski base.<br />
8 Trim skin fabric by following ski edge with <strong>G3</strong> skin trim tool (6).<br />
9 Repeat this simple action on both edges of ski without<br />
repositioning skin (7).<br />
10 Skin should be trimmed precisely to reveal both edges of ski (8).<br />
CARE AND STORAGE<br />
CARE<br />
Your skin glue is sacred – keep it clean. When removing your skins don’t<br />
drop them in snow, pine needles or on dusty floors. Dirt and lint from<br />
fabrics will stick to your skin glue and weaken its hold.<br />
If possible, dry both sides of your skins daily. Be careful not to expose them<br />
to direct sunlight or sources of heat like fires and stoves. If hanging them in<br />
a mountain hut’s common drying area, hang them carefully and securely, so<br />
that other items like wool socks and gloves do not come into contact with<br />
the glue.<br />
Do not expose your skins to temperatures above normal room temperature<br />
(22C/72F), or expose them to direct sunlight.<br />
Freshly waxed skis must be well scraped. Any loose wax will contaminate<br />
your skins’ glue.<br />
Do not put your skins on your skis the night before; apply them at<br />
the trailhead.
1 2<br />
3 4<br />
5 6<br />
7<br />
trim corners/<br />
Découper les coins/<br />
Ecken abschneiden<br />
STORAGE<br />
fold through loop & attach<br />
Do not store your skins on your skis.<br />
9cm (3.5in)<br />
Plier à travers la boucle et fixer/<br />
Durch den Spitzenbeschlag ziehen und festkleben<br />
For any longer-term storage we strongly recommend using <strong>G3</strong> Skin Savers, not<br />
included with your skins. These storage sheets sandwich between the adhesive<br />
sides of your folded skins, making your skins much easier to handle and pull<br />
apart after they have been stored for a length of time. Use them!<br />
Cut the <strong>G3</strong> Skin Saver in half and adhere each piece to the bottom half of each<br />
skin. Fold the tip end o f the skin back onto the <strong>G3</strong> Skin Saver so that a single<br />
layer of mesh is sandwiched between the two halves of the skin.<br />
With the <strong>G3</strong> Skin Savers in place between the skins’ adhesive sides, you can<br />
roll or fold your skins and put them in the storage bag.<br />
NOTE: Skin Savers are not intended for use in the field.<br />
ALWAYS store your fully dried skins in a cool, dry place.<br />
centreline / ligne de centrage/<br />
Mittellinie<br />
trim tool/<br />
taille-peaux/<br />
Zuschneider<br />
WARRANTY<br />
trim off excess/<br />
découper l’éxces/<br />
überschüssigen Fellrest<br />
abschneiden<br />
mark fold line/<br />
Marquer la ligne de pliure/<br />
Faltlinie markieren<br />
centreline / ligne de centrage/<br />
Mittellinie<br />
8<br />
9cm (3.5in)<br />
exposed<br />
ski edge/<br />
carre exposé/<br />
freiliegende<br />
Skikanten<br />
<strong>G3</strong> warrants that the product will meet the specification stated in the<br />
instructions and <strong>G3</strong> agrees to repair or replace the product free of charge if the<br />
product does not conform to the specifications. Notice for replacement must be<br />
given within 60 days of the discovery of the defect. ALL WARRANTIES OF<br />
MERCHANTABILITY OR OF FITNESS FOR A PARTICULAR PURPOSE ARE HEREBY<br />
EXCLUDED AND/OR WAIVED.<br />
For more warranty information go to www.genuineguidegear.com.<br />
WARNING<br />
Winter Backcountry travel is inherently dangerous. There is always the risk of<br />
serious injury or death. You are solely responsible for your actions and decisions.<br />
Familiarize yourself with the use of this product, its limitations and capabilities.<br />
Learn proper skiing techniques, avalanche awareness and exercise good<br />
judgment in conjunction with using this product properly. Use this equipment<br />
and ski at your own risk.
FRANÇAIS<br />
GENUINE GUIDE GEAR CRÉE L’ÉQUIPEMENT DE SKIS POUR LES GUIDES ET LES PROFESSIONNELS DE LA MONTAGNE. <strong>G3</strong> SE FIXE LES PLUS HAUTS STANDARTS EN<br />
MATIÈRE DE PERFORMANCE ET DE FIABILITÉ.<br />
FAIRE CORRESPONDRE LES PEAUX AU SKIS<br />
Les peaux <strong>G3</strong> sont dotées de boucles de spatule. Utilisez la charte de<br />
référence ci-dessous pour déterminer quelle taille de boucle est inclus avec<br />
quelles peaux. Assurez-vous que la boucle de vos futures peaux corresponde<br />
à la largeur de la spatule de vos skis. Renseignez-vous chez votre<br />
revendeur <strong>G3</strong> ou via le site internet <strong>G3</strong>.<br />
LARGEUR DES PEAUX<br />
50 60-70 80-100 110 120 130 140<br />
SM SM MED LG LG LG LG<br />
Taille des boucles de spatule<br />
FORME PARABOLIQUE OU FORME DROITE<br />
Il y a deux écoles de pensée dans les côtés la sélection de vos peaux de<br />
phoque <strong>G3</strong> : des peaux paraboliques (taillées selon la ligne les côtés de<br />
votre ski) ou bien des peaux droites, (à bord parallèles).<br />
FORME PARABOLIQUE Vous pouvez obtenir le maximum de surface recouverte<br />
en choisissant des peaux qui sont légèrement plus étroites que la partie<br />
la plus large de votre ski, et découper les peaux en suivant les lignes de<br />
cotes du ski. Le travail supplémentaire pour tailler les peaux au mieux sera<br />
compensé par un meilleur rendement des peaux, avec cette couverture<br />
maximale de la semelle du ski. Choisissez une peau qui couvre votre<br />
semelle d’une carre à l’autre.<br />
Par exemple, si les côtés de votre skis sont 115-77-105, une paire de peaux<br />
de phoque en 110mm fera parfaitement l’affaire.<br />
FORME DROITE Pour éviter d’avoir à retailer vos peaux, choisissez-en des<br />
peaux qui correspondent à la largeur la plus étroite de votre ski. Ce montage<br />
est plus léger, permet une meilleure glisse et élimine la possibilité de<br />
dégradation des parties encollées lors du pliage des peaux. Les peaux de<br />
phoque droites sont aussi plus faciles à plier et à stocker.<br />
Par exemple, si les côtés de votre skis sont 115-77-105, une paire de peaux<br />
de phoque en 70mm sera suffisante.<br />
Chaque paire de peaux de phoque <strong>G3</strong> est livrée avec un outil de découpe et<br />
des instructions spécifiques pour l’adapter à vos skis.<br />
DÉCOUPE DES PEAUX DE PHOQUE (AVEC OU SANS ATTACHE<br />
DE TALON)<br />
DÉCOUPE DE LA LONGUEUR<br />
ATTENTION: avant de découper les peaux sans attache de talon assurezvous<br />
que la peau est droite, et orientée correctement pour une bonne<br />
adhérence à la montée.<br />
1 Enlever le film protecteur (1).<br />
(Pour les peaux sans attaches de talon, passez directement à l’étape 3.)<br />
2 Attacher et ajuster le clip de talon de la peau sur le ski et placer la peau<br />
sur la semelle du ski. L’extrémité de la peau doit se trouver à 2.5cm du<br />
talon du ski quand l’attache du talon est réglée sur le 3ème trou. (2).<br />
3 Placer la boucle de spatule sur le ski, au niveau médian de la spatule.<br />
Les boucles de spatule trop près de l’extrémité de la spatule risquent de<br />
tomber pendant l’utilisation. Les boucles de spatule trop descendues sur<br />
le ski risquent de traîner dans la neige. Tourner la boucle de spatule si<br />
besoin pour obtenir une taille adaptée. (3).<br />
4 Marquer la peau au niveau où la boucle de spatule se trouve et enlever<br />
la peau du ski. Découper la peau supplementaire 9cm au dessus de la<br />
marque (4).<br />
5 Plier la peau au niveau de la marque et couper l’excédent de peau audelà<br />
de la largeur de la boucle de spatule. (5).<br />
6 Placer la boucle de spatule sur le côté adhésif de la peau et au niveau<br />
de la pliure afin de maintenir la boucle en place. (5)<br />
DÉCOUPE DE LA LARGEUR<br />
7 Attacher et ajuster le clip de talon de la peau sur le ski et centrer la peau<br />
sur la semelle du ski.<br />
8 Découper la peau en suivant la carre du ski et en utilisant l’outil de<br />
découpe des peaux <strong>G3</strong>. (6).<br />
9 Repeter cette action sure l’autre carre du ski sans repositionner la peau (7).<br />
10 La peau ainsi taillée doit laisser les carres du ski exposees pendant<br />
l’utilisation. (8).<br />
ENTRETIEN ET STOCKAGE<br />
ENTRETIEN<br />
La colle de vos peaux est sacrée : gardez-la propre ! Quand vous enlevez<br />
vos peaux ne les jetez pas dans la neige, les aiguilles de pin ou un plancher<br />
poussiéreux. La saleté et les fibres de différentes matières risquent de<br />
coller à vos peaux et affaiblir son pouvoir adhésif.<br />
Autant que possible, asséchez les deux côtés de vos peaux chaque jour. Ne<br />
les exposez pas directement au soleil ou à des sources de chaleur comm e<br />
des feux ou des réchauds. Si vous les suspendez à l’intérieur d’un séchoir<br />
dans un refuge de montagne, disposez-les conscienceusement de manière<br />
à tenir le côté encollé éloigné des vêtements et autres chaussettes de laine.<br />
N’exposez pas vos peaux à des temperatures supérieures à 22°C ou<br />
directement en plein soleil.<br />
Des skis récemment fartés doivent être parfaitement nettoyés. S’il reste du<br />
fart, celui-ci risque de gêner le pouvoir adhésif de vos peaux.<br />
Ne mettez pas vos peaux le soir précédant votre sortie, mais le matin.<br />
STOCKAGE<br />
Ne stockez pas vos peaux de phoque en les laissant sur vos skis.<br />
Pour n’importe quel stockage de longue durée, nous vous recommandons<br />
vivement l’emploi des <strong>G3</strong> Skin Savers, non fournis avec vos peaux <strong>G3</strong>. Ces<br />
feuilles de protection permettent de stocker les peaux sans que celles-ci ne<br />
soient collées sur elles-mêmes. Ce qui permet de manipuler vos peaux plus<br />
facilement. Et vous n’aurez plus de problème pour les décoller après une<br />
longue période de stockage. Utilisez-les !<br />
Coupez la feuille de protection <strong>G3</strong> en deux et collez chaque morceau à la<br />
moitié inférieure de chaque peau. Pliez l’extrémité de la peau en arrière sur<br />
le feuillet de protection de sorte qu’une seule couche de filet soit enserrée<br />
entre les deux moitiés de la peau.<br />
Avec les feuilles de protection de peaux <strong>G3</strong> en place entre les deux faces<br />
autocollantes des peaux, vous pouvez roulez celles-ci et les placer dans le<br />
sac de rangement.<br />
REMARQUE : les feuilles de protection ne sont pas conçues pour une utilisation<br />
sur le terrain.<br />
Rangez toujours vos peaux une fois totalement séchées dans un endroit<br />
frais et sec.<br />
GARANTIE<br />
<strong>G3</strong> garantit que le produit répondra aux spécifications indiquées dans les<br />
instructions, et <strong>G3</strong> accepte de réparer ou remplacer le produit gratuitement<br />
si le produit n'est pas conforme aux spécifications. La notification pour le<br />
remplacement doit être donnée dans les 60 jours de la découverte du<br />
défaut. TOUTES LES GARANTIES DE VALEUR MARCHANDE OU de FORME<br />
PHYSIQUE POUR UNE UTILISATION PARTICULIERE SONT PAR CECI EXCLUES<br />
ET/OU ÉCARTÉES.<br />
Pour plus d'information sur la garantie et pour faire enregistrer votre produit<br />
<strong>G3</strong>, allez sur www.genuineguidegear.com.<br />
ATTENTION : MISE EN GARDE<br />
La montagne hivernale est un milieu dangereux. Il y a toujours un risque de<br />
blessure ou de décès. Vous êtes seul responsable de vos actions et de vos<br />
décisions. Entraînez-vous au maniement du matériel, familiarisez-vous avec<br />
ses limites et ses possibilités. Apprenez les techniques du ski, les méthodes<br />
de recherche de victime d’avalanche, et usez de votre jugement pour<br />
tirer le meilleur parti de notre produit. Utilisez cet équipement et skiez sous<br />
votre propre responsabilité.
DEUTSCH<br />
GENUINE GUIDE GEAR STELLT SKITOURENAUSRÜSTUNG FÜR BERGFÜHRER UND LAWINENSPEZIALISTEN HER. <strong>G3</strong> STEHT FÜR HÖHERE STANDARDS BEI FUNKTION<br />
UND HALTBARKEIT DER AUSRÜSTUNG.<br />
ANPASSUNG DER FELLE AN DEN SKI<br />
Alle <strong>G3</strong> Felle haben einen <strong>G3</strong> Spitzenspanner. Mit der unten angeführten<br />
Tabelle können Sie feststellen, welche Schlaufengröße in Ihrem Fell<br />
enthalten ist. Achten Sie darauf, dass der Spitzenbeschlag, der Ihrer<br />
gewünschten Fellbreite beiliegt, über Ihre Skispitze passt. Bei Fragen<br />
wenden Sie sich bitte an Ihren <strong>G3</strong> Fachhandel oder die <strong>G3</strong> Webseite.<br />
Fellbreite<br />
50 60-70 80-100 110 120 130 140<br />
SM SM MED LG LG LG LG<br />
Größe des Spitzenbeschlag<br />
TAILLIERT ODER GERADE<br />
Bei Auswahl und Anpassung von <strong>G3</strong> Steigfellen gibt es zwei<br />
Glaubensrichtungen: die taillierte und die gerade Option.<br />
TAILLIERT Die optimale Fellabdeckung erzielen Sie mit einem Fell, das<br />
etwas schmäler als die breitesten Stellen Ihres Skis ist. Dann können Sie<br />
das Fell der Taillierung Ihres Skis anpassen, indem Sie die Seiten der<br />
Anleitung folgend zuschneiden. Die zusätzliche Arbeit, die beim seitlichen<br />
Zuschneiden anfällt, zahlt sich wirklich aus: Somit haben Sie einen Ski, der<br />
mit einem Fell, das von Kante zu Kante reicht, optimalen Halt bietet.<br />
Wählen Sie ein Fell aus, das den Skibelag ca. 25 cm unterhalb der Skispitze<br />
von Kante zu Kante abdeckt. Wenn Sie also beispielsweise einen Ski mit<br />
einer 115-77-105 Taillierung haben, passt ein 110 mm Fell perfekt.<br />
GERADE Wenn Sie das Zuschneiden vermeiden wollen, wählen Sie ein Fell,<br />
das der schmälsten Stelle des Skis entspricht. Diese Option ist leichter,<br />
gleitet besser und man läuft nicht Gefahr, dass hervorstehende Abschnitte<br />
der Klebeschicht beim Lagern der Felle verunreinigt werden. Beim Packen<br />
oder Lagern sind gerade Felle auch einfacher zu falten.<br />
Wenn Sie beispielsweise einen Ski mit einer 115-77-105 Taillierung haben,<br />
passen 70mm Felle wunderbar. Jedem Paar der <strong>G3</strong> Felle mit und ohne<br />
Endbeschlag liegt ein <strong>G3</strong> Zuschneider sowie eine spezielle Anleitung für die<br />
Anpassung an Ihre Ski bei.<br />
ZUSCHNEIDEN DER FELLE<br />
(ANLEITUNG FÜR FELLE MIT ODER OHNE ENDBESCHLAG)<br />
ZUSCHNEIDEN DER LÄNGE<br />
ACHTUNG: Stellen Sie vor dem Zuschneiden von Fellen OHNE Endbeschlag<br />
sicher, das die Felle richtig ausgerichtet sind, um bergauf zu gleiten (mit<br />
dem Strich) und talwärts Halt zu bieten (gegen den Strich).<br />
1 Entfernen Sie die Schutzfolie (1). (Bei Fellen ohne Endbeschlag,<br />
beginnen Sie direkt mit Schritt 3.)<br />
2 Befestigen Sie den Endbeschlag am Skiende und platzieren Sie das Fell<br />
auf der Skilauffläche. Das Fell sollte 2,5 cm vom Skiende beginnen mit<br />
dem Endbeschlag im dritten Loch. (2).<br />
3 Platzieren Sie den Spitzenbeschlag (Metallbügel) vorne mittig auf der<br />
Skispitze. Überprüfen Sie nochmals deren Breite: Enge Spitzenbeschläge<br />
sitzen zu nah an der Skispitze und können leicht herunterrutschen. Weite<br />
Spitzenbeschläge schleifen im Schnee. Falls der Spitzenbeschlag nicht<br />
optimal sitzt, drehen Sie ihn um, so dass die Metallschiene auf der<br />
Skioberseite aufliegt. Sollte die Größe trotzdem nicht passen, kaufen Sie<br />
bei Ihrem Händler die richtige Größe. (3).<br />
4 Markieren Sie das Fell an der Stelle, an der Spitzenbeschlag die<br />
Klebefläche berührt, und schneiden Sie das überschüssige Fell 9 cm<br />
oberhalb dieser Markierung ab. Entfernen Sie dann das Fell vom Ski. (4).<br />
5 Falten Sie das Fell an der Markierung. Schneiden Sie das Material auf<br />
die Breite des Spitzenbeschlags zu. (5.)<br />
6 Platzieren Sie den Spitzenbeschlag genau an der Markierung, ziehen Sie<br />
das umgeschlagene Stück durch die Schlaufe des Beschlags und fixieren<br />
Sie den Spitzenbeschlag in dem Sie die beiden Klebeflächen fest<br />
zusammendrücken. (5).<br />
BREITEN ANPASSUNG<br />
7 Fell zentriert Aufkleben und Endhaken festziehen.<br />
8 <strong>G3</strong>-Trim-Tool an der Skispitze ansetzen und das übersehende Fell<br />
entlang der Skikanten beidseitig abschneiden (Fell dabei NICHT<br />
versetzen!).<br />
9 Das Fell sollte präzise geschnitten werden so dass beide Kanten sichtbar<br />
sind. HIER MÜSSTE DOCH DAS VERSETZEN UND NOCHMALIGE SCHNEIDEN<br />
BESCHRIEBEN WERDEN, außer man verwendet das neue TrimTool.<br />
PFLEGE UND LAGERUNG<br />
PFLEGE<br />
Der Kleber des Fells ist heilig – also: sauber halten! Wenn Sie Ihre Felle<br />
entfernen, achten Sie darauf, dass sie nicht mit Schnee, Baumnadeln oder<br />
Staub in Kontakt kommen. Schmutz und Fussel von Kleidung bleiben an der<br />
Klebeseite haften und beeinträchtigen somit die Klebefähigkeit.<br />
Trocknen Sie wenn möglich jeden Tag beide Seiten des Fells. Achten Sie<br />
darauf, dass Sie nicht direktem Sonnenlicht oder Wärmequellen wie Feuer<br />
oder Öfen ausgesetzt werden. Wenn Sie die Felle in einem der üblichen<br />
Trockenräume in einer Berghütte lagern, achten Sie darauf, dass sie<br />
sorgsam und geschützt hängen, d.h. dass andere Gegenstände wie<br />
Wollsocken und Handschuhe nicht mit der Klebeseite in Berührung<br />
kommen.<br />
Achten Sie darauf, dass Ihre Felle nicht Temperaturen über der normalen<br />
Zimmertemperatur (22°C) oder direktem Sonnenlicht ausgesetzt werden.<br />
Frisch gewachste Ski müssen gründlich abgezogen werden. Loses Wachs<br />
verschmutzt die Klebeflächen.<br />
Kleben Sie die Felle nicht schon die Nacht zuvor auf Ihre Ski; befestigen Sie<br />
sie erst zu Beginn der Tour.<br />
LAGERUNG<br />
Lassen Sie die Felle für die Lagerung niemals auf den Skiern.<br />
Fuer eine Langzeitlagerung empfehlen wir, einen <strong>G3</strong> Fellschutz zu<br />
benutzen,der nicht mitgeliefert wird mit diesen <strong>Skins</strong>, er muss extra bestellt<br />
werden. Diese Lagerungsnetze werden zwischen die Klebeseite der<br />
gefalteten Felle gelegt. So ist es viel einfacher, die Felle nach längerer<br />
Lagerzeit auseinanderzufalten und wieder einzusetzen. Benutzen Sie sie<br />
also!<br />
Schneiden Sie den <strong>G3</strong> Fellschutz in zwei Hälften und kleben Sie jeweils eine<br />
Hälfte auf die Unterseite eines Fells. Falten Sie die Spitze des Fells auf den<br />
<strong>G3</strong> Fellschutz um, so dass eine Netzschicht zwischen den beiden Fellhälften<br />
liegt.<br />
Liegt nun der <strong>G3</strong> Fellschutz zwischen den Klebeseiten, können Sie Ihre Felle<br />
einrollen oder falten und im Transportsack aufbewahren.<br />
Achtung: Fellschutz nicht auf Tour sondern nur zur Lagerung verwenden.<br />
Lagern Sie Ihre vollständig getrockneten Felle an einem kühlen,<br />
trockenen Ort.<br />
GARANTIE<br />
Alle <strong>G3</strong> Produkte werden mit der größtmöglichen Sorgfalt entwickelt und<br />
mit modernster Technik aus besten Materialien hergestellt. Sollten Sie mit<br />
einem <strong>G3</strong> Produkt dennoch nicht zufrieden sein, wenden Sie sich bitte an<br />
Ihren Händler oder direkt an den Importeur in ihrem Land. Für alle <strong>G3</strong>-<br />
Produkte gelten mindestens die nationalen Bestimmungen zur gesetzlichen<br />
Gewährleistungspflicht.<br />
Darüber hinaus garantieren wir Material und Verarbeitung von <strong>G3</strong>-Produkten<br />
für deren natürliche Lebensdauer. Ersatzansprüche müssen bis 60 Tage nach<br />
Feststellung des Defekts mitgeteilt werden. JEGLICHE ZUSICHERUNG<br />
ALLGEMEINER GEBRAUCHSTAUGLICHKEIT SOWIE TAUGLICHKEIT FÜR EINEN<br />
BESTIMMTEN ZWECK SIND HIERMIT AUSGESCHLOSSEN.<br />
Mehr Informationen über unsere Garantiebestimmungen sowie<br />
die Möglichkeit, ihr Produkt zu registrieren, finden Sie unter<br />
www.genuineguidegear.com.<br />
WARNUNG<br />
Es ist gefährlich, abseits markierter Pisten und Wanderwege im Gebirge<br />
unterwegs zu sein – besonders im Winter! Es besteht immer das Risiko,<br />
sich ernsthaft zu verletzen oder sogar tödlich zu verunglücken. Jeder<br />
Einzelne ist selbst für seine Handlungen und Entscheidungen<br />
verantwortlich. Machen Sie sich mit den Einsatzmöglichkeiten und Grenzen<br />
ihrer Ausrüstung, insbesondere dieses Produkts vertraut. Lernen Sie<br />
sicheres Skifahren, die Beurteilung der Lawinengefahr und üben Sie den<br />
sicheren Umgang mit diesem Produkt. Im Backcountry unterwegs zu sein<br />
bleibt – auch durch das Verletzungsrisiko beim Skifahren – trotzdem<br />
gefährlich. <strong>G3</strong> weist Sie daraufhin, dass Sie diese Ausrüstung und Ski auf<br />
eigene Gefahr verwenden und übernimmt keine Haftung für mittelbare oder<br />
unmittelbare Schäden.