ENZO R Mounting and Installation Instruction - G3 Genuine Guide ...
ENZO R Mounting and Installation Instruction - G3 Genuine Guide ...
ENZO R Mounting and Installation Instruction - G3 Genuine Guide ...

You also want an ePaper? Increase the reach of your titles
YUMPU automatically turns print PDFs into web optimized ePapers that Google loves.
1. Notes<br />
Scan for the most<br />
current document<br />
1 x 14 2 x 4<br />
1.1. Important warnings<br />
• <strong>G3</strong> strongly recommends only mounting <strong>ENZO</strong> R<br />
bindings in newly drilled holes. Using holes from<br />
a previously mounted binding could result in<br />
binding pullout.<br />
• Any custom modifications to the binding will<br />
invalidate the warranty, <strong>and</strong> could put the skier at<br />
risk of injury.<br />
• Prior to each use the bindings should be checked<br />
for any broken parts. If anything is defective or<br />
broken please return the binding to an authorized<br />
dealer for service.<br />
• Skiing without a ski leash can put others at risk,<br />
as well as the risk of loss of the ski <strong>and</strong> binding.<br />
• Ski touring is a dem<strong>and</strong>ing sport in which<br />
environmental conditions <strong>and</strong> terrain can<br />
change quickly <strong>and</strong> be hazardous. Obtain proper<br />
training <strong>and</strong> rescue equipment before ski touring,<br />
<strong>and</strong> don’t overestimate your abilities. Always make<br />
use of all available weather <strong>and</strong> avalanche condition<br />
information prior to touring.<br />
• Do not ski tour alone.<br />
• During transport, bindings can become contaminated<br />
with salt, dirt <strong>and</strong> other contaminants that can<br />
alter or impair the performance. Cover your bindings<br />
during transport to reduce this risk.<br />
• Any unintended use of the binding will void the<br />
warranty, <strong>and</strong> could put people at risk.<br />
• Use only genuine <strong>G3</strong> accessories for <strong>ENZO</strong> R<br />
bindings to ensure that the safety, performance or<br />
any other design feature is not compromised.<br />
1.2. Boot Compatibility<br />
• The <strong>G3</strong> <strong>ENZO</strong> R binding is only compatible with<br />
75 mm/Duckbill telemark ski boots (ISO 22264).<br />
1:1<br />
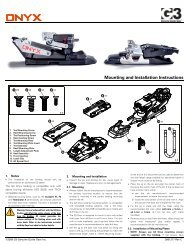
1. Toe <strong>Mounting</strong>/Anti-Iceplate Screw<br />
2. Heel <strong>Mounting</strong> Screw<br />
3. Toe Assembly<br />
4. Anti-Iceplate<br />
5. Activity Pin<br />
6. Heel Assembly<br />
7. Heel Throw<br />
8. Heel Lift Assembly<br />
9. Spring Blocking Pin<br />
Cable Adjuster<br />
3 x 2<br />
1<br />
<strong>ENZO</strong> R <strong>Mounting</strong> <strong>and</strong> <strong>Installation</strong> <strong>Instruction</strong><br />
4 x 2<br />
10. <strong>G3</strong>-TA2-G007<br />
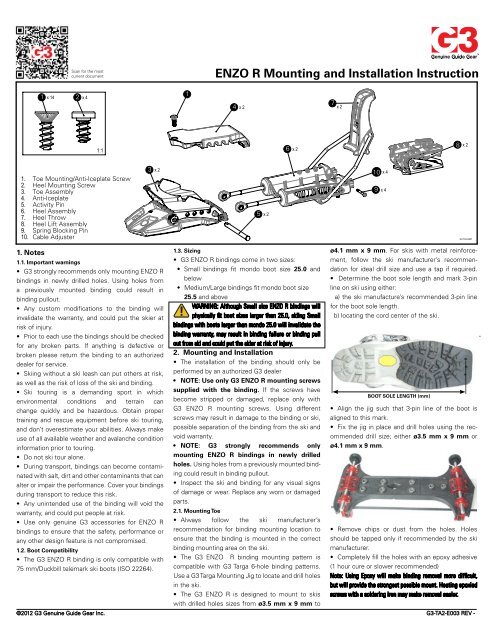
1.3. Sizing<br />
• <strong>G3</strong> <strong>ENZO</strong> R bindings come in two sizes:<br />
• Small bindings fit mondo boot size 25.0 <strong>and</strong><br />
below<br />
• Medium/Large bindings fit mondo boot size<br />
25.5 <strong>and</strong> above<br />
WARNING: Although Small size <strong>ENZO</strong> R bindings will<br />
physically fit boot sizes larger than 25.0, skiing Small<br />
bindings with boots larger than mondo 25.0 will invalidate the<br />
binding warranty, may result in binding failure or binding pull<br />
out from ski <strong>and</strong> could put the skier at risk of injury.<br />
2. <strong>Mounting</strong> <strong>and</strong> <strong>Installation</strong><br />
• The installation of the binding should only be<br />
performed by an authorized <strong>G3</strong> dealer<br />
• NOTE: Use only <strong>G3</strong> <strong>ENZO</strong> R mounting screws<br />
supplied with the binding. If the screws have<br />
become stripped or damaged, replace only with<br />
<strong>G3</strong> <strong>ENZO</strong> R mounting screws. Using different<br />
screws may result in damage to the binding or ski,<br />
possible separation of the binding from the ski <strong>and</strong><br />
void warranty.<br />
• NOTE: <strong>G3</strong> strongly recommends only<br />
mounting <strong>ENZO</strong> R bindings in newly drilled<br />
holes. Using holes from a previously mounted binding<br />
could result in binding pullout.<br />
• Inspect the ski <strong>and</strong> binding for any visual signs<br />
of damage or wear. Replace any worn or damaged<br />
parts.<br />
2.1. <strong>Mounting</strong> Toe<br />
• Always follow the ski manufacturer’s<br />
recommendation for binding mounting location to<br />
ensure that the binding is mounted in the correct<br />
binding mounting area on the ski.<br />
• The <strong>G3</strong> <strong>ENZO</strong> R binding mounting pattern is<br />
compatible with <strong>G3</strong> Targa 6-hole binding patterns.<br />
Use a <strong>G3</strong>Targa <strong>Mounting</strong> Jig to locate <strong>and</strong> drill holes<br />
in the ski.<br />
• The <strong>G3</strong> <strong>ENZO</strong> R is designed to mount to skis<br />
with drilled holes sizes from ø3.5 mm x 9 mm to<br />
ø4.1 mm x 9 mm. For skis with metal reinforcement,<br />
follow the ski manufacturer’s recommendation<br />
for ideal drill size <strong>and</strong> use a tap if required.<br />
• Determine the boot sole length <strong>and</strong> mark 3-pin<br />
line on ski using either:<br />
a) the ski manufacture’s recommended 3-pin line<br />
for the boot sole length.<br />
b) locating the cord center of the ski.<br />
BOOT SOLE LENGTH (mm)<br />
• Align the jig such that 3-pin line of the boot is<br />
aligned to this mark.<br />
• Fix the jig in place <strong>and</strong> drill holes using the recommended<br />
drill size; either ø3.5 mm x 9 mm or<br />
ø4.1 mm x 9 mm.<br />
• Remove chips or dust from the holes. Holes<br />
should be tapped only if recommended by the ski<br />
manufacturer.<br />
• Completely fill the holes with an epoxy adhesive<br />
(1 hour cure or slower recommended)<br />
Note: Using Epoxy will make binding removal more difficult,<br />
but will provide the strongest possible mount. Heating epoxied<br />
screws with a soldering iron may make removal easier.<br />
©2012 <strong>G3</strong> <strong>Genuine</strong> <strong>Guide</strong> Gear Inc. <strong>G3</strong>-TA2-E003 REV -<br />
5 x 2<br />
6 x 2<br />
7 x 2<br />
10 x 4<br />
9 x 4<br />
8 x 2
• Install the six supplied 16.5 mm mounting<br />
screws (1) <strong>and</strong> torque to 4Nm (35 in·lbf)<br />
using a Pozidriv® #3 screwdriver.<br />
• Install the anti-ice plates (4), ensure the rear latch<br />
tab is completely snapped into place, <strong>and</strong> tighten<br />
anti-ice screw. (1)<br />
• NOTE: to remove anti-ice plates, remove anti-ice<br />
screw <strong>and</strong> lift front of anti ice place.<br />
2.2. Selecting Activity Setting<br />
• The <strong>ENZO</strong> R binding has 4 activity settings. The<br />
further toward the rear of the binding the activity pin<br />
setting, the more active or powerful the binding will<br />
feel. The further forward the pin, the more neutral<br />
it will feel. Refer to section 3.1: Activity Setting for<br />
instruction on how to change activity settings.<br />
4<br />
3<br />
2 1<br />
4Nm<br />
MORE ACTIvE LESS ACTIvE<br />
CAUTION: For skiers that have a “low” or “deep<br />
knee bend style”, <strong>G3</strong> recommends a more neutral<br />
setting. This setting will help speed transitions from<br />
edge to edge, <strong>and</strong> minimize the risk of binding pullouts.<br />
2.3. Setting Cable Length/Tension<br />
• Place the ski boot into the binding <strong>and</strong> engage the heel<br />
throw, flex a few times to seat the boot in the toeplate<br />
(note: this is best done on the bench).<br />
• Using a Pozidriv® #3 screwdriver adjust the cable<br />
tension so that the preload indicator is inside the<br />
recommended adjustment zone. Adjust both cables<br />
evenly.<br />
10<br />
6<br />
+<br />
AdJUSTMENT RANGE<br />
CAUTION: A small break-in period is common <strong>and</strong> to be<br />
expected. The binding tension must be checked after<br />
the first couple of uses, <strong>and</strong> the tension adjusted as required. <strong>G3</strong><br />
recommends checking cable tension regularly, especially if the<br />
heel throw feels weak as it snaps onto the boot heel.<br />
CAUTION: Thread exposure indicates maximum cartridge<br />
adjustment. No threads should be visible. Care must<br />
also be taken to not over tighten the adjusters.<br />
2.4. <strong>Mounting</strong> Heel<br />
• Place the ski boot into the binding <strong>and</strong> engage<br />
the heel throw, flex a few times to seat the boot in<br />
the toe plate.<br />
• Lift the heel in to the climbing position, <strong>and</strong><br />
position it centred on the ski ~3-4mm (1/8”-5/32”)<br />
from the spring housing as shown<br />
• Mark the centre of the rear track as shown<br />
with a marker, pen or center punch.<br />
• Line up the <strong>G3</strong> Targa <strong>Mounting</strong> Jig to the center<br />
mark <strong>and</strong> fix the jig in place <strong>and</strong> drill two holes using<br />
the recommended drill size; either ø3.5 mm x 9 mm<br />
or ø4.1 mm x 9 mm.<br />
• Remove chips or dust from the holes. Holes<br />
should be tapped only if recommended by the ski<br />
manufacturer.<br />
• Completely fill the holes with waterproof wood<br />
glue or an epoxy adhesive (1 hour cure or slower<br />
recommended).<br />
• NOTE: Epoxy adhesive will make adjusting heel for different<br />
boot sizes more difficult.<br />
©2012 <strong>G3</strong> <strong>Genuine</strong> <strong>Guide</strong> Gear Inc. <strong>G3</strong>-TA2-E003 REV -<br />
+<br />
BOOT MUST BE<br />
IN BINdING<br />
8<br />
3-4mm<br />
(1/8”-5/32”)<br />
MARK
• Install the heel using two supplied 13 mm Heel<br />
<strong>Mounting</strong> screws (2), but do not tighten screws<br />
fully.<br />
2<br />
• Adjust the location of the heel by sliding it<br />
backwards or forwards so that the climbing heel is<br />
3-4mm (1/8”- 5/32”) from the spring housing when<br />
the boot is in the binding.<br />
BOOT MUST<br />
BE IN BINdING<br />
• Torque screws to 4Nm (35 in.lbf) using a<br />
Pozidriv® #3 screwdriver.<br />
2<br />
8 3-4mm<br />
(1/8”-5/32”)<br />
4Nm<br />
WARNING: Heel location is important to the<br />
correct operation of the binding. Incorrect heel<br />
position could cause the heel to interfere<br />
with the operation of the binding, or<br />
result in the heel lift moving to the climb<br />
position unexpectedly. Take care to check <strong>and</strong><br />
readjust the heel if required if the bindings are used with<br />
different boots.<br />
3. Binding Adjustment<br />
The <strong>ENZO</strong> R binding features an unprecedented<br />
level of adjustment to suit any skiing style. The key<br />
adjustments are:<br />
• Activity setting: Dramatically adjust the<br />
activity of the binding.<br />
• Spring Selection: Changing to springs of a<br />
different rate dramatically adjusts the “feel”<br />
of the binding.<br />
• Cable Tension/Preload: Fine tunes the feel of<br />
the binding.<br />
8<br />
8<br />
3.1. Activity Setting Adjustment<br />
The <strong>ENZO</strong> R binding has 4 activity settings. The<br />
further toward the rear of the binding the activity<br />
pin setting, the more active or powerful the binding<br />
will feel, <strong>and</strong> the further forward the more neutral it<br />
will feel. Choose a setting that best represents the<br />
skiers skiing preferences.<br />
Be aware that changing the activity setting in the field will<br />
require readjusting the cable length, requiring a screwdriver.<br />
Refer to 2.3: Setting Cable Length/Tension for instruction on<br />
adjusting cable tension.<br />
4<br />
3<br />
2 1<br />
MORE ACTIvE LESS ACTIvE<br />
CAUTION: For skiers that have a “low” or “deep knee<br />
bend style”, <strong>G3</strong> recommends a more neutral setting.<br />
This setting will help speed transitions from edge to edge, <strong>and</strong><br />
minimize the risk of binding pullouts.<br />
• Remove activity pin (5) by depressing small<br />
plunger with a finger or small screw driver.<br />
• Pull activity pin through cable ends <strong>and</strong> binding,<br />
taking care not to rotate pin.<br />
• If pin becomes stuck, push the pin all the way<br />
back in <strong>and</strong> repeat the removal process.<br />
• Move the cable eyelets to the desired activity<br />
location, <strong>and</strong> reinsert the pin, ensuring that the pin<br />
passes through both cable eyelets.<br />
• The pin end has two flats that must line up with<br />
the flats in the hole. It may be necessary to rotate<br />
the pin to pass it through the end hole.<br />
• Ensurethepinisfullyinstalled,<strong>and</strong>thesmallspring<br />
plunger has engaged to prevent accidental pin loss.<br />
3.2. Spring Replacement<br />
• NOTE: S springs are only compatible with S bindings, <strong>and</strong><br />
M/L springs are only compatible with M/L bindings. Refer to<br />
Table 1.<br />
• NOTE: <strong>G3</strong> does not recommend mixing<br />
springs of different stiffness as it may result in<br />
damage to the binding, or unpredictable release from the<br />
binding, <strong>and</strong> could put the skier <strong>and</strong> others at risk of injury.<br />
Table 1: Spring Compatibility <strong>and</strong> Identification<br />
Part Number Spring Model Colour<br />
<strong>ENZO</strong> &<strong>ENZO</strong> R<br />
S<br />
1817-4131<br />
1818-4040<br />
1819-4132<br />
Soft<br />
Medium<br />
Stiff<br />
Black<br />
Silver<br />
Gold<br />
<strong>ENZO</strong> & <strong>ENZO</strong> R<br />
M/L<br />
1958-4132<br />
1959-4313<br />
1960-4314<br />
Soft<br />
Medium<br />
Stiff<br />
Black<br />
Silver<br />
Gold<br />
• Using a torx T10 screwdriver, remove both spring<br />
blocking pins (9) from the spring housing.<br />
• Separate the cable adjusters (10) from the cables<br />
by turning them counter clockwise until the cable<br />
ends are unthreaded.<br />
• Remove the springs <strong>and</strong> set aside.<br />
• Check that the replacement springs are the<br />
correct size <strong>and</strong> stiffness for the binding.<br />
Use table 1<br />
• Install new springs in spring housing <strong>and</strong><br />
reinstall the cable adjusters by compressing the<br />
spring slightly <strong>and</strong> reinstalling the spring blocking<br />
pin.<br />
• Thread the adjusters back onto the threaded<br />
cable ends <strong>and</strong> adjust the cable tension as per<br />
3.3: Cable Tension/Preload.<br />
©2012 <strong>G3</strong> <strong>Genuine</strong> <strong>Guide</strong> Gear Inc. <strong>G3</strong>-TA2-E003 REV -<br />
5<br />
95 mm<br />
10<br />
9<br />
S<br />
M/L<br />
130 mm
3.3. Cable Tension/Preload Adjustment<br />
• NOTE: Cable tension is an especially subjective<br />
<strong>and</strong> person specific setting, so adjust the cables to<br />
your liking.<br />
• The <strong>ENZO</strong> R binding features an easy to use<br />
pre-load indicator. The preload should be<br />
adjusted such that the preload indicator is in the<br />
recommended adjustment zone.<br />
• For more cable tension, tighten the cable<br />
adjuster using a Pozidriv® #3 screwdriver,<br />
adjusting the cable tensions that the<br />
preload indicator is further forward in the<br />
recommended adjustment zone<br />
10<br />
6<br />
AdJUSTMENT RANGE<br />
• For less cable tension, loosen the cable<br />
adjuster using a Pozidriv® #3 screwdriver, adjusting<br />
the cable tension so that the preload indicator is<br />
further back in the recommended adjustment zone.<br />
NOTE: <strong>G3</strong> recommends checking cable tension regularly,<br />
especially if the heel throw feels weak as it snaps onto the<br />
boot heel.<br />
CAUTION: Thread exposure indicates maximum cartridge<br />
adjustment; care must also be taken to not over tighten<br />
the adjusters.<br />
4. User Operating <strong>Instruction</strong>s<br />
4.1. Entering the Binding<br />
• Telemark bindings typically have a left <strong>and</strong> right<br />
binding.<br />
• Insert toe into toeplate <strong>and</strong> step down on<br />
binding heel.<br />
• Align heel throw with welt on boot <strong>and</strong> flip up.<br />
Heel throw should have a nice firm snap.<br />
2<br />
4.2. Using the Heel Lift<br />
• To flip the heel lift up into climbing mode, put<br />
the pole tip into the heel as shown, <strong>and</strong> rotate lift<br />
forward until it pops up.<br />
• To stow the heel in the ski or low climbing mode,<br />
put the tip of the pole on the heel lift pocket as<br />
shown <strong>and</strong> press down.<br />
4.3. Transportation<br />
• The <strong>ENZO</strong> R binding features a ‘carry’ mode<br />
that holds the cables <strong>and</strong> spring housing down for<br />
transportation.<br />
• Do not apply any lubricants to the binding other<br />
than original <strong>G3</strong> Binding Grease. Use of lubricants<br />
other than original <strong>G3</strong> Binding Grease can damage<br />
the binding, greatly reducing the strength of parts or<br />
affect the performance <strong>and</strong> release <strong>and</strong> may result<br />
in bodily injury or death.<br />
6. Warranty<br />
For complete warranty information, please visit:<br />
http://www.genuineguidegear.com/service/g3product-warranty<br />
7. Additional Information<br />
The <strong>G3</strong> website www.genuineguidegear.com<br />
has the most current information regarding all <strong>G3</strong><br />
products. Please go to the website to find any<br />
recent updates <strong>and</strong> additional information on how to<br />
use the product.<br />
L R<br />
5. Maintenance <strong>and</strong> Storage<br />
• After every use the binding should be cleaned<br />
with a damp rag to remove any dirt or dust. Do<br />
not use any other kind of cleaning products or<br />
pressurized devices.<br />
• Store <strong>G3</strong> <strong>ENZO</strong> R bindings in ski mode (toe <strong>and</strong><br />
heel) in an environment where there aren’t large<br />
fluctuations in temperature <strong>and</strong> humidity from<br />
st<strong>and</strong>ard conditions. Avoid environments with<br />
excessive heat (ie. next to furnaces, heating<br />
elements or water heaters).<br />
©2012 <strong>G3</strong> <strong>Genuine</strong> <strong>Guide</strong> Gear Inc. <strong>G3</strong>-TA2-E003 REV -<br />
1