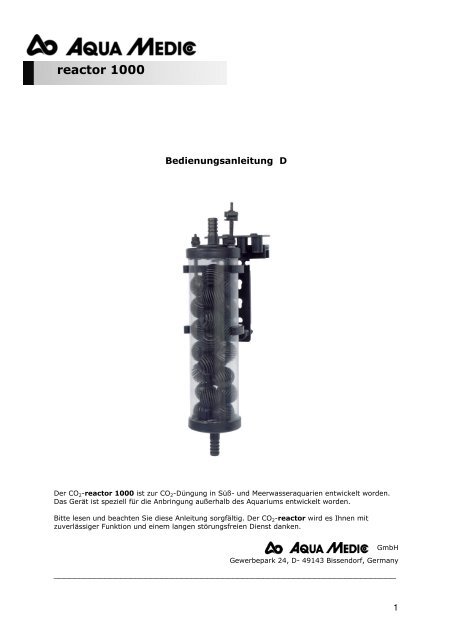
reactor 1000-manual .pdf - Aqua Medic
reactor 1000-manual .pdf - Aqua Medic
reactor 1000-manual .pdf - Aqua Medic

Sie wollen auch ein ePaper? Erhöhen Sie die Reichweite Ihrer Titel.
YUMPU macht aus Druck-PDFs automatisch weboptimierte ePaper, die Google liebt.
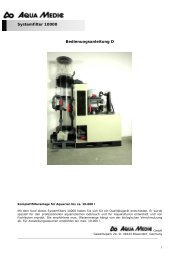
eactor <strong>1000</strong><br />
Bedienungsanleitung D<br />
Der CO 2-<strong>reactor</strong> <strong>1000</strong> ist zur CO 2-Düngung in Süß- und Meerwasseraquarien entwickelt worden.<br />
Das Gerät ist speziell für die Anbringung außerhalb des <strong>Aqua</strong>riums entwickelt worden.<br />
Bitte lesen und beachten Sie diese Anleitung sorgfältig. Der CO 2-<strong>reactor</strong> wird es Ihnen mit<br />
zuverlässiger Funktion und einem langen störungsfreien Dienst danken.<br />
GmbH<br />
Gewerbepark 24, D- 49143 Bissendorf, Germany<br />
___________________________________________________________________<br />
1
1. Einzelteile<br />
1. Reaktorgehäuse gefüllt mit<br />
Bactoballs<br />
2. Zulaufstutzen<br />
3. CO 2 –Einlassstutzen<br />
4. Entlüftungsstutzen mit Absperrhahn<br />
5. Halteklammern (2 Stück)<br />
6. Haltevorrichtung zur Befestigung am<br />
<strong>Aqua</strong>rium<br />
7. Halteplatte<br />
8. Ablaufstutzen<br />
9. 0-Ring am Zu- und Ablaufstutzen<br />
Technische Daten:<br />
Bezeichnung: <strong>reactor</strong> <strong>1000</strong><br />
Bestell-Nr.: 71113<br />
Wasseranschluss: 12/16 mm<br />
CO 2-Schlauchanschluss: 6/4 mm<br />
Wasseranschluss: min. 1.000 l/Std.<br />
Aufstellung: intern oder extern<br />
2<br />
7<br />
6<br />
5<br />
4<br />
8<br />
2<br />
9<br />
1<br />
3
2. Einbau/Montage<br />
Der <strong>reactor</strong> <strong>1000</strong> besitzt zwei Schlauchanschlüsse für Schlauch 16/18 mm und kann sowohl<br />
extern als auch intern verwendet werden.<br />
- Montage im <strong>Aqua</strong>rium<br />
Die im Lieferumfang enthaltene Halterung ermöglicht die einfache Anbringung des <strong>reactor</strong>s am<br />
oder im <strong>Aqua</strong>rium. Die Halterung wird auf eine Querstrebe im <strong>Aqua</strong>rium oder auf eine<br />
<strong>Aqua</strong>rienscheibe geschoben und mit zwei Schrauben fixiert.<br />
- Montage außerhalb des <strong>Aqua</strong>riums<br />
Der <strong>reactor</strong> <strong>1000</strong> kann auch an eine Wand oder an den <strong>Aqua</strong>rienschrank montiert werden. Dazu<br />
wird die Halteplatte z. B. mit Sperrholz unterfüttert und direkt an die Wand oder an den<br />
<strong>Aqua</strong>rienschrank geschraubt. Beim Betrieb des <strong>reactor</strong> <strong>1000</strong> außerhalb des <strong>Aqua</strong>riums ist darauf<br />
zu achten, dass beide Anschlussstutzen fest eingeschraubt und jeweils mit dem dazu gehörigen<br />
Dichtring versehen sind.<br />
Jetzt werden die beiden Halteklammern (5) in die Halteplatte (7) eingehängt. Der <strong>reactor</strong> <strong>1000</strong><br />
wird einfach in die Halteklammern eingedrückt.<br />
Anschlüsse<br />
- Wasserzulauf: Der Wasserzulauf wird an den oberen Stutzen des <strong>reactor</strong> <strong>1000</strong> (2)<br />
angeschlossen. Zur Wasserversorgung kann eine separate Pumpe (min. 1.000 l/Std.) oder der<br />
Rücklauf eines <strong>Aqua</strong>rienfilters eingesetzt werden. Eine stärkere Durchströmung verbessert die<br />
Auflösung des Kohlendioxids. Ist die Umwälzleistung des Filters zu groß, kann der <strong>reactor</strong><br />
auch im Bypass betrieben werden.<br />
- Wasserrücklauf: Am unteren Stutzen des <strong>reactor</strong> <strong>1000</strong> wird mit einem 12/16 Schlauch der<br />
Rücklauf zum <strong>Aqua</strong>rium angeschlossen.<br />
- Das CO 2 wird an den Druckanschluss (3) angeschlossen. Es ist darauf zu achten, dass zwischen<br />
<strong>reactor</strong> und der CO 2-Anlage in jedem Fall ein Rückschlagventil eingebaut wird. Das CO 2 wird<br />
im <strong>reactor</strong> mit einem Schlauch nach unten geleitet. Das damit erreichte Gegenstromprinzip<br />
führt zu einer besseren Auflösung des Gases. Die Bactoballs sorgen für zusätzliche<br />
Verwirbelung.<br />
- Entlüftung: Der <strong>reactor</strong> kann über den Absperrhahn am Anschluss (4) bei der Inbetriebnahme<br />
entlüftet werden. Auch die Falschgase, die sich während des Betriebes im <strong>reactor</strong> ansammeln,<br />
können über diesen Anschluss abgelassen werden. Dazu wird der Hahn kurz geöffnet.<br />
Es ist immer darauf zu achten, dass die Schläuche nicht abknicken.<br />
3. Inbetriebnahme/Einstellen<br />
Bevor der CO 2-<strong>reactor</strong> eingestellt werden kann, muss ein Druckminderer auf die CO 2-<br />
Vorratsflasche montiert werden.<br />
Beachten Sie bitte die Betriebsanleitung dieser Geräte genauestens. Wir empfehlen den<br />
Druckminderer regular aus unserem CO 2-Programm.<br />
Nachdem der Druckminderer und der CO 2-<strong>reactor</strong> vorschriftsmäßig montiert sind, kann mit der<br />
Einstellung des CO 2-<strong>reactor</strong>s begonnen werden.<br />
1. Kreiselpumpe für den Wasserdurchsatz einschalten.<br />
2. Das Hauptventil der CO 2-Flasche öffnen.<br />
3. Den Arbeitsdruck am Druckminderer auf 1 – 2 bar einstellen. Beim AB <strong>Aqua</strong> <strong>Medic</strong> regular ist der<br />
Arbeitsdruck auf 1,5 bar eingestellt.<br />
4. Langsam das Feineinstellventil am CO 2-Druckminderer öffnen. Am Blasenzähler dabei die<br />
austretenden CO 2-Blasen kontrollieren.<br />
5. Stellen Sie vorerst ca. 15 Blasen/Minute ein.<br />
6. Das CO 2-Gas strömt in den <strong>reactor</strong> und wird vom durchfließenden Wasser aufgenommen.<br />
Beobachten Sie immer den pH-Wert und korrigieren die Blasenmenge nach Bedarf. Hinweis: Wir<br />
empfehlen den AB <strong>Aqua</strong> <strong>Medic</strong> Blasenzähler mit integriertem Rückschlagventil aus unserem CO 2-<br />
Programm.<br />
3
Abb. 2: <strong>reactor</strong> <strong>1000</strong> am <strong>Aqua</strong>rium mit automatischer CO 2-Steuerung<br />
1. CO 2-Druckgasflasche station<br />
2. Druckminderer regular<br />
3. Magnetventil<br />
4. pH-Computer<br />
5. Zwischenstecker<br />
6. Blasenzähler mit Rückschlagventil<br />
4<br />
1<br />
2<br />
3<br />
5<br />
pH Computer<br />
6<br />
7.25<br />
High Prog<br />
Low<br />
CAL CAL<br />
pH4 pH7<br />
11<br />
High<br />
Lo w<br />
Ou t<br />
4<br />
12<br />
7. <strong>reactor</strong> <strong>1000</strong><br />
8. pH-Elektrode<br />
9. <strong>Aqua</strong>rium<br />
10. Entlüftung<br />
11. Wasserzulauf zum <strong>reactor</strong> <strong>1000</strong><br />
12. Wasserablauf zum <strong>Aqua</strong>rium<br />
Abb. 2 zeigt den <strong>reactor</strong> <strong>1000</strong> in Außenanbringung, zusammen mit einer kompletten CO 2–<br />
Versorgung und Steuerung von AB <strong>Aqua</strong> <strong>Medic</strong>. Das Wasser wird vom Außenfilter kommend<br />
(nicht dargestellt) in den Reactor geleitet. Der pH-Computer misst den pH-Wert im <strong>Aqua</strong>rium<br />
und schaltet je nach Bedarf über das Magnetventil die CO 2-Versorgung ein.<br />
Auf diese Weise wird im <strong>Aqua</strong>rium immer ein konstanter pH-Wert eingehalten (z. B pH 6,5 – 6,8 im<br />
Pflanzenaquarium). Dennoch soll die Blasenzahl am Feinnadelventil des Druckminderers nicht auf<br />
zu hohe Werte eingestellt werden. Es besteht dann das Risiko, dass beim Ausfall des Magnetventils<br />
(z. B. Blockierung durch Schmutz) der pH-Wert im <strong>Aqua</strong>rium zu weit absinkt.<br />
10<br />
7<br />
8<br />
9
Karbonathärte anheben<br />
Ein <strong>Aqua</strong>riumwasser, gleichgültig ob Süß- oder Meerwasser, soll eine Mindestkarbonathärte von 4 -<br />
6 dKH aufweisen. Unterhalb dieser Grenze ist der pH-Wert schwierig zu stabilisieren. Durch<br />
biologische Prozesse (z. B. Bakterientätigkeit) werden laufend Säuren produziert, welche die<br />
Karbonathärte reduzieren. Ein weiterer Karbonathärteverbraucher ist die Filterung über Torf oder<br />
der Einsatz von anderen starken Säuren (z. B. Salz- oder Phosphorsäure). Eine wöchentliche<br />
Kontrolle der Karbonathärte sollte bei Torffilterung durchgeführt werden. Bei Werten unter 4 KH<br />
(im Süßwasser) sollte die Karbonathärte entsprechend angehoben werden. Wir empfehlen dafür die<br />
aqua+KH Puffertabletten von AB <strong>Aqua</strong> <strong>Medic</strong>.<br />
4. Wartung und Pflege<br />
Die richtige CO 2-Menge<br />
Die im Wasser gelöste CO 2-Menge ist vor allem von der Karbonathärte abhängig. Je höher sie ist,<br />
um so mehr CO 2-Gas ist gelöst – bei gleichem pH-Wert. Die Schädlichkeitsgrenze der CO 2-<br />
Konzentration ist ebenfalls an die Karbonathärte gekoppelt.<br />
Damit die Calcium- und Magnesiumionen (das sind die, in Verbindung mit CO 2-Gas,<br />
Karbonathärtebildner) in Lösung (gelöst) bleiben, ist eine sogenannte freie dazugehörige<br />
Kohlensäure (gelöstes CO 2-Gas) erforderlich. Die freie dazugehörige Kohlensäure (auch<br />
Gleichgewichtskohlensäure genannt) ist die für die Pflanzen wichtige Kohlensäure. Das<br />
Gleichgewicht zwischen Karbonathärtebildner und CO 2 ist im Bereich von pH 7,1 - 7,4 bei<br />
Süßwasser (für Meerwasser pH 8,1 - 8,4) gegeben. Die CO 2-Menge ist in diesem Bereich für Fische<br />
nicht gefährlich, gleichgültig, wie hoch die Karbonathärte ist. Die Pflanzen verbrauchen die<br />
Gleichgewichtskohlensäure bei der Assimilation (Photosynthese). Wird sie nicht laufend ergänzt, so<br />
kommt es zu Ausfällungen der Karbonathärtebildner (sogenannte biogene Entkalkung). Das sollte<br />
unbedingt vermieden werden.<br />
Das AB <strong>Aqua</strong> <strong>Medic</strong> CO 2-complet gleicht diesen Verlust aus.<br />
Es ist wichtig, nur das verbrauchte CO 2 zu ersetzen und nicht, weil man meint, >>viel hilft viel
6<br />
<strong>reactor</strong> <strong>1000</strong><br />
Operation Manual GB<br />
The <strong>reactor</strong> <strong>1000</strong> has been developed for the fertilization of fresh water and marine aquaria<br />
Carbondioxide.<br />
The unit has been especially designed for external use, outside the aquarium.<br />
Read and follow all instructions in this <strong>manual</strong> carefully so the <strong>reactor</strong> <strong>1000</strong> will run safely and<br />
trouble-free.<br />
GmbH<br />
Gewerbepark 24, D- 49143 Bissendorf, Germany<br />
___________________________________________________________________
1. Parts of the <strong>reactor</strong><br />
Fig. 1: <strong>reactor</strong> <strong>1000</strong><br />
1. Reactor housing filled with Bactoballs<br />
2. Water inlet<br />
3. CO2–inlet<br />
4. Vent connection incl. stop cock<br />
5. Holding clamps (2 pcs.)<br />
6. Holder for fixing at the aquarium<br />
7. Holding plate<br />
8. Water outlet<br />
9. 0-ring at the water inlet and outlet<br />
7<br />
6<br />
5<br />
4<br />
8<br />
2<br />
9<br />
1<br />
7<br />
3
2. Set Up/Installation<br />
The <strong>reactor</strong> <strong>1000</strong> has two hose connections for 16/18 mm hose and may be used externally or<br />
internally.<br />
- Mounting inside the aquarium:<br />
The included holding system allows easy fixing of the <strong>reactor</strong> at or inside of the aquarium. The<br />
holder is mounted on a vertical or horizontal glass stripe and secured by 2 screws.<br />
- Mounting outside the aquarium:<br />
The <strong>reactor</strong> <strong>1000</strong> may be mounted at a wall or inside the aquarium cabinet. Put a piece of<br />
plywood behind the holding plate and screw the plate directly to the wall or aquarium cabinet. If<br />
the <strong>reactor</strong> <strong>1000</strong> is used externally, make sure that both water connections are tightened and the<br />
O-rings (9) are correctly mounted.<br />
Now, both holding clamps (7) are mounted and the <strong>reactor</strong> <strong>1000</strong> is pressed into the clamps.<br />
Water inlet: The water inlet is connected to the upper hose connection of the <strong>reactor</strong> <strong>1000</strong> (2).<br />
For the water supply, a separate pump (min. 1,000 l/hr , 250 gph) or the water outlet of a canister<br />
filter may be used. A stronger circulation improves the solution of the carbon dioxide. If the<br />
circulation pump is too strong, the <strong>reactor</strong> can be mounted in a bypass.<br />
Water back flow: The lower connecting piece of the <strong>reactor</strong> <strong>1000</strong> will be connected with a hose<br />
12/16 mm, back to the aquarium.<br />
The CO2 is connected to the pressure fitting (3): Make sure, that a non-return valve is mounted<br />
between the <strong>reactor</strong> and the bubble-counter of the CO2-unit. The CO2 is directed downwards inside<br />
the <strong>reactor</strong> with a hose. By this counter-current flow, the dissolving of gas is optimized. The<br />
Bactoballs give an extra turbulence.<br />
Ventilation: The air in the <strong>reactor</strong> can be removed by the valve (4) during starting. Also the false<br />
gas which can accumulate in the <strong>reactor</strong> during operation, can be absorbed by opening the tap for<br />
a short time.<br />
Please take always care that the hoses do not bend.<br />
Technical Data<br />
Unit <strong>reactor</strong> <strong>1000</strong> Art.-No: 71113<br />
Water connection port: 12/16 mm<br />
CO2-connection: 6/4 mm<br />
Water flow: min 1.000 l/h<br />
Set up: internally or externally<br />
3. Appliance/Setting<br />
A pressure regulator has to be installed onto the CO2 store bottle before the CO2 <strong>reactor</strong> can be<br />
set up.<br />
Please read the operation <strong>manual</strong> relating to this device carefully. We recommend the pressure<br />
regulator regular of our CO2 program.<br />
After having installed the pressure regulator and the CO2 <strong>reactor</strong> as stipulated, the setting up of<br />
the CO2 <strong>reactor</strong> can be started.<br />
1. Switch on the circulation pump for the water flow.<br />
2. Open the main valve of the CO2 bottle.<br />
3. Fix the working pressure on the pressure regulator to 1 – 2 bar. The working pressure of the<br />
regular is fixed to 1,5 bar.<br />
4. Open the fine tuning valve of the pressure regulator slowly. When doing so, control the outgoing<br />
CO2 bubbles of the bubble-counter.<br />
5. At first, fix 15 bubbles per minute.<br />
6. The CO2 gas flows into the <strong>reactor</strong> and is absorbed by the running water.<br />
8
Please always observe the pH-value and amend the quantity of the bubbles according to demand.<br />
Advice: We recommend the AB <strong>Aqua</strong> <strong>Medic</strong> bubble-counter with integrated non-return valve of our<br />
CO2 program.<br />
1<br />
2<br />
3<br />
5<br />
High Prog<br />
Low<br />
pH Computer<br />
6<br />
7.25<br />
CAL CAL<br />
pH 4 pH7<br />
11<br />
Hig h<br />
L ow<br />
Ou t<br />
4<br />
12<br />
10<br />
Fig. 2: <strong>reactor</strong> <strong>1000</strong> on aquarium with automatic CO2 control<br />
1. CO2 pressure gas bottle station<br />
2. Pressure regulator regular<br />
3. Solenoid valve<br />
4. pH-Computer<br />
5. Adaptor<br />
6. Bubble-counter with non-return valve<br />
7<br />
8<br />
7. <strong>reactor</strong> <strong>1000</strong><br />
8. pH electrode<br />
9. <strong>Aqua</strong>rium<br />
10. Ventilation<br />
11. Water inlet to the <strong>reactor</strong> <strong>1000</strong><br />
12. Outlet of water to the aquarium<br />
Fig. 2 shows the <strong>reactor</strong> <strong>1000</strong> in exterior fixing together with a complete CO2 supply and<br />
controlling by <strong>Aqua</strong> <strong>Medic</strong>. The water is led into the <strong>reactor</strong> coming from the exterior filter (not<br />
shown). The pH-Computer measures the pH-value in the aquarium and switches on the CO2 supply<br />
via the solenoid valve according to demand.<br />
This way, one can keep a constant pH-value in the aquarium (e.g .pH 6,5 - 6,8) in plant<br />
aquariums. Nevertheless, the number of bubbles on the fine needle valve of the pressure regulator<br />
is not to be fixed on too high values. The risk is given that the pH-value in the aquarium decreases<br />
too much when the solenoid valve fails (e. g. blocked by dirt).<br />
Increasing the hardness of carbonate<br />
The carbonate hardness in aquarium water, both fresh and marine water, is to be at 4 – 6<br />
minimum. It is difficult to stabilize the pH-value when it is under the limit. Acids which reduce the<br />
carbonate hardness are permanently produced by biological procedures (e. g. germ reaction).<br />
Another carbonate hardness consumer is the filtering over peat or the setting in of other hard<br />
acids. A weekly control of the carbonate hardness is to be executed in case of peat filtering. If the<br />
value is under 4 KH (in fresh water) the carbonate hardness is to be increased. Therefore, we<br />
recommend the aqua+KH tablets by AB <strong>Aqua</strong> <strong>Medic</strong>.<br />
9<br />
9
4. Maintenance and care<br />
The quantity of CO2 dissolved in the water depends on the carbonate hardness. The higher it is,<br />
the more CO2 gas is dissolved – at the same pH-value. The harmfullness limit of the CO2<br />
concentration also depends on the carbonate hardness.<br />
A so-called free carbonic acid (dissolved CO2 gas) belonging to it is necessary in order that the<br />
calcium and magnesium ions (those which build carbonate hardness in connection with CO2 gas)<br />
keep being dissolved. The free carbonic acid belonging to it (also called equivalent carbonic acid) is<br />
important for the plants. The equivalence between carbonate hardness builder and CO2 is<br />
stipulated from pH 7,1 – 7,4 for fresh water (8,1 – 8,4 for marine water). This quantity of CO2 is<br />
not dangerous for fish, it does not depend on the carbonate hardness. The plants consume the<br />
equivalent carbonic acid at the assimilation (photosynthesis). If it is not permanently<br />
supplemented, the carbonate hardness builder can break down (so-called biogenetic<br />
decalcification). This should be avoided in any case.<br />
The CO2 system compensates for this loss. It is very important to replace only the CO2 and not to<br />
supply the aquarium with more CO2. For a balanced ambience it is important to get the calcium<br />
carbonic acid equivalence. The plants only receive enough CO2 (carbonic acid) when this<br />
equivalence is maintained.<br />
5. Warranty<br />
Should any defect in material or workmanship be found within 12 months of the date of purchase<br />
AB <strong>Aqua</strong> <strong>Medic</strong> GmbH undertakes to repair or, at our option, replace the defective part free of<br />
charge – always provided the product has been installed correctly, is used for the purpose that was<br />
intended by us, is used in accordance with the operating instructions and is returned to us carriage<br />
paid. The warranty term is not applicable on the all consumable products.<br />
Proof of Purchase is required by presentation of an original invoice or receipt indicating the dealer’s<br />
name, the model number and date of purchase, or a Guarantee Card if appropriate. This warranty<br />
may not apply if any model or production number has been altered, deleted or removed,<br />
unauthorised persons or organisations have executed repairs, modifications or alterations, or<br />
damage is caused by accident, misuse or neglect.<br />
We regret we are unable to accept any liability for any consequential loss.<br />
Please note that the product is not defective under the terms of this warranty where the product,<br />
or any of its component parts, was not originally designed and / or manufactured for the market in<br />
which it is used. These statements do not affect your statutory rights as a customer.<br />
If your AB <strong>Aqua</strong> <strong>Medic</strong> GmbH product does not appear to be working correctly or appears to be<br />
defective please contact your dealer in the first instance.<br />
Before calling your dealer please ensure you have read and understood the operating instructions.<br />
If you have any questions your dealer cannot answer please contact us.<br />
Our policy is one of continual technical improvement and we reserve the right to modify and adjust<br />
the specification of our products without prior notification.<br />
10<br />
AB AQUA MEDIC GmbH - Gewerbepark 24 - 49143 Bissendorf/Germany<br />
- Technical changes reserved -
![Katalog 2013 D [High 25 MB] .pdf - Aqua Medic](https://img.yumpu.com/21885102/1/184x260/katalog-2013-d-high-25-mb-pdf-aqua-medic.jpg?quality=85)