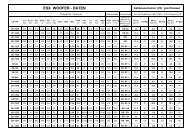
ESX Signum SC1000 Powercap - Audio Design GmbH
ESX Signum SC1000 Powercap - Audio Design GmbH
ESX Signum SC1000 Powercap - Audio Design GmbH

Sie wollen auch ein ePaper? Erhöhen Sie die Reichweite Ihrer Titel.
YUMPU macht aus Druck-PDFs automatisch weboptimierte ePaper, die Google liebt.
DISCHARGING PROCESS<br />
If the capacior will be de-installated you need to discharge it completely. To<br />
discharge the capacitor, remove the wire at the ”+” terminal of the capacitor.<br />
Keep the ground terminal “-” connected. Then bridgeover the ”-”pole and ”+”pole<br />
of the capacitor with the supplied resistor.<br />
The discharging process could last some minutes.<br />
It is recommended to use a gripper during this procedure, because the resistor<br />
may get very hot.<br />
WARNING:<br />
Never discharge the capacitor without the supplied resistor.<br />
Never discharge the capacitor with bypassing the terminals (short circuit).<br />
The capacitor may get damaged or explode.<br />
”–” Ground<br />
Terminal<br />
Resitor<br />
VOLTMETER ADJUSTMENT<br />
The adjustment is already done by the factory, but can be redone if necessary.<br />
By using additional capacitors, various indicated values could be occured. This<br />
can be adjusted by the potentiometer.<br />
Follow these instructions:<br />
1.) Measure the actual operating voltage on the ”+” und ”–”pole of the capacitor<br />
by using an appropriate multimeter.<br />
2.) Remove the plexi-cover of the capacitor and adjust the value with the<br />
potetiometer by using a appropriate screwdriver to the same value, you have<br />
measured before.<br />
3.) Ensure while removing the cover, not to short the terminals.<br />
4.) Or assign your car audio retailer.<br />
15