
Sie wollen auch ein ePaper? Erhöhen Sie die Reichweite Ihrer Titel.
YUMPU macht aus Druck-PDFs automatisch weboptimierte ePaper, die Google liebt.
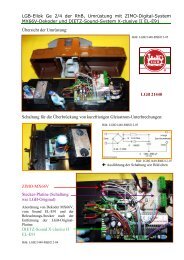
<strong>LGB</strong> <strong>20010</strong> <strong>Bahnmeister</strong>-<strong>Draisine</strong><br />
<strong>LGB</strong> <strong>20010</strong> <strong>Bahnmeister</strong>-<strong>Draisine</strong><br />
Die hier beschriebenen Änderungen erfolgen auf eigenes Risiko !<br />
Home Gartenbahn Umbauten<br />
Inhalt<br />
Decoder-Einbau<br />
Beleuchtung<br />
Decoder-Einbau<br />
http://www.beathis.ch/lgb/<strong>20010</strong>/<strong>20010</strong>.html<br />
18/09/09 8:00 AM<br />
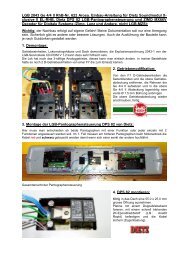
Die Demontage der <strong>20010</strong> gestaltet sich relativ einfach. Zuerst entfernte ich die rote<br />
Kiste auf der <strong>Draisine</strong> (2 Schrauben). Der Motor kann jetzt herausgezogen werden.<br />
Die beiden Anschlussklemmen am Motor zog ich vorsichtig mit einer spitzigen<br />
Zange ab. Nun löste ich die beiden Schrauben auf der Unterseite und zog das<br />
Bodengehäuse vorsichtig weg. Die beiden Achsen entfernte ich ebenfalls.<br />
Auf den 4 Stromabnehmern ist eine kleine Platine aufgeklippt. Diese entfernte ich,<br />
um darauf den Decoder zu montieren.<br />
Als Decoder für die <strong>Draisine</strong> verwendete ich den DH142 von Digitrax. Er verkraftet<br />
1.5A Strom im Dauerbetrieb und hat eine Lastregelung. Die Bauform ist kompakt<br />
und die Kabel werden über einen speziellen Stecker direkt am Decoder<br />
angeschlossen.<br />
Den Decoder klemmte ich mit einem kleinen Kabelbinder direkt auf die Platine der<br />
Stromabnahme. Die beiden Kabel für die Gleisverbindung lötete ich direkt auf der<br />
Platine an.<br />
Der Zusammenbau erfolgte in der umgekehrten Reihenfolge, wie die Demontage.<br />
Page 1 of 2
<strong>LGB</strong> <strong>20010</strong> <strong>Bahnmeister</strong>-<strong>Draisine</strong><br />
Zum Anfang<br />
Beleuchtung<br />
Zum Anfang<br />
© 2000 by This Manhart - Letzte Änderung: 1.6.2000<br />
http://www.beathis.ch/lgb/<strong>20010</strong>/<strong>20010</strong>.html<br />
Die beiden Klemmen am Motor lötete ich an die entsprechenden Kabel des<br />
Decoders.<br />
18/09/09 8:00 AM<br />
Bei der Konfigurierung des Decoders änderte ich einige CVs, die mit der<br />
Lastregelung zusammenhängen (CV55 = 0x30, CV56 = 0x20, CV57 = 0x03 Hex-<br />
Werte !!). Mit diesen Werten fährt die <strong>Draisine</strong> zuverlässig an und rollt mit mittlerer<br />
Geschwindigkeit ziemlich gleichmässig. Im unteren Geschwindigkeitsbereich ruckelt<br />
sie leider, doch liegt dort das Problem hauptsächlich in der Hebelmechanik.<br />
Bedingt durch den kurzen Achsabstand und das geringe Gewicht der <strong>Draisine</strong>,<br />
hatte ich immer wieder das Problem, dass sie nicht losfuhr. Ich überlegte mir, dass<br />
eine kleine Laterne hilfreich wäre, da man sofort sehen könnte, ob die <strong>Draisine</strong><br />
Strom hat oder nicht.<br />
In meiner <strong>LGB</strong>-Wühlkiste fand ich noch eine US-Schlusslaterne (68332). Nicht<br />
ganz passend, ich weiss ! Die Lampe sitzt in einer kleinen Fassung und die<br />
Laterne wird daraufgesteckt.<br />
Ich bohrte ein Loch (Durchmesser für Lampenfassung) genau in der Mitte über den<br />
Achsen in den <strong>Draisine</strong>nboden. Die Fassung steckte ich in dieses Loch und fixierte<br />
sie von unten mit etwas Araldit. Um die genaue Höhe der Fassung zu erwischen,<br />
steckte ich die Laterne oben drauf und wartete, bis der Araldit trocken war. Die<br />
beiden Kabel führte ich ins Innere der <strong>Draisine</strong>, wobei man ein Loch in die eine<br />
Wand und eine Aussparung in eine andere Wand machen muss. Die Lampe<br />
schloss ich direkt an den Anschluss "Lampe vorn" des Decoders an.<br />
Ich setzte dann CV61 auf den Wert 0x01 (Hex). Dies bewirkt, dass der Anschluss<br />
"Lampe vorn" als Funktionsausgang "F0" (Licht) nur über die Funktionstaste<br />
gesteuert wird und nicht abhängig von der Fahrtrichtung der <strong>Draisine</strong> ist.<br />
Jetzt weiss ich dank der Lampe auf der <strong>Draisine</strong> sofort, ob das Fahrzeug<br />
überhaupt Strom hat oder nicht.<br />
Page 2 of 2
<strong>LGB</strong> <strong>20010</strong> Track Inspector's Handcar<br />
<strong>LGB</strong> <strong>20010</strong> Track Inspector's Handcar<br />
All modifications described herein are done at your own risk !<br />
Home Garden Railway Digital Conversions<br />
Contents<br />
Decoder Installation<br />
Lighting<br />
Decoder Installation<br />
http://www.beathis.ch/lgb/<strong>20010</strong>/<strong>20010</strong>_e.html<br />
18/09/09 7:59 AM<br />
The disassembly of the <strong>20010</strong> is relatively simple. First, I removed the red crate on<br />
the hand trolley (2 screws). The motor can be now pulled out. I then carefully pulled<br />
off the two motor terminals using needle-nose pliers.<br />
Next, I loosened the two screws at the bottom and carefully removed the lower<br />
shell. I also removed the two axles. A small PCB (printed circuit board) is snapped<br />
onto the 4 current collectors. I removed this PCB to mount the decoder on it.<br />
The decoder I used for the hand trolley is the Digitrax DH142. It can handle 1.5A of<br />
current in continuous operation and has back-emf load compensation. The design is<br />
compact and the cables are connected directly to the decoder via a special plug.<br />
I fastened the decoder directly onto the PCB of the current pick-ups using a small<br />
cable strap. The two wires for the track connection were soldered directly to the<br />
PCB.<br />
The assembly takes place in the reverse order of the original disassembly. I<br />
Page 1 of 2
<strong>LGB</strong> <strong>20010</strong> Track Inspector's Handcar<br />
Top<br />
Lighting<br />
Top<br />
Translated by Knut Schartmann<br />
© 2000 by This Manhart - last modification: 23.May 2000<br />
http://www.beathis.ch/lgb/<strong>20010</strong>/<strong>20010</strong>_e.html<br />
soldered the two motor connectors to the appropriate wires of the decoder.<br />
18/09/09 7:59 AM<br />
During programming of the decoder, I changed some of the CVs which control the<br />
back-emf load compensation (CV55 = 0x30, CV56 = 0x20, CV57 = 0x03, all Hex<br />
values!!). With these values the handcar starts reliably and runs at medium speed<br />
quite steadily. Unfortunately, at the lower speed range it's jerky, but this problem is<br />
caused mainly by the lever mechanism<br />
Due to the short wheel base and the low weight of the handcar, I constantly had<br />
the problem that the trolley would not start running. I though that a small lantern<br />
would be useful, since one could see immediately whether the hand trolley had<br />
power or not. In my <strong>LGB</strong> parts box, I found a US caboose lantern (68332). Not<br />
exactly prototypical, I know! The bulb mounts into a small socket and the lantern<br />
fits on top.<br />
I drilled a hole (diameter of the bulb socket) exactly in the center between the<br />
axles in the floor of the hand trolley. I inserted the socket into this hole and<br />
fastened it from below with two-component epoxy (Must be able to fasten brass to<br />
plastic and tolerate some heat). In order to determine the exact height of the<br />
socket, I mounted the lantern and waited for the epoxy to dry. I routed the two<br />
wires to the inside of the hand trolley, where one has to make a hole in one side<br />
and a recess in the other side. I connected the lamp directly to the function output<br />
"light front" of the decoder. Then I programmed CV61 to the value 0x01 (Hex). This<br />
setting causes the "light front" function output "F0" to be controlled by the function<br />
button only and makes the lamp independent of the direction of travel of the<br />
handcar.<br />
With the lamp on the hand trolley, I now know immediately if the vehicle even has<br />
power or not.<br />
Page 2 of 2