The Alessi-Serie - Solarlink GmbH, preiswert und kompetent
The Alessi-Serie - Solarlink GmbH, preiswert und kompetent
The Alessi-Serie - Solarlink GmbH, preiswert und kompetent

Sie wollen auch ein ePaper? Erhöhen Sie die Reichweite Ihrer Titel.
YUMPU macht aus Druck-PDFs automatisch weboptimierte ePaper, die Google liebt.
<strong>The</strong> <strong>Alessi</strong>-<strong>Serie</strong><br />
Pure Sine Wave Inverters<br />
inverter.<br />
This warranty is void if the inverter has suffered any physical damage or alteration, either internally<br />
or externally, and does not cover damage arising from improper use, attempting to operate the<br />
inverter with excessive power consumption requirements, or from use in an unsuitable<br />
environment.<br />
This warranty will not apply where the product has been misused, neglected, improperly installed<br />
or repaired by anyone other than <strong>Alessi</strong> Center. <strong>Alessi</strong> Center is not responsible for any loss,<br />
damage or costs arising from improper use, use in an unsuitable environment, improper installing<br />
of the inverter and inverter malfunctioning.<br />
5. MAINTENANCE / FUSE REPLACEMENT<br />
5.1 Maintenance<br />
Your <strong>Alessi</strong> inverter does not need any specific maintenance besides checking all DC and AC<br />
connections at least once a year. Check if all nuts and bolds in the electrical system are still<br />
tightened sufficiently and if all cables are in good condition. Keep the inverter reasonably clean and<br />
remove eventual dust/cloth gathered at the fan in- and outlets to avoid extra airflow obstruction.<br />
5.2 Replacing fuses<br />
<strong>The</strong> inverter is equipped with two internal fuses, one on the DC side and one on the AC side.<br />
<strong>The</strong>se fuses will only blow in case of serious malfunction and/or external inverter abuse like<br />
reverse polarity of battery connections. Both fuses can be accessed by removing the hood of the<br />
enclosure as described below.<br />
CAUTION<br />
BEFORE OPENING THE INVERTER TO REPLACE A FUSE, ALWAYS<br />
DISCONNECT THE BATTERY FROM THE INVERTER FOLLOWED BY<br />
DISCHARGING THE INTERNAL CAPACITORS BY PUSHING THE POWER<br />
SWITCH (OF THE DISCONNECTED INVERTER) IN THE 'I' POSITION FOR 10<br />
SECONDS.<br />
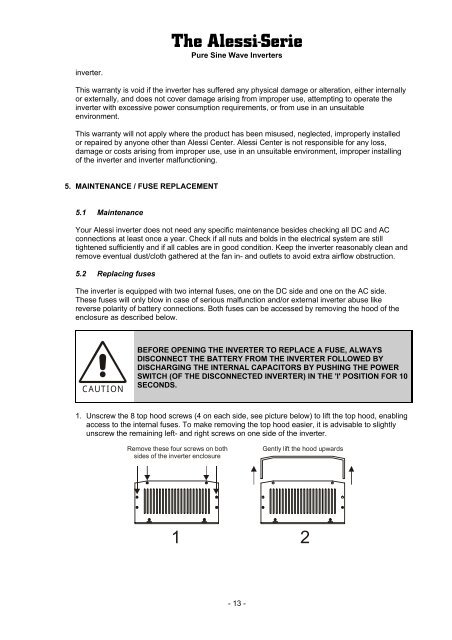
1. Unscrew the 8 top hood screws (4 on each side, see picture below) to lift the top hood, enabling<br />
access to the internal fuses. To make removing the top hood easier, it is advisable to slightly<br />
unscrew the remaining left- and right screws on one side of the inverter.<br />
Remove these four screws on both<br />
sides of the inverter enclosure<br />
Gently lift the hood upwards<br />
1 2<br />
- 13 -