Dynaudio SUB 300/500 - Studio 22
Dynaudio SUB 300/500 - Studio 22
Dynaudio SUB 300/500 - Studio 22

Erfolgreiche ePaper selbst erstellen
Machen Sie aus Ihren PDF Publikationen ein blätterbares Flipbook mit unserer einzigartigen Google optimierten e-Paper Software.
<strong>SUB</strong><br />
Owners Manual / Bedienungsanleitung<br />
Home Systems<br />
| Professional | Automotive
Contents<br />
<strong>Dynaudio</strong> <strong>SUB</strong> <strong>300</strong><br />
Dear Music Lover..................................................................................................... 1<br />
Important Safety Instructions................................................................................. 2<br />
Safety signs......................................................................................................... 3<br />
Signal words........................................................................................................ 3<br />
About this operating manual .................................................................................. 4<br />
Used signs and symbols ..................................................................................... 4<br />
Unpacking ................................................................................................................ 5<br />
Grille.................................................................................................................... 5<br />
Controls and connections ...................................................................................... 6<br />
Connecting the subwoofer ..................................................................................... 7<br />
Master and Slave mode ...................................................................................... 7<br />
Connecting a single subwoofer ........................................................................... 7<br />
Connecting multiple subwoofers ......................................................................... 8<br />
Connecting using the XLR sockets ..................................................................... 8<br />
Operating the subwoofer ........................................................................................ 9<br />
Fitting the remote control battery......................................................................... 9<br />
Switching on/off................................................................................................. 10<br />
Changing the volume level (LEVEL) ................................................................. 12<br />
Setting the cross-over frequency (CROSSOVER FREQUENCY)..................... 12<br />
Activating the bass extension (EXT) ................................................................. 13<br />
Setting the phase (PHASE)............................................................................... 13<br />
Storing and Recalling Presets (PRESET) ......................................................... 14<br />
Positioning the subwoofer.................................................................................... 15<br />
Room modes..................................................................................................... 15<br />
Corner placement.............................................................................................. 16<br />
Next to wall, away from corner.......................................................................... 16<br />
Free standing, away from wall and corner ........................................................ 16<br />
Multiple subwoofers........................................................................................... 16<br />
Finding the correct settings ................................................................................. 17<br />
Volume level...................................................................................................... 17<br />
Cross-over frequencies ..................................................................................... 18<br />
Phase ................................................................................................................ 20<br />
Troubleshooting .................................................................................................... 21<br />
Changing the fuse ................................................................................................. 23<br />
Factory default settings ........................................................................................ 23<br />
Technical specifications ....................................................................................... 24<br />
Warranty ................................................................................................................. 25<br />
<strong>Dynaudio</strong> <strong>SUB</strong> <strong>300</strong>/<strong>500</strong>
Inhaltsverzeichnis<br />
<strong>Dynaudio</strong> <strong>SUB</strong> <strong>500</strong><br />
Vorwort................................................................................................................... 27<br />
Sicherheitshinweise.............................................................................................. 28<br />
Bestimmungsgemäßer Gebrauch ..................................................................... 28<br />
Service .............................................................................................................. 28<br />
Zu dieser Anleitung............................................................................................... 29<br />
Verwendete Zeichen und Symbole ................................................................... 29<br />
Auspacken ............................................................................................................. 30<br />
Stoffabdeckung ................................................................................................. 30<br />
Anschluss- und Bedienelemente......................................................................... 31<br />
Den Subwoofer anschließen ................................................................................ 32<br />
Master- und Slave-Einstellung .......................................................................... 32<br />
Einen einzelnen Subwoofer anschließen.......................................................... 32<br />
Mehrere Subwoofer anschließen ...................................................................... 33<br />
Verbindungen mit XLR-Kabel............................................................................ 33<br />
Den Subwoofer bedienen ..................................................................................... 34<br />
Batterie der Fernbedienung einlegen/wechseln ............................................... 34<br />
Den Subwoofer ein-/ausschalten ...................................................................... 34<br />
Die Lautstärke ändern (LEVEL) ........................................................................ 36<br />
Die Übergabefrequenz wählen (CROSSOVER FREQUENCY)........................ 37<br />
Die Tiefbass-Erweiterung aktivieren (EXT ON/OFF) ........................................ 37<br />
Die Phasendrehung einstellen (PHASE)........................................................... 38<br />
Voreinstellungen speichern und abrufen (PRESET)......................................... 39<br />
Den Subwoofer positionieren............................................................................... 40<br />
Raum-Moden .................................................................................................... 40<br />
Eckaufstellung................................................................................................... 41<br />
Wandaufstellung mit Abstand zur Ecke ............................................................ 41<br />
Freistehend, mit Abstand zur Wand und zur Ecke............................................ 41<br />
Mehrere Subwoofer verwenden........................................................................ 41<br />
Ideale Einstellungen finden.................................................................................. 42<br />
Lautstärke ......................................................................................................... 42<br />
Übergangsfrequenzen....................................................................................... 43<br />
Phase................................................................................................................ 45<br />
Fehlersuche ........................................................................................................... 46<br />
Sicherung ersetzen ............................................................................................... 48<br />
Auf Werkseinstellungen zurücksetzen................................................................ 48<br />
Technische Daten.................................................................................................. 49<br />
Garantie.................................................................................................................. 50<br />
<strong>Dynaudio</strong> <strong>SUB</strong> <strong>300</strong>/<strong>500</strong>
Notes:<br />
<strong>Dynaudio</strong> <strong>SUB</strong> <strong>300</strong>/<strong>500</strong>
English<br />
Dear Music Lover<br />
Dear Music Lover,<br />
Thank you for purchasing this <strong>Dynaudio</strong> subwoofer. With it, you have<br />
chosen for the latest in audio technology and engineering, culminating<br />
into the finest in audio reproduction.<br />
<strong>Dynaudio</strong> is one of very few companies who can realize such<br />
loudspeaker concepts through it's own in-house development and<br />
production facilities. These facilities are so advanced and the quality<br />
control is so strict that <strong>Dynaudio</strong> is likely the only specialty audio company<br />
to have exceeded ISO 9000 and earned QS 9000 certification. Each<br />
Subwoofer model is constructed by <strong>Dynaudio</strong>'s master craftsmen in<br />
Denmark to these high standards of quality.<br />
With their dynamic, accurate performance and ease of integration into<br />
even elaborate systems, <strong>Dynaudio</strong> subwoofers are ideally suited to<br />
obtain maximum enjoyment from High-Resolution formats such as DVD-<br />
Audio and SACD. These characteristics in combination with sustained<br />
high volume level capabilities make <strong>Dynaudio</strong> subwoofers also an ideal<br />
choice for demanding Home Theater set-ups.<br />
In order to obtain the best possible performance from your <strong>Dynaudio</strong><br />
subwoofer, please carefully read and follow the instructions.<br />
We wish you many musical and exciting moments with your subwoofer,<br />
<strong>Dynaudio</strong><br />
<strong>Dynaudio</strong> <strong>SUB</strong> <strong>300</strong>/<strong>500</strong> 1
Before Operation<br />
Before Operation<br />
Important Safety Instructions<br />
1. Read these instructions.<br />
2. Keep these instructions.<br />
3. Heed all warnings.<br />
4. Follow all instructions.<br />
5. Do not use this apparatus near water.<br />
6. Clean only with dry cloth.<br />
7. Do not block any ventilation openings. Install in accordance with the<br />
manufacturer's instructions.<br />
8. Do not install near any heat sources such as radiators, heat registers, stoves,<br />
or other apparatus (including amplifiers) that produce heat.<br />
9. Do not defeat the safety purpose of the polarized or grounding-type plug. A<br />
polarized plug has two blades with one wider than the other. A grounding type<br />
plug has two blades and a third grounding prong. The wide blade or the third<br />
prong are provided for your safety. If the provided plug does not fit into your<br />
outlet, consult an electrician for replacement of the obsolete outlet.<br />
10.Protect the power cord from being walked on or pinched particularly at plugs,<br />
convenience receptacles, and the point where they exit from the apparatus.<br />
11.Only use attachments/accessories specified by the manufacturer.<br />
12.Use only with the cart, stand, tripod, bracket, or table specified by the<br />
manufacturer, or sold with the apparatus. When a cart is used use caution<br />
when moving the cart/apparatus combination to avoid injury from tip-over.<br />
13.Unplug this apparatus during lightning storms or when unused for long periods<br />
of time.<br />
14.Refer all servicing to qualified service personnel. Servicing is required when<br />
the apparatus has been damaged in any way, such as power-supply cord or<br />
plug is damaged, liquid has been spilled or objects have fallen into the<br />
apparatus, the apparatus has been exposed to rain or moisture, does not<br />
operate normally, or has been dropped.<br />
15.WARNING: To reduce the risk of fire or electric shock, this apparatus should<br />
not be exposed to rain or moisture and objects filled with liquids, such as<br />
vases, should not be placed on this apparatus.<br />
16.To completely disconnect this equipment from the mains, disconnect the power<br />
supply cord plug from the receptacle.<br />
17.The mains plug of the power supply cord shall remain readily operable.<br />
2 <strong>Dynaudio</strong> <strong>SUB</strong> <strong>300</strong>/<strong>500</strong>
Before Operation<br />
WARNING<br />
RISK OF ELECTRIC SHOCK!<br />
DO NOT OPEN!<br />
To reduce the risk of electric shock, do not remove<br />
the rear panel and do not expose the apparatus to<br />
rain or moisture. No user serviceable parts inside.<br />
Refer servicing to qualified personnel.<br />
Safety signs<br />
The exclamation point within an equilateral triangle is intended to alert the user to the<br />
presence of important operating and maintenance (servicing) instructions in the<br />
literature accompanying the product.<br />
The lightning flash with arrowhead symbol within an equilateral triangle is intended to<br />
alert the user to the presence of uninsulated “dangerous voltage” within the product's<br />
enclosure that may be of sufficient magnitude to constitute a risk of electric shock to<br />
persons.<br />
Signal words<br />
CAUTION<br />
WARNING<br />
Indicates in combination with a safety sign a potentially hazardous situation which, if<br />
not avoided, could result in minor or moderate injury or damage to equipment.<br />
Indicates in combination with a safety sign a potentially hazardous situation which, if<br />
not avoided, could result in death or serious injury.<br />
<strong>Dynaudio</strong> <strong>SUB</strong> <strong>300</strong>/<strong>500</strong> 3
Before Operation<br />
About this operating manual<br />
Used signs and symbols<br />
In this operating manual following signs and symbols are used:<br />
Note<br />
<br />
1.<br />
2.<br />
3.<br />
italics<br />
bold-grey<br />
Additional information is provided, which is important to fully understand the<br />
<strong>SUB</strong> <strong>300</strong>/<strong>500</strong> and how to operate it.<br />
The arrow will identify steps to be performed. Please follow the instructions carefully.<br />
Multiple steps that should be performed consecutively are numbered. Please follow<br />
these instructions carefully.<br />
The result of a step is printed in italics. This may help you verify the success of a<br />
step.<br />
Controls are printed in bold-grey type face.<br />
4 <strong>Dynaudio</strong> <strong>SUB</strong> <strong>300</strong>/<strong>500</strong>
Before Operation<br />
Unpacking<br />
To find the suitable position for the <strong>SUB</strong> <strong>300</strong>/<strong>500</strong> in your listening room, please read<br />
the chapter “Positioning the subwoofer” on page 15.<br />
1.<br />
2.<br />
3.<br />
Unpacking the subwoofer<br />
1. Unpack the subwoofer on a clean, even and soft area; floor carpeting is very<br />
suitable.<br />
2. The packaging should be opened from the top. Remove all accessories that<br />
come packed with the subwoofer (such as AC power cord and grille). Do not<br />
remove the top part of the protective material.<br />
3. With the protective material still in place but with accessories removed, carefully<br />
tilt the packaging on its side and tilt again to turn it upside-down. Ensure that no<br />
part of the top-cover is obstructing the opening at the top.<br />
4. The outer packaging can now be lifted away from the subwoofer itself. Remove<br />
the protective material that now is on top. Through the polyethylene bag you can<br />
now see the underside of the subwoofer.<br />
5. Open the plastic bag and remove such from around the base of the subwoofer.<br />
6. Again, carefully tilt the subwoofer on its side and again to turn it onto its feet. Note<br />
that the top part of the protective material will now come off easily so ensure that<br />
the subwoofer doesn’t drop or slide away in the process.<br />
Check that the contents are complete:<br />
• Subwoofer: The factory-set power requirements (refer to label on rear of<br />
subwoofer) should correspond for the region where the subwoofer was purchased.<br />
Refer also to “Important Safety Instructions” on page 2.<br />
• Front baffle grille.<br />
• AC mains lead. The supplied lead should be suitable for the region where the<br />
subwoofer was purchased.<br />
• Owners Manual.<br />
Grille<br />
The subwoofer can be operated without the grille. However, it is recommended that<br />
the grille is mounted during normal use to help prevent accidental damage or dirt<br />
settling on the cone of the loudspeaker. With subwoofers, the influence of the grille on<br />
the sound is virtually negligible.<br />
NOTICE<br />
• Be careful when mounting the grille not to touch the cone of the loudspeaker itself.<br />
To fit the grille:<br />
Holding it at a 45° angle vertically, align the bottom magnets of the grille with the<br />
bolts on the loudspeaker‘s baffle.<br />
Gently straighten up the grille until the top magnets of the grille meet the top bolts<br />
of the baffle.<br />
The magnets will click into place. The grille is now attached to the baffle.<br />
To remove the grille:<br />
Removing the grille is the same procedure in reverse.<br />
<strong>Dynaudio</strong> <strong>SUB</strong> <strong>300</strong>/<strong>500</strong> 5
Before Operation<br />
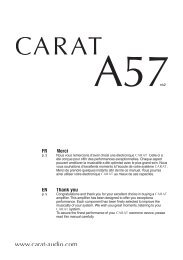
Controls and connections<br />
2<br />
4<br />
6<br />
1<br />
LEVEL<br />
Remote Eye<br />
D NAUDIO<br />
<strong>Dynaudio</strong> A/S - Skanderborg - Denmark<br />
Master<br />
Store<br />
Input<br />
Preset<br />
Function<br />
Settings<br />
Slave<br />
Protect<br />
INPUT<br />
Processed OUT<br />
To Slave<br />
CAUTION<br />
To prevent electric shock, do not remove cover.<br />
No user-serviceable parts inside.<br />
Refer service to qualified personnel.<br />
WARNING<br />
To reduce the risk of fire or electric shock,<br />
do not exposure to rain or moisture.<br />
POWER<br />
On<br />
8<br />
CAUTION<br />
RISK OF ELECTRICAL SHOCK<br />
DO NOT OPEN<br />
7<br />
AC IN<br />
POWER<br />
9<br />
3<br />
5<br />
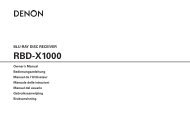
Subwoofer back panel<br />
1 Remote Eye<br />
Infrared receiver.<br />
2 Input Function<br />
Subwoofer operation mode: Master or Slave<br />
• Master: setting if just one subwoofer is used or for first subwoofer if system<br />
consists of multiple subwoofers.<br />
• Slave: setting for second and all following subwoofers.<br />
In Slave mode just the remote control POWER functions are available.<br />
3 Preset Settings<br />
Preset mode selector:<br />
• Store: position when saving presets.<br />
• Protect: position to protect presets from overwriting.<br />
4 INPUT<br />
Input for LFE or full bandwidth signal from processor/receiver.<br />
Connector types: Cinch (top), XLR (below).<br />
5 Processed OUT To Slave<br />
Output to next subwoofer if installed: Cinch (top), XLR (below).<br />
6 POWER<br />
Main power switch to switch the subwoofer manually on (On) and off. When<br />
switched off, the subwoofer can not be switched on by the remote control.<br />
7 AC IN<br />
Mains power input.<br />
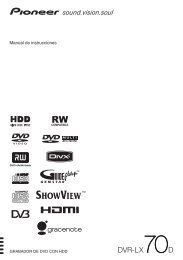
<strong>SUB</strong>WOOFER CONTROL DSC 1<br />
CROSSOVER FREQUENCY Hz<br />
60 80 100 FLAT<br />
13<br />
OFF 0 o 90 o<br />
EXT<br />
PHASE<br />
ON<br />
270 o 180 o<br />
A B C D<br />
PRESET<br />
D NAUDIO<br />
A U T H E N T I C F I D E L I T Y<br />
10<br />
11<br />
12<br />
Remote Control<br />
8 LEVEL<br />
Subwoofer volume level.<br />
9 POWER<br />
Switching the subwoofer on/off manually.<br />
10 CROSSOVER FREQUENCY Hz<br />
Cross-over frequency setting: 60 Hz, 80 Hz, 100 Hz, FLAT.<br />
11 PHASE<br />
Phase setting: phase can be set to 0°, 90°, 180° or 270°.<br />
12 PRESET<br />
Up to four settings can be stored and recalled on demand.<br />
13 EXT<br />
Extension of bass level (EXT = Extended).<br />
6 <strong>Dynaudio</strong> <strong>SUB</strong> <strong>300</strong>/<strong>500</strong>
Before Operation<br />
Connecting the subwoofer<br />
CAUTION<br />
DAMAGE OF DEVICE DUE TO IMPROPER CONNECTION!<br />
Before making any connections to the subwoofer we strongly recommend that<br />
the <strong>SUB</strong> <strong>300</strong>/<strong>500</strong> is disconnected from the mains outlet.<br />
Only switch the subwoofer on (mains power switch to On) after all connections<br />
and set up steps have been properly completed.<br />
NOTICE<br />
• The <strong>Dynaudio</strong> <strong>SUB</strong> <strong>300</strong>/<strong>500</strong> can be controlled by any source provided with a LFE<br />
or preamplifier output. In the operating manual the expression “processor/receiver”<br />
will be used for all these sources.<br />
• In order to avoid interference and noise, we recommend you use quality, well<br />
shielded cables.<br />
Master and Slave mode<br />
The subwoofer can operate in two different modes:<br />
• Master or<br />
• Slave.<br />
If your system consists of multiple subwoofers, it is desirable that all subwoofers<br />
operate with identical settings (LEVEL, CROSSOVER FREQUENCY, PHASE and<br />
EXT).<br />
Using the Master/Slave feature of <strong>Dynaudio</strong> subwoofers this is easily achieved: The<br />
Master subwoofer (connected directly to the subwoofer output of the amplifier or<br />
receiver) will control all Slave subwoofers (connected to the Master subwoofer). Thus,<br />
using a single remote control, all subwoofers in the system will follow all settings from<br />
the Master subwoofer. Note that in Slave mode, only the On/Off and<br />
Auto/Manual selections are available.<br />
LFE/<strong>SUB</strong> Out<br />
Connecting a single subwoofer<br />
1.<br />
Master<br />
Input<br />
Function<br />
Slave<br />
INPUT<br />
2.<br />
Store<br />
Preset<br />
Settings<br />
Protect<br />
Processed OUT<br />
To Slave<br />
1. From the processor or receiver's low-level (not a speaker output) subwoofer<br />
output (often marked as “subwoofer out”, “Sub out” or “LFE”), connect a mono<br />
RCA-to-RCA or XLR-to-XLR cable to the subwoofer's INPUT (for information<br />
about XLR connections refer to “Connecting using the XLR sockets” on page 8).<br />
2. Set the subwoofer's Input Function switch to the Master position. In this position<br />
you will be able to change the settings with the remote control.<br />
After all connections are made, connect the supplied mains lead to the<br />
subwoofer's IEC power socket and a mains outlet.<br />
<strong>Dynaudio</strong> <strong>SUB</strong> <strong>300</strong>/<strong>500</strong> 7
Before Operation<br />
Connecting multiple subwoofers<br />
1.<br />
LFE/<strong>SUB</strong> Out<br />
Master<br />
Input<br />
Function<br />
Slave<br />
INPUT<br />
2.<br />
Store<br />
Preset<br />
Settings<br />
Protect<br />
Processed OUT<br />
To Slave<br />
1. From the processor or receiver's subwoofer output (often marked as “subwoofer<br />
out”, “Sub out” or “LFE”), connect a mono RCA-to-RCA or XLR-to-XLR cable to the<br />
INPUT of the first subwoofer in the daisy chain. This is now the Master subwoofer.<br />
2. Set the Master subwoofer's Input Function switch to the Master position.<br />
3. From the Master subwoofer's Processed Out To Slave output, connect a mono<br />
RCA-to-RCA or XLR-to-XLR cable to the next subwoofer's (Slave) INPUT.<br />
4. Set the Slave subwoofer's Input Function switch to the Slave position.<br />
5. Any subsequent Slave subwoofers can be connected in a daisy chain style, going<br />
from the Processed Out To Slave output to the next Slave subwoofer's INPUT.<br />
After all connections are made, connect the supplied mains leads to the<br />
subwoofer's IEC power sockets and a mains outlet.<br />
Master<br />
Input<br />
Function<br />
Slave<br />
4.<br />
Store<br />
Preset<br />
Settings<br />
Protect<br />
3.<br />
Note<br />
• The Input Function switch of each subwoofer operated as a Slave must be set to<br />
the Slave position.<br />
• When using multiple subwoofers in a Master-Slave setup, it is recommended that<br />
the subwoofers are all the same model.<br />
• If you wish to use multiple subwoofers with full individual control, set the Input<br />
Function switch for all to the Master position. From the Amplifier, processor or<br />
receiver's subwoofer output, use a Y-connector.<br />
INPUT<br />
Processed OUT<br />
To Slave<br />
5.<br />
Connecting using the XLR sockets<br />
NOTICE<br />
• DO NOT use XLR and RCA connections in parallel for the same connection.<br />
A balanced signal connection (XLR sockets) provides a connection that is far less<br />
susceptible to cable signal interference compared to an unbalanced connection (RCA<br />
connection). It is for this reason that XLR and balanced connections are used almost<br />
exclusively in critical and professional installations.<br />
Provided your processor or receiver has a XLR symmetric or balanced output for<br />
subwoofer you should consider using the XLR input on the <strong>Dynaudio</strong> subwoofer. In a<br />
setup with multiple subwoofers you can use the XLR connections between the Master<br />
and Slave subwoofers, even if the connection between the processor or receiver has<br />
been made using the RCA connectors.<br />
Configuring and making connections using XLR is done in the same way as using the<br />
RCA connectors. Please refer to “Connecting a single subwoofer” on page 7 and<br />
“Connecting multiple subwoofers” on page 8.<br />
<strong>Dynaudio</strong> follows the most usual convention for termination of XLR sockets:<br />
• Pin 1 = ground<br />
• Pin 2 = signal +<br />
• Pin 3 = signal –<br />
Note<br />
• Always ensure that all connections are correct: It may be that the source equipment<br />
follows a different way of terminating the XLR sockets or it may be that the XLR<br />
connection cables themselves do not comply. When in doubt, consult your dealer.<br />
8 <strong>Dynaudio</strong> <strong>SUB</strong> <strong>300</strong>/<strong>500</strong>
Operation<br />
Operation<br />
Operating the subwoofer<br />
1.<br />
2.<br />
3.<br />
Fitting the remote control battery<br />
Before the DSC 1 remote control can be used, it needs to be fitted with the battery cell<br />
that comes separately packed with the remote control.<br />
To replace and insert a battery:<br />
1. Release the battery tray by pushing its locking tab on the back of the remote<br />
sideways with your nail and at the same time slide the tray out of the remote<br />
control battery compartment.<br />
2. Remove the exhausted battery and dispose of properly. Insert a new battery in the<br />
battery tray: observe correct polarity (both battery and tray are marked with a “+”).<br />
3. Slide the battery tray into the battery compartment until the locking tab clicks into<br />
place. Make sure it is inserted the correct way up, the tray will slide into place<br />
easily, do not use force.<br />
Note<br />
• The battery will last a considerable time, depending on frequency of use. When you<br />
notice that the subwoofer doesn't always respond or only from a very close range<br />
to commands from the remote control, it is likely the battery is exhausted and will<br />
need replacing.<br />
• Use only CR2025 button cell batteries to replace the original battery with. These<br />
are readily available from most electrical stores.<br />
• Do not leave the remote control in high temperature environments (such as in<br />
direct sunlight) as it can possibly result in deformation of the remote's case.<br />
<strong>Dynaudio</strong> <strong>SUB</strong> <strong>300</strong>/<strong>500</strong> 9
Operation<br />
POWER<br />
On<br />
AC IN<br />
Switching on/off<br />
Once you have ensured yourself that all necessary connections have been made, the<br />
subwoofer can be switched on and used. With the exception of the mains power<br />
switch controlling the subwoofer is done through the DSC 1 remote control.<br />
Switching the subwoofer on<br />
The power switch on the subwoofer's back panel switches the subwoofer completely<br />
off: Set to the off position, the subwoofer will not respond to commands from the<br />
remote control. For normal operation, the switch will always be set to the On position<br />
in most cases.<br />
Switch the subwoofer on with the switch on the back panel.<br />
The Status LED on the front of the subwoofer will light up green.<br />
AUTOMATIC mode for On/Standby<br />
The subwoofer switches to On or Standby automatically. Automatic switching works<br />
by signal-sensing: As long as a music signal is available on the subwoofer's input, it<br />
will remain switched on. After 20 minutes of not sensing any input music signal or<br />
receiving a signal from the remote control, the subwoofer will switch itself<br />
automatically to Standby.<br />
The front LEDs will show the actual mode of the subwoofer:<br />
1 2 3<br />
1. Remote control command receiver<br />
2. Status LED<br />
Green:<br />
Red:<br />
Off:<br />
subwoofer is on<br />
subwoofer is in Standby mode<br />
subwoofer is switched off completely<br />
3. MANUAL mode LED<br />
Green: subwoofer was switched on manually (see following section).<br />
LEVEL<br />
POWER<br />
Manually switch to On or Standby<br />
It is possible to temporarily override automatic switching and to set the subwoofer to<br />
On or Standby mode by pressing the POWER buttons briefly<br />
Briefly pressing the green I button on the remote will switch the subwoofer to On,<br />
even if no signal is present.<br />
Note that if no music signal presents itself within 20 minutes, the subwoofer will<br />
switch back to Standby again.<br />
Briefly pressing the red O button will switch it to Standby.<br />
If the music signal is still present, it will switch to On again immediately.<br />
10 <strong>Dynaudio</strong> <strong>SUB</strong> <strong>300</strong>/<strong>500</strong>
Operation<br />
MANUAL mode for On/Standby<br />
If you prefer the subwoofer to stay switched on or to Standby all the time you can<br />
override the AUTOMATIC mode completely. The MANUAL mode LED indicates to<br />
which state the subwoofer is set: in MANUAL mode the LED is green. Note that in<br />
Standby the LED is always off, regardless if it is in AUTOMATIC or MANUAL mode.<br />
LEVEL<br />
POWER<br />
To switch to permanent On<br />
Press and hold the green I button for 2 seconds.<br />
The MANUAL mode LED will light up green. If the subwoofer was already switched<br />
on, it will remain on; if it was set to Standby, it will switch to On.<br />
LEVEL<br />
POWER<br />
To switch to permanent Standby<br />
Press and hold the red O button for 2 seconds.<br />
If the subwoofer was already switched to Standby, it will remain in Standby; if it<br />
was switched on, it will switch to Standby.<br />
The subwoofer can be switched from Standby either manually or automatically. The<br />
subwoofer is factory set at AUTOMATIC mode, as this will be the most convenient<br />
setting in most cases.<br />
LEVEL<br />
POWER<br />
Back to AUTOMATIC mode:<br />
Press either the I or O button briefly.<br />
Regardless if the subwoofer is switched on or in Standby mode, the subwoofer will<br />
switch back to AUTOMATIC mode again. If the Manual mode LED was lit, it will<br />
extinguish.<br />
Note<br />
• Unlike all other functions on the remote control, the POWER buttons remain active<br />
when the subwoofer is set to Slave mode.<br />
• When powering up, the subwoofer always reverts to the same settings as when it<br />
was switched off. Even if mains power is removed completely for a prolonged<br />
period of time, the last settings will be retained.<br />
<strong>Dynaudio</strong> <strong>SUB</strong> <strong>300</strong>/<strong>500</strong> 11
Operation<br />
LEVEL<br />
POWER<br />
Changing the volume level (LEVEL)<br />
The right volume level is one of the critical aspects of correct and seamless integration<br />
of any subwoofer as part of a speaker system. Please also refer to “Finding the correct<br />
settings” on page 17.<br />
<strong>SUB</strong>WOOFER CONTROL DSC 1<br />
CROSSOVER FREQUENCY Hz<br />
60 80 100 FLAT<br />
OFF 0 o 90 o<br />
EXT<br />
PHASE<br />
ON<br />
270 o 180 o<br />
NOTICE<br />
• Loud volume levels over prolonged periods of time can cause permanent damage<br />
to your hearing!<br />
Changing the level<br />
Press LEVEL + to increase the volume of the subwoofer, release when the desired<br />
level has been reached. Each short, momentary press will increase the volume<br />
level with 1 dB.<br />
Press LEVEL – to decrease the volume of the subwoofer, release when the<br />
desired level has been reached. Each short, momentary press will decrease the<br />
volume level with 1 dB.<br />
A<br />
PRESET<br />
B C<br />
D NAUDIO<br />
A U T H E N T I C F I D E L I T Y<br />
D<br />
Note<br />
• Together with the other settings, the volume level can be stored in one of the four<br />
presets. Refer to “Storing and Recalling Presets (PRESET)” on page 14. Together<br />
with the other settings cross-over frequency and phase we recommend that, once<br />
found, you store the optimum volume level into one of the presets.<br />
• The volume control is disabled when the subwoofer is set to Slave mode (refer also<br />
to “Master and Slave mode” on page 7).<br />
LEVEL<br />
POWER<br />
<strong>SUB</strong>WOOFER CONTROL DSC 1<br />
CROSSOVER FREQUENCY Hz<br />
60 80 100 FLAT<br />
OFF 0 o 90 o<br />
EXT<br />
PHASE<br />
ON<br />
270 o 180 o<br />
A B C D<br />
PRESET<br />
D NAUDIO<br />
A U T H E N T I C F I D E L I T Y<br />
Setting the cross-over frequency (CROSSOVER<br />
FREQUENCY)<br />
The cross-over frequency can be set to four positions: 60 Hz, 80 Hz, 100 Hz and<br />
FLAT. The roll-off slope is 24 dB per octave. In most cases, selecting cross-over<br />
frequencies is done through the bass-management system of your processor or<br />
receiver. In this case, use the FLAT position. Refer to the operating guide of the<br />
processor or receiver how to set the cross-over frequency.<br />
Selecting the cross-over frequency:<br />
Press the button for the desired position. When pressing the button, ensure that<br />
the command from the remote control is received.<br />
Check the operating guide of the other speakers in the system if a specific frequency<br />
is recommended. Please refer to “Finding the correct settings” on page 17 for more<br />
information.<br />
Note<br />
Together with the other settings, the cross-over frequency can be stored in one of the<br />
four presets (refer to “Storing and Recalling Presets (PRESET)” on page 14).<br />
Together with the other settings volume and phase we recommend that, once found,<br />
you store the correct cross-over frequency into one of the presets.<br />
The CROSSOVER FREQUENCY control is disabled when the subwoofer is set to<br />
Slave mode (refer also to “Master and Slave mode” on page 7).<br />
12 <strong>Dynaudio</strong> <strong>SUB</strong> <strong>300</strong>/<strong>500</strong>
Operation<br />
LEVEL<br />
POWER<br />
<strong>SUB</strong>WOOFER CONTROL DSC 1<br />
CROSSOVER FREQUENCY Hz<br />
60 80 100 FLAT<br />
OFF 0 o 90 o<br />
EXT<br />
PHASE<br />
ON<br />
270 o 180 o<br />
A B C D<br />
PRESET<br />
LEVEL<br />
D NAUDIO<br />
A U T H E N T I C F I D E L I T Y<br />
POWER<br />
Activating the bass extension (EXT)<br />
EXT stands for Extension, in this case “Low Frequency Extension”. <strong>Dynaudio</strong><br />
subwoofers allow for deep and accurate bass response even at high levels. In the<br />
EXT OFF mode, the very deepest bass will be mildly filtered; this will allow the<br />
subwoofer to achieve even higher sound pressure levels. Generally speaking, this<br />
setting is best suited for movies and most music. Some movies and high quality,<br />
audiophile recordings can contain extreme low frequencies.<br />
NOTICE<br />
• Loud volume levels over prolonged periods of time can cause permanent damage<br />
to your hearing!<br />
To experience these:<br />
Press the EXT ON button to switch on the low frequency extension .<br />
Note<br />
• Together with the other settings, the EXT status can be stored in one of the four<br />
presets (refer to “Storing and Recalling Presets (PRESET)” on page 14). This way,<br />
you can program EXT ON as part of a setting for “audiophile listening” and program<br />
EXT OFF as part of a setting for “cinema mode” for instance. .<br />
• If you use a turntable, you will get the best results with EXT OFF. Many vinyl<br />
records contain, and the turntable itself will generate, very low frequencies (rumble)<br />
which, with the subwoofer's low frequencies capabilities can otherwise prove<br />
distracting from enjoying the music.<br />
• The EXT mode is disabled when the subwoofer is set to Slave mode (refer also to<br />
“Master and Slave mode” on page 7).<br />
<strong>SUB</strong>WOOFER CONTROL DSC 1<br />
CROSSOVER FREQUENCY Hz<br />
60 80 100 FLAT<br />
Setting the phase (PHASE)<br />
The phase setting of the subwoofer has been factory set at 0° which in many cases<br />
will be the appropriate setting (for more information about the phase refer to “Phase”<br />
on page 20).<br />
To set the phase<br />
Press the 0°, 90°, 180° or 270° button to select the desired phase setting.<br />
ON<br />
A<br />
EXT<br />
OFF<br />
B<br />
0 o 90 o<br />
PHASE<br />
270 o 180 o<br />
C D<br />
Note<br />
• Together with the other settings, the phase setting can be stored in one of the four<br />
presets (refer to “Storing and Recalling Presets (PRESET)” on page 14). Together<br />
with the other settings, volume level and cross-over frequency, we recommend<br />
that, once found, you store the correct phase setting into one of the presets.<br />
• The PHASE selector is disabled when the subwoofer is set to Slave mode. Refer<br />
also to “Master and Slave mode” on page 7.<br />
PRESET<br />
D NAUDIO<br />
A U T H E N T I C F I D E L I T Y<br />
<strong>Dynaudio</strong> <strong>SUB</strong> <strong>300</strong>/<strong>500</strong> 13
Operation<br />
Master<br />
Input<br />
Function<br />
Slave<br />
LEVEL<br />
Store<br />
Preset<br />
Settings<br />
Protect<br />
POWER<br />
<strong>SUB</strong>WOOFER CONTROL DSC 1<br />
CROSSOVER FREQUENCY Hz<br />
60 80 100 FLAT<br />
ON<br />
A<br />
PRESET<br />
EXT<br />
OFF<br />
B<br />
0 o 90 o<br />
PHASE<br />
270 o 180 o<br />
C<br />
D NAUDIO<br />
A U T H E N T I C F I D E L I T Y<br />
D<br />
1.<br />
2.<br />
3.<br />
Storing and Recalling Presets (PRESET)<br />
With four presets available you have the flexibility of recalling different sets of<br />
subwoofer settings, depending on what suits the occasion best. For instance, you<br />
may store the settings best suited for classical music setting under A, for Rock and<br />
Pop music under B, program C to have the best settings for action movies and<br />
program PRESET D for late-night listening. The presets are also an excellent tool for<br />
recalling different settings when experimenting with either location or settings of the<br />
subwoofer.<br />
Once you have stored all presets, you can choose to block access to storing, so that<br />
presets can not be over-written by mistake. Each preset stores settings for volume<br />
level, cross-over frequency, bass extension and phase.<br />
To store a PRESET:<br />
1. Ensure that preset programming hasn't been blocked: The Preset Settings<br />
switch on the subwoofer's back panel must be in the Store position.<br />
2. Set all parameters (LEVEL, CROSSOVER FREQUENCY, EXT and PHASE) to<br />
your liking.<br />
3. Press and hold the desired PRESET A, B, C or D button for 3 seconds. Ensure<br />
that the subwoofer receives the commands from the remote control without<br />
interruption.<br />
The Status LED will blink 3 times to confirm the preset has been stored. Any<br />
previously stored setting has been overwritten with your new setting.<br />
4. To avoid accidental over-writing of presets, set the Preset Settings switch on the<br />
subwoofer's back panel to the Protect position.<br />
To recall a PRESET:<br />
Simply briefly press the desired PRESET button A, B, C or D.<br />
Note<br />
• Temporary adjustments for all settings are still possible.<br />
• Presets can only be stored or recalled in Master mode.<br />
• Program one preset with the best global settings for your system and use this as<br />
the starting point to program the other presets. This way you always have a starting<br />
and reference point.<br />
Master<br />
Input<br />
Function<br />
Slave<br />
Store<br />
4.<br />
Preset<br />
Settings<br />
Protect<br />
14 <strong>Dynaudio</strong> <strong>SUB</strong> <strong>300</strong>/<strong>500</strong>
Positioning and Optimizing<br />
Positioning and Optimizing<br />
Positioning the subwoofer<br />
Although it is often said that the location of a subwoofer in a listening room is not critical<br />
(as the human ear can not locate direction at very low frequencies), we recommend that<br />
you choose its position carefully so the subwoofer can integrate fluently with the other<br />
speakers in the system and interact in the correct way with the acoustical environment.<br />
All of the following should be taken as rough guidelines; bass response in general is<br />
very dependent on the acoustics of the listening environment. Finding the best<br />
position often involves a lot of trial-and-error experimenting. Always trust your ears,<br />
even if seemingly the position of the subwoofer goes against the guidelines.<br />
Contradictory as it may seem, good integration of subwoofers has been achieved<br />
when one isn't aware that a subwoofer is present at all in the system, yet performance<br />
involves fast, deep and solid bass without sounding stressed, even at loud levels.<br />
• Trying to find the right location will also involve finding the right settings such as level,<br />
cross-over frequency and phase for that location. The subwoofer's presets will prove<br />
to be a useful tool when trying to find a suitable setting: You can store the settings that<br />
match a particular position so you can easily swap between locations. It will also allow<br />
you to make small changes in settings and to store these as separate presets. This<br />
way, you can compare between presets to find the best setting. Refer also to “Storing<br />
and Recalling Presets (PRESET)” on page 14.<br />
• When experimenting to find the optimal location, use a couple of music tracks with<br />
repetitive bass across a large spectrum. The tracks should be sufficiently different<br />
from each other and each should cover a wide bass-range. Musical instruments,<br />
such as a double-bass, bass guitar, church organ, etc. cover a wide spectrum in the<br />
bass region and are therefore very suitable. Using non-music (such as action<br />
movies) material to position and adjust the subwoofer with, may lead to spectacular<br />
results with such material but almost always it will result in overblown and excessive<br />
bass when playing music with the same setting. Remember that the <strong>Dynaudio</strong><br />
subwoofers allow for 4 different preset settings, so you can store a preset with the<br />
setting that matches the occasion (be it for action movie or music listening) best.<br />
Room modes<br />
1/4<br />
1/2<br />
3/4<br />
1/4<br />
1/2 3/4<br />
Listening room<br />
Every listening environment will have specific “room modes”, whereby in some<br />
specific locations in the room and at particular frequencies, the bass may be too much<br />
or too lean. This effect will be stronger in square and “shoe-box” shaped rooms. With<br />
a single subwoofer, the better position for the subwoofer relative to the listening<br />
position will be the one where bass is perceived to be neither too much or too lean at<br />
any given frequency.<br />
Generally, avoid placing the subwoofer at 1/4, 1/2 or 3/4 of either the length or<br />
width of the room as at these locations the room-modes are likely to be strongest<br />
(the dashed lines in the figure left).<br />
Moving the subwoofer closer to walls and corners in particular will generally increase<br />
the amount of bass. Although the extra amount of bass can be compensated for by<br />
reducing the volume level of the subwoofer relative to the rest of the system, this can<br />
result in uneven bass response at the listening position. You can try starting with<br />
placement in a corner and experiment by gradually moving it out of the corner or<br />
further away from the wall. Try to locate the position which yields the best compromise<br />
between position, volume and even bass response. Note that every time that you<br />
reposition the subwoofer (even if it's over a short distance) you may need to adjust<br />
the LEVEL and PHASE settings again.<br />
<strong>Dynaudio</strong> <strong>SUB</strong> <strong>300</strong>/<strong>500</strong> 15
Positioning and Optimizing<br />
Corner placement<br />
Maximum boost of bass level but potentially uneven distribution of bass in the room<br />
(room modes), particularly if the room is square or shoe-box shaped.<br />
From the listening position, check if the bass is even across the entire bass<br />
spectrum. If not, move the subwoofer out of the corner. Try moving it along either<br />
wall.<br />
Next to wall, away from corner<br />
This position still provides considerable boost but less than the corner placement as<br />
above. Room modes can also still be considerable but less so than with corner<br />
placement.<br />
From the listening position, check if the bass is even across the entire bass<br />
spectrum. If not, move the subwoofer away or towards your listening position until<br />
most even response has been obtained. Avoid placing the subwoofer exactly halfway<br />
or at a quarter of the wall's length.<br />
Free standing, away from wall and corner<br />
This position will give least boost compared to wall or corner placement, but in general<br />
offers best flexibility at achieving most even bass distribution at the listening position.<br />
Avoid placing the subwoofer exactly half-way or at a quarter's length of either<br />
sidewall. Particularly in smaller square or “shoe-box” shaped rooms the free<br />
standing position is recommended.<br />
Multiple subwoofers<br />
By using carefully positioned multiple subwoofers it is possible to even out the<br />
different room modes and thus create a more coherent overall bass response in the<br />
room. It is worth experimenting with different locations around the room for the<br />
additional subwoofers, even using the rear of the room. As adding subwoofers will not<br />
increase the effect of room-modes, even adding a subwoofer without much care or<br />
thought to positioning is likely to help even out room modes.<br />
Note<br />
Always position subwoofers at least 1 mtr/3 ft away from a television as the<br />
magnetic field emanating from the subwoofer may otherwise distort the picture. If<br />
you see discolorations on the television screen, try moving the subwoofer and<br />
other speakers close by away from the television.<br />
16 <strong>Dynaudio</strong> <strong>SUB</strong> <strong>300</strong>/<strong>500</strong>
Finding the correct settings<br />
Positioning and Optimizing<br />
Experiment with<br />
location and adjustment<br />
Use a couple of music<br />
Double-check your settings<br />
Store your settings<br />
Before deciding on a final setting, you will probably want to experiment with both<br />
location and adjustment of the subwoofer. Here, the subwoofer's presets will prove an<br />
ideal tool. When trying to decide on a particular location, simply store the settings that<br />
are best for the location and swap back and forth, using the appropriate preset every<br />
time. Refer also to “Storing and Recalling Presets (PRESET)” on page 14.<br />
When experimenting to find the optimal settings, use a couple of music tracks with<br />
repetitive bass across a large spectrum. The tracks should be sufficiently different<br />
from each other and each should cover a wide bass-range. Musical instruments, such<br />
as a double-bass, bass guitar, church organ, etc. covering a wide spectrum in the<br />
bass region and above, are very suitable as these depend on accurately balanced<br />
subwoofers and main speakers.<br />
Although in general it is best to make adjustments in the sequence outlined below,<br />
note that changing one setting may influence another. For example, finding the right<br />
setting for phase may result in having to decrease level, even if this was set correct<br />
before. It is recommended that you double-check the previous settings before moving<br />
on to the next one. Obtaining the best integration of the subwoofers generally involves<br />
a considerable amount of repeated fine-tuning.<br />
Once done, use the presets to store the settings. It is advisable to reserve one preset<br />
as the “system default” settings so you can always revert to this setting when you<br />
have made temporary changes to any of the settings.<br />
Volume level<br />
With the LEVEL + and LEVEL – buttons you can adjust the relative volume level of<br />
the subwoofer to the main speakers of the system:<br />
Play the same track a couple of times, adjusting the level so that the instrument<br />
sounds homogenous across its range.<br />
If you find that at certain specific bass tones the response is either too loud (bloated<br />
sound) or soft (thin sound), it may be that you have to experiment further with the<br />
location of the subwoofer and/or the cross-over frequency settings (refer to<br />
“Positioning the subwoofer” on page 15 and “Cross-over frequencies” on page 18).<br />
Note<br />
When using multiple subwoofers, ensure that all settings such as level, cross-over<br />
frequency, phase and LF extension are identical. Use the Master and Slave mode<br />
options to ensure that all subwoofers operate on the same settings (refer to “Master<br />
and Slave mode” on page 7).<br />
<strong>Dynaudio</strong> <strong>SUB</strong> <strong>300</strong>/<strong>500</strong> 17
Positioning and Optimizing<br />
Level<br />
60 Hz<br />
80 Hz<br />
100 Hz<br />
Flat<br />
Cross-over frequencies<br />
Matching the frequency responses of subwoofer and speakers has an important<br />
impact on the overall sound quality, when integrating a subwoofer into a audio-videosystem.<br />
In general a large, floor-standing speaker still has significant output in the<br />
deeper bass range, whereas a very small speaker will not be able to reproduce deep<br />
bass at all. In the first case a bump in the overlapping area will cause a louder or even<br />
bloated sound while in the second case an acoustic hole will be experienced.<br />
The following figures visualize the possible results (please note that all curves are for<br />
illustration purposes and do not show exact filter characteristics).<br />
60 80 100<br />
Frequency/Hz<br />
Combined frequency response<br />
Subwoofer<br />
Main speakers<br />
Cross-over frequencies set correctly<br />
Subwoofer and main speakers are perfectly matched, when the combined frequency<br />
response is smooth without bumps and gaps. A neutral sound will be the result.<br />
Level<br />
Frequency<br />
Level<br />
Combined frequency response<br />
Subwoofer<br />
Main speakers<br />
Subwoofer too low, main speakers too high<br />
A gap in the frequency response occurs, if the cut-off frequency of the subwoofer is<br />
set too low and of the main speakers too high (or if the main speakers are not able to<br />
reproduce low frequencies accordingly). In this acoustic hole you will miss some<br />
signal information and experience a thin bass sound.<br />
Frequency<br />
Level<br />
Combined frequency response<br />
Subwoofer<br />
Main speakers<br />
Subwoofer too high, main speakers too low<br />
In the other case you will experience unnatural and bloated bass sound, if the<br />
overlapping area is too large. The combined frequency response shows a bump, as<br />
the sound pressure levels in this area are increased.<br />
Frequency<br />
18 <strong>Dynaudio</strong> <strong>SUB</strong> <strong>300</strong>/<strong>500</strong>
Positioning and Optimizing<br />
Multi-channel<br />
bass-management system<br />
Loudspeakers<br />
with full-range signal<br />
Many multi-channel processors and receivers provide elaborate bass-management<br />
systems where the cross-over frequency for both subwoofer and main speakers can<br />
be set. If you are using such a bass-management system, you can select the Flat<br />
setting on the subwoofer's remote control, as all filtering has been done by the bassmanagement<br />
system. Carefully follow the instructions for the amplifier/processor or<br />
receiver.<br />
Note<br />
• If you are using your system's bass-management system, ensure that the<br />
subwoofer's cross-over frequency hasn't been set to the same or lower frequency<br />
compared to the setting chosen with the bass management system.<br />
• Selecting the correct frequency depends to a large extend on the main speakers.<br />
Sometimes main speakers are specifically intended to work with a subwoofer. In<br />
such cases, the main speakers can get damaged by a full-range amplifier signal. If<br />
in doubt, check the operating guide for the main speakers for any restrictions or<br />
recommendations.<br />
Of course it is possible to combine the subwoofer in a system where the loudspeakers<br />
are being fed with a full-range signal. In that case, setting the cross-over frequency<br />
for the subwoofer depends very much on the natural roll-off frequency in the bass of<br />
the main speakers. In general, a large, floor-standing speaker will still have significant<br />
output in the deeper bass range, in which case the cross-over frequency should be<br />
set to 60 Hz. A small or very small speaker will have less deep bass output in which<br />
case the setting should be 80 Hz or 100 Hz. To find the correct setting in such<br />
scenarios:<br />
Play a music track that has a significant amount of bass over a large bass region.<br />
An instrument such as a double-bass or bass-guitar is very suitable. Starting with<br />
the 60 Hz position, use this track to set the subwoofer's relative volume level.<br />
Listen carefully to the bass-line played by the instrument. As it goes up and down<br />
in the bass range, the overall bass volume should remain the same, be it with very<br />
deep or higher bass notes. Particularly with very small main speakers, it may be<br />
that you can hear a “hole” in the bass response: You can hear the deepest bass<br />
notes and everything from lower midrange easily, but overall the bass leaves a thin<br />
impression. On the other hand, it may be that using the 60 Hz setting the system<br />
already sounds good. In both cases, select the next setting, 80 Hz.<br />
Playing the same track at the same volume level, again listen to the overall bass<br />
volume level. Should the bass volume suddenly become louder or bloated at<br />
certain tones compared to the 60Hz setting earlier, revert to this setting; in this<br />
case setting the cross-over frequency is done. If the apparent hole in bass<br />
response is still present or if the system sounds good now, move on to the next<br />
setting, 100 Hz.<br />
Again play the track to listen to the overall bass volume level. Should the bass<br />
volume suddenly become louder or bloated at certain tones compared to the 80 Hz<br />
setting earlier, revert to this setting. If the bass sounds correct now, leave the<br />
setting at 100 Hz.<br />
<strong>Dynaudio</strong> <strong>SUB</strong> <strong>300</strong>/<strong>500</strong> 19
Positioning and Optimizing<br />
Level<br />
Combined frequency response<br />
Subwoofer<br />
Main speakers<br />
Frequency<br />
Phase<br />
With the phase settings you can adjust the timing relationship between the<br />
subwoofers and main speakers. If either subwoofer or main speaker are slightly<br />
delayed in response in relation to the other, it can result in decreased bass output in<br />
the frequency response area where they overlap each other.<br />
The Phase relationship between subwoofer and satellite speakers is very dependent<br />
on relative distance, construction and working principles of the main speakers.<br />
The figure left shows a case whereby phase of the subwoofer and main speakers are<br />
incorrect in the critical overlap area, thus significantly reducing acoustic output in the<br />
listening room in that area. Incorrect phase relation of subwoofer to main speakers in<br />
critical overlap area: Reduced acoustical output in overlap area, even if levels are set<br />
correct.<br />
LEVEL<br />
POWER<br />
<strong>SUB</strong>WOOFER CONTROL DSC 1<br />
CROSSOVER FREQUENCY Hz<br />
60 80 100 FLAT<br />
To find the optimum phase setting:<br />
1. Playing the same bass-rich track which also covers the overlap area, repeatedly<br />
press the 0°, and its opposite phase, the 180° button in succession.<br />
2. Without changing volume level, do the same with the 90° and its opposite phase,<br />
the 270° button.<br />
3. Using the set of phase settings that provided the biggest difference in bass<br />
response found in the step above (either 0° ⇔ 180° or<br />
90°⇔ 270°), press each of the two buttons in alteration.<br />
The position in which you experience the most bass is the correct setting.<br />
4. If it appears that the bass is too much reduce the volume level until it sounds<br />
homogeneous.<br />
OFF<br />
0 o 90 o<br />
EXT<br />
PHASE<br />
ON<br />
270 o 180 o<br />
A<br />
B<br />
C<br />
D<br />
PRESET<br />
D NAUDIO<br />
A U T H E N T I C F I D E L I T Y<br />
20 <strong>Dynaudio</strong> <strong>SUB</strong> <strong>300</strong>/<strong>500</strong>
Troubleshooting and Technical Information<br />
Troubleshooting and Technical<br />
Information<br />
Troubleshooting<br />
There may be various reasons why the subwoofer doesn’t function properly in a<br />
system without it being faulty. The checklist below will help solve problems you may<br />
encounter. Before consulting your <strong>Dynaudio</strong> dealer, check this list first.<br />
Check this first:<br />
Check if all signal cables are connected properly.<br />
Check settings in bass-management menu of the connected processor/receiver<br />
Carefully and gradually increase the subwoofer volume level on the processor/<br />
receiver<br />
Carefully and gradually increase the subwoofer volume level on the subwoofer<br />
LEVEL control.<br />
Problem Cause Solution<br />
The subwoofer switches itself off<br />
although music is being played.<br />
The subwoofer responds intermittently<br />
to remote control commands.<br />
The subwoofer will not switch on at all.<br />
There is hardly any low-frequency signal available. This<br />
can happen if the music or movie itself does not contain<br />
very low frequencies (e.g. long dialogues).<br />
• The remote control battery is becoming weak.<br />
• The remote control eye (either front- or back panel) is<br />
obstructed.<br />
• The subwoofer is in direct, strong sunlight.<br />
• AC mains cable has become disconnected<br />
(no LEDs are lit)<br />
• Mains switch on the rear is switched to Off<br />
(no LED are lit)<br />
The subwoofer will switch on automatically as<br />
soon as low frequent signals are detected.<br />
Use the temporary manual On facility by briefly<br />
pressing the green I button on the remote<br />
control.<br />
Replace battery.<br />
Ensure there is a clear line-of-sight from the<br />
remote control to either the front- or back panel<br />
remote receiver. If this is not possible, consider<br />
an IR repeating system which consists of a<br />
separate remote receiver which connects by wire<br />
to a remote control emitter which can be<br />
positioned close to the subwoofer's remote eye.<br />
Consult your <strong>Dynaudio</strong> dealer for help.<br />
Avoid placing the subwoofer in strong direct<br />
sunlight.<br />
Make sure to switch the system off first before<br />
making any changes!<br />
Reconnect mains cable.<br />
Switch mains back on.<br />
Check if all signal cables are connected properly.<br />
<strong>Dynaudio</strong> <strong>SUB</strong> <strong>300</strong>/<strong>500</strong> 21
Troubleshooting and Technical Information<br />
Problem Cause Solution<br />
The subwoofer will not switch on<br />
automatically.<br />
The subwoofer will not switch to<br />
standby automatically.<br />
• No signal is present on either of the subwoofer’s inputs<br />
(Status LED lights red).<br />
• The subwoofer has been set to temporary manual<br />
On/Standby switching.<br />
• The subwoofer has been set to temporary manual<br />
On/Standby switching.<br />
Make sure to switch the system off first before<br />
making any changes!<br />
Check if all signal cables are connected properly.<br />
Check if the subwoofer output on the source is<br />
engaged.<br />
Switch back to automatic On/Standby facility by<br />
briefly pressing the green I button on the remote<br />
control. The subwoofer will switch on and the<br />
MANUAL mode LED will extinguish.<br />
Switch back to automatic On/Standby facility by<br />
briefly pressing the red O button on the remote<br />
control. The subwoofer will switch to Standby<br />
and the MANUAL mode LED will extinguish.<br />
I cannot store a setting. • Preset Settings switch is set to Protect. Set Preset Setting switch from Protect to Store.<br />
Subwoofer is switched on but no sound<br />
from the subwoofer.<br />
• No signal is present on either of the subwoofer’s inputs.<br />
• In the processor or receiver’s bass-management set-up,<br />
“subwoofer” has been disabled.<br />
• Subwoofer volume level has been turned down all the<br />
way on the processor/receiver.<br />
• Subwoofer volume level has been turned down all the<br />
way with the subwoofer’s remote control.<br />
Make sure to switch the system off first before<br />
making any changes!<br />
Check if all signal cables are connected properly.<br />
Check settings in bass-management menu of the<br />
connected amplifier or receiver.<br />
Carefully and gradually increase the subwoofer<br />
volume level on the amplifier or receiver.<br />
Carefully and gradually increase the subwoofer<br />
volume level with its remote control.<br />
<strong>22</strong> <strong>Dynaudio</strong> <strong>SUB</strong> <strong>300</strong>/<strong>500</strong>
Troubleshooting and Technical Information<br />
Changing the fuse<br />
WARNING<br />
RISK OF FIRE!<br />
For continued protection against risk of fire, replace only with same type<br />
fuse and rating.<br />
POWER<br />
On<br />
AC IN<br />
The fuse is placed on the rear of the subwoofer below the mains power input. It can<br />
be changed without removing the amplifier module.<br />
Changing the fuse<br />
1. Switch off the mains power switch and unplug the power cable.<br />
2. Pull out the fuse holder.<br />
3. Replace fuse with same type and rating.<br />
4. Push fuse holder back firmly until it is locked in its position.<br />
Factory default settings<br />
The factory default settings are as follows:<br />
Power mode:<br />
Automatic<br />
Phase: 0°<br />
Volume level:<br />
0 dB<br />
Bass extension:<br />
On<br />
Cross-over frequency:<br />
100 Hz<br />
To reinstate the factory default settings:<br />
1. Switch the subwoofer off completely using the switch on the back panel.<br />
2. Wait for at least 10 seconds.<br />
3. Press and hold the PRESET A button.<br />
4. While holding down the PRESET A button, switch on subwoofer on the back<br />
panel.<br />
The power Status LED will start to flash green.<br />
5. Release the PRESET A button.<br />
The subwoofer is now reset to the factory default settings.<br />
Note<br />
• All previously stored presets will be deleted also when resetting to factory defaults.<br />
<strong>Dynaudio</strong> <strong>SUB</strong> <strong>300</strong>/<strong>500</strong> 23
Troubleshooting and Technical Information<br />
Technical specifications<br />
<strong>SUB</strong> <strong>500</strong> <strong>SUB</strong> <strong>300</strong><br />
Frequency response<br />
18 Hz - 250 Hz 25 Hz - 250 Hz<br />
(± 3 dB)<br />
Low frequency limit with<br />
27 Hz 33 Hz<br />
EXT Off<br />
Amplifier power 250 W / 4 Ohm 200 W / 4 Ohm<br />
Cross-over frequencies 60 Hz / 80 Hz / 100 Hz 60 Hz / 80 Hz / 100 Hz<br />
Cross-over slope 4th order, Linkwitz-Riley 4th order, Linkwitz-Riley<br />
Cross-over bypass Yes (FLAT) Yes (FLAT)<br />
Phase adjustment 0° / 90° / 180° / 270° 0° / 90° / 180° / 270°<br />
Inputs<br />
Single ended/RCA,<br />
Balanced/XLR<br />
Single ended/RCA,<br />
Balanced/XLR<br />
Input sensitivity for full output* 0.1 V - 5 V 0.1 V - 5 V<br />
Maximum input 10 V 10 V<br />
Input impedance 20 kOhm 20 kOhm<br />
Output<br />
Single ended/RCA,<br />
Balanced/XLR<br />
Single ended/RCA,<br />
Balanced/XLR<br />
Master/Slave link Yes Yes<br />
Remote control included included<br />
No. of presets 4 4<br />
Each preset includes<br />
level, cross-over frequency,<br />
phase, ext. frequency range<br />
level, cross-over frequency,<br />
phase, ext. frequency range<br />
Drive unit 12" (30 cm), long throw 10" (24 cm), long throw<br />
Magnetic shielding Yes Yes<br />
Internal cabinet volume 36 litres 19 litres<br />
Bass principle Closed Ported<br />
Power consumption, max. 480 W 480 W<br />
Power consumption, standby 5 W 5 W<br />
Mains voltage** 120 V/60 Hz or 230 V/50 Hz 120 V/60 Hz or 230 V/50 Hz<br />
Weight (net) 30.6 kg 19.1 kg<br />
Dimensions (W x H x D) 360 x 378 x 568 mm 320 x 338 x 466 mm<br />
* Depended on setting.<br />
** Please refer to your local network.<br />
All aspects relating to the performance criteria are strictly controlled. Along all stages<br />
of the entire production progress – from raw material selection to the final assembly<br />
and quality control – <strong>Dynaudio</strong> thoroughly inspects each parameter along every step<br />
of way.<br />
Subject to alterations.<br />
24 <strong>Dynaudio</strong> <strong>SUB</strong> <strong>300</strong>/<strong>500</strong>
Troubleshooting and Technical Information<br />
Warranty<br />
<strong>Dynaudio</strong> provides a transferable five-year limited manufacturer’s warranty on<br />
speaker parts. (Integrated electronics feature a two year warranty!)<br />
This warranty only covers faults or defects in material and production. Damage<br />
caused as a result of abuse, misuse or defective associated electronics is not covered<br />
by the warranty.<br />
All warranty claims must be accompanied by a copy of the original purchase invoice<br />
and warranties are only valid in the country or market of original origin and distribution.<br />
Should warranty service be required, it must be arranged for in the country of<br />
purchase by an authorized <strong>Dynaudio</strong> dealer.<br />
<strong>Dynaudio</strong> <strong>SUB</strong> <strong>300</strong>/<strong>500</strong> 25
Notes:<br />
26 <strong>Dynaudio</strong> <strong>SUB</strong> <strong>300</strong>/<strong>500</strong>
Deutsch<br />
Sehr geehrter Musikliebhaber<br />
Sehr geehrter Musikliebhaber,<br />
vielen Dank, dass Sie sich für einen Subwoofer von <strong>Dynaudio</strong> entschieden<br />
haben. Alle unsere Modelle basieren auf modernster, hoch entwickelter<br />
<strong>Dynaudio</strong> Technologie und erreichen so eine beeindruckende Klangqualität.<br />
<strong>Dynaudio</strong> ist einer der wenigen Hersteller, der anspruchsvolle Lautsprecherkonzepte<br />
nicht nur in eigener Entwicklung, sondern auch in aufwändiger<br />
eigener Fertigung realisieren kann. Aufgrund dieser Qualitätsorientierung ist<br />
<strong>Dynaudio</strong> nach der strengen, die ISO 9000 übertreffenden Qualitätsnorm<br />
QS 9000 zertifiziert. Jeder Subwoofer wird in Dänemark nach diesen höchsten<br />
Qualitätsanforderungen gefertigt.<br />
Dank dynamischer, präziser Wiedergabe tiefster Frequenzen sind die<br />
<strong>Dynaudio</strong> Subwoofer bestens für aufwändige Audio-Video und HiFi-Systeme<br />
geeignet – von anspruchsvollen Stereo Musikaufnahmen bis hin zu modernen<br />
DVD-Video-, DVD-Audio- und SACD-Produktionen. Vielfältige Einstellmöglichkeiten<br />
sowie die hohe Wiedergabequalität bei jeder Lautstärke<br />
ermöglichen eine individuelle Wohnraum-Integration.<br />
Um die bestmögliche Klangqualität zu erzielen, sollten einige Anforderungen<br />
beachtet werden, die wir auf den folgenden Seiten beschreiben. Sie werden<br />
so die Freude an Ihrem Subwoofer und an seinen musikalischen Fähigkeiten<br />
für viele Jahre erhalten.<br />
Wir wünschen Ihnen viel Spaß beim Musik hören,<br />
<strong>Dynaudio</strong><br />
<strong>Dynaudio</strong> <strong>SUB</strong> <strong>300</strong>/<strong>500</strong> 27
Vor dem Betrieb<br />
Vor dem Betrieb<br />
Sicherheitshinweise<br />
Bestimmungsgemäßer Gebrauch<br />
Der Subwoofer <strong>SUB</strong> <strong>300</strong>/<strong>500</strong> ist ein Lautsprecher mit integriertem Verstärker zur<br />
Wiedergabe tiefster Frequenzen. Er wurde konzipiert für den Einsatz in Audio-Video-<br />
Anlagen im Heimbereich und darf auch nur dort betrieben werden. Bei nicht bestimmungsgemäßem<br />
Gebrauch können Sicherheit und Funktionsfähigkeit nicht garantiert<br />
werden.<br />
Service<br />
Sollte ein technischer Service notwendig sein oder sind optische Mängel/Beschädigungen<br />
vorhanden, wenden Sie sich bitte umgehend an Ihren autorisierten <strong>Dynaudio</strong><br />
Fachhändler.<br />
WARNUNG<br />
LEBENSGEFÄHRLICHE SPANNUNG!<br />
Öffnen Sie niemals das Gerät. Im Inneren befinden sich keine Teile, die von dem<br />
Anwender selbst eingestellt werden können. Jeder technische Eingriff ist ausschließlich<br />
durch den <strong>Dynaudio</strong> Service vorzunehmen.<br />
Vermeiden Sie unbedingt, dass Feuchtigkeit in den Subwoofer eindringt. Dies<br />
kann zu einem Kurzschluss oder einem elektrischen Schlag führen.<br />
Überprüfen Sie das mitgelieferte IEC-Netzkabel auf schadhafte Stellen und verlegen<br />
Sie es so, dass eine Beschädigung ausgeschlossen ist.<br />
VORSICHT<br />
BESCHÄDIGUNG DES GERÄTES DURCH AUFSTELLUNGSFEHLER!<br />
Stellen Sie den Subwoofer nicht in der Nähe von Wärmequellen wie Heizung,<br />
Kamin, Heizlüfter etc. auf. Dies gilt ebenso für Wärme abstrahlende Verstärker<br />
oder andere elektrische Geräte.<br />
Holz ist ein Naturprodukt. Direkte Sonneneinstrahlung kann über die Zeit den<br />
Farbton des Furnieres verändern, beeinträchtigt aber nicht die Gehäusequalität.<br />
BESCHÄDIGUNG DES GERÄTES DURCH ANSCHLUSSFEHLER!<br />
Bitte beachten Sie die Sicherheitsbestimmungen Ihres Wohnortes – die Einstellungen<br />
des Subwoofers (siehe rückseitiges Label) müssen mit den Eigenschaften<br />
Ihres Stromnetzes übereinstimmen.<br />
Achten Sie darauf, dass der Netzstecker genau zu dem Steckdosen-System<br />
Ihres Wohnraumes passt. Sollten Sie hier Abweichungen feststellen, schließen<br />
Sie den Subwoofer nicht an und kontaktieren Sie Ihren <strong>Dynaudio</strong> Fachhändler.<br />
Während schlechter Wetterbedingungen sollten Sie jedes elektrische Gerät zum<br />
Schutz vor Blitzschlag vom Stromnetz trennen. Dies gilt ebenfalls als Vorsichtsmaßnahme<br />
während längerer Abwesenheit.<br />
Sie sollten den Subwoofer auch vorübergehend von allen Anschlüssen trennen,<br />
wenn Sie an der Anlage Komponenten austauschen oder neu verbinden.<br />
28 <strong>Dynaudio</strong> <strong>SUB</strong> <strong>300</strong>/<strong>500</strong>
Vor dem Betrieb<br />
Zu dieser Anleitung<br />
Lesen Sie diese Bedienhinweise bitte sorgfältig, bevor Sie den Subwoofer in Betrieb<br />
nehmen, und befolgen Sie alle Anleitungen. Bewahren Sie die Bedienungsanleitung<br />
in der Nähe des Subwoofers auf, um stets eine korrekte Bedienung zu gewährleisten.<br />
Verwendete Zeichen und Symbole<br />
In dieser Anleitung werden folgende Zeichen und Symbole verwendet.<br />
Warnzeichen<br />
Allgemeines Warnzeichen<br />
Das Ausrufezeichen in einem Dreieck macht den Benutzer auf eine Gefahr aufmerksam,<br />
die zur Beschädigung des Gerätes oder zu Verletzungen führen kann.<br />
Lebensgefährliche Spannung<br />
Das Blitzsymbol in einem Dreieck macht den Benutzer auf eine Gefahr durch eine<br />
nicht-isolierte Spannung innerhalb des Gehäuses aufmerksam. Die Höhe der Spannung<br />
kann zu einem lebensgefährlichen elektrischen Schock führen.<br />
Signalworte<br />
VORSICHT<br />
WARNUNG<br />
Das Warnwort VORSICHT in Verbindung mit einem Warnsymbol kennzeichnet eine<br />
Gefahr, die zur Beschädigung des Gerätes und leichten Verletzungen führen kann.<br />
Beachten Sie bitte unbedingt die an diesen Stellen gegebenen Anweisungen.<br />
Das Warnwort WARNUNG in Verbindung mit einem Warnsymbol kennzeichnet eine<br />
Gefahr, die möglicherweise zu Verletzungen oder zum Tod führen kann. Beachten<br />
Sie bitte unbedingt die an diesen Stellen gegebenen Anweisungen.<br />
Textkennzeichnungen<br />
Hinweis<br />
<br />
1.<br />
2.<br />
3.<br />
kursiv<br />
fett-grau<br />
Diese Textstellen geben Ihnen zusätzliche Informationen, die zum Verständnis des<br />
<strong>SUB</strong> <strong>300</strong>/<strong>500</strong> und seiner Bedienung wichtig sind.<br />
Stellen, die mit einem Pfeil gekennzeichnet sind, fordern Sie auf, etwas zu tun.<br />
Lesen Sie bitte sorgfältig die dort gegebenen Anleitungen.<br />
Mehrere Tätigkeiten, die nacheinander ausgeführt werden müssen, sind entsprechend<br />
nummeriert. Bitte befolgen Sie die angegebene Reihenfolge - Sie kommen<br />
dadurch schneller zum Ziel.<br />
Das Resultat eines Bedienungsschrittes wird in kursiver Schrift beschrieben. Dies<br />
kann für Sie hilfreich sein, um den Erfolg eines Schrittes zu überprüfen.<br />
Bedienelemente und Beschriftungen sind im Text fett-grau markiert.<br />
<strong>Dynaudio</strong> <strong>SUB</strong> <strong>300</strong>/<strong>500</strong> 29
Vor dem Betrieb<br />
Auspacken<br />
Um den geeigneten Standort in Ihrem Raum zu finden, lesen Sie bitte das Kapitel<br />
„Den Subwoofer positionieren“ auf Seite 40.<br />
1.<br />
2.<br />
3.<br />
Subwoofer auspacken:<br />
1. Öffnen Sie die Verpackung an der Oberseite auf einer ebenen, sauberen und<br />
rutschfesten Unterlage oder auf dem Fußboden.<br />
2. Entnehmen Sie alle Zubehörteile (Netzkabel, Fernbedienung, Stoffabdeckung).<br />
Entfernen Sie noch nicht das obere Schutzpolster.<br />
3. Drehen Sie den geöffneten Karton vorsichtig auf die Seite. Achten Sie darauf,<br />
dass alle Deckel nach außen geklappt sind. Drehen Sie den Karton mit der Öffnung<br />
nach unten auf den Boden.<br />
4. Die Kartonverpackung kann nun nach oben vom Subwoofer weggezogen werden.<br />
Entfernen Sie nun das Schutzpolster.<br />
5. Öffnen Sie die Schutzfolie und ziehen Sie sie vorsichtig nach unten.<br />
6. Drehen Sie nun den Subwoofer vorsichtig, bis er auf den vier Füßen der Unterseite<br />
steht. Das Schutzpolster kann entfernt werden.<br />
Überprüfen Sie den Inhalt auf Vollständigkeit:<br />
• Subwoofer: Achten Sie auf die korrekte Netzeinstellung, die auf dem Label an der<br />
Rückseite vermerkt ist.<br />
• Stoffabdeckung<br />
• Netzkabel: Achten Sie auf einen zu Ihrem Netzanschluss passenden Netzstecker.<br />
• Bedienungsanleitung<br />
Stoffabdeckung<br />
Der Subwoofer kann mit oder ohne Abdeckung betrieben werden. Um Beschädigungen<br />
und Verschmutzung zu vermeiden, sollte die Stoffabdeckung auf der Front belassen<br />
werden. Bei den tieffrequenten Signalen (große Wellenlänge) eines Subwoofers<br />
ist hierbei eine klangliche Auswirkung vernachlässigbar.<br />
ACHTUNG<br />
• Achten Sie darauf, die Bassmembran nicht zu berühren.<br />
Abdeckung anbringen:<br />
1. Halten Sie die Abdeckung um 45 Grad geneigt an die Front, sodass die Vertiefungen<br />
der unteren zwei Magnethalter direkt auf den unteren zwei Schrauben sitzen.<br />
2. Neigen Sie die Abdeckung langsam zur Front, sodass die oberen zwei Magnethalter<br />
direkt auf die oberen zwei Schrauben zielen.<br />
Die Magnete klicken ein, die Abdeckung ist befestigt.<br />
Abdeckung abnehmen:<br />
Führen Sie die obigen Schritte in umgekehrter Reihenfolge aus.<br />
30 <strong>Dynaudio</strong> <strong>SUB</strong> <strong>300</strong>/<strong>500</strong>
Vor dem Betrieb<br />
Anschluss- und Bedienelemente<br />
2<br />
4<br />
1<br />
Remote Eye<br />
D NAUDIO<br />
<strong>Dynaudio</strong> A/S - Skanderborg - Denmark<br />
Master<br />
Store<br />
Input<br />
Preset<br />
Function<br />
Settings<br />
Slave<br />
Protect<br />
INPUT<br />
Processed OUT<br />
To Slave<br />
3<br />
5<br />
Geräterückseite<br />
1 Remote Eye<br />
Infrarot-Empfänger.<br />
2 Input Function<br />
Betriebsart des Subwoofers: Master oder Slave<br />
• Master: Einstellung, wenn nur ein Subwoofer im Einsatz ist oder bei mehreren<br />
Subwoofern für den ersten in der Kette.<br />
• Slave: Einstellung bei mehreren Subwoofern ab dem zweiten in der Kette.<br />
Im Slave-Betrieb sind nur On/Off sowie Auto/Manual möglich.<br />
CAUTION<br />
To prevent electric shock, do not remove cover.<br />
No user-serviceable parts inside.<br />
Refer service to qualified personnel.<br />
WARNING<br />
To reduce the risk of fire or electric shock,<br />
do not exposure to rain or moisture.<br />
CAUTION<br />
RISK OF ELECTRICAL SHOCK<br />
DO NOT OPEN<br />
3 Preset Settings<br />
Wahlschalter für die Voreinstellungen:<br />
• Store: Stellung zum Abspeichern von Einstellungen.<br />
• Protect: Stellung zum Schutz der Einstellungen vor versehentlichem Ändern.<br />
6<br />
POWER<br />
On<br />
AC IN<br />
4 INPUT<br />
Signaleingang: Cinch (oben), XLR (unten).<br />
5 Processed OUT To Slave<br />
Ausgang zum Anschluss eines weiteren Subwoofers: Cinch (oben), XLR (unten).<br />
8<br />
7<br />
9<br />
6 POWER<br />
Netzschalter: Schaltet den Subwoofer ein (On) und aus. Im ausgeschalteten<br />
Zustand kann der Subwoofer nicht über die Fernbedienung eingeschaltet werden.<br />
LEVEL<br />
POWER<br />
<strong>SUB</strong>WOOFER CONTROL DSC 1<br />
CROSSOVER FREQUENCY Hz<br />
60 80 100 FLAT<br />
13<br />
OFF 0 o 90 o<br />
EXT<br />
PHASE<br />
ON<br />
270 o 180 o<br />
A B C D<br />
PRESET<br />
D NAUDIO<br />
A U T H E N T I C F I D E L I T Y<br />
10<br />
11<br />
12<br />
Fernbedienung<br />
7 AC IN<br />
Netzanschluss.<br />
8 LEVEL<br />
Lautstärkeregelung des Subwoofers.<br />
9 POWER (Remote Control)<br />
Manuelles Ein-/Ausschalten des Subwoofers.<br />
10 CROSSOVER FREQUENCY Hz<br />
Wahl der Übergangsfrequenz: 60 Hz, 80 Hz, 100 Hz, FLAT (ohne).<br />
11 PHASE<br />
Einstellen der Phase: 0°, 90°, 180°, 270°.<br />
12 PRESET<br />
Bis zu vier Voreinstellungen können abgespeichert und bei Bedarf wieder abgerufen<br />
werden.<br />
13 EXT<br />
Erweiterung der Tiefbass-Wiedergabe (EXT = Extended).<br />
<strong>Dynaudio</strong> <strong>SUB</strong> <strong>300</strong>/<strong>500</strong> 31
Vor dem Betrieb<br />
Den Subwoofer anschließen<br />
VORSICHT<br />
BESCHÄDIGUNG DES GERÄTES DURCH ANSCHLUSSFEHLER!<br />
Trennen Sie den Netzanschluss vom Stromnetz, bevor Sie den Subwoofer<br />
anschließen.<br />
Schalten Sie den Subwoofer erst ein (Netzschalter auf On), wenn Sie alle Verbindungen<br />
und Einstellungen vorgenommen haben.<br />
ACHTUNG<br />
• Verbinden Sie den Subwoofer NICHT mit den Lautsprecher-Ausgängen Ihres<br />
Verstärkers, da es sich bei dem <strong>Dynaudio</strong> Subwoofer um ein aktives Modell mit<br />
integriertem Verstärker handelt (Informationen zum Anschluss eines XLR-Systems<br />
finden Sie im Kapitel „Verbindungen mit XLR-Kabel“ auf Seite 33).<br />
• Um Signalbeeinträchtigungen zu vermeiden, verwenden Sie hochwertiges, nach<br />
Möglichkeit abgeschirmtes Kabel.<br />
Master- und Slave-Einstellung<br />
Der Subwoofer kann in zwei verschiedenen Betriebsarten betrieben werden:<br />
• Master oder<br />
• Slave.<br />
Wenn Sie mehrere Subwoofer anschließen, sollten alle Einstellungen (LEVEL,<br />
CROSSOVER FREQUENCY, PHASE and EXT) identisch sein.<br />
Die Betriebsart Master oder Slave ist bei allen <strong>Dynaudio</strong> Subwoofern leicht einzustellen:<br />
Der Master-Subwoofer ist direkt an den Receiver oder Prozessor angeschlossen<br />
und steuert alle nachfolgenden Slave-Subwoofer. Dadurch werden alle Slave-Subwoofer<br />
über die Fernbedienung des Master-Subwoofers kontrolliert und folgen seinen<br />
Einstellungen. In der Slave-Betriebsart sind nur die POWER-Tasten in Funktion.<br />
LFE/<strong>SUB</strong> Out<br />
Einen einzelnen Subwoofer anschließen<br />
1.<br />
Master<br />
Input<br />
Function<br />
Slave<br />
INPUT<br />
2.<br />
Store<br />
Preset<br />
Settings<br />
Protect<br />
Processed OUT<br />
To Slave<br />
1. Verbinden Sie den Subwoofer-Ausgang des Prozessors oder Receivers (meistens<br />
markiert mit „<strong>SUB</strong> Out“, „Subwoofer Out“ oder „LFE“) über ein Cinch- oder<br />
XLR-Kabel mit dem Eingang (INPUT) des Subwoofers (Hinweise zu XLR-Verbindungen<br />
finden Sie unter „Verbindungen mit XLR-Kabel“ auf Seite 33).<br />
2. Stellen Sie den rückseitigen Input Function-Schalter auf Master. In dieser Position<br />
können Sie Einstellungen mit der Fernbedienung vornehmen.<br />
Wenn alle Verbindungskabel fest angeschlossen sind, verbinden Sie mit dem beigelegten<br />
Netzkabel den Netzanschluss mit dem Stromnetz.<br />
32 <strong>Dynaudio</strong> <strong>SUB</strong> <strong>300</strong>/<strong>500</strong>
Vor dem Betrieb<br />
Mehrere Subwoofer anschließen<br />
1.<br />
LFE/<strong>SUB</strong> Out<br />
Master<br />
Input<br />
Function<br />
Slave<br />
INPUT<br />
2.<br />
Store<br />
Preset<br />
Settings<br />
Protect<br />
Processed OUT<br />
To Slave<br />
3.<br />
1. Verbinden Sie den Subwoofer-Ausgang des Prozessors oder Receivers (meistens<br />
markiert mit „<strong>SUB</strong> Out“, „Subwoofer Out“ oder „LFE“) über ein Cinch- oder<br />
XLR-Kabel mit dem Eingang (INPUT) des Subwoofers. Dieser Subwoofer ist nun<br />
automatisch der Master-Subwoofer.<br />
2. Stellen Sie den rückseitigen Input Function-Schalter auf Master.<br />
3. Verbinden Sie den Subwoofer-Ausgang (Processed OUT To Slave) des Master-<br />
Subwoofers über ein Cinch- oder XLR-Kabel mit dem Eingang (INPUT) des weiteren<br />
Subwoofers. Dieser ist nun der Slave-Subwoofer.<br />
4. Stellen Sie den Schalter Input Function des zweiten Subwoofers auf Slave.<br />
5. Nach dem gleichen System können nun weitere Subwoofer an den jeweils vorherigen<br />
Subwoofer in Reihe angeschlossen werden (so genannter „Daisy Chain“-<br />
Anschluss).<br />
Wenn alle Verbindungskabel fest angeschlossen sind, verbinden Sie mit dem beigelegten<br />
Netzkabel den Netzanschluss mit dem Stromnetz.<br />
Master<br />
Input<br />
Function<br />
Slave<br />
INPUT<br />
4.<br />
Store<br />
Preset<br />
Settings<br />
Protect<br />
Processed OUT<br />
To Slave<br />
5.<br />
Hinweis<br />
• Jeder an einen vorgeschalteten Subwoofer angeschlossene Subwoofer muss mit<br />
dem rückseitigen Input Function-Schalter zwingend auf Slave gestellt werden.<br />
• Wenn Sie mehrere Subwoofer parallel verwenden, sollten aus Funktions- und<br />
Klangqualitätsgründen alle Subwoofer identisch sein.<br />
• Sollen mehrere Subwoofer individuell ansteuerbar bleiben, stellen Sie alle Subwoofer<br />
auf Master. Das Signal vom Receiver/Prozessor muss dann über eine Weiche<br />
(Y-Adapter) verteilt werden .<br />
Verbindungen mit XLR-Kabel<br />
ACHTUNG<br />
• Verbinden Sie Receiver/Prozessor und Subwoofer niemals gleichzeitig über<br />
Cinch- und XLR-Kabel.<br />
Die so genannte „symmetrische Verbindung“ mit kontaktsicheren XLR-Anschlüssen<br />
wird im professionellen Audio-Bereich verwendet, da Sie weniger störanfällig und<br />
daher potenziell klangneutraler als die Cinch-Verbindung ist.<br />
Wenn Ihr Prozessor oder Vorverstärker über XLR-Subwoofer-Ausgänge verfügt, sollten<br />
Sie diese Anschlussmöglichkeit bevorzugen.<br />
Wenn Sie einen Master-Subwoofer mit Slave-Subwoofern verbinden, können Sie hier<br />
XLR-Kabel verwenden, auch wenn der Master-Subwoofer mit einem Cinch-Kabel an<br />
den Receiver/Prozessor angeschlossen ist.<br />
Alle weiteren Einstellungen sind identisch zu dem Anschluss mit Cinch-Kabeln.<br />
<strong>Dynaudio</strong> hat die einzelnen XLR-Pins nach dem international üblichen System belegt:<br />
• Pin 1 = Masse<br />
• Pin 2 = + Signal<br />
• Pin 3 = – Signal<br />
Hinweis<br />
• Vergewissern Sie sich, dass alle Verbindungen korrekt sind. Vereinzelt wählen<br />
Hersteller eine andere Pin-Belegung. Wenden Sie sich hierzu an Ihren Händler.<br />
<strong>Dynaudio</strong> <strong>SUB</strong> <strong>300</strong>/<strong>500</strong> 33
Den Subwoofer bedienen<br />
Den Subwoofer bedienen<br />
Den Subwoofer bedienen<br />
1.<br />
2.<br />
3.<br />
Batterie der Fernbedienung einlegen/tauschen<br />
Bevor Sie die DSC 1-Fernbedienung verwenden können, muss zunächst die aus<br />
Sicherheitsgründen separat mitgelieferte Batterie eingelegt werden.<br />
Batterie einlegen<br />
1. Nehmen Sie das Batteriefach heraus, indem Sie den Sicherheits-Clip zur Mitte<br />
hinschieben und gleichzeitig an dem Fach ziehen.<br />
2. Legen Sie die Batterie in das herausgenommene Batteriefach. Achten Sie auf die<br />
richtige Polarität, die mit „+“ gekennzeichnet ist.<br />
3. Schieben Sie das Batteriefach mit der Batterie zurück in die Fernbedienung, bis<br />
sie mit einem deutlichen Klick einrastet.<br />
Sollte dies nicht leichtgängig durchzuführen sein, wiederholen Sie die Schritte und<br />
achten Sie auf die richtige Positionierung.<br />
Hinweis<br />
• Die Batterie zeichnet sich durch eine lange Lebensdauer aus, abhängig von der<br />
Gebrauchshäufigkeit. Wenn Sie bemerken, dass die Bedienbefehle nicht spontan<br />
angenommen werden oder Sie genau auf den Sensor zielen müssen, ist vermutlich<br />
die Batterie schwach und sollte daher ausgetauscht werden.<br />
• Verwenden Sie ausschließlich eine Batterie von Typ CR2025. Dieses Modell ist in<br />
den meisten Elektronik-Fachgeschäften problemlos erhältlich.<br />
• Lassen Sie die Fernbedienung nicht an sehr warmen Orten oder im direkten Sonnenlicht<br />
liegen, da sonst die Bedienoberfläche beschädigt werden kann.<br />
Den Subwoofer ein-/ausschalten<br />
Wenn Sie alle Verbindungen geprüft haben, können Sie den Subwoofer und die<br />
angeschlossenen Komponenten nun einschalten. Alle Bedienschritte (außer dem<br />
Ein- und Ausschalten am Stromnetz) können einfach mit der Fernbedienung vorgenommen<br />
werden.<br />
POWER<br />
On<br />
AC IN<br />
Netzschalter ein-/ausschalten<br />
Der Netzschalter auf der Rückseite schaltet den Subwoofer komplett aus: Fernbedienbefehle<br />
sind dann nicht möglich. Im Normalfall sollte daher der Netzschalter auf<br />
On stehen.<br />
Schalten Sie den Subwoofer am rückseitigen Netzschalter ein.<br />
Die Status LED auf der Front leuchtet grün.<br />
34 <strong>Dynaudio</strong> <strong>SUB</strong> <strong>300</strong>/<strong>500</strong>
Den Subwoofer bedienen<br />
AUTOMATIK-Modus für Ein/Stand-by<br />
Bei jedem Signal schaltet sich die Elektronik automatisch ein. Wenn 20 Minuten lang<br />
kein Signal erfolgt, schaltet der Subwoofer automatisch auf Stand-by, bis wieder ein<br />
Signal am Eingang anliegt.<br />
Die LEDs an der Vorderfront zeigen an, in welchem Modus sich der Subwoofer<br />
befindet:<br />
1 2 3<br />
1. Infrarot Empfänger<br />
2. Status LED<br />
Grün:<br />
Rot:<br />
Aus:<br />
Subwoofer ist eingeschaltet<br />
Subwoofer ist im Stand-by-Modus<br />
Netzschalter ist ausgeschaltet<br />
3. MANUELL-Modus LED<br />
Grün: Subwoofer wurde manuell eingeschaltet (siehe nächsten Abschnitt).<br />
LEVEL<br />
POWER<br />
Manuell ein- oder auf Stand-by schalten<br />
Auch im AUTOMATIK-Modus ist es jederzeit möglich, den Subwoofer mit den<br />
POWER-Tasten ein oder auf Stand-by zu schalten.<br />
Durch kurzes Drücken der grünen Taste I schaltet sich der Subwoofer ein.<br />
War er bereits eingeschaltet, bleibt der Befehl ohne Funktion. Nach 20 Minuten<br />
ohne Signal wird der Subwoofer wieder auf Stand-by geschaltet.<br />
Durch kurzes Drücken der roten Taste O schaltet der Subwoofer auf Stand-by.<br />
War er bereits auf Stand-by, bleibt der Befehl ohne Funktion. Sollte gerade ein<br />
Signal anliegen, schaltet sich der Subwoofer sofort wieder ein.<br />
MANUELL-Modus für Ein/Stand-by<br />
Soll der Subwoofer ständig (und unabhängig vom Musiksignal) auf Stand-by oder eingeschaltet<br />
sein, kann der AUTOMATIK-Modus deaktiviert werden.<br />
Die MANUELL-Modus LED leuchtet, wenn der Subwoofer im<br />
MANUELL-Modus eingeschaltet ist.<br />
LEVEL<br />
POWER<br />
Den Subwoofer dauerhaft einschalten:<br />
Halten Sie die grüne Taste I der Fernbedienung für zwei Sekunden gedrückt.<br />
Die Status LED leuchtet nun grün. Wenn der Subwoofer eingeschaltet war, bleibt<br />
er eingeschaltet; wenn er auf Stand-by stand, wird er eingeschaltet.<br />
<strong>Dynaudio</strong> <strong>SUB</strong> <strong>300</strong>/<strong>500</strong> 35
Den Subwoofer bedienen<br />
LEVEL<br />
LEVEL<br />
LEVEL<br />
POWER<br />
POWER<br />
POWER<br />
Dauerhaft auf Stand-by schalten:<br />
Halten Sie die rote Taste O der Fernbedienung für zwei Sekunden gedrückt.<br />
Wenn der Subwoofer auf Stand-by war, bleibt er auf Stand-by; wenn er<br />
eingeschaltet war, wird er auf Stand-by eingestellt.<br />
Der Subwoofer kann im Stand-by-Betrieb automatisch oder manuell eingeschaltet<br />
werden. Werkseitig ist der AUTOMATIK-Modus voreingestellt, da dies der bedienerfreundlichste<br />
ist.<br />
Zurück in den AUTOMATIK-Modus:<br />
Drücken Sie kurz die rote Taste O oder die grüne Taste I.<br />
Unabhängig vom derzeitigen Modus wird so der AUTOMATIK-Modus wieder<br />
aktiviert. Hatte die Manuell-Modus LED zuvor geleuchtet, so erlischt sie nun.<br />
Hinweis<br />
• Während alle anderen Tasten der Fernbedienung im Slave-Betrieb deaktiviert sind,<br />
kann der Subwoofer weiterhin manuell ein oder auf Stand-by geschaltet werden.<br />
• Nach jedem Einschalten werden die Einstellungen vor dem letzten Ausschalten<br />
übernommen. Auch bei einer vorübergehenden Trennung vom Stromnetz bleiben<br />
die letzten Einstellungen erhalten.<br />
Die Lautstärke ändern (LEVEL)<br />
Die richtige Lautstärke ist ein sehr wichtiger Aspekt einer ausgewogenen, ideal auf<br />
einander abgestimmten Lautsprecherkombination. Beachten Sie daher auch das<br />
Kapitel „Ideale Einstellungen finden“ auf Seite 42.<br />
ACHTUNG<br />
• Hören Sie nicht über einen längeren Zeitraum bei hoher Lautstärke, um gesundheitliche<br />
Schäden zu vermeiden.<br />
<strong>SUB</strong>WOOFER CONTROL DSC 1<br />
CROSSOVER FREQUENCY Hz<br />
60 80 100 FLAT<br />
OFF 0 o 90 o<br />
EXT<br />
PHASE<br />
ON<br />
270 o 180 o<br />
A B C D<br />
PRESET<br />
D NAUDIO<br />
A U T H E N T I C F I D E L I T Y<br />
Ändern der Lautstärke<br />
Drücken Sie LEVEL + um die Lautstärke anzuheben, bis die gewünschte Lautstärke<br />
erreicht ist. Bei einem kurzen, einmaligen Tastendruck wird die Lautstärke<br />
um 1 dB angehoben.<br />
Drücken Sie LEVEL – um die Lautstärke zu verringern, bis die gewünschte Lautstärke<br />
erreicht ist. Bei einem kurzen, einmaligen Tastendruck wird die Lautstärke<br />
um 1 dB verringert.<br />
Hinweis<br />
• Zusammen mit weiteren Einstellmöglichkeiten kann die Lautstärke in einer der vier<br />
Preset-Voreinstellungen gespeichert werden (siehe „Voreinstellungen speichern<br />
und abrufen (PRESET)“ auf Seite 39). Sie können so die ideale Übergangsfrequenz<br />
mit einer korrekten Phase und der abgestimmten Lautstärke jederzeit per<br />
kurzem Tastendruck einstellen.<br />
• Die Lautstärkeregelung ist nicht aktiviert, wenn der Subwoofer im Slave-Betrieb<br />
arbeitet. In diesem Fall werden die Einstellungen des Master-Subwoofers übernommen<br />
(siehe „Master- und Slave-Einstellung“ auf Seite 32).<br />
36 <strong>Dynaudio</strong> <strong>SUB</strong> <strong>300</strong>/<strong>500</strong>
Den Subwoofer bedienen<br />
LEVEL<br />
POWER<br />
<strong>SUB</strong>WOOFER CONTROL DSC 1<br />
CROSSOVER FREQUENCY Hz<br />
60 80 100 FLAT<br />
OFF 0 o 90 o<br />
EXT<br />
PHASE<br />
ON<br />
270 o 180 o<br />
A B C D<br />
PRESET<br />
LEVEL<br />
D NAUDIO<br />
A U T H E N T I C F I D E L I T Y<br />
POWER<br />
<strong>SUB</strong>WOOFER CONTROL DSC 1<br />
CROSSOVER FREQUENCY Hz<br />
60 80 100 FLAT<br />
Die Übergabefrequenz wählen (CROSSOVER<br />
FREQUENCY)<br />
Für die Übergabefrequenz des Subwoofers gibt es vier Einstellmöglichkeiten: 60 Hz,<br />
80 Hz und 100 Hz (mit einer Flankensteilheit von 24 dB/Okt.) sowie FLAT (ohne<br />
Begrenzung). In den meisten Anwendungen wird die Übergabefrequenz im Bass-<br />
Management des Receivers oder Prozessors voreingestellt. In diesem Fall stellen Sie<br />
den Subwoofer auf FLAT. In dieser Einstellung wird der Frequenzgang des Subwoofers<br />
selbst nicht begrenzt. Beachten Sie die entsprechenden Hinweise in der Bedienungsanleitung<br />
Ihres Receivers/Prozessors.<br />
Übergabefrequenz wählen:<br />
Drücken Sie die entsprechende CROSSOVER FREQUENCY-Taste auf der Fernbedienung.<br />
Beachten Sie auch mögliche Hinweise und Empfehlungen in der Bedienungsanleitung<br />
Ihrer weiteren Lautsprecher sowie das Kapitel „Ideale Einstellungen finden“ auf<br />
Seite 42.<br />
Hinweis<br />
• Zusammen mit weiteren Einstellmöglichkeiten kann die Übergabefrequenz in einer<br />
der vier Presets gespeichert werden (siehe „Voreinstellungen speichern und abrufen<br />
(PRESET)“ auf Seite 39). Sie können so die ideale Übergabefrequenz mit einer<br />
korrekten Phase und der abgestimmten Lautstärke jederzeit per kurzem Tastendruck<br />
einstellen.<br />
• Die Frequenzregelung ist nicht aktiviert, wenn der Subwoofer im Slave-Betrieb<br />
arbeitet. In diesem Fall werden die Einstellungen des Master-Subwoofers übernommen<br />
(siehe „Master- und Slave-Einstellung“ auf Seite 32).<br />
Die Tiefbass-Erweiterung aktivieren (EXT ON/OFF)<br />
Die Bezeichnung EXT steht für „Extended“ (erweitert). Mit EXT ON wird ein erweiterter<br />
Tiefbassbereich aktiviert, der auch die tiefsten Frequenzen unbegrenzt wiedergibt.<br />
Extrem tiefe Bass-Signale benötigen viel Leistung. Daher ermöglicht EXT OFF das<br />
sanfte Filtern dieser tiefsten Frequenzen, wodurch in dem verbleibenden normalen<br />
Bass-Bereich höhere Dynamik und kräftigere Impulse möglich sind. Für die meisten<br />
Filmproduktionen und Musikaufnahmen ist diese Einstellung die geeignetste.<br />
Einige aufwändige Spezialeffekte oder besonders hochwertige Musikaufnahmen mit<br />
speziellen Instrumenten sind dagegen nur durch die unlimitiert tiefsten Frequenzen<br />
bei EXT ON vollständig hörbar.<br />
ON<br />
A<br />
EXT<br />
OFF<br />
B<br />
0 o 90 o<br />
PHASE<br />
270 o 180 o<br />
C D<br />
ACHTUNG<br />
• Hören Sie nicht über einen längeren Zeitraum bei hoher Lautstärke, um gesundheitliche<br />
Schäden zu vermeiden.<br />
Tiefbassbereich erweitern:<br />
Drücken Sie EXT ON, um den erweiterten Tiefbassbereich zu aktivieren.<br />
PRESET<br />
D NAUDIO<br />
A U T H E N T I C F I D E L I T Y<br />
<strong>Dynaudio</strong> <strong>SUB</strong> <strong>300</strong>/<strong>500</strong> 37
Den Subwoofer bedienen<br />
LEVEL<br />
POWER<br />
Hinweis<br />
• Zusammen mit weiteren Einstellmöglichkeiten kann der EXT-Modus in einer der<br />
vier Presets gespeichert werden (siehe „Voreinstellungen speichern und abrufen<br />
(PRESET)“ auf Seite 39). So können Sie beispielsweise eine Einstellung mit<br />
EXT ON für die „audiophile Wiedergabe“ verwenden und die Einstellung mit<br />
EXT OFF für Homecinema.<br />
• Wenn Sie Musik von einer Schallplatte hören, sollte der EXT-Modus ausgeschaltet<br />
bleiben (EXT OFF), da jeder Plattenspieler systembedingt tieffrequente Störsignale<br />
abgibt (so genanntes Rumpeln), die der Subwoofer sonst ungefiltert zusammen<br />
mit dem Musiksignal wiedergibt.<br />
• Die Einstellung des EXT-Modus ist nicht möglich, wenn der Subwoofer im Slave-<br />
Betrieb arbeitet. In diesem Fall werden die Einstellungen des Master-Subwoofers<br />
übernommen (siehe auch „Master- und Slave-Einstellung“ auf Seite 32).<br />
Die Phasendrehung einstellen (PHASE)<br />
Die Phase des <strong>Dynaudio</strong> Subwoofers ist werkseitig auf 0° eingestellt, was in den<br />
meisten Aufstellungen korrekt ist. Für weitere Anpassungen beachten Sie bitte die<br />
Hinweise im Kapitel „Ideale Einstellungen finden“ auf Seite 42.<br />
Phase einstellen<br />
0°, 90°, 180° oder 270° drücken, um die gewünschte Phase auszuwählen.<br />
<strong>SUB</strong>WOOFER CONTROL DSC 1<br />
CROSSOVER FREQUENCY Hz<br />
60 80 100 FLAT<br />
OFF 0 o 90 o<br />
EXT<br />
PHASE<br />
ON<br />
270 o 180 o<br />
Hinweis<br />
• Zusammen mit weiteren Einstellmöglichkeiten kann die Phase in einer der vier Presets<br />
gespeichert werden (siehe auch „Voreinstellungen speichern und abrufen<br />
(PRESET)“ auf Seite 39). Sie können so die ideale Phase mit der idealen Übergabefrequenz<br />
und der abgestimmten Lautstärke jederzeit per kurzem Tastendruck<br />
einstellen.<br />
• Die Einstellung der Phase ist nicht möglich, wenn der Subwoofer im Slave-Betrieb<br />
arbeitet. In diesem Fall werden die Einstellungen des Master-Subwoofers übernommen.<br />
A<br />
B<br />
C<br />
D<br />
PRESET<br />
D NAUDIO<br />
A U T H E N T I C F I D E L I T Y<br />
38 <strong>Dynaudio</strong> <strong>SUB</strong> <strong>300</strong>/<strong>500</strong>
Den Subwoofer bedienen<br />
Master<br />
Input<br />
Function<br />
Slave<br />
LEVEL<br />
Store<br />
Preset<br />
Settings<br />
Protect<br />
POWER<br />
<strong>SUB</strong>WOOFER CONTROL DSC 1<br />
CROSSOVER FREQUENCY Hz<br />
60 80 100 FLAT<br />
1.<br />
2.<br />
Voreinstellungen speichern und abrufen (PRESET)<br />
Mit den PRESET-Tasten können vier individuelle Einstellungen mit Hilfe einer<br />
Memory-Funktion gespeichert und jederzeit abgerufen werden. Zum Beispiel: A für<br />
Klassikmusik, B für Rock-/Popmusik, C für Video-DVDs und D für eine dezentere<br />
Abend-Einstellung.<br />
Durch die bequeme Fernbedienbarkeit der Presets sind die verschiedenen Voreinstellungen<br />
auch ideal zum Experimentieren während der ersten Einstellungen geeignet.<br />
Die Einstellungen können nach dem Speichern gesperrt werden, um<br />
unbeabsichtigte Veränderungen zu vermeiden.<br />
Jede Preset-Voreinstellung (Tasten A bis D) speichert eine Kombination aus zuvor<br />
gewählter Lautstärke-, Übergangsfrequenz-, Tiefbass- und Phaseneinstellung.<br />
Voreinstellungen speichern<br />
1. Zum Speichern einer Voreinstellung muss der Schalter Preset Settings auf der<br />
Rückseite des Subwoofers auf Store (speichern) gestellt werden.<br />
2. Stellen Sie nun LEVEL, CROSSOVER FREQUENCY, EXT and PHASE auf die<br />
gewünschten Werte ein.<br />
3. Halten Sie die gewünschten PRESET-Taste A, B, C oder D der Fernbedienung<br />
für 3 Sekunden gedrückt.<br />
Die Status LED blinkt nun 3 mal, um den Speichervorgang zu bestätigen. Eine<br />
bisher gespeicherte Einstellung ist nun überschrieben.<br />
4. Zum Sichern der gespeicherten Voreinstellung stellen Sie den rückseitigen<br />
Schalter Preset Settings in die Position Protect (schützen).<br />
ON<br />
A<br />
PRESET<br />
EXT<br />
Master<br />
Input<br />
Function<br />
Slave<br />
OFF<br />
B<br />
0 o 90 o<br />
PHASE<br />
270 o 180 o<br />
C<br />
D NAUDIO<br />
A U T H E N T I C F I D E L I T Y<br />
D<br />
3.<br />
Store<br />
4.<br />
Preset<br />
Settings<br />
Protect<br />
Hinweis<br />
Voreinstellungen abrufen<br />
Drücken Sie kurz auf die gewünschte PRESET-Taste A, B, C oder D der Fernbedienung.<br />
Die gewählte Voreinstellung ist nun aktiviert.<br />
Hinweis<br />
• Individuelle Veränderungen der Werte sind temporär möglich, ohne die gespeicherten<br />
Voreinstellungen zu beeinflussen.<br />
• Voreinstellungen können nur im Master-Betrieb gespeichert und abgerufen werden.<br />
• Einer der Presets kann als ideale Grundeinstellung (z. B. eine möglichst neutrale<br />
Einstellung) gespeichert werden, die dann beim Experimentieren und Speichern<br />
neuer Variationen jederzeit als Referenz dienen kann.<br />
<strong>Dynaudio</strong> <strong>SUB</strong> <strong>300</strong>/<strong>500</strong> 39
Aufstellen und Optimieren<br />
Aufstellen und Optimieren<br />
Den Subwoofer positionieren<br />
Sehr häufig wird die Aufstellung eines Subwoofers als nebensächlich betrachtet, da<br />
das menschliche Ohr tiefe Töne zwar hören, aber nicht orten kann. Tatsächlich ist die<br />
richtige Positionierung eines Subwoofers aber entscheidend für die Klangqualität, da<br />
die Einflüsse des Raumes sowie die Aufstellung in Verbindung mit weiteren Lautsprechern<br />
insbesondere bei tiefen Frequenzen berücksichtigt werden müssen. Ein gut<br />
positionierter Subwoofer integriert sich bei jeder Lautstärke vollkommen in das<br />
gesamte Klangbild; eine falsche Aufstellung kann die gesamte Klangabbildung beeinträchtigen.<br />
Die folgenden Hinweise sind lediglich ungefähre Richtlinien, die eine richtige Aufstellung<br />
erleichtern sollen. Um die bestmögliche Klangqualität des Subwoofers bei Ihrer<br />
eigenen Raumaufstellung zu erreichen, wird Ihr <strong>Dynaudio</strong> Fachhändler noch einige<br />
Aufstellungshinweise geben können.<br />
• Das richtige Aufstellen und Positionieren ist unweigerlich verbunden mit der passenden<br />
Lautstärke-, Frequenz- und Phaseneinstellung für die gewählte Aufstellung.<br />
Dazu eignen sich besonders die vier Speicherplätze des Subwoofers.<br />
Beachten Sie daher auch die Kapitel „Ideale Einstellungen finden“ auf Seite 42<br />
sowie „Voreinstellungen speichern und abrufen (PRESET)“ auf Seite 39.<br />
• Wenn Sie verschiedene Einstellungen und Positionen ausprobieren, spielen Sie<br />
unterschiedliche Musiktitel mit einer Vielzahl verschiedener Bassfrequenzen und<br />
verschiedener Instrumente. Gerade akustische Instrumente, wie Kontrabass,<br />
Bassgitarre, Kirchenorgel etc., spielen über einen weiten Bassbereich und zeigen<br />
eindrucksvoll die Bedeutung einer idealen Balance zwischen dem Subwoofer und<br />
den Frontlautsprechern. Ein Signal mit nur kurzen, impulsiven Bass-Sequenzen<br />
(z. B. Explosionen in Filmszenen) sind nicht geeignet, da die Aufstellung dann nur<br />
für dieses spezielle Bass-Signal optimiert wird und andere tiefe Frequenzen eventuell<br />
verfälscht wiedergegeben werden. Zudem können Sie für spezielle Filme oder<br />
Musikaufnahmen die verschiedenen Speicher (Presets) belegen.<br />
Raum-Moden<br />
1/4<br />
1/2<br />
3/4<br />
1/4<br />
1/2 3/4<br />
Hörraum<br />
Jeder Wohnraum hat bestimmte so genannte Raum-Moden, d. h. diverse Bereiche im<br />
Raum, die entweder deutlich weniger oder sehr viel Bassvolumen aufweisen. Dieser<br />
Effekt tritt insbesondere in geschlossenen, nahezu quadratisch geschnittenen Räumen<br />
auf. Mit einem Subwoofer ist der beste Platz dort, wo der Bass weder überhöht<br />
noch zurückgenommen klingt.<br />
Vermeiden Sie es bei geschlossenen, gerade geschnittenen Räumen im allgemeinen,<br />
den Subwoofer in 1/4, 1/2 oder 3/4 der Raumlänge zu platzieren. Hier sind<br />
die Raum-Moden am deutlichsten (gestrichelte Linien in der Abbildung links).<br />
Eine wandnahe Aufstellung verstärkt die tiefen Frequenzen zusätzlich, insbesondere<br />
in den Raumecken. Obwohl diese Verstärkung teilweise durch die Lautstärkeeinstellung<br />
kompensiert werden kann, kann die Wandnähe wie bei jedem Lautsprecher<br />
Klangverfälschungen und Dröhnen verursachen. Halten Sie einen gewissen Abstand<br />
zu allen Seiten- und Rückwänden ein und versuchen Sie, einen guten Kompromiss<br />
zwischen der optisch gewünschten Aufstellung und einem ausgeglichenen Klangbild<br />
zu erreichen. Bedenken Sie, dass jede neue Aufstellung potenziell auch mit neuen<br />
Einstellungen verbunden ist.<br />
40 <strong>Dynaudio</strong> <strong>SUB</strong> <strong>300</strong>/<strong>500</strong>
Aufstellen und Optimieren<br />
Eckaufstellung<br />
Maximaler Schalldruck im Bass, aber ungleichmäßige Energieverteilung im Raum<br />
(ausgeprägte Raum-Moden), insbesondere bei rechteckigen und quadratischen,<br />
geschlossenen Räumen.<br />
Kontrollieren Sie vom Hörplatz aus, ob der Bass sich über das gesamte Tiefton-<br />
Spektrum gleichmäßig anhört. Es sollte möglichst nicht zu frequenzabhängigen<br />
Überhöhungen oder Auslöschungen kommen, die ein äußerst inhomogenes<br />
Klangbild erzeugen. In diesem Fall schieben Sie den Subwoofer aus der Ecke<br />
heraus, zum Beispiel entlang einer der Wände.<br />
Wandaufstellung mit Abstand zur Ecke<br />
Diese Position dicht an der Wand erzeugt noch immer einen verstärkten Tiefbass,<br />
aber deutlich weniger als direkt in der Ecke. Auch hier können störende Raum-Moden<br />
auftreten.<br />
Kontrollieren Sie vom Hörplatz aus, ob der Bass sich über das gesamte Tiefton-<br />
Spektrum gleichmäßig anhört. Falls nicht, schieben Sie den Subwoofer erneut<br />
weiter weg oder näher zu Ihrer Hörposition hin. Vermeiden Sie die Platzierung<br />
exakt in der Mitte der Wand oder bei jeweils einem Viertel der Wandlänge.<br />
Freistehend, mit Abstand zur Wand und zur Ecke<br />
An dieser Stelle ist der Bass am geringsten, weil die physikalisch bedingte Bassverstärkung<br />
der umliegenden Wände fehlt. Dafür erreichen Sie an diesem Standort aber<br />
eine sehr gleichmäßige Schallverteilung im Raum.<br />
Auch hier ist es ratsam, nicht exakt die Mitte zwischen den Wänden oder ein Viertel<br />
der Strecke zu wählen. Besonders in quadratischen und rechteckigen,<br />
geschlossenen Räumen ist diese freie Aufstellung dringend anzuraten.<br />
Mehrere Subwoofer verwenden<br />
Wenn Sie mehrere Subwoofer verwenden und sorgfältig im Raum positionieren, ist<br />
es möglich, die einzelnen Raum-Moden elegant auszubalancieren. Dadurch erreichen<br />
Sie kräftige Basspegel bei einer gleichzeitig sehr gleichmäßigen Schallverteilung<br />
im Raum. Es macht sich klanglich bezahlt, ausgiebig mit der Aufstellung des<br />
zusätzlichen Subwoofers zu experimentieren. Dabei können auch eher kritische Aufstellungen<br />
(zum Beispiel dicht an der Rückwand) beachtet werden.<br />
Zusätzliche Subwoofer verstärken nicht automatisch die Ausprägung einzelner<br />
Raummoden, sonder helfen in aller Regel – sogar schon ohne zeitraubende und<br />
sorgfältige Standortsuche – die Raum-Moden gleichmäßiger im Hörraum zu verteilen.<br />
Das Ergebnis ist fast immer ein homogenerer Bassbereich.<br />
Hinweis<br />
Stellen Sie Subwoofer generell mindestens einen Meter entfernt von jedem<br />
Fernsehgerät auf, da das starke Magnetfeld die Bildqualität beeinträchtigen kann.<br />
Sollten Sie Farbveränderungen auf dem Bildschirm feststellen, positionieren Sie<br />
den Subwoofer oder andere Lautsprecher weiter vom Fernsehgerät weg.<br />
<strong>Dynaudio</strong> <strong>SUB</strong> <strong>300</strong>/<strong>500</strong> 41
Aufstellen und Optimieren<br />
Ideale Einstellungen finden<br />
Experimentieren Sie<br />
Verwenden Sie<br />
unterschiedliche Musiktitel<br />
Überprüfen Sie Änderungen<br />
Speichern Sie<br />
Ihre Ergebnisse ab<br />
Bevor Sie sich für eine endgültige Einstellung entscheiden, sollten Sie in jedem Fall<br />
sowohl mit dem Aufstellungsort wie auch den einzustellenden Werten des Subwoofers<br />
experimentieren. Dazu eignen sich besonders die vier Speicherplätze des Subwoofers.<br />
Sind Sie auf der Suche nach der besten Platzierung des Subwoofers im<br />
Raum, speichern Sie einfach die für den gewählten Platz am besten geeigneten Einstellungen<br />
ab. Dann können Sie zum Beispiel zwischen einem zweiten Standort ganz<br />
leicht hin und her schieben und per Tastendruck die jeweils passende Konfiguration<br />
anwählen. Bitte lesen Sie dazu auch den Abschnitt „Voreinstellungen speichern und<br />
abrufen (PRESET)“ auf Seite 39.<br />
Um die optimale Einstellung zu finden, spielen Sie unterschiedliche Musiktitel mit<br />
einer Vielzahl verschiedener Bassfrequenzen. Gerade akustische Instrumente, wie<br />
Kontrabass, Bassgitarre, Kirchenorgel etc., spielen über einen weiten Bassbereich<br />
und zeigen eindrucksvoll die Bedeutung einer idealen Balance zwischen dem Subwoofer<br />
und den Frontlautsprechern.<br />
Obwohl es generell empfehlenswert ist, mit dem zuvor genannten Prozedere die richtigen<br />
Parameter zu finden, muss man beachten, dass die Änderung eines Wertes<br />
andere Einstellungen stark beeinflusst. Zum Beispiel könnte es sein, dass die korrekte<br />
Phase eine leichte Absenkung des Pegels notwendig macht – obwohl der<br />
gewählte Level vorher perfekt gestimmt hat. Es ist deshalb empfehlenswert, die vorherigen<br />
Einstellungen nach einer Änderung nochmals zu überprüfen, bevor man den<br />
nächsten Schritt macht. In der Summe kann diese Vorgehensweise dann allerdings<br />
eine nennenswerte Anzahl von Wiederholungen provozieren, bis die optimale<br />
Balance gefunden ist.<br />
Ist diese erzielt, hinterlegen Sie die Einstellungen auf einem der vier Speicherplätze.<br />
Als dauerhaften Bezugspunkt empfiehlt es sich, eine Referenzeinstellung unverändert<br />
auf einem der Presets zu speichern, damit Sie beim Experimentieren mit dem<br />
einen oder anderen Wert immer wieder leicht zur gefundenen Grundeinstellung<br />
zurückkehren können.<br />
Lautstärke<br />
Mit den Tasten LEVEL + und LEVEL – können Sie das Verhältnis der Lautstärke zwischen<br />
Subwoofer und Ihren weiteren Lautsprechern justieren:<br />
Spielen Sie einen Titel mehrfach hintereinander, bis zum Beispiel ein Instrument<br />
über seinen gesamten Frequenzbereich homogen klingt.<br />
Sollten Sie einen bestimmten Bassbereich an Ihrem Hörplatz als übertrieben laut<br />
(voluminös, kräftig) oder ganz im Gegenteil als zurückhaltend (dünn, schwach) empfinden,<br />
deutet es darauf hin, dass Sie nochmals die Platzierung des Subwoofers verändern<br />
und/oder die Übergangsfrequenz variieren sollten. Bitte lesen Sie dazu das<br />
Kapitel „Den Subwoofer positionieren“ auf Seite 40 und den Abschnitt „Übergangsfrequenzen“<br />
auf Seite 43.<br />
Hinweis<br />
Wenn Sie mehrere Subwoofer in einem Aufbau verwenden, achten Sie bitte sorgfältig<br />
darauf, dass alle Einstellungen wie Lautstärke, Übergangsfrequenz, Phase und Tiefbass<br />
an allen Subwoofern übereinstimmen. Dazu sollten Sie die Option nützen, einen<br />
Subwoofer als Master zu definieren und alle anderen als Slave zu betreiben (siehe<br />
„Master- und Slave-Einstellung“ auf Seite 32).<br />
42 <strong>Dynaudio</strong> <strong>SUB</strong> <strong>300</strong>/<strong>500</strong>
Aufstellen und Optimieren<br />
Pegel<br />
60 Hz<br />
80 Hz<br />
100 Hz<br />
Flat<br />
Übergangsfrequenzen<br />
Wird ein Subwoofer in eine Anlage integriert, hängt das klangliche Ergebnis stark vom<br />
Zusammenspiel zwischen Subwoofer und den weiteren Lautsprechern ab. Während<br />
ein großer Standlautsprecher im Tieftonbereich einen entsprechend hohen Anteil<br />
zum Musikgeschehen beiträgt, kann ein kleiner Lautsprecher tiefste Frequenzen gar<br />
nicht mehr wiedergeben. Im Überschneidungsbereich von Subwoofer und Lautsprecher<br />
ergeben sich im ersten Fall Überhöhungen, im zweiten Fall akustische Löcher.<br />
Die nachfolgenden Abbildungen veranschaulichen die möglichen Folgen (beachten<br />
Sie bitte, dass die Diagramme keine exakten Messwerte, sondern den prinzipiellen<br />
Filterverlauf wiedergeben).<br />
60 80 100<br />
Frequenz/Hz<br />
Pegel<br />
Kombinierter Frequenzgang<br />
Subwoofer<br />
Hauptlautsprecher<br />
Übergangsfrequenzen optimal eingestellt<br />
Idealerweise knüpft der Hauptlautsprecher übergangslos an den Übertragungsbereich<br />
des Subwoofers an. In der linken Abbildung passen Frequenzgang von Subwoofer<br />
und Hauptlautsprecher perfekt zueinander. Das Ergebnis: Ein glatter<br />
Frequenzgang mit neutralem Klangbild.<br />
Frequenz<br />
Pegel<br />
Kombinierter Frequenzgang<br />
Subwoofer<br />
Hauptlautsprecher<br />
Subwoofer zu niedrig, Lautsprecher zu hoch eingestellt<br />
Filtert der Subwoofer entsprechend des gewählten Frequenzbereichs zu früh, oder<br />
reicht die Basswiedergabe der Lautsprecher nicht tief genug, so entsteht ein akustisches<br />
Loch. Das heißt, es gibt einen Bereich, in dem die Klanginformation verloren<br />
geht.<br />
Frequenz<br />
Pegel<br />
Kombinierter Frequenzgang<br />
Subwoofer<br />
Hauptlautsprecher<br />
Subwoofer zu hoch, Lautsprecher zu niedrig eingestellt<br />
Umgekehrt verursacht eine viel zu hohe Grenzfrequenz des Subwoofers eine Überlappung<br />
des Subwoofers mit dem Signal der Frontlautsprecher. Der Schalldruck<br />
erhöht sich in diesem Bereich, da sich die Pegel addieren.<br />
Frequenz<br />
<strong>Dynaudio</strong> <strong>SUB</strong> <strong>300</strong>/<strong>500</strong> 43
Aufstellen und Optimieren<br />
Bass-Management<br />
bei Mehrkanal-Systemen<br />
Viele Mehrkanal-Prozessoren und Receiver besitzen ein umfangreiches Bass-<br />
Management, mit dessen Hilfe die Übergangsfrequenzen sowohl für den Subwoofer<br />
wie auch für die Hauptlautsprecher eingestellt werden können. Sollten Sie eine solche<br />
Voreinstellung verwenden, können Sie den Subwoofer mit der Fernbedienung<br />
auf FLAT stellen, denn in diesem Fall übernimmt das Bass-Management die erforderliche<br />
Filterarbeit. Bitte beachten Sie für diese Einstellung die Anweisungen in der<br />
Anleitung Ihres Receivers oder Prozessors.<br />
Hinweis<br />
• Wenn Sie das Bass-Management Ihres Mehrkanal-Systems verwenden, vergewissern<br />
Sie sich unbedingt davon, dass der Subwoofer nicht auf der gleichen oder gar<br />
niedrigeren Grenzfrequenz eingestellt ist, als das verwendete Bass-Management<br />
Ihres Receivers.<br />
• Die korrekte Frequenzgangwahl hängt stark von den Hauptlautsprechern ab.<br />
Manchmal sind kompakte Lautsprecher für das Zusammenspiel mit einem Subwoofer<br />
konzipiert. In diesem Fall könnte ein unbeschnittenes Verstärkersignal die<br />
Lautsprecher beschädigen. Sollten Sie sich nicht ganz sicher sein, überprüfen Sie<br />
in der Bedienungsanleitung Ihrer Lautsprecher, ob es Einschränkungen zu beachten<br />
gibt oder Empfehlungen ausgesprochen werden.<br />
Lautsprecher mit<br />
unbeschnittenem Signal<br />
Selbstverständlich ist es möglich, den Subwoofer in ein System zu integrieren, in dem<br />
die Lautsprecher das unbeschnittene Signal erhalten. In diesem Fall hängt die Einstellung<br />
der Übergangsfrequenz des Subwoofers stark von dem natürlichen Frequenzgangverlauf<br />
des Hauptlautsprechers ab. Im Allgemeinen leistet ein großer<br />
Standlautsprecher im Tieftonbereich einen entsprechenden Anteil am Musikgeschehen.<br />
Deshalb sollte in dieser Kombination der Subwoofer auf 60 Hz eingestellt werden.<br />
Im Zusammenspiel mit kompakten Lautsprechern (Regallautsprechern) mit<br />
systembedingt nicht so tiefem Bass empfiehlt sich die Wahl von 80 oder 100 Hz. Im<br />
Folgenden einige Hilfen, um die richtige Wahl zu treffen:<br />
Spielen Sie einen Musiktitel mit einem kräftigen Bassanteil. Geeignet sind dazu<br />
zum Beispiel Instrumente wie der Kontrabass oder eine Bassgitarre.<br />
Beginnen Sie mit 60 Hz und verwenden Sie diesen Wert zur Pegel-Einstellung.<br />
Achten Sie genau auf den gespielten Bass-Anteil. Dabei muss über den gesamten<br />
Bassbereich des Instruments die Lautstärke unverändert bleiben – unabhängig<br />
vom jeweiligen Frequenzbereich. Speziell mit sehr kleinen Lautsprechern kann es<br />
vorkommen, dass der Bassbereich nicht homogen wirkt. Meist hört man den Subwoofer<br />
sehr deutlich, dann bricht der Ton ein bis der Lautsprecher wieder übernimmt.<br />
Dies wird oft als akustisches Loch im Bassbereich bezeichnet. Insgesamt<br />
wirkt die Wiedergabe dann dünn. In einigen Anwendungen kann dennoch auch die<br />
60 Hz-Einstellung schon sehr gut klingen. In beiden Fällen wählen Sie zum Vergleich<br />
nun die 80 Hz-Einstellung.<br />
Während Sie den gleichen Titel mit identischer Lautstärke noch einmal spielen, achten<br />
Sie bitte genau auf die Lautstärke des Bassbereichs. Sollte der Bass bei 80 Hz<br />
auf einmal lauter und aufgebläht spielen – verglichen mit der vorherigen 60 Hz-Einstellung<br />
– gehen Sie zurück zu 60 Hz und haben damit auch schon die richtige Übergabefrequenz<br />
gefunden. Sollte es immer noch ein Defizit (Loch) in der Basswiedergabe<br />
geben, oder auch wenn Sie nun mit dem Ergebnis zufrieden sind, erhöhen<br />
Sie die Übergangsfrequenz und wechseln Sie zur 100 Hz-Einstellung.<br />
Spielen Sie den gleichen Titel erneut und achten Sie wieder auf die Basslautstärke.<br />
Falls der Bass nun korrekt klingt, belassen Sie es bei der 100 Hz-Wahl.<br />
Wird der Bassbereich allerdings wieder lauter und unpräziser – verglichen mit der<br />
80 Hz-Einstellung – gehen Sie auf die Übergangsfrequenz von 80 Hz zurück.<br />
44 <strong>Dynaudio</strong> <strong>SUB</strong> <strong>300</strong>/<strong>500</strong>
Aufstellen und Optimieren<br />
Pegel<br />
Kombinierter Frequenzgang<br />
Subwoofer<br />
Hauptlautsprecher<br />
Phase<br />
Mit der Einstellung der Phase können Sie das Zeitverhalten zwischen dem Subwoofer<br />
und den Hauptlautsprechern justieren. Falls der Subwoofer oder die Frontlautsprecher<br />
in Relation zueinander verzögert spielen, führt das zu einem abgeschwächten<br />
Ausgangspegel in dem Frequenzbereich, in dem sich beide Systeme überschneiden.<br />
Diese komplexe Phasenbeziehung zwischen dem Subwoofer und den Frontlautsprechern<br />
hängt von ihrem Abstand zueinander wie auch vom Konzept des Hauptlautsprechers<br />
ab. Die Abbildung links zeigt den Fall, wenn die Phase zwischen den<br />
beiden Wiedergabequellen im kritischen Überlappungsbereich nicht korrekt ist. Dies<br />
führt in dem entsprechenden Frequenzbereich zu einer nennenswerten Reduzierung<br />
der Bass-Energie im Hörraum.<br />
Frequenz<br />
LEVEL<br />
POWER<br />
<strong>SUB</strong>WOOFER CONTROL DSC 1<br />
CROSSOVER FREQUENCY Hz<br />
60 80 100 FLAT<br />
OFF 0 o 90 o<br />
EXT<br />
PHASE<br />
Die richtige Phasen-Einstellung finden:<br />
1. Wieder sollten Sie einen basskräftigen Titel einlegen, der auch Informationen im<br />
Überschneidungsbereich anbietet.<br />
2. Dann drücken Sie abwechselnd die Taste 0° und die gegensätzliche Phase 180°<br />
auf der Fernbedienung. Ohne die Lautstärke zu verändern, verfahren Sie in gleicher<br />
Weise mit der 90° und der inversen, gegenüberliegenden Phase 270°.<br />
Es kommt darauf an, welches Paar der Phasen-Einstellung (0° ⇔ 180° oder<br />
90° ⇔ 270°) den größten Unterschied im Bass produziert.<br />
3. Konzentrieren Sie sich jetzt auf das Zahlen-Paar, das Sie im ersten Schritt herausgefiltert<br />
haben (entweder 0° ⇔ 180° oder 90° ⇔ 270°), und drücken Sie die<br />
beiden Tasten immer abwechselnd hintereinander.<br />
Den Wert, bei dem Sie den Eindruck des kräftigeren Basses haben, lassen Sie<br />
eingestellt, auch wenn der Bass sehr ausgeprägt erscheint.<br />
4. Verringern Sie die Lautstärke (LEVEL), falls die Basswiedergabe jetzt zu ausgeprägt<br />
erscheint.<br />
ON<br />
270 o 180 o<br />
A<br />
B<br />
C<br />
D<br />
PRESET<br />
D NAUDIO<br />
A U T H E N T I C F I D E L I T Y<br />
<strong>Dynaudio</strong> <strong>SUB</strong> <strong>300</strong>/<strong>500</strong> 45
Fehlersuche und technische Informationen<br />
Fehlersuche und technische<br />
Informationen<br />
Fehlersuche<br />
Es kann verschiedene Gründe geben, warum der Subwoofer in Ihrem System nicht<br />
einwandfrei spielt, ohne dass ein technischer Defekt vorliegt. Die Check-Liste im Folgenden<br />
soll helfen, auftauchende Probleme zu beheben. Bevor Sie sich also auf den<br />
Weg zu Ihrem <strong>Dynaudio</strong> Fachhändler machen, vergleichen Sie bitte zuerst die möglichen<br />
Fehlerquellen anhand der nachfolgenden Tabelle.<br />
Prüfen Sie zuerst folgende Punkte:<br />
Kontrollieren Sie, ob alle Signalkabel richtig angeschlossen sind.<br />
Prüfen Sie die Einstellungen im Bass-Management Ihres Prozessors/Receivers.<br />
Erhöhen Sie schrittweise die Subwoofer-Lautstärke am Prozessor/Receiver.<br />
Erhöhen Sie schrittweise die Lautstärke an der Subwoofer-Fernbedienung<br />
(LEVEL).<br />
Problem Ursache Lösung<br />
Der Subwoofer schaltet sich aus,<br />
obwohl ein Tonsignal anliegt.<br />
Der Subwoofer reagiert nicht auf die<br />
Befehle der Fernbedienung.<br />
Der Subwoofer schaltet sich überhaupt<br />
nicht ein.<br />
Es sind keine tieffrequenten Anteile im Tonsignal<br />
enthalten. Das kann zum Beispiel bei Spielfilmen während<br />
langer Sprachdialoge passieren.<br />
• Die Leistung der Batterie in der Fernbedienung ist zu<br />
schwach.<br />
• Die Infrarot-Empfänger am Subwoofer sind verdeckt<br />
(sowohl an der Vorder- wie auch Rückseite).<br />
• Die Infrarot-Empfänger sind direktem, intensivem<br />
Sonnenlicht ausgesetzt.<br />
• Das Netzkabel sitzt nicht mehr fest in der Netzbuchse<br />
oder hat sich ganz gelöst.<br />
• Der Hauptschalter auf der Rückseite ist ausgeschaltet.<br />
Entsprechend leuchtet auch keine LED.<br />
Schalten Sie den Subwoofer vorübergehend<br />
durch Drücken der grünen Einschalttaste I auf<br />
der Fernbedienung ein.<br />
Ersetzen Sie die Batterie der Fernbedienung<br />
durch den gleichen Typ (CR 2025).<br />
Stellen Sie eine optisch direkte, unverstellte Linie<br />
(Blickkontakt) zum jeweiligen Infrarot-Empfänger<br />
(vorne oder hinten) sicher. Sollte das in Ihrem<br />
Wohnraum nicht zu realisieren sein, können Sie<br />
eine zusätzliche Infrarotverbindung (per Kabel<br />
verbundener Sender und Empfänger) einrichten.<br />
Dabei wird Ihnen Ihr <strong>Dynaudio</strong> Fachhändler<br />
gerne helfen.<br />
Vermeiden Sie es, den Subwoofer direkter<br />
Sonneneinstrahlung auszusetzen.<br />
Bitte schalten Sie das komplette System aus,<br />
bevor Sie Änderungen vornehmen!<br />
Stecken Sie das Netzkabel wieder ein.<br />
Schalten Sie den Subwoofer am Hauptschalter<br />
auf der Rückseite ein (Stellung On).<br />
Prüfen Sie die Kabelverbindungen sorgfältig.<br />
46 <strong>Dynaudio</strong> <strong>SUB</strong> <strong>300</strong>/<strong>500</strong>
Fehlersuche und technische Informationen<br />
Problem Ursache Lösung<br />
Der Subwoofer schaltet sich nicht<br />
automatisch ein.<br />
Der Subwoofer geht nicht automatisch<br />
auf Stand-by.<br />
Der Subwoofer speichert keine<br />
Einstellungen.<br />
Der Subwoofer ist eingeschaltet, aber<br />
er gibt keinen Ton von sich.<br />
• Es liegt kein Musiksignal an den Eingängen an<br />
(die Status LED leuchtet rot).<br />
• Der Subwoofer wurde vorübergehend auf manuelles<br />
Ein- und Ausschalten gestellt.<br />
Der Subwoofer wurde vorübergehend auf manuelles Einund<br />
Ausschalten gestellt (MANUELL-Modus LED leuchtet<br />
grün).<br />
Der Preset Settings-Schalter wurde auf Protect gestellt<br />
und verbietet so eine Änderung des Speicherinhaltes.<br />
• Es liegt an keinem der Eingänge des Subwoofers ein<br />
Signal an.<br />
• Im Menü des Prozessors oder Receivers wurde der<br />
Subwoofer-Ausgang ausgeschaltet.<br />
• Die Lautstärke wurde am Prozessor/Receiver auf Null<br />
gedreht.<br />
• Die Lautstärke (LEVEL) des Subwoofers wurde mittels<br />
der Fernbedienung komplett auf Null heruntergeregelt.<br />
Bitte schalten Sie das komplette System aus,<br />
bevor Sie Änderungen vornehmen!<br />
Prüfen Sie alle signalführenden Kabel sorgfältig.<br />
Überprüfen Sie, ob der Subwoofer-Ausgang am<br />
Quellengerät aktiviert ist.<br />
Schalten Sie zurück in den AUTOMATIK-Modus.<br />
Dazu drücken Sie einmal kurz die grüne<br />
Einschalttaste I auf der Fernbedienung. Der<br />
Subwoofer schaltet sich ein.<br />
Verwenden Sie den MANUELL-Modus, um den<br />
Subwoofer in Stand-by zu schalten.<br />
Dazu drücken Sie mindestens zwei Sekunden<br />
lang die rote Ausschalttaste O auf der<br />
Fernbedienung.<br />
Der Subwoofer schaltet auf Stand-by und die<br />
MANUELL-Modus LED erlischt.<br />
Schalten Sie auf der Rückseite den Schalter<br />
Preset Settings von Protect auf Store. Damit<br />
sind auf allen Speicherplätzen wieder<br />
Änderungen möglich.<br />
Bitte schalten Sie das komplette System aus,<br />
bevor Sie Änderungen vornehmen!<br />
Prüfen Sie die Kabelverbindungen sorgfältig.<br />
Kontrollieren Sie die Einstellungen des Bass-<br />
Managements Ihres Prozessors/Receivers, der<br />
den Subwoofer ansteuert.<br />
Erhöhen Sie die Lautstärke für den Subwoofer-<br />
Ausgang am Prozessor/Receiver vorsichtig in<br />
kleinen Schritten.<br />
Erhöhen Sie den Lautstärkepegel am Subwoofer<br />
(LEVEL) schrittweise und mit entsprechender<br />
Vorsicht, um das System nicht zu beschädigen.<br />
<strong>Dynaudio</strong> <strong>SUB</strong> <strong>300</strong>/<strong>500</strong> 47
Fehlersuche und technische Informationen<br />
Sicherung ersetzen<br />
WARNUNG<br />
BRANDGEFAHR DURCH FALSCHE SICHERUNG!<br />
Zur Vermeidung von Brandgefahr ersetzten Sie eine defekte Sicherung nur<br />
durch den gleichen Typ.<br />
POWER<br />
On<br />
AC IN<br />
Die Sicherung befindet sich auf der Subwoofer-Rückseite unter der Netzbuchse. Sie<br />
kann ersetzt werden, ohne dass die Verstärkerelektronik geöffnet werden muss.<br />
Sicherung wechseln<br />
1. Schalten Sie den Subwoofer aus und ziehen Sie das Netzkabel heraus.<br />
2. Ziehen Sie den Sicherungshalter heraus.<br />
3. Ersetzen Sie die defekte Sicherung durch eine neue gleichen Typs.<br />
4. Schieben Sie den Sicherungshalter wieder in die Öffnung, bis er einrastet.<br />
Auf Werkseinstellungen zurücksetzen<br />
Werkseitig sind folgende Einstellungen gespeichert:<br />
Einschalt-Modus:<br />
Automatik<br />
Phase: 0°<br />
Lautstärke:<br />
0 dB<br />
Tiefbass-Erweiterung:<br />
On<br />
Obere Grenzfrequenz:<br />
100 Hz<br />
Um die ursprünglichen Einstellungen wieder herzustellen:<br />
1. Schalten Sie den Subwoofer mit dem Netzschalter auf der Rückseite komplett<br />
aus.<br />
2. Warten Sie mindestens 10 Sekunden.<br />
3. Halten Sie die PRESET-Taste A auf der Fernbedienung gedrückt.<br />
4. Während Sie die PRESET-Taste A gedrückt halten, schalten Sie den Subwoofer<br />
mit dem Netzschalter auf der Rückseite wieder ein.<br />
Die Power-LED beginnt grün zu blinken.<br />
5. Lassen Sie die PRESET-Taste A wieder los.<br />
Der Subwoofer hat nun wieder die Werkseinstellungen.<br />
Hinweis<br />
• Alle Preset-Voreinstellungen werden durch diesen Vorgang gelöscht (Reset).<br />
48 <strong>Dynaudio</strong> <strong>SUB</strong> <strong>300</strong>/<strong>500</strong>
Technische Daten<br />
Fehlersuche und technische Informationen<br />
<strong>SUB</strong> <strong>500</strong> <strong>SUB</strong> <strong>300</strong><br />
Frequenzgang (± 3 dB) 18 Hz - 250 Hz 25 Hz - 250 Hz<br />
Untere Grenzfrequenz bei<br />
27 Hz 33 Hz<br />
EXT Off<br />
Verstärkerleistung 250 W an 4 Ohm 200 W an 5 Ohm<br />
Übergabefrequenzen 60 Hz / 80 Hz / 100 Hz 60 Hz / 80 Hz / 100 Hz<br />
Flankensteilheit 4. Ordnung, Linkwitz-Riley 4. Ordnung, Linkwitz-Riley<br />
Tiefpass-Filterung umgehbar Ja (FLAT) Ja (FLAT)<br />
Phaseneinstellung 0° / 90° / 180° / 270° 0° / 90° / 180° / 270°<br />
Eingänge<br />
Cinch (Koaxial),<br />
XLR (Symmetrisch)<br />
Cinch (Koaxial),<br />
XLR (Symmetrisch)<br />
Eingangsempfindlichkeit* 0,1 V - 5 V 0,1 V - 5 V<br />
Eingangsspannung max. 10 V 10 V<br />
Eingangswiderstand 20 kOhm 20 kOhm<br />
Ausgänge<br />
Cinch (Koaxial),<br />
XLR (Symmetrisch)<br />
Cinch (Koaxial),<br />
XLR (Symmetrisch)<br />
Master/Slave-Verbindung Ja Ja<br />
Fernbedienung mitgeliefert mitgeliefert<br />
Anzahl der Speicherplätze 4 4<br />
Speichereinstellungen für Lautstärke, Übergangsfreq.,<br />
Phase, Tiefbass-Erweiterung<br />
Lautstärke, Übergangsfreq.,<br />
Phase, Tiefbass-Erweiterung<br />
Chassis 30 cm (12"), Langhub 24 cm (10"), Langhub<br />
Magnetische Abschirmung Ja Ja<br />
Gehäusevolumen (Innen) 36 Liter 19 Liter<br />
Bass Prinzip Geschlossen Bassreflex<br />
Leistungsaufnahme max. 480 W 480 W<br />
Leistungsaufnahme Stand-by 5 W 5 W<br />
Betriebsspannung** 230 V/50 Hz 230 V/50 Hz<br />
Gewicht (netto) 30,6 kg 19,1 kg<br />
Abmessungen (B x H x T) 360 x 378 x 568 mm 320 x 338 x 466 mm<br />
* Einstellungsabhängig.<br />
** Bitte beachten Sie regionale Voraussetzungen.<br />
Alle oben genannten Daten unterliegen einer strengen Kontrolle. So werden im<br />
gesamten Produktionsablauf vom Einkauf bis zur Endmontage für jede Station die<br />
spezifischen Parameter kontrolliert.<br />
Änderungen vorbehalten.<br />
<strong>Dynaudio</strong> <strong>SUB</strong> <strong>300</strong>/<strong>500</strong> 49
Fehlersuche und technische Informationen<br />
Garantie<br />
<strong>Dynaudio</strong> gewährt auf Lautsprecher eine Garantie von fünf Jahren. Bitte beachten Sie<br />
regionale Sondervereinbarungen, um eine über die gesetzliche Gewährleistungsfrist<br />
erweiterte <strong>Dynaudio</strong> Garantie von fünf Jahren zu erhalten. (Auf die Elektronik<br />
gewährt <strong>Dynaudio</strong> eine Garantie von zwei Jahren!)<br />
Diese Garantie erstreckt sich ausschließlich auf Material- und Fertigungsmängel.<br />
Schäden, die durch unsachgemäßen Betrieb oder defekte Verstärker entstanden<br />
sind, werden von der Garantie nicht abgedeckt.<br />
Als Nachweis für den Garantieanspruch gilt der Kaufbeleg. Die Abwicklung von<br />
Reklamationen erfolgt in der Regel über einen autorisierten <strong>Dynaudio</strong> Fachhändler.<br />
50 <strong>Dynaudio</strong> <strong>SUB</strong> <strong>300</strong>/<strong>500</strong>
Notizen:<br />
<strong>Dynaudio</strong> <strong>SUB</strong> <strong>300</strong>/<strong>500</strong> 51
www.dynaudio.com<br />
DYNAUDIO A/S<br />
8660 Skanderborg<br />
Denmark<br />
Sales & Marketing<br />
DYNAUDIO International GmbH<br />
Ohepark 2<br />
21<strong>22</strong>4 Rosengarten<br />
Germany<br />
Phone +49 (0) 4108 - 41 80 - 0<br />
© <strong>Dynaudio</strong> International GmbH, <strong>SUB</strong> II Manual INT 0605. Item No. 455 295 B. Subject to change without notice. All text and image copyrights reserved.