Anleitung - Viessmann Modellspielwaren GmbH
Anleitung - Viessmann Modellspielwaren GmbH
Anleitung - Viessmann Modellspielwaren GmbH

Sie wollen auch ein ePaper? Erhöhen Sie die Reichweite Ihrer Titel.
YUMPU macht aus Druck-PDFs automatisch weboptimierte ePaper, die Google liebt.
sorgen. Hierbei sollten Sie die Sockel der<br />
Bahnschranke von oben festhalten.<br />
5. Stecken Sie die Widerlager in die entsprechenden<br />
Bohrungen ein.<br />
6. Kleben Sie das Gleisfüllstück (8) bzw. (9) auf<br />
die Schwellen zwischen den Schienenprofilen<br />
im Bereich des Bahnüberganges auf. Bei<br />
Zweileitergleisen (Roco, Fleischmann,<br />
Trix, Peco, Lima, usw.) verwenden Sie bitte das<br />
Gleiszwischenstück ohne Metallstreifen und<br />
Anschlusskabel.<br />
Für Mittelleitergleise (Märklin C, M und K,<br />
Trix Express) verwenden Sie bitte das Gleiszwischenstück<br />
mit Metallstreifen und rotem Anschlusskabel.<br />
Das rote Anschlusskabel führen Sie<br />
zwischen den Schwellen nach unten (eventuell<br />
zuvor ein Loch bohren) und schließen es am Mittelleiter-Fahrstromanschluss<br />
(rot bei Märklin) an.<br />
Zum Erstellen breiterer oder mehrgleisiger Übergänge<br />
für H0 gibt es unter der Art.-Nr. 5101 (Zweileiter)<br />
und Art.-Nr. 5102 (Mittelleiter) einen Ergänzungssatz<br />
mit jeweils einem entsprechenden<br />
Gleiszwischenstück. Die Rampen (6) dienen als<br />
Auffahrt für die Modellautos auf das Gleisniveau.<br />
Eine der Schranken ist bereits mit der Steuerungsplatine<br />
(Decoder) verbunden. Die andere<br />
Schranke muss man mit Hilfe eines Steckers an<br />
die Platine anschließen. Bitte beachten Sie die<br />
richtige Polarität! Eine inkorrekte Verkabelung<br />
könnte zur Beschädigung führen!<br />
down the base of the barrier form above.<br />
5. Insert the barrier supports into the appropriate<br />
holes.<br />
6. Glue the infill (8) or (9) onto the sleepers between<br />
the rails matching the location of the<br />
ramps. Please use the infill without the metal<br />
strip and wire for two-rail systems (Roco,<br />
Fleischmann, Trix, Peco, Lima, etc.).<br />
Correspondingly use the one with the metal strip<br />
and the red wire for tracks with centre pick-up<br />
(Märklin C, M and K tracks, Trix Express). Install<br />
the red wire by guiding it through a hole between<br />
the sleepers (you may have to drill a hole for this<br />
purpose) and connect it to the centre conductor of<br />
the track (red in case of Märklin).<br />
For realising wider level crossings or over several<br />
tracks you may purchase additional infills, part-No:<br />
5101 (two-rail system) and part-No: 5102 (threerail-system).<br />
The ramps (6) serve to raise the road<br />
to the level of the tracks.<br />
One drive mechanism is already connected to<br />
the control circuit board. The other one has to be<br />
connected by means of the micro plug after installing<br />
the barrier. Please observe the correct polarity!<br />
Incorrect wiring may cause damage to<br />
the product!<br />
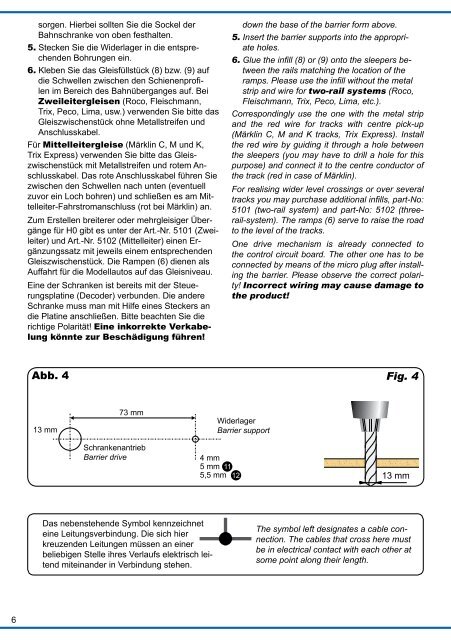
Abb. 4<br />
Fig. 4<br />
13 mm<br />
73 mm<br />
Widerlager<br />
Barrier support<br />
Schrankenantrieb<br />
Barrier drive<br />
4 mm<br />
5 mm<br />
5,5 mm<br />
13 mm<br />
Das nebenstehende Symbol kennzeichnet<br />
eine Leitungsverbindung. Die sich hier<br />
kreuzenden Leitungen müssen an einer<br />
beliebigen Stelle ihres Verlaufs elektrisch leitend<br />
miteinander in Verbindung stehen.<br />
The symbol left designates a cable connection.<br />
The cables that cross here must<br />
be in electrical contact with each other at<br />
some point along their length.<br />
6