clivia ⢠Armaturen
clivia ⢠Armaturen
clivia ⢠Armaturen
Erfolgreiche ePaper selbst erstellen
Machen Sie aus Ihren PDF Publikationen ein blätterbares Flipbook mit unserer einzigartigen Google optimierten e-Paper Software.
GB<br />
Technical data<br />
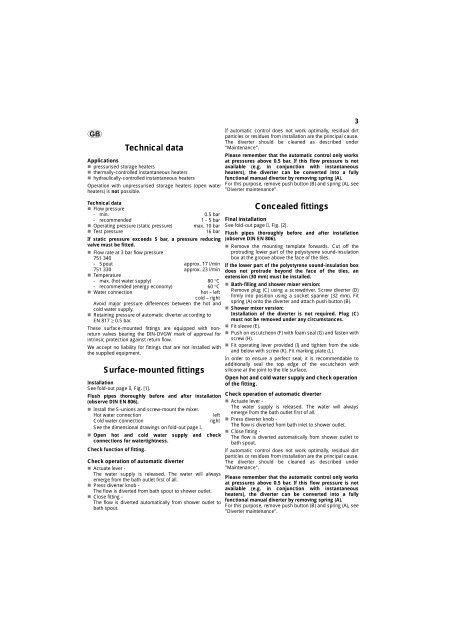
Applications<br />
• pressurised storage heaters<br />
• thermally-controlled instantaneous heaters<br />
• hydraulically-controlled instantaneous heaters<br />
Operation with unpressurised storage heaters (open water<br />
heaters) is not possible.<br />
If automatic control does not work optimally, residual dirt<br />
particles or residues from installation are the principal cause.<br />
The diverter should be cleaned as described under<br />
"Maintenance".<br />
Please remember that the automatic control only works<br />
at pressures above 0.5 bar. If this flow pressure is not<br />
available (e.g. in conjunction with instantaneous<br />
heaters), the diverter can be converted into a fully<br />
functional manual diverter by removing spring (A).<br />
For this purpose, remove push button (B) and spring (A), see<br />
"Diverter maintenance".<br />
3<br />
Technical data<br />
• Flow pressure<br />
- min. 0.5 bar<br />
- recommended 1 - 5 bar<br />
• Operating pressure (static pressure) max. 10 bar<br />
• Test pressure<br />
16 bar<br />
If static pressure exceeds 5 bar, a pressure reducing<br />
valve must be fitted.<br />
• Flow rate at 3 bar flow pressure<br />
751 340<br />
- Spout approx. 17 l/min<br />
751 330 approx. 23 l/min<br />
• Temperature<br />
- max. (hot water supply) 80 °C<br />
- recommended (energy economy) 60 °C<br />
• Water connection<br />
hot – left<br />
cold – right<br />
Avoid major pressure differences between the hot and<br />
cold water supply.<br />
• Retaining pressure of automatic diverter according to<br />
EN 817 ≥ 0.5 bar.<br />
These surface-mounted fittings are equipped with nonreturn<br />
valves bearing the DIN-DVGW mark of approval for<br />
intrinsic protection against return flow.<br />
We accept no liability for fittings that are not installed with<br />
the supplied equipment.<br />
Surface-mounted fittings<br />
Installation<br />
See fold-out page II, Fig. [1].<br />
Flush pipes thoroughly before and after installation<br />
(observe DIN EN 806).<br />
• Install the S-unions and screw-mount the mixer.<br />
Hot water connection<br />
left<br />
Cold water connection<br />
right<br />
See the dimensional drawings on fold-out page I.<br />
• Open hot and cold water supply and check<br />
connections for watertightness.<br />
Check function of fitting.<br />
Check operation of automatic diverter<br />
• Actuate lever -<br />
The water supply is released. The water will always<br />
emerge from the bath outlet first of all.<br />
• Press diverter knob -<br />
The flow is diverted from bath spout to shower outlet.<br />
• Close fitting -<br />
The flow is diverted automatically from shower outlet to<br />
bath spout.<br />
Concealed fittings<br />
Final installation<br />
See fold-out page II, Fig. [2].<br />
Flush pipes thoroughly before and after installation<br />
(observe DIN EN 806).<br />
• Remove the mounting template forwards. Cut off the<br />
protruding lower part of the polystyrene sound-insulation<br />
box at the groove above the face of the tiles.<br />
If the lower part of the polystyrene sound-insulation box<br />
does not protrude beyond the face of the tiles, an<br />
extension (30 mm) must be installed.<br />
• Bath-filling and shower mixer version:<br />
Remove plug (C) using a screwdriver. Screw diverter (D)<br />
firmly into position using a socket spanner (32 mm). Fit<br />
spring (A) onto the diverter and attach push button (B).<br />
• Shower mixer version:<br />
Installation of the diverter is not required. Plug (C)<br />
must not be removed under any circumstances.<br />
• Fit sleeve (E).<br />
• Push on escutcheon (F) with foam seal (G) and fasten with<br />
screw (H).<br />
• Fit operating lever provided (I) and tighten from the side<br />
and below with screw (K). Fit marking plate (L).<br />
In order to ensure a perfect seal, it is recommendable to<br />
additionally seal the top edge of the escutcheon with<br />
silicone at the joint to the tile surface.<br />
Open hot and cold water supply and check operation<br />
of the fitting.<br />
Check operation of automatic diverter<br />
• Actuate lever -<br />
The water supply is released. The water will always<br />
emerge from the bath outlet first of all.<br />
• Press diverter knob -<br />
The flow is diverted from bath inlet to shower outlet.<br />
• Close fitting -<br />
The flow is diverted automatically from shower outlet to<br />
bath spout.<br />
If automatic control does not work optimally, residual dirt<br />
particles or residues from installation are the principal cause.<br />
The diverter should be cleaned as described under<br />
"Maintenance".<br />
Please remember that the automatic control only works<br />
at pressures above 0.5 bar. If this flow pressure is not<br />
available (e.g. in conjunction with instantaneous<br />
heaters), the diverter can be converted into a fully<br />
functional manual diverter by removing spring (A).<br />
For this purpose, remove push button (B) and spring (A), see<br />
"Diverter maintenance".


