Printer Installation Guide - MaRCo
Printer Installation Guide - MaRCo
Printer Installation Guide - MaRCo

Erfolgreiche ePaper selbst erstellen
Machen Sie aus Ihren PDF Publikationen ein blätterbares Flipbook mit unserer einzigartigen Google optimierten e-Paper Software.
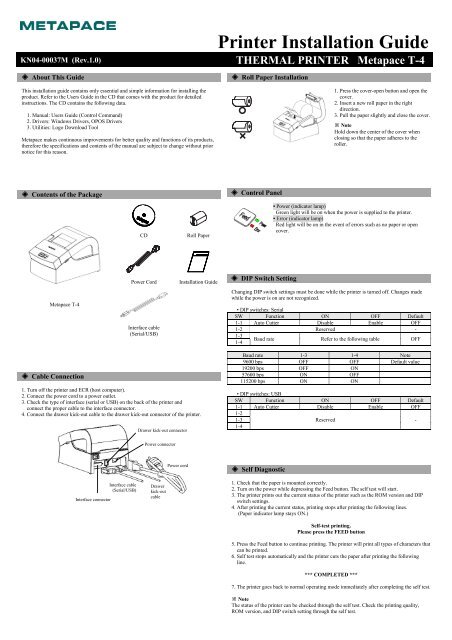
<strong>Printer</strong> <strong>Installation</strong> <strong>Guide</strong><br />
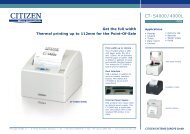
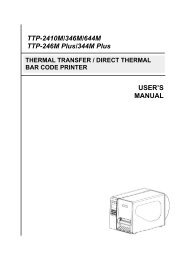
KN04-00037M (Rev.1.0) THERMAL PRINTER Metapace T-4<br />
◈ About This <strong>Guide</strong><br />
◈ Roll Paper <strong>Installation</strong><br />
This installation guide contains only essential and simple information for installing the<br />
product. Refer to the Users <strong>Guide</strong> in the CD that comes with the product for detailed<br />
instructions. The CD contains the following data.<br />
1. Manual: Users <strong>Guide</strong> (Control Command)<br />
2. Drivers: Windows Drivers, OPOS Drivers<br />
3. Utilities: Logo Download Tool<br />
Metapace makes continuous improvements for better quality and functions of its products,<br />
therefore the specifications and contents of the manual are subject to change without prior<br />
notice for this reason.<br />
1. Press the cover-open button and open the<br />
cover.<br />
2. Insert a new roll paper in the right<br />
direction.<br />
3. Pull the paper slightly and close the cover.<br />
※ Note<br />
Hold down the center of the cover when<br />
closing so that the paper adheres to the<br />
roller.<br />
◈ Contents of the Package<br />
◈ Control Panel<br />
CD<br />
Roll Paper<br />
• Power (indicator lamp)<br />
Green light will be on when the power is supplied to the printer.<br />
• Error (indicator lamp)<br />
Red light will be on in the event of errors such as no paper or open<br />
cover.<br />
Metapace T-4<br />
Power Cord<br />
Interface cable<br />
(Serial/USB)<br />
<strong>Installation</strong> <strong>Guide</strong><br />
◈ DIP Switch Setting<br />
Changing DIP switch settings must be done while the printer is turned off. Changes made<br />
while the power is on are not recognized.<br />
• DIP switches: Serial<br />
SW Function ON OFF Default<br />
1-1 Auto Cutter Disable Enable OFF<br />
1-2 Reserved -<br />
1-3<br />
1-4<br />
Baud rate Refer to the following table OFF<br />
◈ Cable Connection<br />
1. Turn off the printer and ECR (host computer).<br />
2. Connect the power cord to a power outlet.<br />
3. Check the type of interface (serial or USB) on the back of the printer and<br />
connect the proper cable to the interface connector.<br />
4. Connect the drawer kick-out cable to the drawer kick-out connector of the printer.<br />
Drawer kick-out connector<br />
Baud rate 1-3 1-4 Note<br />
9600 bps OFF OFF Default value<br />
19200 bps OFF ON<br />
57600 bps ON OFF<br />
115200 bps ON ON<br />
• DIP switches: USB<br />
SW Function ON OFF Default<br />
1-1 Auto Cutter Disable Enable OFF<br />
1-2<br />
1-3<br />
1-4<br />
Reserved -<br />
Power connector<br />
Interface connector<br />
Interface cable<br />
(Serial/USB)<br />
Drawer<br />
kick-out<br />
cable<br />
Power cord<br />
◈ Self Diagnostic<br />
1. Check that the paper is mounted correctly.<br />
2. Turn on the power while depressing the Feed button. The self test will start.<br />
3. The printer prints out the current status of the printer such as the ROM version and DIP<br />
switch settings.<br />
4. After printing the current status, printing stops after printing the following lines.<br />
(Paper indicator lamp stays ON.)<br />
Self-test printing.<br />
Please press the FEED button<br />
5. Press the Feed button to continue printing. The printer will print all types of characters that<br />
can be printed.<br />
6. Self test stops automatically and the printer cuts the paper after printing the following<br />
line.<br />
*** COMPLETED ***<br />
7. The printer goes back to normal operating mode immediately after completing the self test.<br />
※ Note<br />
The status of the printer can be checked through the self test. Check the printing quality,<br />
ROM version, and DIP switch setting through the self test.
◈ Product Specifications<br />
<strong>Printer</strong><br />
Paper<br />
Item<br />
<strong>Printer</strong> type<br />
Dot pitch<br />
Printing width<br />
Number of characters<br />
per line (default value)<br />
Printing speed *1)<br />
Receive buffer size<br />
SMPS input voltage<br />
Frequency<br />
SMPS output voltage<br />
Temperature<br />
Humidity<br />
Auto cutter<br />
Mechanism MCBF *2)<br />
Paper type<br />
Roll paper width<br />
Diameter of roll paper<br />
Paper thickness<br />
Description<br />
Thermal transfer (thermal) printing<br />
203 dpi (8dots/mm)<br />
48 mm<br />
32 (Font A) (12x24)<br />
42 (Font C) (9x24)<br />
19 lines/sec, 65 mm/sec<br />
4Kbyte<br />
100 ~ 240 VAC<br />
50/60 Hz<br />
12 VDC<br />
0 ~ 45 ℃ (Operating)<br />
-20 ~ 60 ℃ (Storage)<br />
10 ~ 80 % RH (Operating)<br />
10 ~ 90 % RH (Storage)<br />
; paper is not included<br />
1,000,000 cuts<br />
20,000,000 lines<br />
Roll paper<br />
58 ± 0.5mm<br />
Maximum 80mm<br />
0.062~0.075 mm<br />
※ Note<br />
*1) Printing speed may be slower depending on the combination of data transfer speed and<br />
commands.<br />
*2) This value is based on the measurement at standard temperature, specified paper, and<br />
printing level 2, and it can be changed depending on the temperature or printing level.<br />
◈ Serial (RS-232C) Interface Model<br />
Windows Driver <strong>Installation</strong><br />
1. After installing the product installation CD, execute Metapace T-4 > Drivers > Windows<br />
Driver > Drivers folder > Metapace T-4_WIN_Vx.x.x.exe .<br />
2. Select the Next button in the initial installation window.<br />
3. Select the Install button in the Ready to Install the Program window.<br />
4. Select the Serial Port 1 (COM1) in Serial Port setting in Select Port Type window and<br />
select the Next button.<br />
◈ USB Interface Model Windows Driver <strong>Installation</strong><br />
1. After installing the product installation CD, execute Metapace T-4 > Drivers > Windows<br />
Driver > Drivers folder > Metapace T-4_WIN_Vx.x.x.exe.<br />
2. Select the Next button in the initial installation window.<br />
3. Select Install in the Ready to Install the Program window.<br />
4. Select USB from the Select Port Type window and select the Next button (refer to Fig. 1)<br />
5-1. If using Windows 2000/VISTA/2008 Server/7<br />
1 When the Information window pops up, turn the printer off and on and select the OK<br />
button.<br />
2 Reboot the computer after completing the installation.<br />
5-2. If using XP/2003 Server<br />
1 When the Information window pops up, turn the printer off and on and select the OK<br />
button.<br />
2 When the New Hardware Search window pops up, keep selecting the Next button to<br />
install the USB driver, and reboot the computer one more time after installing the USB<br />
driver.<br />
※ Note<br />
Click OK or Continue Anyway when digital certificate messages pop up during the<br />
installation.<br />
6. After rebooting, select Start > Setting > <strong>Printer</strong>s and Faxes > Metapace T-4 Icon ><br />
Right mouse click > Properties.<br />
7. Select the General tab and then Print Test Page from the Properties window, and check<br />
that the printer is working correctly.<br />
◈ WEEE (Waste Electrical and Electric Equipment)<br />
This marking shown on the product or its literature, indicates that is should not be<br />
disposed of with other household wastes at the end of its working life, To prevent<br />
possible harm to the environment or human health from uncontrolled waste disposal,<br />
please separate this from other types of wastes and recycle it responsibly to promote<br />
the sustainable reuse of material resources. Household users should contact either<br />
the retailer where they purchased this product, or their local government office, for<br />
details of where and how they can take this item for environmentally safe recycling.<br />
Business users should contact their supplier and check the terms and conditions of<br />
the purchase contract. This product should not be mixed with other commercial<br />
wastes for disposal.<br />
5. Reboot the computer by selecting the Yes button from the Question window.<br />
6. After rebooting, select Start> Setting > <strong>Printer</strong>s and Faxes > Metapace T-4 Icon ><br />
Right mouse click > Properties.<br />
7. Select Port tab and then Port Configuration from the Properties window and set the<br />
settings same as the result shown in the self test, and select the OK button.<br />
(Fig 1)<br />
8. Select the General tab and then Print Test Page from the Properties window, and check<br />
whether the printer is working correctly.
Drucker-<strong>Installation</strong>shandbuch<br />
THERMODRUCKER Metapace T-4<br />
◈ Über diese Anleitung<br />
Diese <strong>Installation</strong>sanleitung enthält nur wesentliche und allgemeine Informationen für die<br />
<strong>Installation</strong> des Produkts. Eine ausführliche Anleitung finden Sie in der Bedienungsanleitung<br />
auf der CD, die Sie mit dem Produkt erhalten haben. Die CD enthält die folgenden<br />
Dokumente:<br />
1. Handbuch: Bedienungsanleitung (Steuerbefehle)<br />
2. Treiber: Windows-Treiber, OPOS-Treiber<br />
3. Dienstprogramme: Logo-Downloadtool<br />
Metapace verbessert seine Produkte ständig, um sie qualitativ und funktionell zu optimieren.<br />
Daher können sich die Spezifikationen und Angaben im Handbuch ohne vorherige<br />
Ankündigung ändern.<br />
◈ Bedienfeld<br />
• Ein/Aus (Leuchtanzeige)<br />
Leuchtet die Anzeige grün, so wird der Drucker mit Strom versorgt.<br />
• Fehler (Leuchtanzeige)<br />
Bei einem Fehler schaltet sich die rote Leuchte ein, zum Beispiel, wenn<br />
das Papier aufgebraucht ist oder wenn die Abdeckung geöffnet ist.<br />
◈ DIP-Schaltereinstellungen<br />
Änderungen an den DIP-Schaltereinstellungen müssen bei ausgeschaltetem Drucker<br />
vorgenommen werden. Bei eingeschaltetem Drucker vorgenommene Änderungen werden<br />
nicht erkannt.<br />
◈ Verpackungsinhalt<br />
CD<br />
Papierrolle<br />
• DIP-Schalter: Seriell<br />
Schalter Funktion EIN AUS Standard<br />
1-1 Autocutter Deaktivieren Aktivieren AUS<br />
1-2 Reserviert -<br />
1-3<br />
1-4<br />
Baudrate Siehe folgende Tabelle AUS<br />
Baudrate 1-3 1-4 Bitte beachten:<br />
9600 Bit/s AUS AUS Standardwert<br />
19200 Bit/s AUS EIN<br />
57600 Bit/s EIN AUS<br />
115200 Bit/s EIN EIN<br />
Metapace T-4<br />
Stromkabel<br />
<strong>Installation</strong>s<br />
Anleitung<br />
• DIP-Schalter: USB<br />
Schalter Funktion EIN AUS Standard<br />
1-1 Autocutter Deaktivieren Aktivieren AUS<br />
1-2<br />
1-3<br />
1-4<br />
Reserviert -<br />
Schnittstellenkabel<br />
(Seriell/USB)<br />
◈ Selbstdiagnose<br />
◈ Anschließen der Kabel<br />
1. Den Drucker und den ECR (Host-Computer) ausschalten.<br />
2. Das Netzkabel mit einer Netzsteckdose verbinden.<br />
3. Auf der Rückseite des Druckers die Art der Schnittstelle feststellen (seriell oder USB) und<br />
das entsprechende Kabel mit dem Schnittstellenanschluss verbinden.<br />
4. Das Schubladenaktivierungskabel mit dem Anschluss für die Schubladenaktivierung am<br />
Drucker verbinden.<br />
Schnittstellenkabel<br />
(Seriell/USB)<br />
Schnittstellenanschluss<br />
Schubladenaktivierungsanschluss<br />
Stromanschluss<br />
Schubladenaktivierungskabel<br />
Stromkabel<br />
1. Prüfen, dass das Papier richtig eingelegt ist.<br />
2. Den Drucker einschalten und dabei dei FEED-Taste gedrückt halten. Der Selbsttest wird<br />
gestartet.<br />
3. Der Drucker druckt den aktuellen Status des Druckers aus, zum Beispiel die ROM-Version<br />
und die DIP-Schaltereinstellungen.<br />
4. Nach dem Ausdrucken des aktuellen Status wird der Druckvorgang angehalten, sobald die<br />
folgenden Zeilen gedruckt wurden:(Die Papier-Leuchtanzeige bleibt EINGESCHALTET.)<br />
Self-test printing.<br />
Please press the FEED button<br />
(Selbsttest wird gedruckt. Bitte FEED-Taste drücken.)<br />
5. Zum Fortsetzen des Druckvorgangs die FEED-Taste drucken. Der Drucker druckt<br />
daraufhin alle Zeichensätze aus, die gedruckt werden können.<br />
6. Der Selbsttest wird automatisch beendet, und der Drucker schneidet das Papier nach dem<br />
Drucken der folgenden Zeilen ab:<br />
*** COMPLETED ***<br />
(*** ABGESCHLOSSEN ***)<br />
7. Der Drucker wechselt sofort im Anschluss an den Selbsttest wieder zurück in den<br />
Normalbetrieb.<br />
※ Hinweis<br />
Der Status des Druckers kann anhand des Selbsttests überprüft werden. Anhand des<br />
Selbsttests können Druckqualität, ROM-Version und DIP-Schaltereinstellungen überprüft<br />
werden.<br />
◈ Enlegen der Papierrolle<br />
1. Die Taste zum Öffnen der Abdeckung<br />
drücken und die Abdeckung öffnen.<br />
2. Eine neue Papierrolle richtig herum<br />
einlegen.<br />
3. Etwas Papier herausziehen und die<br />
Abdeckung schließen.<br />
※ Hinweis<br />
Beim Schließen der Abdeckung auf die<br />
Mitte der Abdeckung drücken, damit das<br />
Papier auf die Walze gedrückt wird.
◈Produktspezifikationen<br />
Drucker<br />
Papier<br />
Komponente<br />
Funktionsprinzip<br />
Punktabstand<br />
Druckbreite<br />
Anzahl Zeichen<br />
pro Zeile (Standardwert)<br />
Druckgeschwindigkeit *1)<br />
Empfangspuffergröße<br />
SMPS-Eingangsspannung<br />
Frequenz<br />
SMPS-Ausgangsspannung<br />
Temperatur<br />
Luftfeuchtigkeit<br />
Autocutter<br />
Mechanik MCBF *2)<br />
Papierart<br />
Papierrollenbreite<br />
Papierrollendurchmesser<br />
Papierstärke<br />
Beschreibung<br />
(Thermo-)Druck per Wärmeübertragung<br />
203 dpi (8 Punkte/mm)<br />
48 mm<br />
32 (Schriftart A) (12x24)<br />
42 (Schriftart C) (9x24)<br />
19 Zeilen/s, 65 mm/s<br />
4 Kb<br />
100-240 VAC<br />
50/60 Hz<br />
12 VDC<br />
0 - 45 ℃ (Betrieb)<br />
-20 - +60 ℃ (Lagerung)<br />
10-80 % (Betrieb)<br />
10-90 % (Lagerung)<br />
; Papier ist nicht enthalten<br />
1.000.000 Schnitte<br />
20.000.000 Zeilen<br />
Rollenpapier<br />
58 ± 0,5 mm<br />
Max. 80 mm<br />
0,062 - 0,075 mm<br />
※ Hinweis<br />
*1) Die Druckgeschwindigkeit kann je nach der Kombination aus<br />
Datenübertragungsgeschwindigkeit und Befehlen langsamer sein.<br />
*2) Dieser Wert basiert auf der Messung bei der Standardtemperatur, dem angegebenen<br />
Papier und Druckvolumen 2. Er kann je nach Temperatur oder Druckvolumen variieren.<br />
◈ Gerätetyp mit USB-Schnittstelle: <strong>Installation</strong> des Windows-<br />
Treibers<br />
1. Die Produktinstallations-CD einlegen und die folgende Datei ausführen: Metapace T-4 ><br />
Treiber > Windows-Treiber > Ordner „Treiber“ > Metapace T-4_WIN_Vx.x.x.exe.<br />
2. Im Startfenster der <strong>Installation</strong> die Schaltfläche Weiter wählen.<br />
3. Die Option Installieren im Fenster Bereit für die Programminstallation wählen.<br />
4. Die Option USB im Fenster Anschlusstyp wählen auswählen und dann die Schaltfläche<br />
Weiter wählen (siehe Abb. 1).<br />
5-1. Betriebssystem Windows 2000/VISTA/2008 Server/7<br />
1 Wenn das Fenster Informationen eingeblendet wird, den Drucker ausschalten und<br />
wieder einschalten. Anschließend die Schaltfläche OK wählen.<br />
2 Den Computer im Anschluss an die <strong>Installation</strong> neu starten.<br />
5-2. Betriebssystem XP/2003 Server<br />
1 Wenn das Fenster Informationen eingeblendet wird, den Drucker ausschalten und<br />
wieder einschalten und die Schaltfläche OKwählen.<br />
2 Wenn das Fenster Suche neue Hardware eingeblendet wird, wiederholt die<br />
Schaltfläche Weiter wählen, um den USB-Treiber auszuwählen, und den Computer<br />
nach der <strong>Installation</strong> des USB-Treibers nochmals neu starten.<br />
※ Hinweis<br />
Auf OK oder Dennoch fortfahren klicken, wenn während der <strong>Installation</strong> Meldungen über<br />
digitale Zertifikate eingeblendet werden.<br />
6. Nach dem Neustart folgenden Befehl wählen: Start > Einstellungen > Drucker und<br />
Faxe > Symbol für Metapace T-4 > Rechtsklick > Eigenschaften.<br />
7. Die Registerkarte Allgemein wählen und dann Testseite drucken im Fenster<br />
Eigenschaften wählen und prüfen, ob der Drucker einwandfrei funktioniert.<br />
◈ Gerätetyp mit serieller (RS-232C) Schnittstelle<br />
<strong>Installation</strong> der Windows-Treiber<br />
1. Die Produktinstallations-CD einlegen und folgende Datei ausführen: Metapace T-4 ><br />
Treiber > Windows-Treiber > Ordner „Treiber“ > Metapace T-4_WIN_Vx.x.x.exe .<br />
2. Im Startfenster der <strong>Installation</strong> die Schaltfläche Weiter wählen.<br />
3. Die Schaltfläche Installieren im Fenster Bereit für die Programminstallation wählen.<br />
4. Als seriellen Anschluss 1 (COM1) unter der Einstellung Serieller Anschluss im Fenster<br />
Anschlussart wählen auswählen, anschließend die SchaltflächeWeiter wählen.<br />
◈ WEEE-Kennzeichnung (Elektroschrott)<br />
Diese Kennzeichnung auf dem Produkt oder der Produktdokumentation weist darauf<br />
hin, dass das Produkt nicht über den Hausmüll entsorgt werden sollte. Um eventuelle<br />
Umwelt- oder Gesundheitsschäden aufgrund der unsachgemäßen Entsorgung zu<br />
vermeiden, sollten Sie dieses Produkt von anderen Abfällen trennen und recyceln. So<br />
fördern Sie den nachhaltigen Gebrauch der Ressourcen. Wenn Sie das Produkt in<br />
Ihrem Haushalt benutzen, wenden Sie sich bitte an Ihren Fachhändler, bei dem Sie das<br />
Produkt gekauft haben, oder an die Stadtverwaltung. Dort können Sie Einzelheiten<br />
dazu erfragen, wie und wo Sie dieses Produkt abgeben können, damit es umweltsicher<br />
recycelt wird. Wenn Sie das Produkt in der Firma benutzen, sollten Sie sich an Ihren<br />
Zulieferer wenden und die entsprechenden Bedingungen über die Rücknahme oder<br />
Entsorgung im Kaufvertrag nachlesen. Dieses Produkt sollte nicht zusammen mit<br />
anderen gewerblichen Abfällen entsorgt werden.<br />
5. Zum Neustarten des Computers die Schaltfläche Ja im Dialogfenster wählen.<br />
6. Nach dem Neustart die Option Start> Einstellungen > Drucker und Faxe > Symbol für<br />
Metapace T-4 > Rechtsklick > Eigenschaften wählen.<br />
7. Die Registerkarte Anschluss wählen, anschließend Anschlusskonfiguration im Fenster<br />
Eigenschaften wählen. Dieselben Einstellungen festlegen, wie im Selbsttest angezeigt,<br />
und die Schaltfläche OK wählen.<br />
(Abb. 1)<br />
8. Die Registerkarte Allgemein wählen und anschließend die Option Testseite drucken im<br />
Fenster Eigenschaften wählen und prüfen, ob der Drucker einwandfrei funktioniert.