Handleiding - Service - Black & Decker
Handleiding - Service - Black & Decker
Handleiding - Service - Black & Decker

Erfolgreiche ePaper selbst erstellen
Machen Sie aus Ihren PDF Publikationen ein blätterbares Flipbook mit unserer einzigartigen Google optimierten e-Paper Software.
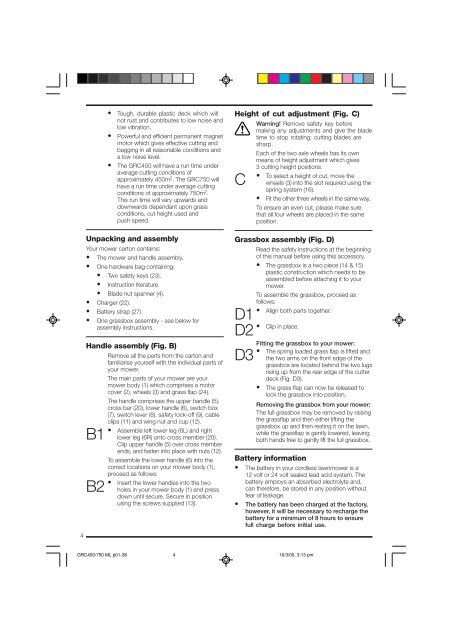
4• Tough, durable plastic deck which willnot rust and contributes to low noise andlow vibration.• Powerful and efficient permanent magnetmotor which gives effective cutting andbagging in all reasonable conditions anda low noise level.• The GRC450 will have a run time underaverage cutting conditions ofapproximately 450m 2 . The GRC750 willhave a run time under average cuttingconditions of approximately 750m 2 .This run time will vary upwards anddownwards dependant upon grassconditions, cut height used andpush speed.Unpacking and assemblyYour mower carton contains:• The mower and handle assembly.• One hardware bag containing:• Two safety keys (23).• Instruction literature.• Blade nut spanner (4).• Charger (22).• Battery strap (27).• One grassbox assembly - see below forassembly instructions.Handle assembly (Fig. B)Remove all the parts from the carton andfamiliarise yourself with the individual parts ofyour mower.The main parts of your mower are yourmower body (1) which comprises a motorcover (2), wheels (3) and grass flap (24).The handle comprises the upper handle (5),cross bar (20), lower handle (6), switch box(7), switch lever (8), safety lock-off (9), cableclips (11) and wing nut and cup (12).• Assemble left lower leg (6L) and rightB1 lower leg (6R) onto cross member (20).Clip upper handle (5) over cross memberends, and fasten into place with nuts (12).To assemble the lower handle (6) into thecorrect locations on your mower body (1),proceed as follows:• Insert the lower handles into the twoB2 holes in your mower body (1) and pressdown until secure. Secure in positionusing the screws supplied (13).Height of cut adjustment (Fig. C)Warning! Remove safety key before! making any adjustments and give the bladetime to stop rotating; cutting blades aresharp.Each of the two axle wheels has its ownmeans of height adjustment which gives3 cutting height positions.• To select a height of cut, move theC wheels (3) into the slot required using thespring system (16).• Fit the other three wheels in the same way.To ensure an even cut, please make surethat all four wheels are placed in the sameposition.Grassbox assembly (Fig. D)Read the safety instructions at the beginningof this manual before using this accessory.• The grassbox is a two piece (14 & 15)plastic construction which needs to beassembled before attaching it to yourmower.To assemble the grassbox, proceed asfollows:• Align both parts together.D1D2D3• Clip in place.Fitting the grassbox to your mower:• The spring loaded grass flap is lifted andthe two arms on the front edge of thegrassbox are located behind the two lugsrising up from the rear edge of the cutterdeck (Fig. D3).• The grass flap can now be released tolock the grassbox into position.Removing the grassbox from your mower:The full grassbox may be removed by raisingthe grassflap and then either lifting thegrassbox up and then resting it on the lawn,while the grassflap is gently lowered, leavingboth hands free to gently lift the full grassbox.Battery information• The battery in your cordless lawnmower is a12 volt or 24 volt sealed lead acid system. Thebattery employs an absorbed electrolyte and,can therefore, be stored in any position withoutfear of leakage.• The battery has been charged at the factory,however, it will be necessary to recharge thebattery for a minimum of 8 hours to ensurefull charge before initial use.GRC450/750 ML p01-38416/3/00, 3:13 pm