eigner-handbuch owner´s manual hobby teil 1 - Grabner Sports
eigner-handbuch owner´s manual hobby teil 1 - Grabner Sports
eigner-handbuch owner´s manual hobby teil 1 - Grabner Sports
- Keine Tags gefunden...

Sie wollen auch ein ePaper? Erhöhen Sie die Reichweite Ihrer Titel.
YUMPU macht aus Druck-PDFs automatisch weboptimierte ePaper, die Google liebt.
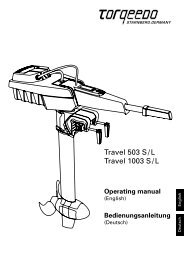
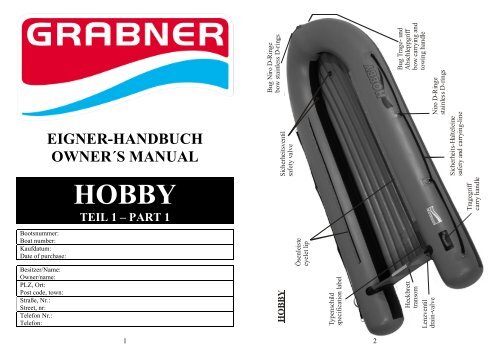
Bug Trage- undAbschleppgriffbow carrying andtowing handleNiro D-Ringestainless D-rings1EIGNER-HANDBUCHOWNER´S MANUALHOBBYTEIL 1 – PART 1Bootsnummer:Boat number:Kaufdatum:Date of purchase:Besitzer/Name:Owner/name:PLZ, Ort:Post code, town:Straße, Nr.:Street, nr:Telefon Nr.:Telefon:2HOBBYSicherheits-Halteleinesafety and carrying-lineTragegriffcarry handleÖsenleisteeyelet lipBug Niro D-Ringebow stainless D-ringsHeckbretttransomLenzventildrain-valveSicherheitsventilsafety valveTypenschildspecification label
INHALTSVERZEICHNISSeiteProduktabbildung 2Bezeichnung der Teile 2Stückliste 3Betriebsdaten 3Einsatzbereich 3Aufbau 3Abbau 3 - 4Anwendung + Details 4 - 6Zubehör 6Konformitätserklärung 11STÜCKLISTE1 Bootskörper6 Halteschlaufen1 Reparaturset inkl. VentilschlüsselBETRIEBSDATENLänge:410 cmBreite:175 cmEigengewicht: 39 kgPersonen:6 ErwachseneZul. Nutzlast: 1000 kgBetriebsdruck: 0,3 barMax.Motorleistung: 18,4 KW / 25 PSMax.Motorgewicht: 75 kgMax. Segelfläche: 9 m²Max. Windstärke 4 BeaufortNorm:EN ISO 6185 / VIIKategorie: CEINSATZBEREICH• Ruderboot für Seen, Flüsse und Küstengewässer• Motorboot bis maximal 18,4 KW/25 PS(ideale Motorisierung 11 KW / 15 PS)• Segelboot mit 9 m² Segelfläche bisWindstärke 4 Beaufort• Paddelboot bis maximales Wildwasser –Schwierigkeitsgrad 1.3AUFBAU• Öffnen Sie den Karton und nehmen SieIhr Boot und die Sitzbretter heraus.ACHTUNG: Beim Aufschneiden des Kartonsdas Boot nicht beschädigen!• Überprüfen Sie anhand der Stückliste oballe Teile vorhanden sind.• Entfernen Sie die Verpackungsfolie undrollen Sie den Schlauchkörper auf.• Pumpen Sie das Boot soweit auf, bisetwa die endgültige Form gegeben ist.• Montieren Sie den Einlegeboden und dieSitzbretter (Sonderzubehör)• Jetzt erst pumpen Sie Ihr Boot auf Betriebsdruck(0,3 bar) auf.• Knoten Sie die Halteschlaufen, an dergewünschten Position, an den Ösenleistenan.ABBAU• Suchen Sie sich zum Abbauen und Verpackeneinen sauberen Untergrund.• Entfernen Sie alle losen Teile Zubehör<strong>teil</strong>evom Boot (Sonnendach, Ruder,Motor, wasserdichte Taschen, persönlicheAusrüstung,....).• Lassen Sie die Luft vom Boot aus.• Entfernen Sie die Sitzbretter und denEinlegeboden (Sonderzubehör).• Reinigen und trocknen Sie Ihr Boot unddas Zubehör um Beschädigung durchSand und kleine Steine zu vermeiden!• Überprüfen Sie Ihr Boot auf eventuelleBeschädigungen und beheben Sie dieseso rasch wie möglich damit das Boot fürdie nächste Fahrt wieder einsatzbereitist!Faltanleitung• Rollen Sie das Boot vom Heck zumBug zusammen (Richtung Ventile) damitdie meiste Luft entweichen kann.• Rollen Sie das Boot wieder auf undlegen Sie das Boot flach auf den Boden.• A: Falten Sie die Seitenschläuche derLänge nach ca. 15 cm nach innen, dassdas Boot die breite vom Heckbrett hat.• B: Klappen Sie die beiden Heckendennach innen auf das Heckbrett.• C: Rollen Sie das Boot, über das Heckbrett,eng zusammen.BBCAACHTUNG: Achten Sie darauf, dass sichkeine Luft mehr im Boot befindet!• Verschnüren Sie das zusammengerollteBoot mit einer Packleine oder einemGurt.ACHTUNG: In diesem Zustand darf dasBoot nicht lange Zeit aufbewahrt werden!(Siehe "Pflege und Lagerung")• Jetzt können Sie Ihr Boot samt serienmäßigemZubehör in Ihre Packtasche(Sonderzubehör) verpacken.ACHTUNG: Überprüfen Sie ob noch alleTeile vorhanden sind!• Wenn sich noch Restluft im Boot befindet,kann es sein, dass Sie Ihr Boot nichtin die Packtasche bringen!(In diesem Fall das Boot nochmals aufrollenund neu zusammenlegen)A4ANWENDUNG + DETAILSLenzventil:Das Lenzventil dient zum entwässern desBootes.Bei Fahrt - schneller als das umgebendeWasser - wird Spritzwasser, das ins Bootgelangt, permanent abgesaugt.Bei Fahrten in ruhigem Gewässer verschließenSie das Lenzventil.Achten Sie darauf, dass das Ventil immerfrei von Blättern, Gras, usw. istMOTORBETRIEBMotorleistung:Die maximale Motorleistung für Ihr HOB-BY ist 18,4 KW / 25 PS.Die ideale Motorisierung ist 11 KW / 15PS.WARNUNG: Verwenden Sie nie einenMotor mit einer höheren Motorleistung alsam Typenschild oder im Eigner<strong>handbuch</strong>angegeben. Sie würden Gesetze verletzenoder Sie könnten die Kontrolle über IhrBoot verlieren.Motorgewicht:Maximale Motorgewicht 75 kg.Das Gewicht des Motors hat großen Einflussauf die Übergangsphase von Verdränger-in Gleitfahrt, Längs Stabilität undFahreigenschaften. Bei gleicher Motorleistungempfehlen wir, den leichteren Motorzu wählen.WARNUNG: Überschreiten Sie nie dasmaximale Motorgewicht!Schaftlänge:Normalschaft-Motor (S).Motorhöhe:Bedingt durch die verschiedenen Motortypen,selbst bei gleichem Schafttyp, kann dieSchaftlänge um wenige cm variieren. Den
Höhenunterschied können Sie durch einDistanzstück (Holzklotz,...) ausgleichen.ACHTUNG: Wenn der Motor zu hochsitzt, kann er Luft ziehen und verliert dadurchan Vorschub. Wenn der Motor zu tiefsitzt, kann das Boot an Geschwindigkeitverlieren und lässt sich schwerer lenken.Motor-Montage:Befestigen Sie den Motor genau in derMitte vom Heckbrett. Schrauben Sie dieKlemmschrauben des Motors von Hand sofest wie möglich zu. Sichern Sie den Motormit einer Kette oder Leine am Boot.ACHTUNG: Überprüfen Sie die Klemmschrauben,nach 15 Minuten Motorbetrieb,auf festen Sitz.Tank:Wenn Sie einen separaten Tank haben,stellen Sie ihn auf den Boden Ihres Bootes.Legen Sie etwas unter den Tank (alte Decke,Kunststofffolie, ein Stück Teppichoder ähnliches)damit die Bootshaut voreventuell auslaufenden Benzin geschütztist. Sichern Sie den Tank im Boot gegenherausfallen mit einer Leine oder einemGurt.ACHTUNG: Schützen Sie die BootshautIhres HOBBY vor Benzin und Öl!Benzin und Öl lösen die Gummierung anund es kann dadurch zu Beschädigungender Bootshaut kommen. Falls trotzdemeinmal Benzin oder Öl auf die Bootshautgelangt, spülen Sie es mit Wasser sofortweg.WARNUNG: Verwenden Sie keine offenenFlammen oder rauchen Sie nicht in derNähe des Tanks EXPLOSIONSGEFAHR!Motortrimmung:Die Motoranstellung (Trimmung) mussjeweils in Abhängigkeit zu den Fahrbedingungenangepasst werden. Der Motor sollso getrimmt werden, dass die Mittellinieder Propellerwelle parallel zur Wasseroberflächeverläuft. Eine individuelle Anpassungdes Anstellwinkels ist dennoch oftsehr empfehlenswert. Lesen Sie dazu dieGebrauchsanleitung Ihres Motors.WARNUNG: Nehmen Sie Veränderungenam Motor nur bei abgestelltem Motor vor!Lastver<strong>teil</strong>ung:Das Gewicht muss so ver<strong>teil</strong>t werden, dassdas Boot sowohl in Längsrichtung als auchin Querrichtung gleichmäßig belastet ist.Entscheidend für eine optimale Fahrleistungist die Gewichtsauf<strong>teil</strong>ung im Bootdaher ver<strong>teil</strong>en Sie die Beladung möglichstgleichmäßig.Steigt der Bug des Bootes beim Wegfahrenzu stark hoch, müssen Sie das Gewicht imBoot nach vorne verlagern.Kommt das Boot hingegen nicht ins gleiten,müssen Sie das Gewicht im Boot nachhinten verlagern.Wenn Sie alleine fahren, empfehlen wirIhnen, in den Bugraum ein Ausgleichsge-wicht (Gepäck, Tank,...) zu legen oder miteiner Pinnenverlängerung zu fahren.WARNUNG: Eine schlechte Beladungsver<strong>teil</strong>ungkann das Boot gefährlich destabilisierenund das kann zum Verlust derKontrolle über das Boot führen!ZUBEHÖR– in der Serienausstattung nicht enthalten• Sitzbretter – Die Sitzbretter werdenseitlich an der Ösenleiste eingeschraubt.Sie geben dem Boot zusätzliche Stabilität,sind für den Fahrbetrieb aber nichtunbedingt notwendig.• Sitzbrett-Polstertasche – für höchstenFahrkomfort und Ordnung im Boot• Ruder und Ruderhalterungen - DieRuderhalterung kann der Länge nach individuellan der Ösenleiste befestigtwerden.‣ Entfernen Sie die schwarzen Rändelmutternund nehmen Sie die zwei Teileauseinander.‣ Stecken Sie den Teil mit den Schraubenvon innen, in der gewünschtenPosition, durch die Ösen der Ösenleiste.‣ Stecken Sie den zweiten Teil von o-ben auf die Schrauben und schraubenSie mit den Rändelmuttern fest.‣ Stecken Sie die Ruder mit den Rudergabelnin die Aufnahmen der RuderhalterungenHinweis: In der Aufnahme befindet sichein Sicherungsdorn!Bei nichtverwenden der Ruder können Siedie Ruder, mit einem Gurt oder Leine ander Ösenleiste fixieren.• Einlegeboden – steift das Boot aus;empfohlen bei einer Motorleistung ab 10PS.• Bugtasche - Die wasserdicht verschweißteTasche, mit semiwasserdichtemReißverschluss, wird mit den Gurtenan den Sitzbrettösen bzw. D-Ringen befestigt.• Bootswagen – zum leichten Transportan Land• Sonnendach – schützt vor Sonne undSonnenbrand• Badeleiter – zum leichten Einsteigennach dem schwimme• Abdeckpersenning – schützt das Bootvor Schmutz, Regen und Sonne.• Besegelung – für den ultimativen SegelspaßWICHTIG:Für Ihr HOBBY gibt es noch viel nützlichesZubehör. Die genauen Informationenüber das Zubehörprogramm finden Sie imGRABNER-LUFTBOOTKATALOG, oderunterwww.grabner-sports.at56
INDEXPagePruduct illustration 2Part description 2List of items 7Specification 7Field of application 7Assembly 7Dismantling 7 - 8Handling + details 8 - 10Accessories 10Declaration of conformity 11LIST OF ITEMS1 hull6 hand-holds1 repair kit incl. valve keySPECIFICATIONLength: 410 cmBeam: 175 cmNet weight: 39 kgNo of persons: 6 adultsCarrying capacity: 1.000 kgOperating pressure: 0.3 barMotor output: 18.4 KW / 25 HPMotor weight: 75 kgSail area : 9 m²Wind force: 4 BeaufortNorm: ISO-EN 6185/VIICategory: CFIELD OF APPLICATION• Rowing boat for lakes, rivers and coastalwaters.• Motorisation to max 18.4KW/ 25HP -ideal motorisation 11 KW/15HP• Sail boat, 9m² sail area, to max. windforce 4 Beaufort.• White-water suited boat to class grade 1ASSEBLY• Open and empty the carton, of your boat.CAUTION: When slicing the carton, takecare not to damage the boat!• Check the list of items to ensure no partsare missing.• Remove the wrapping foil and unroll theboat.• Inflate bottom and side tubes till theyreach approximate final shape.• Mount the insert-floor and the seatboards(accessories)• Now only inflate your boat to fulloperating pressure (0.3 bar).• Fasten hand-holds to the eyelet lip on theport- and starboard side.DISMANTLING• Choose clean ground for dismantlingand packing.• Remove all loose parts from the boat(sun-awning, oars, engine and personalitems, ...)• Deflate the boat.• Remove the seat-boards and the inserfloor• Clean and dry your boat and theaccessories to avoid damage by grit!• Check your boat for possible damage,and repair such as soon as possible,ready for next use!Folding instructions• Roll up the boat from stern to bow(direction towards valves) so as to allowdischarge of most of the air.• Unroll the boat and lay it flat on theground.• A: Fold the side tubes lengthways ca. 15cm to the middle, that the boat has thesame width like the transom.• B: Lay the transom inside and fold thetwo stern cones inwards on the transom.• C; Rolling up the boat tightly over thetransom.BBCACAUTION: Make sure there is no air leftin the boat!• Lace the rolled up boat by means of aline or strap.CAUTION: The boat must not be stored inthis state for longer periods! (Refer "careand storage")• You may now pack your boat andstandard accessories into your pack-bag(special accessory).CAUTION: Check for completion of allparts!• If you still find residue of air inside airchambers of the boat, you may not beable to successfully stow your boat intoyour bag. (In the event of that unroll theboat and repeat the process of rolling uponce more).AHANDLING + DETAILSDrain valve:The drain valve serves to drain the boat.When travelling faster than the surroundingwater, spray water entering the boat issucked off continuously.When travelling in calm waters, close thedrain valve.Check that the valve is always free ofleaves, grass etc.Engine performance:Maximum engine output for your HOBBYis 25 HP / 18.4 KW. The ideal engineoutput is 15HP/11KW.WARNING: Never use an engineexceeding the recommended output asstated per manufacturers specification labelor <strong>manual</strong>. You would contravene the law,and risk loosing control over your boat.Engine weight:Maximum permissible engine weight is 75kg. The weight of an engine affects theboats performance, and stability,particularly during the phase of movingfrom displacement to planing mode. Whenchoosing between engines of equal power,we recommend opting for the lighter one.WARNING: Never exceed the max.permissible engine weight!Shaft length:Standard shaft engine (S).Engine Height:Engine dimensions vary between differentmakes of similar shaft types by a few cm ofshaft length. You should be able tocompensate such by means of a spacerpiece, (i.e. a piece of wood ...).78
NOTICE: When the engine position is toohigh, the prop may pop out of the water, revin the air and loose forward propulsion. Ifpositioned too deep, the boat may loosespeed and become difficult to steer.Engine-mounting:Fit the engine precisely in centre position ofthe transom panel. Fasten the enginesclamp-screws by hand, as tight as possible,and secure the engine to the boat by meansof a chain or recovery-line.IMPORTANT: Re-check firm clampscrewholding after 15 minutes of engineoperation.Fuel-tank:If you carry a remote fuel tank, place it (onan old rug, blanket, plastic sheet or similar)on the floor of your boat, thus avoidingdamage to the boat skin by spillage of fuel.Secure the tank to the boat against beinglost overboard by means of a chain,recovery-line or strap.NOTICE: Protect the boat skin of yourboat against fuel and oil contact!Engine fuel and oil dissolves the rubber -layer and may damage the boat skin. If inspite of care fuel is spilled onto the boatskin, rinse thoroughly with water.WARNING: Do not smoke or use openfire near fuel tanks!RISK OF EXPLOSION!Engine trim:Engine setting (trim) should be arrangedrelative to, and to suit, under wayconditions. The engine should be alignedwhereby the prop-shaft is appointedhorizontally level, parallel to the watersurface.Individual alignment and change of anglesetting May never the less improve trim.Read the instructions supplied with yourengine.WARNING: Adjustments to the enginemust not be made whilst the engine isrunning!Load distribution:The boat should be loaded in a manner,where length- and lateral level is wellbalanced.Well spread and balanced load onlyguarantees optimised movement throughthe water. Therefore endeavour to spreadloads evenly.If the bow of your boat distinctly risesabove the water surface, then you ought tomove weight forward.If the boat does not plane when at speed,you need to move weight aft.When using the boat on your own, werecommend to move forward and counterbalance (luggage, fuel-tank...) to the bow,or to use a tiller extension.WARNING: Poor trim may dangerouslydestabilise the boat and may cause loss ofboat control!ACCESSORIES- not contained in standard accessorysupply• Seat-board - The seat boards arescrewed at the sides to the eyelet lip. Theseat-boards make the boat firm, but it isnot necessary to use it.• Seat-board pad with bag - for comfortand on board tidiness• Oars and rowlocks - Rowlocks can beattached individually on the eyelet lip.‣ Remove the black knurled nuts andtake the pieces apart.‣ Feed the part with the bolts throughthe eyelets into the desired positionon the eyelet strip.‣ Place the second part from the outsideonto the bolts and fasten the knurlednuts firmly.‣ Push the oar with the rowlock into therowlock-socket.NOTICE: The socket is supplied with asecuring bolt!When not in use, the oars may be securedto the eyelet lip by means of a line.• Insert floor – provides stability andresists torsion. Recommended for engineoutput as from 10 HP• Bow dry bag - water tight bag withwelded seams and semi water proof zip,fit to the sea board eyelets or D-rings bymeans of straps.• Boat trolley - for convenient transportashore• Sun-awning – protects against too muchsun and sunburn.• Boat-ladder – for re-boarding after aswim.• Tarpaulin – protects the boat againstsun, rain and soiling.• Sailing rig - for ultimate sailingexperienceIMPORTANT:There is an abundance of useful accessoriesfor your HOBBY. For information refer tothe accessory programme contained in theGRABNER-INFLATABLEBOATCATALOGUE, orwww.grabner-sports.at910
KONFORMITÄTSERKLÄRUNG 2003/44/EGDeclaration of conformity 2003/44/ECHersteller:producerModell:modelSeriennummer:serial numberArt des Bootes:Auslegungskategorie:categoryLänge:Breite:Eigengewicht:Personen:Nutzlast:Motorleistung:Motorgewicht:Segelfläche:Tiefgang:GRABNER GMBHWeistracherstraße 11A-3350 HAAGHOBBYCIN: AT-GRAAufblasbares BootInflatable boatCKonformitätsbewertungsmodulConformity evaluation classLength (L.o.a.)BeamNet weightPersonsLoading capacityMotor outputMotor weightSail areaDraft/draughtA4,1 m1,75 m39 kg61.000 kg18.4 kW – 25 PS75 kg9 m²0,21 mDie Firma <strong>Grabner</strong> erklärt, dass das Boot, für das diese Erklärung ausgestellt ist, unter Anwendungder EN ISO 6185/VII, den Anforderungen der Richtlinie 2003/44/EG des europäischenParlaments und des Rates entspricht.The GRABNER Company hereby declare that the boat, for which this declaration is issued,conforms to regulation 2003/44/EG of standard EN ISO 6185/VII of the European Counciland Parliament.GRABNER GMBHWeistracherstraße 113350 HAAG, ÖsterreichTel: +43(0)7434/42251Fax: +43(0)7434/42251-66Mail: grabner@grabner-sports.atwww.grabner-sports.atHaag, April 2009Wolfgang <strong>Grabner</strong>FirmeninhaberTechnische Änderungen, Irrtum undDruckfehler vorbehalten. 04/09Subject to change, technical changes, errorsand misprints 04/091112