ATH Pneumatischer Montagefinger Bedienungsanleitung
ATH Pneumatischer Montagefinger Bedienungsanleitung
ATH Pneumatischer Montagefinger Bedienungsanleitung

Erfolgreiche ePaper selbst erstellen
Machen Sie aus Ihren PDF Publikationen ein blätterbares Flipbook mit unserer einzigartigen Google optimierten e-Paper Software.
Use<br />
Bead breaking of tire<br />
Preparation<br />
Before you operate the unit, the following points should be checked:<br />
- Check the oil level, the water level and the adjacent air pressure at the maintenance unit<br />
- Check whether the mains connection is connected correctly.<br />
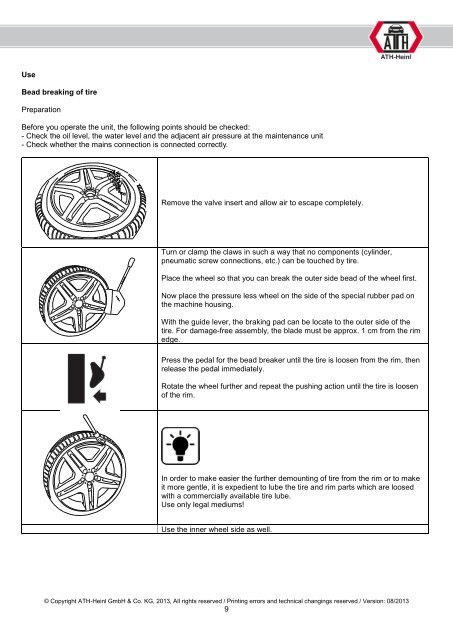
Remove the valve insert and allow air to escape completely.<br />
Turn or clamp the claws in such a way that no components (cylinder,<br />
pneumatic screw connections, etc.) can be touched by tire.<br />
Place the wheel so that you can break the outer side bead of the wheel first.<br />
Now place the pressure less wheel on the side of the special rubber pad on<br />
the machine housing.<br />
With the guide lever, the braking pad can be locate to the outer side of the<br />
tire. For damage-free assembly, the blade must be approx. 1 cm from the rim<br />
edge.<br />
Press the pedal for the bead breaker until the tire is loosen from the rim, then<br />
release the pedal immediately.<br />
Rotate the wheel further and repeat the pushing action until the tire is loosen<br />
of the rim.<br />
In order to make easier the further demounting of tire from the rim or to make<br />
it more gentle, it is expedient to lube the tire and rim parts which are loosed<br />
with a commercially available tire lube.<br />
Use only legal mediums!<br />
Use the inner wheel side as well.<br />
© Copyright <strong>ATH</strong>-Heinl GmbH & Co. KG, 2013, All rights reserved / Printing errors and technical changings reserved / Version: 08/2013<br />
9