Installation and Use - Friedland
Installation and Use - Friedland
Installation and Use - Friedland

Sie wollen auch ein ePaper? Erhöhen Sie die Reichweite Ihrer Titel.
YUMPU macht aus Druck-PDFs automatisch weboptimierte ePaper, die Google liebt.
Setting up<br />
PRE-INSTALLATION SETUP<br />
Before fi xing the door camera in place, set up <strong>and</strong> test<br />
the system as follows:<br />
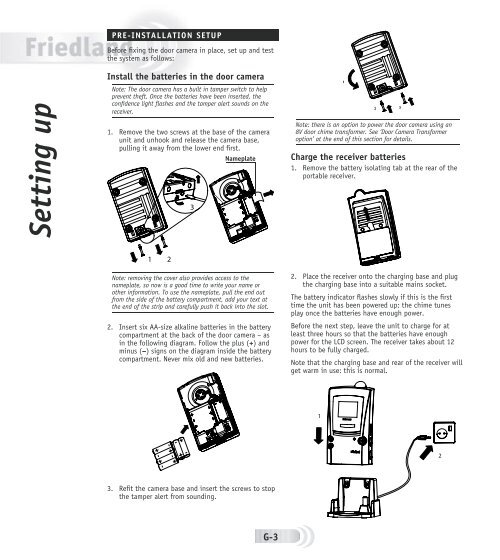
Install the batteries in the door camera<br />
Note: The door camera has a built in tamper switch to help<br />
prevent theft. Once the batteries have been inserted, the<br />
confi dence light fl ashes <strong>and</strong> the tamper alert sounds on the<br />
receiver.<br />
1. Remove the two screws at the base of the camera<br />
unit <strong>and</strong> unhook <strong>and</strong> release the camera base,<br />
pulling it away from the lower end fi rst.<br />
� �<br />
�<br />
Nameplate<br />
Note: removing the cover also provides access to the<br />
nameplate, so now is a good time to write your name or<br />
other information. To use the nameplate, pull the end out<br />
from the side of the battery compartment, add your text at<br />
the end of the strip <strong>and</strong> carefully push it back into the slot.<br />
2. Insert six AA-size alkaline batteries in the battery<br />
compartment at the back of the door camera – as<br />
in the following diagram. Follow the plus (+) <strong>and</strong><br />
minus (–) signs on the diagram inside the battery<br />
compartment. Never mix old <strong>and</strong> new batteries.<br />
3. Refi t the camera base <strong>and</strong> insert the screws to stop<br />
the tamper alert from sounding.<br />
G-3<br />
1<br />
Note: there is an option to power the door camera using an<br />
8V door chime transformer. See ‘Door Camera Transformer<br />
option’ at the end of this section for details.<br />
Charge the receiver batteries<br />
1. Remove the battery isolating tab at the rear of the<br />
portable receiver.<br />
2<br />
2. Place the receiver onto the charging base <strong>and</strong> plug<br />
the charging base into a suitable mains socket.<br />
The battery indicator fl ashes slowly if this is the fi rst<br />
time the unit has been powered up; the chime tunes<br />
play once the batteries have enough power.<br />
Before the next step, leave the unit to charge for at<br />
least three hours so that the batteries have enough<br />
power for the LCD screen. The receiver takes about 12<br />
hours to be fully charged.<br />
Note that the charging base <strong>and</strong> rear of the receiver will<br />
get warm in use: this is normal.<br />
�<br />
3<br />
�