FREE** **Enter our photo contest to win a mini-safari trip - aziab media
FREE** **Enter our photo contest to win a mini-safari trip - aziab media
FREE** **Enter our photo contest to win a mini-safari trip - aziab media

Create successful ePaper yourself
Turn your PDF publications into a flip-book with our unique Google optimized e-Paper software.
Get Creative With<br />
Y<strong>our</strong> Lighting<br />
words and <strong>pho<strong>to</strong></strong>s by Dray van Beeck<br />
Selective lighting can give a great new<br />
atmosphere <strong>to</strong> y<strong>our</strong> <strong>pho<strong>to</strong></strong>s. The easiest way<br />
is <strong>to</strong> use y<strong>our</strong> <strong>to</strong>rch <strong>to</strong> light a subject. This<br />
will give the subject light while the rest stays<br />
darker and has less col<strong>our</strong>.<br />
The help of y<strong>our</strong> buddy could make the<br />
<strong>pho<strong>to</strong></strong>graphy easier. If y<strong>our</strong> buddy holds the<br />
<strong>to</strong>rch and shines it on the subject, you can<br />
position the camera and have a more hands<br />
free approach.<br />
Sometimes it’s possible <strong>to</strong> position y<strong>our</strong> <strong>to</strong>rch<br />
behind a subject and lighting it this way from<br />
the back. A fan coral or feather stars are quite<br />
suitable for these kinds of <strong>pho<strong>to</strong></strong>s.<br />
Another possibility is using one of y<strong>our</strong><br />
strobes <strong>to</strong> backlight a subject. Either you use<br />
the strobe in slave mode or attached <strong>to</strong> y<strong>our</strong><br />
camera. Experiment with the right angle, right<br />
position and amount of strobe light.<br />
The new rage from 2010 was the reinvention<br />
of a studio technique from more than 50 years<br />
ago - the “snoot”. Portrait <strong>pho<strong>to</strong></strong>graphers in<br />
the forties and fifties used a cone shaped<br />
appendix over the lamps/strobes <strong>to</strong> create a<br />
darker area around the face. This technique<br />
can be used underwater <strong>to</strong> highlight a subject<br />
without the area around it - (of c<strong>our</strong>se you<br />
can also do this afterwards in editing software<br />
such as Adobe Pho<strong>to</strong>shop).<br />
A snoot, a cone you attach <strong>to</strong> y<strong>our</strong> strobe,<br />
can be bought or self-made. The size of the<br />
opening dictates how much of y<strong>our</strong> <strong>pho<strong>to</strong></strong> is<br />
illuminated.<br />
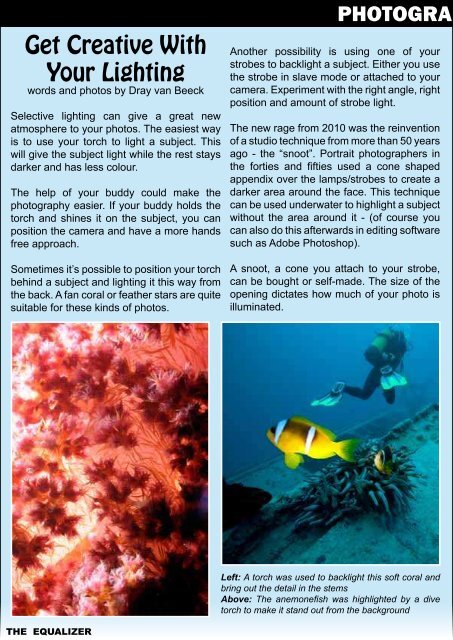
Left: A <strong>to</strong>rch was used <strong>to</strong> backlight this soft coral and<br />
bring out the detail in the stems<br />
Above: The anemonefish was highlighted by a dive<br />
<strong>to</strong>rch <strong>to</strong> make it stand out from the background<br />
PHOTOGRAPHY FOCUS<br />
Making a snoot is easy. Take a plastic bottle,<br />
cut away the bot<strong>to</strong>m half and paint it black.<br />
Find a way <strong>to</strong> attach it <strong>to</strong> y<strong>our</strong> strobe and you<br />
are ready <strong>to</strong> go. Keep the cap and make a<br />
small hole in it. For macro <strong>pho<strong>to</strong></strong>graphy this<br />
can give a neat small light area.<br />
Modern snoots that are available from<br />
good camera retailers, come with all the<br />
accessories you need.<br />
Snoots work very well if you use the spotting<br />
light of y<strong>our</strong> strobe. This way you can see<br />
where it focuses and where the snoot will<br />
Above (clockwise from <strong>to</strong>p left): An example of a homemade<br />
snoot, a shop bought snoot with accessories, the snoot fitted on the<br />
strobe for wide angle lighting, a lionfish illuminated by the spotlight<br />
appears <strong>to</strong> be performing on stage, a tube sponge <strong>to</strong>p lit by a snoot<br />
aim the light. The easiest “snooting” is with<br />
wide-angle <strong>pho<strong>to</strong></strong>graphy. Macro requires a<br />
lot of patience and positioning. It can be a<br />
good idea <strong>to</strong> use a <strong>trip</strong>od <strong>to</strong> offer even greater<br />
control.<br />
More tips and advice<br />
can be found in this<br />
new guide. Available<br />
as an app for both<br />
iPhone and iPad.<br />
Click here for details<br />
THE EQUALIZER Sep-Oct 2011