

Machine Quilting Unlimited - Special Edition - Winter 2011
Machine Quilting Unlimited - Special Edition - Winter 2011
Machine Quilting Unlimited - Special Edition - Winter 2011

You also want an ePaper? Increase the reach of your titles
YUMPU automatically turns print PDFs into web optimized ePapers that Google loves.
from 1 to 2. Now, reposition your ruler, and stitch<br />
a line from 2 to 3, forming a V. (Illustration 2)<br />
Continue from 4 to 5, from 5 to 6 and so on<br />
until you come to 9, which is the point at which<br />
you started your design. You just stitched out a<br />
beautiful Mariner’s Compass-type star, and it was<br />
so easy! (Illustration 3)<br />
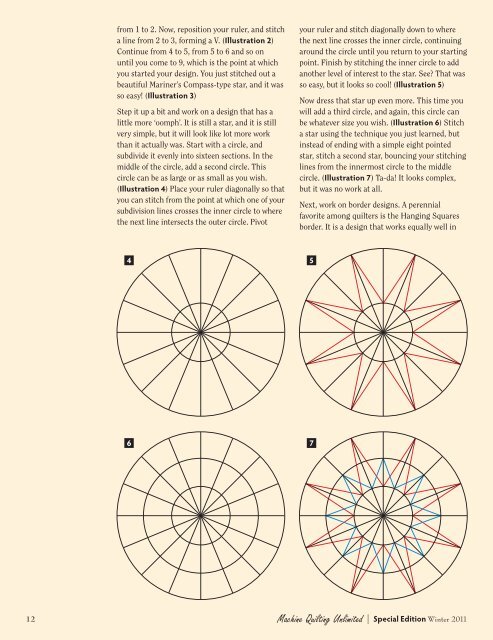
Step it up a bit and work on a design that has a<br />
little more ‘oomph’. It is still a star, and it is still<br />
very simple, but it will look like lot more work<br />
than it actually was. Start with a circle, and<br />
subdivide it evenly into sixteen sections. In the<br />
middle of the circle, add a second circle. This<br />
circle can be as large or as small as you wish.<br />
(Illustration 4) Place your ruler diagonally so that<br />
you can stitch from the point at which one of your<br />
subdivision lines crosses the inner circle to where<br />
the next line intersects the outer circle. Pivot<br />
4<br />
6<br />
your ruler and stitch diagonally down to where<br />
the next line crosses the inner circle, continuing<br />
around the circle until you return to your starting<br />
point. Finish by stitching the inner circle to add<br />
another level of interest to the star. See? That was<br />
so easy, but it looks so cool! (Illustration 5)<br />
Now dress that star up even more. This time you<br />
will add a third circle, and again, this circle can<br />
be whatever size you wish. (Illustration 6) Stitch<br />
a star using the technique you just learned, but<br />
instead of ending with a simple eight pointed<br />
star, stitch a second star, bouncing your stitching<br />
lines from the innermost circle to the middle<br />
circle. (Illustration 7) Ta-da! It looks complex,<br />
but it was no work at all.<br />
Next, work on border designs. A perennial<br />
favorite among quilters is the Hanging Squares<br />
border. It is a design that works equally well in<br />
12 <strong>Machine</strong> <strong>Quilting</strong> <strong>Unlimited</strong> | <strong>Special</strong> <strong>Edition</strong> <strong>Winter</strong> <strong>2011</strong><br />
5<br />
7