

Machine Quilting Unlimited - Special Edition - Winter 2011
Machine Quilting Unlimited - Special Edition - Winter 2011
Machine Quilting Unlimited - Special Edition - Winter 2011

You also want an ePaper? Increase the reach of your titles
YUMPU automatically turns print PDFs into web optimized ePapers that Google loves.
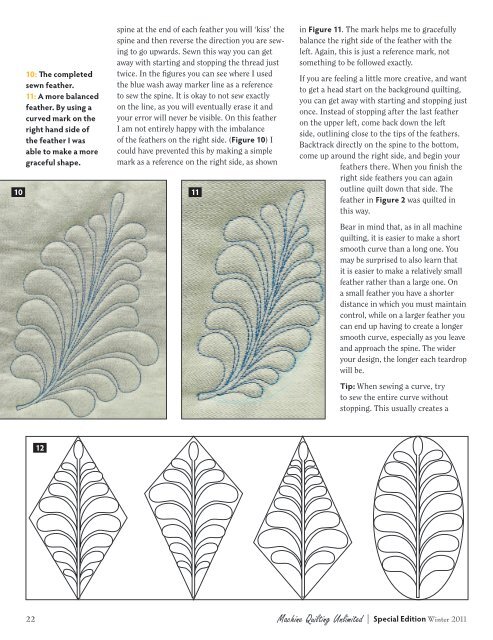
10<br />
10: The completed<br />
sewn feather.<br />
11: A more balanced<br />
feather. By using a<br />
curved mark on the<br />
right hand side of<br />
the feather I was<br />
able to make a more<br />
graceful shape.<br />
12<br />
spine at the end of each feather you will ‘kiss’ the<br />
spine and then reverse the direction you are sewing<br />
to go upwards. Sewn this way you can get<br />
away with starting and stopping the thread just<br />
twice. In the figures you can see where I used<br />
the blue wash away marker line as a reference<br />
to sew the spine. It is okay to not sew exactly<br />
on the line, as you will eventually erase it and<br />
your error will never be visible. On this feather<br />
I am not entirely happy with the imbalance<br />
of the feathers on the right side. (Figure 10) I<br />
could have prevented this by making a simple<br />
mark as a reference on the right side, as shown<br />
11<br />
in Figure 11. The mark helps me to gracefully<br />
balance the right side of the feather with the<br />
left. Again, this is just a reference mark, not<br />
something to be followed exactly.<br />
If you are feeling a little more creative, and want<br />
to get a head start on the background quilting,<br />
you can get away with starting and stopping just<br />
once. Instead of stopping after the last feather<br />
on the upper left, come back down the left<br />
side, outlining close to the tips of the feathers.<br />
Backtrack directly on the spine to the bottom,<br />
come up around the right side, and begin your<br />
feathers there. When you finish the<br />
right side feathers you can again<br />
outline quilt down that side. The<br />
feather in Figure 2 was quilted in<br />
this way.<br />
Bear in mind that, as in all machine<br />
quilting, it is easier to make a short<br />
smooth curve than a long one. You<br />
may be surprised to also learn that<br />
it is easier to make a relatively small<br />
feather rather than a large one. On<br />
a small feather you have a shorter<br />
distance in which you must maintain<br />
control, while on a larger feather you<br />
can end up having to create a longer<br />
smooth curve, especially as you leave<br />
and approach the spine. The wider<br />
your design, the longer each teardrop<br />
will be.<br />
Tip: When sewing a curve, try<br />
to sew the entire curve without<br />
stopping. This usually creates a<br />
22 <strong>Machine</strong> <strong>Quilting</strong> <strong>Unlimited</strong> | <strong>Special</strong> <strong>Edition</strong> <strong>Winter</strong> <strong>2011</strong>