Elite Screens Inc | Elite Screens China Corp. | Elite Screens Europe ...
Elite Screens Inc | Elite Screens China Corp. | Elite Screens Europe ...
Elite Screens Inc | Elite Screens China Corp. | Elite Screens Europe ...

You also want an ePaper? Increase the reach of your titles
YUMPU automatically turns print PDFs into web optimized ePapers that Google loves.
Product Review Sound & Vision Magazine, October 2008<br />
The House that Jim Built (James Wilcox) Evaluation of ezFrame (R106WH1)<br />
The House That Jim Built, Part 3<br />
At long last, our intrepid DIYer finally gets his home theater<br />
www.elitescreens.com/reviews<br />
By James K. Willcox<br />
October 2008<br />
Edward Smith<br />
Has it really been 2 years since I last wrote about my efforts to install the A/V and<br />
networking systems in the new addition to my home? (See “The House That Jim<br />
Built,” June 2006, “The House That Jim Built: Part Two,” September 2006, and the<br />
Web-exclusive prequel to this story, The Basement Home Theater Jim Built in the<br />
House that Jim Built). It’s hard to imagine that much time has passed, but despite<br />
some dumb mistakes along the way, I have to say I couldn’t be happier with the<br />
result. When you do a lot of the work yourself, you pick up an incredible amount<br />
of knowledge about what goes into building a dedicated home theater — things<br />
I never learned from just profiling them for magazines. The previous articles<br />
detailed my experiences running wire and installing gear as my wife Lisa and I added a living room and bedroom to<br />
our riverfront home 30 miles north of New York City. Stealth, rather than high-end performance, was the priority, as our<br />
view of the Hudson River is the real star of these rooms. And with considerable help from Hudson Valley Home Media in<br />
nearby Sparkill, NY (among other things, owner Barry Weiner had to rescue me from an electrician’s bad low-voltage<br />
wiring job), my wife and I successfully met our home-entertainment goals for that part of the house.<br />
But the basement we added at the same time was my chance to go wild — or<br />
at last as wild as a man with a toddler, a mortgage, and a limited budget can<br />
afford to go. I was determined to transform the basement into a kick-ass home<br />
theater, with a small recording studio to boot.<br />
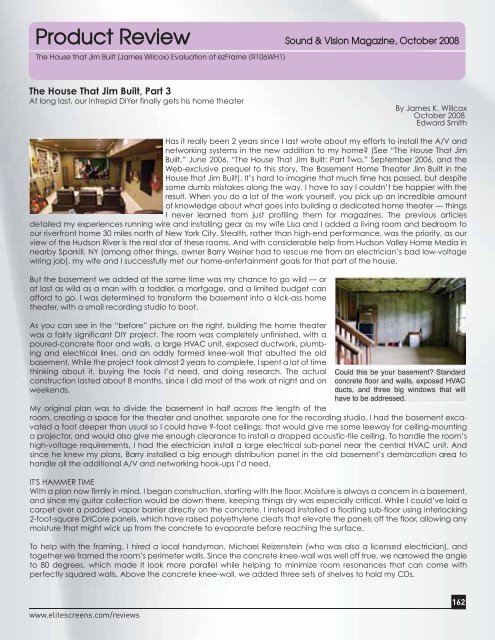
As you can see in the “before” picture on the right, building the home theater<br />
was a fairly significant DIY project. The room was completely unfinished, with a<br />
poured-concrete floor and walls, a large HVAC unit, exposed ductwork, plumbing<br />
and electrical lines, and an oddly formed knee-wall that abutted the old<br />
basement. While the project took almost 2 years to complete, I spent a lot of time<br />
thinking about it, buying the tools I’d need, and doing research. The actual<br />
construction lasted about 8 months, since I did most of the work at night and on<br />
weekends.<br />
My original plan was to divide the basement in half across the length of the<br />
room, creating a space for the theater and another, separate one for the recording studio. I had the basement excavated<br />
a foot deeper than usual so I could have 9-foot ceilings; that would give me some leeway for ceiling-mounting<br />
a projector, and would also give me enough clearance to install a dropped acoustic-tile ceiling. To handle the room’s<br />
high-voltage requirements, I had the electrician install a large electrical sub-panel near the central HVAC unit. And<br />
since he knew my plans, Barry installed a big enough distribution panel in the old basement’s demarcation area to<br />
handle all the additional A/V and networking hook-ups I’d need.<br />
IT'S HAMMER TIME<br />
With a plan now firmly in mind, I began construction, starting with the floor. Moisture is always a concern in a basement,<br />
and since my guitar collection would be down there, keeping things dry was especially critical. While I could’ve laid a<br />
carpet over a padded vapor barrier directly on the concrete, I instead installed a floating sub-floor using interlocking<br />
2-foot-square DriCore panels, which have raised polyethylene cleats that elevate the panels off the floor, allowing any<br />
moisture that might wick up from the concrete to evaporate before reaching the surface.<br />
To help with the framing, I hired a local handyman, Michael Reizenstein (who was also a licensed electrician), and<br />
together we framed the room’s perimeter walls. Since the concrete knee-wall was well off true, we narrowed the angle<br />
to 80 degrees, which made it look more parallel while helping to minimize room resonances that can come with<br />
perfectly squared walls. Above the concrete knee-wall, we added three sets of shelves to hold my CDs.<br />
162