GHOST Pickup System Acousti-Phonic Intelligent Pre ... - Graph Tech
GHOST Pickup System Acousti-Phonic Intelligent Pre ... - Graph Tech
GHOST Pickup System Acousti-Phonic Intelligent Pre ... - Graph Tech

You also want an ePaper? Increase the reach of your titles
YUMPU automatically turns print PDFs into web optimized ePapers that Google loves.
Quick<br />
Switch<br />
Magnetic<br />
Volume<br />
Magnetic<br />
Tone<br />
Strat Style Instruments Tele Style Instruments<br />
STEP 6: Auxiliary Power Out<br />
STEP 7: Setup<br />
To QSW pin<br />
contact on<br />
pre-amp.<br />
Diagram 11.<br />
<strong>GHOST</strong><br />
Volume<br />
To QSW pin<br />
contact on<br />
pre-amp.<br />
Magnetic<br />
Volume<br />
<strong>GHOST</strong><br />
Volume<br />
Quick<br />
Switch<br />
If you do NOT require auxiliary power out, skip to STEP 7, below. The<br />
<strong>Acousti</strong>-<strong>Phonic</strong> <strong>Intelligent</strong> <strong>Pre</strong>-amp includes a circuit to switch on battery power<br />
when a plug is inserted into the stereo jack. If you have another electronic device<br />
(such as an active pickup system) inside the guitar cavity that requires a nine volt<br />
supply, you may power it from the auxiliary power output of the <strong>Acousti</strong>-<strong>Phonic</strong><br />
<strong>Intelligent</strong> <strong>Pre</strong>-amp. The auxiliary power output is switched on and off with the<br />
<strong>Acousti</strong>-<strong>Phonic</strong> <strong>Intelligent</strong> <strong>Pre</strong>-amp.<br />
Connect your device to the PWR pins of the <strong>Acousti</strong>-<strong>Phonic</strong> <strong>Intelligent</strong> <strong>Pre</strong>-amp.<br />
The pin next to the PWR marking is positive. The pin near the edge of the board<br />
is negative.<br />
The maximum current that may be drawn from the auxiliary power output is<br />
50mA. However, for long battery life the current drawn should be kept to no more<br />
than a few mA. Do not exceed the maximum current (in particular, do not short<br />
the output) or the <strong>Acousti</strong>-<strong>Phonic</strong> <strong>Intelligent</strong> <strong>Pre</strong>-amp may be damaged.<br />
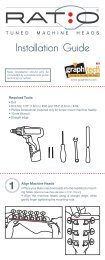
Once you are finished installing the <strong>GHOST</strong> system you need to set up your action<br />
and intonation.<br />
Step 1: To set up your action, set each string’s height using the two Allen screws<br />
on each saddle. Once it is close, tune it up. Do any final height adjustments. You<br />
want to set the height for each string high enough so notes don’t buzz when<br />
played, but low enough to play easily.<br />
19