GHOST Pickup System Acousti-Phonic Intelligent Pre ... - Graph Tech
GHOST Pickup System Acousti-Phonic Intelligent Pre ... - Graph Tech
GHOST Pickup System Acousti-Phonic Intelligent Pre ... - Graph Tech

You also want an ePaper? Increase the reach of your titles
YUMPU automatically turns print PDFs into web optimized ePapers that Google loves.
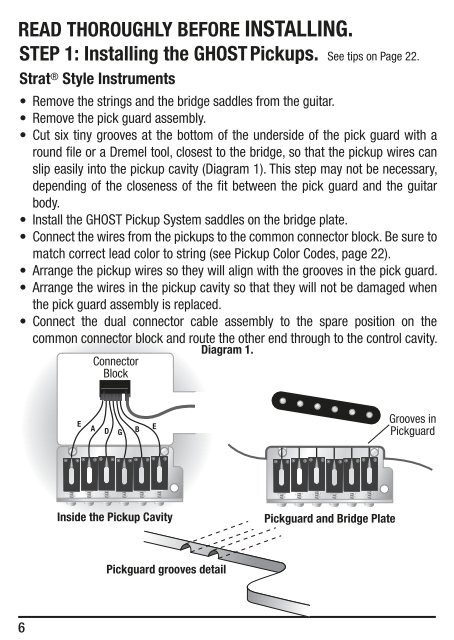
STEP 1: Installing the <strong>GHOST</strong> <strong>Pickup</strong>s.<br />
Strat ® READ THOROUGHLY BEFORE INSTALLING.<br />
See tips on Page 22.<br />
Style Instruments<br />
•<br />
•<br />
•<br />
•<br />
•<br />
•<br />
•<br />
6<br />
Remove the strings and the bridge saddles from the guitar.<br />
Remove the pick guard assembly.<br />
Cut six tiny grooves at the bottom of the underside of the pick guard with a<br />
round file or a Dremel tool, closest to the bridge, so that the pickup wires can<br />
slip easily into the pickup cavity (Diagram 1). This step may not be necessary,<br />
depending of the closeness of the fit between the pick guard and the guitar<br />
body.<br />
Install the <strong>GHOST</strong> <strong>Pickup</strong> <strong>System</strong> saddles on the bridge plate.<br />
Connect the wires from the pickups to the common connector block. Be sure to<br />
match correct lead color to string (see <strong>Pickup</strong> Color Codes, page 22).<br />
Arrange the pickup wires so they will align with the grooves in the pick guard.<br />
Arrange the wires in the pickup cavity so that they will not be damaged when<br />
the pick guard assembly is replaced.<br />
Connect the dual connector cable assembly to the spare position on the<br />
•<br />
common connector block and route the other end through to the control cavity.<br />
Diagram 1.<br />
Connector<br />
Block<br />
E<br />
A D G B E<br />
Inside the <strong>Pickup</strong> Cavity Pickguard and Bridge Plate<br />
Pickguard grooves detail<br />
Grooves in<br />
Pickguard