Indoor Unit Outdoor Unit CS-E9NKUAW CS ... - Panasonic
Indoor Unit Outdoor Unit CS-E9NKUAW CS ... - Panasonic
Indoor Unit Outdoor Unit CS-E9NKUAW CS ... - Panasonic

Create successful ePaper yourself
Turn your PDF publications into a flip-book with our unique Google optimized e-Paper software.
8. Mount valve caps onto the 2-way valve and the 3-way valve.<br />
o Be sure to check for gas leakage.<br />
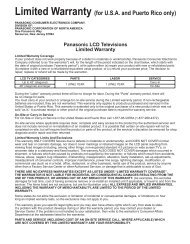
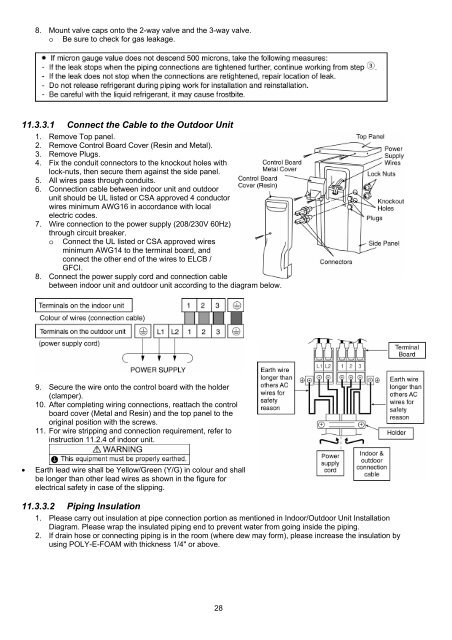
11.3.3.1 Connect the Cable to the <strong>Outdoor</strong> <strong>Unit</strong><br />
1. Remove Top panel.<br />
2. Remove Control Board Cover (Resin and Metal).<br />
3. Remove Plugs.<br />
4. Fix the conduit connectors to the knockout holes with<br />
lock-nuts, then secure them against the side panel.<br />
5. All wires pass through conduits.<br />
6. Connection cable between indoor unit and outdoor<br />
unit should be UL listed or <strong>CS</strong>A approved 4 conductor<br />
wires minimum AWG16 in accordance with local<br />
electric codes.<br />
7. Wire connection to the power supply (208/230V 60Hz)<br />
through circuit breaker.<br />
o Connect the UL listed or <strong>CS</strong>A approved wires<br />
minimum AWG14 to the terminal board, and<br />
connect the other end of the wires to ELCB /<br />
GFCI.<br />
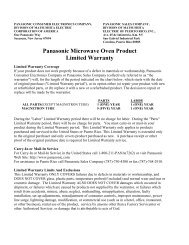
8. Connect the power supply cord and connection cable<br />
between indoor unit and outdoor unit according to the diagram below.<br />
9. Secure the wire onto the control board with the holder<br />
(clamper).<br />
10. After completing wiring connections, reattach the control<br />
board cover (Metal and Resin) and the top panel to the<br />
original position with the screws.<br />
11. For wire stripping and connection requirement, refer to<br />
instruction 11.2.4 of indoor unit.<br />
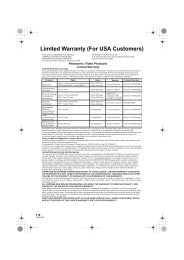
� Earth lead wire shall be Yellow/Green (Y/G) in colour and shall<br />
be longer than other lead wires as shown in the figure for<br />
electrical safety in case of the slipping.<br />
11.3.3.2 Piping Insulation<br />
1. Please carry out insulation at pipe connection portion as mentioned in <strong>Indoor</strong>/<strong>Outdoor</strong> <strong>Unit</strong> Installation<br />
Diagram. Please wrap the insulated piping end to prevent water from going inside the piping.<br />
2. If drain hose or connecting piping is in the room (where dew may form), please increase the insulation by<br />
using POLY-E-FOAM with thickness 1/4" or above.<br />
28