

LTV 1200 Operator's Manual - CareFusion Emergency Preparedness
LTV 1200 Operator's Manual - CareFusion Emergency Preparedness
LTV 1200 Operator's Manual - CareFusion Emergency Preparedness

You also want an ePaper? Increase the reach of your titles
YUMPU automatically turns print PDFs into web optimized ePapers that Google loves.
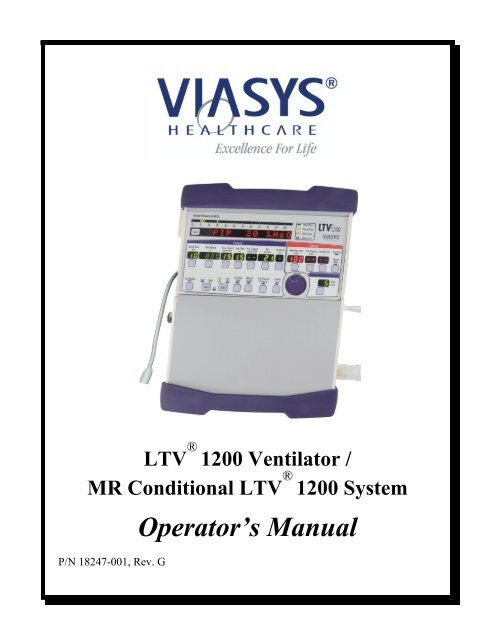
<strong>LTV</strong> ® <strong>1200</strong> Ventilator /<br />
MR Conditional <strong>LTV</strong> ® <strong>1200</strong> System<br />
P/N 18247-001, Rev. G<br />
Operator’s <strong>Manual</strong>
Document Revision History<br />
Document Revision Level Revision Date<br />
Rev A, ECO 3891 April 2006<br />
Rev B, ECO 4016 May 2006<br />
Rev C, ECO 4763 October 2007<br />
Rev D, ECO 5407 July 2008<br />
Rev E, ECO 5462 May 2009<br />
Rev F, ECO 5952 June 2009<br />
Rev G, ECO 6082 August 2009<br />
Contact Information<br />
Pulmonetic Systems<br />
17400 Medina Rd., Suite 100<br />
Minneapolis, Minnesota 55447-1341<br />
Phone: (763) 398-8300<br />
Customer Care Center: (800) 754-1914<br />
Fax: (763) 398-8400<br />
E-mail: info@pulmonetic.com<br />
Website: http://www.pulmonetic.com<br />
<strong>LTV</strong> ® <strong>1200</strong> is a trademark belonging to Pulmonetic Systems.<br />
Copyright © 2009 Pulmonetic Systems, Minneapolis, Minnesota<br />
Operator’s <strong>Manual</strong> <strong>LTV</strong> ® <strong>1200</strong> Ventilator Page i<br />
p/n 18247-001, Rev. G
Warranty<br />
Pulmonetic Systems warrants that the <strong>LTV</strong> ® <strong>1200</strong> ventilator is free from defects in material and<br />
workmanship for a period of one (1) year from the date of shipment, or 8,800 hours as measured on<br />
the usage meter, whichever comes first, with the following limitations:<br />
1) The internal battery is warranted for ninety (90) days from date of shipment.<br />
Pulmonetic Systems will, at its option, either repair, replace, or issue credit for products that prove to<br />
be defective during the warranty period.<br />
For warranty service or repair, the product must be returned to Pulmonetic Systems or a service<br />
facility designated by Pulmonetic Systems, shipping prepaid by the Buyer.<br />
LIMITATION OF WARRANTY<br />
Ordinary maintenance, as specified in the <strong>LTV</strong> ® <strong>1200</strong> Ventilator Operator’s and Service <strong>Manual</strong>s, is<br />
not covered under the foregoing warranty.<br />
The foregoing warranty does not apply to defects or damage to the unit resulting from:<br />
• Improper use or misuse<br />
• Improper or inadequate maintenance The foregoing warranty is in lue of any implied.<br />
• Unauthorized modifications or repairs<br />
• Use of the unit with unauthorized accessories, e.g. external battery or AC adapter<br />
• Use or storage outside the specified environment<br />
NO IMPLIED WARRANTIES<br />
This warranty is exclusive. There are no other warranties expressed or implied.<br />
LIMITATION OF LIABILITY<br />
Pulmonetic Systems shall not be liable for loss of profits, loss of use, consequential damages, or any<br />
other claim based on breach of warranty. Pulmonetic Systems’ liability for damages of any kind shall<br />
be limited to the purchase price of the defective unit.<br />
Page ii <strong>LTV</strong> ® <strong>1200</strong> Ventilator Operator’s <strong>Manual</strong><br />
p/n 18247-001, Rev. G
Notices<br />
The <strong>LTV</strong> ® <strong>1200</strong> ventilator complies with limitations as specified in IEC 601-1-2 for Medical Products. It<br />
does however, use and radiate radio frequency energy.<br />
The function of this machine may be adversely affected by the operation of other nearby equipment,<br />
such as high frequency surgical diathermy equipment, short-wave therapy equipment, defibrillators,<br />
or MRI equipment (except the MR Conditional <strong>LTV</strong> ® <strong>1200</strong>).<br />
The <strong>LTV</strong> ® <strong>1200</strong> ventilator may emit and receive electromagnetic interference. Avoidance of this<br />
exposure is recommended whenever possible.<br />
The MR Conditional <strong>LTV</strong> ® <strong>1200</strong> System is comprised of only (i.e., no unauthorized accessories): an<br />
MR Conditional <strong>LTV</strong> ® <strong>1200</strong> ventilator (P/N 18888-2XX), <strong>LTV</strong> ® <strong>1200</strong> MR Safe 15ft Patient Circuit (P/N<br />
19189-001), MR Conditional Floor Stand (P/N 14982-001), and an <strong>LTV</strong> ® AC adapter (P/N 18053-<br />
001).<br />
The MR Conditional <strong>LTV</strong> ® <strong>1200</strong> System is suitable for use in both 1.5 and 3.0 Tesla (not to exceed<br />
3.0 Tesla static magnetic field) shielded magnetic scanners (see Chapter 16 – MR Conditional<br />
System for more information).<br />
European Regulatory Requirements per 93/42/EEC Medical Device Directives<br />
Pulmonetic Systems’ European Representative for vigilance reporting within the European<br />
Community is:<br />
MediMark® Europe Sarl.<br />
11, rue Emile Zola. BP 2332<br />
F-38033 Grenoble Cedex 2. France<br />
Tel: +33 (0)4 76 86 43 22<br />
Fax: +33 (0)4 76 17 19 82<br />
E-mail: info@medimark-europe.com<br />
Any product malfunctioning issues that fall under Medical Device Directives Essential Requirements<br />
should be directed to MediMark.<br />
Operator’s <strong>Manual</strong> <strong>LTV</strong> ® <strong>1200</strong> Ventilator Page iii<br />
p/n 18247-001, Rev. G
Notice To Operators<br />
Unsafe Operation - Operating the <strong>LTV</strong> ® <strong>1200</strong> ventilator without a complete and thorough<br />
understanding of its attributes is unsafe and may cause harm to the patient. It is important that this<br />
manual be read and understood in its entirety before operating the ventilator.<br />
Warnings and Cautions Section - Read the section on Warnings and Cautions carefully before<br />
operating the <strong>LTV</strong> ® <strong>1200</strong> ventilator.<br />
Use and Maintenance - Any questions regarding installing, operating, or maintaining the <strong>LTV</strong> ® <strong>1200</strong><br />
ventilator, should be directed to a certified Pulmonetic Systems’ service technician or Pulmonetic<br />
Systems.<br />
Avis important<br />
Fonctionnement dangereux - L'opération d'un ventilateur de la <strong>LTV</strong> ® <strong>1200</strong> sans une excellente<br />
compréhension de ses attributs est dangereuse et risque de blesser le patient. Il est très important de<br />
lire et de comprendre entièrement ce manuel avant de faire fonctionner le ventilateur.<br />
Section Avertissements et Attention - Lire attentivement la section Avertissements et Attention<br />
avant de procéder à l'opération des ventilateurs de la <strong>LTV</strong> ® <strong>1200</strong>.<br />
Utilisation et entretien - En cas de questions concernant l'installation, l'opération ou l'entretien des<br />
ventilateurs de la série <strong>LTV</strong> ® , veuillez vous adresser à un technicien de service certifié de Pulmonetic<br />
Systems ou directement à Pulmonetic Systems.<br />
Page iv <strong>LTV</strong> ® <strong>1200</strong> Ventilator Operator’s <strong>Manual</strong><br />
p/n 18247-001, Rev. G
Contents<br />
Warranty ............................................................................................................................................. ii<br />
Notices................................................................................................................................................iii<br />
Chapter 1 - Introduction ....................................................................................... 1-1<br />
Operator’s Safety Information..........................................................................................................1-2<br />
Warnings..........................................................................................................................................1-3<br />
Cautions.........................................................................................................................................1-10<br />
Symbols .........................................................................................................................................1-16<br />
Chapter 2 - Ventilator Overview........................................................................... 2-1<br />
Indications for Use ...........................................................................................................................2-2<br />
Power/Supplies Required ................................................................................................................2-3<br />
Information/Assistance ....................................................................................................................2-4<br />
Chapter 3 - Breath Types ..................................................................................... 3-1<br />
Breath Types ...................................................................................................................................3-1<br />
Volume Control Breaths ...............................................................................................................3-2<br />
Pressure Control Breaths.............................................................................................................3-3<br />
Pressure Support Breaths............................................................................................................3-5<br />
Spontaneous Breaths...................................................................................................................3-6<br />
Chapter 4 - Ventilation Modes.............................................................................. 4-1<br />
Control Mode ...................................................................................................................................4-1<br />
Assist/Control Mode.........................................................................................................................4-1<br />
SIMV Mode ......................................................................................................................................4-2<br />
CPAP Mode .....................................................................................................................................4-3<br />
NPPV Mode .....................................................................................................................................4-4<br />
Apnea Backup .................................................................................................................................4-5<br />
Volume Pressure Ventilation ...........................................................................................................4-6<br />
Bias Flow .........................................................................................................................................4-6<br />
Chapter 5 - Using the Controls and Indicators................................................... 5-1<br />
Ventilator Controls ...........................................................................................................................5-1<br />
Setting a Control ..............................................................................................................................5-2<br />
Variable Controls .............................................................................................................................5-2<br />
Buttons.............................................................................................................................................5-3<br />
Set Value Knob................................................................................................................................5-3<br />
Extended Features ..........................................................................................................................5-3<br />
Bright, Dim and Blank Control Displays...........................................................................................5-4<br />
Flashing Controls.............................................................................................................................5-5<br />
Dashes.............................................................................................................................................5-5<br />
Control Limiting................................................................................................................................5-5<br />
Control Locking................................................................................................................................5-6<br />
Control Retention.............................................................................................................................5-6<br />
Operator’s <strong>Manual</strong> <strong>LTV</strong> ® <strong>1200</strong> Ventilator Page v<br />
p/n 18247-001, Rev. G
Chapter 6 - Controls..............................................................................................6-1<br />
Assist/Control - SIMV/CPAP - NPPV .............................................................................................. 6-1<br />
Breath Rate ..................................................................................................................................... 6-2<br />
Control Lock .................................................................................................................................... 6-3<br />
High Pressure Limit......................................................................................................................... 6-4<br />
Inspiratory / Expiratory Hold............................................................................................................ 6-5<br />
Inspiratory Hold............................................................................................................................ 6-6<br />
Expiratory Hold ............................................................................................................................ 6-8<br />
Inspiratory Time............................................................................................................................. 6-10<br />
Low Minute Volume....................................................................................................................... 6-11<br />
Low Pressure ................................................................................................................................ 6-12<br />
Low Pressure O2 Source............................................................................................................... 6-13<br />
<strong>Manual</strong> Breath............................................................................................................................... 6-17<br />
O2 % (O2 Flush)............................................................................................................................. 6-18<br />
On/Standby ................................................................................................................................... 6-20<br />
PEEP Control ................................................................................................................................ 6-21<br />
PEEP Control in NPPV Mode .................................................................................................... 6-21<br />
Pressure Control ........................................................................................................................... 6-22<br />
Pressure Support .......................................................................................................................... 6-23<br />
Pressure Support in NPPV Mode .............................................................................................. 6-23<br />
Select ............................................................................................................................................ 6-24<br />
Sensitivity ...................................................................................................................................... 6-25<br />
Set Value Knob ............................................................................................................................. 6-26<br />
Silence Reset ................................................................................................................................ 6-27<br />
Tidal Volume ................................................................................................................................. 6-28<br />
Volume Pressure Mode................................................................................................................. 6-29<br />
Chapter 7 - Displays and Indicators ....................................................................7-1<br />
Airway Pressure .............................................................................................................................. 7-1<br />
Display Window............................................................................................................................... 7-1<br />
Indicators......................................................................................................................................... 7-1<br />
Battery Level ................................................................................................................................... 7-2<br />
Charge Status ................................................................................................................................. 7-4<br />
External Power................................................................................................................................ 7-5<br />
NPPV............................................................................................................................................... 7-6<br />
Patient Effort.................................................................................................................................... 7-6<br />
Vent Inop ......................................................................................................................................... 7-6<br />
Chapter 8 - Monitored Data ..................................................................................8-1<br />
Automatic or <strong>Manual</strong> Data Display Scrolling................................................................................... 8-2<br />
PIP xxx cmH2O............................................................................................................................ 8-3<br />
MAP xx cmH2O ........................................................................................................................... 8-3<br />
PEEP xx cmH2O.......................................................................................................................... 8-3<br />
f xxx bpm...................................................................................................................................... 8-3<br />
Vte xxx ml .................................................................................................................................... 8-3<br />
VE xx.x L...................................................................................................................................... 8-3<br />
Page vi <strong>LTV</strong> ® <strong>1200</strong> Ventilator Operator’s <strong>Manual</strong><br />
p/n 18247-001, Rev. G
I:E xx:xx........................................................................................................................................8-3<br />
I:Ecalc xx:xx .................................................................................................................................8-4<br />
Vcalc xxx Lpm ..............................................................................................................................8-4<br />
SBT xxx min .................................................................................................................................8-4<br />
xxx f/Vt xx f ...................................................................................................................................8-4<br />
Chapter 9 - Ventilator Alarms............................................................................... 9-1<br />
Alarms..............................................................................................................................................9-2<br />
APNEA, APNEA xx bpm ..............................................................................................................9-2<br />
BAT EMPTY .................................................................................................................................9-3<br />
BAT LOW .....................................................................................................................................9-5<br />
DEFAULTS...................................................................................................................................9-7<br />
DEFAULTS SET...........................................................................................................................9-9<br />
DISC/SENSE..............................................................................................................................9-10<br />
HIGH f.........................................................................................................................................9-11<br />
HIGH O2 PRES...........................................................................................................................9-12<br />
HIGH PEEP................................................................................................................................9-13<br />
HIGH PRES................................................................................................................................9-14<br />
HW FAULT .................................................................................................................................9-16<br />
INOP...........................................................................................................................................9-17<br />
LOW MIN VOL ...........................................................................................................................9-18<br />
LOW O2 PRES............................................................................................................................9-19<br />
LOW PEEP.................................................................................................................................9-20<br />
LOW PRES ................................................................................................................................9-21<br />
NO CAL DATA, NO CAL Monitor Display..................................................................................9-22<br />
POWER LOST ...........................................................................................................................9-23<br />
POWER LOW.............................................................................................................................9-24<br />
REMOVE PTNT .........................................................................................................................9-25<br />
RESET / RESET 1 .....................................................................................................................9-26<br />
SBT < f .......................................................................................................................................9-27<br />
SBT > f .......................................................................................................................................9-28<br />
SBT < f/Vt ...................................................................................................................................9-29<br />
SBT > f/Vt ...................................................................................................................................9-30<br />
SBT OFF ....................................................................................................................................9-31<br />
XDCR FAULT.............................................................................................................................9-32<br />
Alarm Status Messages.................................................................................................................9-33<br />
f PEEP OFF................................................................................................................................9-33<br />
HI f/Vt OFF .................................................................................................................................9-33<br />
HI PEEP OFF .............................................................................................................................9-33<br />
H&L PEEP OFF..........................................................................................................................9-34<br />
HIGH f OFF ................................................................................................................................9-34<br />
LMV LPPS OFF..........................................................................................................................9-34<br />
LMV OFF....................................................................................................................................9-35<br />
LO PEEP OFF............................................................................................................................9-35<br />
LOCKED.....................................................................................................................................9-35<br />
LO f/Vt OFF ................................................................................................................................9-36<br />
Operator’s <strong>Manual</strong> <strong>LTV</strong> ® <strong>1200</strong> Ventilator Page vii<br />
p/n 18247-001, Rev. G
LPPS OFF.................................................................................................................................. 9-36<br />
SBT f OFF.................................................................................................................................. 9-36<br />
SBT f/Vt OFF ............................................................................................................................. 9-37<br />
SBT HI f OFF ............................................................................................................................. 9-37<br />
SBT LO f OFF ............................................................................................................................ 9-37<br />
SBT TIME .................................................................................................................................. 9-38<br />
WARMUP xx .............................................................................................................................. 9-38<br />
Chapter 10 - Extended Features.........................................................................10-1<br />
Navigating the Extended Features Menus.................................................................................... 10-2<br />
Alarm Operations .......................................................................................................................... 10-3<br />
Alarm Volume ............................................................................................................................ 10-3<br />
Apnea Interval............................................................................................................................ 10-4<br />
High Pressure Alarm Delay ....................................................................................................... 10-4<br />
Low Peak Pressure Alarm ......................................................................................................... 10-4<br />
High f.......................................................................................................................................... 10-5<br />
High PEEP ................................................................................................................................. 10-5<br />
Low PEEP.................................................................................................................................. 10-5<br />
Patient Assist ............................................................................................................................. 10-6<br />
Exit ............................................................................................................................................. 10-6<br />
Vent Operations ............................................................................................................................ 10-7<br />
Variable Rise Time..................................................................................................................... 10-8<br />
Variable Flow Termination ......................................................................................................... 10-9<br />
Variable Time Termination....................................................................................................... 10-10<br />
Pressure Control Flow Termination ......................................................................................... 10-11<br />
Leak Compensation................................................................................................................. 10-12<br />
O2 Conserve ............................................................................................................................ 10-13<br />
O2 Flush ................................................................................................................................... 10-14<br />
Control Unlock ......................................................................................................................... 10-15<br />
Language Selection ................................................................................................................. 10-15<br />
Software Version...................................................................................................................... 10-16<br />
Usage Meter ............................................................................................................................ 10-16<br />
Communications Setting.......................................................................................................... 10-16<br />
Set Date ................................................................................................................................... 10-17<br />
Set Time................................................................................................................................... 10-18<br />
Date Format............................................................................................................................. 10-18<br />
PIP LED ................................................................................................................................... 10-19<br />
Model Number / Serial Number ............................................................................................... 10-19<br />
Valve Home Position ............................................................................................................... 10-20<br />
Set Defaults ............................................................................................................................. 10-20<br />
O2 Cylinder Duration ................................................................................................................ 10-21<br />
Presets ........................................................................................................................................ 10-23<br />
Turning Patient Query on or off ............................................................................................... 10-23<br />
Selecting Patient Size.............................................................................................................. 10-23<br />
<strong>LTV</strong> ® <strong>1200</strong> Presets Table ........................................................................................................ 10-24<br />
SBT (Spontaneous Breathing Trial) Operations ......................................................................... 10-25<br />
Page viii <strong>LTV</strong> ® <strong>1200</strong> Ventilator Operator’s <strong>Manual</strong><br />
p/n 18247-001, Rev. G
SBT Alarms..................................................................................................................................10-27<br />
Transducer Autozero ...................................................................................................................10-28<br />
Airway Pressure Transducer Autozero ....................................................................................10-28<br />
Bi-directional Flow Transducer Differential Autozero...............................................................10-29<br />
Exhalation Flow Transducer Differential Autozero - Narrow....................................................10-30<br />
Exhalation Flow Transducer Differential Autozero - Wide .......................................................10-31<br />
Real Time Transducers ...............................................................................................................10-32<br />
Chapter 11 - Ventilator Checkout Tests ............................................................ 11-1<br />
Alarm Test .....................................................................................................................................11-3<br />
Display Test ...................................................................................................................................11-4<br />
Control Test ...................................................................................................................................11-6<br />
Leak Test .......................................................................................................................................11-8<br />
Vent Inop Alarm Test...................................................................................................................11-10<br />
Exit...............................................................................................................................................11-12<br />
Chapter 12 - Operating Procedure..................................................................... 12-1<br />
To Turn the Ventilator On ..............................................................................................................12-1<br />
Before Connecting the Ventilator to a Patient ...............................................................................12-2<br />
Procedure for Control Mode Set Up ..............................................................................................12-4<br />
Procedure for Assist/Control Mode Set Up....................................................................................12-5<br />
Procedure for SIMV Mode Set Up .................................................................................................12-6<br />
Procedure for CPAP Mode Set Up ................................................................................................12-7<br />
Procedure for NPPV Mode Set Up ................................................................................................12-8<br />
To Turn the Ventilator Off ..............................................................................................................12-9<br />
<strong>LTV</strong> ® Ventilator Settings Checklist ..............................................................................................12-10<br />
Chapter 13 - Cleaning, Disinfecting and Sterilizing ......................................... 13-1<br />
Cleaning the Ventilator ..................................................................................................................13-1<br />
Cleaning or replacing the Fan Filter ..............................................................................................13-2<br />
Cleaning or replacing the Inlet Filter..............................................................................................13-3<br />
Cleaning or Replacing the O2 Inlet Filter .......................................................................................13-4<br />
Cleaning the Exhalation Valve and Reusable Patient Circuit........................................................13-6<br />
Chapter 14 - Power and Battery Operation....................................................... 14-1<br />
Using the AC Adapter....................................................................................................................14-2<br />
Using an External Battery..............................................................................................................14-3<br />
Using the Automobile Cigarette Lighter Adapter ...........................................................................14-6<br />
Replacing the Automobile Adapter Fuse..................................................................................14-10<br />
The Universal Power Supply (UPS) ............................................................................................14-10<br />
The Transport Battery System (TBS) ..........................................................................................14-10<br />
The SprintPack Li-Ion Power System..........................................................................................14-11<br />
Caring for the Internal Battery .....................................................................................................14-12<br />
Battery Replacement................................................................................................................14-12<br />
Battery Disposal .......................................................................................................................14-12<br />
Operator’s <strong>Manual</strong> <strong>LTV</strong> ® <strong>1200</strong> Ventilator Page ix<br />
p/n 18247-001, Rev. G
Chapter 15 - Troubleshooting ............................................................................15-1<br />
Displays and Buttons .................................................................................................................... 15-2<br />
Ventilator Performance ................................................................................................................. 15-6<br />
Power and Battery Operation...................................................................................................... 15-15<br />
Alarms ......................................................................................................................................... 15-17<br />
Checkout Test Failures ............................................................................................................... 15-24<br />
Test Lung Operations.................................................................................................................. 15-26<br />
Chapter 16 - MR Conditional System.................................................................16-1<br />
MR Conditional System Components........................................................................................ 16-1<br />
MR Conditional System – Conditions for Operation.................................................................. 16-2<br />
Appendix A - Ventilator Specifications .............................................................. A-1<br />
Appendix B - Set Up / Maintenance .................................................................... B-1<br />
Recommended Maintenance Schedule ..........................................................................................B-1<br />
Service Assistance..........................................................................................................................B-2<br />
Appendix C - Installation and Checkout............................................................. C-1<br />
Installation and Setup......................................................................................................................C-1<br />
Unpacking the Ventilator – Instructions .......................................................................................C-1<br />
Protective Boots...........................................................................................................................C-2<br />
Protective Boot Removal .............................................................................................................C-3<br />
Protective Boot Installation ..........................................................................................................C-6<br />
Patient Breathing Circuit – Connection Instructions ..................................................................C-10<br />
Oxygen Lines – Connection Instructions ...................................................................................C-12<br />
Patient Assist Call System – Connection Instructions...............................................................C-14<br />
Communications Port ................................................................................................................C-15<br />
LTM Graphics Monitor............................................................................................................C-15<br />
Using the Remote Alarm Cable .................................................................................................C-16<br />
Checking the Ventilator for Proper Operation ...............................................................................C-18<br />
Ventilator Proper Operation Worksheet.....................................................................................C-20<br />
Appendix D - Principles of Operation................................................................. D-1<br />
Overview .........................................................................................................................................D-1<br />
Appendix E - Event Trace .................................................................................... E-1<br />
Event Codes....................................................................................................................................E-3<br />
Event Codes by Code #............................................................................................................... E-3<br />
Event Codes by Event Name.......................................................................................................E-6<br />
Appendix F - Glossary ......................................................................................... F-1<br />
Appendix G - Index...............................................................................................G-1<br />
Page x <strong>LTV</strong> ® <strong>1200</strong> Ventilator Operator’s <strong>Manual</strong><br />
p/n 18247-001, Rev. G
Chapter 1 - INTRODUCTION<br />
This Operator’s <strong>Manual</strong> contains detailed information and instructions which when adhered to, ensure<br />
the safe and effective set up, use and simple maintenance of the <strong>LTV</strong> ® <strong>1200</strong> ventilator.<br />
It is designed for use by Respiratory Therapists or other qualified and trained personnel under the<br />
direction of a physician and in accordance with applicable state laws and regulations. It contains the<br />
following:<br />
• Ventilator Overview<br />
• Installation and Checkout<br />
• Using the Controls and Indicators<br />
• Monitored Data<br />
• Ventilator Alarms<br />
• Extended Features<br />
• Ventilator Checkout tests<br />
• Operating Procedure<br />
• Troubleshooting<br />
• Cleaning, Disinfecting and Sterilizing<br />
• Set Up / Maintenance<br />
• Power and Battery Operation<br />
Service tests, calibration, and major maintenance operations are described in the <strong>LTV</strong> ® <strong>1200</strong> / 1150<br />
Ventilator Service <strong>Manual</strong> (P/N 18603-001).<br />
NOTE<br />
Pressure Support and Pressure Control breaths on the <strong>LTV</strong> ® <strong>1200</strong> are compensated for PEEP.<br />
Delivered pressure is controlled by the Pressure Support or Pressure Control setting and is affected<br />
by the PEEP setting. For example, a Pressure Support setting of 20cmH2O and a PEEP setting of<br />
10cmH2O results in a Peak Inspiratory Pressure (PIP) of 30cmH2O.<br />
REMARQUE<br />
La pression de support et le contrôle de la pression des respirations sur le <strong>LTV</strong> ® <strong>1200</strong> sont<br />
compensés pour la pression expiratoire positive (PEP). La pression administrée est contrôlée par le<br />
réglage de la pression de support ou par le réglage du contrôle de la pression et elle dépend du<br />
réglage PEP. Par exemple, un réglage de la pression de support de 20 cmH2O et un réglage PEP de<br />
10 cmH2O donnent une pression inspiratoire maximale (PImax) de 30 cmH2O.<br />
Operator’s <strong>Manual</strong> <strong>LTV</strong> ® <strong>1200</strong> Ventilator Page 1-1<br />
p/n 18247-001, Rev. G
Operator’s Safety Information<br />
All Operators are to read and understand the following information about Warning, Caution and<br />
Note statements before operating the <strong>LTV</strong> ® <strong>1200</strong> ventilator.<br />
WARNING<br />
“WARNING” statements alert the reader to potentially hazardous situations which, if not avoided,<br />
could result in death or serious injury.<br />
AVERTISSEMENT<br />
Les énoncés « AVERTISSEMENT » informent le lecteur de situations dangereuses qui, si elles ne<br />
sont pas évitées, peuvent entraîner la mort ou des blessures graves.<br />
CAUTION<br />
“CAUTION” statements alert the reader to potentially hazardous situations which, if not avoided,<br />
could result in equipment damage.<br />
ATTENTION<br />
Les énoncés « ATTENTION » informent le lecteur de situations dangereuses qui, si elles ne sont pas<br />
évitées, peuvent causer des dommages à l’équipement.<br />
NOTE<br />
“NOTE” statements contain additional information to assist in the proper operation of the <strong>LTV</strong> ® <strong>1200</strong><br />
ventilator.<br />
REMARQUE<br />
Les énoncés « REMARQUE » contiennent des informations supplémentaires pour aider à l'opération<br />
adéquate des ventilateurs de la <strong>LTV</strong> ® <strong>1200</strong>.<br />
Page 1-2 <strong>LTV</strong> ® <strong>1200</strong> Ventilator Operator’s <strong>Manual</strong><br />
p/n 18247-001, Rev. G
Warnings<br />
WARNING<br />
Untrained Personnel – Only properly trained personnel should operate the ventilator. The <strong>LTV</strong> ®<br />
<strong>1200</strong> ventilator is a restricted medical device designed for use by Respiratory Therapists or other<br />
properly trained and qualified personnel under the direction of a physician and in accordance with<br />
applicable state laws and regulations.<br />
Leak Testing the Patient Breathing Circuit – The patient circuit must be leak tested in the VENT<br />
CHECK mode before connection to the patient. In addition, the Ventilator Checkout mode should be<br />
used to check for correct operation of the ventilator alarm, displays and controls. Harm to the patient<br />
or ineffective ventilation may result from failure to leak test the patient breathing circuit before<br />
connection to a patient. When using a heated humidifier, include it in the circuit when performing leak<br />
testing.<br />
Adjustable and Critical Alarms – For safety purposes, all adjustable alarms and all critical alarms<br />
must be checked to insure proper operation.<br />
Alarms Function Verification - All alarms must be verified as functioning properly on a daily basis. If<br />
any alarm malfunctions, immediately contact a certified Pulmonetic Systems’ service technician or<br />
Pulmonetic Systems.<br />
Patient Monitoring - Patients who are dependent on a ventilator should be constantly monitored by<br />
qualified personnel. Such personnel should be prepared to address equipment malfunctions and<br />
circumstances where equipment becomes inoperative. An alternative method of ventilation should be<br />
available for all patients dependent on the ventilator, and qualified personnel should be fully familiar<br />
with emergency ventilation procedures.<br />
Alternative Ventilation - It is recommended that an alternative means of ventilating the patient be<br />
available at all times and that all ventilator operators be fully familiar with emergency ventilation<br />
procedures.<br />
Fire or Explosion - Operation of the <strong>LTV</strong> ® <strong>1200</strong> ventilator in the presence of flammable gases could<br />
cause a fire or explosion. Under no circumstances is the ventilator to be operated when explosive<br />
gases are present. The presence of nitrous oxide or flammable anesthetics presents a danger to the<br />
patient and operator.<br />
Patient Breathing Circuit Disconnection - Inadvertent disconnection of the patient from the patient<br />
breathing circuit can be dangerous.<br />
Critical Alarms - Failure to set the critical alarms such as the Low Minute Volume alarm and the Low<br />
Pressure alarm may cause non-detection (no alarm) for a disconnection of the lower sense line or the<br />
exhalation valve drive line.<br />
Exhalation Valve Diaphragm – Patient ventilation may be ineffective or dangerous if the exhalation<br />
valve diaphragm is damaged or worn out. The exhalation valve diaphragm must be inspected on a<br />
daily basis and replaced whenever necessary.<br />
Sustained HIGH PRES Alarm - During a sustained High Pressure alarm condition (HIGH PRES), the<br />
ventilator’s turbine is stopped and gas is not delivered to the patient. Disconnect the patient from the<br />
ventilator and ventilate the patient using an alternative method. See Chapter 15 - Troubleshooting,<br />
Alarms for additional information concerning the HIGH PRES alarm.<br />
BAT EMPTY Alarm - A BAT EMPTY alarm indicates the internal battery is almost depleted. Connect<br />
the ventilator to an external power source immediately.<br />
Operator’s <strong>Manual</strong> <strong>LTV</strong> ® <strong>1200</strong> Ventilator Page 1-3<br />
p/n 18247-001, Rev. G
WARNING<br />
Battery run time - When the battery reaches the BAT LOW level, the ventilator will only run for<br />
approximately 10 minutes before generating a battery empty alarm (BAT EMPTY). The approximate<br />
time shown is based on tests using the nominal settings, a new battery and a full 8 hour charge cycle<br />
as specified in Appendix A - Ventilator Specifications. Actual run time may be more or less depending<br />
on ventilator settings, patient demand, and battery age or condition. It is highly recommended that an<br />
alternate power source is connected PRIOR to the ventilator reaching the BAT EMPTY alarm<br />
condition to ensure continuous, uninterrupted patient ventilation<br />
INOP Alarm - If an INOP alarm occurs during operation, ventilate the patient using an alternative<br />
method, disconnect the ventilator, and immediately contact a certified Pulmonetic Systems’ service<br />
technician or Pulmonetic Systems.<br />
NO CAL Condition - Operation of the <strong>LTV</strong> ® <strong>1200</strong> ventilator under a NO CAL condition may result in<br />
inaccurate pressure and volume measurements. Should this condition occur, disconnect the patient<br />
from the ventilator, provide an alternative method of ventilation and immediately contact a certified<br />
Pulmonetic Systems’ service technician or Pulmonetic Systems.<br />
XDCR FAULT Alarm - Continued operation of the <strong>LTV</strong> ® <strong>1200</strong> ventilator with an activated XDCR<br />
FAULT alarm may result in inaccurate flow and volume measurements. Should this condition occur,<br />
disconnect the patient from the ventilator, provide an alternative method of ventilation and<br />
immediately contact a certified Pulmonetic Systems’ service technician or Pulmonetic Systems.<br />
Personal Injury and Electric Shock - Operation of the <strong>LTV</strong> ® <strong>1200</strong> ventilator if any of its panels have<br />
been removed may result in electrical shock to the patient or operator. All servicing must be<br />
performed by a certified Pulmonetic Systems’ service technician.<br />
Audible Alarms - Failure to immediately identify and correct audible alarm situations may result in<br />
serious patient injury.<br />
Equipment Malfunction or Failure - The <strong>LTV</strong> ® <strong>1200</strong> ventilator has alarms to notify operators of<br />
certain conditions and to cease operating upon detecting possible danger. In the event of equipment<br />
failure, all ventilator operators should have an alternative method of ventilation available and be fully<br />
familiar with emergency ventilation procedures.<br />
Improperly Functioning Ventilator - Operation of a ventilator that does not appear to be working<br />
properly may be hazardous. If the ventilator is damaged, fails Ventilator Checkout tests or<br />
malfunctions in any way, discontinue its use and immediately contact a certified Pulmonetic Systems’<br />
service technician or Pulmonetic Systems.<br />
Ventilator Checkout Tests – Be aware that gas is not delivered to the patient during these tests.<br />
Disconnect the patient from the ventilator and ventilate the patient using an alternative method before<br />
running the Ventilator Checkout tests.<br />
Ventilator Checkout and Maintenance Modes - The <strong>LTV</strong> ® <strong>1200</strong> ventilator does not deliver gas<br />
during the Ventilator Checkout mode (VENT CHECK) or Ventilator Maintenance mode (VENT<br />
MTNCE) and should not be used to ventilate a patient during these tests.<br />
Inspired Oxygen (FIO2) Concentration – If the patient has a variable respiratory rate, his/her minute<br />
ventilation will fluctuate. If exact concentrations of inspired oxygen (FIO2) are required to be delivered<br />
to the patient, it is recommended that an accurate oxygen analyzer with alarms be used.<br />
O2 Cylinder Duration Information - The accuracy of the displayed useable amount of oxygen<br />
remaining in an external O2 cylinder (O2 DUR hh:mm) is dependant on the precision of the pressure<br />
gauge used on the O2 cylinder and the accuracy of the information provided by the operator in the O2<br />
CYL DUR menu settings. The calculated/displayed useable amount of oxygen information is to be<br />
used for reference purposes only.<br />
Page 1-4 <strong>LTV</strong> ® <strong>1200</strong> Ventilator Operator’s <strong>Manual</strong><br />
p/n 18247-001, Rev. G
WARNING<br />
Ventilation Variables and O2 Consumption - Variations in the patient’s minute ventilation, I:E ratio<br />
and/or ventilator setting changes or equipment status (i.e. circuit leaks) affect the consumption rate of<br />
oxygen. When warranted by a patients condition, it is recommended that a back-up cylinder or<br />
alternative source of oxygen be available at all times.<br />
Before Using Automobile Cigarette Lighter or Power Outlets - Before using Automobile Cigarette<br />
Lighter or Power Outlets as a power source for the <strong>LTV</strong> ® <strong>1200</strong>, assure that the ventilator’s internal<br />
battery is in good condition and fully charged. Poor cigarette lighter or power outlet connections,<br />
electrical system defects (battery, charging system, etc.), or use of vehicle accessories (air<br />
conditioner, high current lights, high power audio equipment, etc.) could result in less than the<br />
required voltage being delivered to the ventilator, generate a POWER LOST alarm and switch the<br />
ventilator’s power source to the internal battery.<br />
Unauthorized Parts or Accessories – Serious harm to the patient may result from the use of<br />
unauthorized parts or accessories. Only items expressly approved by Pulmonetic Systems may be<br />
used in conjunction with the <strong>LTV</strong> ® <strong>1200</strong> ventilators.<br />
Unapproved Adapters – Only Pulmonetic Systems Accessories should be used to connect the<br />
ventilator to Patient Assist Call Systems. These accessories incorporate safety features to reduce the<br />
risk of shock. Do not attempt to modify these accessories in any way.<br />
Patient Assist Call Connector – Do not apply more than 25V rms or 32VDC to the Patient Assist<br />
Call connector.<br />
Ventilator Service and Repair - All servicing or repair of the <strong>LTV</strong> ® <strong>1200</strong> ventilator must be performed<br />
only by a service technician certified by Pulmonetic Systems.<br />
Patient Circuits – Pulmonetic Systems Patient Circuits, Exhalation Valve Assemblies and Water<br />
Traps are shipped clean, not sterile.<br />
Ultra Violet Light Sensitivity – The material used in the tubing of the Reusable Patient Circuits is<br />
not UV stable. Avoid exposure of the tubing to UV light.<br />
Mounting Screws - Refer to the information contained in Pulmonetic Systems Replacement Screws<br />
Kit, P/N 11149, to determine the appropriate accessories mounting screws or accessories<br />
replacement screws location, type and length to use when removing or exchanging external<br />
accessories on an <strong>LTV</strong> ® ventilator.<br />
Mounting Screw Use – Internal damage to the ventilator may result if the wrong length mounting<br />
screws are used when installing or removing external accessories.<br />
Patient Circuit Accessories - The use of accessories such as Speaking Valves, Heat-Moisture<br />
Exchangers and Filters create additional patient circuit resistance and in the event of a disconnection,<br />
may impede the generation of a Low Pressure alarm. Ensure that the Low Pressure alarm settings<br />
accommodate these types of accessories when used in combination with patient circuits.<br />
Low Minute Volume Control Settings - The Low Min. Vol. control should be set to its highest<br />
clinically appropriate value. If there is a clinical need to set the Low Minute Volume alarm to lower<br />
values or off (“- - -“), perform a clinical assessment to determine if an alternative monitor (i.e. a Pulse<br />
Oxymeter with an audible alarm, or a Cardio Respiratory Monitor) should be used.<br />
The MR Conditional <strong>LTV</strong> ® <strong>1200</strong> System is specified as - An <strong>LTV</strong> ® <strong>1200</strong> Ventilator (P/N 18888-<br />
2XX), <strong>LTV</strong> ® <strong>1200</strong> MR Safe 15ft Patient Circuit (P/N 19189-001), MR Conditional Floor Stand (P/N<br />
14982-001), and a <strong>LTV</strong> ® AC adapter (P/N 18053-001). Adding not approved parts or accessories may<br />
cause patient and/or operator harm.<br />
Operator’s <strong>Manual</strong> <strong>LTV</strong> ® <strong>1200</strong> Ventilator Page 1-5<br />
p/n 18247-001, Rev. G
AVERTISSEMENT<br />
Personnel non qualifié - Seul le personnel qualifié doit opérer le ventilateur. Le ventilateur de la<br />
<strong>1200</strong> <strong>LTV</strong> ® est un dispositif médical restreint conçu pour être utilisé par les inhalothérapeutes ou<br />
autres personnes qualifiées, et par le personnel qualifié sous la supervision d'un médecin et en<br />
conformité avec les lois et règlements applicables.<br />
Contrôle de l’étanchéité du circuit respiratoire du patient – L'étanchéité du circuit respiratoire du<br />
patient (vérification de ventilation) doit être vérifiée en mode VENT CHECK avant le raccordement au<br />
patient. En outre, on doit utiliser le mode Ventilator Checkout (vérification du ventilateur) afin de<br />
s’assurer du fonctionnement adéquat de l’alarme, des affichages et des commandes du ventilateur.<br />
Le défaut de vérifier l’étanchéité du circuit respiratoire du patient avant le raccordement à un patient<br />
peut être nocif pour le patient ou provoquer une ventilation inefficace. Lorsqu’un humidificateur<br />
chauffant est employé, il convient de l’inclure dans le circuit en procédant à la vérification de<br />
l’étanchéité.<br />
Alarmes réglables et critiques – Pour assurer la sécurité et obtenir un fonctionnement adéquat,<br />
toutes les alarmes réglables et critiques doivent être vérifiées.<br />
Vérification du fonctionnement des alarmes - Toutes les alarmes sonores et visuelles doivent être<br />
vérifiées quotidiennement. Si une des alarmes fonctionne de façon inadéquate, contactez votre<br />
technicien de service certifié de Pulmonetic Systems ou Pulmonetic Systems.<br />
Surveillance du patient – Un personnel qualifié doit constamment surveiller les patients qui sont<br />
reliés à un ventilateur. Le personnel doit être en mesure de s’occuper des défectuosités de<br />
fonctionnement de l’équipement ainsi que des circonstances où ce dernier devient inopérant. Une<br />
forme de ventilation alternative doit être disponible à tous les patients reliés au ventilateur et le<br />
personnel qualifié devrait être pleinement familier avec les procédures de ventilation d’urgence.<br />
Ventilation alternative - Il est recommandé qu'un moyen alternatif de ventilation soit disponible en<br />
tout temps, et que tous les opérateurs de ventilateur soient pleinement familiers avec les procédures<br />
de ventilation d'urgence.<br />
Feu ou explosion - L'opération des ventilateurs de la <strong>1200</strong> <strong>LTV</strong> ® en présence de gaz inflammables<br />
peut causer un feu ou une explosion. Le ventilateur ne doit être opéré sous aucune circonstance en<br />
présence de gaz. La présence d'oxyde nitreux ou d'anesthésiques inflammables représente un<br />
danger pour le patient et l'opérateur.<br />
Débranchement du circuit respiratoire du patient - Le débranchement accidentel du circuit<br />
respiratoire du patient peut s'avérer dangereux.<br />
Alarmes critiques – Le défaut de définir les alarmes critiques telles que l’alarme basse ventilationminute<br />
et l’alarme basse pression peut causer une non-détection (absence d’alarme) pour un<br />
débranchement du tube de détection inférieur ou du tube d’entraînement de la soupape d’expiration.<br />
Diaphragme de la soupape d'expiration - Une ventilation inefficace ou dangereuse pour le patient<br />
peut résulter si le diaphragme de la soupape est endommagé ou usé. Le diaphragme de la soupape<br />
d'expiration doit être vérifié quotidiennement, et remplacé au besoin.<br />
Alarme ALARME PMAX continue — Dans des conditions d’alarme de haute pression prolongées<br />
(ALARME PMAX), la turbine du ventilateur s'arrête et le gaz n’est plus transmis au patient.<br />
Débranchez le patient du ventilateur et utilisez une autre méthode de ventilation. Pour plus de détails<br />
sur l’état ALARME PMAX, reportez-vous au chapitre 15, Troubleshooting, Alarms.<br />
Page 1-6 <strong>LTV</strong> ® <strong>1200</strong> Ventilator Operator’s <strong>Manual</strong><br />
p/n 18247-001, Rev. G
AVERTISSEMENT<br />
Durée d’utilisation de la batterie – Lorsque la batterie atteint le niveau BAT INT BASS, le<br />
ventilateur fonctionne pendant environ 10 minutes avant d’émettre une alarme de batterie faible (BAT<br />
INT VIDE). Cette durée approximative est basée sur des tests avec des paramètres nominaux, une<br />
nouvelle batterie et un cycle de chargement complet de 8 heures, tel que spécifié dans l’Annexe A –<br />
Spécifications du ventilateur. La durée d’utilisation réelle pourrait être supérieure ou inférieure, selon<br />
les paramètres du ventilateur, la demande du patient et l’âge ou l’état de la batterie. Il est fortement<br />
recommandé qu’une source d’alimentation alternative soit connectée AVANT que le ventilateur<br />
n’atteigne l’état d’alarme BAT INT VIDE afin d’assurer une ventilation continue et ininterrompue au<br />
patient.<br />
Alarme BAT EMPTY - Une alarme BAT EMPTY indique que la pile interne est pratiquement à plat.<br />
Branchez immédiatement le ventilateur à une source d'alimentation externe.<br />
Alarme INOP - Si une alarme INOP survient au cours de l'opération, ventilez le patient à l'aide de la<br />
méthode alternative, retirez immédiatement le ventilateur du service, et contactez immédiatement<br />
votre technicien de service certifié de Pulmonetic Systems ou Pulmonetic Systems.<br />
Condition NO CAL - L'opération continue du ventilateur de la série <strong>LTV</strong> ® sous condition NO CAL<br />
peut résulter en mesures de pression et de volume erronées. Si cette condition se présente, le<br />
ventilateur doit être retiré du service, et vous devez immédiatement contacter votre technicien de<br />
service certifié de Pulmonetic Systems ou Pulmonetic Systems.<br />
Alarme XDCR FAULT - L'opération continue du ventilateur de la série <strong>LTV</strong> ® avec une alarme XDCR<br />
FAULT activée peut résulter en mesures de débit et de volume erronées. Si cette condition se<br />
présente, le ventilateur doit être retiré du service, et vous devez immédiatement contacter votre<br />
technicien de service certifié de Pulmonetic Systems ou Pulmonetic Systems.<br />
Blessures personnelles et chocs électriques - L'opération d’un ventilateur de la série <strong>LTV</strong> ® alors<br />
que ses panneaux sont enlevés, peut causer un choc électrique au patient ou à l'opérateur. Tout<br />
entretien doit être effectué par un technicien de service certifié de Pulmonetic Systems.<br />
Alarmes sonores - L'échec à identifier et à corriger dans l'immédiat les situations d'alarmes sonores<br />
peut causer des blessures au patient.<br />
Mauvais fonctionnement ou panne de l'équipement - Des dispositifs électromécaniques peuvent<br />
mal fonctionner ou subir une panne. Le ventilateur de la série <strong>LTV</strong> ® a été conçu avec des alarmes,<br />
pour détecter et aviser les opérateurs de certaines conditions, et pour cesser d'opérer en cas de<br />
conditions d'opération dangereuses. En cas de panne de l'équipement, tous les opérateurs du<br />
ventilateur devraient avoir une forme de ventilation alternative à leur disponibilité, et être pleinement<br />
familiers avec les procédures de ventilation d'urgence.<br />
Ventilateurs fonctionnant de façon inadéquate - L'opération d'un ventilateur dont le<br />
fonctionnement semble inadéquat peut représenter un danger. Si le ventilateur est endommagé, s'il<br />
échoue les tests de vérification du ventilateur ou s'il fonctionne de façon inadéquate, suspendez<br />
l'utilisation de ce ventilateur et contactez immédiatement votre technicien de service certifié de<br />
Pulmonetic Systems.<br />
Tests de vérification du ventilateur – Noter que le gaz n’est pas transmis au patient au cours de<br />
ces tests. Débrancher le patient du ventilateur et ventiler le patient à l’aide d’une forme de ventilation<br />
alternative avant de procéder aux tests de vérification du ventilateur.<br />
Modes Vérification et Entretien du ventilateur - Le ventilateur de la série <strong>LTV</strong> ® ne transmet pas le<br />
mélange de gaz en mode Vérification du ventilateur (VENT CHECK) ou en mode Entretien du<br />
ventilateur (VENT MTNCE), il ne devrait donc pas être utilisé pour ventiler un patient durant<br />
l'exécution de ces tests.<br />
Operator’s <strong>Manual</strong> <strong>LTV</strong> ® <strong>1200</strong> Ventilator Page 1-7<br />
p/n 18247-001, Rev. G
AVERTISSEMENT<br />
Concentration d’oxygène inspiré (FIO2) – Si la fréquence respiratoire du patient est variable, sa<br />
ventilation-minute va fluctuer. Lorsqu’une concentration exacte d’oxygène inspiré (FIO2) est<br />
nécessaire pour une transmission au patient, il est recommandé d’utiliser un analyseur de niveau<br />
d’oxygène2 précis, comportant des alarmes.<br />
Informations sur la durée d'utilisation restante de la bouteille d’oxygène - La précision de<br />
l’affichage de la quantité d’oxygène utilisable restante dans une bouteille d’oxygène externe (O2 DUR<br />
hh:mm) dépend de la précision de la jauge de pression utilisée sur la bouteille et de l'exactitude des<br />
informations fournies par l’opérateur dans les paramètres du menu DUREE CYL O2. Les<br />
informations calculées et affichées sur la quantité d’oxygène utilisable ne doivent être utilisées qu’à<br />
titre indicatif.<br />
Variables de ventilation et consommation d’oxygène — Les variations dans la ventilation par<br />
minute du patient et dans le rapport inspiration/expiration, la modification des paramètres ou l’état du<br />
matériel (fuite dans le circuit, par exemple) modifient le taux de consommation de l’oxygène. Lorsque<br />
la situation du patient le permet, il est recommandé qu'une bouteille d’oxygène de secours ou toute<br />
autre source alternative d’oxygène soit disponible en permanence.<br />
Avant toute utilisation d’une prise d’allume-cigare ou d’une prise de courant — Avant d’utiliser<br />
un allume-cigare ou une prise de courant comme source d’alimentation du ventilateur <strong>LTV</strong> ® , vérifiez<br />
que la batterie interne du ventilateur est en bon état et entièrement chargée. L’utilisation d’un allumecigare<br />
ou d’une prise de courant fournissant un branchement de qualité médiocre, des défauts du<br />
circuit électrique (batterie, système de charge, etc.), ou l’utilisation d’accessoires d’automobile<br />
(climatisation, phares, chaîne stéréo et haut-parleurs à forte consommation, etc.) peuvent affecter le<br />
voltage délivré au ventilateur et provoquer une sous-alimentation de celui-ci. Dans cette situation, le<br />
ventilateur déclenche une alarme PAS ALIM SEC et utilise la batterie interne du ventilateur comme<br />
source d’alimentation.<br />
Pièces, accessoires et options non autorisées - Des dommages à l'équipement ou des blessures<br />
au patient peuvent survenir suite à l'utilisation de pièces, accessoires et options non autorisées.<br />
Seuls les éléments expressément approuvés par Pulmonetic Systems doivent être utilisés en<br />
conjonction avec les ventilateurs de la série <strong>LTV</strong> ® .<br />
Accessoires non approuvés – L’utilisation d’accessoires qui ne sont pas expressément approuvés<br />
par Pulmonetic Systems pourrait entraîner des conditions dangereuses. Seuls les accessoires de<br />
Pulmonetic Systems devraient être utilisés pour brancher les ventilateurs aux systèmes d’aide aux<br />
patients. Ces accessoires comportent des caractéristiques de sécurité pour réduire les risques de<br />
choc. N’essayez pas de modifier ces accessoires d’aucune façon.<br />
Connecteur d’appel d’aide aux patients – Ne mettez pas plus de 25 V efficace ou 32 V c.c. au<br />
connecteur d’appel d’aide aux patients.<br />
Entretien et réparation du ventilateur - Tout entretien ou réparation du ventilateur de la série <strong>LTV</strong> ®<br />
ne doit être effectué que par un technicien de service certifié de Pulmonetic Systems.<br />
Circuits du patient – Les circuits du patient du Pulmonetic Systems, les valves expiratoires et les<br />
collecteurs d’eau sont expédiés propres, mais pas stériles.<br />
Sensibilité à la lumière ultraviolette – Les matériaux utilisés pour la tubulure des circuits du patient<br />
ne sont pas stables sous rayons UV. Éviter d’exposer la tubulure à la lumière UV.<br />
Vis de montage des accessoires – Voir les renseignements fournis dans la trousse de vis de<br />
remplacement de Pulmonetic Systems, numéro de pièce 11149, pour déterminer l’emplacement, le<br />
type et la longueur des vis de montage d’accessoires ou des vis de remplacement pour accessoires à<br />
utiliser lors de la dépose ou de l’échange d’accessoires externes sur un ventilateur de la série <strong>LTV</strong> ® .<br />
Page 1-8 <strong>LTV</strong> ® <strong>1200</strong> Ventilator Operator’s <strong>Manual</strong><br />
p/n 18247-001, Rev. G
AVERTISSEMENT<br />
Utilisation des vis de montage – Vous pourriez causer des dommages internes au ventilateur si<br />
des vis de montage de mauvaise longueur sont utilisées lors de l’installation ou de la dépose des<br />
accessoires externes.<br />
Accessoires du circuit du patient - L’utilisation d’accessoires tels que les membranes vocales, les<br />
échangeurs thermohydriques et les filtres, produit une résistance additionnelle dans le circuit de<br />
patient et en cas de débranchement, elle risque d’empêcher la génération de l’alarme de basse<br />
pression. S’assurer que les paramètres de l’alarme de basse pression s’adaptent à ces types<br />
d’accessoires lorsqu’ils sont utilisés avec les circuits du patient.<br />
Réglages du contrôle de volume bas par minute - Le contrôle du volume bas par minute doit être<br />
ajusté à la plus haute valeur clinique appropriée. Si l’alarme de volume bas par minute doit être<br />
ajustée à des valeurs inférieures ou mise à l’arrêt (“- - -“) pour satisfaire aux besoins cliniques,<br />
effectuer une évaluation clinique afin de déterminer si l’utilisation d’un autre moniteur (c.-à-d.,<br />
sphygmo-oxymètre muni d’une alarme sonore ou un moniteur cardio-respiratoire) s’avère pertinente.<br />
Le système à RM conditionnelle <strong>LTV</strong> ® <strong>1200</strong> est spécifié comme - un ventilateur <strong>LTV</strong> ® <strong>1200</strong> (P/N<br />
18888-2XX), circuit de patient <strong>LTV</strong> ® <strong>1200</strong> de 4,6 m (15 pi) sans danger pour la RM (P/N 19189-001),<br />
support de plancher à RM conditionnelle (P/N 14982-001), et un adaptateur <strong>LTV</strong> ® à c.a. (P/N 18053-<br />
001). Ajouter des pièces ou accessoires non approuvés pourrait mener à des dangers au patient<br />
et/ou à l'opérateur.<br />
Operator’s <strong>Manual</strong> <strong>LTV</strong> ® <strong>1200</strong> Ventilator Page 1-9<br />
p/n 18247-001, Rev. G
Cautions<br />
CAUTION<br />
Ventilator Sterilization – To avoid irreparable damage to the <strong>LTV</strong> ® <strong>1200</strong> ventilator, do not attempt to<br />
sterilize it.<br />
Cleaning Agents – To avoid damaging the ventilator’s plastic components and front panel, do not<br />
use cleaning agents containing ammonium chloride, other chloride compounds, more than 2%<br />
glutaraldehyde, phenols, or abrasive cleaners.<br />
Ventilator Immersion - Do not immerse the ventilator in liquids.<br />
Reusable Patient Circuit Components - To avoid degradation of the reusable patient circuit<br />
components, do not exceed the following constraints:<br />
• 50 cleaning cycles or 1 year (whichever comes first)<br />
Steam Autoclave:<br />
• Pressure: 20 PSIG<br />
• Temperature: 275°F (135°C)<br />
• Time: 6 minutes<br />
Liquid Sterilizing Agent:<br />
Do not use any of the following solutions to clean, disinfect, or sterilize the patient circuit:<br />
• Ketone • Chlorinated solutions<br />
• Phenol (>5%) • Chlorinated hydrocarbons<br />
• Inorganic acids • Aromatic hydrocarbons<br />
• Formaldehyde • Hypochlorite<br />
• Liquid agents containing more than<br />
2% glutaraldehyde<br />
Pasteurization:<br />
• A 30-minute warm water detergent and a 30-minute 165°F (74°C) hot water cycle.<br />
• Drying in a sterile drier for more than 1 hour or 140°F (59°C).<br />
Gas (ETO):<br />
• Temperature: 131°F (55°C)<br />
Differential Pressure Ports - A low pressure air nozzle with flow less than 10 liters per minute<br />
should be used for cleaning the differential pressure ports.<br />
Exhalation Valve Cleaning - Do not pour or spray liquid cleaners into the exhalation valve.<br />
Patient Wye Installation – After cleaning, install the patient wye in the patient circuit so the proximal<br />
sense lines are oriented up while operating.<br />
Page 1-10 <strong>LTV</strong> ® <strong>1200</strong> Ventilator Operator’s <strong>Manual</strong><br />
p/n 18247-001, Rev. G
CAUTION<br />
Care of the Exhalation Valve - The exhalation valve is a delicate assembly and may be damaged if;<br />
• Care is not exercised when handling or cleaning it.<br />
• Cleaning instruments or foreign bodies are inserted into it.<br />
• High-pressure gas nozzles are used to dry it.<br />
Front Panel Cleaning – Do not pour or spray liquid cleaners onto the front panel.<br />
Care of Bacterial Filters – If bacterial filters are used in conjunction with the <strong>LTV</strong> ® <strong>1200</strong> ventilator,<br />
comply with all procedures as specified by the filter manufacturer.<br />
Wet or Damp Filters - Do not install a wet or damp filter into the <strong>LTV</strong> ® <strong>1200</strong> ventilator. This could<br />
damage the ventilator.<br />
Oxygen Supply Contamination - The accuracy of the oxygen delivery capabilities of <strong>LTV</strong> ® <strong>1200</strong><br />
ventilator can be compromised by foreign debris contamination in the oxygen supply system. To<br />
reduce the risk of airborne contaminants entering the ventilator, ensure that any oxygen supply<br />
connected to the ventilator is clean, properly filtered 1 and that the ventilator’s O2 Inlet Port Cap is<br />
securely installed on the O2 Inlet Port whenever the ventilator is not connected to an external oxygen<br />
supply.<br />
Proximal Sense Lines - Do not remove the proximal sense lines from the patient wye.<br />
Automobile Cigarette Lighter and Power Outlets – Automobile cigarette lighter and power outlets<br />
are normally wired for a positive center contact and ground sleeve contact. Connecting the ventilator<br />
to an improperly wired outlet will cause the adapter fuse to blow and may damage the adapter or the<br />
ventilator.<br />
Automobile Cigarette Lighter Outlet Power Rating - Running a ventilator from an improperly rated<br />
automobile cigarette lighter outlet (less than 20 amperes) may cause a fuse in the automobile to blow,<br />
causing the ventilator and possibly other accessories in the automobile to stop operating.<br />
Automobile Cigarette Lighter Adapter - Do not operate the ventilator from the Automobile Cigarette<br />
Lighter Adapter while starting the vehicle or when jump starting the automobile battery. Doing so may<br />
cause damage to the ventilator.<br />
Automobile Cigarette Lighter Adapter Tip - Use care when disconnecting the Automobile Cigarette<br />
Lighter Adapter after use, its tip may be hot.<br />
Automobile Cigarette Lighter Outlet – Depending on the condition of the automobile battery,<br />
whether the automobile is turned off, being started or running, automobile cigarette lighter outlets can<br />
provide varying levels of voltage (in some, the outlet only operates when the vehicle is running).<br />
Verify which power source the ventilator is using by checking the External Power LED on the<br />
ventilator.<br />
Remote Alarm - Always verify that the remote alarm properly reports the <strong>LTV</strong> ® <strong>1200</strong> ventilator alarms<br />
before use.<br />
Remote Alarm - Always follow the remote alarm manufacturer’s usage and maintenance<br />
requirements to guarantee proper function of the device.<br />
1<br />
In addition to the existing internal O2 Inlet filter, P/N 14313, an External, In-Line Oxygen Filter (P/N 14470) is<br />
available from Pulmonetic Systems.<br />
Operator’s <strong>Manual</strong> <strong>LTV</strong> ® <strong>1200</strong> Ventilator Page 1-11<br />
p/n 18247-001, Rev. G
CAUTION<br />
External Battery Pack - The External Battery Pack should only be connected to the <strong>LTV</strong> ® <strong>1200</strong><br />
ventilator using the Pulmonetic Systems External Battery Cable (PN 10802). This cable is pre-wired<br />
and properly terminated to ensure safe connection of the External Battery Pack to the ventilator.<br />
Electrical Grounding – In the event of a loss of electrical protective ground, touching the ventilator<br />
could result in electrical shock. To ensure grounding and avoid this danger, use only the unmodified<br />
power cord originally supplied with the <strong>LTV</strong> ® <strong>1200</strong> ventilator, maintained in good condition and<br />
connected to a properly wired and grounded electrical power outlet.<br />
Do not cover the ventilator – To avoid damage to the ventilator, do not cover while operating or<br />
position relative to other objects such that the operation or performance of the ventilator may be<br />
adversely affected. Ensure that sufficient space exists around the ventilator while in use to allow free<br />
circulation of gases.<br />
Electrostatic Discharge – The use of electrically conductive hoses and tubing is not recommended.<br />
The use of such materials may result in damage to the ventilator from electrostatic discharge.<br />
External DC Power Source or External Battery - When connecting the <strong>LTV</strong> ® <strong>1200</strong> ventilator to an<br />
external DC power source or external battery, use only the approved method and connectors<br />
specified in Chapter 14 - Power and Battery Operation.<br />
AC Power Source - When connecting the ventilator to an AC power source, use only the approved<br />
<strong>LTV</strong> ® AC Power Adapter.<br />
AC Power Earth Ground Validity – If the validity of the AC power earth ground connection is in<br />
doubt, use the internal battery, an external battery, or an external DC power source to operate the<br />
<strong>LTV</strong> ® <strong>1200</strong> ventilator.<br />
Fuse Fire Hazard – Replacement of existing fuses with fuses with different voltage or electrical<br />
current ratings may cause a fire.<br />
Storage Temperature - Storing the <strong>LTV</strong> ® <strong>1200</strong> ventilator at temperatures above 60°C (140°F) for<br />
long periods can damage the internal battery and cause expected battery duration to degrade.<br />
Patient Assist Call Connector – Do not apply more than 25V rms or 32VDC to the Patient Assist<br />
Call connector.<br />
Ventilator Checkout Tests - <strong>LTV</strong> ® <strong>1200</strong> ventilator Checkout tests must be performed before initial<br />
use of the ventilator. Rerun the tests whenever a question about the ventilator’s operation arises.<br />
Release Button - To avoid damaging the ventilator or the power connector, push the release button<br />
on the connector before removing it from the ventilator power port or the power port pigtail connector.<br />
Page 1-12 <strong>LTV</strong> ® <strong>1200</strong> Ventilator Operator’s <strong>Manual</strong><br />
p/n 18247-001, Rev. G
ATTENTION<br />
Stérilisation du ventilateur - Afin d'éviter des dommages irréparables au ventilateur de la <strong>1200</strong><br />
<strong>LTV</strong> ® , ne tentez pas de stériliser ce dernier.<br />
Produits de nettoyage - Afin d'éviter d'endommager les composants plastiques et le panneau frontal<br />
du ventilateur, n'utilisez pas des produits de nettoyage contenant : chlorure d'ammonium, composés<br />
de chlorure, plus de 2% de glutaraldéhyde, ou phénol.<br />
Immersion du ventilateur - Ne pas immerger le ventilateur dans des liquides, incluant les produits<br />
stérilisants.<br />
Composants réutilisables du circuit du patient – Pour éviter la dégradation des composants<br />
réutilisables du circuit du patient, ne dépassez pas les limites suivantes:<br />
• 50 cycles de nettoyage ou 1 an (le premier des deux prévalant)<br />
Autoclave à vapeur:<br />
• Pression : 20 lb/po 2<br />
• Température : 275°F (135°C)<br />
• Durée : 6 minutes<br />
Agent de stérilisation liquide:<br />
Il ne faut utiliser aucune des solutions suivantes pour nettoyer, désinfecter ou stériliser le circuit<br />
du patient :<br />
• Cétone • Solutions contenant du chlore<br />
• Phénol (>5%) • Hydrocarbures contenant du chlore<br />
• Acides inorganiques • Hydrocarbures aromatiques<br />
• Formaldéhyde • Hypochlorite<br />
• Les agents liquides contenant plus<br />
de 2% de glutaraldéhyde<br />
Pasteurisation:<br />
• Un cycle avec détergent à l’eau tiède pendant 30 minutes et à l’eau chaude à 165°F<br />
(74°C) pendant 30 minutes.<br />
• Séchage dans un séchoir stérile pendant plus de 1 heure ou à 140°F (59°C).<br />
Gaz (ETO):<br />
• Température : 131°F (55°C)<br />
Ports de pression différentielle - Une source de gaz à débit faible (moins de 10 ppm) doit être<br />
utilisée pour le nettoyage des fluides et de débris des ports de pression différentielle.<br />
Nettoyage de la soupape d'expiration - Ne pas asperger une solution nettoyante dans la soupape<br />
d'expiration.<br />
Installation de la soupape d'expiration - Après le nettoyage, installez la soupape d'expiration dans<br />
le circuit du patient de sorte que les lignes de détection soient alignées vers le haut pendant<br />
l’opération.<br />
Entretien de la soupape d'expiration - La soupape d'expiration est une pièce fragile et peut être<br />
endommagée si :<br />
• Des précautions ne sont pas prises lors de sa manipulation ou de son nettoyage.<br />
• Des instruments de nettoyage ou des corps étrangers sont insérés dans celle-ci.<br />
• Des pistolets de gaz à haute-pression sont utilisés pour l'assécher.<br />
Operator’s <strong>Manual</strong> <strong>LTV</strong> ® <strong>1200</strong> Ventilator Page 1-13<br />
p/n 18247-001, Rev. G
ATTENTION<br />
Nettoyage du panneau frontal - Ne pas asperger des solutions nettoyantes ou les laisser s'écouler<br />
sur le panneau frontal.<br />
Entretien des filtres bactériens - Les filtres bactériens ne devraient pas être immergés dans un<br />
liquide. Un autoclave à vapeur devrait être utilisé pour le nettoyage des filtres bactériens.<br />
Filtres mouillés ou humides - Ne pas installer des filtres mouillés ou humides dans les ventilateurs<br />
de la série <strong>LTV</strong> ® . Cela pourrait endommager le ventilateur.<br />
Contamination de la réserve d’oxygène — La précision de la capacité d’alimentation en oxygène<br />
des ventilateurs <strong>LTV</strong> ® peut être compromise par la présence de corps étrangers dans le système<br />
d’alimentation en oxygène. Afin de diminuer le risque de présence d’agents contaminants<br />
atmosphériques dans le ventilateur, assurez-vous que la réserve d’oxygène reliée au ventilateur est<br />
propre et filtrée de manière adéquate 2 , et que le bouchon de l’orifice d’alimentation en oxygène est<br />
correctement installé à chaque fois que le ventilateur n’est pas relié à une source d'oxygène externe.<br />
Conduites de détection – N’enlevez pas les conduites de détection qui se trouvent sur les divisions<br />
en Y du circuit du patient.<br />
Allume-cigare et prises de courant – L’allume-cigare et les prises de courant sont habituellement<br />
câblés de façon à obtenir un contact central positif et un contact du manchon à la terre. Le<br />
branchement du ventilateur dans une prise qui n’est pas câblée adéquatement aura pour effet de<br />
faire sauter le fusible de l’adaptateur et pourrait endommager l’adaptateur ou le ventilateur.<br />
Puissance nominale des prises d’allume-cigare – Le branchement d’un ventilateur à une prise<br />
d’allume-cigare qui ne possède pas la tension suffisante (moins de 20 ampères) peut faire griller un<br />
fusible de l’automobile, causant ainsi l’arrêt du ventilateur et éventuellement, celui d’autres<br />
accessoires de l’automobile.<br />
Adaptateur pour allume-cigare – Ne faites pas fonctionner le ventilateur à l’aide de l’adaptateur<br />
pour allume-cigare lorsque vous démarrez le véhicule ou lorsque vous faites une connexion<br />
provisoire de la batterie d'un véhicule. Vous pourriez ainsi endommager le ventilateur.<br />
Embout adaptateur pour allume-cigarette d’automobile - Après l'utilisation, débrancher<br />
l’adaptateur pour allume-cigarette d’automobile avec précaution car son embout peut être chaud.<br />
Prise d’allume-cigare d’automobile – Selon la condition de la batterie de l’automobile, si le moteur<br />
est coupé, démarré ou est en marche, les prises d’allume-cigare d’une automobile peut générer des<br />
niveaux de tension variés (sur certains modèles, la prise ne fonctionne que si le moteur est en<br />
marche). Vérifier la source d’alimentation utilisée par le ventilateur indiquée par la DEL External<br />
Power du ventilateur.<br />
Alarme à distance – Assurez-vous toujours que l’alarme à distance indique de façon adéquate les<br />
alarmes du ventilateur <strong>LTV</strong> ® avant d’utiliser le ventilateur.<br />
Alarme à distance – Suivez toujours les exigences d’utilisation et d’entretien du fabricant de l’alarme<br />
à distance afin d’assurer le fonctionnement adéquat de l’appareil.<br />
Bloc-piles externe – Le bloc-piles externe ne doit être branché qu’aux ventilateurs de la <strong>1200</strong> <strong>LTV</strong> ®<br />
à l’aide du câble pour piles externes de Pulmonetic Systems (N o pièce 10802). Ce câble est précâblé<br />
et ses terminaisons assurent une connexion sécuritaire entre le bloc-piles externe et le ventilateur.<br />
Mise électrique à la terre - En cas de perte de la mise électrique à la terre de protection, toutes les<br />
pièces conductrices peuvent transmettre un choc électrique. Pour éviter un choc électrique, n'utilisez<br />
que le cordon d'alimentation d'origine non modifié fourni avec les ventilateurs de la <strong>1200</strong> <strong>LTV</strong> ® ,<br />
maintenus en bonne condition, et branchés à une prise adéquatement câblée et mise à la terre.<br />
2 En plus du filtre interne de l’orifice d’alimentation en oxygène, dont le numéro de pièce est 14313, Pulmonetic<br />
Systems propose un filtre à oxygène externe, de numéro de pièce 14470.<br />
Page 1-14 <strong>LTV</strong> ® <strong>1200</strong> Ventilator Operator’s <strong>Manual</strong><br />
p/n 18247-001, Rev. G
ATTENTION<br />
Ne recouvrez pas le ventilateur – En vue d’éviter le risque de dommages du ventilateur, ne le<br />
recouvrez pas pendant son fonctionnement ou ne le positionnez pas en relation avec d’autres objets<br />
de sorte que le fonctionnement ou le rendement du ventilateur puisse en être négativement affecté.<br />
Assurez-vous qu’un espace suffisant existe autour du ventilateur pendant son utilisation afin de<br />
permettre une bonne circulation des gaz<br />
Choc électrostatique – L'utilisation de tuyaux et de tubes conductibles n'est pas recommandée.<br />
L'utilisation de ces matériaux risque de causer une décharge électrostatique qui endommagerait le<br />
ventilateur.<br />
Source de courant continu ou pile externe - Lorsque vous branchez les ventilateurs de la <strong>1200</strong><br />
<strong>LTV</strong> ® sur une source de courant continu ou sur une pile externe, utilisez seulement les méthodes et<br />
les connecteurs approuvés spécifiés au chapitre 14 - Alimentation et opération avec pile.<br />
Source d'alimentation c.a. - Lorsque vous branchez le ventilateur sur une source d'alimentation<br />
c.a., utilisez l'adaptateur c.a. <strong>LTV</strong> ® approuvé.<br />
Validité de la mise à la terre de l'alimentation c.a. - Si vous doutez de la validité de la mise à la<br />
terre de l'alimentation c.a., utilisez la pile interne, une pile externe ou une source externe de courant<br />
continu, pour opérer le ventilateur de la <strong>1200</strong> <strong>LTV</strong> ® .<br />
Danger d'incendie des fusibles - Le remplacement des fusibles existants par des fusibles de type,<br />
d'ampérage et de courant électrique différent peut causer un incendie.<br />
Température d'entreposage - L'entreposage du ventilateur de la <strong>1200</strong> <strong>LTV</strong> ® à des températures<br />
supérieures à 60° C (140° F) durant des périodes prolongées peut endommager la pile interne et<br />
causer l'usure prématurée de la pile.<br />
Connecteur d’appel d’aide aux patients - Ne mettez pas plus de 25 V efficace ou 32 V c.c. au<br />
connecteur d’appel d’aide aux patients.<br />
Tests de vérification du ventilateur - Les tests de vérification du ventilateur doivent être effectués<br />
avant de relier le patient au ventilateur. Effectuez les tests lors de doutes relativement à l'opération<br />
adéquate du ventilateur.<br />
Bouton de déclenchement – Pour éviter d'endommager le ventilateur ou le connecteur<br />
d'alimentation, appuyer sur le bouton de déclenchement situé sur le connecteur avant de le retirer du<br />
port d'alimentation du ventilateur ou du raccord de queue de cochon du port d'alimentation.<br />
Ne recouvrez pas le ventilateur – Afin d’éviter tout risque de dommages au ventilateur, ne le<br />
recouvrez pas pendant son fonctionnement et positionnez-le de manière à ce que son<br />
fonctionnement ou son rendement ne puisse être gêné par d’autres objets. Assurez-vous qu’un<br />
espace suffisant existe autour du ventilateur pendant son utilisation afin de permettre une bonne<br />
circulation des gaz.<br />
Operator’s <strong>Manual</strong> <strong>LTV</strong> ® <strong>1200</strong> Ventilator Page 1-15<br />
p/n 18247-001, Rev. G
Symbols<br />
Symbol Compliance 3 Title Application<br />
ISO 3864<br />
(Prev. IEC 348)<br />
Symbol No.B.3.1<br />
IEC 417<br />
Symbol No.<br />
417-IEC-5016<br />
IEC 417<br />
Symbol No.<br />
417-IEC-5035<br />
IEC 417<br />
Symbol No.<br />
417-IEC-5019<br />
IEC 417<br />
Symbol No.<br />
417-IEC-5333<br />
IEC 417<br />
Symbol No.<br />
417-IEC-5031<br />
IEC 417<br />
Symbol No.<br />
417-IEC-5032<br />
IEC 417<br />
Symbol No.<br />
417-IEC-5172<br />
IEC 60417<br />
Symbol No. 5182<br />
Directive<br />
2002/96/EC<br />
Caution (refer to<br />
accompanying<br />
documents)<br />
Used to direct the user to the instruction<br />
manual where it is necessary to follow<br />
certain specified instructions where<br />
safety is involved.<br />
Fuse To indicate the fuse boxes, for example,<br />
and their location.<br />
Output To identify an output terminal when it is<br />
necessary to distinguish between inputs<br />
and outputs.<br />
Protective earth<br />
(ground)<br />
Type BF<br />
equipment.<br />
To identify any terminal which is<br />
intended for connection to an external<br />
protective conductor for protection<br />
against electric shock in case of a fault<br />
or the terminal of a protective earth<br />
(ground) electrode.<br />
To mark a type BF equipment complying<br />
with IEC Publication 601.<br />
Direct Current To indicate on the rating plate that the<br />
equipment is suitable for direct current<br />
only; to identify relevant terminals.<br />
Alternating current To indicate on the rating plate that the<br />
equipment is suitable for alternating<br />
current only; to identify relevant<br />
terminals.<br />
Class II equipment To identify equipment meeting safety<br />
requirements specified for Class II<br />
equipment.<br />
Sound; audio Used to identify controls or terminals<br />
related to audio signals.<br />
Waste Container To identify Waste Electrical and<br />
Electronic Equipment (WEEE) that is not<br />
to be disposed of as unsorted municipal<br />
waste and is to be collected separately.<br />
ASTM F2503-05 MR Conditional To identify equipment that has been<br />
demonstrated to pose no known hazards<br />
in a specified MR environment with<br />
specified conditions of use.<br />
3 Reference IEC Medical Electrical Equipment, 2 nd . Edition 1988<br />
Page 1-16 <strong>LTV</strong> ® <strong>1200</strong> Ventilator Operator’s <strong>Manual</strong><br />
p/n 18247-001, Rev. G
Chapter 2 - VENTILATOR OVERVIEW<br />
The <strong>LTV</strong> ® <strong>1200</strong> ventilator is a lightweight, high performance ventilator that is designed to provide the<br />
maximum functionality in the smallest possible package. The <strong>LTV</strong> ® <strong>1200</strong> ventilator provides the<br />
following features:<br />
• High performance ventilation in a small lightweight package (10.5” x 13.5” x 3.25”, 14.5 lbs).<br />
• Turbine technology allows the ventilator to operate without an external compressed gas source.<br />
• CPAP 4 , SIMV 5 , Control, Assist/Control and Apnea Backup ventilation modes.<br />
• NPPV 6 mode ventilation.<br />
• Volume Control, Pressure Control and Pressure Support ventilation.<br />
• Spontaneous Breathing Trial (SBT) to assist with weaning and discontinuation of ventilatory support.<br />
• Variable alarm settings including High Peak Pressure, Low Peak Pressure, Low Minute Volume,<br />
Apnea, High Breath Rate, High PEEP and Low PEEP.<br />
• Oxygen Blending from a High-Pressure Oxygen source, Low-Pressure Oxygen Bleed-in, O2 Flush,<br />
and O2 Cylinder Duration Monitoring<br />
• Lockable front panel controls.<br />
• Monitors for Breath Rate (f), I:E Ratio, MAP, Minute Ventilation (VE), PEEP, PIP and Tidal Volume<br />
(Vte).<br />
• Real-time patient circuit pressure display with Peak Inspiratory Pressure indicator.<br />
• Variable termination conditions for Pressure Support breaths, including maximum inspiratory time<br />
termination and percentage of peak flow.<br />
• Selectable Percentage of Peak Flow termination for Pressure Control breaths.<br />
• Presets to facilitate rapid patient set-up.<br />
• Leak Compensation to improve triggering when a circuit leak is present.<br />
• Single or dual tone output capabilities.<br />
• Operation from a variety of power sources including AC power, internal battery and external DC<br />
power sources.<br />
4 Continuous Positive Airway Pressure<br />
5 Synchronized Intermittent Mandatory Ventilation<br />
6 Non-invasive Positive Pressure Ventilation<br />
Operator’s <strong>Manual</strong> <strong>LTV</strong> ® <strong>1200</strong> Ventilator Page 2-1<br />
p/n 18247-001, Rev. G
Indications for Use<br />
The <strong>LTV</strong> ® <strong>1200</strong> ventilator is intended to provide continuous or intermittent ventilatory support for the<br />
care of the individuals who require mechanical ventilation. The ventilator is a restricted medical<br />
device intended for use by qualified, trained personnel under the direction of a physician.<br />
Specifically, the ventilator is applicable for adult and pediatric patients weighing at least 5kg (11 lbs.),<br />
who require the following types of ventilatory support:<br />
• Positive Pressure Ventilation, delivered invasively (via endotrach tube or trach tube) or<br />
non-invasively (via mask or nasal prongs).<br />
• Assist/Control, SIMV, CPAP, or NPPV modes of ventilation.<br />
The ventilator is suitable for use in institutional, home, or transport settings.<br />
The MR Conditional <strong>LTV</strong> ® <strong>1200</strong> System is suitable for use in both 1.5 and 3.0 Tesla (not to exceed<br />
3.0 Tesla static magnetic field) shielded magnetic scanners (see Chapter 16 – MR Conditional<br />
System for more information).<br />
CAUTION: Federal law restricts this device to sale by or on the order of a physician.<br />
Page 2-2 <strong>LTV</strong> ® <strong>1200</strong> Ventilator Operator’s <strong>Manual</strong><br />
p/n 18247-001, Rev. G
Power/Supplies Required<br />
To operate the <strong>LTV</strong> ® <strong>1200</strong> ventilator, you will need the following:<br />
• Power source: Pulmonetic Systems P/N 10537, 11537, or 18053-001, 110V or 220V<br />
AC power source, or 11V to 15V DC power source. This may be an<br />
external battery or a DC power system 7 .<br />
• For enriched FIO2: High-pressure oxygen source providing between 40 PSIG and 80<br />
PSIG, or Low-flow, low-pressure oxygen source providing less than<br />
10 PSIG.<br />
WARNING<br />
Untrained Personnel – Only properly trained personnel should operate the ventilator. The <strong>LTV</strong> ®<br />
<strong>1200</strong> ventilator is a restricted medical device designed for use by Respiratory Therapists or other<br />
properly trained and qualified personnel under the direction of a physician and in accordance with<br />
applicable state laws and regulations.<br />
Patient Monitoring - Patients who are dependent on a ventilator should be constantly monitored by<br />
qualified personnel. Such personnel should be prepared to address equipment malfunctions and<br />
circumstances where equipment becomes inoperative. An alternative method of ventilation should be<br />
available for all patients dependent on the ventilator, and qualified personnel should be fully familiar<br />
with emergency ventilation procedures.<br />
AVERTISSEMENT<br />
Personnel non qualifié - Seul le personnel qualifié doit opérer le ventilateur. Le ventilateur de la<br />
<strong>1200</strong> <strong>LTV</strong> ® est un dispositif médical restreint conçu pour être utilisé par les inhalothérapeutes ou<br />
autres personnes qualifiées, et par le personnel qualifié sous la supervision d'un médecin et en<br />
conformité avec les lois et règlements applicables.<br />
Surveillance du patient – Un personnel qualifié doit constamment surveiller les patients qui sont<br />
reliés à un ventilateur. Le personnel doit être en mesure de s’occuper des défectuosités de<br />
fonctionnement de l’équipement ainsi que des circonstances où ce dernier devient inopérant. Une<br />
forme de ventilation alternative doit être disponible à tous les patients reliés au ventilateur et le<br />
personnel qualifié devrait être pleinement familier avec les procédures de ventilation d’urgence.<br />
7 Airline carriers typically allow only dry cell batteries on board aircraft. However, some airlines may allow an<br />
electrical cord to be plugged in if arranged in advance. Pulmonetic Systems recommends checking with the<br />
intended carrier well in advance before traveling.<br />
Operator’s <strong>Manual</strong> <strong>LTV</strong> ® <strong>1200</strong> Ventilator Page 2-3<br />
p/n 18247-001, Rev. G
Information/Assistance<br />
For additional information or troubleshooting assistance concerning the operation of the <strong>LTV</strong> ® <strong>1200</strong><br />
ventilator, contact a certified Pulmonetic Systems’ service technician or:<br />
Pulmonetic Systems<br />
17400 Medina Rd., Suite 100<br />
Minneapolis, Minnesota 55447-1341<br />
Phone: (763) 398-8300<br />
Customer Care Center: (800) 754-1914<br />
Fax: (763) 398-8400<br />
E-mail: info@pulmonetic.com<br />
Website: http://www.pulmonetic.com<br />
Page 2-4 <strong>LTV</strong> ® <strong>1200</strong> Ventilator Operator’s <strong>Manual</strong><br />
p/n 18247-001, Rev. G
Chapter 3 - BREATH TYPES<br />
This chapter contains information regarding the breath types available on the <strong>LTV</strong> ® <strong>1200</strong> ventilator. It<br />
covers how breaths are initiated, limited and cycled, and when each type of breath is given.<br />
The following terms are used in discussing how breaths are given:<br />
Initiate What causes a breath to be given. Breaths may be initiated by a patient trigger, a<br />
push of the <strong>Manual</strong> Breath button, or by the ventilator based on the set breath rate<br />
and ventilation mode.<br />
Limit How the breath is controlled. Breaths may be limited to a maximum circuit pressure<br />
or flow.<br />
Cycle What causes the breath to be cycled from the inspiratory phase to the exhalation<br />
phase. Breaths may be cycled by the ventilator when a set time or delivered volume<br />
has been reached, or when an alarm condition such as a high pressure limit has<br />
been reached.<br />
Breath Types<br />
Breaths are defined by how they are initiated, limited and cycled. The breath types are Machine,<br />
Assist, and Patient.<br />
Machine Assist Patient 8<br />
Initiated By - Ventilator Patient Patient<br />
Limited By - Ventilator Ventilator Ventilator<br />
Cycled By - Ventilator Ventilator Patient<br />
Breaths may be given in any of the following forms: Volume Control, Pressure Control, Pressure<br />
Support and Spontaneous. These breaths are given as described in the sections below.<br />
In addition, the following parameters apply to all breaths:<br />
• The Minimum Inspiratory Time is 300 ms.<br />
• The Minimum Exhalation Time is 346 ms.<br />
• When patient triggers are enabled, triggers are detected during exhalation after the Minimum<br />
Exhalation Time has expired.<br />
8 Pressure Support or Spontaneous<br />
Operator’s <strong>Manual</strong> <strong>LTV</strong> ® <strong>1200</strong> Ventilator Page 3-1<br />
p/n 18247-001, Rev. G
Volume Control Breaths<br />
For Volume Control breaths, the set Tidal Volume is delivered over the set Inspiratory Time and flow<br />
is delivered in a decelerating taper flow waveform. Peak flow is calculated based on the Tidal Volume<br />
and Inspiratory Time and the final flow is 50% of the peak flow. Volume breaths may be machine or<br />
assist type breaths.<br />
When the combination of inspiratory time and tidal volume result in an initial flow of
Pressure Control Breaths<br />
For Pressure Control breaths 9 , flow is delivered to elevate the circuit pressure to the Pressure Control<br />
setting and maintain it at that pressure for the set Inspiratory Time. Pressure Control breaths may be<br />
machine or assist type breaths.<br />
Adjusting the Rise Time Profile changes the flow and pressure waveforms for Pressure Control<br />
breaths.<br />
9 Pressure Control and Pressure Support breaths do compensate for PEEP. For example, a Pressure Control<br />
setting of 20cmH2O and a PEEP setting of 10cmH2O results in a Peak Inspiratory Pressure (PIP) of 30cmH2O<br />
(20 cmH20 over the set PEEP).<br />
Operator’s <strong>Manual</strong> <strong>LTV</strong> ® <strong>1200</strong> Ventilator Page 3-3<br />
p/n 18247-001, Rev. G
Pressure Control Breaths (cont)<br />
Pressure Control breaths have an optional flow termination criteria. If PC Flow Termination is ON<br />
Pressure Control breaths may be time or flow terminated. If the flow drops to the set FLOW TERM<br />
level before the inspiratory time is completed, the inspiration is cycled.<br />
Page 3-4 <strong>LTV</strong> ® <strong>1200</strong> Ventilator Operator’s <strong>Manual</strong><br />
p/n 18247-001, Rev. G
Pressure Support Breaths<br />
For Pressure Support breaths 10 , flow is delivered to elevate the circuit pressure to the Pressure<br />
Support setting and maintain it at that pressure until the flow drops below a variable percentage of the<br />
peak flow. Pressure Support breaths may also be cycled by a variable time limit, or by exceeding 2<br />
breath periods. Pressure support breaths are patient type breaths.<br />
For some patients, it may be useful to adjust the variable flow termination percentage. Adjusting the<br />
FLOW TERM setting between 10% and 40% will change the length, volume and comfort of the<br />
inspiration.<br />
10 Pressure Control and Pressure Support breaths do compensate for PEEP. For example, a Pressure Control<br />
setting of 20cmH2O and a PEEP setting of 10cmH2O results in a Peak Inspiratory Pressure (PIP) of 30cmH2O<br />
(20 cmH20 over the set PEEP).<br />
Operator’s <strong>Manual</strong> <strong>LTV</strong> ® <strong>1200</strong> Ventilator Page 3-5<br />
p/n 18247-001, Rev. G
Spontaneous Breaths<br />
For Spontaneous breaths, flow is delivered to meet patient demand and maintain the circuit pressure<br />
at the measured PEEP from the previous breath. The breath is cycled when the flow drops below the<br />
Pressure Support Flow Termination setting, or below 3 lpm. Spontaneous breaths may also be<br />
terminated by exceeding 2 breath periods. Spontaneous breaths are patient type breaths.<br />
Page 3-6 <strong>LTV</strong> ® <strong>1200</strong> Ventilator Operator’s <strong>Manual</strong><br />
p/n 18247-001, Rev. G
Chapter 4 - VENTILATION MODES<br />
The <strong>LTV</strong> ® <strong>1200</strong> ventilator provides the following modes of ventilation:<br />
• Control<br />
• Assist/Control<br />
• SIMV - Synchronized Intermittent Mandatory Ventilation<br />
• CPAP - Continuous Positive Airway Pressure<br />
• Apnea Backup Ventilation<br />
• NPPV - Non-Invasive Positive Pressure Ventilation<br />
Each of these modes is described below.<br />
Control Mode<br />
Control mode ventilation is selected when Assist/ Ctrl is selected and Sensitivity is set to a dash “-”.<br />
In Control mode, Volume or Pressure Controlled machine breaths are given at the rate specified by<br />
the Breath Rate setting and no triggered breaths are allowed.<br />
Assist/Control Mode<br />
Assist/Control ventilation is selected when Assist/ Ctrl is selected and Sensitivity is on. In<br />
Assist/Control mode, the ventilator guarantees a minimum number of Volume or Pressure Controlled<br />
breaths are given. The patient may trigger additional Volume or Pressure Controlled assist breaths.<br />
Operator’s <strong>Manual</strong> <strong>LTV</strong> ® <strong>1200</strong> Ventilator Page 4-1<br />
p/n 18247-001, Rev. G
SIMV Mode<br />
SIMV mode is selected when SIMV/CPAP is selected and the Breath Rate is set between 1 and 80.<br />
In SIMV mode, machine, assist and patient breaths may be given.<br />
For the first patient trigger detected within a breath period, an assist breath is given. For all<br />
subsequent patient triggers within the same breath period, spontaneous patient breaths or pressure<br />
support if set, are given.<br />
At the beginning of a breath period, if no triggered breaths were given in the previous breath period, a<br />
machine breath is given. If there was a patient trigger in the previous breath cycle, the ventilator will<br />
not give a machine breath in the current breath period unless the set Apnea Interval is exceeded.<br />
NOTE<br />
<strong>LTV</strong> ® ventilators provide an Apnea Backup mode of ventilation. When the set Apnea Interval<br />
(maximum time allowed between the beginning of one breath and the beginning of the next breath) is<br />
exceeded, the APNEA alarm is generated and the ventilator will enter Apnea Backup ventilation<br />
mode.<br />
REMARQUE<br />
Les ventilateurs <strong>LTV</strong> ® procurent un mode de ventilation de secours pour l’apnée. Lorsque l’intervalle<br />
de l’apnée établi (durée maximum allouée entre le début d’une respiration et le début de la respiration<br />
suivante) est excédé, l’alarme APNEA est générée et le ventilateur entre en mode de ventilation de<br />
secours pour l’apnée.<br />
Page 4-2 <strong>LTV</strong> ® <strong>1200</strong> Ventilator Operator’s <strong>Manual</strong><br />
p/n 18247-001, Rev. G
CPAP Mode<br />
CPAP mode is selected when SIMV/CPAP is selected and the Breath Rate is set to dashes “- -”. In<br />
CPAP mode, when a patient trigger is detected, a patient breath is given. Breaths will be Pressure<br />
Support or Spontaneous breaths according to the Pressure Support setting.<br />
NOTE<br />
<strong>LTV</strong> ® ventilators provide an Apnea Backup mode of ventilation. When the set Apnea Interval<br />
(maximum time allowed between the beginning of one breath and the beginning of the next breath) is<br />
exceeded, the APNEA alarm is generated and the ventilator will enter Apnea Backup ventilation<br />
mode.<br />
REMARQUE<br />
Ventilateur <strong>LTV</strong> ® procurent un mode de ventilation de secours pour l’apnée. Lorsque l’intervalle de<br />
l’apnée établi (durée maximum allouée entre le début d’une respiration et le début de la respiration<br />
suivante) est excédé, l’alarme APNEA est générée et le ventilateur entre en mode de ventilation de<br />
secours pour l’apnée.<br />
Operator’s <strong>Manual</strong> <strong>LTV</strong> ® <strong>1200</strong> Ventilator Page 4-3<br />
p/n 18247-001, Rev. G
NPPV Mode<br />
Non-invasive Positive Pressure Ventilation, (NPPV) can be selected as the primary mode of<br />
ventilation. In the NPPV mode, the ventilator cycles between IPAP (Pressure Support) and EPAP<br />
(PEEP). When a patient trigger is detected, a Pressure Support patient breath is given.<br />
WARNING<br />
Masks used with the <strong>LTV</strong> ® <strong>1200</strong> must be non-vented (no holes or leak vents). With a vented mask,<br />
the patient's exhaled air escapes via holes or vents in the mask, elbow or swivel connector. With a<br />
non-vented mask, the patient's exhaled air escapes through the ventilator exhalation valve. Using a<br />
vented mask will deplete the oxygen supply faster, and also may lead to patient-ventilator<br />
dysynchrony.<br />
Excessive leakage can also occur if the mask is not properly sealed to the patients face.<br />
REMARQUE<br />
Les masques utilisés avec le <strong>LTV</strong> ® <strong>1200</strong> ne doivent pas être ventilés (ni trous ni épanchements d’air).<br />
Avec un masque de ventilation, l’air que le patient expire s’échappe par les trous ou la ventilation du<br />
masque, le coude ou le connecteur pivotant. Avec un masque qui n’a pas de ventilation, l’air que le<br />
patient expire s’échappe à travers la valve d’expiration du ventilateur. Utiliser un masque de<br />
ventilation va épuiser la réserve d’oxygène plus rapidement et peut aussi causer une dysynchronie<br />
entre le patient et le ventilateur.<br />
Des fuites excessives peuvent aussi se produire si le masque n’est pas proprement étanche sur le<br />
visage des patients.<br />
Page 4-4 <strong>LTV</strong> ® <strong>1200</strong> Ventilator Operator’s <strong>Manual</strong><br />
p/n 18247-001, Rev. G
Apnea Backup<br />
The <strong>LTV</strong> ® <strong>1200</strong> ventilator provides an Apnea Backup mode of ventilation. Apnea Backup ventilation<br />
begins when the time since the last breath start is greater than the set Apnea Interval.<br />
When an apnea alarm occurs:<br />
• If an inspiration is in progress, the ventilator cycles to exhalation.<br />
• The ventilator begins Apnea Backup ventilation in the Assist/Control mode according to the<br />
current control settings. The active controls are displayed at full intensity, and all other controls<br />
are dimmed.<br />
The breath rate for Apnea Backup mode is determined as follows:<br />
• If the set Breath Rate is ≥ = 12 bpm, the Apnea breath rate is the set Breath Rate.<br />
• If the set Breath Rate is < 12 bpm and the set Breath Rate is not limited by other control settings,<br />
the Apnea breath rate is 12 bpm.<br />
• If the set Breath Rate is limited to
Volume Pressure Ventilation<br />
The <strong>LTV</strong> ® <strong>1200</strong> ventilator offers both Volume and Pressure ventilation.<br />
When Volume is selected, all machine and assist breaths are Volume Control breaths. Breaths are<br />
given according to the Tidal Volume and Insp. Time controls. For more information on Volume<br />
Control breaths, see Chapter 6 - Controls, Tidal Volume.<br />
When Pressure is selected, all machine and assist breaths are Pressure Control breaths. Breaths<br />
are given according to the Pres. Control and Insp. Time controls. For more information on Pressure<br />
Control breaths, see Chapter 6 - Controls, Pressure Control.<br />
Bias Flow<br />
The <strong>LTV</strong> ® <strong>1200</strong> ventilator provides a constant bias flow of 10 Lpm during exhalation to assist with<br />
patient triggering. When the O2 Conserve option is ON, the bias flow is 0 lpm and assistance with<br />
patient triggering is reduced. For more information on bias flow using the O2 Conserve option, see<br />
Chapter 10 - Extended Features, O2 Conserve.<br />
WARNING<br />
O2 Conserve – When CONSERVE ON is selected, the <strong>LTV</strong> ® <strong>1200</strong> automatically sets the bias flow to<br />
0 lpm and selects pressure triggering. Certain patients may experience difficulty triggering a breath<br />
with a bias flow of 0 lpm.<br />
AVERTISSEMENT<br />
Conservation d’O2 – Lorsque CONSERVE ON est sélectionné, le <strong>LTV</strong> ® <strong>1200</strong> règle automatiquement<br />
le débit corrigé à 0 l/min et sélectionne l’enclenchement de la pression. Certains patients peuvent<br />
éprouver des difficultés pour enclencher un souffle respiratoire de 0 l/min de débit corrigé.<br />
Page 4-6 <strong>LTV</strong> ® <strong>1200</strong> Ventilator Operator’s <strong>Manual</strong><br />
p/n 18247-001, Rev. G
Chapter 5 - USING THE CONTROLS AND INDICATORS<br />
Ventilator Controls<br />
The following diagram shows how the front panel controls and displays are arranged.<br />
Operator’s <strong>Manual</strong> <strong>LTV</strong> ® <strong>1200</strong> Ventilator Page 5-1<br />
p/n 18247-001, Rev. G
Setting a Control<br />
There are 5 kinds of controls on the <strong>LTV</strong> ® <strong>1200</strong> ventilator. They are:<br />
Variable Controls Controls and alarms that have front panel displays.<br />
Buttons Push buttons that select an option or perform a function.<br />
Set Value Knob Used to set control values and navigate extended features<br />
menus.<br />
Extended Features Ventilation options that do not have front panel controls but are<br />
available through a special menu.<br />
Mechanical Controls Controls, such as Over Pressure Relief, that are hardware<br />
regulated and not operator adjustable.<br />
The following sections describe how to set each kind of control.<br />
Variable Controls<br />
To set a variable control:<br />
1) Select the control by pushing the associated button. The display for the selected control will be<br />
displayed at normal brightness, but the remaining control displays will dim.<br />
2) Change the control value by rotating the Set Value knob. Rotate clockwise to increase and<br />
counter-clockwise to decrease the value. Turning the control knob slowly will change the setting<br />
by a small increment. Turning the control knob more quickly will change the setting by a larger<br />
increment.<br />
3) Deselect the control by:<br />
• Waiting 5 seconds, or<br />
• Pushing the selected button again, or<br />
• Selecting another control, or<br />
• Pushing the Control Lock button<br />
When the control is deselected, all displays will return to their normal brightness. The new control<br />
value goes into effect as soon as the control is deselected.<br />
Page 5-2 <strong>LTV</strong> ® <strong>1200</strong> Ventilator Operator’s <strong>Manual</strong><br />
p/n 18247-001, Rev. G
Buttons<br />
Button controls do one of three things:<br />
• Turn a feature on or off, such as Control Lock.<br />
• Toggle between two features, such as Volume or Pressure ventilation.<br />
• Perform a function, such as <strong>Manual</strong> Breath.<br />
Push the button to activate the feature or change the feature state. A green LED next to the button<br />
indicates when a feature is on.<br />
For Mode buttons, there is a second confirmation push required. To toggle between modes:<br />
1) Push the mode button. The associated LED will flash for 5 seconds.<br />
2) To confirm the mode change, push the mode button again while the LED is flashing. The<br />
ventilator will begin operating in the new mode.<br />
To prevent an accidental shutdown, the ventilator requires a longer push of the On/Standby button to<br />
put the ventilator in the Standby state. To put the ventilator in Standby, push and hold the<br />
On/Standby button for 3 seconds.<br />
Set Value Knob<br />
Use the Set Value knob to set control values and navigate extended features menus.<br />
To change the setting for a variable control, select the control then turn the knob clockwise or<br />
counter-clockwise until the desired setting is reached.<br />
For information on how to use the Set Value knob to navigate the extended features menus, see<br />
Chapter 10 - Extended Features.<br />
Extended Features<br />
The Extended Features menus allow you to set ventilation parameters that do not have dedicated<br />
front panel controls. For information on how to use the Set Value knob to navigate the extended<br />
features menus, see Chapter 10 - Extended Features.<br />
Operator’s <strong>Manual</strong> <strong>LTV</strong> ® <strong>1200</strong> Ventilator Page 5-3<br />
p/n 18247-001, Rev. G
Bright, Dim and Blank Control Displays<br />
Variable controls will be displayed at normal or dimmed intensity, or may be blanked. A display will be<br />
displayed at normal intensity:<br />
• When it is selected for change. All other displays will be dimmed.<br />
• When it is active in the current ventilation mode. Dimmed displays are not active in the current<br />
mode.<br />
NOTE<br />
Be sure to set any controls that may be used in Apnea Backup ventilation to appropriate values. Even<br />
though these controls are dimmed, they will be used if apnea should occur.<br />
REMARQUE<br />
Assurez-vous de régler aux valeurs appropriées, tous les contrôles susceptibles d'être utilisés en<br />
mode ventilation de secours pour l'apnée. Même si ces contrôles sont en veilleuse, ils seront utilisés<br />
en cas d'apnée.<br />
A display will be displayed at dimmed intensity:<br />
• When another control is selected for change.<br />
• When it is not active in the current ventilation mode.<br />
A display will be blank:<br />
• To conserve battery power while operating from battery power:<br />
• If no button pushes or control knob activity occurs for 60 seconds, the displays are turned off.<br />
The display window, 7-segment control displays, and LEDs are turned off. Anytime an alarm<br />
occurs, or if an alarm message is already displayed, the display window will remain active.<br />
The Airway Pressure display is always active.<br />
• To turn the displays back on, push any button or turn the control knob.<br />
• When an option, such as oxygen blending, is not installed.<br />
• When a control feature is not available, such as during Ventilator Checkout tests.<br />
Page 5-4 <strong>LTV</strong> ® <strong>1200</strong> Ventilator Operator’s <strong>Manual</strong><br />
p/n 18247-001, Rev. G
Flashing Controls<br />
Variable controls and alarms will be displayed solid or flashing. A flashing control means one of the<br />
following things:<br />
• If you are changing a control setting, and the display flashes, you have reached a limited value for<br />
the control. Control Limiting is covered later in this section.<br />
• If an alarm display flashes, it indicates that an alarm has occurred or is occurring. See Chapter 9 -<br />
Ventilator Alarms for more information on this.<br />
• If a control display flashes, it indicates a special condition such as time termination of a pressure<br />
support breath. For more information, see Chapter 6 - Controls.<br />
• If the Control Lock LED flashes, it indicates you have tried to change the control settings while<br />
the front panel controls are locked. For more information, see Chapter 6 - Controls, Control Lock.<br />
Dashes<br />
If a control display is set to dashes “ - - ”, it indicates that control is turned off, or is not available in<br />
the current ventilation mode.<br />
Control Limiting<br />
Variable control settings may be limited to less than their specified range for any of the following<br />
reasons:<br />
• To prevent inverse I:E ratios of greater than 4:1<br />
• To ensure a minimum inspiration time of 300 ms<br />
• To ensure a minimum exhalation time of 346 ms<br />
• To ensure a minimum initial flow of 10 lpm for Volume Controlled breaths<br />
• To ensure a maximum initial flow of 100 lpm for Volume Controlled breaths<br />
When you are updating a control and have reached a limited condition, the following things happen:<br />
• The control stops updating and will remain displayed at the highest (or lowest) allowed value.<br />
• The control display will flash.<br />
• The displays for other controls involved in the limited condition will flash.<br />
To set the control to a value outside the limited range, you will need to change the settings for other<br />
controls involved in the limit condition. For instance, if the Breath Rate is set to 12, the maximum<br />
allowed Inspiratory Time is 4.0 seconds. To set the Inspiratory Time to more than 4.0 seconds, you<br />
must first decrease the Breath Rate.<br />
Operator’s <strong>Manual</strong> <strong>LTV</strong> ® <strong>1200</strong> Ventilator Page 5-5<br />
p/n 18247-001, Rev. G
Control Locking<br />
The front panel controls may be locked so that settings cannot be accidentally changed. When the<br />
controls are locked, the Control Lock LED will be on. If you try to select or change a control while the<br />
Control Lock is on, the message LOCKED will be displayed in the display window and the Control<br />
Lock LED will flash.<br />
Two different levels of difficulty can be set for control unlocking: Easy and Hard. The Easy unlocking<br />
method should be used when only trained personnel have access to the ventilator. The Hard method<br />
should be used when children or others may have access to the ventilator and you want to prevent<br />
accidental changes to the control settings. Easy unlocking is the default and this setting is changed<br />
using the Extended Features menus 11 .<br />
To turn the Control Lock on:<br />
1) Push the Control Lock button.<br />
The Control Lock LED is on whenever the front panel controls are locked.<br />
If you push a button while the controls are locked:<br />
1) The Control Lock LED will flash.<br />
2) LOCKED will be displayed in the display window.<br />
3) The button push is ignored.<br />
To turn the Control Lock off with Easy unlocking:<br />
1) Push the Control Lock button.<br />
To turn the Control Lock off with Hard unlocking:<br />
1) Push and hold the Control Lock button for 3 seconds.<br />
These controls are not affected by the Control Lock and operate even when the Control Lock is on:<br />
<strong>Manual</strong> Breath, Silence Reset, Select.<br />
NOTE<br />
The Control Lock button also serves as an “escape” key from the Extended Menu.<br />
REMARQUE<br />
Le bouton de verrouillage sert aussi de touche d'échappement pour quitter le menu Fonctions<br />
avancées.<br />
Control Retention<br />
Once a control value is set, that value will be retained in non-volatile memory 12 . The settings retained<br />
in non-volatile memory may be used when the ventilator is next powered up.<br />
11 See Chapter 10 - Extended Features, Control Unlock for more information.<br />
12 Non-volatile memory is memory that is not erased when the ventilator is turned off or disconnected.<br />
Page 5-6 <strong>LTV</strong> ® <strong>1200</strong> Ventilator Operator’s <strong>Manual</strong><br />
p/n 18247-001, Rev. G
Chapter 6 - CONTROLS<br />
This section explains how each of the <strong>LTV</strong> ® <strong>1200</strong> ventilator front panel controls work.<br />
Assist/Control - SIMV/CPAP - NPPV<br />
This button toggles between Assist/Control, SIMV/CPAP, and NPPV modes of ventilation. Each<br />
press of the button advances or confirms your selection as follows:<br />
• One press selects the first mode in the series (Assist/Control) and the associated LED<br />
flashes. A second press confirms the selection and the associated LED lights solid.<br />
• If you press the button again, the SIMV/CPAP LED flashes. Pressing again confirms and<br />
causes the SIMV/CPAP LED to light solid green.<br />
• Press once more to select NPPV mode and the NPPV LED flashes. To confirm NPPV mode<br />
you must press again but be aware that the NPPV LED will continue to flash until the IPAP<br />
and EPAP values have been set.<br />
• For more information see Procedure for NPPV Mode Set Up, in Chapter 12 – Operating<br />
Procedure.<br />
NOTE<br />
When Assist/Control is selected, the ventilator will be in Control or Assist/Control mode, depending<br />
on the Sensitivity setting.<br />
• If Sensitivity is set to dashes “- -”, the ventilator will be operating in Control mode.<br />
• If Sensitivity is set to any other value, the ventilator will be operating in Assist/Control mode.<br />
When SIMV/CPAP is selected, the ventilator will be in SIMV or CPAP mode, depending on the<br />
Breath Rate setting.<br />
• If Breath Rate is set to dashes “- -”, the ventilator will be operating in CPAP mode.<br />
• If Breath Rate is set to any other value, the ventilator will be operating in SIMV mode.<br />
REMARQUE<br />
Lorsque Aide / Contrôle est sélectionné, le ventilateur sera en mode Contrôle ou Aide, selon le<br />
réglage de la sensibilité.<br />
• Si la sensibilité est réglée sur Traits « - - », le ventilateur fonctionnera en mode Contrôle.<br />
• Si la sensibilité est réglée sur toute autre valeur, le ventilateur fonctionnera en mode Aide /<br />
Contrôle.<br />
Lorsque le mode SIMV/CPAP est sélectionné, le ventilateur sera en mode SIMV ou CPAP, selon le<br />
réglage du débit respiratoire.<br />
• Si le débit respiratoire est réglé sur Traits « - - », le ventilateur fonctionnera en mode CPAP.<br />
• Si le débit respiratoire est réglé sur toute autre valeur, le ventilateur fonctionnera en mode SIMV.<br />
Operator’s <strong>Manual</strong> <strong>LTV</strong> ® <strong>1200</strong> Ventilator Page 6-1<br />
p/n 18247-001, Rev. G
Breath Rate<br />
Use the Breath Rate control to establish the minimum rate of machine or assist breaths that the<br />
ventilator will deliver per minute.<br />
To set the Breath Rate:<br />
1) Push the Breath Rate button.<br />
2) Change the setting using the Set Value knob.<br />
Range: “- -”, 1 - 80 bpm<br />
NOTE<br />
When SIMV/CPAP is selected, the ventilator will be in SIMV or CPAP mode, depending on the<br />
Breath Rate setting.<br />
• If Breath Rate is set to dashes “- -”, the ventilator will be operating in CPAP mode.<br />
• If Breath Rate is set to any other value, the ventilator will be operating in SIMV mode.<br />
REMARQUE<br />
Lorsque le mode SIMV/CPAP est sélectionné, le ventilateur sera en mode SIMV ou CPAP, selon le<br />
réglage du débit respiratoire.<br />
• Si le débit respiratoire est réglé sur Traits « - - », le ventilateur fonctionnera en mode CPAP.<br />
• Si le débit respiratoire est réglé sur toute autre valeur, le ventilateur fonctionnera en mode SIMV.<br />
Page 6-2 <strong>LTV</strong> ® <strong>1200</strong> Ventilator Operator’s <strong>Manual</strong><br />
p/n 18247-001, Rev. G
Control Lock<br />
The <strong>LTV</strong> ® <strong>1200</strong> ventilator front panel controls may be locked so that settings are not accidentally<br />
changed. Two different levels of difficulty can be set for control unlocking: Easy and Hard. Easy<br />
unlocking is the default and this setting is changed using the Extended Features menus 13 . For more<br />
information on using the Control Lock, see Chapter 5 - Control Locking.<br />
To turn the Control Lock on:<br />
1) Push the Control Lock button.<br />
The Control Lock LED is on whenever the front panel controls are locked.<br />
To turn the Control Lock off with Easy unlocking:<br />
1) Push the Control Lock button.<br />
To turn the Control Lock off with Hard unlocking:<br />
1) Push and hold the Control Lock button for 3 seconds.<br />
These controls are not affected by the Control Lock and operate even when the Control Lock is on:<br />
<strong>Manual</strong> Breath, Silence Reset, Select.<br />
13 See Chapter 10 - Extended Features, Control Unlock for more information.<br />
Operator’s <strong>Manual</strong> <strong>LTV</strong> ® <strong>1200</strong> Ventilator Page 6-3<br />
p/n 18247-001, Rev. G
High Pressure Limit<br />
Use the High Pressure Limit to establish the maximum pressure permitted the patient circuit. When<br />
this limit is reached:<br />
• A HIGH PRES alarm is displayed<br />
• The audible alarm is sounded<br />
• Inspiration is terminated and exhalation begins<br />
The turbine is stopped to allow the circuit pressure to evacuate when the high pressure condition<br />
persists for more than four times the set inspiratory time or more than 3.0 seconds, whichever is less.<br />
To set the High Pressure Limit:<br />
1) Push the High Pres. Limit button.<br />
2) Change the setting using the Set Value knob.<br />
Range: 5 - 100 cmH2O<br />
Page 6-4 <strong>LTV</strong> ® <strong>1200</strong> Ventilator Operator’s <strong>Manual</strong><br />
p/n 18247-001, Rev. G
Inspiratory / Expiratory Hold<br />
Pushing the Insp/Exp (Inspiratory/Expiratory) Hold control button causes the ventilator to toggle<br />
between the following messages in the display window. Each push causes the next item in sequence<br />
to be displayed:<br />
INSP HOLD<br />
EXP HOLD<br />
Normal monitor display<br />
While INSP HOLD or EXP HOLD is displayed:<br />
• The Insp/Exp Hold control button LED will flash on and off.<br />
• If the Insp/Exp Hold control button is not pushed within 60 seconds, the message will be<br />
removed and the LED will turn off.<br />
• Pushing the Select, Silence Reset or Control button will return the display to normal and the<br />
LED will stop flashing.<br />
Operator’s <strong>Manual</strong> <strong>LTV</strong> ® <strong>1200</strong> Ventilator Page 6-5<br />
p/n 18247-001, Rev. G
Inspiratory Hold<br />
An Inspiratory Hold maneuver holds the inspiratory phase of a delivered breath for a duration<br />
sufficient to determine Δ Pres pressure and static lung compliance of the patient.<br />
To perform the Inspiratory Hold maneuver:<br />
1) Push the Insp/Exp (Inspiratory/Expiratory) Hold control button once and the display window will<br />
toggle from normal monitor display to INSP HOLD.<br />
2) Push and hold the Insp/Exp (Inspiratory/Expiratory) Hold button during a volume inspiration.<br />
• The ventilator will perform an Inspiratory Hold on the next Volume breath.<br />
• P Plat 14 --- will be displayed in the display window.<br />
• All buttons that are not lockable will operate normally.<br />
• All buttons that are lockable will be ignored.<br />
3) Continue holding the button until the Volume inspiration is completed. During the maneuver:<br />
• The exhalation valve will remain closed.<br />
• Flow will be set to 0 LPM.<br />
• P Plat xxx will be displayed in the display window, where xxx is the real time circuit<br />
pressure.<br />
• The breath period will remain in inspiration phase so no breath triggers are allowed.<br />
• DISC/SENSE and HIGH PRES alarms will terminate the maneuver.<br />
4) Release the button when the pressure setting is P Plat (or when 6.0 seconds elapse, whichever<br />
comes first):<br />
• The exhalation valve will be opened and a normal exhalation phase will begin.<br />
• The display will cycle every 2 seconds between Δ Pres xxx where xxx is the change in<br />
pressure 15 , C Static xxx where xxx is the static compliance 16 and<br />
P Plat xxx where xxx is the plateau pressure.<br />
NOTE<br />
Breath period timing and apnea timing will be suspended while the maneuver is performed. As a<br />
result, the apnea alarm will not alarm during the maneuver.<br />
REMARQUE<br />
La synchronisation de la période de respiration et la synchronisation de l’apnée sont interrompues<br />
pendant la manœuvre. Ainsi, l’alarme d’apnée ne se déclenche pas au cours de la manœuvre.<br />
Range: P Plat 0 - 100 cmH2O<br />
Δ Pres 0 - 100 cmH2O<br />
C Static 1 – 999 ml/cmH2O<br />
14 “P Plat” is Plateau pressure reached during Inspiratory Hold maneuver.<br />
15 Δ Pres is calculated as P Plat Pressure – PEEP measured from previous breath.<br />
16 C Static is calculated as Set Delivered Volume / Δ Pres.<br />
Page 6-6 <strong>LTV</strong> ® <strong>1200</strong> Ventilator Operator’s <strong>Manual</strong><br />
p/n 18247-001, Rev. G
NOTE<br />
The ventilator will not perform an Inspiratory Hold maneuver during Pressure Control, Pressure<br />
Support or Spontaneous breaths.<br />
If the button is held during exhalation or any non-volume inspiration:<br />
• The associated LED will be blinking.<br />
• All buttons that are not lockable will operate normally.<br />
• All buttons that are lockable will be ignored.<br />
If the button is released before the inspiration is complete, the display will return to INSP HOLD.<br />
Once the maneuver is completed, if any buttons are touched or an alarm occurs, the Δ Pres, C Static<br />
or P Plat display will be cleared.<br />
After 60 seconds, the display will be cleared.<br />
REMARQUE<br />
Le ventilateur n’effectue pas une manœuvre de maintien de l’inspiration au cours du contrôle de<br />
pression, du soutien de pression et de ventilations spontanées.<br />
Lorsque le bouton est maintenu pendant l’exhalation ou toute inspiration sans volume:<br />
• Le LED correspondant demeure allumé en continu.<br />
• Tous les boutons non verrouillables fonctionnent normalement.<br />
• Tous les boutons verrouillables sont ignorés.<br />
Lorsque le bouton est relâché avant la fin de l’inspiration, l’affichage indique INSP HOLD.<br />
Au terme de la manœuvre, l’actionnement d’un bouton ou le déclenchement d’une alarme entraînent<br />
l’effacement de l’affichage Δ Pres ou C Static.<br />
L’affichage est effacée après 60 secondes.<br />
Operator’s <strong>Manual</strong> <strong>LTV</strong> ® <strong>1200</strong> Ventilator Page 6-7<br />
p/n 18247-001, Rev. G
Expiratory Hold<br />
An Expiratory Hold maneuver holds the expiratory phase of a delivered breath for a duration sufficient<br />
to determine the AutoPEEP of a patient.<br />
To perform the Expiratory Hold maneuver:<br />
1) Push the Insp/Exp (Inspiratory/Expiratory) Hold button twice and the display widow will toggle<br />
from normal monitor display to EXP HOLD.<br />
2) Push and hold the Insp/Exp (Inspiratory/Expiratory) Hold button during a Volume or Pressure<br />
Control exhalation and the ventilator will perform an Expiratory Hold at the end of that exhalation.<br />
• Exhalation will proceed normally with the exhalation valve open and normal bias flow.<br />
• All buttons that are not lockable will operate normally.<br />
• All buttons that are lockable will be ignored.<br />
• The breath will remain in exhalation phase.<br />
• If a Patient Effort is detected, the maneuver will be terminated and the appropriate breath<br />
will be given.<br />
• DISC/SENSE and HIGH PRES alarms will terminate the maneuver.<br />
3) Continue holding the button until P Exp with a numeric value is displayed, or the next breath is<br />
scheduled to begin, either due to Breath Rate or a <strong>Manual</strong> Breath button push. During the<br />
maneuver:<br />
• The exhalation valve will be closed.<br />
• Flow will be set to 0 LPM.<br />
• P Exp xxx will be displayed in the display window, where xxx is the real time circuit<br />
pressure 17 .<br />
• The breath will remain in expiration phase.<br />
• DISC/SENSE and HIGH PRES alarms will terminate the maneuver.<br />
• If a Patient Effort is detected, the maneuver will be terminated and the appropriate breath<br />
will be given.<br />
4) Release the button (or when 6.0 seconds elapse, whichever comes first):<br />
• A normal inspiration phase will begin.<br />
• AutoPEEP xxx will be displayed where xxx is the autoPEEP 17 .<br />
• Any machine breath starts or apnea alarms that were held off will resume.<br />
NOTE<br />
Breath period timing and apnea timing will be suspended while the maneuver is performed. As a<br />
result, the apnea alarm will not alarm during the maneuver.<br />
REMARQUE<br />
La synchronisation de la période de respiration et la synchronisation de l’apnée sont interrompues<br />
pendant la manœuvre. Ainsi, l’alarme d’apnée ne se déclenche pas au cours de la manœuvre.<br />
Range: P Exp 0 - 100 cmH2O<br />
AutoPEEP 0 - 100 cmH2O<br />
17<br />
AutoPEEP is calculated as P Exp at end of Expiratory Hold maneuver minus P Exp at end of normal<br />
exhalation (monitored PEEP).<br />
Page 6-8 <strong>LTV</strong> ® <strong>1200</strong> Ventilator Operator’s <strong>Manual</strong><br />
p/n 18247-001, Rev. G
NOTE<br />
The ventilator will not perform an Expiratory Hold maneuver during Pressure Support or Spontaneous<br />
breaths.<br />
If the button is held during inspiration or during Pressure Support or spontaneous exhalation:<br />
• The associated LED will be blinking.<br />
• All buttons that are not lockable will operate normally.<br />
• All buttons that are lockable will be ignored.<br />
If the button is released before the expiration is complete, the display will return to EXP HOLD.<br />
Once the maneuver is completed, if any buttons are touched or an alarm occurs, the AutoPEEP<br />
display will be cleared.<br />
After 60 seconds, the AutoPEEP display will be cleared.<br />
REMARQUE<br />
Le ventilateur n’effectue pas une manœuvre de maintien de l’expiration au cours du soutien de<br />
pression ou de ventilations spontanées.<br />
Lorsque le bouton est maintenu pendant l’inspiration, le soutien de pression ou des ventilations<br />
spontanées:<br />
• Le LED correspondant demeure allumé en continu.<br />
• Tous les boutons non verrouillables fonctionnent normalement.<br />
• Tous les boutons verrouillables sont ignorés.<br />
Lorsque le bouton est relâché avant la fin de l’expiration, l’affichage indique EXP HOLD.<br />
Au terme de la manœuvre, l’actionnement d’un bouton ou le déclenchement d’une alarme entraînent<br />
l’effacement de l’affichage AutoPEEP.<br />
L’affichage AutoPEEP est effacée après 60 secondes.<br />
Operator’s <strong>Manual</strong> <strong>LTV</strong> ® <strong>1200</strong> Ventilator Page 6-9<br />
p/n 18247-001, Rev. G
Inspiratory Time<br />
This control sets the length of the inspiratory period for Volume Controlled and Pressure Controlled<br />
breaths.<br />
The Insp. Time setting, along with the Volume control setting are used to determine the peak flow for<br />
Volume controlled breaths. While the Inspiratory Time is being updated, the Calculated Peak Flow will<br />
be displayed in the display window.<br />
To set the Inspiratory Time:<br />
1) Push the Insp. Time button.<br />
2) Change the setting using the Set Value knob.<br />
Range: 0.3 - 9.9 sec<br />
Page 6-10 <strong>LTV</strong> ® <strong>1200</strong> Ventilator Operator’s <strong>Manual</strong><br />
p/n 18247-001, Rev. G
Low Minute Volume<br />
The Low Minute Volume alarm sets the minimum expected exhaled Minute Volume. The exhaled<br />
Minute Volume is recalculated after every breath. If the Minute Volume does not meet or exceed the<br />
Low Minute Volume setting:<br />
• A LOW MIN VOL alarm is displayed<br />
• The audible alarm is sounded<br />
To set the Low Minute Volume alarm:<br />
1) Push the Low Min. Vol. button.<br />
2) Change the setting using the Set Value knob.<br />
Range: Off, 0.1 - 99 L<br />
WARNING<br />
Low Minute Volume Control Settings - The Low Min. Vol. control should be set to its highest<br />
clinically appropriate value. If there is a clinical need to set the Low Minute Volume alarm to lower<br />
values or off (“- - -“), perform a clinical assessment to determine if an alternative monitor (i.e. a Pulse<br />
Oxymeter with an audible alarm, or a Cardio Respiratory Monitor) should be used.<br />
AVERTISSEMENT<br />
Réglages du contrôle de volume bas par minute - Le contrôle du volume bas par minute doit être<br />
ajusté à la plus haute valeur clinique appropriée. Si l’alarme de volume bas par minute doit être<br />
ajustée à des valeurs inférieures ou mise à l’arrêt (“- - -“) pour satisfaire aux besoins cliniques,<br />
effectuer une évaluation clinique afin de déterminer si l’utilisation d’un autre moniteur (c.-à-d.,<br />
sphygmo-oxymètre muni d’une alarme sonore ou un moniteur cardio-respiratoire) s’avère pertinente.<br />
Operator’s <strong>Manual</strong> <strong>LTV</strong> ® <strong>1200</strong> Ventilator Page 6-11<br />
p/n 18247-001, Rev. G
Low Pressure<br />
The Low Pressure alarm can be set to apply to All breaths or to Volume Control and Pressure Control<br />
breaths only. (For information on selecting breath types, see Chapter 10 - Extended Features, Low<br />
Peak Pressure Alarm.) The Low Pressure alarm establishes the minimum expected circuit pressure<br />
for the selected breath types. If the circuit pressure does not meet or exceed the Low Pressure<br />
setting:<br />
• A LOW PRES alarm is displayed<br />
• The audible alarm is sounded<br />
To set the Low Pressure alarm:<br />
1) Push the Low Pressure button.<br />
2) Change the setting using the Set Value knob.<br />
Range: “- -”, 1 - 60 cmH2O<br />
WARNING<br />
Patient Circuit Accessories - The use of accessories such as Speaking Valves, Heat-Moisture<br />
Exchangers and Filters create additional patient circuit resistance and in the event of a disconnection,<br />
may impede the generation of a Low Pressure alarm. Ensure that the Low Pressure alarm settings<br />
accommodate these types of accessories when used in combination with patient circuits.<br />
AVERTISSEMENT<br />
Accessoires du circuit du patient - L’utilisation d’accessoires tels que les membranes vocales, les<br />
échangeurs thermohydriques et les filtres, produit une résistance additionnelle dans le circuit de<br />
patient et en cas de débranchement, elle risque d’empêcher la génération de l’alarme de basse<br />
pression. S’assurer que les paramètres de l’alarme de basse pression s’adaptent à ces types<br />
d’accessoires lorsqu’ils sont utilisés avec les circuits du patient.<br />
Page 6-12 <strong>LTV</strong> ® <strong>1200</strong> Ventilator Operator’s <strong>Manual</strong><br />
p/n 18247-001, Rev. G
Low Pressure O 2 Source<br />
When selected, this option allows oxygen to be supplied from a low pressure / low flow oxygen<br />
source such as an oxygen concentrator or line mounted flow meter. Oxygen from the low pressure<br />
source is mixed with air inside the ventilator. The O2 percent delivered to the patient is determined by<br />
the O2 inlet flow and the total minute volume and is not regulated by the ventilator. Use the Input O2<br />
Flow chart (page 6-15) to determine the correct O2 flow for the desired FIO2.<br />
• When the Low Pressure O2 Source option is selected and a high O2 pressure source is attached<br />
to the ventilator, an Automatic High O2 Switch Over safety response generates a HIGH O2 PRES<br />
alarm, switches the ventilator to High Pressure O2 Source mode and sets the percentage of<br />
oxygen to be delivered in the gas flow to 21%.<br />
When the Low Pressure O2 Source option is not selected, a high pressure oxygen source is<br />
expected, and oxygen blending is done within the ventilator. The ventilator expects an oxygen source<br />
with a pressure of 40 - 80 PSIG. The O2 percent delivered to the patient is determined by the O2 %<br />
(O2 Flush) setting on the ventilator front panel.<br />
To toggle the state of the Low Pressure O2 Source:<br />
1) Push and hold the Low Pressure O2 Source button for three (3) seconds.<br />
• While the Low Pressure O2 Source button is being held, the associated LED will be flashing<br />
• When the Low Pressure O2 Source is selected, the associated LED will be on continually<br />
While Low Pressure O2 Source is on:<br />
• The O2 Inlet Pressure Low alarm is inactive.<br />
• The O2 Pressure High alarm is set to activate at > 10 PSIG.<br />
• The O2 % (O2 Flush) display will display dimmed dashes and O2 % cannot be set.<br />
• Oxygen inlet flow must be set to obtain the desired oxygen percentage.<br />
WARNING<br />
Inspired Oxygen (FIO2) Concentration – If the patient has a variable respiratory rate, his/her minute<br />
ventilation will fluctuate. If exact concentrations of inspired oxygen (FIO2) are required to be delivered<br />
to the patient, it is recommended that an accurate oxygen analyzer with alarms be used.<br />
AVERTISSEMENT<br />
Concentration d’oxygène inspiré (FIO2) – Si la fréquence respiratoire du patient est variable, sa<br />
ventilation-minute va fluctuer. Lorsqu’une concentration exacte d’oxygène inspiré (FIO2) est<br />
nécessaire pour une transmission au patient, il est recommandé d’utiliser un analyseur de niveau<br />
d’oxygène 2 précis, comportant des alarmes.<br />
Operator’s <strong>Manual</strong> <strong>LTV</strong> ® <strong>1200</strong> Ventilator Page 6-13<br />
p/n 18247-001, Rev. G
Low Pressure O 2 Source (cont.)<br />
NOTE<br />
The Oxygen Inlet High Pressure alarm at 10 PSIG is only active when Low Pressure O2 Source is on.<br />
REMARQUE<br />
L'alarme de haute pression d'entrée de l'oxygène réglée sur 10 PSIG ne sera active que lorsque la<br />
source de basse pression O2 est activée.<br />
While Low Pressure O2 Source is off:<br />
• The O2 Inlet Pressure Low alarm is set to activate at less than 35 PSIG.<br />
• The O2 Pressure High alarm is set to activate at greater than 85 PSIG.<br />
• The O2% (O2 Flush) may be used to set the desired percentage of oxygen.<br />
NOTE<br />
The Oxygen Inlet High Pressure alarm at 85 PSIG and Oxygen Inlet Low Pressure alarm at 35 PSIG<br />
are only active when Low Pressure O2 Source is off and the O2 % (O2 Flush) setting is greater than<br />
21%.<br />
REMARQUE<br />
L'alarme de haute pression d'entrée de l'oxygène réglée sur 85 PSIG, et l'alarme de basse pression<br />
d'entrée de l'oxygène réglée sur 35 PSIG ne seront actives que lorsque la source de basse pression<br />
O2 est désactivée et que le réglage du O2 % (Flush O2) est supérieur à 21%.<br />
When the Oxygen Blending option is not installed:<br />
The Low Pressure O2 Source button is only active when the oxygen blending option is installed.<br />
Oxygen may still be supplied through the low pressure, low flow inlet, but the Low Pressure O2<br />
Source button, O2 % (O2 Flush) control, and the Oxygen Inlet Pressure alarms are inactive.<br />
Page 6-14 <strong>LTV</strong> ® <strong>1200</strong> Ventilator Operator’s <strong>Manual</strong><br />
p/n 18247-001, Rev. G
Low Pressure O 2 Source (cont)<br />
Low Pressure O2 Blending:<br />
Oxygen will be applied through the low pressure, low flow inlet. Use this chart to determine the<br />
approximate O2 flow required to deliver the desired FIO2.<br />
WARNING<br />
Inspired Oxygen (FIO2) Concentration – If the patient has a variable respiratory rate, his/her minute<br />
ventilation will fluctuate. If exact concentrations of inspired oxygen (FIO2) are required to be delivered<br />
to the patient, it is recommended that an accurate oxygen analyzer with alarms be used.<br />
AVERTISSEMENT<br />
Concentration d’oxygène inspiré (FIO2) – Si la fréquence respiratoire du patient est variable, sa<br />
ventilation-minute va fluctuer. Lorsqu’une concentration exacte d’oxygène inspiré (FIO2) est<br />
nécessaire pour une transmission au patient, il est recommandé d’utiliser un analyseur de niveau<br />
d’oxygène précis, comportant des alarmes.<br />
Operator’s <strong>Manual</strong> <strong>LTV</strong> ® <strong>1200</strong> Ventilator Page 6-15<br />
p/n 18247-001, Rev. G
Low Pressure O 2 Source (cont.)<br />
To determine the required O2 input flow:<br />
1) Find the desired FIO2 (bottom of chart).<br />
2) Calculate the patient’s minute ventilation rate by using the following formula: Tidal volume x<br />
breath rate.<br />
3) Follow the FIO2 up to the applicable slanted VE (minute volume) line (right side of chart).<br />
4) Read across horizontally to the left side of chart to the required Input O2 Flow (lpm).<br />
To determine the delivered O2 concentration:<br />
1) Find the Input O2 Flow (left side of chart).<br />
2) Follow the Input O2 Flow across horizontally to the right to the applicable slanted VE (minute<br />
volume) line.<br />
3) Read down to the FIO2 (bottom of chart).<br />
Page 6-16 <strong>LTV</strong> ® <strong>1200</strong> Ventilator Operator’s <strong>Manual</strong><br />
p/n 18247-001, Rev. G
<strong>Manual</strong> Breath<br />
Use the <strong>Manual</strong> Breath button to deliver one (1) Machine breath. The breath will be a Volume<br />
Control or Pressure Control breath as defined by the current ventilator settings. The <strong>Manual</strong> Breath<br />
LED is on during the <strong>Manual</strong> Breath inspiration.<br />
To deliver a <strong>Manual</strong> breath:<br />
1) Push the <strong>Manual</strong> Breath button.<br />
The <strong>Manual</strong> Breath button is only active during exhalation.<br />
Operator’s <strong>Manual</strong> <strong>LTV</strong> ® <strong>1200</strong> Ventilator Page 6-17<br />
p/n 18247-001, Rev. G
O 2 % (O 2 Flush)<br />
The O2% (O2 Flush) button is a dual function control (O2 % and O2 Flush).<br />
• When being used to set the percentage of oxygen delivered by the ventilator through the oxygen<br />
blending system (O2%), push and release the O2% (O2 Flush) button, as described below.<br />
When being used to elevate the delivered FIO2 to 100% for a preset period of time (O2 Flush), push<br />
and hold the O2% (O2 Flush) button for 3 seconds, as described in Chapter 10 - Extended Features,<br />
O2 Flush<br />
The O2% (O2 Flush) control establishes the percentage of oxygen to be delivered through the oxygen<br />
blending system. Oxygen blending requires a high pressure oxygen source and is active only when<br />
Low Pressure O2 Source is not selected 18 . When Low Pressure O2 Source is selected, this control is<br />
displayed as dashes “---” and may not be modified.<br />
To set the percentage of oxygen delivered by the ventilator:<br />
1) Push and release the O2% (O2 Flush) button.<br />
2) Change the setting using the Set Value knob.<br />
Range: 21 - 100 %<br />
WARNING<br />
Inspired Oxygen (FIO2) Concentration – If the patient has a variable respiratory rate, his/her minute<br />
ventilation will fluctuate. If exact concentrations of inspired oxygen (FIO2) are required to be delivered<br />
to the patient, it is recommended that an accurate oxygen analyzer with alarms be used.<br />
AVERTISSEMENT<br />
Concentration d’oxygène inspiré (FIO2) – Si la fréquence respiratoire du patient est variable, sa<br />
ventilation-minute va fluctuer. Lorsqu’une concentration exacte d’oxygène inspiré (FIO2) est<br />
nécessaire pour une transmission au patient, il est recommandé d’utiliser un analyseur de niveau<br />
d’oxygène 2 précis, comportant des alarmes.<br />
CAUTION<br />
Oxygen Supply Contamination - The accuracy of the oxygen delivery capabilities of <strong>LTV</strong> ® <strong>1200</strong><br />
ventilator can be compromised by foreign debris contamination in the oxygen supply system. To<br />
reduce the risk of airborne contaminants entering the ventilator, ensure that any oxygen supply<br />
connected to the ventilator is clean, properly filtered 19 and that the ventilator’s O2 Inlet Port Cap is<br />
securely installed on the O2 Inlet Port whenever the ventilator is not connected to an external oxygen<br />
supply.<br />
18<br />
For information on using a low pressure, low flow source, see Low Pressure O2 Source in this section.<br />
19<br />
In addition to the existing internal O2 Inlet filter, P/N 14313, an External, In-Line Oxygen Filter (P/N 14470) is<br />
available from Pulmonetic Systems.<br />
Page 6-18 <strong>LTV</strong> ® <strong>1200</strong> Ventilator Operator’s <strong>Manual</strong><br />
p/n 18247-001, Rev. G
O 2 % (O 2 Flush) (cont)<br />
ATTENTION<br />
Contamination de la réserve d’oxygène — La précision de la capacité d’alimentation en oxygène<br />
des ventilateur <strong>1200</strong> <strong>LTV</strong> ® peut être compromise par la présence de corps étrangers dans le système<br />
d’alimentation en oxygène. Afin de diminuer le risque de présence d’agents contaminants<br />
atmosphériques dans le ventilateur, assurez-vous que la réserve d’oxygène reliée au ventilateur est<br />
propre et filtrée de manière adéquate 21 , et que le bouchon de l’orifice d’alimentation en oxygène est<br />
correctement installé à chaque fois que le ventilateur n’est pas relié à une source d'oxygène externe.<br />
NOTE<br />
The Oxygen Inlet High Pressure alarm at 85 PSIG and Oxygen Inlet Low Pressure alarm at 35 PSIG<br />
are only active when Low Pressure O2 Source is off and the O2% (O2 Flush) setting is greater than<br />
21%.<br />
REMARQUE<br />
L'alarme de haute pression d'entrée de l'oxygène réglée sur 85 PSIG, et l'alarme de basse pression<br />
d'entrée de l'oxygène réglée sur 35 PSIG ne seront actives que lorsque la source de basse pression<br />
O2 est désactivée et que le réglage du O2% (O2 Flush) est supérieur à 21%.<br />
When the Oxygen Blending option is not enabled:<br />
O2 % (O2 Flush) is only available when the oxygen blending option is enabled. Oxygen may still be<br />
supplied through the low pressure low flow inlet 20 , but the Low Pressure O2 Source and O2 % (O2<br />
Flush) controls, and the Oxygen Inlet Pressure alarms are inactive.<br />
20 See Low Pressure O2 Source in this chapter for more information.<br />
Operator’s <strong>Manual</strong> <strong>LTV</strong> ® <strong>1200</strong> Ventilator Page 6-19<br />
p/n 18247-001, Rev. G
On/Standby<br />
This button switches the <strong>LTV</strong> ® <strong>1200</strong> ventilator between Standby and On.<br />
When the ventilator is on, the On/Standby LED will be on. The ventilator will operate on external<br />
power if it is available, or internal battery, if there is no external power or the external power source is<br />
depleted. The internal battery will be charged from the external power source while the ventilator is<br />
operating on external power.<br />
When the ventilator is in Standby, the On/Standby LED will be off, however, the internal battery will<br />
continue to charge.<br />
To turn the ventilator on from the Standby state:<br />
1) Push the On/Standby button.<br />
If the Patient Query feature is enabled/on when the ventilator is powered up, ventilation and alarm<br />
activation are suspended and the message SAME PATIENT is displayed (see Presets in Chapter 10<br />
- Extended Features).<br />
• To enable the suspended alarms and begin ventilation with the settings in use during the last<br />
power cycle, press the Select button while SAME PATIENT is displayed<br />
OR<br />
• To enable the suspended alarms and begin ventilation with Presets values appropriate for a<br />
new patient, turn the Set Value knob until NEW PATIENT is displayed and press the Select<br />
button. Then turn the Set Value knob until the desired patient type is displayed (INFANT,<br />
PEDIATRIC or ADULT) and press the Select button (see <strong>LTV</strong>® <strong>1200</strong> Presets Table in<br />
Chapter 10 – Extended Features for detailed settings information)<br />
• Turning the Set Value knob until EXIT is displayed and pressing the Select button<br />
returns the ventilator to the SAME PATIENT menu option/message<br />
If no controls are activated for three (3) seconds while either the SAME PATIENT or NEW PATIENT<br />
options are being displayed, an audible alert sounds. Activation of any control resets the 3 second<br />
delay of the audile alert.<br />
If the Patient Query feature is disabled/off when the ventilator is powered up and passes POST, it will<br />
begin ventilation (appropriate alarms enabled) using the settings in use during the last power cycle.<br />
To prevent autocycling, the Leak Compensation feature (if enabled/on) is suspended during the first<br />
30 seconds of operation.<br />
To prevent nuisance alarms, the LOW MIN VOL alarm (Low Minute Volume) is suspended for the<br />
first 20 seconds and the HIGH f alarm (High Breath Rate) is suspended for the first 60 seconds of<br />
operation.<br />
To put the ventilator into Standby:<br />
1) Push and hold the On/Standby button for 3 seconds.<br />
2) An Inop alarm will occur. To cancel the Inop alarm, push the Silence Reset button.<br />
• Verify a confirming audible chirp occurs after the alarm is silenced.<br />
3) The Vent Inop LED will remain lit for a minimum of 5 minutes.<br />
Page 6-20 <strong>LTV</strong> ® <strong>1200</strong> Ventilator Operator’s <strong>Manual</strong><br />
p/n 18247-001, Rev. G
PEEP Control<br />
The PEEP control establishes the Positive End Expiratory Pressure.<br />
To set the PEEP:<br />
1) Push the PEEP control button.<br />
2) Change the setting using the Set Value knob.<br />
Range: 0 – 20 cmH2O<br />
The <strong>LTV</strong> ® <strong>1200</strong> has PEEP Compensated Pressure Support and Pressure Control.<br />
On the left waveform (breath), the ventilator is set to deliver Pressure Support (or Pressure Control)<br />
of 20 cmH2O with no PEEP. The “span” or “delta” is 20 cmH2O.<br />
On the right waveform, the vent is set to deliver Pressure Support (or Pressure Control) of 20 cmH2O.<br />
Note that 5 cmH2O of PEEP have been added. This ventilator “compensates” for the added PEEP by<br />
automatically increasing the Pressure Support (or Pressure Control) in order to maintain the same<br />
“span” or “delta” of 20 cmH2O.<br />
To view the measured PEEP in the display window:<br />
1) Use the Select button to display the measured PEEP in the display window.<br />
PEEP Control in NPPV Mode<br />
When NPPV mode is selected, the PEEP control is used to set the EPAP value.<br />
Operator’s <strong>Manual</strong> <strong>LTV</strong> ® <strong>1200</strong> Ventilator Page 6-21<br />
p/n 18247-001, Rev. G
Pressure Control<br />
This control establishes the target pressure above the PEEP setting for Pressure Control breaths.<br />
NOTE<br />
Pressure Control and Pressure Support breaths do compensate for PEEP. Delivered pressure is<br />
controlled by the Pressure Control setting and is affected by the PEEP setting. For example, a<br />
Pressure Control setting of 20cmH2O and a PEEP setting of 10cmH2O results in a Peak Inspiratory<br />
Pressure (PIP) of 30cmH2O.<br />
REMARQUE<br />
Le contrôle de la pression et la pression de support des respirations compensent la PEP. La pression<br />
administrée est contrôlée par le réglage du contrôle de la pression et elle dépend du réglage PEP.<br />
Par exemple, un réglage du contrôle de la pression de 20 cmH2O et un réglage PEP de 10 cmH2O<br />
donnent une pression inspiratoire maximale (PImax) de 30 cmH2O.<br />
The inspiratory time for the Pressure Control breath is determined by the Inspiratory Time setting.<br />
The ventilator controls inspiratory flow to maintain the set circuit pressure for the set time.<br />
To set the Pressure Control level:<br />
1) Push the Pres. Control button.<br />
2) Change the setting using the Set Value knob.<br />
To select Pressure Control:<br />
1) Toggle the Volume Pressure mode to select Pressure ventilation 21 .<br />
Range: 1 - 99 cmH2O<br />
Flow Termination for Pressure Control breaths may be enabled under Extended Features 22 . If flow<br />
termination is enabled, the Pres. Control display will flash briefly after each flow terminated breath.<br />
The Rise Time profile for Pressure Control breaths may be selected under Extended Features 23 .<br />
21 See Chapter 6 - Controls for more information on how to select Pressure ventilation.<br />
22 See Chapter 10 - Extended Features for how to set the Variable Flow Termination percentage and enable<br />
Flow Termination for Pressure Control breaths.<br />
23 See Chapter 10 - Extended Features for how to set the Flow Rise Time profile.<br />
Page 6-22 <strong>LTV</strong> ® <strong>1200</strong> Ventilator Operator’s <strong>Manual</strong><br />
p/n 18247-001, Rev. G
Pressure Support<br />
This control establishes the target pressure above the PEEP setting for Pressure Support patient<br />
breaths. If Pressure Support is set to dashes “- -“, all patient breaths will be given as Spontaneous<br />
breaths. Inspiratory flow for Pressure Support and Spontaneous breaths is controlled to meet the<br />
patient demand.<br />
NOTE<br />
Pressure Control and Pressure Support breaths do compensate for PEEP. Delivered pressure is<br />
controlled by the Pressure Support setting and is affected by the PEEP setting. For example, a<br />
Pressure Control setting of 20cmH2O and a PEEP setting of 10cmH2O results in a Peak Inspiratory<br />
Pressure (PIP) of 30cmH2O.<br />
REMARQUE<br />
Le contrôle de la pression et la pression de support des respirations compensent la PEP. La pression<br />
administrée est contrôlée par le réglage du contrôle de la pression et elle dépend du réglage PEP.<br />
Par exemple, un réglage du contrôle de la pression de 20 cmH2O et un réglage PEP de 10 cmH2O<br />
donnent une pression inspiratoire maximale (PImax) de 30 cmH2O.<br />
To set Pressure Support:<br />
1) Push the Pres. Support button.<br />
2) Change the setting using the Set Value knob.<br />
Range: “- -”, 1 - 60 cmH2O<br />
Pressure Support breaths may be terminated by flow or by time.<br />
Flow Termination: Pressure Support breaths are flow terminated when the flow decreases to a set<br />
percentage of the peak flow 24 delivered for that breath.<br />
Time Termination: Pressure Support breaths are time terminated 25 when the inspiratory time exceeds<br />
two breath periods, or when the inspiratory time exceeds the set Time Termination Limit 26 before the<br />
flow termination criteria is reached. The Pres. Support display will flash briefly after each time<br />
terminated breath.<br />
The Rise Time profile for Pressure Support breaths may be selected under Extended Features 26 .<br />
Pressure Support in NPPV Mode<br />
When NPPV mode is selected, the Pres. Support control is used to set the IPAP value.<br />
24 See Chapter 10 - Extended Features to set the Variable Flow Termination for Pressure Support breaths.<br />
25 Only Pressure Support breaths are flow and/or time terminated (Time Termination must be enabled).<br />
26 See Chapter 10 - Extended Features to set the Variable Time Termination or Flow Rise Time profile.<br />
Operator’s <strong>Manual</strong> <strong>LTV</strong> ® <strong>1200</strong> Ventilator Page 6-23<br />
p/n 18247-001, Rev. G
Select<br />
Use this button to change the monitor in the display window and to select items in the Extended<br />
Feature menus.<br />
Monitored Data:<br />
The monitored data displays may be automatically or manually scrolled.<br />
To cycle through the available monitored data automatically from a halted scan:<br />
1) Push the monitor Select button twice within 0.3 sec.<br />
2) Pushing the Select button once while scan is active will halt scanning and the currently<br />
displayed data will remain in the display window.<br />
3) Each time you push the button once, the next data item in the list will be displayed.<br />
4) To resume scan, push the Select button twice.<br />
The monitored data is displayed for 3 seconds.<br />
Extended Features:<br />
To enter the Extended Features menu:<br />
1) Push and hold the Select button for 3 seconds.<br />
The first Menu Item will be displayed, for example: ALARM OP<br />
For more information on how to use the Extended Features menu, see Chapter 10 - Extended<br />
Features.<br />
Page 6-24 <strong>LTV</strong> ® <strong>1200</strong> Ventilator Operator’s <strong>Manual</strong><br />
p/n 18247-001, Rev. G
Sensitivity<br />
Use the Sensitivity control to establish the threshold level to allow the patient to flow trigger delivered<br />
breaths.<br />
A flow trigger occurs when:<br />
• The O2 Conserve feature is OFF (CONSERVE OFF),<br />
• The Sensitivity is set to any value from 1 to 9,<br />
• And the ventilator is in exhalation phase,<br />
• And the minimum exhalation time has expired,<br />
• And the flow is greater than or equal to the Sensitivity setting.<br />
The LEAK measurement displayed in the RT XDCR DATA menu can be used to help select an<br />
appropriate sensitivity value. Typically, the sensitivity value is set higher than the displayed LEAK<br />
measurement. For instance, if the LEAK measurement were up to 2.53, a minimum sensitivity of<br />
three (3) would be appropriate.<br />
A pressure trigger occurs when:<br />
• The O2 Conserve feature is ON (CONSERVE ON).<br />
Backup pressure triggers are enabled when the setting is any value other than a dash “-”.<br />
A backup pressure trigger occurs when:<br />
• The Sensitivity is set to any value from 1 to 9,<br />
• And the ventilator is in exhalation phase,<br />
• And the minimum exhalation time has expired,<br />
• And the airway pressure drops below -3 cmH2O.<br />
When a trigger is detected, the Patient Effort LED is illuminated briefly.<br />
NOTE<br />
Triggers are disabled when the Sensitivity setting is set to “-”.<br />
REMARQUE<br />
Les amorces sont désactivées lorsque le réglage de la sensibilité est réglé sur « - ».<br />
To set Sensitivity:<br />
1) Push the Sensitivity button.<br />
2) Change the setting using the Set Value knob.<br />
Range: 1 - 9, “-”, 1 is the most sensitive, 9 is the least sensitive and “-“ is off.<br />
Operator’s <strong>Manual</strong> <strong>LTV</strong> ® <strong>1200</strong> Ventilator Page 6-25<br />
p/n 18247-001, Rev. G
Set Value Knob<br />
Use the Set Value knob to establish control values and navigate extended features menus.<br />
Variable Controls:<br />
To change the setting for a variable control:<br />
1) Push the button for the control to be modified.<br />
2) Turn the Set Value knob clockwise to increase the value, or<br />
3) Turn the Set Value knob counter-clockwise to decrease the value.<br />
To change the setting by small increments, turn the knob slowly. To change the setting by larger<br />
increments, turn the knob more quickly.<br />
Extended Features:<br />
To navigate through a list of items in an Extended Features menu:<br />
1) Turn the Set Value knob clockwise to display the next menu item, or<br />
2) Turn the Set Value knob counter-clockwise to display the previous menu item.<br />
Page 6-26 <strong>LTV</strong> ® <strong>1200</strong> Ventilator Operator’s <strong>Manual</strong><br />
p/n 18247-001, Rev. G
Silence Reset<br />
Use this button to silence an alarm for 60 seconds, to reset an alarm, to start a 60 second preemptive<br />
silence period, and to permanently silence the Vent Inop and Standby alarms. Two important<br />
definitions for understanding how the Silence Reset button works:<br />
• Active alarm: An alarm for which the condition currently exists.<br />
• Inactive alarm: An alarm that has occurred, but for which the condition no longer<br />
exists.<br />
Silencing and Clearing Alarms:<br />
To silence an active alarm for 60 seconds:<br />
1) Push the Silence Reset button. The audible alarm will be silenced for 60 seconds. Once the<br />
silence period expires, the audible alarm will resume sounding.<br />
To clear an inactive alarm:<br />
1) Push the Silence Reset button. The visual alarm displays will be cleared.<br />
To cancel an active alarm:<br />
1) Push the Silence Reset button twice. The audible alarm will be silenced and the visual alarm<br />
displays will be cleared and the silence period will be terminated.<br />
Preemptive Silence Period<br />
To start a preemptive silence period:<br />
1) Push the Silence Reset button. A 60 second silence period will begin. For any alarms that occur<br />
during the silence period, the visual displays will flash, but the audible alarm will remain silenced<br />
until the end of the silence period.<br />
Vent Inop and Standby alarms:<br />
To silence the Vent Inop or Standby alarm:<br />
1) Push the Silence Reset button. The audible alarm will be permanently silenced, but the Vent<br />
Inop LED will remain lit for a minimum of 5 minutes. This does not adversely affect battery life.<br />
Operator’s <strong>Manual</strong> <strong>LTV</strong> ® <strong>1200</strong> Ventilator Page 6-27<br />
p/n 18247-001, Rev. G
Tidal Volume<br />
Use the Tidal Volume control to establish the volume of gas which the ventilator will produce and<br />
deliver during Volume Controlled breaths. Flow is delivered in a taper waveform over the set<br />
Inspiratory Time. The peak flow is calculated based on the Tidal Volume and Inspiratory Time with a<br />
maximum flow of 100 lpm and a minimum flow of 10 lpm. Flow is decelerated from the calculated<br />
peak flow to 50% of the calculated peak flow.<br />
While the Tidal Volume is being updated, the Calculated Peak Flow is displayed in the display<br />
window.<br />
To set the Tidal Volume:<br />
1) Push the Tidal Volume button.<br />
2) Change the setting using the Set Value knob.<br />
3) Push the Tidal Volume button again to deselect the setting and accept the new value.<br />
Range: 50 - 2000 ml<br />
NOTE<br />
Be sure that Volume ventilation is selected.<br />
REMARQUE<br />
Assurez-vous que le volume de ventilation est sélectionné.<br />
Page 6-28 <strong>LTV</strong> ® <strong>1200</strong> Ventilator Operator’s <strong>Manual</strong><br />
p/n 18247-001, Rev. G
Volume Pressure Mode<br />
Use this button to toggle between Pressure control and Volume control modes of ventilation.<br />
To toggle between the modes:<br />
1) Push the mode button once. The associated LED will flash for 5 seconds.<br />
2) To confirm the mode change, push the mode button again while the LED is flashing.<br />
The ventilator will begin operating in the new mode as soon as the mode change is complete.<br />
Operator’s <strong>Manual</strong> <strong>LTV</strong> ® <strong>1200</strong> Ventilator Page 6-29<br />
p/n 18247-001, Rev. G
Page 6-30 <strong>LTV</strong> ® <strong>1200</strong> Ventilator Operator’s <strong>Manual</strong><br />
p/n 18247-001, Rev. G
Chapter 7 - DISPLAYS AND INDICATORS<br />
This section describes each of the <strong>LTV</strong> ® <strong>1200</strong> ventilator front panel displays.<br />
Airway Pressure<br />
The Airway Pressure display is a bar of 60 LEDs that is used to display the real-time airway circuit<br />
pressure. The displayed pressures range from -10 cmH2O to 108 cmH2O in increments of 2 cmH2O.<br />
In addition to displaying the real-time airway pressure, a single LED is lit showing the Peak Inspiratory<br />
Pressure of the previous breath.<br />
Display Window<br />
The display window is a 12 character, 5x7 dot matrix array that is used to display alarms, monitored<br />
data, and Extended Features menu items. Messages are displayed with the following priorities<br />
(highest to lowest):<br />
• Alarm Messages 27<br />
• Extended Features Menu Items 28<br />
• Monitored Data 29<br />
Indicators<br />
The following section describes the purpose of the LED indicators on the front panel that do not have<br />
associated front panel controls.<br />
27<br />
See Chapter 9 - Ventilator Alarms and Chapter 6 - Controls, Silence Reset for more information on how to<br />
clear alarm displays.<br />
28<br />
See Chapter 10 - Extended Features for more information on how to use the Extended Features Menus.<br />
29<br />
See Chapter 8 - Monitored Data and Chapter 6 - Controls, Select for more information on displaying monitors.<br />
Operator’s <strong>Manual</strong> <strong>LTV</strong> ® <strong>1200</strong> Ventilator Page 7-1<br />
p/n 18247-001, Rev. G
Battery Level<br />
The Battery Level indicator shows the level of available internal battery power while running from the<br />
internal battery. When the ventilator is running from an external power source, the Battery Level<br />
indicator is off. When running from the internal battery at the nominal settings shown below, the<br />
indicator shows the following levels:<br />
Alarm<br />
LED<br />
Color Battery Level Approximate Battery Time<br />
(Total time: 60 mins)<br />
-- Green Internal battery level is acceptable 45 minutes<br />
BAT LOW Amber Internal battery level is low 10 minutes<br />
BAT EMPTY Red Internal battery level is critically low 5 minutes<br />
Mode<br />
Nominal Settings<br />
Assist/Control, Volume Peep 5 cmH2O<br />
Breath Rate 15 bpm 02 % 21%<br />
Tidal Volume 800 ml Lung Compliance 50 ml/cmH2O<br />
Inspiratory Time 1.5 sec ET Tube Resistance 5.87 cmH2O/L/s<br />
Sensitivity 2 lpm Battery Temperature 25° C<br />
When an <strong>LTV</strong> ® <strong>1200</strong> ventilator is operated on its internal battery to the point that the internal battery is<br />
completely depleted, the ventilator will shut down. If the ventilator remains in this state, the internal<br />
battery may recharge slightly within a few seconds / minutes and cause the ventilator to automatically<br />
restart and operate for a short period of time. This cycle may repeat several times, depending on the<br />
condition of the internal battery.<br />
Page 7-2 <strong>LTV</strong> ® <strong>1200</strong> Ventilator Operator’s <strong>Manual</strong><br />
p/n 18247-001, Rev. G
Battery Level (cont)<br />
WARNING<br />
Battery run time - When the battery reaches the BAT LOW level, the ventilator will only run for<br />
approximately 10 minutes before generating a battery empty alarm (BAT EMPTY). The approximate<br />
times shown here are based on tests using the nominal settings, a new battery and a full 8- hour<br />
charge cycle as specified in Appendix A - Ventilator Specifications. Actual run time may be more or<br />
less depending on ventilator settings, patient demand, and battery age or condition. It is highly<br />
recommended that an alternate power source is secured PRIOR to the ventilator reaching the BAT<br />
EMPTY alarm condition to ensure continuous, uninterrupted patient ventilation.<br />
AVERTISSEMENT<br />
Durée d’utilisation de la batterie – Lorsque la batterie atteint le niveau BAT INT BASS, le<br />
ventilateur fonctionne pendant environ 10 minutes avant d’émettre une alarme de batterie faible (BAT<br />
INT VIDE). Cette durée approximative est basée sur des tests avec des paramètres nominaux, une<br />
nouvelle batterie et un cycle de chargement complet de 8 heures, tel que spécifié dans l’Annexe A –<br />
Spécifications du ventilateur. La durée d’utilisation réelle pourrait être supérieure ou inférieure, selon<br />
les paramètres du ventilateur, la demande du patient et l’âge ou l’état de la batterie. Il est fortement<br />
recommandé qu’une source d’alimentation alternative soit connectée AVANT que le ventilateur<br />
n’atteigne l’état d’alarme BAT INT VIDE afin d’assurer une ventilation continue et ininterrompue au<br />
patient.<br />
Operator’s <strong>Manual</strong> <strong>LTV</strong> ® <strong>1200</strong> Ventilator Page 7-3<br />
p/n 18247-001, Rev. G
Charge Status<br />
The Charge Status indicator shows the charge state of the internal battery. This LED is on when the<br />
ventilator is supplied with external power and the internal battery is being charged. The charge status<br />
is indicated as follows:<br />
LED Color Charge Status<br />
Flashing Amber The ventilator is performing pre-charge testing of the battery before<br />
starting the charge process. This occurs when external power is first<br />
connected. The process normally takes a few seconds but may take up to<br />
an hour on a deeply discharged battery.<br />
Green The internal battery is charged to full level. While in this state, the charger<br />
will continue to trickle charge the battery.<br />
Amber The internal battery is being bulk charged. The battery has not reached a<br />
full charge level yet.<br />
Red The ventilator has detected a charge internal battery fault. The internal<br />
battery cannot be charged.<br />
CAUTION<br />
Charge Fault - If the Charge Status LED indicates a charge fault, contact a certified Pulmonetic<br />
Systems’ service technician immediately.<br />
Internal Battery Use: The internal battery is intended for use during short periods while switching<br />
between external power supplies, in emergencies or for short duration transports. The length of time<br />
the ventilator will operate on internal power is a function of factors such as settings, charge level and<br />
condition of the battery; therefore, the use of the internal battery as a standard operating practice is<br />
not recommended.<br />
ATTENTION<br />
Erreur de charge - Si le DEL de l'état de charge indique une erreur de charge, veuillez contacter<br />
immédiatement un technicien de service certifié Pulmonetic Systems.<br />
Utilisation de la batterie interne: La batterie interne est conçue pour être utilisée sur de courtes<br />
périodes pendant la commutation entre des connexions d’alimentation externe, les situations<br />
d’urgence ou les transports de courte durée. La durée pendant laquelle le ventilateur fonctionnera sur<br />
l’alimentation interne dépend de facteurs tels, la configuration, le niveau de la charge et la condition<br />
de la batterie; l’utilisation de la batterie interne pour l'opération normale n’est donc pas<br />
recommandée.<br />
Page 7-4 <strong>LTV</strong> ® <strong>1200</strong> Ventilator Operator’s <strong>Manual</strong><br />
p/n 18247-001, Rev. G
External Power<br />
The External Power indicator shows the level of external power while the ventilator is operating from<br />
an external power source. When the ventilator is running from the internal battery, the External<br />
Power indicator is off. When running from external power, the indicator shows the following levels:<br />
(See Chapter 7 - Battery Level for approximate battery time.)<br />
LED Color Power Level<br />
Green External Power level is acceptable<br />
Amber External Power level is low<br />
External power may be provided by connecting the ventilator to an external DC power source,<br />
external battery or to the <strong>LTV</strong> ® AC Power Adapter.<br />
CAUTION<br />
AC Power Source - When connecting the ventilator to an AC power source, use only the approved<br />
<strong>LTV</strong> ® AC Power Adapter.<br />
External DC Power Source or External Battery - When connecting the <strong>LTV</strong> ® <strong>1200</strong> ventilator to an<br />
external DC power source or external battery, use only the approved method and connectors<br />
specified in Chapter 14 - Power and Battery Operation.<br />
Internal Battery Use: The internal battery is intended for use during short periods while switching<br />
between external power supply connections, emergency situations or short duration transports. The<br />
length of time the ventilator will operate on internal power is a function of many factors such as<br />
settings, charge level and condition or age of the battery; therefore, the use of the internal battery as<br />
a standard operating practice is not recommended.<br />
ATTENTION<br />
Source d'alimentation c.a. - Lorsque vous branchez le ventilateur sur une source d'alimentation<br />
c.a., utilisez l'adaptateur c.a. <strong>LTV</strong> ® approuvé.<br />
Source de courant continu ou pile externe - Lorsque vous branchez les ventilateurs de la <strong>1200</strong><br />
<strong>LTV</strong> ® sur une source de courant continu ou sur une pile externe, utilisez seulement les méthodes et<br />
les connecteurs approuvés spécifiés au chapitre 14 - Alimentation et opération avec pile.<br />
Utilisation de la batterie interne: La batterie interne est conçue pour être utilisée sur de courtes<br />
périodes pendant la commutation entre des connexions d’alimentation externe, les situations<br />
d’urgence ou les transports de courte durée. La durée pendant laquelle le ventilateur fonctionnera sur<br />
l’alimentation interne dépend de plusieurs facteurs tels, la configuration, le niveau de la charge et la<br />
condition ou l’âge de la batterie; l’utilisation de la batterie interne pour l'opération normale n’est donc<br />
pas recommandée.<br />
Operator’s <strong>Manual</strong> <strong>LTV</strong> ® <strong>1200</strong> Ventilator Page 7-5<br />
p/n 18247-001, Rev. G
NPPV<br />
The NPPV 30 indicator LED is lit when NPPV mode is selected. For more information on NPPV mode,<br />
see NPPV Mode in Chapter 4 - Ventilation Modes and Procedure for NPPV Mode Set Up in Chapter<br />
12 – Operating Procedure.<br />
Patient Effort<br />
This LED is lit briefly each time a patient trigger is detected. See Chapter 6 - Controls, Sensitivity for<br />
more information on patient triggers.<br />
Vent Inop<br />
The Vent Inop LED is lit any time the ventilator is in the Inop state. This occurs when:<br />
• The ventilator is put into Standby using the On/Standby button.<br />
• The ventilator power sources, both external and internal, are insufficient to operate the ventilator.<br />
• A Vent Inop alarm sounds.<br />
An audible alarm sounds continuously when the ventilator enters the Vent Inop state, and may be<br />
silenced by pushing the Silence Reset button.<br />
While in the Vent Inop state, the ventilator is set to a safe state, allowing the patient to breathe<br />
spontaneously from room air.<br />
30 Non-Invasive Positive Pressure Ventilation<br />
Page 7-6 <strong>LTV</strong> ® <strong>1200</strong> Ventilator Operator’s <strong>Manual</strong><br />
p/n 18247-001, Rev. G
Chapter 8 - MONITORED DATA<br />
This section describes each of the monitored data displays and how the data is calculated. Monitored<br />
data is shown in the Display Window and is actively updated whenever alarms and extended features<br />
are not displayed.<br />
NOTE<br />
Some monitored data depends on valid transducer calibrations. If valid calibration data is not<br />
available, the monitored data display will be replaced with the message NO CAL.<br />
REMARQUE<br />
Certaines données surveillées dépendent de la validité du calibrage du transducteur. Si des données<br />
de calibrage valides ne sont pas disponibles, le données surveillées affichées seront remplacées par<br />
le message NO CAL.<br />
WARNING<br />
NO CAL Condition - Operation of the <strong>LTV</strong> ® <strong>1200</strong> ventilator under a NO CAL condition may result in<br />
inaccurate pressure and volume measurements. Should this condition occur, disconnect the patient<br />
from the ventilator, provide an alternative method of ventilation and immediately contact a certified<br />
Pulmonetic Systems’ service technician or Pulmonetic Systems.<br />
AVERTISSEMENT<br />
Condition NO CAL - L'opération continue du ventilateur de la <strong>1200</strong> <strong>LTV</strong> ® sous condition NO CAL<br />
peut résulter en mesures de pression et de volume erronées. Si cette condition se présente, le<br />
ventilateur doit être retiré du service, et vous devez immédiatement contacter votre technicien de<br />
service certifié de Pulmonetic Systems ou Pulmonetic Systems.<br />
Operator’s <strong>Manual</strong> <strong>LTV</strong> ® <strong>1200</strong> Ventilator Page 8-1<br />
p/n 18247-001, Rev. G
Automatic or <strong>Manual</strong> Data Display Scrolling<br />
The monitored data displays may be automatically or manually scrolled.<br />
To cycle through the available monitored data automatically from a halted scan:<br />
1) Push the monitor Select button twice within 0.3 seconds.<br />
2) Pushing the Select button once while scan is active will halt scanning and the currently<br />
displayed data will remain in the display window.<br />
3) Each time you push the button once, the next data item in the list will be displayed.<br />
4) To resume scan, push the Select button twice.<br />
The monitored data is displayed for 3 seconds, in the following order:<br />
Display Monitored Data Units<br />
PIP Peak Inspiratory Pressure cmH2O<br />
MAP Mean Airway Pressure cmH2O<br />
PEEP Positive End Expiratory Pressure cmH2O<br />
f Total Breath Rate Breaths Per Minute<br />
Vte Exhaled Tidal Volume Milliliters<br />
VE Minute Volume Liters<br />
I:E I:E Ratio Smaller unit normalized to 1<br />
I:Ecalc Calculated I:E ratio based on Breath Rate and<br />
Inspiratory Time<br />
Smaller unit normalized to 1<br />
Vcalc Calculated Peak Flow for Volume Breaths Liters Per Minute<br />
SBT min 31 Remaining time for SBT mode of ventilation Minutes<br />
f/Vt f 32 Total Breath Rate divided by the Average<br />
Exhaled Tidal Volume, and the Total Breath<br />
f/Vt and Breaths Per Minute<br />
Following the displayed monitored data, the Alarm Informational Messages listed below (when<br />
applicable) will be displayed for 3 seconds.<br />
NOTE<br />
While automatic scrolling is active and when applicable, the following messages 33 will also be<br />
displayed along with the monitored data:<br />
* LMV OFF * HI f/Vt OFF * SBT HI f OFF * HIGH f OFF 34 * LO PEEP OFF<br />
* LPPS OFF * LO f/Vt OFF * SBT LO f OFF * HI PEEP OFF * H&L PEEP OFF<br />
* LMV LPPS OFF * SBT f/Vt OFF * SBT f OFF * f PEEP OFF 34<br />
REMARQUE<br />
Lorsque le défilement automatique est actif, et en fonction du contexte, les messages suivants seront<br />
également affichés avec les données surveillées :<br />
* Vmin ARRET * f/Vt max NON * VST fmax NON * f HTE ARRET * PEP MIN OFF<br />
* PminAI ARRET * f/Vt min NON * VST fmin NON * PEPmax ARRET * AL PEP ARRET<br />
* Vm-Pmin NON * VST f/Vt NON * VST f NON * f PEP ARRET<br />
31 SBT min is only displayed during the Spontaneous Breathing Trial (SBT) mode of ventilation.<br />
32<br />
f/Vt f is only displayed during, and for five minutes after, the Spontaneous Breathing Trial (SBT) mode of<br />
ventilation has ended.<br />
33<br />
See Chapter 9 - Ventilator Alarms, for additional information.<br />
34<br />
HIGH f OFF and f PEEP OFF messages are not displayed during SBT ventilation.<br />
Page 8-2 <strong>LTV</strong> ® <strong>1200</strong> Ventilator Operator’s <strong>Manual</strong><br />
p/n 18247-001, Rev. G
PIP xxx cmH2O<br />
The Peak Inspiratory Pressure (PIP) monitor displays the greatest pressure measured during the<br />
inspiratory phase and the first 300 ms of exhalation 35 .<br />
Monitored PIP data is measured and displayed at the completion of inspiration.<br />
MAP xx cmH2O<br />
The Mean Airway Pressure (MAP) monitor displays a running average of the airway pressure for the<br />
last 60 seconds. MAP data is recalculated and displayed in 10 second intervals.<br />
PEEP xx cmH2O<br />
The Positive End Expiratory Pressure (PEEP) monitor displays the pressure in the patient circuit at<br />
the completion of exhalation. PEEP data is displayed at the completion of exhalation.<br />
f xxx bpm<br />
The Total Breath Rate displays the breaths per minute based on the last 8 breaths, and includes all<br />
breath types. Total Breath Rate is recalculated and updated at the end of each exhalation or every 20<br />
seconds.<br />
Vte xxx ml<br />
The Exhaled Tidal Volume (Vte) monitor displays the tidal volume as measured at the patient wye.<br />
Vte data is recalculated and displayed at the completion of every exhalation.<br />
VE xx.x L<br />
The Minute Volume (VE) monitor displays the exhaled tidal volume for the last 60 seconds as<br />
calculated from the last 8 breaths. VE data is recalculated and displayed at the completion of every<br />
exhalation or every 20 seconds, whichever occurs first.<br />
I:E xx:xx<br />
The I:E Ratio displays the unitless ratio between measured inspiratory time and measured exhalation<br />
time. The smaller of the inspiratory and exhalation times is normalized to one. Both normal and<br />
inverse I:E Ratios are displayed.<br />
35<br />
This is done to protect the patient, since often the highest pressure is obtained at the beginning of the<br />
exhalation phase.<br />
Operator’s <strong>Manual</strong> <strong>LTV</strong> ® <strong>1200</strong> Ventilator Page 8-3<br />
p/n 18247-001, Rev. G
I:Ecalc xx:xx<br />
The Calculated I:E ratio (I:Ecalc) display is based on the set Breath Rate and Inspiratory Time. The<br />
display is updated in real-time while either setting is being changed. In modes where Vcalc is<br />
displayed during Inspiratory Time changes, the display can be toggled between Vcalc and I:E calc<br />
using the Select button.<br />
Vcalc xxx Lpm<br />
The Calculated Peak Flow is based on the Tidal Volume and Inspiratory Time settings. Vcalc is<br />
included in the list of monitored values when Volume ventilation is selected, and is not included when<br />
Pressure ventilation is selected. Vcalc is automatically displayed when Tidal Volume or Inspiratory<br />
Time 36 is selected for change. When both controls are deselected, the previously displayed monitored<br />
data will be restored to the display window.<br />
SBT xxx min<br />
During the Spontaneous Breathing Trial (SBT) mode of ventilation, the monitor displays the time<br />
remaining until the number of minutes preset in the SBT OP, MINUTES menu have elapsed. When<br />
this preset time has elapsed, the SBT mode of ventilation is terminated, an SBT OFF alarm is<br />
generated and the ventilator returns to the previously set modes/settings.<br />
xxx f/Vt xx f<br />
During a Spontaneous Breathing Trial (SBT), when DISPLAY ON has been selected in the SBT<br />
DISPLAY f/Vt menu, the monitor displays the current values of the Total Breath Rate divided by the<br />
Average Exhaled Tidal Volume (f/Vt), and the Total Breath Rate (f).<br />
• f/Vt is computed every time the Total Breath Rate (f) or Total Minute Volume (VE) is calculated.<br />
At the completion of the SBT mode of ventilation, the final values of the Total Breath Rate divided by<br />
the Average Exhaled Tidal Volume (f/Vt), and Total Breath Rate (f) are displayed and retained for an<br />
additional five minutes.<br />
36 Vcalc is only displayed while Inspiratory Time is selected if Volume Mode is selected. Vcalc is displayed any<br />
time Tidal Volume is selected regardless of the current ventilation mode.<br />
Page 8-4 <strong>LTV</strong> ® <strong>1200</strong> Ventilator Operator’s <strong>Manual</strong><br />
p/n 18247-001, Rev. G
Chapter 9 - VENTILATOR ALARMS<br />
When conditions requiring immediate operator interaction are detected by the <strong>LTV</strong> ® <strong>1200</strong> ventilator,<br />
an alarm is generated. Some alarms can reset themselves, for instance, a high pressure alarm that is<br />
caused by a cough. Other alarms require some action from the operator and the audible and visual<br />
alarms will continue until the problem is corrected.<br />
When an alarm occurs:<br />
• A flashing alarm message appears in the display window.<br />
• An audible alarm sounds.<br />
• Any associated control displays flash.<br />
• Depending on the alarm, other actions may be taken, such as terminating an inspiration or<br />
opening the exhalation valve.<br />
When an alarm condition clears:<br />
• The audible alarm is silenced.<br />
• The alarm message continues to flash in the display window.<br />
• Any associated control displays continue to flash.<br />
WARNING<br />
Adjustable and Critical Alarms – For safety purposes, all adjustable alarms and all critical alarms<br />
must be checked to insure proper operation.<br />
Audible Alarms - Failure to immediately identify and correct audible alarm situations may result in<br />
serious patient injury.<br />
AVERTISSEMENT<br />
Alarmes réglables et critiques – Pour assurer la sécurité et obtenir un fonctionnement adéquat,<br />
toutes les alarmes réglables et critiques doivent être vérifiées.<br />
Alarmes sonores - L'échec à identifier et à corriger dans l'immédiat les situations d'alarmes sonores<br />
peut causer des blessures au patient.<br />
The following sections describe what alarms can occur on the <strong>LTV</strong> ® <strong>1200</strong> ventilator and how to<br />
correct them.<br />
Operator’s <strong>Manual</strong> <strong>LTV</strong> ® <strong>1200</strong> Ventilator Page 9-1<br />
p/n 18247-001, Rev. G
Alarms<br />
APNEA, APNEA xx bpm<br />
When the time since the start of the last breath is longer than the set Apnea Interval, the APNEA<br />
alarm is generated. When an Apnea alarm occurs, the ventilator will enter Apnea Backup ventilation<br />
mode. For more information on Apnea Backup mode, see Chapter 4 - Ventilation Modes, Apnea<br />
Backup. For more information on the variable Apnea Interval, see Chapter 10 - Extended Features.<br />
When an APNEA alarm occurs:<br />
• Any inspiration in progress is terminated.<br />
• The ventilator changes to Apnea Backup ventilation.<br />
• The APNEA xx bpm backup ventilation breath rate is displayed.<br />
• Control displays used while in Apnea Backup mode are illuminated and all other control displays<br />
are dimmed.<br />
• The audible alarm is sounded.<br />
While in Apnea Backup mode, the alarm will continue to sound and the alarm message and breath<br />
rate will be flashed in the display window. Apnea backup mode will continue until the operator resets<br />
the alarm or the patient triggers 2 consecutive breaths.<br />
When the APNEA alarm is reset by 2 consecutive triggered breaths:<br />
• Apnea Backup Ventilation terminates and the ventilator returns to the previous mode.<br />
• The APNEA alarm message remains flashing in the window but the breath rate is no longer<br />
displayed.<br />
• Control displays used in the selected ventilation mode are illuminated and all other control<br />
displays are dimmed.<br />
• The audible alarm is silenced.<br />
To reset the APNEA alarm and exit Apnea Backup ventilation:<br />
1) Push the Silence Reset button twice.<br />
Page 9-2 <strong>LTV</strong> ® <strong>1200</strong> Ventilator Operator’s <strong>Manual</strong><br />
p/n 18247-001, Rev. G
BAT EMPTY<br />
When the ventilator is operating on internal battery power and the battery charge level falls below the<br />
empty threshold, the BAT EMPTY alarm is generated. For patient safety, this alarm can only be<br />
silenced once for 30 seconds and cannot be silenced preemptively. After the 30 seconds has<br />
elapsed, the alarm cannot be silenced again and will continue to sound and display until an alternate<br />
power source is provided or the battery is depleted and the ventilator goes INOP. This alarm will<br />
always sound at maximum volume.<br />
WARNING<br />
BAT EMPTY alarm - A BAT EMPTY alarm indicates the internal battery is almost depleted. Connect<br />
the ventilator to an external power source immediately.<br />
AVERTISSEMENT<br />
Alarme BAT EMPTY - Une alarme BAT EMPTY indique que la pile interne est pratiquement à plat.<br />
Branchez immédiatement le ventilateur à une source d'alimentation externe.<br />
When a BAT EMPTY alarm occurs:<br />
• The Battery Level LED displays red.<br />
• The BAT EMPTY message is displayed.<br />
• The audible alarm is sounded.<br />
NOTE<br />
Volume of the BAT EMPTY alarm cannot be lowered. For patient safety, this alarm will always sound<br />
at full volume.<br />
REMARQUE<br />
Le volume de l’alarme batterie faible ne peut être réduit. Pour la sécurité des patients, le volume de<br />
l’émission de cette alarme est toujours fort.<br />
To temporarily silence the BAT EMPTY alarm:<br />
1) Push the Silence Reset button once to silence the audible alarm for 30 seconds only.<br />
The BAT EMPTY alarm can only be silenced once and cannot be reset until the battery is recharged<br />
or external power is applied.<br />
Operator’s <strong>Manual</strong> <strong>LTV</strong> ® <strong>1200</strong> Ventilator Page 9-3<br />
p/n 18247-001, Rev. G
BAT EMPTY (cont.)<br />
NOTE<br />
When the battery reaches empty, the ventilator may run for approximately 5 minutes before<br />
shutdown, based on the nominal settings, a new battery and a full 8 - hour charge cycle as specified<br />
in Appendix A - Ventilator Specifications. Actual run time may be more or less depending on ventilator<br />
settings, patient demand, and battery age.<br />
Internal Battery Use: The internal battery is intended for use during short periods while switching<br />
between external power supply connections, emergency situations or short duration transports. The<br />
length of time the ventilator will operate on internal power is a function of many factors such as<br />
settings, charge level and condition or age of the battery; therefore, the use of the internal battery as<br />
a standard operating practice is not recommended.<br />
REMARQUE<br />
Lorsque la batterie atteint le niveau Vide, le ventilateur continuera de fonctionner pendant environ<br />
cinq minutes avant de s’éteindre, dans le cas de réglages nominaux, d’une nouvelle batterie et d’un<br />
cycle de charge complet de huit heures, tel que spécifié dans l’annexe A, Ventilator Specifications. La<br />
durée de fonctionnement réelle peut être inférieure ou supérieure, suivant les réglages du ventilateur,<br />
les besoins du patient et l’âge de la batterie.<br />
Utilisation de la batterie interne: La batterie interne est conçue pour être utilisée sur de courtes<br />
périodes pendant la commutation entre des connexions d’alimentation externe, les situations<br />
d’urgence ou les transports de courte durée. La durée pendant laquelle le ventilateur fonctionnera sur<br />
l’alimentation interne dépend de plusieurs facteurs tels, la configuration, le niveau de la charge et la<br />
condition ou l’âge de la batterie; l’utilisation de la batterie interne pour l'opération normale n’est donc<br />
pas recommandée.<br />
When an <strong>LTV</strong> ® <strong>1200</strong> ventilator is operated on its internal battery to the point that the internal battery is<br />
completely depleted, the ventilator will shut down. If the ventilator remains in this state, the internal<br />
battery may recharge slightly within a few seconds / minutes and cause the ventilator to automatically<br />
restart and operate for a short period of time. This cycle may repeat several times, depending on the<br />
condition of the internal battery.<br />
Page 9-4 <strong>LTV</strong> ® <strong>1200</strong> Ventilator Operator’s <strong>Manual</strong><br />
p/n 18247-001, Rev. G
BAT LOW<br />
When the ventilator is operating on internal battery power and the battery charge level falls below the<br />
low threshold, a BAT LOW alarm is generated.<br />
When a BAT LOW alarm occurs:<br />
• The Battery Level LED is displayed Amber.<br />
• The BAT LOW message is displayed.<br />
• The audible alarm is sounded.<br />
To reset the BAT LOW alarm:<br />
1) Push the Silence Reset button twice.<br />
WARNING<br />
Battery run time: When the battery reaches the BAT LOW level, the ventilator will only run for<br />
approximately 10 minutes before generating a battery empty alarm (BAT EMPTY). This approximate<br />
time is based on tests using the nominal settings, a new battery and a full 8 hour charge cycle as<br />
specified in Appendix A - Ventilator Specifications. Actual run time may be more or less depending on<br />
ventilator settings, patient demand, and battery age or condition. It is highly recommended that an<br />
alternate power source is connected PRIOR to the ventilator reaching the BAT EMPTY alarm<br />
condition to ensure continuous, uninterrupted patient ventilation<br />
AVERTISSEMENT<br />
Durée d’utilisation de la batterie – Lorsque la batterie atteint le niveau BAT INT BASS, le<br />
ventilateur fonctionne pendant environ 10 minutes avant d’émettre une alarme de batterie faible (BAT<br />
INT VIDE). Cette durée approximative est basée sur des tests avec des paramètres nominaux, une<br />
nouvelle batterie et un cycle de chargement complet de 8 heures, tel que spécifié dans l’Annexe A –<br />
Spécifications du ventilateur. La durée d’utilisation réelle pourrait être supérieure ou inférieure, selon<br />
les paramètres du ventilateur, la demande du patient et l’âge ou l’état de la batterie. Il est fortement<br />
recommandé qu’une source d’alimentation alternative soit connectée AVANT que le ventilateur<br />
n’atteigne l’état d’alarme BAT INT VIDE afin d’assurer une ventilation continue et ininterrompue au<br />
patient<br />
Operator’s <strong>Manual</strong> <strong>LTV</strong> ® <strong>1200</strong> Ventilator Page 9-5<br />
p/n 18247-001, Rev. G
BAT LOW (cont)<br />
NOTE<br />
Internal Battery Use: The internal battery is intended for use during short periods while switching<br />
between external power supply connections, emergency situations or short duration transports. The<br />
length of time the ventilator will operate on internal power is a function of factors such as settings,<br />
charge level and condition or age of the battery; therefore, the use of the internal battery as a<br />
standard operating practice is not recommended.<br />
REMARQUE<br />
Utilisation de la batterie interne: La batterie interne est conçue pour être utilisée sur de courtes<br />
périodes pendant la commutation entre des connexions d’alimentation externe, les situations<br />
d’urgence ou les transports de courte durée. La durée pendant laquelle le ventilateur fonctionnera sur<br />
l’alimentation interne dépend de plusieurs facteurs tels, la configuration, le niveau de la charge et la<br />
condition ou l’âge de la batterie; l’utilisation de la batterie interne pour l'opération normale n’est donc<br />
pas recommandée.<br />
When an <strong>LTV</strong> ® <strong>1200</strong> ventilator is operated on its internal battery to the point that the internal battery is<br />
completely depleted, the ventilator will shut down. If the ventilator remains in this state, the internal<br />
battery may recharge slightly within a few seconds / minutes and cause the ventilator to automatically<br />
restart and operate for a short period of time. This cycle may repeat several times, depending on the<br />
condition of the internal battery.<br />
Page 9-6 <strong>LTV</strong> ® <strong>1200</strong> Ventilator Operator’s <strong>Manual</strong><br />
p/n 18247-001, Rev. G
DEFAULTS<br />
All controls and extended features on the <strong>LTV</strong> ® <strong>1200</strong> ventilator have factory-set default values. When<br />
the operator makes changes to the controls or extended features settings, the ventilator stores the<br />
new settings in non-volatile memory 37 . During POST, the ventilator checks the stored settings. If the<br />
ventilator detects an invalid stored setting, the DEFAULTS alarm occurs and the affected settings are<br />
set to the default values.<br />
When a DEFAULTS alarm is generated:<br />
• An audible alarm is sounded.<br />
• The DEFAULTS message is flashed in the display window.<br />
• All affected controls or features are set to their default values.<br />
To reset the DEFAULTS alarm:<br />
1) Push the Silence Reset button twice.<br />
2) Select and return the control(s) or features to the desired settings.<br />
NOTE<br />
Be sure to check all Controls, Alarms and Extended Features options and return them to the desired<br />
settings.<br />
Repeated occurrences of the DEFAULTS alarm may indicate a problem with the ventilator’s nonvolatile<br />
memory. Please immediately contact a certified Pulmonetic Systems’ service technician.<br />
Control values are re-set to default values each time the ventilator is turned on, only if an invalid<br />
stored setting is detected during POST.<br />
REMARQUE<br />
Assurez-vous de procéder à la vérification de toutes les options de contrôles, d'alarmes et de<br />
caractéristiques étendues, et de les retourner aux réglages souhaités.<br />
L'occurrence répétitive des alarmes PAR DÉFAUT peut indiquer un problème avec la mémoire non<br />
volatile du ventilateur. Veuillez contacter immédiatement un technicien de service certifié de<br />
Pulmonetic Systems.<br />
Les valeurs de contrôle sont rétablies à leurs valeurs par défaut chaque fois que le ventilateur est<br />
allumé, seulement si un paramètre en mémoire non valable est détecté au moment du diagnostic<br />
automatique de mise sous tension.<br />
37 Non-volatile memory is memory that is not erased when the ventilator is turned off or disconnected.<br />
Operator’s <strong>Manual</strong> <strong>LTV</strong> ® <strong>1200</strong> Ventilator Page 9-7<br />
p/n 18247-001, Rev. G
DEFAULTS (cont.)<br />
The factory-set default Control settings are:<br />
• See Chapter 6 - Controls, for detailed information concerning specific Controls.<br />
Control - Default Control - Default<br />
Breath Rate - 12 bpm O2 % (O2 Flush) - 21%<br />
Control Lock - On PEEP - 0 cmH2O<br />
Data Display Scrolling - Auto-On Pressure Control - 1 cmH2O<br />
High Pressure Limit - 20 cmH2O Pressure Support - 1 cmH2O<br />
Inspiratory/Expiratory Hold - Off Sensitivity - 2 Lpm<br />
Inspiratory Time - 1.5 sec Tidal Volume - 500 ml<br />
Low Minute Volume - 2.5 Lpm Ventilation Mode - Assist/Control<br />
Low Pressure - 5 cmH2O<br />
Low Pressure O2 Source - Off<br />
Volume Pressure Mode - Volume<br />
The factory-set default Extended Features settings are:<br />
• See Chapter 10 - Extended Features, for detailed information concerning specific Features.<br />
Feature - Default Feature - Default<br />
Alarm Volume - 85 dBA Patient Assist - Normal<br />
Apnea Interval - 20 sec Patient Query - On<br />
Com Setting 38 - Data Patient Size - INFANT<br />
Control Unlock - Easy PC Flow Termination - Off<br />
Date Format - MM/DD/YYYY PIP LED - On<br />
High f Alarm - High f Off Rise Time Profile - 4<br />
High f Alarm Delay - 30 sec SBT Display f/Vt Alarm - Off<br />
High PEEP Alarm - PEEP +5 cmH2O SBT FIO2 - 21%<br />
HP Alarm Delay - No Delay SBT High f Alarm - 35 bpm<br />
Language - English SBT High f/Vt Alarm - 105 f/Vt<br />
Leak Compensation - On SBT Low f Alarm - 10 bpm<br />
Low PEEP Alarm - PEEP -5 cmH2O SBT Low f/Vt Alarm - 70 f/Vt<br />
LPP Alarm - All Breaths SBT Mode - Off<br />
NPPV Mode - Off SBT Mode Run Time - 20 min<br />
O2 Conserve - Off SBT PEEP - 0 cmH2O<br />
O2 Cylinder Duration - 2000 psi or 138 bar SBT Pressure Support - 10 cmH2O<br />
O2 Cylinder Duration - 622 liters Variable Flow Termination - 25%<br />
O2 Flush Period - 3 min Variable Time Termination - 1.5 sec<br />
38 This feature is not reset to default values when the SET DEFAULTS option is used in Extended Features.<br />
Page 9-8 <strong>LTV</strong> ® <strong>1200</strong> Ventilator Operator’s <strong>Manual</strong><br />
p/n 18247-001, Rev. G
DEFAULTS SET<br />
The DEFAULTS SET alarm is generated when the <strong>LTV</strong> ® <strong>1200</strong> ventilator is first powered up after the<br />
SET DEFAULTS 39 option has been used to reset all controls and extended features settings to their<br />
factory-set default values 40 .<br />
• Language, Time/Date Format and Com settings are not reset to default values when the SET<br />
DEFAULTS option is used in Extended Features.<br />
When a DEFAULTS SET alarm is generated:<br />
• The DEFAULTS SET message is flashed in the display window.<br />
• The audible alarm is sounded.<br />
To reset the DEFAULTS SET alarm:<br />
1) Push the Silence Reset button twice.<br />
2) Select and return the control(s) and extended features settings to the desired settings.<br />
NOTE<br />
Be sure to check all Controls, Alarms and Extended Features options and return them to the desired<br />
settings.<br />
REMARQUE<br />
Assurez-vous de procéder à la vérification de toutes les options de contrôles, d'alarmes et de<br />
caractéristiques étendues, et de les retourner aux réglages souhaités.<br />
39 See Chapter 10 - Extended Features, Set Defaults for additional information.<br />
40 See Chapter 9 - Ventilator Alarms, DEFAULTS for factory-set default values.<br />
Operator’s <strong>Manual</strong> <strong>LTV</strong> ® <strong>1200</strong> Ventilator Page 9-9<br />
p/n 18247-001, Rev. G
DISC/SENSE<br />
When the ventilator detects one of the following conditions, the DISC/SENSE alarm is generated:<br />
• When a sense line is pinched or blocked.<br />
• When a sense line has become disconnected.<br />
• When a sense line is occluded (e.g., excessive condensation in the line).<br />
The ventilator detects circuit pressure during the beginning of each inspiration. If an appropriate<br />
pressure change is not detected, a DISC/SENSE alarm occurs. While the DISC/SENSE alarm is<br />
active, the ventilator cannot sense the circuit pressure so the breath is terminated.<br />
When a DISC/SENSE alarm occurs:<br />
• Inspiration is immediately terminated and exhalation begins.<br />
• The DISC/SENSE message is flashed in the display window.<br />
• The audible alarm is sounded.<br />
To reset the DISC/SENSE alarm:<br />
1) Push the Silence Reset button to silence the alarm.<br />
2) Push the Silence Reset button to reset the alarm.<br />
Page 9-10 <strong>LTV</strong> ® <strong>1200</strong> Ventilator Operator’s <strong>Manual</strong><br />
p/n 18247-001, Rev. G
HIGH f<br />
When the Total Breath Rate (f) exceeds the high breath rate and time period alarm values, the HIGH<br />
f alarm is generated.<br />
• To prevent nuisance alarms, the HIGH f alarm is suspended for the first 60 seconds of ventilator<br />
operation after power up and passing the Power On Self Tests.<br />
When a HIGH f alarm occurs:<br />
• The HIGH f message is flashed in the display window.<br />
• The audible alarm is sounded.<br />
To reset the HIGH f alarm:<br />
1) Push the Silence Reset button once to silence the audible alarm.<br />
2) Push the Silence Reset button twice to reset the alarm (silences the audible alarm and clears the<br />
flashing display).<br />
• When the HIGH f alarm is reset (Silence Reset button pushed twice), the alarm is<br />
suspended for the next 60 seconds.<br />
• The 60-second suspension of the HIGH f alarm is only enabled when the alarm is manually<br />
silenced/reset by pushing the Silence Reset button twice. It is not enabled when the HIGH f<br />
alarm is automatically silenced/reset because the patient’s breath rate no longer exceeds the<br />
set HIGH f alarm value.<br />
Operator’s <strong>Manual</strong> <strong>LTV</strong> ® <strong>1200</strong> Ventilator Page 9-11<br />
p/n 18247-001, Rev. G
HIGH O 2 PRES<br />
When the average oxygen inlet pressure exceeds the acceptable limit for the type of oxygen source,<br />
the HIGH O2 PRES alarm is generated.<br />
• If Low Pressure O2 Source is selected, the inlet pressure is >10 PSIG.<br />
• If Low Pressure O2 Source is not selected and the oxygen concentration is set to greater than<br />
21%, the inlet pressure is >85 PSIG.<br />
When the Low Pressure O2 Source option is selected and a high O2 pressure source is attached to<br />
the ventilator, an Automatic High O2 Switch Over safety response generates a HIGH O2 PRES alarm,<br />
switches the ventilator to High Pressure O2 Source mode and sets the percentage of oxygen to be<br />
delivered in the gas flow to 21%.<br />
When a HIGH O2 PRES alarm occurs:<br />
• The HIGH O2 PRES message is flashed in the display window.<br />
• The O2 % (O2 Flush) control display is flashed.<br />
• The audible alarm is sounded.<br />
To reset the HIGH O2 PRES alarm:<br />
1) Push the Silence Reset button to silence the alarm.<br />
2) Adjust the oxygen inlet pressure.<br />
3) Push the Silence Reset button to reset the alarm.<br />
Page 9-12 <strong>LTV</strong> ® <strong>1200</strong> Ventilator Operator’s <strong>Manual</strong><br />
p/n 18247-001, Rev. G
HIGH PEEP<br />
When the patient circuit positive end expiratory pressure (PEEP) exceeds the High PEEP alarm<br />
setting, the HIGH PEEP alarm is generated.<br />
When a HIGH PEEP alarm occurs:<br />
• The HIGH PEEP message is flashed in the display window.<br />
• The audible alarm is sounded.<br />
To reset the HIGH PEEP alarm:<br />
1) Push the Silence Reset button once to silence the audible alarm.<br />
2) Push the Silence Reset button twice to reset the alarm (silences the audible alarm and clears the<br />
flashing display).<br />
Operator’s <strong>Manual</strong> <strong>LTV</strong> ® <strong>1200</strong> Ventilator Page 9-13<br />
p/n 18247-001, Rev. G
HIGH PRES<br />
When the pressure in the patient circuit is greater than the High Pressure Limit setting, the HIGH<br />
PRES alarm is generated. When this alarm occurs, any inspiration in progress is terminated and the<br />
exhalation valve is opened. The turbine is stopped to allow the circuit pressure to evacuate when the<br />
high pressure condition persists for more than four times the set inspiratory time or more than 3.0<br />
seconds, whichever is less.<br />
WARNING<br />
Sustained HIGH PRES Alarm - During a sustained High Pressure alarm condition (HIGH PRES), the<br />
ventilator’s turbine is stopped and gas is not delivered to the patient. Disconnect the patient from the<br />
ventilator and ventilate the patient using an alternative method. See Chapter 15 - Troubleshooting,<br />
Alarms for additional information concerning the HIGH PRES alarm.<br />
AVERTISSEMENT<br />
Alarme ALARME PMAX continue — Dans des conditions d’alarme de haute pression prolongées<br />
(ALARME PMAX), la turbine du ventilateur s'arrête et le gaz n’est plus transmis au patient.<br />
Débranchez le patient du ventilateur et utilisez une autre méthode de ventilation. Pour plus de détails<br />
sur l’état ALARME PMAX, reportez-vous au chapitre 15, Troubleshooting, Alarms.<br />
Immediate or delayed audible alarms for high pressure conditions can be selected using the<br />
Extended Features 41 . If immediate notification is selected, the audible alarm will sound on every high<br />
pressure occurrence. If Delayed notification is selected, the audible alarm will sound on the second or<br />
third consecutive breath terminated by the HIGH PRES alarm. The audible alarm will sound anytime<br />
a high pressure condition persists which stops the turbine.<br />
NOTE<br />
The High Pressure alarm output signal is generated by the ventilator’s Patient Assist Port for use with<br />
Remote Alarm systems. This signal is dependent on the selected setting (NORMAL or PULSE) in the<br />
Extended Features, PNT ASSIST menu. See Chapter 10 - Extended Features, Alarm Operations, for<br />
instructions on setting the Patient Assist Port output signal for use with single or dual tone Remote<br />
Alarm systems.<br />
REMARQUE<br />
Le signal de sortie correspondant à l’alarme de pression élevée est généré sur le port d’assistance au<br />
patient pour une utilisation avec des systèmes d’alarme à distance. Ce signal dépend du réglage<br />
choisi (NORMAL ou IMPULSION) dans le menu Fonctions avancées, PNT ASSIST. Reportez-vous<br />
au chapitre 10, Extended Features, Alarm Operations pour plus de détails sur le réglage du signal de<br />
sortie sur le port d’assistance au patient et sur son utilisation avec des systèmes d’alarme à distance<br />
à fréquence simple ou double.<br />
41 For more information on selecting the High Pressure Alarm Delay, see Chapter 10 - Extended Features.<br />
Page 9-14 <strong>LTV</strong> ® <strong>1200</strong> Ventilator Operator’s <strong>Manual</strong><br />
p/n 18247-001, Rev. G
High PRES (cont.)<br />
The HIGH PRES alarm becomes inactive and is automatically silenced using the following criteria:<br />
High Pressure<br />
Limit Setting<br />
31 to 100 cmH2O Less than 25 cmH2O<br />
Circuit Pressure at which HIGH PRES alarm is silenced<br />
8 to 30 cmH2O More than 5 cmH2O lower than current High Pressure Limit Setting<br />
5 to 7 cmH2O Less than 2 cmH2O<br />
When a HIGH PRES alarm occurs:<br />
• Inspiration is immediately terminated and exhalation begins.<br />
• The HIGH PRES message is flashed in the display window.<br />
• The High Pressure Limit control display is flashed.<br />
• The audible alarm is sounded.<br />
To reset the HIGH PRES alarm:<br />
1) Push the Silence Reset button to silence the alarm.<br />
2) Resolve the high pressure problem.<br />
3) Push the Silence Reset button to reset the alarm.<br />
Operator’s <strong>Manual</strong> <strong>LTV</strong> ® <strong>1200</strong> Ventilator Page 9-15<br />
p/n 18247-001, Rev. G
HW FAULT<br />
When the ventilator detects one of the following hardware faults, the HW FAULT alarm is generated:<br />
• The cooling fan is not operating, or the fan filter may be blocking the fan (see page 13-2 for<br />
cleaning and installation instructions).<br />
• A problem is detected with the analog to digital converters.<br />
• A problem is detected with the flow valve.<br />
• A problem is detected with the processor.<br />
• A problem is detected with the EEPROM memory.<br />
• A problem is detected writing data to the EEPROM during system shutdown.<br />
• A problem is detected with the audible alarm circuitry.<br />
• A problem is detected with the alarm sounder.<br />
The HW FAULT alarm may occur as a result of ESD 42 or other transient causes. If the problem is<br />
temporary, the alarm will automatically silence when the condition clears. If the problem persists, or<br />
you experience repeated HW FAULT alarms, immediately contact a certified Pulmonetic Systems’<br />
service technician or Pulmonetic Systems.<br />
• To determine the type of hardware fault detected by the ventilator, see Appendix E - Event<br />
Trace.<br />
When a HW FAULT alarm occurs:<br />
• The HW FAULT message is flashed in the display window.<br />
• The audible alarm is sounded.<br />
To reset the HW FAULT alarm:<br />
1) Push the Silence Reset button twice.<br />
2) If the alarm occurs again, immediately contact a certified Pulmonetic Systems’ service technician<br />
or Pulmonetic Systems.<br />
NOTE<br />
Repeated or continuous HW FAULT alarms may indicate a hardware failure that could prevent the<br />
ventilator from performing within its specifications. Remove the ventilator from service and<br />
immediately contact a certified Pulmonetic Systems’ service technician or Pulmonetic Systems.<br />
REMARQUE<br />
Des erreurs HW FAULT répétitives ou continuelles peuvent indiquer une panne matérielle qui<br />
pourrait empêcher le ventilateur de fonctionner à l'intérieur des limites spécifiées. Retirer le<br />
ventilateur du service, et contactez immédiatement un technicien de service certifié de Pulmonetic<br />
Systems ou Pulmonetic Systems.<br />
42 Electrostatic Discharge.<br />
Page 9-16 <strong>LTV</strong> ® <strong>1200</strong> Ventilator Operator’s <strong>Manual</strong><br />
p/n 18247-001, Rev. G
INOP<br />
An INOP alarm is generated when:<br />
• The ventilator is switched from On to Standby.<br />
• The ventilator detects any condition that is deemed to make the ventilator unsafe.<br />
When an INOP occurs, the ventilator shuts down and sets the hardware to a safe state so the patient<br />
can breathe from room air.<br />
When an INOP alarm occurs:<br />
• Inspiratory flow is stopped and the exhalation valve is opened, allowing the patient to breathe<br />
spontaneously from room air.<br />
• The oxygen blending solenoids are closed.<br />
• The INOP LED is illuminated red.<br />
• The audible alarm is sounded continuously.<br />
To silence the INOP alarm:<br />
1) Push the Silence Reset button to silence the alarm. Verify a confirming audible chirp occurs after<br />
the alarm is silenced 43 .<br />
WARNING<br />
Alternative Ventilation - It is recommended that an alternative means of ventilating the patient be<br />
available at all times and that all ventilator operators be fully familiar with emergency ventilation<br />
procedures.<br />
INOP Alarm - If an INOP alarm occurs during operation, ventilate the patient using an alternative<br />
method, disconnect the ventilator, and immediately contact a certified Pulmonetic Systems’ service<br />
technician or Pulmonetic Systems.<br />
AVERTISSEMENT<br />
Ventilation alternative - Il est recommandé qu'un moyen alternatif de ventilation soit disponible en<br />
tout temps, et que tous les opérateurs de ventilateur soient pleinement familiers avec les procédures<br />
de ventilation d'urgence.<br />
Alarme INOP - Si une alarme INOP survient au cours de l'opération, ventilez le patient à l'aide de la<br />
méthode alternative, retirez immédiatement le ventilateur du service, et contactez immédiatement<br />
votre technicien de service certifié de Pulmonetic Systems ou Pulmonetic Systems.<br />
NOTE<br />
An INOP alarm is generated as a part of the normal process of switching the ventilator from On to the<br />
Standby state and does not indicate a problem with the ventilator. The INOP LED will remain lit for a<br />
minimum of 5 minutes and does not affect battery life.<br />
REMARQUE<br />
Une alarme INOP est générée au cours du processus normal de commutation du ventilateur de la<br />
position On (Marche) à la position Standby State (État d’attente), et n’indique pas un problème de<br />
fonctionnement du ventilateur. La DEL INOP restera allumée durant au moins 5 minutes et n’affecte<br />
en rien la durée de vie de la batterie.<br />
43 The audible chirp occurs after the Inop Alarm sounds for longer than 0.8 seconds and is then silenced.<br />
Operator’s <strong>Manual</strong> <strong>LTV</strong> ® <strong>1200</strong> Ventilator Page 9-17<br />
p/n 18247-001, Rev. G
LOW MIN VOL<br />
When the exhaled minute volume (VE) is less than the Low Minute Volume setting, the LOW MIN<br />
VOL alarm is generated.<br />
• To prevent nuisance alarms, the LOW MIN VOL alarm is suspended for the first 20 seconds of<br />
ventilator operation after power up and passing the Power On Self Tests.<br />
When a LOW MIN VOL alarm occurs:<br />
• The LOW MIN VOL message is flashed in the display window.<br />
• The Low Min. Vol. control display is flashed.<br />
• The audible alarm is sounded.<br />
To reset the LOW MIN VOL alarm:<br />
1) Push the Silence Reset button twice.<br />
WARNING<br />
Low Minute Volume Control Settings - The Low Min. Vol. control should be set to its highest<br />
clinically appropriate value. If there is a clinical need to set the Low Minute Volume alarm to lower<br />
values or off (“- - -“), perform a clinical assessment to determine if an alternative monitor (i.e. a Pulse<br />
Oxymeter with an audible alarm, or a Cardio Respiratory Monitor) should be used.<br />
AVERTISSEMENT<br />
Réglages du contrôle de volume bas par minute - Le contrôle du volume bas par minute doit être<br />
ajusté à la plus haute valeur clinique appropriée. Si l’alarme de volume bas par minute doit être<br />
ajustée à des valeurs inférieures ou mise à l’arrêt (“- - -“) pour satisfaire aux besoins cliniques,<br />
effectuer une évaluation clinique afin de déterminer si l’utilisation d’un autre moniteur (c.-à-d.,<br />
sphygmo-oxymètre muni d’une alarme sonore ou un moniteur cardio-respiratoire) s’avère pertinente.<br />
Page 9-18 <strong>LTV</strong> ® <strong>1200</strong> Ventilator Operator’s <strong>Manual</strong><br />
p/n 18247-001, Rev. G
LOW O 2 PRES<br />
When the average oxygen inlet pressure is less than the minimum inlet pressure of 35 PSIG, the<br />
LOW O2 PRES alarm is generated. This alarm is only active when Low Pressure O2 Source is not<br />
selected and the oxygen concentration is set to greater than 21%.<br />
NOTE<br />
The <strong>LTV</strong> ® <strong>1200</strong> features an enhanced Low O2 Pressure alarm algorithm which allows for a brief,<br />
temporary drop of the O2 pressure supply while maintaining delivered O2 %.<br />
REMARQUE<br />
Le <strong>LTV</strong> est caractérisé par un algorithme amélioré ↔alarme de pression d’oxygène basse≈, lequel<br />
permet la chute brève et temporaire de l’approvisionnement de pression d’oxygène basse tout en<br />
maintenant le % d’oxygène administré.<br />
When a LOW O2 PRES alarm occurs:<br />
• The LOW O2 PRES message is flashed in the display window.<br />
• The O2% (O2 Flush) control display is flashed.<br />
• The audible alarm is sounded.<br />
To reset the LOW O2 PRES alarm:<br />
1) Push the Silence Reset button to silence the alarm.<br />
2) Reset the ventilator’s oxygen inlet pressure.<br />
3) Push the Silence Reset button to reset the alarm.<br />
Operator’s <strong>Manual</strong> <strong>LTV</strong> ® <strong>1200</strong> Ventilator Page 9-19<br />
p/n 18247-001, Rev. G
LOW PEEP<br />
When the patient circuit positive end expiratory pressure (PEEP) is less than the Low PEEP alarm<br />
setting, the LOW PEEP alarm is generated.<br />
• To prevent nuisance alarms, the LOW PEEP alarm is suspended for the first three (3) breaths or<br />
60 seconds (whichever is longer) after power on and ventilation begins 44 .<br />
When a LOW PEEP alarm occurs:<br />
• The LOW PEEP message is flashed in the display window.<br />
• The audible alarm is sounded.<br />
To reset the LOW PEEP alarm:<br />
1) Push the Silence Reset button once to silence the audible alarm.<br />
2) Push the Silence Reset button twice to reset the alarm (silences the audible alarm and clears the<br />
flashing display).<br />
• When the LOW PEEP alarm is reset (Silence Reset button pushed twice), the alarm is<br />
suspended for the next 60 seconds 44 .<br />
• The 60 second suspension of the LOW PEEP alarm is only enabled when the alarm is<br />
manually silenced/reset by pushing the Silence Reset button twice. The suspension is not<br />
enabled when the LOW PEEP alarm is automatically silenced/reset because the patient’s<br />
PEEP no longer exceeds the set LOW PEEP alarm value 44 .<br />
44 The Low PEEP alarm suspension is only available with software version 05.07 or higher installed.<br />
Page 9-20 <strong>LTV</strong> ® <strong>1200</strong> Ventilator Operator’s <strong>Manual</strong><br />
p/n 18247-001, Rev. G
LOW PRES<br />
When the peak inspiratory pressure for a selected breath is less than the Low Pressure setting, the<br />
LOW PRES alarm is generated. The Low Pressure alarm can be set to apply to all breaths (ALL<br />
BREATHS) or to Volume Control (VC) and Pressure Control (PC) breaths only. (For information on<br />
selecting breath types, see Chapter 10 - Extended Features, Low Peak Pressure Alarm.)<br />
When a LOW PRES alarm occurs:<br />
• The LOW PRES message is flashed in the display window.<br />
• The Low Pressure control display is flashed.<br />
• The audible alarm is sounded.<br />
To reset the LOW PRES alarm:<br />
1) Push the Silence Reset button twice.<br />
WARNING<br />
Patient Circuit Accessories - The use of accessories such as Speaking Valves, Heat-Moisture<br />
Exchangers and Filters create additional patient circuit resistance and in the event of a disconnection,<br />
may impede the generation of a Low Pressure alarm. Ensure that the Low Pressure alarm settings<br />
accommodate these types of accessories when used in combination with patient circuits.<br />
AVERTISSEMENT<br />
Accessoires du circuit du patient - L’utilisation d’accessoires tels que les membranes vocales, les<br />
échangeurs thermohydriques et les filtres, produit une résistance additionnelle dans le circuit de<br />
patient et en cas de débranchement, elle risque d’empêcher la génération de l’alarme de basse<br />
pression. S’assurer que les paramètres de l’alarme de basse pression s’adaptent à ces types<br />
d’accessoires lorsqu’ils sont utilisés avec les circuits du patient.<br />
Operator’s <strong>Manual</strong> <strong>LTV</strong> ® <strong>1200</strong> Ventilator Page 9-21<br />
p/n 18247-001, Rev. G
NO CAL DATA, NO CAL Monitor Display<br />
When the ventilator detects invalid or missing calibration records on power up, the NO CAL DATA<br />
alarm is generated. When this happens, default calibration values are used, and although the<br />
ventilator will continue to operate, the accuracy of volumes and pressures may be reduced.<br />
A NO CAL message is posted in place of affected monitored values when the ventilator is operating<br />
without valid transducer calibration data.<br />
When the NO CAL DATA alarm occurs:<br />
• The NO CAL DATA message is flashed in the display window.<br />
• The audible alarm is sounded.<br />
• The ventilator continues to operate.<br />
• Default transducer data is used.<br />
• Vte, PIP, MAP, PEEP, and VE monitored values are displayed as NO CAL.<br />
To clear the NO CAL DATA alarm:<br />
1) Push the Silence Reset button twice. This will clear the alarm and the ventilator will continue to<br />
operate; however, the NO CAL message will still be displayed in place of affected monitored<br />
values.<br />
2) Take the unit out of service and perform the Calibration procedure 45 .<br />
To clear the NO CAL message:<br />
1) Take the unit out of service and perform the Calibration procedure 45 .<br />
WARNING<br />
NO CAL Condition - Operation of the <strong>LTV</strong> ® <strong>1200</strong> ventilator under a NO CAL condition may result in<br />
inaccurate pressure and volume measurements. Should this condition occur, disconnect the patient<br />
from the ventilator, provide an alternative method of ventilation and immediately contact a certified<br />
Pulmonetic Systems’ service technician or Pulmonetic Systems.<br />
AVERTISSEMENT<br />
Condition NO CAL - L'opération continue du ventilateur de la <strong>1200</strong> <strong>LTV</strong> ® sous condition NO CAL<br />
peut résulter en mesures de pression et de volume erronées. Si cette condition se présente, le<br />
ventilateur doit être retiré du service, et vous devez immédiatement contacter votre technicien de<br />
service certifié de Pulmonetic Systems ou Pulmonetic Systems.<br />
45 ®<br />
For more information on the Calibration procedure, see the <strong>LTV</strong> <strong>1200</strong> / 1150 Ventilator Service <strong>Manual</strong>,<br />
p/n 18603-001.<br />
Page 9-22 <strong>LTV</strong> ® <strong>1200</strong> Ventilator Operator’s <strong>Manual</strong><br />
p/n 18247-001, Rev. G
POWER LOST<br />
When the ventilator is powered up without an external source of power, or is operating on external<br />
power and switches to the internal battery, the POWER LOST alarm is generated.<br />
• The change to internal battery is made when the external power voltage drops below the<br />
usable level.<br />
There is no interruption in ventilation.<br />
When a POWER LOST alarm occurs:<br />
• The POWER LOST message is flashed in the display window.<br />
• The External Power and Charge Status LEDs are turned off.<br />
• The Battery Level LED is lit showing the internal battery charge level.<br />
• The ventilator begins operating from the internal battery.<br />
• The audible alarm is sounded.<br />
• After 60 seconds, the displays are turned off to conserve battery power. 46<br />
To reset the POWER LOST alarm:<br />
1) Push the Silence Reset button twice.<br />
46 To turn the displays on, push any button or turn the Set Value knob.<br />
Operator’s <strong>Manual</strong> <strong>LTV</strong> ® <strong>1200</strong> Ventilator Page 9-23<br />
p/n 18247-001, Rev. G
POWER LOW<br />
When the ventilator is operating on external power and the voltage drops to the low level, the<br />
POWER LOW alarm is generated.<br />
When a POWER LOW alarm occurs:<br />
• The POWER LOW message is flashed in the display window.<br />
• The External Power LED is displayed amber.<br />
• The audible alarm is sounded.<br />
To reset the POWER LOW alarm:<br />
1) Push the Silence Reset button twice.<br />
Page 9-24 <strong>LTV</strong> ® <strong>1200</strong> Ventilator Operator’s <strong>Manual</strong><br />
p/n 18247-001, Rev. G
REMOVE PTNT<br />
When the ventilator is powered up in the Ventilator Checkout or Ventilator Maintenance modes, the<br />
REMOVE PTNT alarm is generated to remind you to remove the patient from the ventilator before<br />
proceeding. Use the Ventilator Checkout mode to check for correct operation of the displays and<br />
controls and to check the patient circuit for leaks. Ventilator Maintenance mode is used by technical<br />
personnel to perform maintenance or calibration.<br />
WARNING<br />
Ventilator Checkout and Maintenance Modes - The <strong>LTV</strong> ® <strong>1200</strong> ventilator does not deliver gas<br />
during the Ventilator Checkout mode (VENT CHECK) or Ventilator Maintenance mode (VENT<br />
MTNCE) and should not be used to ventilate a patient during these tests.<br />
AVERTISSEMENT<br />
Modes Vérification et Entretien du ventilateur - Le ventilateur de la <strong>1200</strong> <strong>LTV</strong> ® ne transmet pas le<br />
mélange de gaz en mode Vérification du ventilateur (VENT CHECK) ou en mode Entretien du<br />
ventilateur (VENT MTNCE), il ne devrait donc pas être utilisé pour ventiler un patient durant<br />
l'exécution de ces tests.<br />
When you enter Ventilator Checkout mode or Ventilator Maintenance mode, a REMOVE PTNT<br />
alarm occurs:<br />
• The REMOVE PTNT message is displayed.<br />
• The audible alarm is sounded.<br />
To reset the REMOVE PTNT alarm:<br />
1) Push the Silence Reset button twice.<br />
Operator’s <strong>Manual</strong> <strong>LTV</strong> ® <strong>1200</strong> Ventilator Page 9-25<br />
p/n 18247-001, Rev. G
RESET / RESET 1<br />
A RESET or a RESET 1 alarm occurs if the ventilator restarts following a condition other than being<br />
shut down by pressing the On/Standby button.<br />
The ventilator runs an ongoing set of self-tests to verify that it is operating correctly. If the ventilator<br />
detects a condition that makes safe ventilator operation uncertain, it reinitializes itself to allow the<br />
more sophisticated Power On Self Tests (POST) to be performed. If the POST does not detect any<br />
further problems, the ventilator will resume operation and a RESET or a RESET 1 alarm is posted. If<br />
the POST detects a problem that could cause continued operation to be unsafe, a ventilator INOP will<br />
occur.<br />
Conditions that could cause a RESET or a RESET 1 alarm:<br />
• Operating the ventilator on the internal battery until it is fully depleted.<br />
• Electrostatic Discharge (ESD)<br />
• Other transient causes.<br />
When a RESET or a RESET 1 alarm is generated:<br />
• An error code is written to the Event Trace indicating the type of problem detected.<br />
• The ventilator resets itself and performs the Power On Self Tests (POST).<br />
• If no further problems are detected, the ventilator resumes operation.<br />
• The RESET or RESET 1 message is flashed in the display window.<br />
• The audible alarm is sounded.<br />
To reset the RESET or a RESET 1 alarm:<br />
1) Push the Silence Reset button twice.<br />
NOTE<br />
When a RESET or RESET 1 alarm has occurred, check the Event Trace for more information about<br />
the problem. See Appendix E - Event Trace for more information about events.<br />
Repeated occurrences of the RESET or RESET 1 alarm may indicate a problem with the ventilator’s<br />
hardware. Please immediately contact a certified Pulmonetic Systems’ service technician.<br />
REMARQUE<br />
Lorsqu'une alarme RESET ou RESET 1 se produit, vérifiez le suivi de l'événement pour obtenir plus<br />
d'informations sur le problème. Consultez l'Annexe E - Suivi de l'événement, pour plus d'informations<br />
à propos de l'événement.<br />
Des occurrences répétitives de l'alarme RESET ou RESET 1 peuvent indiquer un problème matériel<br />
avec le ventilateur. Veuillez contacter immédiatement un technicien de service certifié de Pulmonetic<br />
Systems.<br />
Page 9-26 <strong>LTV</strong> ® <strong>1200</strong> Ventilator Operator’s <strong>Manual</strong><br />
p/n 18247-001, Rev. G
SBT < f<br />
When the Spontaneous Breathing Trial (SBT) mode of ventilation is on and the Total Breath Rate ( f )<br />
is less than the SBT LOW f setting (low limit of breath rate range) for 30 seconds, the SBT < f alarm<br />
is generated.<br />
For additional information concerning the Spontaneous Breathing Trial (SBT) mode of ventilation, see<br />
SBT (Spontaneous Breathing Trial) Operations in Chapter 10 - Extended Features.<br />
When a SBT< f alarm is generated:<br />
• The SBT < f message is flashed in the display window.<br />
• The audible alarm is sounded.<br />
To reset the SBT < f alarm:<br />
1) Push the Silence Reset button once to silence the audible alarm.<br />
2) Push the Silence Reset button twice to reset the alarm (silences the audible alarm and clears<br />
the flashing display).<br />
• When the SBT < f alarm is reset (Silence Reset button pushed twice), the alarm is<br />
suspended for the next 60 seconds.<br />
• The 60-second suspension of the SBT < f alarm is only enabled when the alarm is<br />
manually silenced/reset by pushing the Silence Reset button twice. It is not enabled<br />
when the SBT < f alarm is automatically silenced/reset because the patient’s breath rate<br />
is no longer less than the set SBT LOW f alarm value.<br />
• When an SBT alarm has been active in excess of 5 minutes, the SBT mode of ventilation<br />
is terminated, the ventilator clears the alarm status, silences the audible alarm and<br />
returns to its previous mode of ventilation / settings. To remove the flashing SBT alarm<br />
message from the display window, push the Silence Reset button.<br />
Operator’s <strong>Manual</strong> <strong>LTV</strong> ® <strong>1200</strong> Ventilator Page 9-27<br />
p/n 18247-001, Rev. G
SBT > f<br />
When the Spontaneous Breathing Trial (SBT) mode of ventilation is on and the Total Breath Rate ( f )<br />
is greater than the SBT HIGH f setting (high limit of breath rate range) for 30 seconds, the SBT > f<br />
alarm is generated.<br />
For additional information concerning the Spontaneous Breathing Trial (SBT) mode of ventilation, see<br />
SBT (Spontaneous Breathing Trial) Operations in Chapter 10 - Extended Features.<br />
When a SBT > f alarm is generated:<br />
• The SBT > f message is flashed in the display window.<br />
• The audible alarm is sounded.<br />
To reset the SBT > f alarm:<br />
1) Push the Silence Reset button once to silence the audible alarm.<br />
2) Push the Silence Reset button twice to reset the alarm (silences the audible alarm and clears<br />
the flashing display).<br />
• When the SBT > f alarm is reset (Silence Reset button pushed twice), the alarm is<br />
suspended for the next 60 seconds.<br />
• The 60-second suspension of the SBT > f alarm is only enabled when the alarm is<br />
manually silenced/reset by pushing the Silence Reset button twice. It is not enabled<br />
when the SBT > f alarm is automatically silenced/reset because the patient’s breath<br />
rate is no longer greater than the set SBT HIGH f alarm value.<br />
• When an SBT alarm has been active in excess of 5 minutes, the SBT mode of<br />
ventilation is terminated, the ventilator clears the alarm status, silences the audible<br />
alarm and returns to its previous mode of ventilation / settings. To remove the flashing<br />
SBT alarm message from the display window, push the Silence Reset button.<br />
Page 9-28 <strong>LTV</strong> ® <strong>1200</strong> Ventilator Operator’s <strong>Manual</strong><br />
p/n 18247-001, Rev. G
SBT < f/Vt<br />
When the Spontaneous Breathing Trial (SBT) mode of ventilation is on and the monitored f/Vt (Total<br />
Breath Rate divided by the Average Exhaled Tidal Volume) is less than the LOW f/Vt setting (low limit<br />
of the f/Vt range) for 30 seconds, the SBT < f/Vt alarm* is generated.<br />
For additional information concerning the Spontaneous Breathing Trial (SBT) mode of ventilation, see<br />
SBT (Spontaneous Breathing Trial) Operations in Chapter 10 - Extended Features.<br />
When a SBT < f/Vt alarm is generated:<br />
• The SBT < f/Vt message is flashed in the display window.<br />
• The audible alarm is sounded.<br />
To reset the SBT < f/Vt alarm:<br />
1) Push the Silence Reset button twice.<br />
• When the SBT < f/Vt alarm is reset (Silence Reset button pushed twice), the alarm is<br />
suspended for the next 60 seconds.<br />
• The 60-second suspension of the SBT < f/Vt alarm is only enabled when the alarm is<br />
manually silenced/reset by pushing the Silence Reset button twice. It is not enabled<br />
when the SBT < f/Vt alarm is automatically silenced/reset because the patient’s breath<br />
rate is no longer lower than the set LOW f/Vt alarm value.<br />
• When an SBT alarm has been active in excess of 5 minutes, the SBT mode of ventilation<br />
is terminated, the ventilator clears the alarm status, silences the audible alarm and<br />
returns to its previous mode of ventilation / settings. To remove the flashing SBT alarm<br />
message from the display window, push the Silence Reset button.<br />
Operator’s <strong>Manual</strong> <strong>LTV</strong> ® <strong>1200</strong> Ventilator Page 9-29<br />
p/n 18247-001, Rev. G
SBT > f/Vt<br />
When the Spontaneous Breathing Trial (SBT) mode of ventilation is on and the monitored f/Vt (Total<br />
Breath Rate divided by the Average Exhaled Tidal Volume) is greater than the HIGH f/Vt setting (high<br />
limit of the f/Vt range) for 30 seconds, the SBT > f/Vt alarm* is generated.<br />
For additional information concerning the Spontaneous Breathing Trial (SBT) mode of ventilation, see<br />
SBT (Spontaneous Breathing Trial) Operations in Chapter 10 - Extended Features.<br />
When a SBT > f/Vt alarm is generated:<br />
• The SBT > f/Vt message is flashed in the display window.<br />
• The audible alarm is sounded.<br />
To reset the SBT > f/Vt alarm:<br />
1) Push the Silence Reset button once to silence the audible alarm.<br />
2) Push the Silence Reset button twice to reset the alarm (silences the audible alarm and clears<br />
the flashing display).<br />
• When the SBT > f/Vt alarm is reset (Silence Reset button pushed twice), the alarm is<br />
suspended for the next 60 seconds.<br />
• The 60-second suspension of the SBT > f/Vt alarm is only enabled when the alarm is<br />
manually silenced/reset by pushing the Silence Reset button twice. It is not enabled<br />
when the SBT > f/Vt alarm is automatically silenced/reset because the patient’s breath<br />
rate is no longer greater than the set HIGH f/Vt alarm value.<br />
• When an SBT alarm has been active in excess of 5 minutes, the SBT mode of ventilation<br />
is terminated, the ventilator clears the alarm status, silences the audible alarm and<br />
returns to its previous mode of ventilation / settings. To remove the flashing SBT alarm<br />
message from the display window, push the Silence Reset button.<br />
Page 9-30 <strong>LTV</strong> ® <strong>1200</strong> Ventilator Operator’s <strong>Manual</strong><br />
p/n 18247-001, Rev. G
SBT OFF<br />
When the minutes preset in the SBT OP, MINUTES menu have elapsed and a Spontaneous<br />
Breathing Trial (SBT) mode of ventilation is terminated, the SBT OFF alarm is generated.<br />
For additional information concerning the Spontaneous Breathing Trial (SBT) mode of ventilation, see<br />
SBT (Spontaneous Breathing Trial) Operations in Chapter 10 - Extended Features.<br />
When a SBT OFF alarm is generated:<br />
• The SBT OFF message is flashed in the display window.<br />
• The audible alarm is sounded for 3 seconds.<br />
To clear the SBT OFF flashing display:<br />
1) Push the Silence Reset button.<br />
Operator’s <strong>Manual</strong> <strong>LTV</strong> ® <strong>1200</strong> Ventilator Page 9-31<br />
p/n 18247-001, Rev. G
XDCR FAULT<br />
When a transducer autozero test fails, the XDCR FAULT alarm is generated. Transducer autozeros<br />
are scheduled at periodic intervals during ventilator operation. This allows the ventilator to adjust the<br />
zero pressure readings as the ventilator warms up and environmental conditions change. If an<br />
autozero test fails, it will be automatically rescheduled to run again on the next breath. The XDCR<br />
FAULT alarm will remain active until a valid autozero can be done. If the XDCR FAULT persists,<br />
remove the ventilator from service and immediately contact a certified Pulmonetic Systems’ service<br />
technician or Pulmonetic Systems.<br />
When a XDCR FAULT alarm occurs:<br />
• The autozero for the transducer is rescheduled to run again on the next breath.<br />
• The XDCR FAULT message is flashed in the display window.<br />
• The audible alarm is sounded.<br />
To reset the XDCR FAULT alarm:<br />
1) Push the Silence Reset button twice.<br />
WARNING<br />
XDCR FAULT alarm - Continued operation of the <strong>LTV</strong> ® <strong>1200</strong> ventilator with an activated XDCR<br />
FAULT alarm may result in inaccurate flow and volume measurements. Should this condition occur,<br />
disconnect the patient from the ventilator, provide an alternative method of ventilation and<br />
immediately contact a certified Pulmonetic Systems’ service technician or Pulmonetic Systems.<br />
AVERTISSEMENT<br />
Alarme XDCR FAULT - L'opération continue du ventilateur de la <strong>1200</strong> <strong>LTV</strong> ® avec une alarme XDCR<br />
FAULT activée peut résulter en mesures de débit et de volume erronées. Si cette condition se<br />
présente, le ventilateur doit être retiré du service, et vous devez immédiatement contacter votre<br />
technicien de service certifié de Pulmonetic Systems ou Pulmonetic Systems.<br />
NOTE<br />
Repeated or continuous XDCR FAULT alarms may indicate a problem with the ventilator that could<br />
prevent the ventilator from performing within its specifications. Discontinue use of the ventilator and<br />
immediately contact a certified Pulmonetic Systems’ service technician.<br />
REMARQUE<br />
Des alarmes XDCR FAULT répétitives ou continuelles peuvent indiquer un problème qui pourrait<br />
empêcher le ventilateur de fonctionner à l'intérieur des limites spécifiées. Retirer le ventilateur du<br />
service, et contactez immédiatement un technicien de service certifié de Pulmonetic Systems.<br />
Page 9-32 <strong>LTV</strong> ® <strong>1200</strong> Ventilator Operator’s <strong>Manual</strong><br />
p/n 18247-001, Rev. G
Alarm Status Messages<br />
f PEEP OFF<br />
The f PEEP OFF message is displayed when;<br />
• The High Breath Rate alarm is turned off by being set to HIGH f OFF and,<br />
• The High PEEP alarm is turned off by being set to HI PEEP OFF.<br />
This is an informational message only. The message is displayed at power up, when monitored data<br />
is being scrolled automatically, and when no front panel activity is detected for 60 seconds.<br />
To clear the f PEEP OFF message:<br />
1) Push any front panel button or turn the Set Value knob.<br />
The f PEEP OFF message is not displayed during SBT mode.<br />
HI f/Vt OFF<br />
The HI f/Vt OFF message is only displayed during the Spontaneous Breathing Trial mode of<br />
ventilation when the SBT High f/Vt alarm is turned off by being set to HI f/Vt OFF.<br />
This is an informational message only. The message is displayed when monitored data is being<br />
scrolled automatically, and when no front panel activity is detected for 60 seconds.<br />
To clear the HI f/Vt OFF message:<br />
1) Push any front panel button or turn the Set Value knob.<br />
HI PEEP OFF<br />
The HI PEEP OFF message is displayed when;<br />
• The High PEEP alarm is turned off by being set to HI PEEP OFF and,<br />
• The High Breath Rate alarm (HIGH f) is turned on.<br />
This is an informational message only. The message is displayed at power up, when monitored data<br />
is being scrolled automatically, and when no front panel activity is detected for 60 seconds.<br />
To clear the HI PEEP OFF message:<br />
1) Push any front panel button or turn the Set Value knob.<br />
Operator’s <strong>Manual</strong> <strong>LTV</strong> ® <strong>1200</strong> Ventilator Page 9-33<br />
p/n 18247-001, Rev. G
H&L PEEP OFF<br />
The H&L PEEP OFF message is displayed when;<br />
• The High Breath Rate alarm (HIGH f) is turned on/set to a value and,<br />
• Both the High PEEP and Low PEEP alarms are turned off<br />
This is an informational message only. The message is displayed at power up, when monitored data<br />
is being scrolled automatically, and when no front panel activity is detected for 60 seconds.<br />
To clear the H&L PEEP OFF message:<br />
1) Push any front panel button or turn the Set Value knob.<br />
HIGH f OFF<br />
The HIGH f OFF message is displayed when;<br />
• The High Breath Rate alarm is turned off by being set to HIGH f OFF and,<br />
• The High PEEP alarm (HIGH PEEP) is turned on.<br />
This is an informational message only. The message is displayed at power up, when monitored data<br />
is being scrolled automatically, and when no front panel activity is detected for 60 seconds.<br />
To clear the HIGH f OFF message:<br />
1) Push any front panel button or turn the Set Value knob.<br />
The HIGH f OFF message is not displayed during SBT mode.<br />
LMV LPPS OFF<br />
The LMV LPPS OFF message is displayed when;<br />
• The Low Minute Volume alarm is turned off by being set to dashes and,<br />
• The LPP alarm is set to VC/PC ONLY. When this setting is selected, the Low Pressure<br />
alarm applies only to Volume Control and Pressure Control breaths.<br />
This is an informational message only. The message is displayed at power up, when monitored data<br />
is being scrolled automatically, and when no front panel activity is detected for 60 seconds.<br />
To clear the LMV LPPS OFF message:<br />
1) Push any front panel button or turn the Set Value knob.<br />
Page 9-34 <strong>LTV</strong> ® <strong>1200</strong> Ventilator Operator’s <strong>Manual</strong><br />
p/n 18247-001, Rev. G
LMV OFF<br />
The LMV OFF message is displayed when;<br />
• The Low Minute Volume alarm is turned off by being set to dashes and,<br />
• The LPP alarm is set to ALL BREATHS.<br />
This is an informational message only. The message is displayed at power up, when monitored data<br />
is being scrolled automatically, and when no front panel activity is detected for 60 seconds.<br />
To clear the LMV OFF message:<br />
1) Push any front panel button or turn the Set Value knob.<br />
LO PEEP OFF<br />
The LO PEEP OFF message is displayed when;<br />
• The Low PEEP alarm is turned off by being set to LO PEEP OFF and,<br />
• The High Breath Rate alarm (HIGH f) is turned on/set to a value.<br />
This is an informational message only. The message is displayed at power up, when monitored data<br />
is being scrolled automatically, and when no front panel activity is detected for 60 seconds.<br />
To clear the LO PEEP OFF message:<br />
1) Push any front panel button or turn the Set Value knob.<br />
LOCKED<br />
The LOCKED message is displayed when a button is pushed while the controls are locked. No<br />
audible alarm is given.<br />
When a LOCKED message is displayed:<br />
• The LOCKED message is flashed in the display window for 5 seconds or until the controls<br />
are unlocked.<br />
• Control settings may not be changed.<br />
There are two methods for unlocking the controls: EASY and HARD. The unlock method is selected<br />
under the Extended Features menus 47 .<br />
To unlock the controls with EASY unlocking:<br />
1) Push the Control Lock button.<br />
To unlock the controls with HARD unlocking:<br />
1) Push and hold the Control Lock button for 3 seconds.<br />
47 See Chapter 10 - Extended Features, Control Unlock for more information.<br />
Operator’s <strong>Manual</strong> <strong>LTV</strong> ® <strong>1200</strong> Ventilator Page 9-35<br />
p/n 18247-001, Rev. G
LO f/Vt OFF<br />
The LO f/Vt OFF message is only displayed during the Spontaneous Breathing Trial mode of<br />
ventilation when the SBT Low f/Vt alarm is turned off by being set to LO f/Vt OFF.<br />
This is an informational message only. The message is displayed when monitored data is being<br />
scrolled automatically, and when no front panel activity is detected for 60 seconds.<br />
To clear the LO f/Vt OFF message:<br />
1) Push any front panel button or turn the Set Value knob.<br />
LPPS OFF<br />
The LPPS OFF message is displayed when;<br />
• The LPPS alarm is set to VC/PC ONLY (when this setting is selected, the Low Pressure<br />
alarm applies only to Volume Control and Pressure Control breaths), and,<br />
• The LMV alarm is not set to dashes “- -”.<br />
This is an informational message only. The message is displayed at power up, when monitored data<br />
is being scrolled automatically, and when no front panel activity is detected for 60 seconds.<br />
To clear the LPPS OFF message:<br />
1) Push any front panel button or turn the Set Value knob.<br />
SBT f OFF<br />
The SBT f OFF message is only displayed during the Spontaneous Breathing Trial mode of<br />
ventilation when;<br />
• The SBT High Breath Rate alarm is turned off by being set to SBT HI f OFF and,<br />
• The SBT Low Breath Rate alarm is turned off by being set to SBT LO f OFF.<br />
This is an informational message only. The message is displayed when monitored data is being<br />
scrolled automatically, and when no front panel activity is detected for 60 seconds.<br />
To clear the SBT f OFF message:<br />
1) Push any front panel button or turn the Set Value knob.<br />
Page 9-36 <strong>LTV</strong> ® <strong>1200</strong> Ventilator Operator’s <strong>Manual</strong><br />
p/n 18247-001, Rev. G
SBT f/Vt OFF<br />
The SBT f/Vt OFF message is only displayed during the Spontaneous Breathing Trial mode of<br />
ventilation when;<br />
• The SBT High f/Vt alarm is turned off by being set to HI f/Vt OFF and,<br />
• The SBT Low f/Vt alarm is turned off by being set to LO f/Vt OFF.<br />
This is an informational message only. The message is displayed when monitored data is being<br />
scrolled automatically, and when no front panel activity is detected for 60 seconds.<br />
To clear the SBT f/Vt OFF message:<br />
1) Push any front panel button or turn the Set Value knob.<br />
SBT HI f OFF<br />
The SBT HI f OFF message is only displayed during the Spontaneous Breathing Trial mode of<br />
ventilation when the SBT High Breath Rate alarm is turned off by being set to SBT HI f OFF.<br />
This is an informational message only. The message is displayed when monitored data is being<br />
scrolled automatically, and when no front panel activity is detected for 60 seconds.<br />
To clear the SBT HI f OFF message:<br />
1) Push any front panel button or turn the Set Value knob.<br />
SBT LO f OFF<br />
The SBT LO f OFF message is only displayed during the Spontaneous Breathing Trial mode of<br />
ventilation when the SBT Low Breath Rate alarm is turned off by being set to SBT LO f OFF.<br />
This is an informational message only. The message is displayed when monitored data is being<br />
scrolled automatically, and when no front panel activity is detected for 60 seconds.<br />
To clear the SBT LO f OFF message:<br />
1) Push any front panel button or turn the Set Value knob.<br />
Operator’s <strong>Manual</strong> <strong>LTV</strong> ® <strong>1200</strong> Ventilator Page 9-37<br />
p/n 18247-001, Rev. G
SBT TIME<br />
The SBT TIME message is displayed during the Spontaneous Breathing Trial mode of ventilation<br />
when only two (2) minutes of SBT mode of ventilation remain.<br />
This is an informational message only.<br />
When a SBT TIME message is generated:<br />
• The SBT TIME message is flashed in the display window.<br />
• The audible alarm is sounded.<br />
To reset the SBT TIME message:<br />
1) Push the Silence Reset button once to silence the audible alarm.<br />
2) Push the Silence Reset button twice to reset the alarm status message (silences the audible<br />
alarm and clears the flashing display).<br />
WARMUP xx<br />
When the ventilator is first powered up, the transducers require up to 60 seconds of warm-up time<br />
before they will operate within their normal tolerances. During this warm-up period, the ventilator will<br />
not allow you to run the leak test or calibration. If you select an option that is not available during the<br />
warm-up period, the WARMUP xx message is displayed. When the warm-up period has expired, the<br />
message is removed.<br />
When a WARMUP message occurs:<br />
• The WARMUP message and the remaining warm-up time are displayed in the window.<br />
• The ventilator does not allow the restricted functions to be performed.<br />
To reset the WARMUP message:<br />
1) The WARMUP message will automatically reset when the warm-up period has expired.<br />
Page 9-38 <strong>LTV</strong> ® <strong>1200</strong> Ventilator Operator’s <strong>Manual</strong><br />
p/n 18247-001, Rev. G
Chapter 10 - EXTENDED FEATURES<br />
This section describes the options and features available under the Extended Features Menus and how<br />
to access them.<br />
The Extended Features menus shown below are representative of the <strong>LTV</strong> ® <strong>1200</strong> ventilator.<br />
Alarm Operations, Ventilator Operations, Transducer Autozero and Real-time Transducers are<br />
covered in this chapter. The other items are covered in Chapter 11 - Ventilator Checkout Tests,<br />
Appendix E - Event Trace, and in the <strong>LTV</strong> ® <strong>1200</strong> / 1150 Ventilator Service <strong>Manual</strong> (P/N 18603-001).<br />
Operator’s <strong>Manual</strong> <strong>LTV</strong> ® <strong>1200</strong> Ventilator Page 10-1<br />
p/n 18247-001, Rev. G
Navigating the Extended Features Menus<br />
To enter the Extended Features menu (in normal ventilation mode):<br />
Push and hold the Select button for three seconds.<br />
To view the next item in a menu:<br />
Turn the Set Value knob clockwise.<br />
To view the previous item:<br />
Turn the Set Value knob counterclockwise.<br />
To enter a menu item or select a setting:<br />
Push the Select button.<br />
To exit a menu:<br />
Turn the Set Value knob until the EXIT option is displayed, then push the Select button.<br />
To toggle the state of an option on or off:<br />
Push the Select button.<br />
NOTE<br />
You cannot enter the Extended Features menu when the controls are locked.<br />
REMARQUE<br />
Vous ne pouvez pas accéder au menu Fonctions avancées lorsque le verrouillage est activé.<br />
Page 10-2 <strong>LTV</strong> ® <strong>1200</strong> Ventilator Operator’s <strong>Manual</strong><br />
p/n 18247-001, Rev. G
Alarm Operations<br />
Use the Alarm Operations menu to set up alarm conditions that are not available directly from front<br />
panel controls. The menu is set up as follows:<br />
ALARM OP<br />
ALARM VOL<br />
APNEA INT<br />
HP DELAY<br />
LPP ALARM<br />
HIGH f<br />
HIGH PEEP<br />
LOW PEEP<br />
PNT ASSIST<br />
EXIT<br />
Alarm Volume<br />
Use this menu item to set the loudness of the audible alarm.<br />
To modify the Alarm Volume:<br />
1) Push the Select button while ALARM VOL is displayed.<br />
2) VOL xx dBA is displayed.<br />
3) Turn the Set Value knob until the desired setting is displayed.<br />
4) Push the Select button.<br />
Range: 60 - 85 dBA<br />
NOTE<br />
Fixed Volume Alarms – The volume of the Battery Empty alarm cannot be lowered. For patient<br />
safety, this alarm always sounds at full volume.<br />
If the battery depletes to point that the ventilator goes INOP, the Vent Inop audible alarm sounds at<br />
maximum volume for a minimum of 5 minutes. The Vent Inop audible alarm is capacitor driven and<br />
the volume is therefore not user modifiable.<br />
REMARQUE<br />
Alarmes à volume fixe - Le volume de l’alarme de batterie faible ne peut être réduit. Pour la sécurité<br />
des patients, le volume de cette alarme est toujours fort.<br />
Si la batterie est suffisamment déchargée pour que le voyant INOP du ventilateur s’active, l’alarme<br />
sonore Vent Inop opérera à son maximum de volume pendant 5 minutes au moins. L’alarme sonore<br />
Vent Inop est contrôlée par un condensateur et son volume ne peut donc pas être modifié par<br />
l’utilisateur..<br />
Operator’s <strong>Manual</strong> <strong>LTV</strong> ® <strong>1200</strong> Ventilator Page 10-3<br />
p/n 18247-001, Rev. G
Apnea Interval<br />
Use this menu item to establish the apnea interval. The apnea interval is the maximum time allowed<br />
between the beginning of one breath and the beginning of the next breath.<br />
To modify the Apnea Interval:<br />
1) Push the Select button while APNEA INT is displayed.<br />
2) APNEA xx sec is displayed.<br />
3) Turn the Set Value knob until the desired setting is displayed.<br />
4) Push the Select button.<br />
Range: 10 - 60 sec<br />
High Pressure Alarm Delay<br />
Use this menu item to select immediate or delayed audible notification for High Pressure alarms.<br />
When NO DELAY is selected, the audible alarm is sounded for all High Pressure alarms.<br />
When DELAY 1 BRTH or DELAY 2 BRTH is selected and a high pressure condition occurs, the<br />
breath is terminated and the HIGH PRES message is posted. The audible alarm is not sounded until<br />
the number of consecutive breaths with a high pressure condition meets the delay setting, (two<br />
breaths for DELAY 1, three breaths for DELAY 2).<br />
Any time a high pressure condition persists for more than 3 seconds, the audible alarm will be<br />
sounded, regardless of the delay setting.<br />
To modify the High Pressure Alarm Display:<br />
1) Push the Select button while HP DELAY is displayed.<br />
2) NO DELAY, DELAY 1 BRTH, or DELAY 2 BRTH is displayed.<br />
3) Turn the Set Value knob until the desired setting is displayed.<br />
4) Push the Select button.<br />
Options: NO DELAY, DELAY 1 BRTH, DELAY 2 BRTH<br />
Low Peak Pressure Alarm<br />
Use the LPP ALARM item to select the type of breaths that the Low Pressure alarm applies to.<br />
When ALL BREATHS is selected, the Low Pressure alarm setting applies to all breath types:<br />
Volume Control, Pressure Control, Pressure Support, and Spontaneous. When the peak pressure<br />
during any breath does not exceed the Low Pressure setting, the LOW PRES alarm will occur.<br />
When VC/PC ONLY is selected, the Low Pressure alarm setting applies only to Volume Control and<br />
Pressure Control breaths. It does not apply to Pressure Support and Spontaneous breaths. When the<br />
peak pressure during any Volume Control or Pressure Control breath does not exceed the Low<br />
Pressure setting, the LOW PRES alarm will occur.<br />
Options: ALL BREATHS, VC/PC ONLY<br />
Page 10-4 <strong>LTV</strong> ® <strong>1200</strong> Ventilator Operator’s <strong>Manual</strong><br />
p/n 18247-001, Rev. G
High f<br />
Use this menu item to set the high breath rate and time period alarm values. When the Total Breath<br />
Rate ( f ) exceeds the set high breath rate and time period alarm values, an audible alarm will be<br />
sounded and a flashing HIGH f message will be displayed.<br />
To set the high breath rate and time period alarm values:<br />
1) Push the Select button while HIGH f is displayed and f is displayed.<br />
2) Push the Select button while f is displayed and HIGH f OFF or f xx bpm is displayed.<br />
3) Turn the Set Value knob until the desired setting is displayed, push the Select button and the<br />
high breath rate alarm value is set.<br />
• Range: 5 - 80 bpm (in increments of 1) - HIGH f OFF<br />
4) Turn the Set Value knob until TIME is displayed, push the Select button and xx sec is displayed.<br />
5) Turn the Set Value knob until the desired setting is displayed and push the Select button. The<br />
high breath rate time period alarm value is set.<br />
• Range: 0 - 60 seconds, in increments of 10<br />
High PEEP<br />
Use this menu item to set a high PEEP alarm. When the current PEEP value exceeds the set high<br />
PEEP alarm value, an audible alarm will be sounded and a flashing HIGH PEEP message will be<br />
displayed.<br />
To modify the HIGH PEEP alarm value:<br />
1) Push the Select button while HIGH PEEP is displayed.<br />
2) HI PEEP OFF or PEEP +XX cmH20 is displayed.<br />
3) Turn the Set Value knob until the desired setting is displayed.<br />
4) Push the Select button.<br />
Range: PEEP +3 through PEEP +20 cmH20, HI PEEP OFF<br />
Low PEEP<br />
Use this menu item to set a low PEEP alarm. When the current PEEP value is less than the set low<br />
PEEP alarm value, an audible alarm will be sounded and a flashing LOW PEEP message will be<br />
displayed.<br />
To modify the LOW PEEP alarm value:<br />
1) Push the Select button while LOW PEEP is displayed.<br />
2) LO PEEP OFF or PEEP -XX cmH20 is displayed.<br />
3) Turn the Set Value knob until the desired setting is displayed.<br />
4) Push the Select button.<br />
Range: PEEP -3 through PEEP -20 cmH20, LO PEEP OFF<br />
Operator’s <strong>Manual</strong> <strong>LTV</strong> ® <strong>1200</strong> Ventilator Page 10-5<br />
p/n 18247-001, Rev. G
Patient Assist<br />
Use the PNT ASSIST menu item to configure the Patient Assist port output signal to be generated for<br />
use with remote alarm systems.<br />
• Allows for the changing of the patient assist alarm output signal used with remote alarm<br />
systems, which in turn will allow users a means of distinguishing the high pressure alarm<br />
(HIGH PRES) from other alarms.<br />
To select the Patient Assist output signal:<br />
1) Push the Select button while PNT ASSIST is displayed.<br />
2) NORMAL or PULSE is displayed.<br />
• When NORMAL is selected, the ventilator sets the Patient Assist Port output signal<br />
continuously on for all alarms and is for use with single tone remote alarm and patient assist<br />
call systems. NORMAL is the factory set default setting.<br />
• When PULSE is selected, the ventilator sets the Patient Assist Port output signal continuous<br />
on for the HIGH PRES alarm, cycles the Patient Assist output signal on / off for all other<br />
alarms and is for use with dual tone remote alarm systems.<br />
3) Turn the Set Value knob until the desired setting is displayed.<br />
4) Push the Select button.<br />
Range: PULSE or NORMAL<br />
Exit<br />
To return to the top of the ALARM OP menu:<br />
1) Push the Select button while EXIT is displayed.<br />
Page 10-6 <strong>LTV</strong> ® <strong>1200</strong> Ventilator Operator’s <strong>Manual</strong><br />
p/n 18247-001, Rev. G
Vent Operations<br />
Use the Vent Operations menu to set up ventilator controls and options that are not available directly<br />
from front panel controls. The menu is set up as follows:<br />
VENT OP<br />
RISE TIME<br />
FLOW TERM<br />
TIME TERM<br />
PC FLOW TERM<br />
LEAK COMP<br />
O2 CONSERVE<br />
O2 FLUSH<br />
CTRL UNLOCK<br />
LANGUAGE<br />
VER xx.xx<br />
USAGE xxxxx.x<br />
COM SETTING<br />
SET DATE<br />
SET TIME<br />
DATE FORMAT<br />
PIP LED<br />
<strong>LTV</strong> xxxx / xxxxxx<br />
VHome xxx<br />
SET DEFAULTS (accessed through Vent Check menu)<br />
O2 CYL DUR<br />
EXIT<br />
Operator’s <strong>Manual</strong> <strong>LTV</strong> ® <strong>1200</strong> Ventilator Page 10-7<br />
p/n 18247-001, Rev. G
Variable Rise Time<br />
Use the Variable Rise Time option to select the rise time profile for Pressure Control and Pressure<br />
Support breaths. The rise time profiles are numbered 1 through 9 where 1 is the fastest rise time and<br />
9 is the slowest rise time. Starting with the fastest rise time, each time is 33% longer than the<br />
previous one.<br />
To modify the Rise Time Profile:<br />
1) Push the Select button while RISE TIME is displayed.<br />
2) PROFILE x is displayed.<br />
3) Turn the Set Value knob until the desired Rise Time Profile is displayed.<br />
4) Push the Select button.<br />
Range: 1 to 9, where 1 is the fastest and 9 is the slowest<br />
Page 10-8 <strong>LTV</strong> ® <strong>1200</strong> Ventilator Operator’s <strong>Manual</strong><br />
p/n 18247-001, Rev. G
Variable Flow Termination<br />
Use the Variable Flow Termination to select the percentage of peak flow used for cycling Pressure<br />
Support breaths. Pressure Support breaths are cycled from inspiration to exhalation when the flow<br />
reaches the set percentage of the peak flow, or when flow goes below 2 lpm.<br />
When Pressure Control Flow Termination is enabled, the Variable Flow Termination setting is used<br />
for flow termination of Pressure Control breaths as well.<br />
Peak<br />
Flow High<br />
Percentage<br />
of Peak Flow<br />
•<br />
V<br />
Inspiratory<br />
Flow<br />
To modify the Variable Flow Termination:<br />
1) Push the Select button while FLOW TERM is displayed.<br />
2) % OF PEAK xx is displayed.<br />
3) Turn the Set Value knob until the desired Variable Flow Termination percentage is displayed.<br />
4) Push the Select button.<br />
Range: 10% to 40%<br />
Peak<br />
Flow Low<br />
Percentage of<br />
Peak Flow<br />
Operator’s <strong>Manual</strong> <strong>LTV</strong> ® <strong>1200</strong> Ventilator Page 10-9<br />
p/n 18247-001, Rev. G<br />
•<br />
V<br />
Inspiratory<br />
Flow
Variable Time Termination<br />
Use the Variable Time Termination to select the maximum inspiratory time for cycling Pressure<br />
Support breaths. Pressure Support Breaths are cycled from inspiration to exhalation if this time is<br />
reached before the flow reaches the set percentage of the peak flow. When a breath is cycled based<br />
on the time setting, the Pres. Support display is flashed briefly.<br />
Peak<br />
Flow Set Percentage of<br />
Peak Flow<br />
•<br />
V<br />
To modify the Variable Time Termination:<br />
1) Push the Select button while TIME TERM is displayed.<br />
2) TERM x.x sec is displayed.<br />
3) Turn the Set Value knob until the desired Variable Time Termination is displayed.<br />
4) Push the Select button.<br />
Range: 0.3 to 3.0 sec<br />
Set Time<br />
Termination<br />
Page 10-10 <strong>LTV</strong> ® <strong>1200</strong> Ventilator Operator’s <strong>Manual</strong><br />
p/n 18247-001, Rev. G
Peak<br />
Flow<br />
•<br />
V<br />
Set<br />
Pressure<br />
Paw<br />
Pressure Control Flow Termination<br />
Use the Pressure Control Flow Termination option to enable or disable flow termination for Pressure<br />
Control breaths.<br />
When this option is ON, Pressure Control breaths are cycled at the set percentage of the peak flow if<br />
it is reached before the set Inspiratory Time elapses. The percentage of peak flow is set in the<br />
Variable Flow Termination option.<br />
When this option is OFF, Pressure Control breaths are cycled when the set Inspiratory Time is<br />
reached.<br />
Set pressure is<br />
maintained and<br />
inspiratory flow<br />
goes to zero<br />
Set Insp Time<br />
To modify the Pressure Control Flow Termination setting:<br />
1) Push the Select button while PC FLOW TERM is displayed.<br />
2) PC FLOW ON or PC FLOW OFF is displayed.<br />
3) Turn the Set Value knob until the desired state is displayed.<br />
4) Push the Select button.<br />
Options: ON or OFF<br />
Breath<br />
terminates<br />
at set Insp<br />
Time<br />
PC FLOW TERM set to OFF<br />
Pressure Control Breath terminates normally<br />
Operator’s <strong>Manual</strong> <strong>LTV</strong> ® <strong>1200</strong> Ventilator Page 10-11<br />
p/n 18247-001, Rev. G<br />
Peak<br />
Flow<br />
•<br />
V<br />
Set<br />
Pressure<br />
Paw<br />
Breath terminates<br />
at percentage of<br />
peak flow<br />
Set Insp Time<br />
Set Percentage of<br />
Peak Flow<br />
PC FLOW TERM set to ON<br />
Pressure Control Breath terminates at the same<br />
Percentage of Peak Flow as Pressure Support breaths
Leak Compensation<br />
Use the Leak Compensation option to enable or disable tracking of the baseline flow 48 to improve<br />
triggering when a circuit leak is present.<br />
When Leak Compensation is on, the system is gradually adjusted to maintain set sensitivity if the leak<br />
is stable and there is no autocycling.<br />
• If a leak is unstable during exhalation, it will not be detected and will not be compensated for.<br />
• Leak Compensation can compensate for a maximum patient circuit leak of 6 Lpm.<br />
If autocycling is occurring, it can be manually eliminated as follows:<br />
1) Set Sensitivity to OFF (see Chapter 6 - Sensitivity), or higher than the leak amount (see<br />
Chapter 10 - Real Time Transducers, LEAK xx.xx Lpm).<br />
2) Set Leak Compensation to LEAK COMP ON (see instructions below).<br />
3) Wait for a period of 10-15 breaths.<br />
4) Reset sensitivity to desired level (see Chapter 6 - Sensitivity).<br />
To modify the Leak Compensation setting:<br />
1) Push the Select button while LEAK COMP is displayed.<br />
2) LEAK COMP ON or LEAK COMP OFF is displayed.<br />
3) Turn the Set Value knob until the desired state is displayed.<br />
4) Push the Select button.<br />
Options: ON or OFF<br />
48 Baseline flow is used for flow triggering detection and Vte calculation/accumulation.<br />
Page 10-12 <strong>LTV</strong> ® <strong>1200</strong> Ventilator Operator’s <strong>Manual</strong><br />
p/n 18247-001, Rev. G
O 2 Conserve<br />
Use the O2 Conserve option to minimize the use of oxygen from an O2 source while maintaining the<br />
FIO2 during inspiration.<br />
When CONSERVE ON is selected, the ventilator provides a bias flow of 0 lpm and automatically<br />
selects pressure triggering. Oxygen is supplied during inspiration, but not during expiration. O2<br />
Conserve ON reduces trigger sensitivity and should be used when the conservation of oxygen is<br />
necessary.<br />
When CONSERVE OFF is selected, the ventilator provides a bias flow of 10 lpm and automatically<br />
selects flow triggering. O2 Conserve OFF provides the best trigger sensitivity and should be used<br />
when the conservation of oxygen is not a priority.<br />
• The O2 Conserve option is not affected by turning the ventilator on or off. The ventilator<br />
retains the desired setting through power up and power down cycles.<br />
• If O2 Conserve is set to ON, the message BIAS FLO OFF will scroll through the<br />
alphanumeric display when the ventilator is in operation.<br />
To modify the O2 CONSERVE setting:<br />
1) Push the Select button while O2 CONSERVE is displayed.<br />
2) CONSERVE ON or CONSERVE OFF is displayed.<br />
3) Turn the Set Value knob until the desired state is displayed.<br />
4) Push the Select button.<br />
Options: ON or OFF<br />
WARNING<br />
O2 Conserve – When CONSERVE ON is selected:<br />
• The <strong>LTV</strong> ® <strong>1200</strong> automatically sets the bias flow to 0 lpm and selects pressure triggering. Certain<br />
patients may experience difficulty triggering a breath with a bias flow of 0 lpm.<br />
• Delivered FIO2 can be lower than the set value when tidal volumes are less than 100 ml.<br />
AVERTISSEMENT<br />
O2 Conserver – Quand “CONSERVE ON” est sélectionné :<br />
• Le <strong>LTV</strong> <strong>1200</strong> règle automatiquement le flux à 0 lpm et sélectionne le déclencheur de pression.<br />
Certains patients peuvent éprouver des la difficulté à déclencher une respiration avec un flux de 0<br />
l/min.<br />
• Le FI02 peut diminuer la valeur sélectionnée quand le volume courant est de moins de 100 ml.<br />
Operator’s <strong>Manual</strong> <strong>LTV</strong> ® <strong>1200</strong> Ventilator Page 10-13<br />
p/n 18247-001, Rev. G
O 2 Flush<br />
Use the O2 Flush option to elevate the delivered FIO2 to 100% for a preset period of time.<br />
To initiate an O2 Flush:<br />
1) Push and hold the O2 % (O2 Flush) button (FIO2) on the ventilator front panel for three seconds to<br />
initiate the elevation (ramp up) of delivered FIO2 to 100% for the preset number of minutes.<br />
• The FIO2 percentile displayed will change to 100 and the O2 Flush maneuver will start<br />
immediately (regardless of the current ventilation mode, breath rate or phase).<br />
• O2 Flush will not be initiated if Low Pressure O2 Source is selected.<br />
• O2 Flush will stop when the preset minutes have elapsed or the O2 % (O2 Flush) button is<br />
pushed again.<br />
• When stopped, the delivered FIO2 percentile will return (ramp down) to the preset O2 %<br />
setting.<br />
To modify the O2 Flush setting:<br />
1) Push the Select button while O2 FLUSH is displayed and xxx min is displayed.<br />
2) Turn the Set Value knob until the desired amount of minutes is displayed and push the Select<br />
button. The O2 Flush time period is set.<br />
Range: 1 to 3 minutes, in increments of 1<br />
Page 10-14 <strong>LTV</strong> ® <strong>1200</strong> Ventilator Operator’s <strong>Manual</strong><br />
p/n 18247-001, Rev. G
Control Unlock<br />
Use the Control Unlock option to select the Easy or Hard unlocking method for unlocking the controls.<br />
The Easy unlocking method should be used when only trained personnel have access to the<br />
ventilator. The Hard method should be used when children or others may have access to the<br />
ventilator and you want to prevent accidental changes to the control settings.<br />
When the Easy method is selected, unlock the controls by pushing the Control Lock button.<br />
When the Hard method is selected, unlock the controls by pushing and holding the Control Lock<br />
button for 3 seconds.<br />
To modify the Control Unlock setting:<br />
1) Push the Select button while CTRL UNLOCK is displayed.<br />
2) UNLOCK EASY or UNLOCK HARD is displayed.<br />
3) Turn the Set Value knob until the desired setting is displayed.<br />
4) Push the Select button.<br />
Options: EASY or HARD<br />
Language Selection<br />
Use the Language Selection option to select the language used in the display window for all<br />
messages, alarms and menus.<br />
To modify the Language setting:<br />
1) Push the Select button while LANGUAGE is displayed.<br />
2) ENGLISH or the currently selected language is displayed.<br />
3) Turn the Set Value knob until the desired language is displayed.<br />
4) Push the Select button.<br />
Options:<br />
ENGLISH<br />
(U.S.)<br />
ITALIANO<br />
(Italian)<br />
DANSK<br />
(Danish)<br />
NORSK<br />
(Norwegian)<br />
DEUTCH<br />
(German)<br />
PORTUGUES<br />
(Portuguese)<br />
ESPANOL<br />
(Spanish)<br />
SVENSKA<br />
(Swedish)<br />
FRANCAIS<br />
(French)<br />
РУССКО<br />
(Russian)<br />
Operator’s <strong>Manual</strong> <strong>LTV</strong> ® <strong>1200</strong> Ventilator Page 10-15<br />
p/n 18247-001, Rev. G
Software Version<br />
Use the Software Version option to verify the software version installed in the ventilator. The software<br />
version number is displayed as: VER xx.xx<br />
Usage Meter<br />
Use the Usage Meter to view the time the ventilator has been in use. It is updated every 1/10 th hour<br />
up to 139,000.0 hours and is displayed as: USAGE xxxxxx.x<br />
Communications Setting<br />
The ventilator may be connected to a printer, a graphics monitor, or a modem, or may be set up to<br />
output system diagnostic data. Use the Communications Setting option 49 to select the<br />
communications protocol for data transmission.<br />
• Use the MONITOR setting to communicate with an LTM Graphics Monitor.<br />
To modify the Communications Setting:<br />
1) Push the Select button while COM SETTING is displayed.<br />
2) DATA or the currently selected protocol is displayed.<br />
3) Turn the Set Value knob until the desired protocol is displayed.<br />
4) Push the Select button.<br />
Options: DATA, MONITOR, PRINTER, and MODEM<br />
49 Only DATA and MONITOR (for LTM Graphic Monitors compatible <strong>LTV</strong> ® ventilators) are available at this time.<br />
Page 10-16 <strong>LTV</strong> ® <strong>1200</strong> Ventilator Operator’s <strong>Manual</strong><br />
p/n 18247-001, Rev. G
Set Date<br />
Use the Set Date option to view or set the current date stored in the ventilator.<br />
To view the Date:<br />
1) Push the Select button while SET DATE is displayed.<br />
2) The current date is displayed in the currently selected date format.<br />
3) Push the Control Lock button to exit.<br />
To modify the Date:<br />
1) Push the Select button while SET DATE is displayed.<br />
2) The current date is displayed in the currently selected date format (MM/DD/YYYY, DD/MM/YYYY,<br />
or YYYY/MM/DD).<br />
3) Push the Select button, YEAR xxxx is displayed.<br />
4) Turn the Set Value knob until the desired year is displayed.<br />
5) Push the Select button, MONTH xx is displayed.<br />
6) Turn the Set Value knob until the desired month is displayed.<br />
7) Push the Select button, DAY xx is displayed.<br />
8) Turn the Set Value knob until the desired day is displayed.<br />
9) Push the Select button to accept the new date.<br />
Range: 1/1/1998 - 12/31/2097<br />
Operator’s <strong>Manual</strong> <strong>LTV</strong> ® <strong>1200</strong> Ventilator Page 10-17<br />
p/n 18247-001, Rev. G
Set Time<br />
Use the Set Time option to view or set the current time stored in the ventilator.<br />
To view the Time:<br />
1) Push the Select button while SET TIME is displayed.<br />
2) The current time is displayed.<br />
3) Push the Control Lock button to exit.<br />
To modify the Time:<br />
1) Push the Select button while SET TIME is displayed.<br />
2) The current date is displayed as hh:mm:ss.<br />
3) Push the Select button, HOUR xx is displayed.<br />
4) Turn the Set Value knob until the desired hour is displayed.<br />
5) Push the Select button, MIN xx is displayed.<br />
6) Turn the Set Value knob until the desired minute is displayed.<br />
7) Push the Select button to accept the new date. The seconds are automatically reset to 00.<br />
Range: 00:00:00 - 23:59:59<br />
Date Format<br />
Use the Date Format option to select the display format for the current date.<br />
To modify the Date Format:<br />
1) Push the Select button while DATE FORMAT is displayed.<br />
2) MM/DD/YYYY or the currently selected date format is displayed.<br />
3) Turn the Set Value knob until the desired format is displayed.<br />
4) Push the Select button.<br />
Options: MM/DD/YYYY, DD/MM/YYYY, YYYY/MM/DD<br />
Page 10-18 <strong>LTV</strong> ® <strong>1200</strong> Ventilator Operator’s <strong>Manual</strong><br />
p/n 18247-001, Rev. G
PIP LED<br />
Use the PIP LED option to turn the display of the PIP LED on the airway display on or off. When the<br />
PIP LED is on, the Airway Pressure display LED representing the Peak Inspiratory Pressure of the<br />
previous breath remains lit during exhalation.<br />
To modify the PIP LED Setting:<br />
1) Push the Select button while PIP LED is displayed.<br />
2) PIP LED ON or PIP LED OFF is displayed.<br />
3) Turn the Set Value knob until the desired setting is displayed.<br />
4) Push the Select button.<br />
Options: ON or OFF<br />
Model Number / Serial Number<br />
Use the Model Number / Serial Number option to view the <strong>LTV</strong>’s model or serial number, and to verify<br />
LTM Graphics Monitor compatibility.<br />
To view the <strong>LTV</strong> model number:<br />
1) Turn the Set Value knob while in the VENT OP menu until <strong>LTV</strong> xxxx is displayed.<br />
• The model number is displayed as: <strong>LTV</strong> xxxx where xxxx is the model of the ventilator.<br />
• The model number is set when the ventilator is manufactured.<br />
2) Push the Control Lock button to exit, or the Select button to display the serial number option.<br />
To view the <strong>LTV</strong> serial number:<br />
1) Push the Select button when the <strong>LTV</strong> model number (<strong>LTV</strong> xxxx) is displayed.<br />
• The serial number is displayed on the left side of the display area as: xxxxxx where xxxxxx<br />
is the serial number of the ventilator.<br />
• The serial number is set when the ventilator is manufactured.<br />
2) Push the Control Lock button or the Select button to return to the model number option.<br />
To verify LTM Graphics Monitor Compatibility:<br />
1) Push the Select button when the <strong>LTV</strong> model number (<strong>LTV</strong> xxxx) is displayed.<br />
• The message LTM will be displayed on the right side of the display area if the ventilator was<br />
originally manufactured or upgraded by Pulmonetic Systems to accommodate the LTM<br />
Graphics Monitor.<br />
2) Push the Control Lock button or the Select button to return to the model number option.<br />
Operator’s <strong>Manual</strong> <strong>LTV</strong> ® <strong>1200</strong> Ventilator Page 10-19<br />
p/n 18247-001, Rev. G
Valve Home Position<br />
Use the Valve Home Position option to view the home position for the <strong>LTV</strong>’s flow valve. The home<br />
position is displayed as: VHome xxx where xxx is the home position for the valve installed in the<br />
ventilator.<br />
The home position is determined by the revision of the flow valve and is set when the ventilator is<br />
manufactured or when the flow valve is replaced by a certified Pulmonetic Systems’ service<br />
technician.<br />
Set Defaults<br />
The SET DEFAULTS option is only displayed and accessed through the Ventilator Checkout menu<br />
(VENT CHECK) or Ventilator Maintenance menu (VENT MTNCE) and is used to reset user settable<br />
Controls and Extended Features settings to their factory-set default values. See Chapter 9 - Ventilator<br />
Alarms, DEFAULTS for factory-set default values.<br />
To enable the Ventilator Checkout menu:<br />
To enable the Ventilator Checkout menu, the patient must be disconnected from the ventilator<br />
(ventilate the patient using an alternative method of ventilation), the ventilator must be turned off, and<br />
a special power on sequence used to turn it back on. See Chapter 11 - Ventilator Checkout Tests for<br />
important information and instructions, prior to proceeding.<br />
To set the default values:<br />
1) When the VENT CHECK menu is displayed, turn the Set Value knob until VENT OP is displayed<br />
and push Select.<br />
2) Turn the Set Value knob until DEFAULTS is displayed and push Select. SET DEFAULTS will<br />
be displayed.<br />
3) Push Select while SET DEFAULTS is displayed. DEFAULTS will be displayed.<br />
• Except for the Language selected and the Date/Time settings and format, all user settable<br />
Controls and Extended Features options are reset to their factory-set default values.<br />
• A DEFAULTS event is recorded in the Event Trace log (see Appendix E - Event Trace for<br />
additional information) along with the date and time the settings were reset.<br />
To exit the Ventilator Checkout menu and enter normal ventilation mode:<br />
1) Turn the Set Value knob through the Ventilator Operations sub-menus until EXIT is displayed,<br />
and push the Select or Control Lock button. VENT OP will be displayed.<br />
2) When VENT OP is displayed, turn the Set Value knob until EXIT is displayed, and push the<br />
Select or Control Lock button.<br />
• POST will be performed, the ventilator will begin ventilation using the factory set default<br />
settings and a DEFAULTS SET alarm will be generated (see Chapter 9 - Ventilator Alarms,<br />
DEFAULTS SET for additional information and instructions to reset the DEFAULTS SET<br />
alarm).<br />
Page 10-20 <strong>LTV</strong> ® <strong>1200</strong> Ventilator Operator’s <strong>Manual</strong><br />
p/n 18247-001, Rev. G
O 2 Cylinder Duration<br />
Use the O2 Cylinder Duration option to calculate the approximate remaining usable time (in hours and<br />
minutes) of an external O2 cylinder.<br />
• To obtain an accurate duration time estimate, the current cylinder pressure must be entered prior<br />
to each calculation.<br />
WARNING<br />
O2 Cylinder Duration Information - The accuracy of the displayed useable amount of oxygen<br />
remaining in an external O2 cylinder (O2 DUR hh:mm) is dependant on the precision of the pressure<br />
gauge used on the O2 cylinder and the accuracy of the information provided by the operator in the O2<br />
CYL DUR menu settings. The calculated/displayed useable amount of oxygen information is to be<br />
used for reference purposes only.<br />
Ventilation Variables and O2 Consumption - Variations in the patient’s minute ventilation, I:E ratio<br />
and/or ventilator setting changes or equipment status (i.e. circuit leaks) affect the consumption rate of<br />
oxygen. When warranted by a patients condition, it is recommended that a back-up cylinder or<br />
alternative source of oxygen be available at all times.<br />
AVERTISSEMENT<br />
Informations sur la durée d'utilisation restante de la bouteille d’oxygène - La précision de<br />
l’affichage de la quantité d’oxygène utilisable restante dans une bouteille d’oxygène externe (O2 DUR<br />
HH:MM) dépend de la précision de la jauge de pression utilisée sur la bouteille et de l'exactitude des<br />
informations fournies par l’opérateur dans les paramètres du menu DUREE CYL O2. Les<br />
informations calculées et affichées sur la quantité d’oxygène utilisable ne doivent être utilisées qu’à<br />
titre indicatif.<br />
Variables de ventilation et consommation d’oxygène — Les variations dans la ventilation par<br />
minute du patient et dans le rapport inspiration/expiration, la modification des paramètres ou l’état du<br />
matériel (fuite dans le circuit, par exemple) modifient le taux de consommation de l’oxygène. Lorsque<br />
la situation du patient le permet, il est recommandé qu'une bouteille d’oxygène de secours ou toute<br />
autre source alternative d’oxygène soit disponible en permanence.<br />
To modify the O2 Cylinder Duration settings:<br />
1) Push the Select button while O2 CYL DUR is displayed and CYL TYPE is displayed.<br />
2) Push the Select button while CYL TYPE is displayed and SIZE xxx l is displayed.<br />
3) Turn the Set Value knob until the applicable O2 cylinder size is displayed (volume in compressed<br />
Liters), push the Select button and the cylinder size is set.<br />
• Range: 75 - 9,900 compressed Liters, in increments of 1.<br />
• This setting is retained by the ventilator (through shut downs and power ups) until re-set by<br />
an operator, and used to calculate the remaining oxygen.<br />
• After changing this, or any ventilation setting, wait approximately 20 seconds before selecting<br />
CALCULATE, to allow the ventilator to monitor the oxygen flow that will be used in the<br />
calculation and display of the remaining usable time of the external O2 cylinder.<br />
Operator’s <strong>Manual</strong> <strong>LTV</strong> ® <strong>1200</strong> Ventilator Page 10-21<br />
p/n 18247-001, Rev. G
O 2 Cylinder Duration (cont.)<br />
4) Turn the Set Value knob until CYL PRES is displayed, push the Select button and xxx psi is<br />
displayed.<br />
5) Turn the Set Value knob until the applicable cylinder pressure is displayed, push the Select<br />
button and the cylinder pressure is set.<br />
• Range: 100 - 2300 psi, in increments of 25, or<br />
• Range: 5 - 150 bar, in increments of 1 (if the selected language uses the bar unit of<br />
measurement)<br />
• This setting is not retained by the ventilator through shut downs and power ups, will be reset<br />
to the factory set default value if the Language setting is changed, and will need to be<br />
reviewed/reset by the operator each time the O2 Cylinder Duration option is used.<br />
• After changing this, or any ventilation setting, wait approximately 20 seconds before selecting<br />
CALCULATE, to allow the ventilator to monitor the oxygen flow that will be used in the<br />
calculation and display of the remaining usable time of the external O2 cylinder.<br />
6) Turn the Set Value knob until CALCULATE is displayed and push the Select button.<br />
• To obtain an accurate duration time estimate, the current cylinder pressure must be entered<br />
prior to each calculation.<br />
• After changing any ventilation setting, wait approximately 20 seconds before selecting<br />
CALCULATE, to allow the ventilator to monitor the oxygen flow that will be used in the<br />
calculation and display of the remaining usable time of the external O2 cylinder.<br />
• When CALCULATE is selected, the ventilator uses the current ventilation values and settings<br />
to calculate the remaining usable time of the external O2 cylinder specified and displays O2<br />
DUR hh:mm (O2 duration in hours and minutes) for 60 seconds or until the message is<br />
acknowledged by pushing the Select or Control Lock button, or by rotating the Set Value<br />
knob on the front panel.<br />
• Breath to breath variations may cause slightly different results in consecutive calculations.<br />
Page 10-22 <strong>LTV</strong> ® <strong>1200</strong> Ventilator Operator’s <strong>Manual</strong><br />
p/n 18247-001, Rev. G
Presets<br />
Use the Presets section of the Extended Features menu to:<br />
• Turn the Patient Query feature on or off<br />
• Select the Patient Size so that the ventilator settings and Extended Features menu settings<br />
are adjusted to accommodate the type of patient (infant, pediatric or adult)<br />
Turning Patient Query on or off<br />
1) After entering the Extended Features menu, turn the Set Value knob until PRESETS is<br />
displayed and press the Select button.<br />
2) Turn the Set Value knob until PTNT QUERY is displayed, press the Select button and either<br />
QUERY ON or QUERY OFF is displayed.<br />
3) Turn the Set Value knob until the desired setting is displayed and press the Select button.<br />
If QUERY ON is selected, when the ventilator is next powered up and passes POST,<br />
ventilation and alarm activation are suspended and the message SAME PATIENT is<br />
displayed.<br />
• To enable the suspended alarms and begin ventilation with the settings in use during<br />
the last power cycle, press the Select button while SAME PATIENT is displayed<br />
OR<br />
• To enable the suspended alarms and begin ventilation with Presets values<br />
appropriate for a new patient, turn the Set Value knob until NEW PATIENT is<br />
displayed and press the Select button. Then turn the Set Value knob until the<br />
desired patient type is displayed (INFANT, PEDIATRIC or ADULT) and press the<br />
Select button<br />
• Turning the Set Value knob until EXIT is displayed and pressing the Select<br />
button returns the ventilator to the SAME PATIENT menu option/message<br />
If no controls are activated for three (3) seconds while either the SAME PATIENT or NEW<br />
PATIENT options are being displayed, an audible alert sounds. Activation of any control<br />
resets the 3 second delay of the audible alert.<br />
If QUERY OFF is selected, when the ventilator is powered up and passes POST, it will begin<br />
ventilation (appropriate alarms enabled) using the settings in use during the last power cycle.<br />
Selecting Patient Size<br />
1) After entering the Extended Features menu, turn the Set Value knob until PRESETS is<br />
displayed.<br />
2) Press the Select button.<br />
3) Turn the Set Value knob until PATIENT SIZE is displayed and press the Select button.<br />
4) Turn the Set Value knob until the desired patient type is displayed (INFANT, PEDIATRIC or<br />
ADULT) and press the Select button to set the Presets values appropriate for the patient<br />
type selected.<br />
Operator’s <strong>Manual</strong> <strong>LTV</strong> ® <strong>1200</strong> Ventilator Page 10-23<br />
p/n 18247-001, Rev. G
<strong>LTV</strong> ® <strong>1200</strong> Presets Table<br />
Feature/Function<br />
Infant<br />
(>5 kg < 10 kg)<br />
Pediatric<br />
(10-40 kg)<br />
Alarm volume 85 85 85<br />
HP delay NO DELAY NO DELAY NO DELAY<br />
Adult<br />
(> 40 kg)<br />
LPP alarm ALL BREATHS ALL BREATHS ALL BREATHS<br />
High f alarm 80 bpm, 30 sec 60 bpm, 30 sec 40 bpm, 30 sec<br />
High PEEP alarm PEEP +5 cmH 2O PEEP +5 cmH 2O PEEP +5 cmH 2O<br />
Low PEEP alarm PEEP -3 cmH 2O PEEP -3 cmH 2O PEEP -3 cmH 2O<br />
Rise Time 5 4 4<br />
FLOW TERM 35% 30% 25%<br />
TIME TERM TERM 0.5 sec TERM 1.0 sec TERM 2.0 sec<br />
PC FLOW TERM Off Off Off<br />
Leak Comp LEAK COMP ON LEAK COMP ON LEAK COMP ON<br />
Breath Rate 20 bpm 15 bpm 12 bpm<br />
Breath type Pressure Pressure Volume<br />
Tidal Volume 50 ml 250 ml 500 ml<br />
Insp. Time 0.3 sec 0.7 sec 1.0 sec<br />
Pres. Control 15 cmH 2O 15 cmH 2O 15 cmH 2O<br />
Pres. Support 10 cmH 2O 10 cmH 2O 10 cmH 2O<br />
Sensitivity 2 Lpm 3 Lpm 3 Lpm<br />
High Pres. Limit 30 cmH 2O 30 cmH 2O 40 cmH 2O<br />
Low Pressure 10 cmH 2O 10 cmH 2O 10 cmH 2O<br />
Low Min. Vol. 0.5 ml 1.0 ml 3.0 ml<br />
PEEP 0 cmH 2O 0 cmH 2O 0 cmH 2O<br />
Mode Assist/Ctrl Assist/Ctrl Assist/Ctrl<br />
Page 10-24 <strong>LTV</strong> ® <strong>1200</strong> Ventilator Operator’s <strong>Manual</strong><br />
p/n 18247-001, Rev. G
SBT (Spontaneous Breathing Trial) Operations<br />
Use the SBT Operations menu to set up ventilator controls and options that are not available directly<br />
from front panel controls. The menu is set up as follows:<br />
SBT OP<br />
SBT START<br />
PRES SUPPORT<br />
PEEP<br />
SBT FIO2<br />
MINUTES<br />
HIGH f/Vt<br />
LOW f/Vt<br />
SBT HIGH f<br />
SBT LOW f<br />
DISPLAY f/Vt<br />
EXIT<br />
Using the Spontaneous Breathing Trial option you can temporarily minimize ventilatory support and<br />
perform clinical assessments of a patient’s dependence on, or ability to be removed from positive<br />
pressure ventilation. SBT mode should be used only while attended by a Respiratory Therapist or<br />
other properly trained and qualified personnel.<br />
WARNING<br />
Untrained Personnel – Only properly trained personnel should operate the ventilator. The <strong>LTV</strong> ®<br />
<strong>1200</strong> ventilator is a restricted medical device designed for use by Respiratory Therapists or other<br />
properly trained and qualified personnel under the direction of a physician and in accordance with<br />
applicable state laws and regulations.<br />
AVERTISSEMENT<br />
Personnel non qualifié - Seul le personnel qualifié doit opérer le ventilateur. Le ventilateur de la<br />
<strong>1200</strong> <strong>LTV</strong> ® est un dispositif médical restreint conçu pour être utilisé par les inhalothérapeutes ou<br />
autres personnes qualifiées, et par le personnel qualifié sous la supervision d'un médecin et en<br />
conformité avec les lois et règlements applicables.<br />
Operator’s <strong>Manual</strong> <strong>LTV</strong> ® <strong>1200</strong> Ventilator Page 10-25<br />
p/n 18247-001, Rev. G
SBT Operations (cont.)<br />
When the Spontaneous Breathing Trial mode is turned on (SBT ON selected);<br />
• The ventilator switches to CPAP mode.<br />
• Pressure Support and FIO2 control settings on the front panel are overridden with the values<br />
preset in the SBT OP menus.<br />
• The High Breath Rate alarm (HIGH f) in the ALARM OP menu is disabled (as long as the<br />
SBT mode is on).<br />
The Spontaneous Breathing Trial mode will be terminated and ventilation will return to the<br />
previously set modes/settings when;<br />
• The minutes preset in the SBT OP, MINUTES menu have elapsed.<br />
• An SBT alarm (SBT < f, SBT > f, SBT < f/Vt, or SBT > f/Vt) has been active in excess of 5<br />
minutes (see Chapter 9 - Ventilator Alarms for additional information).<br />
• An Apnea alarm (APNEA) is generated and the ventilator automatically enters the Apnea<br />
Backup mode of ventilation (see Chapter 9 - Ventilator Alarms for additional information).<br />
• A High Pressure alarm (HIGH PRES) is generated during which the ventilator’s turbine is<br />
stopped to allow the circuit pressure to evacuate (see Chapter 9 - Ventilator Alarms for<br />
additional information).<br />
• The operator selects SBT OFF in the SBT OP, SBT START menu.<br />
• The operator pushes any control button, other than the <strong>Manual</strong> Breath, Select, Control<br />
Lock or Silence Reset.<br />
To modify the Spontaneous Breathing Trial settings:<br />
1) Turn the Set Value knob until SBT START is displayed, push the Select button, and SBT OFF<br />
or SBT ON is displayed.<br />
Turn the Set Value knob until the desired setting is displayed, and push the Select button.<br />
• When SBT ON is selected, the Spontaneous Breathing Trial ventilation mode is turned<br />
on using the current SBT menu settings. If the SBT menu settings were not previously<br />
reset, the factory set default settings will be used (see DEFAULTS in Chapter 9 -<br />
Ventilator Alarms for additional information). All SBT menu settings are to be<br />
reviewed for applicability and/or set as necessary, prior to selecting the SBT ON<br />
menu option.<br />
• When the Spontaneous Breathing Trial ventilation mode is active and SBT OFF is<br />
selected, the Spontaneous Breathing Trial ventilation mode is terminated and ventilation<br />
returns to the previously set modes/settings.<br />
2) Turn the Set Value knob until PRES SUPPORT is displayed, push the Select button and PEEP<br />
+xx cmH2O is displayed.<br />
Turn the Set Value knob until the desired setting is displayed, push the Select button, and the<br />
SBT Pressure Support value is set.<br />
• Range: 0 - 30 cmH2O, in increments of 1<br />
3) Turn the Set Value knob until PEEP is displayed, push the Select button, and xxx cmH2O is<br />
displayed.<br />
Turn the Set Value knob until the desired setting is displayed, push the Select button, and the<br />
SBT PEEP value is set.<br />
• Range: 0 – 20 cmH2O, in increments of 1<br />
Page 10-26 <strong>LTV</strong> ® <strong>1200</strong> Ventilator Operator’s <strong>Manual</strong><br />
p/n 18247-001, Rev. G
SBT Operations (cont.)<br />
4) Turn the Set Value knob until SBT FIO2 is displayed, push the Select button, and xxx O2% is<br />
displayed.<br />
Turn the Set Value knob until the desired setting is displayed, push the Select button, and the<br />
SBT O2% value is set.<br />
• Range: 21 - 100 %, in increments of 1<br />
5) Turn the Set Value knob until MINUTES is displayed, push the Select button, and xxx MIN is<br />
displayed.<br />
Turn the Set Value knob until the desired setting is displayed, push the Select button, and the<br />
SBT ventilation mode run time is set.<br />
• Range: 15 - 120 minutes, in increments of 5<br />
6) Turn the Set Value knob until HIGH f/Vt is displayed, push the Select button, and xxx f/Vt is<br />
displayed.<br />
Turn the Set Value knob until the desired setting is displayed, push the Select button, and the<br />
SBT high f/Vt alarm value is set (see SBT > f/Vt in Chapter 9 - Ventilator Alarms, for additional<br />
information).<br />
• Range: HI f/Vt OFF or 70 - 900 f/Vt, in increments of 5<br />
7) Turn the Set Value knob until LOW f/Vt is displayed, push the Select button, and xxx f/Vt is<br />
displayed.<br />
Turn the Set Value knob until the desired setting is displayed, push the Select button, and the<br />
SBT low f/Vt alarm value is set (see SBT < f/Vt in Chapter 9 - Ventilator Alarms, for additional<br />
information).<br />
• Range: LO f/Vt OFF or 5 - 90 f/Vt, in increments of 5<br />
8) Turn the Set Value knob until SBT HIGH f is displayed, push the Select button, and xxx bpm is<br />
displayed.<br />
Turn the Set Value knob until the desired setting is displayed, push the Select button, and the<br />
SBT high f alarm value is set (see SBT > f in Chapter 9 - Ventilator Alarms, for additional<br />
information).<br />
• Range: SBT HI f OFF or 15 - 80 bpm, in increments of 1<br />
9) Turn the Set Value knob until SBT LOW f is displayed, push the Select button, and xxx bpm is<br />
displayed.<br />
Turn the Set Value knob until the desired setting is displayed, push the Select button, and the<br />
SBT low f alarm value is set (see SBT < f in Chapter 9 - Ventilator Alarms, additional<br />
information).<br />
• Range: SBT LO f OFF or 1 - 40 bpm, in increments of 1<br />
10) Turn the Set Value knob until DISPLAY f/Vt is displayed, push the Select button, and DISPLAY<br />
OFF or DISPLAY ON is displayed.<br />
Turn the Set Value knob until the desired setting is displayed, push the Select button, and the<br />
SBT scrolling display status (on or off) of the monitored xxx f/Vt value is set (see Automatic or<br />
<strong>Manual</strong> Data Display Scrolling in Chapter 8 - Monitored Data, for additional information).<br />
Exit<br />
To return to the top of the SBT OP menu:<br />
1) Push the Select button while EXIT is displayed.<br />
SBT Alarms<br />
For information concerning SBT related alarms, see Chapter 9 - Ventilator Alarms.<br />
Operator’s <strong>Manual</strong> <strong>LTV</strong> ® <strong>1200</strong> Ventilator Page 10-27<br />
p/n 18247-001, Rev. G
Transducer Autozero<br />
Use the Transducer Autozero menu to manually schedule transducer autozeros and to view previous<br />
autozero results. Autozeros are automatically scheduled at appropriate intervals during ventilator<br />
operation, so manual scheduling of autozeros is not commonly performed, but may occasionally be<br />
done.<br />
The menu is set up as follows:<br />
XDCR ZERO<br />
AP xxxx P<br />
FDb xxxx P<br />
FDw xxxx P<br />
FDn xxxx P<br />
Airway Pressure Transducer Autozero<br />
Use this item to view the Airway Pressure Transducer Autozero results and schedule the Airway<br />
Pressure Transducer Autozero to be run.<br />
To view the Airway Pressure Transducer Autozero results:<br />
1) The previous results, AP xxxx P, are displayed. The final P indicates the previous zero results<br />
were within the required tolerance and the previous autozero passed. If a final F is displayed, the<br />
previous zero results were outside the required tolerance and the autozero failed. An asterisk<br />
indicates that an autozero is scheduled for the next breath.<br />
2) Turn the Set Value knob to display the EXIT option.<br />
3) Push the Select button.<br />
To schedule the Airway Pressure Transducer Autozero:<br />
1) The previous results, AP xxxx P, are displayed.<br />
2) Push the Select button. An asterisk appears, the pass / fail indicator is removed from the display<br />
and the test is scheduled for the next breath.<br />
3) After the autozero is run on the next breath, the new autozero value and the pass / fail indicator<br />
are displayed.<br />
If an autozero fails, it will be automatically rescheduled for the next breath.<br />
Page 10-28 <strong>LTV</strong> ® <strong>1200</strong> Ventilator Operator’s <strong>Manual</strong><br />
p/n 18247-001, Rev. G
Bi-directional Flow Transducer Differential Autozero<br />
Use this item to view the Bi-directional Flow Transducer Differential Autozero results and schedule<br />
Autozeros to be run.<br />
To view the Bi-directional Flow Transducer Differential Autozero results:<br />
1) The previous results, FDb xxxx P, are displayed. If the results are displayed as FDb xxxx -, the<br />
Bi-directional Flow Transducer is not installed on your unit. The final P indicates the previous zero<br />
results were within the required tolerance and the previous autozero passed. If a final F is<br />
displayed, the previous zero results were outside the required tolerance and the autozero failed.<br />
An asterisk indicates that an autozero is scheduled for the next breath.<br />
2) Turn the Set Value knob to display the EXIT option.<br />
3) Push the Select button.<br />
To schedule the Bi-directional Flow Transducer Differential Autozero:<br />
1) The previous results, FDb xxxx P, are displayed.<br />
2) Push the Select button. An asterisk appears, the pass / fail indicator is removed from the display<br />
and the autozero test is scheduled for the next breath.<br />
3) After the autozero is run on the next breath, the new autozero value and the pass / fail indicator<br />
are displayed.<br />
If the autozero fails, it will be automatically rescheduled for the next breath.<br />
Operator’s <strong>Manual</strong> <strong>LTV</strong> ® <strong>1200</strong> Ventilator Page 10-29<br />
p/n 18247-001, Rev. G
Exhalation Flow Transducer Differential Autozero - Narrow<br />
Use this item to view the Exhalation Flow Transducer Differential Autozero – Narrow results and<br />
schedule the Exhalation Flow Transducer Differential Autozero - Narrow to be run.<br />
To view the Exhalation Flow Transducer Differential Autozero – Narrow results:<br />
1) The previous results, FDn xxxx P, are displayed. The final P indicates the previous zero results<br />
were within the required tolerance and the previous autozero passed. If a final F is displayed, the<br />
previous zero results were outside the required tolerance and the autozero failed. An asterisk<br />
indicates that an autozero is scheduled for the next breath.<br />
2) Turn the Set Value knob to display the EXIT option.<br />
3) Push the Select button.<br />
To schedule the Exhalation Flow Transducer Differential Autozero - Narrow:<br />
1) The previous results, FDn xxxx P, are displayed.<br />
2) Push the Select button. An asterisk appears, the pass / fail indicator is removed from the display<br />
and the autozero test is scheduled for the next breath.<br />
3) After the autozero is run on the next breath, the new autozero value and the pass / fail indicator<br />
are displayed.<br />
If the autozero fails, it will be automatically rescheduled for the next breath.<br />
Page 10-30 <strong>LTV</strong> ® <strong>1200</strong> Ventilator Operator’s <strong>Manual</strong><br />
p/n 18247-001, Rev. G
Exhalation Flow Transducer Differential Autozero - Wide<br />
Use this item to view the Exhalation Flow Transducer Differential Autozero - Wide results and<br />
schedule the Exhalation Flow Transducer Differential Autozeros - Wide to be run.<br />
To view the Exhalation Flow Transducer Differential Autozero – Wide results:<br />
1) The previous results, FDw xxxx P, are displayed. The final P indicates the previous zero results<br />
were within the required tolerance and the previous autozero passed. If a final F is displayed, the<br />
previous zero results were outside the required tolerance and the autozero failed. An asterisk<br />
indicates that an autozero is scheduled for the next breath.<br />
2) Turn the Set Value knob to display the EXIT option.<br />
3) Push the Select button.<br />
To schedule the Exhalation Flow Transducer Differential Autozero - Wide:<br />
1) The previous results, FDw xxxx P, are displayed.<br />
2) Push the Select button. An asterisk appears, the pass / fail indicator is removed from the display<br />
and the autozero test is scheduled for the next breath.<br />
3) After the autozero is run on the next breath, the new autozero value and the pass / fail indicator<br />
are displayed.<br />
If the autozero fails, it will be automatically rescheduled for the next breath.<br />
Operator’s <strong>Manual</strong> <strong>LTV</strong> ® <strong>1200</strong> Ventilator Page 10-31<br />
p/n 18247-001, Rev. G
Real Time Transducers<br />
Use the Real Time Transducer data to view the real time activity in the ventilator. The real time<br />
transducer menu is set up as follows:<br />
RT XDCR DATA<br />
AP xx.xx<br />
FDb xx.xx<br />
FDw xx.xx<br />
FDn xx.xx<br />
c<br />
mH20<br />
mH2O<br />
mH20<br />
c<br />
c<br />
c<br />
mH20<br />
FTw or FTn xx.xx Lpm<br />
FTb x.xx Lpm<br />
LEAK xx.xx Lpm<br />
FVd xx.xx<br />
c<br />
mH20<br />
FV xx.xx Lpm<br />
STEP xxxx<br />
TS xxxx rpm<br />
O2 xx.xx PSI<br />
BV xx.xx VOLTS<br />
EV xx.xx VOLTS<br />
PPP xx.xx<br />
RT EXIT<br />
c<br />
mH2O<br />
Each item displays real time activity in the displayed units. For some items, transducer counts can<br />
also be displayed. Pushing Select while the item is displayed displays additional transducer data 50 .<br />
Display Real Time Data<br />
AP xx.xx c<br />
mH20 Airway pressure as measured at the patient wye using the high side<br />
proximal sense line.<br />
FDb xx.xx c<br />
mH20 Flow differential pressure as measured at the patient wye using the bidirectional<br />
transducer. Differential pressure is measured between the<br />
high and low side proximal sense lines.<br />
FDw xx.xx c mH20 Flow differential pressure as measured at the patient wye using the<br />
wide scale transducer. Differential pressure is measured between the<br />
high and low side proximal sense lines.<br />
FDn xx.xx c mH20 Flow differential pressure as measured at the patient wye using the<br />
narrow scale transducer. Differential pressure is measured between the<br />
high and low side proximal sense lines. The narrow scale transducer is<br />
only used for differential pressures between -0.35 cmH2O and 0.35<br />
cmH2O (approximately -15 Lpm to 15 Lpm).<br />
FTb xx.xx Lpm Flow in Lpm calculated from the differential pressure measured at the<br />
patient wye using the bi-directional transducer.<br />
Transducer count display is not available for this item.<br />
50 For more information, see the <strong>LTV</strong> ® Series Ventilator’s Service <strong>Manual</strong>, p/n 10665.<br />
Page 10-32 <strong>LTV</strong> ® <strong>1200</strong> Ventilator Operator’s <strong>Manual</strong><br />
p/n 18247-001, Rev. G
Display Real Time Data<br />
LEAK xx.xx Lpm Leak flow calculated from the differential pressure transducer,<br />
measured at the patient wye during exhalation. This value will be<br />
approximately 0.0 when the ventilator is autocycling. Eliminate<br />
autocycling by turning the sensitivity off before reviewing this<br />
measurement.<br />
FTw xx.xx Lpm<br />
or<br />
FTn xx.xx Lpm<br />
Flow in Lpm calculated from the differential pressure measured at the<br />
patient wye. When the value is calculated using the wide scale<br />
differential pressure, FTw is displayed. When the value is calculated<br />
using the narrow scale differential pressure, FTn is displayed.<br />
When Leak Compensation is on, FTw xx.xx and FTn xx.xx Lpm values<br />
are offset by the value of LEAK xx.xx Lpm.<br />
Transducer count display is not available for this item.<br />
FVd xx.xx c<br />
mH20 Differential pressure as measured across the flow valve.<br />
FV xx.xx Lpm Flow valve flow in Lpm calculated from the differential pressure<br />
measured across the flow valve.<br />
Transducer count display is not available for this item.<br />
STEP xxxx Commanded flow valve motor step position.<br />
Transducer count display is not available for this item.<br />
TS xxxx rpm The monitored speed of the turbine in rpms.<br />
O2 xx.xx PSI Oxygen inlet pressure in PSIG as measured at the inlet pressure<br />
transducer.<br />
BV xx.xx VOLTS Internal battery voltage.<br />
EV xx.xx VOLTS External power voltage.<br />
PPP xx.xx c<br />
mH2O Pressure in the PEEP accumulator (PEEP Pilot Pressure)<br />
Operator’s <strong>Manual</strong> <strong>LTV</strong> ® <strong>1200</strong> Ventilator Page 10-33<br />
p/n 18247-001, Rev. G
Page 10-34 <strong>LTV</strong> ® <strong>1200</strong> Ventilator Operator’s <strong>Manual</strong><br />
p/n 18247-001, Rev. G
Chapter 11 - VENTILATOR CHECKOUT TESTS<br />
This chapter details five test procedures accessed through the Vent Check menu and used to verify<br />
the proper operation of the <strong>LTV</strong> ® <strong>1200</strong>. These tests should be performed as shown in the schedule in<br />
Appendix B - Set Up / Maintenance for periodic maintenance and testing of the ventilator.<br />
The five test procedures are:<br />
Test Test used to:<br />
Alarm Test Verify that the audible alarm is working correctly.<br />
Display Test Verify that the ventilator displays are working correctly.<br />
Control Test Verify that the buttons and the Set Value knob are working correctly.<br />
Leak Test Test the patient circuit for leaks.<br />
Vent Inop Alarm Test Verify that the Vent Inop alarm is working correctly.<br />
The Vent Check Menu is set up as follows:<br />
VENT CHECK<br />
ALARM<br />
DISPLAY<br />
CONTROL<br />
LEAK<br />
EXIT<br />
WARNING<br />
Ventilator Checkout Tests –Gas is not delivered to the patient during these tests. Disconnect the<br />
patient from the ventilator and ventilate using an alternative method before running the Ventilator<br />
Checkout tests.<br />
Leak Testing the Patient Breathing Circuit – The patient circuit must be leak tested in VENT<br />
CHECK mode before connection to the patient. Ventilator Checkout mode should also be used to<br />
check for correct operation of the alarms, displays and controls. Harm to the patient or ineffective<br />
ventilation may result from failure to leak test the patient breathing circuit before connection to a<br />
patient. When using a heated humidifier, include it in the circuit when leak testing.<br />
AVERTISSEMENT<br />
Tests de vérification du ventilateur – Noter que le gaz n’est pas transmis au patient au cours de<br />
ces tests. Débrancher le patient du ventilateur et ventiler à l’aide d’une forme de ventilation<br />
alternative avant de procéder aux tests de vérification du ventilateur.<br />
Contrôle de l’étanchéité du circuit respiratoire du patient – L'étanchéité du circuit respiratoire du<br />
patient (vérification de ventilation) doit être vérifiée en mode VENT CHECK avant le raccordement au<br />
patient. En outre, on doit utiliser le mode Ventilator Checkout (vérification du ventilateur) afin de<br />
s’assurer du fonctionnement adéquat de l’alarme, des affichages et des commandes du ventilateur.<br />
Le défaut de vérifier l’étanchéité du circuit respiratoire du patient avant le raccordement à un patient<br />
peut être nocif pour le patient ou provoquer une ventilation inefficace. Lorsqu’un humidificateur<br />
chauffant est employé, il convient de l’inclure dans le circuit en procédant à la vérification de<br />
l’étanchéité.<br />
Operator’s <strong>Manual</strong> <strong>LTV</strong> ® <strong>1200</strong> Ventilator Page 11-1<br />
p/n 18247-001, Rev. G
To enable the Ventilator Checkout menu:<br />
1) Disconnect the patient from the ventilator and ventilate the patient using an alternative method.<br />
2) Turn the ventilator off.<br />
3) Ensure that the AC Adapter is connected to a valid AC power source and verify that the External<br />
Power and Charge Status LEDs are illuminated.<br />
4) Push and hold the Select button. Continue to hold the Select button and press the On/Standby<br />
button. REMOVE PTNT should be displayed; if not, power down the ventilator and repeat steps<br />
2 through 4.<br />
5) An audible alarm (alternating on/off tone) will sound while REMOVE PTNT is displayed.<br />
6) Clear the alarm by pressing the Silence Reset button. The audible alarm silences, and the<br />
display changes to VENT CHECK.<br />
7) Push the Select button. The first Ventilator Checkout Test, ALARM, is displayed.<br />
Page 11-2 <strong>LTV</strong> ® <strong>1200</strong> Ventilator Operator’s <strong>Manual</strong><br />
p/n 18247-001, Rev. G
Alarm Test<br />
Use the Alarm Test to verify that the audible alarm is working correctly.<br />
To run the Alarm Test:<br />
1) Push the Select button while ALARM is displayed.<br />
2) Verify that the audible alarm is sounded.<br />
• If a Patient Assist Call System or Remote Alarm is connected via the ventilator’s Patient<br />
Assist Port, verify the device also activates (audible/visual), as specified by its manufacturer.<br />
3) When the alarm has sounded for at least 2 seconds, push the Select button again.<br />
• The audible alarm is silenced and the next menu item is displayed.<br />
4) Verify a confirming audible chirp occurs after the alarm is silenced.<br />
If the Alarm Test fails, see Chapter 15 - Troubleshooting for more information.<br />
Operator’s <strong>Manual</strong> <strong>LTV</strong> ® <strong>1200</strong> Ventilator Page 11-3<br />
p/n 18247-001, Rev. G
Display Test<br />
Use the Display Test to verify that the ventilator displays are working correctly.<br />
To run the Display Test:<br />
1) Push the Select button while DISPLAY is displayed.<br />
2) All segments of the 7-segment control displays, all dots of the dot-matrix window displays and all<br />
LEDs are illuminated.<br />
NOTE<br />
The display states for the External Power, Vent Inop, and Charge Status LEDs are not tested in the<br />
Display Test.<br />
• The External Power and Charge Status LEDs are tested and verified when the AC adapter is<br />
connected to the ventilator (see page 11-2).<br />
• The Vent Inop LED is tested and verified during the Vent Inop Alarm Test (see page 11-11).<br />
REMARQUE<br />
Ce test d’affichage ne comprend pas l’état d’affichage des DEL External Power, Vent Inop, et<br />
Charge Status.<br />
• Les DEL External Power et Charge Status sont testés et vérifiés lorsqu’on branche l’adapteur<br />
CA au ventilateur (voir page 11-2).<br />
• Le DEL Vent Inop est testé et vérifié en même temps que l’avertisseur du Vent Inop (voir page<br />
11-11).<br />
Page 11-4 <strong>LTV</strong> ® <strong>1200</strong> Ventilator Operator’s <strong>Manual</strong><br />
p/n 18247-001, Rev. G
Display Test (cont)<br />
Verify displays are illuminated in the following colors:<br />
Display Color Display Color<br />
Airway Pressure Display Green Assist/Control Mode LED Green<br />
Display Window Red SIMV/CPAP Mode LED Green<br />
Breath Rate Green NPPV Mode LED Green<br />
Tidal Volume Green Inspiratory / Expiratory Green<br />
Pressure Control Green <strong>Manual</strong> Breath LED Green<br />
Inspiratory Time Green Low Pressure O2 Source LED Green<br />
Pressure Support Green Control Lock LED Green<br />
O2 % (O2 Flush) Green PEEP Green<br />
Sensitivity Green Patient Effort LED Green<br />
High Pressure Limit Alarm Red External Power LED Not tested<br />
Low Pressure Alarm Red Charge Status LED Not tested<br />
Low Minute Volume Alarm Red Battery Level LED Amber<br />
On/Standby LED Green Vent Inop LED Not tested<br />
Volume Mode LED Green Silence Reset LED Red<br />
Pressure Mode LED Green<br />
3) To end the display test, push the Select button again and the next menu item is displayed.<br />
If the Display Test fails, see Chapter 15 - Troubleshooting for more information.<br />
Operator’s <strong>Manual</strong> <strong>LTV</strong> ® <strong>1200</strong> Ventilator Page 11-5<br />
p/n 18247-001, Rev. G
Control Test<br />
Use the Control Test to verify that the ventilator buttons and the Set Value knob are working<br />
correctly.<br />
To run the Control Test:<br />
1) Push the Select button while CONTROL is displayed.<br />
2) SELECT is displayed in the display window.<br />
Page 11-6 <strong>LTV</strong> ® <strong>1200</strong> Ventilator Operator’s <strong>Manual</strong><br />
p/n 18247-001, Rev. G
Control Test (cont)<br />
3) Test each control by pressing each button, one at a time. When pressed, verify that the name of<br />
the button pressed is displayed in the display window. Control names are as shown in the table<br />
below.<br />
Control Display<br />
Display Select SELECT<br />
Breath Rate BREATH RATE<br />
Tidal Volume TIDAL VOLUME<br />
Pressure Control PRES CONTROL<br />
Inspiratory Time INSP TIME<br />
Pressure Support PRES SUPPORT<br />
O2 % (O2 Flush) O2%<br />
Sensitivity SENSITIVITY<br />
High Pressure Alarm HIGH PRES<br />
Low Peak Pressure LOW PRES<br />
Low Minute Volume LOW MIN VOL<br />
Silence Reset SILENCE<br />
On/Standby ON / STNDBY<br />
Volume & Pressure MODE VOL/PRS<br />
Assist/Control & SIMV/CPAP MODE A/C S/C<br />
Inspiratory / Expiratory Hold IE HOLD<br />
<strong>Manual</strong> Breath MANUAL BRTH<br />
Low Pressure O2 Source LOW PRES O2<br />
Control Lock CONTROL LOCK<br />
Set Value knob rotate Left ROTATE LEFT<br />
Set Value knob rotate Right ROTATE RIGHT<br />
PEEP PEEP<br />
4) Test the Set Value knob by turning it clockwise and counterclockwise. Verify that the direction of<br />
rotation is displayed in the display window.<br />
5) To exit the control test, push the Select button again and the next menu item is displayed.<br />
If the Control Test fails, see Chapter 15 - Troubleshooting for more information.<br />
Operator’s <strong>Manual</strong> <strong>LTV</strong> ® <strong>1200</strong> Ventilator Page 11-7<br />
p/n 18247-001, Rev. G
Leak Test<br />
Use the Leak Test to test the patient circuit for leaks.<br />
To run the Leak Test:<br />
1) Attach all patient circuit accessories (such as water traps, heated circuits and humidifiers) to the<br />
patient circuit.<br />
2) Connect the patient circuit to the ventilator.<br />
3) With a clean, gloved hand or 4”X4” gauze pad, occlude the proximal end of the patient circuit.<br />
4) Push the Select button while LEAK is displayed.<br />
NOTE<br />
The Leak Test cannot be run until the ventilator has been running for 60 seconds. If you attempt to<br />
run the leak test before the warm-up period has completed, a WARMUP xx message will be<br />
displayed. When the warm-up period is complete, the Leak Test menu item is redisplayed.<br />
REMARQUE<br />
Le test de fuites ne peut s'exécuter tant que le ventilateur n'a pas fonctionné durant 60 secondes.<br />
Si vous tentez d'exécuter un test de fuites avant que la période de réchauffement ne soit<br />
complétée, un message «WARMUP xx» sera affiché. Lorsque la période de réchauffement est<br />
complétée, les éléments du menu Test de fuites sont de nouveau affichés.<br />
Page 11-8 <strong>LTV</strong> ® <strong>1200</strong> Ventilator Operator’s <strong>Manual</strong><br />
p/n 18247-001, Rev. G
Leak Test (cont)<br />
5) To perform the Leak Test, the ventilator does the following:<br />
a) Closes the exhalation valve and sets the flow valve to a near-closed state. The display briefly<br />
shows HOMING VALVE.<br />
b) Elevates the turbine motor speed. The display shows SET TURBINE. If the display shows<br />
LEAK xx.x FAIL, see Chapter 15 - Troubleshooting for more information.<br />
c) Elevates the circuit pressure. The display shows PRES xx.x cmH2O where xx.x is the realtime<br />
airway pressure.<br />
d) Sets the flow valve to a near closed position. The display shows FLOW xx.x Lpm where xx.x<br />
is the flow through the flow valve.<br />
e) After several seconds, the display shows LEAK xx.x PASS or LEAK xx.x FAIL indicating the<br />
Leak Test results. The Leak Test will fail if the flow through the flow valve is greater than 1<br />
Lpm.<br />
6) To exit the Leak Test, push the Select button again and the next menu item is displayed.<br />
If the ventilator fails the Leak Test, see Chapter 15 - Troubleshooting for more information.<br />
Operator’s <strong>Manual</strong> <strong>LTV</strong> ® <strong>1200</strong> Ventilator Page 11-9<br />
p/n 18247-001, Rev. G
Vent Inop Alarm Test<br />
Use the Vent Inop Alarm Test to verify that the Vent Inop alarm is working correctly.<br />
To run the Vent Inop Alarm Test:<br />
1) To run the Vent Inop Alarm Test, the ventilator must be on (running) for at least 60 seconds and<br />
the Ventilator Checkout menu must be enabled.<br />
• When the Ventilator Checkout menu is enabled, VENT CHECK, ALARM, DISPLAY,<br />
CONTROL, LEAK, or EXIT is displayed in the ventilator display area.<br />
2) Turn the ventilator off by pressing and holding the On/Standby button for a minimum of 3<br />
seconds. DO NOT push the Silence Reset button.<br />
3) Observe the ventilator for 15 seconds.<br />
• Listen for the alarm tone<br />
• Watch the Vent Inop LED<br />
Page 11-10 <strong>LTV</strong> ® <strong>1200</strong> Ventilator Operator’s <strong>Manual</strong><br />
p/n 18247-001, Rev. G
Vent Inop Alarm Test (cont)<br />
4) For all ventilators, verify that both of the following conditions existed;<br />
• The alarm tone sounded continuously for the full 15-second duration.<br />
• The Vent Inop LED illuminated continuously for the full 15-second duration.<br />
5) If a Patient Assist Call System or Remote Alarm is connected via the ventilator’s Patient Assist<br />
Port, verify the device also activates (audible/visual), as specified by its manufacturer.<br />
6) Silence the alarm by pressing the Silence Reset button.<br />
7) Verify the following;<br />
• A confirming audible chirp occurred after the alarm was silenced.<br />
If the Inop Alarm fails the test, discontinue use of the ventilator and immediately contact a certified<br />
Pulmonetic Systems’ service technician.<br />
Operator’s <strong>Manual</strong> <strong>LTV</strong> ® <strong>1200</strong> Ventilator Page 11-11<br />
p/n 18247-001, Rev. G
Exit<br />
To exit the vent check mode and return to normal ventilation mode at any point proceed as follows:<br />
Enter normal ventilation mode:<br />
1) Turn the Set Value knob to scroll through the main menu entries (VENT OPS, ALARM OPS,<br />
VENT CHECK, etc.) until EXIT is displayed.<br />
2) Push the Select button while EXIT is displayed.<br />
3) Alternatively, push the Control Lock button until normal ventilation mode is restored.<br />
POST will be performed and the ventilator will begin ventilation using the previously stored settings.<br />
Page 11-12 <strong>LTV</strong> ® <strong>1200</strong> Ventilator Operator’s <strong>Manual</strong><br />
p/n 18247-001, Rev. G
Chapter 12 - OPERATING PROCEDURE<br />
This section describes how to turn the <strong>LTV</strong> ® <strong>1200</strong> ventilator on and off, and how to set up the<br />
ventilation modes.<br />
NOTE<br />
• Before operating the MR Conditional <strong>LTV</strong> ® <strong>1200</strong> System in the MR environment/MR Suite, see<br />
Chapter 16 - MR Conditional System, for additional safety and setup information.<br />
• In the absence of an external power source, the ventilator automatically begins operation using the<br />
internal battery. Do not operate the <strong>LTV</strong> ® <strong>1200</strong> exclusively on the internal battery as a standard operating<br />
practice. The internal battery should be used for emergency situations only or for short periods while<br />
switching between external power supply connections.<br />
REMARQUE<br />
• Avant d'utiliser le système MR Conditional <strong>LTV</strong> ® <strong>1200</strong> dans un milieu de RM/Suite RM, reportezvous<br />
au Chapitre 16 – système MR Conditional, pour d'autre information sur l'installation et la<br />
sécurité.<br />
• S’il n’y a pas de source d’alimentation externe, le ventilateur s’alimente automatiquement de la pile<br />
interne. Ne pas utiliser le <strong>LTV</strong> ® <strong>1200</strong> exclusivement avec la batterie interne en tant que procédure<br />
d’exploitation normale. La batterie interne doit être réservée aux situations d’urgence seulement ou<br />
pour de courtes périodes de temps pendant le transfert entre des sources d’alimentation externes.<br />
To Turn the Ventilator On<br />
1) Connect the unit to an external source of power. The AC power adapter may be used or the<br />
ventilator may be connected to an external battery.<br />
• The External Power LED is lit to indicate the external power source voltage level.<br />
• The ventilator begins charging the internal battery from the external source.<br />
• The Charge Status LED is lit to indicate the charge progress.<br />
2) Push the On/Standby button and the ventilator will commence operation:<br />
• The On/Standby LED is lit.<br />
• The Power On Self Tests 51 (POST) are performed:<br />
• The front panel displays light up.<br />
• The audible alarm activates for 1 second (to be verified by operator).<br />
• A confirming audible chirp sounds (to be verified by operator).<br />
• POST messages (CPU, SRAM, INT VECTOR, ROM CRC and EEPROM) are flashed in<br />
the message window.<br />
51 Power On Self Tests - A set of self-tests the ventilator performs when turned on to verify the operational<br />
integrity of the Processor, Displays, Audible Alarm, Confirming Audible Chirp, SRAM, Program Memory and<br />
EEPROM (some tests require operator visual and/or audible verification).<br />
Operator’s <strong>Manual</strong> <strong>LTV</strong> ® <strong>1200</strong> Ventilator Page 12-1<br />
p/n 18247-001, Rev. G
To Turn the Ventilator On (cont.)<br />
If the Power On Self Tests are passed successfully;<br />
The ventilator starts operation using the stored control settings, with the following exceptions:<br />
If the Patient Query feature is enabled/on when the ventilator is powered up, ventilation and alarm<br />
activation are suspended and the message SAME PATIENT is displayed (see Presets in Chapter<br />
10 - Extended Features).<br />
• To enable the suspended alarms and begin ventilation with the settings in use during the<br />
last power cycle, press the Select button while SAME PATIENT is displayed<br />
OR<br />
• To enable the suspended alarms and begin ventilation with Presets values appropriate<br />
for a new patient, turn the Set Value knob until NEW PATIENT is displayed and press<br />
the Select button. Then turn the Set Value knob until the desired patient type is<br />
displayed (INFANT, PEDIATRIC or ADULT) and press the Select button (see <strong>LTV</strong>®<br />
<strong>1200</strong> Presets Table in Chapter 10 – Extended Features for detailed settings information)<br />
• Turning the Set Value knob until EXIT is displayed and pressing the Select<br />
button returns the ventilator to the SAME PATIENT menu option/message<br />
If no controls are activated for three (3) seconds while either the SAME PATIENT or NEW<br />
PATIENT options are being displayed, an audible alert sounds. Activation of any control resets<br />
the 3 second delay of the audible alert.<br />
If the Patient Query feature is disabled/off when the ventilator is powered up and passes POST, it<br />
will begin ventilation (appropriate alarms enabled) using the settings in use during the last power<br />
cycle.<br />
To prevent autocycling, the Leak Compensation feature (if enabled/on) is suspended during the<br />
first 30 seconds of operation.<br />
To prevent nuisance alarms, the LOW MIN VOL alarm (Low Minute Volume) is suspended for the<br />
first 20 seconds and the HIGH f alarm (High Breath Rate) is suspended for the first 60 seconds of<br />
operation.<br />
If the Power On Self Tests fail;<br />
The mode of failure (CPU, SRAM, INT VECTOR, ROM CRC or EEPROM) is displayed in the<br />
message window and an audible alarm sounds continuously.<br />
• Turn the ventilator off by pushing the On/Standby button<br />
• Silence the alarm by pushing the Silence Reset button<br />
• Discontinue use of the ventilator and immediately contact a certified Pulmonetic Systems’<br />
service technician or Pulmonetic Systems<br />
Before Connecting the Ventilator to a Patient<br />
Perform the following steps before connecting the ventilator to a patient:<br />
1) If this is the initial use of the ventilator, follow the checkout procedures in Appendix C -<br />
Installation and Checkout before proceeding.<br />
2) If desired, you may connect the ventilator to a Patient Assist Call system. See Appendix C -<br />
Installation and Checkout for details.<br />
Page 12-2 <strong>LTV</strong> ® <strong>1200</strong> Ventilator Operator’s <strong>Manual</strong><br />
p/n 18247-001, Rev. G
3) If required, connect a low or high pressure oxygen source to the ventilator. If you connect a low<br />
pressure oxygen source, make sure to select the Low Pressure O2 Source option on the front<br />
panel. See Appendix C - Installation and Checkout for connection and setup details.<br />
WARNING<br />
Inspired Oxygen (FIO2) Concentration – If the patient has a variable respiratory rate, his/her minute<br />
ventilation will fluctuate. If exact concentrations of inspired oxygen (FIO2) are required to be delivered<br />
to the patient, it is recommended that an accurate oxygen analyzer with alarms be used.<br />
AVERTISSEMENT<br />
Concentration d’oxygène inspiré (FIO2) – Si la fréquence respiratoire du patient est variable, sa<br />
ventilation-minute va fluctuer. Lorsqu’une concentration exacte d’oxygène inspiré (FIO2) est<br />
nécessaire pour une transmission au patient, il est recommandé d’utiliser un analyseur de niveau<br />
d’oxygène précis, comportant des alarmes.<br />
4) Connect the Patient Circuit. 52 To keep moisture out of the sense lines attached at the patient<br />
wye, be sure to connect the exhalation valve and circuit to the wye so the proximal sense lines<br />
are oriented up (see below). Connect a test lung to the circuit.<br />
5) Set any desired extended features options. For a detailed list of extended features see Chapter<br />
10 - Extended Features.<br />
6) Select the ventilation mode and all controls, including PEEP, to prescribed values. Detailed<br />
procedures for setting each mode are included later in this chapter.<br />
52 The <strong>LTV</strong> ® Patient Circuit complies with ASTM Specification F 1246.<br />
Operator’s <strong>Manual</strong> <strong>LTV</strong> ® <strong>1200</strong> Ventilator Page 12-3<br />
p/n 18247-001, Rev. G
Procedure for Control Mode Set Up<br />
Set any desired Extended Features options and:<br />
1) Push the mode Select button twice to toggle the modes between Assist/ Ctrl and SIMV/CPAP.<br />
Select the Assist/ Ctrl mode.<br />
2) Push the mode Select button twice to toggle between Volume and Pressure ventilation. Select<br />
Volume or Pressure, as desired.<br />
3) Establish the Breath Rate.<br />
4) If Volume ventilation is selected, establish the Tidal Volume. The calculated peak flow Vcalc is<br />
displayed in the window while Tidal Volume is being changed.<br />
5) If Pressure ventilation is selected, establish the Pressure Control.<br />
6) Establish the Inspiratory Time. The calculated peak flow Vcalc is displayed in the window while<br />
Inspiratory Time is being changed. Vcalc only applies to volume ventilation.<br />
7) Set the desired percentage of oxygen to be delivered by the ventilator.<br />
8) Set the Sensitivity to dashes “-”.<br />
9) Set the High Pres. Limit alarm.<br />
10) Set the Low Pressure alarm.<br />
11) Set the Low Min. Vol. alarm.<br />
12) Set the PEEP.<br />
Page 12-4 <strong>LTV</strong> ® <strong>1200</strong> Ventilator Operator’s <strong>Manual</strong><br />
p/n 18247-001, Rev. G
Procedure for Assist/Control Mode Set Up<br />
Set any desired Extended Features options and:<br />
1) Push the mode Select button twice to toggle the modes between Assist/ Ctrl and SIMV/CPAP.<br />
Select the Assist/ Ctrl mode.<br />
2) Push the mode Select button twice to toggle between Volume and Pressure ventilation. Select<br />
Volume or Pressure, as desired.<br />
3) Establish the Breath Rate.<br />
4) If Volume ventilation is selected, establish the Tidal Volume. The calculated peak flow Vcalc is<br />
displayed in the window while Tidal Volume is being changed.<br />
5) If Pressure ventilation is selected, establish the Pressure Control.<br />
6) Establish the Inspiratory Time. The calculated peak flow Vcalc is displayed in the window while<br />
Inspiratory Time is being changed. Vcalc only applies to volume ventilation.<br />
7) Set the desired percentage of oxygen to be delivered by the ventilator.<br />
8) Set the Sensitivity to a setting from 1 to 9.<br />
9) Set the High Pres. Limit alarm.<br />
10) Set the Low Pressure alarm.<br />
11) Set the Low Min. Vol. alarm.<br />
12) Set the PEEP.<br />
Operator’s <strong>Manual</strong> <strong>LTV</strong> ® <strong>1200</strong> Ventilator Page 12-5<br />
p/n 18247-001, Rev. G
Procedure for SIMV Mode Set Up<br />
Set any desired Extended Features options and:<br />
1) Push the mode Select button twice to toggle the modes between Assist/ Ctrl and SIMV/CPAP.<br />
Select the SIMV/CPAP mode.<br />
2) Push the mode Select button twice to toggle between Volume and Pressure ventilation. Select<br />
Volume or Pressure, as desired.<br />
3) Establish the Breath Rate.<br />
4) If Volume ventilation is selected, establish the Tidal Volume. The calculated peak flow Vcalc is<br />
displayed in the window while Tidal Volume is being changed.<br />
5) If Pressure ventilation is selected, establish the Pressure Control.<br />
6) Establish the Inspiratory Time. The calculated peak flow Vcalc is displayed in the window while<br />
Inspiratory Time is being changed. Vcalc only applies to volume ventilation.<br />
7) Set the Pressure Support, if desired.<br />
8) Set the desired percentage of oxygen to be delivered by the ventilator.<br />
9) Set the Sensitivity to a setting from 1 to 9.<br />
10) Set the High Pres. Limit alarm.<br />
11) Set the Low Pressure alarm.<br />
12) Set the Low Min. Vol. alarm.<br />
13) Set the PEEP.<br />
Page 12-6 <strong>LTV</strong> ® <strong>1200</strong> Ventilator Operator’s <strong>Manual</strong><br />
p/n 18247-001, Rev. G
Procedure for CPAP Mode Set Up<br />
Set any desired Extended Features options and:<br />
1) Push the mode Select button twice to toggle the modes between Assist/ Ctrl and SIMV/CPAP.<br />
Select the SIMV/CPAP mode.<br />
2) Push the mode Select button twice to toggle between Volume and Pressure ventilation for<br />
apnea backup. Select Volume or Pressure, as ordered.<br />
3) Establish the Breath Rate to dashes “- -”.<br />
4) If Volume ventilation is selected, establish the Tidal Volume for apnea backup. The calculated<br />
peak flow Vcalc is displayed in the window while Tidal Volume is being changed.<br />
5) If Pressure ventilation is selected, establish the Pressure Control for apnea backup.<br />
6) Establish the Inspiratory Time for apnea backup. The calculated peak flow Vcalc is displayed in<br />
the window while Inspiratory Time is being changed. Vcalc only applies to volume ventilation.<br />
7) Set the Pressure Support, if desired.<br />
8) Set the desired percentage of oxygen to be delivered by the ventilator.<br />
9) Set the Sensitivity to a setting from 1 to 9.<br />
10) Set the High Pres. Limit alarm.<br />
11) Set the Low Pressure alarm for apnea backup.<br />
12) Set the Low Min. Vol. alarm.<br />
13) Set the PEEP.<br />
Operator’s <strong>Manual</strong> <strong>LTV</strong> ® <strong>1200</strong> Ventilator Page 12-7<br />
p/n 18247-001, Rev. G
Procedure for NPPV Mode Set Up<br />
Set any desired Extended Features options and:<br />
1) Push the Assist/Control, SIMV/CPAP mode button until the NPPV LED flashes. Press the<br />
button once more to confirm. The NPPV LED continues to flash and SET IPAP displays. The<br />
Pres. Support control display is bright and all other controls dim.<br />
2) Turn the Set Value knob to adjust the IPAP value (shown in the Pres. Support LED window).<br />
Press the Pres. Support button to confirm, SET EPAP will display. The PEEP control display is<br />
bright and all other controls are dim.<br />
3) Turn the Set Value knob to adjust the EPAP value (shown in the PEEP LED window). Press the<br />
PEEP button to confirm.<br />
4) The PEEP button push confirms NPPV operation and LED then turns solid.<br />
5) Set the desired percentage of oxygen to be delivered by the ventilator.<br />
6) Set the High Pres. Limit alarm.<br />
Page 12-8 <strong>LTV</strong> ® <strong>1200</strong> Ventilator Operator’s <strong>Manual</strong><br />
p/n 18247-001, Rev. G
To Turn the Ventilator Off<br />
1) Disconnect the ventilator from the patient.<br />
2) Push and hold the On/Standby button for 3 seconds. The ventilator ceases operating, the<br />
audible alarm sounds continuously and the Vent Inop LED is lit.<br />
3) Stop the audible alarm from sounding by pushing the Silence Reset button.<br />
• Verify a confirming audible chirp sounds immediately after the alarm is silenced 53<br />
4) The ventilator continues to charge the internal battery as long as it is connected to an external<br />
power source.<br />
NOTE<br />
The Vent Inop LED will remain lit for a minimum of 5 minutes and does not affect battery life.<br />
REMARQUE<br />
La DEL Vent Inop restera allumée durant au moins 5 minutes et n’affecte en rien la durée de vie de<br />
la batterie.<br />
53 The audible Chirp occurs after the Inop Alarm sounds for longer than 0.8 seconds and is then silenced.<br />
Operator’s <strong>Manual</strong> <strong>LTV</strong> ® <strong>1200</strong> Ventilator Page 12-9<br />
p/n 18247-001, Rev. G
<strong>LTV</strong> ® Ventilator Settings Checklist<br />
The <strong>LTV</strong> ® <strong>1200</strong> Ventilator Settings Checklist may be used by caregivers as a reminder that all<br />
appropriate controls on the ventilator were properly set, adjusted and/or recorded.<br />
Patient Name: Ordered By: Date:<br />
Controls: (Fill in (x.x), or Confirm (X)) Check-up<br />
Volume Mode: - or - Pressure Mode: By: Date:<br />
Assist Control Mode:<br />
- or - NPPV Mode:<br />
- or - SIMV / CPAP Mode:<br />
By: Date:<br />
Breath Rate: bpm By: Date:<br />
Tidal Volume: ml By: Date:<br />
Pressure Control: cmH2O By: Date:<br />
Inspiratory Time: Seconds By: Date:<br />
Pressure Support: cmH2O By: Date:<br />
Sensitivity: Lpm By: Date:<br />
PEEP: cmH2O By: Date:<br />
Alarms: (Fill in (x.x), or Confirm (X)) Check-up<br />
High Pressure Limit: cmH2O By: Date:<br />
Low Pressure Limit: cmH2O By: Date:<br />
Low Minute Volume: Liters By: Date:<br />
Extended Features-Alarms: (Fill in (x.x), or Confirm (X)) Check-up<br />
Apnea Interval: Seconds By: Date:<br />
High f:<br />
HIGH f<br />
OFF<br />
High PEEP: HI PEEP<br />
OFF<br />
- or -<br />
Page 12-10 <strong>LTV</strong> ® <strong>1200</strong> Ventilator Operator’s <strong>Manual</strong><br />
p/n 18247-001, Rev. G<br />
Bpm<br />
Seconds<br />
By: Date:<br />
- or - cmH2O By: Date:<br />
Low PEEP: LO PEEP<br />
OFF<br />
- or - cmH2O By: Date:<br />
High Pressure Delay: No Delay, 1 BRTH - or - 2 BRTH By: Date:<br />
LPP Alarm: All Breaths - or - VC/PC Only By: Date:<br />
Extended Features-Ventilator: (Fill in (x.x), or Confirm (X)) Check-up<br />
Rise Time Profile: (1 to 9) By: Date:<br />
Flow Termination: 10-40% of Peak Flow By: Date:<br />
Pressure Support Time<br />
Termination:<br />
Pressure Control Flow<br />
Termination:<br />
Seconds<br />
By: Date:<br />
YES - or - NO By: Date:<br />
Leak Compensation: ON - or - OFF By: Date:
Chapter 13 - CLEANING, DISINFECTING AND<br />
STERILIZING<br />
Cleaning the Ventilator<br />
All ventilator external surfaces should be cleaned prior to initial use, before and after each patient<br />
use, and as may be required.<br />
To clean the ventilator:<br />
1) Wipe the exterior surfaces of the ventilator with a clean, damp cloth. The use of an anti-bacterial<br />
cleaning solution is recommended. Be sure to wipe away any residual cleaner.<br />
CAUTION<br />
Ventilator Sterilization – To avoid irreparable damage to the <strong>LTV</strong> ® <strong>1200</strong> ventilator, do not attempt to<br />
sterilize it.<br />
Cleaning Agents – To avoid damaging the ventilator’s plastic components and front panel, do not<br />
use cleaning agents containing ammonium chloride, other chloride compounds, more than 2%<br />
glutaraldehyde, phenols, or abrasive cleaners.<br />
Ventilator Immersion - Do not immerse the ventilator in liquids.<br />
Exhalation Valve Cleaning - Do not pour or spray liquid cleaners into the exhalation valve.<br />
Front Panel Cleaning – Do not pour or spray liquid cleaners onto the front panel.<br />
ATTENTION<br />
Stérilisation du ventilateur - Afin d'éviter des dommages irréparables au ventilateur de la <strong>1200</strong><br />
<strong>LTV</strong> ® , ne tentez pas de stériliser ce dernier.<br />
Produits de nettoyage - Afin d'éviter d'endommager les composants plastiques et le panneau frontal<br />
du ventilateur, n'utilisez pas des produits de nettoyage contenant : chlorure d'ammonium, composés<br />
de chlorure, plus de 2% de glutaraldéhyde, ou phénol.<br />
Immersion du ventilateur - Ne pas immerger le ventilateur dans des liquides, incluant les produits<br />
stérilisants.<br />
Nettoyage de la soupape d'expiration - Ne pas asperger une solution nettoyante dans la soupape<br />
d'expiration.<br />
Nettoyage du panneau frontal - Ne pas asperger des solutions nettoyantes ou les laisser s'écouler<br />
sur le panneau frontal.<br />
Operator’s <strong>Manual</strong> <strong>LTV</strong> ® <strong>1200</strong> Ventilator Page 13-1<br />
p/n 18247-001, Rev. G
Cleaning or replacing the Fan Filter<br />
To clean the fan filter:<br />
1) Using a small screwdriver, detach the fan filter grill from its housing.<br />
2) Remove the fan filter by squeezing the foam filter gently with your fingers and pulling it out.<br />
NOTE<br />
Hardware Fault -If you touch the fan blades while removing the fan filter grill or filter, a HW FAULT<br />
may occur. This is normal. Clear the HW FAULT alarm by using the Silence Reset button.<br />
REMARQUE<br />
Si vous touchez les pales du ventilateur en enlevant le grillage du filtre ou le filtre du ventilateur, une<br />
alarme HW FAULT se produira. C'est une situation normale. Effacez l'alarme HW FAULT à l'aide du<br />
bouton Silence / Remise à zéro.<br />
3) Gently bathe the filter in a solution of mild detergent and warm water.<br />
4) Rinse thoroughly in warm water.<br />
5) Examine the filter for excessive wear or damage. Discard and replace with a new filter if<br />
necessary.<br />
6) Allow the filter to thoroughly air dry before reinstallation.<br />
7) Reinstall the filter.<br />
8) Reposition the filter grill over the filter and apply light pressure until it fully seats (“clicks”) into the<br />
filter housing.<br />
CAUTION<br />
Wet or Damp Filters - Do not install a wet or damp filter into the <strong>LTV</strong> ® <strong>1200</strong> ventilator. This could<br />
damage the ventilator.<br />
ATTENTION<br />
Filtres mouillés ou humides - Ne pas installer des filtres mouillés ou humides dans les ventilateurs<br />
de la <strong>1200</strong> <strong>LTV</strong> ® . Cela pourrait endommager le ventilateur.<br />
Page 13-2 <strong>LTV</strong> ® <strong>1200</strong> Ventilator Operator’s <strong>Manual</strong><br />
p/n 18247-001, Rev. G
Cleaning or replacing the Inlet Filter<br />
To clean the Inlet Filter:<br />
1) Remove the Inlet Filter by squeezing the foam filter gently with your fingers and pulling it out.<br />
2) Gently bathe the filter in a solution of mild detergent and warm water.<br />
3) Rinse thoroughly in warm water.<br />
4) Examine the filter for excessive wear or damage. Discard and replace with a new filter if<br />
necessary.<br />
5) Allow the filter to thoroughly air dry before reinstallation.<br />
6) Reinstall the filter.<br />
CAUTION<br />
Wet or Damp Filters - Do not install a wet or damp filter into the <strong>LTV</strong> ® <strong>1200</strong> ventilator. This could<br />
damage the ventilator.<br />
ATTENTION<br />
Filtres mouillés ou humides - Ne pas installer des filtres mouillés ou humides dans les ventilateurs<br />
de la <strong>1200</strong> <strong>LTV</strong> ® . Cela pourrait endommager le ventilateur.<br />
Operator’s <strong>Manual</strong> <strong>LTV</strong> ® <strong>1200</strong> Ventilator Page 13-3<br />
p/n 18247-001, Rev. G
Cleaning or Replacing the O 2 Inlet Filter<br />
The O2 filter should be cleaned or replaced when it becomes soiled. Failure to do this can affect<br />
ventilator performance.<br />
CAUTION<br />
Oxygen Supply Contamination - The accuracy of the oxygen delivery capabilities of <strong>LTV</strong> ® <strong>1200</strong><br />
ventilator can be compromised by foreign debris contamination in the oxygen supply system. To<br />
reduce the risk of airborne contaminants entering the ventilator, ensure that any oxygen supply<br />
connected to the ventilator is clean, properly filtered 54 and that the ventilator’s O2 Inlet Port Cap is<br />
securely installed on the O2 Inlet Port whenever the ventilator is not connected to an external oxygen<br />
supply.<br />
ATTENTION<br />
Contamination de la réserve d’oxygène - La précision de la capacité d’alimentation en oxygène<br />
des ventilateurs <strong>LTV</strong> ® <strong>1200</strong> peut être compromise par la présence de corps étrangers dans le<br />
système d’alimentation en oxygène. Afin de diminuer le risque de présence d’agents contaminants<br />
atmosphériques dans le ventilateur, assurez-vous que la réserve d’oxygène reliée au ventilateur est<br />
propre et filtrée de manière adéquate 54 , et que le bouchon de l’orifice d’alimentation en oxygène est<br />
correctement installé à chaque fois que le ventilateur n’est pas relié à une source d'oxygène externe.<br />
To clean or replace the O2 Inlet Filter:<br />
1) If a high pressure O2 source is being used, disconnect the high pressure O2 hose from the<br />
oxygen block on the left side of the ventilator.<br />
2) If a low pressure O2 source is being used, disconnect the O2 line from the barbed oxygen<br />
adapter. Unscrew and remove the barbed adapter from the oxygen block on the left side of the<br />
ventilator.<br />
54<br />
In addition to the existing internal O2 Inlet filter, P/N 14313, an External, In-Line Oxygen Filter (P/N 14470) is<br />
available from Pulmonetic Systems.<br />
Page 13-4 <strong>LTV</strong> ® <strong>1200</strong> Ventilator Operator’s <strong>Manual</strong><br />
p/n 18247-001, Rev. G
3) Using a pick, gently remove the rubber O-Ring from inside the O2 inlet port. Use caution: Do not<br />
damage the O-Ring while removing it. Tip the ventilator to allow the O2 Inlet Filter to slide out.<br />
4) Clean the filter using a mild cleanser, warm water and a soft brush. Rinse the filter thoroughly to<br />
remove all traces of the cleanser. Allow the filter to dry completely before replacing it in the<br />
ventilator.<br />
5) Inspect the filter for damage. If the filter is not intact, shows signs of damage or cannot be<br />
completely cleaned, replace it with a new O2 Inlet Filter (P/N 14313) and O-Ring (P/N 10609),<br />
available from Pulmonetic Systems.<br />
6) Replace the filter by sliding it back into the O2 inlet port. Replace the O-Ring, making sure it is<br />
completely tucked under the retaining lip on the inside of the O2 inlet port.<br />
7) Reconnect the high pressure O2 line or the barbed adapter and low pressure O2 line.<br />
CAUTION<br />
Wet or Damp Filters - Do not install a wet or damp filter into the <strong>LTV</strong> ® <strong>1200</strong> ventilators. This could<br />
damage the ventilator.<br />
ATTENTION<br />
Filtres mouillés ou humides - Ne pas installer des filtres mouillés ou humides dans les ventilateurs<br />
de la <strong>1200</strong> <strong>LTV</strong> ® . Cela pourrait endommager le ventilateur.<br />
Operator’s <strong>Manual</strong> <strong>LTV</strong> ® <strong>1200</strong> Ventilator Page 13-5<br />
p/n 18247-001, Rev. G
Cleaning the Exhalation Valve and Reusable Patient<br />
Circuit<br />
WARNING<br />
Patient Circuits – Pulmonetic Systems’ Patient Circuits, Exhalation Valve Assemblies and Water<br />
Traps are shipped clean, not sterile. The reusable patient circuit should be cleaned prior to initial use,<br />
and after each patient use.<br />
Ultra Violet Light Sensitivity – The material used in the tubing of the “Reusable” Patient Circuits is<br />
not UV stable. Avoid exposure of the tubing to UV light.<br />
AVERTISSEMENT<br />
Circuits du patient – Les circuits du patient du Pulmonetic Systems, les valves expiratoires et les<br />
collecteurs d’eau sont expédiés propres, mais pas stériles. Le circuit du patient réutilisable doit être<br />
nettoyé avant la première utilisation et après chaque utilisation.<br />
Sensibilité à la lumière ultraviolette – Les matériaux utilisés pour la tubulure des circuits du patient<br />
ne sont pas stables sous rayons UV. Éviter d’exposer la tubulure à la lumière UV.<br />
CAUTION<br />
Proximal Sense Lines - Do not remove the proximal sense lines from the patient wye.<br />
Care of the Exhalation Valve - The exhalation valve is a delicate assembly and may be damaged if;<br />
• Care is not exercised when handling or cleaning it.<br />
• Cleaning instruments or foreign bodies are inserted into it.<br />
• High-pressure gas nozzles are used to dry it.<br />
Care of Bacterial Filters – If bacterial filters are used in conjunction with the <strong>LTV</strong> ® <strong>1200</strong> ventilator,<br />
comply with all procedures as specified by the filter manufacturer.<br />
ATTENTION<br />
Conduites de détection – N’enlevez pas les conduites de détection qui se trouvent sur les divisions<br />
en Y du circuit du patient.<br />
Entretien de la soupape d'expiration - La soupape d'expiration est une pièce fragile et peut être<br />
endommagée si :<br />
• Des précautions ne sont pas prises lors de sa manipulation ou de son nettoyage.<br />
• Des instruments de nettoyage ou des corps étrangers sont insérés dans celle-ci.<br />
• Des pistolets de gaz à haute-pression sont utilisés pour l'assécher<br />
Entretien des filtres bactériens - Les filtres bactériens ne devraient pas être immergés dans un<br />
liquide. Un autoclave à vapeur devrait être utilisé pour le nettoyage des filtres bactériens.<br />
Page 13-6 <strong>LTV</strong> ® <strong>1200</strong> Ventilator Operator’s <strong>Manual</strong><br />
p/n 18247-001, Rev. G
CAUTION<br />
Cleaning the Water Trap – Do NOT use KlenZyme to clean Pulmonetic water traps. It will cause<br />
deterioration of the water trap material.<br />
Reusable Patient Circuit Components - To avoid degradation of the reusable patient circuit<br />
components, do not exceed the following constraints:<br />
• 50 cleaning cycles or 1 year (whichever comes first)<br />
Steam Autoclave:<br />
• Pressure: 20 PSIG<br />
• Temperature: 275°F (135°C)<br />
• Time: 6 minutes<br />
Liquid Sterilizing Agent:<br />
Do not use any of the following solutions to clean, disinfect, or sterilize the patient circuit:<br />
• Ketone • Chlorinated solutions<br />
• Phenol (>5%) • Chlorinated hydrocarbons<br />
• Inorganic acids • Aromatic hydrocarbons<br />
• Formaldehyde • Hypochlorite<br />
• Liquid agents containing more than<br />
2% glutaraldehyde<br />
Pasteurization:<br />
• 30-minute warm water detergent and 30-minute 165°F (74°C) hot cycle.<br />
• Drying in a sterile drier for more than 1 hour or 140°F (59°C).<br />
Gas (ETO):<br />
• Temperature: 131°F (55°C)<br />
Care of the Exhalation Valve - The exhalation valve is delicate and may be damaged if;<br />
• Care is not exercised when handling or cleaning it.<br />
• Cleaning instruments or foreign bodies are inserted into it.<br />
• High-pressure gas nozzles are used to dry it.<br />
Differential Pressure Ports - A low pressure air nozzle with flow less than 10 liters per minute<br />
should be used for cleaning the differential pressure ports.<br />
Patient Wye Installation – After cleaning, install the patient wye in the patient circuit so the proximal<br />
sense lines are oriented up while operating.<br />
Operator’s <strong>Manual</strong> <strong>LTV</strong> ® <strong>1200</strong> Ventilator Page 13-7<br />
p/n 18247-001, Rev. G
ATTENTION<br />
Nettoyage du piège à eau – NE PAS utiliser KlenZyme pour nettoyer les pièges à eau Pulmonetic.<br />
Le cas échéant, le matériau composant le piège à eau se détériorera.<br />
Composants réutilisables du circuit du patient – Pour éviter la dégradation des composants<br />
réutilisables du circuit du patient, ne dépassez pas les limites suivantes:<br />
• 50 cycles de nettoyage ou 1 an (le premier des deux prévalant)<br />
Autoclave à vapeur:<br />
• Pression : 20 lb/po 2<br />
• Température : 275°F (135°C)<br />
• Durée : 6 minutes<br />
Agent de stérilisation liquide:<br />
Il ne faut utiliser aucune des solutions suivantes pour nettoyer, désinfecter ou stériliser le circuit<br />
du patient :<br />
• Cétone • Solutions contenant du chlore<br />
• Phénol (>5%) • Hydrocarbures contenant du chlore<br />
• Acides inorganiques • Hydrocarbures aromatiques<br />
• Formaldéhyde • Hypochlorite<br />
• Les agents liquides contenant plus<br />
de 2% de glutaraldéhyde<br />
Pasteurisation:<br />
• Un cycle avec détergent à l’eau tiède pendant 30 minutes et à l’eau chaude à 165°F (74°C)<br />
pendant 30 minutes.<br />
• Séchage dans un séchoir stérile pendant plus de 1 heure ou à 140°F (59°C).<br />
Gaz (ETO):<br />
• Température : 131°F (55°C)<br />
Entretien de la soupape d'expiration - La soupape d'expiration est une pièce fragile et peut être<br />
endommagée si :<br />
• Des précautions ne sont pas prises lors de sa manipulation ou de son nettoyage.<br />
• Des instruments de nettoyage ou des corps étrangers sont insérés dans celle-ci.<br />
• Des pistolets de gaz à haute-pression sont utilisés pour l'assécher.<br />
Ports de pression différentielle - Une source de gaz à débit faible (moins de 10 ppm) doit être<br />
utilisée pour le nettoyage des fluides et de débris des ports de pression différentielle.<br />
Installation de la soupape d'expiration - Après le nettoyage, installez la soupape d'expiration dans<br />
le circuit du patient de sorte que les lignes de détection soient alignées vers le haut pendant<br />
l’opération.<br />
Page 13-8 <strong>LTV</strong> ® <strong>1200</strong> Ventilator Operator’s <strong>Manual</strong><br />
p/n 18247-001, Rev. G
For purposes of cleaning or disinfecting, the patient circuit (tubing and all accessories) must<br />
be detached from the ventilator:<br />
1) Detach the patient circuit from the ventilator.<br />
2) Detach the various components from the patient circuit.<br />
3) Disassemble the exhalation valve by using the small extrusion above the notch on the exhalation<br />
valve cap to pry the valve cap and valve body apart. When opened, remove the diaphragm.<br />
Operator’s <strong>Manual</strong> <strong>LTV</strong> ® <strong>1200</strong> Ventilator Page 13-9<br />
p/n 18247-001, Rev. G
To clean the exhalation valve, sense lines, wye and reusable patient circuit:<br />
1) Remove all particulate matter and bathe for a minimum of 10 minutes using one of the following<br />
solutions warmed to 95°F to 150°F (35°C to 65.5°C):<br />
• mild detergent, 50% water / 50% white vinegar solution, or liquid cleaner (e.g.,<br />
KlenZyme® or other enzymatic cleaner)<br />
Ultrasonic cleaning is not recommended.<br />
2) Rinse gently for 2 minutes and use a low flow air source (less than 10 L/min) to eliminate any<br />
residual fluid.<br />
To clean the water trap (if used), use a mild detergent solution followed by rinsing and drying<br />
with a low-flow air source.<br />
To high level disinfect the exhalation valve, sense lines, wye and reusable patient circuit:<br />
1) Remove all particulate matter and bathe in a glutaraldehyde solution (e.g., Cidex (2%)) for 20<br />
minutes.<br />
2) Rinse gently for 2 minutes and use a low flow air source (less than 10 L/min) to eliminate any<br />
residual fluid.<br />
Sterilization:<br />
Sterilization of the patient circuit components and water traps should follow individual institution<br />
processes or guidelines.<br />
To reassemble the exhalation valve and patient circuit:<br />
1) Insert the side of the diaphragm with the scalloped edge into the mating cavity on the inside of<br />
the valve cap.<br />
CAUTION<br />
Valve assembly - If the diaphragm is inserted backwards when assembling the valve, it may<br />
adversely affect the operation of the ventilator. Be sure to insert the side of the diaphragm with the<br />
scalloped edge into the mating cavity on the inside of the valve cap.<br />
ATTENTION<br />
Assemblage de la valve – Si le diaphragme est inséré à l’envers lors de l’assemblage de la valve, il<br />
peut entraver le fonctionnement du ventilateur. S’assurer d’insérer le côté du diaphragme dont le bord<br />
est festonné dans la cavité commune à l’intérieur du couvercle de la valve.<br />
Page 13-10 <strong>LTV</strong> ® <strong>1200</strong> Ventilator Operator’s <strong>Manual</strong><br />
p/n 18247-001, Rev. G
2) Align the tab on the valve body with the notch on the valve cap and press until the cap and body<br />
“snap” together.<br />
NOTE<br />
Be careful not to dislodge the diaphragm when snapping the parts together.<br />
REMARQUE<br />
S’assurer de ne pas déplacer le diaphragme lors de l’assemblage des pièces.<br />
3) Inspect the patient circuit and all accessories, replace any excessively worn or damaged<br />
components and reassemble.<br />
4) Reconnect the exhalation valve drive line, the sense lines and the inspiratory limb to the mating<br />
ports on the side of the ventilator (see Patient Breathing Circuit – Connection Instructions in<br />
Appendix C - Installation and Checkout for detailed instructions).<br />
5) Leak test the patient breathing circuit.<br />
WARNING<br />
Leak Testing Patient Circuits – Leak test the patient circuit with all accessories connected before<br />
connection to the patient. Failing to do this can result in ineffective ventilation and possible harm to<br />
the patient. Refer to Leak Test in Chapter 11 – Ventilator Checkout Tests for detailed instructions.<br />
AVERTISSEMENT<br />
Essais de fuite du circuit du patient – Faire un essai de fuite du circuit du patient une fois que tous<br />
les accessoires sont en place, avant de faire le raccordement final au patient. L’omission de cette<br />
étape peut entraîner une ventilation inefficace et pourrait blesser le patient. Pour obtenir les<br />
consignes détaillées, consulter Essai de fuite dans le Chapitre 11 – Tests de vérification du<br />
ventilateur.<br />
Operator’s <strong>Manual</strong> <strong>LTV</strong> ® <strong>1200</strong> Ventilator Page 13-11<br />
p/n 18247-001, Rev. G
Page 13-12 <strong>LTV</strong> ® <strong>1200</strong> Ventilator Operator’s <strong>Manual</strong><br />
p/n 18247-001, Rev. G
Chapter 14 - POWER AND BATTERY OPERATION<br />
The <strong>LTV</strong> ® <strong>1200</strong> ventilator operates on Direct Current (11 to 15 VDC), supplied by an external AC to<br />
DC power adapter, an external battery or other suitable external DC power source such as the<br />
Pulmonetic Systems Universal Power Supply or Transport Battery System. The ventilator can also be<br />
powered for short periods of time by its own internal battery (see note below).<br />
• When the ventilator is connected to an appropriate external power source, the ventilator’s<br />
internal battery is continuously charged and will reach 90% charge status within 8 hours.<br />
• When the power connector on the ventilator is connected to the AC power adapter, the ventilator<br />
is isolated from the power supply mains.<br />
• If an <strong>LTV</strong> ® <strong>1200</strong> ventilator is allowed to operate on its internal battery to the point that the internal<br />
battery is completely depleted, the ventilator will shut down. If the ventilator remains in this state,<br />
the internal battery may recharge slightly within a few seconds / minutes and cause the ventilator<br />
to automatically restart and operate for a short period of time. This cycle can repeat several<br />
times, depending on the condition of the internal battery.<br />
NOTE<br />
The Charge Status LED is illuminated green when the internal battery is charged to >90% of its<br />
capacity. If the Charge Status LED is red, is flashing amber for more than 1 hour, or does not show a<br />
green Charge Status indication after 24 hours, the battery is defective and should be replaced.<br />
Please immediately contact a certified Pulmonetic Systems’ service technician.<br />
Internal Battery Use: The internal battery is intended for use during short periods while switching<br />
between external power supply connections, emergency situations or short duration transports. The<br />
length of time the ventilator will operate on internal power is a function of many factors such as<br />
settings, charge level and condition or age of the battery; therefore, the use of the internal battery as<br />
a standard operating practice is not recommended.<br />
REMARQUE<br />
Le voyant du DEL Charge Status est vert lorsque la pile interne est chargée à plus de 90 % de sa<br />
capacité. Si le voyant du DEL Charge Status est rouge, qu’il est jaune et clignote pendant plus d’une<br />
heure, ou qu’il n’affiche pas un Charge Status vert après 24 heures, la pile est défectueuse et il faut<br />
la changer. Veuillez communiquer immédiatement avec un technicien de service certifié par<br />
Pulmonetic Systems.<br />
Utilisation de la batterie interne: La batterie interne est conçue pour être utilisée sur de courtes<br />
périodes pendant la commutation entre des connexions d’alimentation externe, les situations<br />
d’urgence ou les transports de courte durée. La durée pendant laquelle le ventilateur fonctionnera sur<br />
l’alimentation interne dépend de plusieurs facteurs tels, la configuration, le niveau de la charge et la<br />
condition ou l’âge de la batterie; l’utilisation de la batterie interne pour l'opération normale n’est donc<br />
pas recommandée.<br />
Operator’s <strong>Manual</strong> <strong>LTV</strong> ® <strong>1200</strong> Ventilator Page 14-1<br />
p/n 18247-001, Rev. G
Using the AC Adapter<br />
To run the ventilator from the Pulmonetic Systems AC Power Adapter: 55<br />
1) Attach the power connector from the AC Adapter to the ventilator as shown here.<br />
2) Connect the proper AC power cable (110V or 220V plug) to the AC Power Adapter.<br />
3) Connect the 110V 56 or 220V power cable to a suitable power source. Verify the External Power<br />
LED shows green or amber.<br />
CAUTION<br />
Release Button - To avoid damaging the ventilator or the<br />
power connector, push the release button on the connector<br />
before removing it from the ventilator power port or the<br />
power port pigtail connector.<br />
ATTENTION<br />
Bouton de déclenchement – Pour éviter d'endommager le ventilateur ou le connecteur<br />
d'alimentation, appuyer sur le bouton de déclenchement situé sur le connecteur avant de le retirer du<br />
port d'alimentation du ventilateur ou du raccord de queue de cochon du port d'alimentation.<br />
While the ventilator is plugged in, the internal battery is continuously charged.<br />
55 Pulmonetic Systems AC Adapter, P/N 10537, 11537, or 18053-001<br />
56 Pulmonetic Systems Power Cord, P/N 10536 or P/N 17527-001<br />
Page 14-2 <strong>LTV</strong> ® <strong>1200</strong> Ventilator Operator’s <strong>Manual</strong><br />
p/n 18247-001, Rev. G
Using an External Battery<br />
Optional External Batteries 57 , Cables 58 and Charger 59 are available from Pulmonetic Systems. The<br />
Large External Battery Pack includes a large capacity battery and hard case with a fuse and power<br />
cable and is pre-wired with a locking quick-connector. The Small External Battery Pack includes a<br />
medium capacity battery, soft bag and power cable with fuse and locking quick-connector.<br />
CAUTION<br />
External Battery Pack - The External Battery Pack should only be connected to the <strong>LTV</strong> ® <strong>1200</strong><br />
ventilator using the Pulmonetic Systems External Battery Cable (PN 10802). This cable is pre-wired<br />
and properly terminated to ensure safe connection of the External Battery Pack to the ventilator.<br />
Release Button - To avoid damaging the ventilator or the<br />
power connector, push the release button on the connector<br />
before removing it from the ventilator power port or the<br />
power port pigtail connector.<br />
ATTENTION<br />
Bloc-piles externe – Le bloc-piles externe ne doit être branché qu’aux ventilateurs de la <strong>1200</strong> <strong>LTV</strong> ®<br />
à l’aide du câble pour piles externes de Pulmonetic Systems (N o pièce 10802). Ce câble est précâblé<br />
et ses terminaisons assurent une connexion sécuritaire entre le bloc-piles externe et le ventilateur.<br />
Bouton de déclenchement – Pour éviter d'endommager le ventilateur ou le connecteur<br />
d'alimentation, appuyer sur le bouton de déclenchement situé sur le connecteur avant de le retirer du<br />
port d'alimentation du ventilateur ou du raccord de queue de cochon du port d'alimentation.<br />
To run the ventilator from an external battery:<br />
1) Connect the battery cable quick-connector to the port on the external battery hard case or the soft<br />
bag.<br />
57 Pulmonetic Systems External Battery P/N 10787 and Case P/N 10790.<br />
58 Pulmonetic Systems External Battery Cable P/N 10802.<br />
59 Pulmonetic Systems External Battery Charger P/N 10801.<br />
Operator’s <strong>Manual</strong> <strong>LTV</strong> ® <strong>1200</strong> Ventilator Page 14-3<br />
p/n 18247-001, Rev. G
2) Connect the power connector on the battery cable to the power port on the left side of the<br />
ventilator as shown here. Verify the External Power LED shows green or amber.<br />
While the ventilator is connected to the external battery, the internal battery is being continuously<br />
charged.<br />
NOTE<br />
The External Battery Packs can only be recharged using the Pulmonetic Systems External Battery<br />
Charger. The External Battery Pack must be disconnected from the <strong>LTV</strong> ® <strong>1200</strong> ventilator before<br />
connecting to the External Battery Charger. The External Battery Pack can be fully recharged in 8<br />
hours. See the instruction sheet that comes with the External Battery Charger for information on how<br />
to properly configure the charger for your AC voltage and frequency.<br />
The external battery is a sealed lead acid battery. Some states and countries require that these<br />
batteries must be disposed of through an authorized recycling or hazardous materials center. Contact<br />
the proper agency for appropriate disposal procedures.<br />
REMARQUE<br />
Les blocs-piles externes ne peuvent être rechargés qu’en utilisant le chargeur de piles externe<br />
Pulmonetic Systems. Le bloc-piles externe doit être débranché du ventilateur de la <strong>1200</strong> <strong>LTV</strong> ® afin<br />
d’être branché au chargeur de piles externe. Il faut 8 heures pour recharger complètement le blocpiles<br />
externe. Consultez la feuille de directives incluse avec le chargeur de piles externe pour obtenir<br />
des renseignements sur la façon de configurer adéquatement le chargeur selon la tension alternative<br />
et la fréquence dont vous disposez.<br />
La batterie externe est une batterie à l’acide sans entretien. Certains états et pays exigent que l’on<br />
dispose de ces piles par l’entremise d’un centre autorisé de recyclage ou de matières dangereuses.<br />
Pour connaître les procédures appropriées, communiquez avec l’agence concernée.<br />
Page 14-4 <strong>LTV</strong> ® <strong>1200</strong> Ventilator Operator’s <strong>Manual</strong><br />
p/n 18247-001, Rev. G
For more detailed information on using or charging the external batteries, or for information on<br />
replacing battery box or bag fuse, see the <strong>LTV</strong> ® External Battery Kit <strong>Operator's</strong> <strong>Manual</strong>. 60<br />
The battery may be set and operated from any position, but always secure the battery box in place<br />
and keep the battery box in a stable, accessible position near the <strong>LTV</strong> ® ventilator. Keep all cords<br />
away from footpaths and moveable equipment, and tie them to unmoving surfaces such as the<br />
ventilator stand or bed post.<br />
Refer to your <strong>LTV</strong> ® External Battery Kit Operator’s <strong>Manual</strong> (P/N 10890) for other safety information,<br />
extended operating procedures and troubleshooting techniques.<br />
60 <strong>LTV</strong> ® Series External Battery Kit <strong>Operator's</strong> <strong>Manual</strong>, P/N 10890.<br />
Operator’s <strong>Manual</strong> <strong>LTV</strong> ® <strong>1200</strong> Ventilator Page 14-5<br />
p/n 18247-001, Rev. G
Using the Automobile Cigarette Lighter Adapter<br />
An optional Automobile Cigarette Lighter Adapter 61 is available to power the <strong>LTV</strong> ® <strong>1200</strong> ventilator<br />
while operating in a vehicle. This adapter is designed to connect to “high power” pre-wired +12V<br />
automobile cigarette lighter or auxiliary power outlets capable of supplying at least 20 amperes of<br />
current.<br />
• Newer vehicles have Auxiliary Power Outlets, which typically have lower contact resistance and<br />
higher amperage ratings than Automobile Cigarette Lighter Outlets and should be used when<br />
available.<br />
• The use of third-party-installed automobile cigarette lighter-style power outlets is not<br />
recommended (i.e. on battery boxes or wheelchairs).<br />
WARNING<br />
Before Using Automobile Cigarette Lighter or Power Outlets - Before using Automobile Cigarette<br />
Lighter or Power Outlets as a power source for the <strong>LTV</strong> ® <strong>1200</strong> ventilator, assure that the ventilator’s<br />
internal battery is in good condition and fully charged.<br />
Poor cigarette lighter or power outlet connections, electrical system defects (battery, charging system,<br />
etc.), or use of vehicle accessories (air conditioner, high current lights, high power audio equipment,<br />
etc.) could result in less than the required voltage being delivered to the ventilator. If this condition<br />
occurs, the ventilator will generate a POWER LOST alarm and switch the ventilator’s power source to<br />
the internal battery.<br />
AVERTISSEMENT<br />
Avant toute utilisation d’une prise d’allume-cigare ou d’une prise de courant — Avant d’utiliser<br />
un allume-cigare ou une prise de courant comme source d’alimentation du ventilateur <strong>LTV</strong> ® <strong>1200</strong>,<br />
vérifiez que la batterie interne du ventilateur est en bon état et entièrement chargée.<br />
L’utilisation d’un allume-cigare ou d’une prise de courant fournissant un branchement de qualité<br />
médiocre, des défauts du circuit électrique (batterie, système de charge, etc.), ou l’utilisation<br />
d’accessoires d’automobile (climatisation, phares, chaîne stéréo et haut-parleurs à forte<br />
consommation, etc.) peuvent affecter le voltage délivré au ventilateur et provoquer une sousalimentation<br />
de celui-ci. Dans cette situation, le ventilateur déclenche une alarme PAS ALIM SEC et<br />
utilise la batterie interne du ventilateur comme source d’alimentation.<br />
61 Pulmonetic Systems Automobile Cigarette Lighter Adapter P/N 10703.<br />
Page 14-6 <strong>LTV</strong> ® <strong>1200</strong> Ventilator Operator’s <strong>Manual</strong><br />
p/n 18247-001, Rev. G
CAUTION<br />
Automobile Cigarette Lighter and Power Outlets - Automobile cigarette lighter and power outlets<br />
are normally wired for a positive center contact and ground sleeve contact. Connecting the ventilator<br />
to an improperly wired outlet will cause the adapter fuse to blow and may damage the adapter or the<br />
ventilator.<br />
Automobile Cigarette Lighter Outlet Power Rating - Running a ventilator from an improperly rated<br />
automobile cigarette lighter outlet (less than 20 amperes) may cause a fuse in the automobile to blow,<br />
causing the ventilator and possibly other accessories in the automobile to stop operating.<br />
Automobile Cigarette Lighter Adapter - Do not operate the ventilator from the Automobile Cigarette<br />
Lighter Adapter while starting the vehicle or when jump starting the automobile. Doing so may cause<br />
damage to the ventilator.<br />
Automobile Cigarette Lighter Adapter Tip - Use care when disconnecting the Automobile Cigarette<br />
Lighter Adapter after use, its tip may be hot.<br />
Automobile Cigarette Lighter Outlet – Depending on the condition of the automobile battery,<br />
whether the automobile is turned off, being started or running, automobile cigarette lighter outlets can<br />
provide varying levels of voltage (in some, the outlet only operates when the vehicle is running).<br />
Verify which power source the ventilator is using by checking the External Power LED on the<br />
ventilator.<br />
ATTENTION<br />
Allume-cigare et prises de courant – L’allume-cigare et les prises de courant sont habituellement<br />
câblés de façon à obtenir un contact central positif et un contact du manchon à la terre. Le<br />
branchement du ventilateur dans une prise qui n’est pas câblée adéquatement aura pour effet de<br />
faire sauter le fusible de l’adaptateur et pourrait endommager l’adaptateur ou le ventilateur.<br />
Puissance nominale des prises d’allume-cigare – Le branchement d’un ventilateur à une prise<br />
d’allume-cigare qui ne possède pas la tension suffisante (moins de 20 ampères) peut faire griller un<br />
fusible de l’automobile, causant ainsi l’arrêt du ventilateur et éventuellement, celui d’autres<br />
accessoires de l’automobile.<br />
Adaptateur pour allume-cigare – Ne faites pas fonctionner le ventilateur à l’aide de l’adaptateur<br />
pour allume-cigare lorsque vous démarrez le véhicule ou lorsque vous faites une connexion<br />
provisoire de la batterie d'un véhicule. Vous pourriez ainsi endommager le ventilateur.<br />
Embout adaptateur pour allume-cigarette d’automobile - Après l'utilisation, débrancher<br />
l’adaptateur pour allume-cigarette d’automobile avec précaution car son embout peut être chaud.<br />
Prise d’allume-cigare d’automobile – Selon la condition de la batterie de l’automobile, si le moteur<br />
est coupé, démarré ou est en marche, les prises d’allume-cigare d’une automobile peut générer des<br />
niveaux de tension variés(sur certains modèles, la prise ne fonctionne que si le moteur est en<br />
marche). Vérifier la source d’alimentation utilisée par le ventilateur indiquée par la DEL External<br />
Power du ventilateur.<br />
Operator’s <strong>Manual</strong> <strong>LTV</strong> ® <strong>1200</strong> Ventilator Page 14-7<br />
p/n 18247-001, Rev. G
CAUTION<br />
Release Button - To avoid damaging the ventilator or the<br />
power connector, push the release button on the connector<br />
before removing it from the ventilator power port or the<br />
power port pigtail connector.<br />
ATTENTION<br />
Bouton de déclenchement – Pour éviter d'endommager<br />
le ventilateur ou le connecteur d'alimentation, appuyer<br />
sur le bouton de déclenchement situé sur le connecteur<br />
avant de le retirer du port d'alimentation du ventilateur<br />
ou du raccord de queue de cochon du port d'alimentation.<br />
To run the ventilator from an automobile cigarette lighter:<br />
1) With the ventilator NOT connected to the outlet, start the automobile.<br />
2) Connect the Automobile Cigarette Lighter Adapter to the automobile cigarette lighter or power<br />
outlet on the vehicle and verify the LED on the adapter shows green.<br />
• Do not use a DC extension cord between the automobile cigarette lighter adapter and the<br />
automobile cigarette lighter or power outlet port.<br />
3) Attach the power connector of the adapter to the ventilator.<br />
Page 14-8 <strong>LTV</strong> ® <strong>1200</strong> Ventilator Operator’s <strong>Manual</strong><br />
p/n 18247-001, Rev. G
4) Verify the ventilator is being powered by the vehicle battery, through the Automobile Cigarette<br />
Lighter Adapter.<br />
• The vehicle battery is powering the ventilator if the External Power LED shows green.<br />
• An amber External Power LED and/or a POWER LOW alarm indicates the external power<br />
level is low.<br />
Immediately reconnect the ventilator to an alternate power source (i.e. the AC Adapter or<br />
External Battery) until the cause of the problem (Automobile Cigarette Lighter Adapter<br />
cable connection or the vehicle battery or power outlet), has been identified and corrected.<br />
• POWER LOST alarm indicates external power voltage has dropped below the usable level<br />
and the ventilator has switched to internal power.<br />
Immediately reconnect the ventilator to an alternate power source (i.e. the AC Adapter or<br />
External Battery) until the cause of the problem (Automobile Cigarette Lighter Adapter<br />
cable connection or the vehicle battery or power outlet), has been identified and corrected.<br />
NOTE<br />
The Automobile Cigarette Lighter Adapter contains a fuse and is designed to protect the <strong>LTV</strong> ®<br />
ventilator from typical automobile power transients. The green LED on the adapter indicates the<br />
adapter is connected and operating correctly. If the LED does not light, the adapter may not be<br />
properly seated in the outlet or the fuse may be blown. Try reseating or turning the adapter to create<br />
a better connection or change the fuse (see Chapter 14 - Replacing the Automobile Adapter Fuse).<br />
REMARQUE<br />
L’adaptateur pour allume-cigare contient un fusible et est conçu pour protéger les ventilateurs de la<br />
<strong>1200</strong> <strong>LTV</strong> ® contre les transitoires d’alimentation des automobiles. Le voyant DEL vert de l’adaptateur<br />
indique que l’adaptateur est branché et qu’il fonctionne adéquatement. Si le voyant ne s’allume pas,<br />
l’adaptateur n’est peut-être pas bien installé dans la prise ou le fusible est peut-être sauté. Essayer de<br />
replacer ou de tourner l’adaptateur de manière à obtenir un meilleur raccordement ou changer le fusible<br />
(se reporter au Chapitre 14 – Remplacement du fusible de l’adaptateur).<br />
While the ventilator is connected to the Automobile Cigarette Lighter Adapter, the internal battery is<br />
being continuously charged.<br />
Operator’s <strong>Manual</strong> <strong>LTV</strong> ® <strong>1200</strong> Ventilator Page 14-9<br />
p/n 18247-001, Rev. G
Replacing the Automobile Adapter Fuse<br />
To replace the fuse:<br />
1) Unscrew the knurled nut.<br />
2) Remove the contact point, nut, fuse and spring as shown below. Be careful not to lose the<br />
internal spring, as the adapter will not operate correctly without it.<br />
3) Replace the spring and new fuse as shown.<br />
4) Ensure that the retaining ring is properly in place.<br />
5) Replace the contact point and tighten the nut.<br />
The Universal Power Supply (UPS)<br />
The Pulmonetic Systems Universal Power Supply kit is a rechargeable external power source and<br />
backup system for Pulmonetic Systems’ devices. It has the following features:<br />
• AC/DC Converter<br />
• Backup Battery Charger<br />
• Power and Charge Status LED<br />
• Audible and visual alarms to indicate loss of mains power<br />
The Universal Power supply provides an AC derived DC power source which is backed up by a<br />
rechargeable 12 volt sealed lead - acid battery. It can power the ventilator and the graphics monitor.<br />
For more information refer to the UPS Operator’s <strong>Manual</strong>, P/N 14492.<br />
The Transport Battery System (TBS)<br />
The TBS is a portable, re-chargeable external power source for the <strong>LTV</strong> ® ventilators. It has the<br />
following features:<br />
• Two no-maintenance re-chargeable Lithium Ion batteries providing up to six hours of mobile<br />
power for the <strong>LTV</strong> ® ventilator.<br />
• The TBS is easy and convenient to set-up and operate and the system includes a battery<br />
charger for use when the TBS has been disconnected from the ventilator<br />
For more information about the TBS, see the Transport Battery System Operator’s <strong>Manual</strong>, P/N<br />
17216-001.<br />
Page 14-10 <strong>LTV</strong> ® <strong>1200</strong> Ventilator Operator’s <strong>Manual</strong><br />
p/n 18247-001, Rev. G
The SprintPack Li-Ion Power System<br />
The SprintPack is a portable, re-chargeable external power source. It accepts external <strong>LTV</strong> ® power<br />
sources and has the following features:<br />
• Two no-maintenance high capacity HotSwap re-chargeable Lithium Ion batteries providing<br />
up to six hours of mobile power for the <strong>LTV</strong> ® ventilator.<br />
• Ability to act as an Uninterruptible Power Supply (UPS) when an approved power source is<br />
connected and the batteries are fully charged.<br />
For more information about the SprintPack, see the SprintPack Li-Ion Power System Operator’s<br />
<strong>Manual</strong>, P/N 18415-001.<br />
Operator’s <strong>Manual</strong> <strong>LTV</strong> ® <strong>1200</strong> Ventilator Page 14-11<br />
p/n 18247-001, Rev. G
Caring for the Internal Battery<br />
The <strong>LTV</strong> ® <strong>1200</strong> ventilator uses a rechargeable, sealed lead acid internal battery.<br />
To preserve maximum battery life:<br />
• Fully recharge the battery every 2 months while the ventilator is in storage. Recharge the battery<br />
by plugging the ventilator into an AC power source for 24 hours. If the battery Charge Status<br />
LED is not illuminated green within 24 hours, or if it is illuminated red, immediately contact a<br />
certified Pulmonetic Systems’ service technician or Pulmonetic Systems.<br />
• Store the ventilator at temperatures less than 60°C (140°F).<br />
CAUTION<br />
Storage Temperature - Storing the <strong>LTV</strong> ® <strong>1200</strong> ventilator at temperatures above 60°C (140°F) for<br />
long periods can damage the internal battery and cause expected battery duration to degrade.<br />
Internal Battery Use: The internal battery is intended for use during short periods while switching<br />
between external power supply connections, emergency situations or short duration transports. The<br />
length of time the ventilator will operate on internal power is a function of many factors such as<br />
settings, charge level and condition or age of the battery; therefore, the use of the internal battery as<br />
a standard operating practice is not recommended.<br />
ATTENTION<br />
Température d'entreposage - L'entreposage du ventilateur de la <strong>1200</strong> série <strong>LTV</strong> ® à des<br />
températures supérieures à 60° C (140° F) durant des périodes prolongées peut endommager la pile<br />
interne et causer l'usure prématurée de la pile.<br />
Utilisation de la batterie interne: La batterie interne est conçue pour être utilisée sur de courtes<br />
périodes pendant la commutation entre des connexions d’alimentation externe, les situations<br />
d’urgence ou les transports de courte durée. La durée pendant laquelle le ventilateur fonctionnera sur<br />
l’alimentation interne dépend de plusieurs facteurs tels, la configuration, le niveau de la charge et la<br />
condition ou l’âge de la batterie; l’utilisation de la batterie interne pour l'opération normale n’est donc<br />
pas recommandée.<br />
Battery Replacement<br />
When necessary, the <strong>LTV</strong> ® <strong>1200</strong> ventilator’s internal battery can be replaced by a trained service<br />
technician. To replace the <strong>LTV</strong> internal battery, refer to the instructions for use provided with the<br />
replacement battery kit, P/N 18634-001.<br />
Battery Disposal<br />
The <strong>LTV</strong> ® <strong>1200</strong> ventilator uses sealed lead acid batteries. Some jurisdictions consider these batteries<br />
hazardous materials subject to special disposal regulations. Contact the proper agency for<br />
information on permissible methods of disposing of used batteries.<br />
Page 14-12 <strong>LTV</strong> ® <strong>1200</strong> Ventilator Operator’s <strong>Manual</strong><br />
p/n 18247-001, Rev. G
Chapter 15 - TROUBLESHOOTING<br />
This chapter describes troubleshooting for the <strong>LTV</strong> ® <strong>1200</strong> ventilator. Some problems can result from<br />
improper operation and can easily be corrected without any modification to the ventilator. Other<br />
problems may require that the ventilator be recalibrated or have parts replaced.<br />
Do not attempt to repair or replace any part of the ventilator unless you are trained and<br />
authorized for service on the <strong>LTV</strong> ® <strong>1200</strong> ventilator.<br />
This chapter is organized into five sections:<br />
Displays and Buttons (See page 15-2) Includes problems with control and window displays<br />
and with setting controls.<br />
Ventilator Performance (See page 15-6) Includes problems with delivered or monitored<br />
pressure, volume or PEEP, accuracy, sensitivity and<br />
triggering.<br />
Power and Battery Operation<br />
(See page 15-15)<br />
Includes problems with turning the ventilator on,<br />
operating from external power sources, battery<br />
operation or duration, and vent inops.<br />
Alarms (See page 15-17) Includes problems with recurring alarms.<br />
Checkout Test Failures (See page 15-24) Includes problems detected while performing the<br />
VENT CHECK tests.<br />
Test Lung Operation (See page 15-26) Includes problems encountered when operating the<br />
ventilator with a test lung.<br />
The troubleshooting tables are organized by symptom, then by possible causes and methods of<br />
diagnosing and resolving the problem. If you do not find the symptom you are looking for under one<br />
section, you may find it listed under another section, or you may be able to diagnose the problem by<br />
reading sections with related symptoms. For information on resolving problems that are not listed<br />
here, contact Pulmonetic Systems.<br />
Operator’s <strong>Manual</strong> <strong>LTV</strong> ® <strong>1200</strong> Ventilator Page 15-1<br />
p/n 18247-001, Rev. G
Displays and Buttons<br />
Some of the symptoms listed in this section are part of the normal operation of the ventilator and do<br />
not indicate any problem with the ventilator. They are included here for completeness.<br />
Symptoms Possible Causes What to Do<br />
Pres. Control<br />
display flashing.<br />
Pres. Support<br />
display flashing.<br />
High Pres. Limit<br />
display flashing.<br />
Low Pressure<br />
display flashing.<br />
Low Min Vol display<br />
flashing.<br />
O2 % (O2 Flush)<br />
display flashing.<br />
Pressure Control breath<br />
terminated by flow - PC<br />
FLOW TERM is set to<br />
on.<br />
Pressure support<br />
breath terminated by<br />
time - set under TIME<br />
TERM.<br />
HIGH PRES alarm<br />
occurred.<br />
LOW PRES alarm<br />
occurred.<br />
LOW MIN VOL alarm<br />
occurred.<br />
LOW O2 PRES or<br />
HIGH O2 PRES alarm<br />
occurred.<br />
Pressure Control breaths are normally<br />
terminated when the set inspiratory time expires.<br />
Flow termination of Pressure Control breaths is<br />
allowed when PC FLOW TERM is set to ON (see<br />
page 10-11.) When a Pressure Control breath is<br />
terminated by flow instead of time, the Pres.<br />
Control display is flashed.<br />
Pressure support breaths are normally<br />
terminated when the flow drops below the set<br />
percentage of the peak flow. Pressure support<br />
breaths may also terminate on time when the<br />
variable time limit is reached before the flow<br />
drops to the set level. (See pages 10-9 and 10-<br />
10 for an explanation of the FLOW TERM and<br />
TIME TERM features.) When a pressure support<br />
breath is terminated based on time, the Pres<br />
Support display is flashed.<br />
The High Pres. Limit display is flashed and the<br />
HIGH PRES message is displayed when a high<br />
pressure alarm occurs. The display will continue<br />
to flash even after the condition clears. (See<br />
page 6-4 for an explanation of the HIGH PRES<br />
alarm feature.)<br />
The Low Pressure display is flashed and the<br />
LOW PRES message is displayed when a low<br />
pressure alarm occurs. The display will continue<br />
to flash even after the condition clears. (See<br />
page 6-12 for an explanation of the LOW PRES<br />
alarm feature.)<br />
The Low Min Vol display is flashed and the<br />
LOW MIN VOL message is displayed when a<br />
low minute volume alarm occurs. The display will<br />
continue to flash even after the condition clears.<br />
(See page 6-11 for an explanation of the LOW<br />
MIN VOL alarm feature.)<br />
The O2 % (O2 Flush) display is flashed and the<br />
LOW O2 PRES or HIGH O2 PRES message is<br />
displayed when a low or high O2 pressure alarm<br />
occurs. The display will continue to flash even<br />
after the condition clears. (See pages 9-19 and<br />
9-12 for an explanation of the LOW O2 PRES<br />
and HIGH O2 PRES alarm features.)<br />
Page 15-2 <strong>LTV</strong> ® <strong>1200</strong> Ventilator Operator’s <strong>Manual</strong><br />
p/n 18247-001, Rev. G
Symptoms Possible Causes What to Do<br />
Control display<br />
flashing when setting<br />
a control.<br />
A display or LED<br />
does not illuminate.<br />
Ventilator is running<br />
but displays are<br />
turned off.<br />
A control doesn't<br />
operate.<br />
Set Value knob<br />
doesn't operate.<br />
Control setting is<br />
limited.<br />
Internal problem with<br />
the ventilator.<br />
Displays are blanked<br />
while on battery power.<br />
Internal problem with<br />
the ventilator.<br />
Control not active in<br />
selected mode.<br />
A control's value may be limited by the current<br />
settings of other controls. (See page 5-5 for an<br />
explanation of Control Limiting.)<br />
Do a display test (see page 11-4 for instructions.)<br />
If the display or LED does not illuminate,<br />
immediately contact a certified Pulmonetic<br />
Systems’ service technician.<br />
To conserve battery life while running from the<br />
internal battery, most of the displays are turned<br />
off when no changes are made to the control<br />
settings for 60 seconds. To turn the displays<br />
back on, touch any control or button or turn the<br />
Set Value knob.<br />
Do a display test (see page 11-4 for instructions.)<br />
If the display or LED does not illuminate,<br />
immediately contact a certified Pulmonetic<br />
Systems’ service technician.<br />
If a control is dimmed, it is not active in the<br />
currently selected mode and changing it's setting<br />
does not affect ventilation. (See page 5-4 for an<br />
explanation of Bright, Dim and Blank Control<br />
Displays.)<br />
Controls are locked. If the controls are locked, a LOCKED message<br />
will be displayed when a control is selected.<br />
To unlock in EASY mode, push the Control<br />
Lock button. To unlock in HARD mode, push<br />
and hold the Control Lock button for 3 seconds.<br />
(See page 10-15 for an explanation of the CTRL<br />
UNLOCK feature and Control Lock button.)<br />
Control is not selected. Before a control value can be changed, the<br />
control must be selected. To select a control,<br />
push the associated button. When a control is<br />
selected it is displayed at normal intensity and all<br />
other controls are dimmed. (See page 5-2 for an<br />
explanation of how to use the controls.)<br />
Controls are limited. A control's value may be limited by the current<br />
settings of other controls. To change the value of<br />
the current control, change the value of the<br />
flashing controls. (See page 5-5 for an<br />
explanation of Control Limiting.)<br />
Internal problem with<br />
the ventilator.<br />
Do a control test (see page 11-6 for instructions).<br />
If the control does not operate, immediately<br />
contact a certified Pulmonetic Systems’ service<br />
technician.<br />
Operator’s <strong>Manual</strong> <strong>LTV</strong> ® <strong>1200</strong> Ventilator Page 15-3<br />
p/n 18247-001, Rev. G
Symptoms Possible Causes What to Do<br />
Can’t unlock the<br />
controls.<br />
Volume Pressure<br />
mode button does not<br />
operate, both LEDs<br />
are off.<br />
Pres. Control button<br />
does not operate,<br />
associated display is<br />
off.<br />
O2 % (O2 Flush)<br />
button does not<br />
operate, associated<br />
display is off.<br />
Low Pressure O2<br />
Source button<br />
associated LED does<br />
not operate.<br />
LMV OFF is<br />
displayed.<br />
LMV LPPS OFF is<br />
displayed.<br />
LPPS OFF is<br />
displayed.<br />
f PEEP OFF is<br />
displayed.<br />
HI PEEP OFF is<br />
displayed.<br />
HIGH f OFF is<br />
displayed.<br />
HI f/Vt OFF is<br />
displayed.<br />
Hard unlock method<br />
selected under CTRL<br />
UNLOCK.<br />
Wrong model selected<br />
in maintenance mode.<br />
Wrong model selected<br />
in maintenance mode.<br />
Wrong model selected<br />
in maintenance mode.<br />
Wrong model selected<br />
in maintenance mode.<br />
Low Minute Volume<br />
alarm is turned off.<br />
Low Minute Volume<br />
alarm is turned off and<br />
the LPP ALARM has<br />
been set to VC/PC<br />
ONLY.<br />
LPP ALARM has been<br />
set to VC/PC ONLY.<br />
The High Breath Rate<br />
and High PEEP alarms<br />
are turned off.<br />
The High PEEP alarm<br />
is turned off.<br />
The High Breath Rate<br />
alarm is turned off.<br />
The SBT High f/Vt<br />
alarm is turned off<br />
during the SBT mode of<br />
ventilation.<br />
Two unlock methods are available on the <strong>LTV</strong> ®<br />
ventilator: (See pages 5-6 and 10-15 for an<br />
explanation of CTRL UNLOCK.)<br />
To unlock in EASY mode, push the Control<br />
Lock button. To unlock in HARD mode, push<br />
and hold the Control Lock button for 3 seconds.<br />
Immediately contact a certified Pulmonetic<br />
Systems’ service technician.<br />
Immediately contact a certified Pulmonetic<br />
Systems’ service technician.<br />
Immediately contact a certified Pulmonetic<br />
Systems’ service technician.<br />
Immediately contact a certified Pulmonetic<br />
Systems’ service technician.<br />
This is an informational message only (see<br />
Chapter 9 - LMV OFF for an explanation of this<br />
feature).<br />
This is an informational message only (see<br />
Chapter 9 - LMV LPPS OFF for an explanation of<br />
this feature).<br />
This is an informational message only (see<br />
Chapter 9 - LPPS OFF for an explanation of this<br />
feature).<br />
This is an informational message only (see<br />
Chapter 9 -<br />
f PEEP OFF for an explanation of this feature).<br />
This is an informational message only (see<br />
Chapter 9 - HI PEEP OFF for an explanation of<br />
this feature).<br />
This is an informational message only (see<br />
Chapter 9 - HIGH f OFF for an explanation of this<br />
feature).<br />
This is an informational message only (see<br />
Chapter 9 - HI f/Vt OFF for an explanation of this<br />
feature).<br />
Page 15-4 <strong>LTV</strong> ® <strong>1200</strong> Ventilator Operator’s <strong>Manual</strong><br />
p/n 18247-001, Rev. G
Symptoms Possible Causes What to Do<br />
LO f/Vt OFF is<br />
displayed.<br />
LO PEEP OFF is<br />
displayed.<br />
SBT f OFF is<br />
displayed.<br />
SBT f/Vt OFF is<br />
displayed.<br />
SBT HI f OFF is<br />
displayed.<br />
SBT LO f OFF is<br />
displayed.<br />
SBT TIME is<br />
displayed.<br />
The SBT Low f/Vt alarm<br />
is turned off during the<br />
SBT mode of<br />
ventilation.<br />
The Low PEEP alarm is<br />
turned off.<br />
The SBT High Breath<br />
Rate and SBT Low<br />
Breath Rate alarms are<br />
turned off during the<br />
SBT mode of<br />
ventilation.<br />
The SBT High f/Vt and<br />
SBT Low f/Vt alarms<br />
are turned off during<br />
the SBT mode of<br />
ventilation.<br />
The SBT High Breath<br />
Rate alarm is turned off<br />
during the SBT mode of<br />
ventilation.<br />
The SBT Low Breath<br />
Rate alarm is turned off<br />
during the SBT mode of<br />
ventilation.<br />
The SBT mode of<br />
ventilation will end in<br />
two (2) minutes.<br />
This is an informational message only (see<br />
Chapter 9 - LO f/Vt OFF for an explanation of this<br />
feature).<br />
This is an informational message only (see<br />
Chapter 9 - LO PEEP OFF for an explanation of<br />
this feature).<br />
This is an informational message only (see<br />
Chapter 9 - SBT f OFF for an explanation of this<br />
feature).<br />
This is an informational message only (see<br />
Chapter 9 - SBT f/Vt OFF for an explanation of<br />
this feature).<br />
This is an informational message only (see<br />
Chapter 9 - SBT HI f OFF for an explanation of<br />
this feature).<br />
This is an informational message only (see<br />
Chapter 9 - SBT LO f OFF for an explanation of<br />
this feature).<br />
This is an informational message only (see<br />
Chapter 9 - SBT TIME for an explanation of this<br />
feature).<br />
Operator’s <strong>Manual</strong> <strong>LTV</strong> ® <strong>1200</strong> Ventilator Page 15-5<br />
p/n 18247-001, Rev. G
Ventilator Performance<br />
Symptoms Possible Causes What to Do<br />
Ventilator is<br />
autocycling,<br />
monitored volumes<br />
are very small, RT<br />
XDCR DATA item<br />
FTx shows negative<br />
flows during<br />
exhalation and<br />
positive flows during<br />
inspiration.<br />
Ventilator won’t allow<br />
patient to exhale.<br />
Set pressure not<br />
reached and turbine<br />
is humming.<br />
Turbine sounds like<br />
inspiration even<br />
during exhalation.<br />
Monitored volume is<br />
high.<br />
Delivered volume is<br />
high.<br />
Sense lines are<br />
reversed.<br />
Diaphragm installed<br />
backwards or<br />
incorrectly seated in<br />
exhalation valve.<br />
Sense lines occluded or<br />
pinched.<br />
Internal problem with<br />
the ventilator.<br />
Failed calibration or<br />
internal problem with<br />
the ventilator.<br />
Very small ET tube<br />
connected directly to<br />
wye.<br />
The sense lines are not designed to be removed<br />
from either the wye or the luer fittings. If the<br />
sense lines have been removed and replaced<br />
incorrectly, they may not seal correctly when<br />
replaced. Replace the patient wye and sense<br />
lines with a known good assembly.<br />
Open the exhalation valve and remove the<br />
diaphragm. Reseat the diaphragm and snap the<br />
valve cap back in place. See page 13-10 for a<br />
diagram of correct exhalation valve assembly.<br />
Check high and low pressure sense lines to be<br />
sure they are correctly attached and securely<br />
seated at both the ventilator and wye ends.<br />
Verify lines are not occluded or pinched.<br />
Immediately contact a certified Pulmonetic<br />
Systems’ service technician.<br />
Immediately contact a certified Pulmonetic<br />
Systems’ service technician.<br />
A very small ET tube connected directly to the<br />
wye may cause turbulence that causes the flow<br />
differential to be read incorrectly. To reduce this<br />
turbulence, add a short larger bore extension<br />
between the ET tube and wye. In this case, the<br />
monitored volume is high, but the delivered<br />
volume is accurate.<br />
Page 15-6 <strong>LTV</strong> ® <strong>1200</strong> Ventilator Operator’s <strong>Manual</strong><br />
p/n 18247-001, Rev. G
Symptoms Possible Causes What to Do<br />
continued…<br />
Monitored volume is<br />
high.<br />
Delivered volume is<br />
high.<br />
Delivered volume is<br />
twice the set<br />
volume.<br />
Low side sense line or<br />
elbow at patient wye<br />
loose or leaking.<br />
High or low sense lines<br />
are occluded.<br />
High or low sense ports<br />
in the wye are<br />
occluded.<br />
Sense lines are<br />
reversed.<br />
Check high and low pressure sense lines to be<br />
sure they are correctly attached and securely<br />
seated at both the ventilator and wye ends.<br />
Check the luer fitting connections for leaks.<br />
Check the elbow connectors at the wye to be<br />
sure they have not loosened or been broken<br />
loose.<br />
Verify lines are not occluded or pinched.<br />
The sense lines are not designed to be removed<br />
from either the wye or the luer fittings. If the<br />
sense lines have been removed and replaced<br />
incorrectly, they may not seal correctly when<br />
replaced. Replace the patient wye and sense<br />
lines with a known good assembly.<br />
Failed autozero. Perform an autozero under XDCR ZERO. See<br />
page 10-28 for more information.<br />
Failed calibration or<br />
internal problem with<br />
the ventilator.<br />
VHome setting does<br />
not match flow valve.<br />
Monitored volume is<br />
low.<br />
Delivered volume is<br />
low. High or low side sense<br />
line or elbow at patient<br />
wye loose or leaking.<br />
High or low sense lines<br />
are occluded.<br />
High or low sense ports<br />
in the wye are<br />
occluded.<br />
Immediately contact a certified Pulmonetic<br />
Systems’ service technician.<br />
Immediately contact a certified Pulmonetic<br />
Systems’ service technician.<br />
Circuit leak. Do a leak test and reseat or replace the leaking<br />
parts or connections. See page 11-8 for<br />
instructions.<br />
Check high and low pressure sense lines to be<br />
sure they are correctly attached and securely<br />
seated at both the ventilator and wye ends.<br />
Check the luer fitting connections for leaks.<br />
Check the elbow connectors at the wye to be<br />
sure they have not loosened or been broken<br />
loose.<br />
Verify lines are not occluded or pinched.<br />
Operator’s <strong>Manual</strong> <strong>LTV</strong> ® <strong>1200</strong> Ventilator Page 15-7<br />
p/n 18247-001, Rev. G
Symptoms Possible Causes What to Do<br />
continued…<br />
Monitored volume is<br />
low.<br />
Delivered volume is<br />
low.<br />
Delivered volume is<br />
half the set volume.<br />
Delivered pressure is<br />
low, PEEP is low,<br />
ventilator is<br />
autocycling.<br />
Delivered pressure is<br />
low.<br />
Monitored pressure is<br />
low.<br />
Exhalation drive line<br />
leaking or loose.<br />
Exhalation valve<br />
leaking during<br />
inspiration.<br />
Sense lines are<br />
reversed.<br />
Leak Compensation is<br />
not on.<br />
Check the exhalation drive line at both the<br />
ventilator and exhalation valve ends. Verify the<br />
line is securely seated and not leaking.<br />
Verify the exhalation valve is not leaking during<br />
inspiration. If it is leaking, open the exhalation<br />
valve and remove the diaphragm. Reseat the<br />
diaphragm. See page 13-10 for a diagram of<br />
correct exhalation valve assembly.<br />
If necessary, replace the exhalation diaphragm,<br />
or exhalation valve with a new one.<br />
The sense lines are not designed to be removed<br />
from either the wye or the luer fittings. If the<br />
sense lines have been removed and replaced<br />
incorrectly, they may not seal correctly when<br />
replaced. Replace the patient wye and sense<br />
lines with a known good assembly.<br />
Verify that the Leak Compensation extended<br />
features option is set to On (default setting is on).<br />
See page 10-12 for instructions.<br />
Failed autozero. Perform an autozero under XDCR ZERO. See<br />
page 10-28 for more information.<br />
Failed calibration or<br />
internal problem with<br />
the ventilator.<br />
VHome setting does<br />
not match flow valve.<br />
Immediately contact a certified Pulmonetic<br />
Systems’ service technician.<br />
Immediately contact a certified Pulmonetic<br />
Systems’ service technician.<br />
Circuit leak. Run a leak test and reseat or replace the leaking<br />
parts or connections. See page 11-8 for<br />
instructions.<br />
Page 15-8 <strong>LTV</strong> ® <strong>1200</strong> Ventilator Operator’s <strong>Manual</strong><br />
p/n 18247-001, Rev. G
Symptoms Possible Causes What to Do<br />
Continued…<br />
Delivered pressure is<br />
low, PEEP is low,<br />
ventilator is<br />
autocycling.<br />
Delivered pressure is<br />
low.<br />
Monitored pressure is<br />
low.<br />
High or low side sense<br />
line or elbow at patient<br />
wye loose or leaking.<br />
High or low sense lines<br />
are occluded.<br />
High or low sense ports<br />
in the wye are<br />
occluded.<br />
Exhalation drive line<br />
leaking or loose.<br />
Exhalation valve<br />
leaking during<br />
inspiration.<br />
Sense lines are<br />
reversed.<br />
Leak Compensation is<br />
not on.<br />
Check high and low pressure sense lines to be<br />
sure they are correctly attached and securely<br />
seated at both the ventilator and wye ends.<br />
Check the luer fitting connections for leaks.<br />
Check the elbow connectors at the wye to be<br />
sure they have not loosened or been broken<br />
loose.<br />
Verify lines are not occluded or pinched.<br />
Check the exhalation drive line at both the<br />
ventilator and exhalation valve ends. Verify the<br />
line is securely seated and not leaking.<br />
Check the exhalation drive line at both the<br />
ventilator and exhalation valve ends. Verify the<br />
line is securely seated and not leaking.<br />
Verify the exhalation valve is not leaking during<br />
inspiration. If it is leaking, open the exhalation<br />
valve and remove the diaphragm. Reseat the<br />
diaphragm. See page 13-10 for a diagram of<br />
correct exhalation valve assembly.<br />
If necessary, replace the exhalation diaphragm,<br />
or exhalation valve with a new one.<br />
The sense lines are not designed to be removed<br />
from either the wye or the luer fittings. If the<br />
sense lines have been removed and replaced<br />
incorrectly, they may not seal correctly when<br />
replaced. Replace the patient wye and sense<br />
lines with a known good assembly.<br />
Verify that the Leak Compensation extended<br />
features option is set to On (default setting is on).<br />
See page 10-12 for instructions.<br />
Failed autozero. Perform an autozero under XDCR ZERO. See<br />
page 10-28 for more information.<br />
Failed calibration or<br />
internal problem with<br />
the ventilator.<br />
Immediately contact a certified Pulmonetic<br />
Systems’ service technician.<br />
Operator’s <strong>Manual</strong> <strong>LTV</strong> ® <strong>1200</strong> Ventilator Page 15-9<br />
p/n 18247-001, Rev. G
Symptoms Possible Causes What to Do<br />
Delivered pressure is<br />
high.<br />
Monitored pressure is<br />
high.<br />
Delivered pressure<br />
increases towards<br />
end of inspiration.<br />
Delivered flow is high.<br />
Delivered flow is low.<br />
Bias flow is 20 lpm or<br />
5 lpm instead of 10<br />
lpm.<br />
Diaphragm is<br />
incorrectly seated in<br />
exhalation valve.<br />
High or low side sense<br />
line or elbow at patient<br />
wye loose or leaking.<br />
High or low sense lines<br />
are occluded.<br />
High or low sense ports<br />
in the wye are<br />
occluded.<br />
Open the exhalation valve and remove the<br />
diaphragm. Reseat the diaphragm and snap the<br />
exhalation valve in place. See page 13-10 for a<br />
diagram of correct exhalation valve assembly.<br />
Check high and low pressure sense lines to be<br />
sure they are correctly attached and securely<br />
seated at both the ventilator and wye ends.<br />
Check the luer fitting connections for leaks.<br />
Check the elbow connectors at the wye to be<br />
sure they have not loosened or been broken<br />
loose.<br />
Verify lines are not occluded or pinched.<br />
Check the exhalation drive line at both the<br />
ventilator and exhalation valve ends. Verify the<br />
line is securely seated and not leaking.<br />
Failed autozero. Perform an autozero under XDCR ZERO. See<br />
page 10-28 for more information.<br />
Failed calibration or<br />
internal problem with<br />
the ventilator.<br />
VHome setting does<br />
not match flow valve.<br />
Disconnected<br />
Exhalation Drive Line.<br />
Leaks in the Patient<br />
Circuit.<br />
Immediately contact a certified Pulmonetic<br />
Systems’ service technician.<br />
Immediately contact a certified Pulmonetic<br />
Systems’ service technician.<br />
Verify lines are not occluded or pinched.<br />
Check the exhalation drive line at both the<br />
ventilator and exhalation valve ends. Verify the<br />
line is securely seated and not leaking.<br />
Failed autozero. Perform an autozero under XDCR ZERO. See<br />
page 10-28 for more information.<br />
Failed calibration or<br />
internal problem with<br />
the ventilator.<br />
VHome setting does<br />
not match flow valve.<br />
Immediately contact a certified Pulmonetic<br />
Systems’ service technician.<br />
Immediately contact a certified Pulmonetic<br />
Systems’ service technician.<br />
Page 15-10 <strong>LTV</strong> ® <strong>1200</strong> Ventilator Operator’s <strong>Manual</strong><br />
p/n 18247-001, Rev. G
Symptoms Possible Causes What to Do<br />
Sensitivity does not<br />
appear to be<br />
accurate.<br />
Ventilator is<br />
autocycling.<br />
Circuit leak. Run a leak test and reseat or replace the leaking<br />
parts or connections. See page 11-8 for<br />
instructions.<br />
Sense lines are<br />
reversed.<br />
High or low side sense<br />
line or elbow at patient<br />
wye loose or leaking.<br />
High or low sense lines<br />
are occluded.<br />
High or low sense ports<br />
in the wye are<br />
occluded.<br />
Pressure Control or<br />
Pressure Support set<br />
below PEEP.<br />
The sense lines are not designed to be removed<br />
from either the wye or the luer fittings. If the<br />
sense lines have been removed and replaced<br />
incorrectly, they may not seal correctly when<br />
replaced. Replace the patient wye and sense<br />
lines with a known good assembly.<br />
Check high and low pressure sense lines to be<br />
sure they are correctly attached and securely<br />
seated at both the ventilator and wye ends.<br />
Check the luer fitting connections for leaks.<br />
Check the elbow connectors at the wye to be<br />
sure they have not loosened or been broken<br />
loose.<br />
Verify lines are not occluded or pinched.<br />
Check the exhalation drive line at both the<br />
ventilator and exhalation valve ends. Verify the<br />
line is securely seated and not leaking.<br />
Verify the control values are appropriately set.<br />
Failed autozero. Perform an autozero under XDCR ZERO. See<br />
page 10-28 for more information.<br />
Leak Compensation is<br />
not on.<br />
Failed calibration or<br />
internal problem with<br />
the ventilator.<br />
O2% is high. O2 inlet pressure too<br />
high when Low O2<br />
Source selected.<br />
O2 inlet flow too high<br />
when Low O2 Source<br />
selected.<br />
Verify that the Leak Compensation extended<br />
features option is set to On (default setting is on).<br />
See page 10-12 for instructions.<br />
Immediately contact a certified Pulmonetic<br />
Systems’ service technician.<br />
Verify the low pressure O2 inlet has been<br />
correctly calculated and set using the Input O2<br />
Flow Chart (see page 6-15).<br />
Pulmonetic Systems recommends the use of an<br />
O2 monitor to verify delivered O2%. Adjust the<br />
entrained O2 flow so the monitored value shows<br />
the desired FIO2. (See pages 6-13 and 6-18 for<br />
information on using the Low O2 Source and<br />
O2% features.)<br />
Operator’s <strong>Manual</strong> <strong>LTV</strong> ® <strong>1200</strong> Ventilator Page 15-11<br />
p/n 18247-001, Rev. G
Symptoms Possible Causes What to Do<br />
Continued…<br />
O2% is high.<br />
O2% is low.<br />
Low Pressure O2<br />
Source incorrectly<br />
selected.<br />
Failed calibration or<br />
internal problem with<br />
the ventilator.<br />
VHome setting does<br />
not match flow valve.<br />
O2 inlet flow too low<br />
when Low Pressure O2<br />
Source selected.<br />
Failed calibration or<br />
internal problem with<br />
the ventilator.<br />
VHome setting does<br />
not match flow valve.<br />
PEEP not working.<br />
PEEP low.<br />
PEEP sags during<br />
exhalation. Diaphragm incorrectly<br />
seated in exhalation<br />
valve.<br />
Diaphragm installed<br />
backwards.<br />
Verify that the Low Pressure O2 Source is on<br />
when using a low flow, low pressure source and<br />
off when using a high pressure source. (See<br />
pages 6-13 and 6-18 for information on using the<br />
Low Pressure O2 Source and O2% features.)<br />
Immediately contact a certified Pulmonetic<br />
Systems’ service technician.<br />
Immediately contact a certified Pulmonetic<br />
Systems’ service technician.<br />
Verify the low pressure O2 inlet has been<br />
correctly calculated and set using the Input O2<br />
Flow Chart (see page 6-15).<br />
Pulmonetic Systems recommends the use of an<br />
O2 monitor to verify delivered O2%. Adjust the<br />
entrained O2 flow so the monitored value shows<br />
the desired FIO2. (See pages 6-13 and 6-18 for<br />
information on using the Low Pressure O2<br />
Source and O2% features.)<br />
Immediately contact a certified Pulmonetic<br />
Systems’ service technician.<br />
Immediately contact a certified Pulmonetic<br />
Systems’ service technician.<br />
Circuit leak. Run a leak test and reseat or replace the leaking<br />
parts or connections. See page 11-8 for<br />
instructions.<br />
Open the exhalation valve and remove the<br />
diaphragm. Reseat the diaphragm and snap the<br />
exhalation valve in place. See page 13-10 for a<br />
diagram of correct exhalation valve assembly.<br />
Page 15-12 <strong>LTV</strong> ® <strong>1200</strong> Ventilator Operator’s <strong>Manual</strong><br />
p/n 18247-001, Rev. G
Symptoms Possible Causes What to Do<br />
Continued…<br />
PEEP not working.<br />
PEEP low.<br />
PEEP sags during<br />
exhalation.<br />
Ventilator won't<br />
trigger at sensitivity<br />
setting of 1 Lpm.<br />
Condensation in<br />
sense lines.<br />
Ventilator is on, gas is<br />
not delivered and<br />
turbine is running.<br />
Ventilator makes a<br />
high pitched noise<br />
when in Standby.<br />
High side sense line or<br />
elbow at patient wye<br />
loose or leaking.<br />
Failed calibration or<br />
internal problem with<br />
the ventilator.<br />
Patient effort<br />
inadequate.<br />
Check high and low pressure sense lines to be<br />
sure they are correctly attached and securely<br />
seated at both the ventilator and wye ends.<br />
Check the luer fitting connections for leaks.<br />
Check the elbow connectors at the wye to be<br />
sure they have not loosened or been broken<br />
loose.<br />
Verify lines are not occluded or pinched.<br />
Immediately contact a certified Pulmonetic<br />
Systems’ service technician.<br />
Some very small patients and patients with very<br />
weak inspiratory efforts may not be able to<br />
generate a 1 Lpm effort.<br />
Failed autozero. Perform an autozero under XDCR ZERO. See<br />
page 10-28 for more information.<br />
Leak Compensation is<br />
not on.<br />
Failed calibration or<br />
internal problem with<br />
the ventilator.<br />
High or low sense lines<br />
are occluded.<br />
High or low sense ports<br />
in the wye are<br />
occluded.<br />
Defective purge<br />
solenoids.<br />
Failed calibration or<br />
internal problem with<br />
the ventilator.<br />
Battery charge circuit<br />
running.<br />
Verify that the Leak Compensation extended<br />
features option is set to On (default setting is on).<br />
See page 10-12 for instructions.<br />
Immediately contact a certified Pulmonetic<br />
Systems’ service technician.<br />
Verify lines are not occluded or pinched and/or<br />
clear the lines with a low flow (less than 10 lpm)<br />
gas source.<br />
Immediately contact a certified Pulmonetic<br />
Systems’ service technician.<br />
Immediately contact a certified Pulmonetic<br />
Systems’ service technician.<br />
When the battery charge circuit is running in bulk<br />
charge (the Charge Status LED is amber) the<br />
ventilator may emit a high pitched sound that<br />
some people can hear. This is normal.<br />
Operator’s <strong>Manual</strong> <strong>LTV</strong> ® <strong>1200</strong> Ventilator Page 15-13<br />
p/n 18247-001, Rev. G
Symptoms Possible Causes What to Do<br />
Ventilator gets<br />
excessively hot.<br />
Ventilator does not<br />
work with LTM<br />
Graphics Monitor.<br />
Patient circuit leaks.<br />
ventilator must run<br />
harder to maintain<br />
PEEP.<br />
Internal problem with<br />
the ventilator.<br />
Communications<br />
setting is not set to<br />
MONITOR mode.<br />
Ventilator requires<br />
upgrades to be<br />
compatible with LTM<br />
Graphics Monitor.<br />
Defective connections<br />
between the LTM<br />
Graphics Monitor and<br />
the ventilator.<br />
Perform a Leak Test and reseat or replace the<br />
leaking parts or connections. See page 11-8 for<br />
instructions.<br />
Immediately contact a certified Pulmonetic<br />
Systems’ service technician.<br />
Set communications setting to MONITOR mode.<br />
See page 10-16 for instructions.<br />
Check LTM compatibility in the Model Number<br />
menu. See page 10-19 for instructions.<br />
If the ventilator is not LTM compatible, it will<br />
require upgrading by a certified Pulmonetic<br />
Systems’ service technician to accommodate the<br />
LTM Graphics Monitor.<br />
Check the Communications Data Cable<br />
connection between the ventilator’s<br />
communications port and the LTM Graphics<br />
Monitor’s Data Port. See the LTM Graphics<br />
Monitor Operator’s <strong>Manual</strong>, P/N 11010, for<br />
detailed instructions.<br />
Page 15-14 <strong>LTV</strong> ® <strong>1200</strong> Ventilator Operator’s <strong>Manual</strong><br />
p/n 18247-001, Rev. G
Power and Battery Operation<br />
Problem Possible Causes What To Do<br />
The ventilator does<br />
not power up.<br />
Vent Inop LED is on<br />
and ventilator is not<br />
ventilating.<br />
The ventilator doesn’t<br />
operate from external<br />
power.<br />
The ventilator does<br />
not operate from<br />
internal battery.<br />
The ventilator shuts<br />
off when external<br />
power is removed.<br />
Faulty power<br />
connection, AC power<br />
source or adapter and<br />
depleted internal<br />
battery.<br />
Internal problem with<br />
the ventilator.<br />
Verify the power cord for the AC adapter is fully<br />
seated. Connect the ventilator to a verified<br />
source of AC power. Allow the internal battery to<br />
charge a minimum of 8 hours.<br />
Immediately contact a certified Pulmonetic<br />
Systems’ service technician.<br />
Vent in Standby. After the vent has been turned off and the<br />
external power is reconnected, the Vent Inop<br />
LED is lit. This is normal. Push the On/Standby<br />
button to turn ventilator on.<br />
Ventilator was running<br />
on internal battery and<br />
battery became<br />
depleted.<br />
Connect the ventilator to a good external power<br />
source.<br />
Vent Inop. Power up the vent and check the EVENT<br />
TRACE for events indicating the reason for inop.<br />
See page E-1 for information on reading the<br />
event trace.<br />
Internal problem with<br />
the ventilator.<br />
Defective AC source.<br />
AC adapter power cord<br />
loose.<br />
Immediately contact a certified Pulmonetic<br />
Systems’ service technician.<br />
Make sure the AC adapter is securely plugged<br />
into a verified source of AC power and is<br />
securely connected to the ventilator. Verify the<br />
power cord for the adapter is fully seated.<br />
Defective AC adapter. Replace the AC adapter.<br />
Internal problem with<br />
the ventilator.<br />
Internal battery<br />
depleted.<br />
Internal problem with<br />
the ventilator.<br />
Immediately contact a certified Pulmonetic<br />
Systems’ service technician.<br />
If the internal battery is depleted, charge the<br />
internal battery for 8 hours by connecting the<br />
external AC adapter and plugging it into a good<br />
AC source.<br />
Immediately contact a certified Pulmonetic<br />
Systems’ service technician.<br />
Operator’s <strong>Manual</strong> <strong>LTV</strong> ® <strong>1200</strong> Ventilator Page 15-15<br />
p/n 18247-001, Rev. G
Problem Possible Causes What To Do<br />
Battery doesn’t reach<br />
full charge.<br />
Battery depletes too<br />
quickly.<br />
Battery Charge<br />
Status LED is<br />
flashing amber.<br />
Battery Charge<br />
Status LED is<br />
flashing red.<br />
Battery Charge<br />
Status LED is solid<br />
red.<br />
Internal battery deeply<br />
discharged.<br />
Defective internal<br />
battery or internal<br />
problem with the<br />
ventilator.<br />
Internal battery<br />
charging.<br />
Defective internal<br />
battery or internal<br />
problem with the<br />
ventilator.<br />
Defective internal<br />
battery or internal<br />
problem with the<br />
ventilator.<br />
Defective internal<br />
battery or internal<br />
problem with the<br />
ventilator.<br />
Charge the internal battery for 24 hours by<br />
connecting the external AC adapter and plugging<br />
it into a good AC source. If the battery is deeply<br />
discharged, it may take several cycles of<br />
charging and discharging for the battery to reach<br />
a maximum charge.<br />
Immediately contact a certified Pulmonetic<br />
Systems’ service technician.<br />
The Charge Status LED flashes amber while the<br />
battery charging circuit evaluates the battery as a<br />
part of the charge cycle. If the battery is found to<br />
be OK, the Charge Status LED will change to<br />
solid amber while the battery is charging. The<br />
internal battery charges any time the ventilator is<br />
connected to an external power source. If the<br />
battery is deeply discharged, the Charge Status<br />
LED may flash amber for up to an hour.<br />
Immediately contact a certified Pulmonetic<br />
Systems’ service technician.<br />
Immediately contact a certified Pulmonetic<br />
Systems’ service technician.<br />
Immediately contact a certified Pulmonetic<br />
Systems’ service technician.<br />
Page 15-16 <strong>LTV</strong> ® <strong>1200</strong> Ventilator Operator’s <strong>Manual</strong><br />
p/n 18247-001, Rev. G
Alarms<br />
Many alarms such as HIGH PRES or LOW O2 PRES can occur during normal operation. Information<br />
on addressing alarms is covered in Chapter 9 – Ventilator Alarms. Single occurrences of some<br />
alarms, such as HW FAULT or RESET may be caused by ESD. If these alarms reoccur, and for other<br />
alarms that do not usually occur during normal operation, follow the instructions in this section or<br />
immediately contact Pulmonetic Systems.<br />
Multiple Alarm Priorities<br />
When multiple active alarms occur at the same time, the alarm with the highest priority level will be<br />
displayed. When a highest priority active alarm is reset, any remaining active alarms will be displayed<br />
in order of priority one by one as each alarm is reset.<br />
When multiple alarms occur:<br />
• A flashing alarm message appears in the display window showing the highest priority active<br />
alarm.<br />
• An audible alarm will sound.<br />
• Any associated control displays will flash.<br />
• Depending on the alarm, other actions may be taken, such as terminating an inspiration or<br />
opening the exhalation valve.<br />
When an alarm is reset and other alarms have occurred at the same time, the active alarms will occur<br />
in order of priority level until each alarm is individually reset.<br />
Active alarms take priority over inactive alarms.<br />
Priority levels<br />
Alarm condition priority levels are categorized in one or more of the following levels: High Priority,<br />
Medium Priority, or Low Priority.<br />
Alarms (in order of priority):<br />
Alarm Name Displayed Alarm Priority Level<br />
1. INOP 62 Inoperable (ventilator shutdown) High<br />
2. REMOVE PTNT Remove Patient High<br />
3. APNEA Apnea High<br />
4. DISC/SENSE Disconnect High<br />
5. BAT EMPTY Internal Battery Empty High<br />
6. BAT LOW Internal Battery Low High<br />
7. POWER LOST External Power Lost High<br />
8. POWER LOW External Power Low High<br />
62 If an INOP alarm condition occurs the ventilator will shut down and the Vent Inop LED on the front panel will<br />
be illuminated red and the audible alarm will sound continuously. See Chapter 9 – Ventilator Alarms for more<br />
information on the INOP alarm.<br />
Operator’s <strong>Manual</strong> <strong>LTV</strong> ® <strong>1200</strong> Ventilator Page 15-17<br />
p/n 18247-001, Rev. G
Alarm Name Displayed Alarm Priority Level<br />
9. LOW O2 PRES O2 Pressure Low High<br />
10. HIGH O2 PRES O2 Pressure High High<br />
11. DEFAULTS Defaults High<br />
12. NO CAL DATA No Calibration Data High<br />
13. HW FAULT Hardware Fault High<br />
14. RESET or RESET 1 Reset High<br />
15. HIGH PRES High Pressure High<br />
16. LOW MIN VOL Low Minute Volume Medium<br />
17. LOW PRES Low Peak Pressure Medium<br />
18. XDCR FAULT Transducer Fault Medium<br />
19. DEFAULTS SET Defaults Set Medium<br />
20. HIGH PEEP High PEEP Medium<br />
21. HIGH f High Rate Low<br />
22. SBT > f SBT High f Low<br />
23. SBT < f SBT Low f Low<br />
24. SBT > f/Vt SBT High f/Vt Low<br />
25. SBT < f/Vt SBT Low f/Vt Low<br />
26. SBT OFF SBT Off Low<br />
27. LOW PEEP Low PEEP Low<br />
Page 15-18 <strong>LTV</strong> ® <strong>1200</strong> Ventilator Operator’s <strong>Manual</strong><br />
p/n 18247-001, Rev. G
Symptoms Possible Causes What to Do<br />
HIGH PRES occurred<br />
but alarm did not<br />
sound.<br />
Alarm silence was already<br />
active (Silence Reset LED<br />
is red).<br />
High pressure alarm delay<br />
is on - HP DELAY is set to<br />
DELAY 1 BRTH or DELAY<br />
2 BRTH.<br />
Alarm automatically<br />
silenced after 3 seconds<br />
because condition cleared.<br />
Alarm doesn’t sound. Internal problem with the<br />
ventilator.<br />
Ventilator won’t<br />
exhale, repeated HIGH<br />
PRES alarms, turbine<br />
stops and pressure<br />
drops, then autocycles<br />
up to HIGH PRES<br />
again.<br />
Diaphragm installed<br />
backwards or incorrectly<br />
seated in exhalation valve.<br />
The ventilator alarms can be silenced for<br />
60 seconds by pushing the Silence Reset<br />
button. If the alarm is already silenced<br />
(Silence Reset LED is red), it will not<br />
sound again until the silence period<br />
expires.<br />
When a high pressure condition is<br />
detected, the HIGH PRES message is<br />
displayed and the High Pres. Limit control<br />
is flashed. If the HP DELAY option is set to<br />
NO DELAY, the audible alarm is sounded<br />
immediately.<br />
When the HP DELAY option is set to<br />
DELAY 1 BRTH or DELAY 2 BRTH, the<br />
audible is not sounded until the second or<br />
third consecutive breath with a high<br />
pressure condition. (See page 10-4 for an<br />
explanation of HP DELAY.)<br />
When an alarm occurs, the audible alarms<br />
sound for a minimum of 3 seconds or for<br />
as long as the condition exists. Some<br />
alarms, such as HIGH PRES may clear<br />
almost immediately and the alarm will<br />
sound for only 3 seconds.<br />
Immediately contact a certified Pulmonetic<br />
Systems’ service technician.<br />
Open the exhalation valve and remove the<br />
diaphragm. Reseat the diaphragm and<br />
snap the exhalation valve in place. See<br />
page 13-10 for a diagram of correct<br />
exhalation valve assembly.<br />
Operator’s <strong>Manual</strong> <strong>LTV</strong> ® <strong>1200</strong> Ventilator Page 15-19<br />
p/n 18247-001, Rev. G
Symptoms Possible Causes What to Do<br />
continued…<br />
Ventilator won’t<br />
exhale, repeated<br />
HIGH PRES alarms,<br />
turbine stops and<br />
pressure drops, then<br />
autocycles up to<br />
HIGH PRES again.<br />
Repeated<br />
DISC/SENSE alarms.<br />
Exhalation Drive line<br />
occluded or pinched.<br />
Internal problem with the<br />
ventilator.<br />
High or low side sense lines<br />
disconnected from vent or<br />
wye.<br />
High or low side sense line<br />
or elbow at patient wye<br />
loose or leaking.<br />
High or low sense lines are<br />
occluded.<br />
High or low sense ports in<br />
the wye are occluded.<br />
Patient circuit disconnected<br />
at patient, ventilator or<br />
circuit component.<br />
Check the exhalation drive line to be sure it<br />
is correctly attached and secured at both<br />
the ventilator and exhalation valve ends.<br />
Verify the line is not occluded or pinched.<br />
Immediately contact a certified Pulmonetic<br />
Systems’ service technician.<br />
Check high and low pressure sense lines<br />
to be sure they are correctly attached and<br />
securely seated at both the ventilator and<br />
wye ends.<br />
Check the luer fitting connections for leaks.<br />
Check the elbow connectors at the wye to<br />
be sure they have not loosened or been<br />
broken loose.<br />
Verify lines are not occluded or pinched.<br />
Check the exhalation drive line at both the<br />
ventilator and exhalation valve ends. Verify<br />
the line is securely seated and not leaking.<br />
Check the circuit and exhalation valve to<br />
verify the circuit is securely connected and<br />
the valve is intact. Open the exhalation<br />
valve and remove the diaphragm. Reseat<br />
the diaphragm and snap the valve cap<br />
back in place. See page 13-10 for a<br />
diagram of correct exhalation valve<br />
assembly.<br />
Page 15-20 <strong>LTV</strong> ® <strong>1200</strong> Ventilator Operator’s <strong>Manual</strong><br />
p/n 18247-001, Rev. G
Symptoms Possible Causes What to Do<br />
continued…<br />
Repeated<br />
DISC/SENSE alarms.<br />
Repeated XDCR<br />
FAULT alarms.<br />
HW FAULT alarm<br />
RESET alarm occurs<br />
after ventilator is<br />
operated on internal<br />
battery until it is fully<br />
depleted.<br />
RESET, CRC,<br />
STACK, POST, or<br />
RUNAWAY alarms<br />
NO CAL DATA alarm.<br />
NO CAL displayed in<br />
place of monitored<br />
values.<br />
Exhalation drive line leaking<br />
or loose.<br />
Exhalation valve leaking<br />
during inspiration.<br />
Internal problem with the<br />
ventilator.<br />
Internal problem with the<br />
ventilator.<br />
Electro static discharge<br />
(ESD).<br />
Fan was bumped or<br />
temporarily stopped while<br />
cleaning fan filter.<br />
Internal problem with the<br />
ventilator.<br />
Check the exhalation drive line at both<br />
the ventilator and exhalation valve ends.<br />
Verify the line is securely seated and not<br />
leaking.<br />
Verify the exhalation valve is not leaking<br />
during inspiration. If it is leaking, open<br />
the exhalation valve and remove the<br />
diaphragm. Reseat the diaphragm. See<br />
page 13-10 for a diagram of correct<br />
exhalation valve assembly.<br />
If necessary, replace the exhalation<br />
diaphragm, or exhalation valve with a<br />
new one.<br />
Immediately contact a certified<br />
Pulmonetic Systems’ service technician.<br />
Immediately contact a certified<br />
Pulmonetic Systems’ service technician.<br />
Clear the alarm. Reduce static causing<br />
conditions in the operating environment.<br />
Clear the alarm. No further action<br />
required if alarm does not reoccur.<br />
If problem reoccurs, immediately contact<br />
a certified Pulmonetic Systems’ service<br />
technician.<br />
Internal battery depleted. This is a normal. Clear the alarm and<br />
charge the internal battery (see page 14-<br />
11 for instructions on charging the<br />
internal battery).<br />
Electro static discharge<br />
(ESD).<br />
Internal problem with the<br />
ventilator.<br />
Failed or missing calibration<br />
records.<br />
Clear the alarm. Reduce static causing<br />
conditions in the operating environment.<br />
If problem reoccurs, immediately contact<br />
a certified Pulmonetic Systems’ service<br />
technician.<br />
Immediately contact a certified<br />
Pulmonetic Systems’ service technician.<br />
Operator’s <strong>Manual</strong> <strong>LTV</strong> ® <strong>1200</strong> Ventilator Page 15-21<br />
p/n 18247-001, Rev. G
Symptoms Possible Causes What to Do<br />
DEFAULTS alarm.<br />
Event Log shows<br />
DEFAULTS.<br />
Repeated HIGH f<br />
alarms.<br />
Repeated HIGH PEEP<br />
alarms.<br />
Remote Alarm<br />
System does not work<br />
with the ventilator.<br />
Remote Alarm<br />
System (single tone<br />
system) generates a<br />
pulsating tone and<br />
manufacturers<br />
instructions indicate it<br />
should be a<br />
continuous tone.<br />
Electro static discharge<br />
(ESD).<br />
Internal problem with the<br />
ventilator.<br />
Total Breath Rate (f) exceeds<br />
the set HIGH f alarm values.<br />
Patient Circuit leak, causing<br />
autocycling.<br />
Internal problem with the<br />
ventilator.<br />
Monitored PEEP exceeds the<br />
set HIGH PEEP alarm value.<br />
Patient circuit and/or<br />
Exhalation valve occluded.<br />
Internal problem with the<br />
ventilator.<br />
Defective or improper<br />
connections.<br />
Defective Remote Alarm<br />
cable.<br />
Defective Remote Alarm<br />
System.<br />
Internal problem with the<br />
ventilator.<br />
PNT ASSIST option set to<br />
PULSE.<br />
Defective Remote Alarm<br />
System.<br />
Internal problem with the<br />
ventilator.<br />
Some or all control settings were found<br />
to be invalid or out of range on power up<br />
and were restored to the default settings.<br />
Clear the alarm. Reduce static causing<br />
conditions in the operating environment.<br />
If problem reoccurs, immediately contact<br />
a certified Pulmonetic Systems’ service<br />
technician.<br />
Check HIGH f alarm values. See page<br />
10-5 for instructions.<br />
Do a Leak test and reseat or replace the<br />
leaking parts or connections. See page<br />
11-8 for instructions.<br />
If problem reoccurs, immediately contact<br />
a certified Pulmonetic Systems’ service<br />
technician.<br />
Check HIGH PEEP alarm value. See<br />
page 10-5 for instructions.<br />
Disassemble, clean and reassemble the<br />
Patient Circuit and Exhalation Valve. See<br />
page 13-10 for a diagram of correct<br />
exhalation valve assembly.<br />
If problem reoccurs, immediately contact<br />
a certified Pulmonetic Systems’ service<br />
technician.<br />
Check the Remote Alarm cable<br />
connection between the ventilator’s<br />
Patient Assist Port and the Remote<br />
Alarm System. See page C-16 for<br />
instructions.<br />
Replace Remote Alarm cable. See page<br />
C-16 for instructions.<br />
Contact Remote Alarm System<br />
manufacturer or service personnel.<br />
Immediately contact a certified<br />
Pulmonetic Systems’ service technician.<br />
Set PNT ASSIST option to NORMAL.<br />
See page 10-6 for instructions.<br />
Contact Remote Alarm System<br />
manufacturer or service personnel.<br />
Immediately contact a certified<br />
Pulmonetic Systems’ service technician.<br />
Page 15-22 <strong>LTV</strong> ® <strong>1200</strong> Ventilator Operator’s <strong>Manual</strong><br />
p/n 18247-001, Rev. G
Symptoms Possible Causes What to Do<br />
Remote Alarm System PNT ASSIST option set to Set PNT ASSIST option to PULSE. See<br />
(dual tone system) NORMAL.<br />
page 10-6 for instructions.<br />
only generates one<br />
continuous tone.<br />
Defective Remote Alarm<br />
System.<br />
Contact Remote Alarm System<br />
manufacturer or service personnel.<br />
Internal problem with the Immediately contact a certified Pulmonetic<br />
ventilator.<br />
Systems’ service technician.<br />
Patient Assist Call Incorrect Patient Assist Establish whether the Patient Assist Call<br />
System does not work cable installed (Normally System is a Normally Open or Normally<br />
with the ventilator. Open versus Normally Closed system and verify the appropriate<br />
Closed system/cable Patient Assist Cable (Normally Open or<br />
mismatch)<br />
Normally Closed) is installed. See page C-<br />
14 for instructions.<br />
Defective or improper Check the Patient Assist Cable connection<br />
connections.<br />
between the ventilator’s Patient Assist Port<br />
and the Patient Assist Call System. See<br />
page C-14 for instructions.<br />
Defective Patient Assist<br />
cable.<br />
Replace Patient Assist Cable.<br />
Defective Patient Assist Contact Patient Assist Call System<br />
Call System.<br />
manufacturer or service personnel.<br />
Internal problem with the Immediately contact a certified Pulmonetic<br />
ventilator.<br />
Systems’ service technician.<br />
Patient Assist Call PNT ASSIST option set to Set PNT ASSIST option to NORMAL. See<br />
System generates a PULSE.<br />
page 10-6 for instructions.<br />
pulsating tone or light<br />
and manufacturers<br />
instructions indicate it<br />
should be a<br />
continuous tone or<br />
light.<br />
Defective Patient Assist<br />
Call System.<br />
Internal problem with the<br />
ventilator.<br />
Contact Patient Assist Call System<br />
manufacturer or service personnel.<br />
Immediately contact a certified Pulmonetic<br />
Systems’ service technician.<br />
Repeated SBT > f Total Breath Rate (f) Check SBT > f alarm value. See page 10alarms.<br />
exceeds the set SBT > f<br />
alarm value.<br />
27 for instructions.<br />
Repeated SBT < f<br />
alarms.<br />
Patient Circuit leak, causing<br />
autocycling.<br />
Internal problem with the<br />
ventilator.<br />
Total Breath Rate (f) is less<br />
than the set SBT < f alarm<br />
value.<br />
Do a Leak test and reseat or replace the<br />
leaking parts or connections. See page<br />
11-8 for instructions.<br />
If problem reoccurs, immediately contact a<br />
certified Pulmonetic Systems service<br />
technician.<br />
Check SBT < f alarm value. See page 10-<br />
27 for instructions.<br />
Patient Circuit leak. Do a Leak test and reseat or replace the<br />
leaking parts or connections. See page<br />
11-8 for instructions.<br />
Internal problem with the<br />
ventilator.<br />
If problem reoccurs, immediately contact a<br />
certified Pulmonetic Systems service<br />
technician.<br />
Operator’s <strong>Manual</strong> <strong>LTV</strong> ® <strong>1200</strong> Ventilator Page 15-23<br />
p/n 18247-001, Rev. G
Symptoms Possible Causes What to Do<br />
Repeated SBT > f/Vt<br />
alarms.<br />
Repeated SBT < f/Vt<br />
alarms.<br />
Total Breath Rate (f)<br />
exceeds the set SBT > f/Vt<br />
alarm value.<br />
Check SBT > f/Vt alarm value. See page<br />
10-27 for instructions.<br />
Patient Circuit leak. Do a Leak test and reseat or replace the<br />
leaking parts or connections. See page<br />
11-8 for instructions.<br />
Internal problem with the<br />
ventilator.<br />
Total Breath Rate (f) is less<br />
than the set SBT < f/Vt<br />
alarm value.<br />
If problem reoccurs, immediately contact a<br />
certified Pulmonetic Systems service<br />
technician.<br />
Check SBT < f/Vt alarm value. See page<br />
10-27 for instructions.<br />
Patient Circuit leak. Do a Leak test and reseat or replace the<br />
leaking parts or connections. See page<br />
11-8 for instructions.<br />
Internal problem with the<br />
ventilator.<br />
Checkout Test Failures<br />
Symptoms Possible Causes What to Do<br />
Alarm Test<br />
Audible alarm level<br />
excessive.<br />
Alarm Test<br />
Audible alarm too soft.<br />
Alarm Test<br />
Alarm does not sound.<br />
Alarm Test<br />
Confirming audible<br />
chirp does not sound.<br />
If problem reoccurs, immediately contact a<br />
certified Pulmonetic Systems service<br />
technician.<br />
Alarm volume set too high. Set the alarm volume under the Extended<br />
Features Menu. (See page 10-3 for an<br />
explanation of the ALARM VOL feature.)<br />
Alarm volume set too low. Set the alarm volume under the Extended<br />
Features Menu. (See page 10-3 for an<br />
explanation of the ALARM VOL feature.)<br />
Alarm sounder blocked. Check the alarm sounder opening in the<br />
right side of the ventilator to verify the<br />
opening is not blocked.<br />
Internal problem with the<br />
ventilator.<br />
Immediately contact a certified Pulmonetic<br />
Systems’ service technician.<br />
Alarm sounder blocked. Check the alarm sounder opening in the<br />
right side of the ventilator to verify the<br />
opening is not blocked.<br />
Internal problem with the<br />
ventilator.<br />
Audible alarm did not sound<br />
long enough before test<br />
was terminated.<br />
Immediately contact a certified Pulmonetic<br />
Systems’ service technician.<br />
Repeat the Alarm Test and allow audible<br />
alarm to sound for at least 2 seconds<br />
before pushing the Select button. (See<br />
Alarm Test in Chapter 11 for instructions.)<br />
Page 15-24 <strong>LTV</strong> ® <strong>1200</strong> Ventilator Operator’s <strong>Manual</strong><br />
p/n 18247-001, Rev. G
Symptoms Possible Causes What to Do<br />
Display Test<br />
A display or LED fails<br />
to light.<br />
Control Test<br />
Correct message is<br />
not displayed when<br />
Set Value knob is<br />
turned, or incorrect<br />
message is displayed.<br />
Control Test<br />
Volume Pressure<br />
Mode button, Pres.<br />
Control button, O2 %<br />
(O2 Flush) button, or<br />
Low Pressure O2<br />
Source button do not<br />
display message when<br />
pushed.<br />
Leak Test<br />
Leak test fails<br />
Leak Test<br />
Leak test fails with<br />
LEAK --- FAIL<br />
message.<br />
Vent Inop Alarm Test<br />
Audible alarm too soft.<br />
Vent Inop Alarm Test<br />
Alarm does not sound.<br />
Vent Inop Alarm Test<br />
The Vent Inop LED is<br />
not illuminated.<br />
Internal problem with the<br />
ventilator.<br />
Internal problem with the<br />
ventilator.<br />
Internal problem with the<br />
ventilator.<br />
Wrong model selected in<br />
maintenance mode.<br />
Circuit connections or<br />
accessories are leaking.<br />
Wye is not properly capped.<br />
Internal problem with the<br />
ventilator.<br />
Internal problem with the<br />
turbine.<br />
Immediately contact a certified Pulmonetic<br />
Systems’ service technician.<br />
Immediately contact a certified Pulmonetic<br />
Systems’ service technician.<br />
Immediately contact a certified Pulmonetic<br />
Systems’ service technician.<br />
Immediately contact a certified Pulmonetic<br />
Systems’ service technician.<br />
Reseat or replace the leaking circuit parts,<br />
accessories or connections. Verify the wye<br />
is securely capped.<br />
Immediately contact a certified Pulmonetic<br />
Systems’ service technician.<br />
Immediately contact a certified Pulmonetic<br />
Systems’ service technician.<br />
Alarm sounder blocked. Check the alarm sounder opening in the<br />
right side of the ventilator to verify the<br />
opening is not blocked.<br />
Internal problem with the<br />
ventilator.<br />
Immediately contact a certified Pulmonetic<br />
Systems’ service technician.<br />
Alarm sounder blocked. Check the alarm sounder opening in the<br />
right side of the ventilator to verify the<br />
opening is not blocked.<br />
Internal problem with the<br />
ventilator.<br />
Internal problem with the<br />
ventilator.<br />
Immediately contact a certified Pulmonetic<br />
Systems’ service technician.<br />
Immediately contact a certified Pulmonetic<br />
Systems’ service technician.<br />
Operator’s <strong>Manual</strong> <strong>LTV</strong> ® <strong>1200</strong> Ventilator Page 15-25<br />
p/n 18247-001, Rev. G
Symptoms Possible Causes What to Do<br />
Vent Inop Alarm Test<br />
Confirming audible<br />
chirp does not sound.<br />
Test Lung Operations<br />
Audible alarm did not sound<br />
long enough before test<br />
was terminated.<br />
Internal problem with the<br />
ventilator.<br />
Symptoms Possible Causes What to Do<br />
Delivered pressure<br />
higher than set<br />
pressure on test lung.<br />
Monitored volumes<br />
very high on test lung.<br />
Pressure> 40 cmH2O used<br />
on small test lung<br />
(Pulmonetic Systems or<br />
Siemens 190.)<br />
Test lung with small<br />
aperture connected directly<br />
to wye.<br />
Very small ET tube<br />
connected directly to wye.<br />
Repeat the Vent Inop Alarm Test and allow<br />
audible alarm to sound for at least 15<br />
seconds before pushing the Silence Reset<br />
button. (See Chapter 11 - Vent Inop Alarm<br />
Test for instructions.)<br />
Immediately contact a certified Pulmonetic<br />
Systems’ service technician.<br />
The compliance characteristics of some<br />
small test lungs (Pulmonetic Systems or<br />
Siemens 190) cause incorrect readings<br />
when high pressures are used. For these<br />
lungs, use pressures under 40 cmH2O or<br />
change to a larger lung.<br />
Some test lungs have a narrow opening or<br />
a restrictor, which may cause jetting and<br />
cause the flow differential to be read<br />
incorrectly. To reduce the jetting effect,<br />
add a short extension between the test<br />
lung and the wye.<br />
A very small ET tube connected directly to<br />
the wye may cause jetting and cause the<br />
flow differential to be read incorrectly. To<br />
reduce the jetting effect, add a short larger<br />
bore extension between the ET tube and<br />
the wye.<br />
Page 15-26 <strong>LTV</strong> ® <strong>1200</strong> Ventilator Operator’s <strong>Manual</strong><br />
p/n 18247-001, Rev. G
Chapter 16 - MR CONDITIONAL SYSTEM<br />
This chapter provides information about using the MR Conditional <strong>LTV</strong> ® <strong>1200</strong> System in the magnetic<br />
resonance (MR) environment.<br />
NOTE<br />
The MR Conditional <strong>LTV</strong> ® <strong>1200</strong> ventilator (P/N 18888-2XX) 63 is different than the <strong>LTV</strong> ® <strong>1200</strong><br />
ventilator (P/N 18888-0XX) 63 . This chapter is intended for use with the MR Conditional <strong>LTV</strong> ® <strong>1200</strong><br />
System only. Contact Pulmonetic Systems with any questions prior to use.<br />
REMARQUE<br />
Le ventilateur MR Conditional <strong>LTV</strong> ® <strong>1200</strong> (P/N 18888-2XX) est différent du ventilateur <strong>LTV</strong> ® <strong>1200</strong><br />
(P/N 18888-0XX). Ce chapitre porte seulement sur le système MR Conditional <strong>LTV</strong> ® <strong>1200</strong>. Contactez<br />
Pulmonetic Systems pour toutes questions avant d'utiliser le produit.<br />
MR Conditional System Components<br />
The MR Conditional <strong>LTV</strong> ® <strong>1200</strong> System is comprised of the following:<br />
• MR Conditional <strong>LTV</strong> ® <strong>1200</strong> Ventilator (P/N 18888-2XX) 63 ,<br />
• <strong>LTV</strong> ® MR Conditional Floor Stand (P/N 14982-001),<br />
• <strong>LTV</strong> ® <strong>1200</strong> MR Safe 15ft (4.57m) Patient Circuit (P/N 19189-001), and<br />
• <strong>LTV</strong> ® AC Adapter (P/N 18053-001)<br />
If an O2 supply is required, both the O2 tank and regulator must be MR Conditional (non-magnetic).<br />
63 The last two characters of the ventilator part number, referenced as “XX”, designate the specific language<br />
configuration of the unit and range from 01 – 12.<br />
Operator’s <strong>Manual</strong> <strong>LTV</strong> ® <strong>1200</strong> Ventilator Page 16-1<br />
p/n 18247-001, Rev. G
MR Conditional System – Conditions for Operation<br />
The MR Conditional <strong>LTV</strong> ® <strong>1200</strong> System is suitable for use in both 1.5 and 3.0 Tesla (not to exceed<br />
3.0 Tesla static magnetic field) shielded magnetic scanners when operated under the following<br />
conditions:<br />
• The <strong>LTV</strong> ® <strong>1200</strong> MR Conditional System shall always be used as an assembled system, using<br />
all of the components (MR Conditional <strong>LTV</strong> ® <strong>1200</strong> ventilator, MR Conditional Floor Stand, MR<br />
Safe 15ft Patient Circuit, and the AC adapter).<br />
• Put the MR Conditional <strong>LTV</strong> ® <strong>1200</strong> System outside the 100 Gauss field line (at least 9ft /<br />
2.74m from the bore opening) and in a position where the operator can always see the <strong>LTV</strong> ®<br />
<strong>1200</strong>. Always lock the two (2) locking caster wheels on the ventilator floor stand when used in<br />
the MR environment.<br />
• Use only MR Conditional, non-magnetic (e.g., aluminum) oxygen cylinders, and MR<br />
Conditional oxygen regulators if O2 is required.<br />
• Follow all institutional guidelines, MR Conditional procedures and precautions, and the <strong>LTV</strong> ®<br />
<strong>1200</strong> Operator’s <strong>Manual</strong> when operating in the MR environment.<br />
WARNING<br />
• Only the MR Conditional <strong>LTV</strong> ® <strong>1200</strong> System (which includes the MR Conditional <strong>LTV</strong> ® <strong>1200</strong><br />
ventilator, MR Conditional Floor Stand, MR Safe 15ft Patient Circuit, and the AC adapter) may<br />
be used in the MR environment. To avoid patient harm and/or equipment damage, do not<br />
operate the MR Conditional <strong>LTV</strong> ® <strong>1200</strong> System in the MR environment if any system component<br />
is missing or not installed.<br />
• Failure to follow all warnings, the <strong>LTV</strong> ® <strong>1200</strong> Operator’s <strong>Manual</strong>, and all MR Conditional<br />
procedures and precautions when the MR Conditional <strong>LTV</strong> ® <strong>1200</strong> System is used may cause<br />
patient and/or operator harm and damage to the ventilator may occur. Contact Pulmonetic<br />
Systems with any questions.<br />
• Remove the <strong>LTV</strong> ® Carrying Strap (if attached) located at the top of the ventilator before entering<br />
the MR environment.<br />
AVERTISSEMENT<br />
• Dans un milieu de RM, seul le système MR Conditional <strong>LTV</strong> ® <strong>1200</strong> (qui inclut le ventilateur MR<br />
Conditional <strong>LTV</strong> ® <strong>1200</strong>, le support de plancher MR Conditional, le circuit de patient de 4,6 m (15<br />
pi) MR Safe et l'adaptateur de c.a.) peut être utilisé dans le milieu de RM. Pour éviter tout<br />
danger pour le patient et/ou tout dommage à l'équipement, ne faites pas fonctionner le système<br />
MR Conditional <strong>LTV</strong> ® <strong>1200</strong> dans un milieu de RM si tout composant du système manque ou<br />
n'est pas installé.<br />
• Ne pas suivre tous les avertissements, le manuel de l'opérateur <strong>LTV</strong> ® <strong>1200</strong> et toutes les<br />
précautions et procédures conditionnelles de RM lorsque le système MR Conditional <strong>LTV</strong> ® <strong>1200</strong><br />
est utilisé pourrait mener à des problèmes pour le patient et/ou pour l'opérateur et des<br />
dommages au ventilateur. Contactez Pulmonetic Systems pour toutes questions.<br />
• Retirez la sangle de transport <strong>LTV</strong> ® (si elle est installée) qui se trouve sur le dessus du<br />
ventilateur avant d'entrer dans le milieu de RM.<br />
Page 16-2 <strong>LTV</strong> ® <strong>1200</strong> Ventilator Operator’s <strong>Manual</strong><br />
p/n 18247-001, Rev. G
Example of the MR Conditonal <strong>LTV</strong> ® <strong>1200</strong> System placed outside the 100 Gauss field line (at<br />
least 9ft / 2.74m from the bore opening) (AC power cord not shown for clarity).<br />
NOTE<br />
• The use of Pressure Control ventilation is recommended with the 15ft patient circuit. If Volume<br />
Control ventilation is selected when using the 15ft patient circuit, compressible volume should be<br />
compensated. The compressibility factor is 4 ml/cmH2O.<br />
• Always plug the AC adapter power cord into a properly working power receptacle (with ground<br />
connection) when operating in the MR environment.<br />
REMARQUE<br />
• L'utilisation d'une ventilation à contrôle de pression est recommandée avec le circuit de patient<br />
de 4,6 m (15 pi). Si la ventilation à contrôle de pression est choisie en utilisant le circuit de<br />
patient de 4,6 m (15 pi), il faut compenser le volume compressible. Le facteur de compressibilité<br />
est de 4 ml/cmH2O.<br />
• Branchez toujours le cordon d'adaptateur de c.a. dans une prise qui fonctionne correctement<br />
(avec connexion de masse) lorsque vous êtes dans le milieu de RM.<br />
Operator’s <strong>Manual</strong> <strong>LTV</strong> ® <strong>1200</strong> Ventilator Page 16-3<br />
p/n 18247-001, Rev. G
WARNING<br />
• Put the MR Conditional <strong>LTV</strong> ® <strong>1200</strong> System outside the 100 Gauss field line (at least 9ft / 2.74m<br />
from the bore opening) and in a position where the operator can always see the <strong>LTV</strong> ® <strong>1200</strong>.<br />
Always lock the two (2) locking caster wheels on the ventilator floor stand when used in the MR<br />
environment.<br />
• Use only MR Conditional non-magnetic (e.g., aluminum) oxygen cylinders, and MR Conditional<br />
oxygen regulators.<br />
AVERTISSEMENT<br />
• Placez le système à RM conditionnelle <strong>LTV</strong> ® <strong>1200</strong> à l'extérieur de la ligne de force de 100<br />
Gauss (au moins 2,74 m/9 pi de l'ouverture d'alésage) et dans une position où l'opérateur peut<br />
toujours voir le <strong>LTV</strong> ® <strong>1200</strong>. Verrouillez toujours les deux (2) roulettes verrouilables sur le support<br />
de plancher du ventilateur en utilisant dans l'environnement de RM.<br />
• Utilisez seulement des régulateurs d'oxygène et des bobonnes d'oxygène non-magnétique<br />
(comme en aluminium) à RM conditionnelle.<br />
Page 16-4 <strong>LTV</strong> ® <strong>1200</strong> Ventilator Operator’s <strong>Manual</strong><br />
p/n 18247-001, Rev. G
Appendix A - VENTILATOR SPECIFICATIONS<br />
Modes and Breath Types<br />
Breath Types Volume Control, Pressure Control, Pressure Support, Spontaneous<br />
Modes Control, Assist/Control, SIMV, CPAP, NPPV, Apnea Backup<br />
Variable Controls<br />
Control Range Tolerance<br />
Backup Pressure Trigger -3 cmH2O ± 2 cmH2O<br />
Breath Rate “--”, 1 to 80 bpm ± 1 bpm or 10% of breath period,<br />
whichever is less<br />
Date Format mm/dd/yyyy, dd/mm/yyyy,<br />
yyyy/mm/dd<br />
Display Select Toggles between manual or<br />
automatic display scrolling<br />
and changes monitor<br />
displayed.<br />
Inspiratory/Expiratory<br />
Hold<br />
One push toggles monitor<br />
window display between<br />
normal display, INSP HOLD<br />
and EXP HOLD.<br />
While INSP HOLD is<br />
displayed, a push and hold<br />
initiates an Inspiratory Hold.<br />
While EXP HOLD is<br />
displayed, a push and hold<br />
initiates an Expiratory Hold.<br />
Operator’s <strong>Manual</strong> <strong>LTV</strong> ® <strong>1200</strong> Ventilator Page A-1<br />
p/n 18247-001, Rev. G<br />
n/a<br />
n/a<br />
6 seconds maximum<br />
6 seconds maximum<br />
Inspiratory Time 0.3 to 9.9 seconds ± 0.05 seconds<br />
Leak Compensation On, Off n/a<br />
Language English, Dansk, Deutsch,<br />
Espan�ol, Francais, Italiano,<br />
Norsk, Portugues, Svenska,<br />
Русско<br />
O2 % 21% to 100% O2 % mean: 21% to 50%: ± 3<br />
51% to 95%: ± 5<br />
keep steady-state only<br />
(O2 Flush)<br />
O2: 95% ± 5<br />
n/a<br />
Time: 1, 2, or 3 minutes ± 0.1 sec<br />
Patient Query On, Off n/a<br />
PEEP/CPAP 0 to 20 cmH2O Uncalibrated
Control Range Tolerance<br />
PIP LED Display On, Off n/a<br />
Pressure Control 1 to 99 cmH2O ± 2 cmH2O or 8% whichever is<br />
greater, steady-state only<br />
Pressure Control Flow<br />
Termination<br />
On, Off n/a<br />
Pressure Support “--”, 1 to 60 cmH2O ± 2 cmH2O or 8% whichever is<br />
greater, steady-state only.<br />
Set Date 01/01/1998 to 12/31/2097 n/a<br />
Set Time 00:00:00 to 23:59:59 n/a<br />
Sensitivity 1 to 9 Lpm, “-” + 1/- 0.5 lpm for setting of 1; ± 1<br />
lpm for all other settings.<br />
Tidal Volume 50 to 2000 ml ± 10% or 10 ml, whichever is<br />
greater for temperatures from 20°C<br />
to 30°C only, standard atmospheric<br />
pressure<br />
Variable Flow<br />
Termination<br />
10% to 40% ± 15% or 2 lpm whichever is greater<br />
Variable Rise Time 1 to 9 0.1 to 1.0 sec<br />
Variable Time<br />
Termination<br />
0.3 to 3.0 sec ± 0.1 sec<br />
Bias Flow 0 lpm or 10 lpm during<br />
exhalation 64<br />
SBT Start On - Off n/a<br />
± 10% or 1 lpm, whichever is<br />
greater<br />
SBT PS 0-30 cmH2O ± 2 cmH2O or 8% whichever is<br />
greater, steady-state only.<br />
SBT PEEP 0-20 cmH2O ± 2 cmH2O or 10%, whichever is<br />
greater<br />
SBT FIO2 21-100% O2 % mean: 21% to 50%: ± 3<br />
51% to 95%: ± 5<br />
keep steady-state only<br />
SBT O2 minutes 15-120 minutes n/a<br />
SBT high f/Vt 70-120 ± 20%<br />
SBT low f/Vt 5-90 ± 20%<br />
SBT High f 15-80 BPM ± 1 bpm or within 5%, whichever is<br />
greater<br />
SBT Low f 0-40 BPM ± 1 bpm or within 5%, whichever is<br />
greater<br />
Display f/Vt On - Off n/a<br />
64 0 lpm when O2 Conserve ON is selected or 10 lpm when O2 Conserve OFF is selected.<br />
Page A-2 <strong>LTV</strong> ® <strong>1200</strong> Ventilator Operator’s <strong>Manual</strong><br />
p/n 18247-001, Rev. G
Alarms<br />
Variable Alarms<br />
Control Range Tolerance<br />
Apnea Interval 10 to 60 seconds ± 0.5 seconds<br />
High Breath Rate<br />
Rate: 5 - 80 bpm - HIGH f OFF ± 1 bpm or within 5% of breath<br />
period, whichever is greater.<br />
Time: 0 - 60 sec ± 0.1 seconds<br />
High PEEP 3 to 20 cmH2O above set PEEP ± 2 cmH2O or ± 10%, whichever is<br />
greater.<br />
Low PEEP -3 to - 20 cmH2O below set<br />
PEEP<br />
± 2 cmH2O or ± 10%, whichever is<br />
greater.<br />
High Pressure Limit 5 to 100 cmH2O 5 to 20 cmH2O: ± 2 cmH2O<br />
21 to 100 cmH2O: ± 4 cmH2O<br />
HP Alarm Delay No Delay, 1 Breath, 2 Breaths Only audible portion of alarm<br />
notification is delayed.<br />
Low Minute Volume 0.1 to 99 liters ± 15% or the measured total breath<br />
rate times 15 ml, whichever is<br />
greater.<br />
Low Peak Pressure “- -”, 1 to 60 cmH2O 2 to 20 cmH2O: ± 2 cmH2O<br />
21 to 60 cmH2O: ± 4 cmH2O<br />
LPP Alarm All Breaths, VC/PC Only Select breath types Low Pressure<br />
alarm applies to.<br />
SBT High f/Vt Off, 70 – 900 f/Vt ± 2 cmH2O or 10%, whichever is<br />
greater<br />
SBT Low f/Vt Off, 5 – 90 f/Vt ± 2%<br />
SBT High f Off, 15 – 80 bpm ± 1 bpm or within 5% of the breath<br />
period, whichever is greater<br />
SBT Low f Off, 1 – 40 bpm ± 1 bpm or within 5% of the breath<br />
period, whichever is greater<br />
Operator’s <strong>Manual</strong> <strong>LTV</strong> ® <strong>1200</strong> Ventilator Page A-3<br />
p/n 18247-001, Rev. G
Fixed Alarms<br />
Control Range Tolerance / Indicators<br />
Default Settings EEPROM problem detected n/a<br />
DISC/SENSE<br />
Positive (exhaled) airway flow n/a<br />
(Low Pressure Sense<br />
Line Disconnect)<br />
during first 200 ms of<br />
inspiration and exhaled tidal<br />
volume (Vte) of previous<br />
breath is more than 4000 ml<br />
DISC/SENSE<br />
(High Pressure Sense<br />
Line Disconnect)<br />
Airway pressure changes by <<br />
1 cmH2O during 200 ms after<br />
inspiratory start<br />
OR<br />
After initial 200 ms of<br />
inspiration airway pressure<br />
drops below 0.125 cmH2O and<br />
can’t be raised more than 0.5<br />
cmH2O in next 500 ms<br />
External Power Lost
Mechanical Controls<br />
Control Range Tolerance<br />
Over Pressure Relief ≤125 cmH2O N/A<br />
Sub-Ambient Relief Pressure Drop: ≤ 5 cmH2O at 50 lpm<br />
Internal Compliance<br />
Monitors<br />
Compliance < 0.1 mL/cm<br />
Monitor Range Tolerance<br />
Calculated Peak Flow 10 to 100 lpm 2 lpm or ± 10%, whichever is greater<br />
Exhaled Tidal Volume 0 to 4000 ml ± 15% or 15 ml, whichever is greater<br />
I:E Ratio, Measured 99:1 and 1:99<br />
Based on the measured<br />
inspiratory / exhalation times<br />
I:E Ratio, Calculated 1:99 to 4.0:1 based on set<br />
breath rate and inspiratory<br />
time<br />
Accuracy for times are ± 50 ms or 5%,<br />
whichever is greater<br />
± 5%<br />
Mean Airway Pressure 0 to 99 cmH2O ± 2 cmH2O or 10%, whichever is greater<br />
O2 Cylinder Duration 0 - 99 hours and 59 minutes - 0 / + 40%<br />
Peak Inspiratory<br />
Pressure<br />
0 to 120 cmH2O ± 2 cmH2O or 5%, whichever is greater<br />
PEEP 0 to 99 cmH2O ± 2 cmH2O or 10%, whichever is greater<br />
Total Breath Rate 0 to 250 breaths per minute ± 1 bpm or within 5% of the breath<br />
period, whichever is greater<br />
Total Minute Volume 0 to 99.9 liters ± 15%, or the measured total breath rate<br />
times 15 ml, whichever is greater<br />
SBT Minutes 15 – 120 minutes ± 0.1 seconds<br />
f/Vt<br />
and<br />
f<br />
Button Controls<br />
0 – 4000<br />
0 – 250bpm<br />
± 20%<br />
Total breath rate: ± 1 bpm or within 5%<br />
of breath period, whichever is greater<br />
Display Function<br />
Control Lock Locks front panel controls, can be set to Easy or Hard unlocking<br />
<strong>Manual</strong> Breath Generates a machine breath<br />
Standby/On Puts ventilator in On or Standby state<br />
Low Pressure O2 Source Selects Low Pressure O2 Source<br />
Silence Reset Silences and resets alarms<br />
Operator’s <strong>Manual</strong> <strong>LTV</strong> ® <strong>1200</strong> Ventilator Page A-5<br />
p/n 18247-001, Rev. G
Displays<br />
Packaging<br />
Display Range Tolerance<br />
Airway Pressure -10 to 108 cmH2O ± 3 cmH2O or 5%, whichever is<br />
greater<br />
Display Window 12 characters n/a<br />
Patient Effort Green LED n/a<br />
Vent Inop Red LED n/a<br />
External Power Amber / Green LED n/a<br />
Charge Status Red / Amber / Green LED n/a<br />
Battery Level Red / Amber / Green LED n/a<br />
Usage Meter<br />
Usage Meter 1 to 139,000 hrs Below 100 hrs: ± 10% Above<br />
100 hrs: ± 5%<br />
Size 3” x 10” x 12” -OR- 3.25” x 10.5” x 13.5” with Protective Boots installed.<br />
Weight 13.4 lbs -OR- 14.5 lbs with Protective Boots installed.<br />
Sound Level<br />
Sound Level Shall not exceed 50 dBA (RMS) at one meter<br />
Storage and Operating Conditions<br />
Specification Tolerance<br />
Storage 65<br />
Temperature -20 to +60 degrees C n/a<br />
Humidity 10% to 95% Relative, non-condensing n/a<br />
Operating<br />
Temperature +5 to +40 degrees C n/a<br />
Humidity 15% to 95% Relative, non-condensing n/a<br />
Orientation<br />
The ventilator functions within its performance specifications when operated in any orientation.<br />
Inlet Air Filtration<br />
The ventilator air filter is removable and cleanable by the operator. All filter materials are FDA<br />
compliant for breathing circuits and meet burn requirements for UL 94HB.<br />
65 <strong>LTV</strong> ® ventilators stored at temperatures outside of the specified Operating Temperature range are to be<br />
allowed to stabilize to within the operating temperature range before turning the ventilator on.<br />
Page A-6 <strong>LTV</strong> ® <strong>1200</strong> Ventilator Operator’s <strong>Manual</strong><br />
p/n 18247-001, Rev. G
Storage and Operating Conditions (cont.)<br />
Specification<br />
Oxygen Inlet<br />
Tolerance<br />
DISS or NIST Connector Inlet Pressure Range 40 to 80 PSIG ± 2 PSIG<br />
Tapered Tubing Connector Inlet Pressure Range 0 to 10 PSIG ± 2 PSIG<br />
Shock and Vibration<br />
The ventilator is designed to withstand shock and vibration in accordance with relevant<br />
requirements set forth in the following standards:<br />
IEC 68-2-27 Shock<br />
IEC 68-2-6 Vibration<br />
IEC 68-2-34 Vibration<br />
MIL-STD-810E Shock, Ground Transport and Helicopter Transport Vibration<br />
Spillage<br />
The ventilator resists fluid spillage when tested in accordance with the relevant standards<br />
specified in IEC 601-1 Clause 44.3.<br />
External Surface Temperature<br />
External surfaces < 50°C, ambient temperature of 35°C n/a<br />
Communications<br />
Port Connector Specification<br />
Communications RS232, DB9 connector Protocol Options: Data, Monitor, Printer,<br />
Modem<br />
Patient Assist Call /<br />
Remote Alarm<br />
Equipment Classification<br />
RJ11-4 Closed contact resistance: ≤ 1 ohm<br />
Classification The ventilator is rated as Class II equipment per IEC 601-1 Clause 6.11<br />
Type The ventilator is specified as Type BF equipment per IEC 601-1 Clause 6.11<br />
Operator’s <strong>Manual</strong> <strong>LTV</strong> ® <strong>1200</strong> Ventilator Page A-7<br />
p/n 18247-001, Rev. G
Power<br />
Feature Range Tolerance / Indicators<br />
Input Voltage<br />
External Power<br />
11 to 15 VDC<br />
AC Adapter Input: 100 to 250 VAC,<br />
50 to 60 Hz<br />
Output: 13 VDC<br />
± 2.5%<br />
Full Power Voltage ≥ 11.5 V ± 2% Green LED<br />
Low Power Voltage < 11.0V and ≥ 9.5V ± 2% Amber LED<br />
External Power Off Voltage < 9.5V ± 2% LED off, switch to<br />
battery<br />
Hysteresis Ventilator shall not resume<br />
external power operation unless<br />
voltage is 11.5V<br />
Nominal Current<br />
Draw<br />
Nominal Power<br />
Draw<br />
Startup: 5.5 amps<br />
Running: 3-4 amps<br />
Startup: 66 watts<br />
Running: 36 - 48 watts<br />
± 2%<br />
Leakage Current Total leakage current to Earth ground for the ventilator with only<br />
approved accessories attached, shall not exceed 500 microAmps<br />
during normal operation, per IEC 601-1.<br />
Total leakage current to Earth ground for the ventilator shall not exceed<br />
one milliAmp when any single fault condition is present, per IEC 601-1.<br />
Ground Resistance Total impedance between the ground contact at the inlet power<br />
connector and any accessible metal part shall not exceed 0.1 ohm, per<br />
IEC 601-1.<br />
Dielectric Strength The ventilator shall be able to survive 1500 volts applied from either<br />
phase of the AC power inlet to Earth ground for a period of one minute,<br />
per IEC 601-1.<br />
Page A-8 <strong>LTV</strong> ® <strong>1200</strong> Ventilator Operator’s <strong>Manual</strong><br />
p/n 18247-001, Rev. G
Power (cont.)<br />
Internal Battery<br />
12V sealed lead acid battery. 4.5Ah.<br />
Feature Range Tolerance / Indicators<br />
Full Power Green LED<br />
Medium Power Amber LED<br />
Low Power Red LED<br />
Charge Time Battery shall be capable of being >90% When external power is<br />
charged within 8 hours, from fully present, and the vent is<br />
discharged state to state indicated by<br />
green Charge Status LED.<br />
running at the nominal load<br />
Charge Status Pre-Charge Qualification:<br />
Battery Charging:<br />
Battery >90% Charged:<br />
Battery Fault:<br />
Hysteresis Ventilator shall not resume battery<br />
operation unless the battery voltage<br />
level is 11.8 V.<br />
Battery Duration Time Before<br />
Ventilator Shutdown (total time):<br />
Approximate Time from battery full<br />
(green LED) to battery low (amber LED<br />
and BAT LOW alarm):<br />
Approximate Time from battery low to<br />
battery empty (red LED and BAT<br />
EMPTY alarm):<br />
Approximate Time from battery empty<br />
to “ventilator shutdown” (Vent Inop LED<br />
and INOP alarm):<br />
Flashing Amber LED<br />
Amber LED<br />
Green LED<br />
Red LED<br />
± 2%<br />
60 minutes* Nominal Load Settings:<br />
45 minutes*<br />
10 minutes*<br />
5 minutes*<br />
* Times based on nominal load, new battery and full 8<br />
hour battery charge.<br />
Mode A/C<br />
PEEP 5<br />
Breath Rate (bpm) 15<br />
O2 % 21<br />
Tidal Volume (ml) 800<br />
Lung Compliance (ml/cmH2O) 50<br />
Insp. Time (sec) 1.5<br />
ET Resistance (cmH2O/L/S) 5.87<br />
Sensitivity (lpm) 2<br />
Battery Temp. 25 o C<br />
DOT Requirements: Unregulated, meets the requirements of 49 CFR 173, 159 (d).<br />
Agency Requirements<br />
Regulatory Requirements<br />
FDA Draft Reviewer Guidance for Ventilators, July, 1995.<br />
Shipping Requirements<br />
The ventilator, packed in its shipping container, conforms to the International Safe Transit<br />
Association requirements for packaged products weighing less than 100 pounds.<br />
Operator’s <strong>Manual</strong> <strong>LTV</strong> ® <strong>1200</strong> Ventilator Page A-9<br />
p/n 18247-001, Rev. G
Page A-10 <strong>LTV</strong> ® <strong>1200</strong> Ventilator Operator’s <strong>Manual</strong><br />
p/n 18247-001, Rev. G
Appendix B - SET UP / MAINTENANCE<br />
Recommended Maintenance Schedule<br />
The <strong>LTV</strong> ® <strong>1200</strong> ventilator is designed to operate for extended periods of time with minimal routine<br />
maintenance. The following periodic maintenance is recommended:<br />
Hours of Service 66 Maintenance Required<br />
Prior to initial use • Charge the Internal Battery by plugging the ventilator into an AC power<br />
source for 24 hours.<br />
• Setup the ventilator/accessories per Appendix C - Installation and<br />
Checkout.<br />
• Check the ventilator for proper operation per Appendix C - Installation and<br />
Checkout<br />
While in storage,<br />
every two months<br />
• Recharge the Internal Battery by plugging the ventilator into an AC power<br />
source for 24 hours 67 .<br />
Daily • Check the Inlet Filter, clean if necessary.<br />
• Check the Fan Filter, clean if necessary.<br />
If in use, a minimum<br />
of once a month<br />
Every 10,000 hours<br />
or two years 68<br />
Every 30,000 hours<br />
or six years,<br />
whichever comes<br />
first 66<br />
• Check the ventilator per Chapter 11 - Ventilator Checkout Tests. While<br />
the ventilator is off-patient, perform the Power (external) disconnect test*<br />
• Verify Vte or VE monitor *<br />
• Verify airway pressure or PIP monitor *<br />
• Verify delivered O2 concentration if not using an oxygen analyzer<br />
continuously, See Appendix A - Ventilator Specifications for accuracy<br />
tolerances.<br />
* Use existing patient settings or example settings as shown in Appendix C<br />
- Installation and Checkout<br />
• Replace the Internal Battery 69 only with Pulmonetic Systems battery P/N<br />
18608-001 70<br />
• Calibrate the Transducers.<br />
• Replace the Motor Board.<br />
• Clean or replace the Interior Air Inlet Filter.<br />
• Clean or replace the O2 Inlet Filter.<br />
• Replace the Turbine Manifold Assembly.<br />
• Replace the Solenoid Manifold.<br />
• Replace the Flow Valve.<br />
• Replace the Rotary Switch Assembly.<br />
• Replace the O2 Blender.<br />
• Replace the Fan Assembly.<br />
• Replace all Silicone Tubing.<br />
• Check the Thermo Pads for compression and replace if necessary.<br />
66 To check the number of hours the ventilator has been in service, see Chapter 10 - Extended Features, Usage Meter.<br />
67 If the battery is deeply discharged, it may take several charge and discharge cycles before it can be fully charged.<br />
68 10,000 hour, two year and/or 30,000 hour, six year Extended Maintenance and ventilator repair must be performed by a<br />
Pulmonetic Systems factory trained service technician.<br />
69 Replacement at 10,000 hours or 2 years is based on normal use of up to 200 charge cycles. The battery may need to be<br />
replaced more frequently if it is being charged more often. The battery should also be replaced any time it fails to reach a full<br />
charge, or if the ventilator runs for less than ½ hour on a fully charged battery.<br />
70 The <strong>LTV</strong> ® Internal Battery (P/N 18608-001) is contained in <strong>LTV</strong> ® Internal Battery Replacement Kit, P/N 18634-001.<br />
Operator’s <strong>Manual</strong> <strong>LTV</strong> ® <strong>1200</strong> Ventilator Page B-1<br />
p/n 18247-001, Rev. G
Service Assistance<br />
For assistance in servicing the <strong>LTV</strong> ® <strong>1200</strong> ventilator, contact a certified Pulmonetic Systems’ service<br />
technician, or:<br />
Pulmonetic Systems<br />
17400 Medina Rd., Suite 100<br />
Minneapolis, Minnesota 55447-1341<br />
Phone: (763) 398-8300<br />
Customer Care Center: (800) 754-1914<br />
Fax: (763) 398-8400<br />
E-mail: info@pulmonetic.com<br />
Website: http://www.pulmonetic.com<br />
Page B-2 <strong>LTV</strong> ® <strong>1200</strong> Ventilator Operator’s <strong>Manual</strong><br />
p/n 18247-001, Rev. G
Appendix C - INSTALLATION AND CHECKOUT<br />
Installation and Setup<br />
Unpacking the Ventilator – Instructions<br />
1) Inspect the exterior of the ventilator transport container for evidence of damage during transit.<br />
If present, notify the delivering service.<br />
2) Take the ventilator and all accessories out of the transport container.<br />
3) Confirm the presence of all items listed on the packing slip. Notify an authorized sales<br />
representative or Pulmonetic Systems of any discrepancies.<br />
4) Examine all components for visible damage. If present, notify the delivering service.<br />
5) Retain the transport container for potential ventilator service or maintenance returns.<br />
Operator’s <strong>Manual</strong> <strong>LTV</strong> ® <strong>1200</strong> Ventilator Page C-1<br />
p/n 18247-001, Rev. G
Protective Boots<br />
Rubberized protective boots are installed on the top and bottom of all current versions of <strong>LTV</strong> ®<br />
ventilators to protect them from accidental shocks and strikes to the casing. If desired, they may be<br />
removed and/or re-installed using the following instructions.<br />
WARNING<br />
Mounting Screw Use – Internal damage to the ventilator may result if the wrong length mounting<br />
screws are used when installing or removing external accessories.<br />
Accessories Mounting Screws - Refer to the information contained in Pulmonetic Systems<br />
Replacement Screws Kit, P/N 11149, to determine the appropriate mounting screws or replacement<br />
screws location, type and length to use when removing or exchanging external accessories on an<br />
<strong>LTV</strong> ® ventilator.<br />
AVERTISSEMENT<br />
Utilisation des vis de montage – Vous pourriez causer des dommages internes au ventilateur si<br />
des vis de montage de mauvaise longueur sont utilisées lors de l’installation ou de la dépose des<br />
accessoires externes.<br />
Vis de montage des accessoires – Voir les renseignements fournis dans la trousse de vis de<br />
remplacement de Pulmonetic Systems, numéro de pièce 11149, pour déterminer l’emplacement, le<br />
type et la longueur des vis de montage d’accessoires ou des vis de remplacement pour<br />
accessoires à utiliser lors de la dépose ou de l’échange d’accessoires externes sur un ventilateur<br />
de la série <strong>LTV</strong> ® .<br />
Page C-2 <strong>LTV</strong> ® <strong>1200</strong> Ventilator Operator’s <strong>Manual</strong><br />
p/n 18247-001, Rev. G
Protective Boot Removal<br />
Supplies/Tools Required:<br />
• Replacement Screws Kit, P/N 11149<br />
• Torque wrench (20 in-oz / 0.14 Nm to 60 in-oz / 0.42 Nm range)<br />
• Phillips-head screwdriver<br />
To Remove the Upper Protective Boot 71 :<br />
1) Carefully place and support the disconnected ventilator in an upright position on a clean, dry<br />
surface.<br />
2) Using a Phillips screwdriver, remove the two flat-head mounting screws and finish washers in<br />
the legs of the upper boot (1) and the two flat-head mounting screws and finish washers in the<br />
sides of the upper boot, as indicated in the illustration on the next page.<br />
3) Remove the upper boot and insert and thread two #4-40 pan-head mounting screws into the<br />
screw holes in the ventilator’s back panel, as indicated in the illustration.<br />
• Requires the use of the 1/4” pan-head mounting screw (4).<br />
4) Insert and thread two #4-40 X 1/4” flat-head mounting screws (5) with finish washers (6) into the<br />
screw holes in the ventilator’s side panels, as indicated in the illustration.<br />
• Finish washers (6) should be already in place.<br />
5) Torque tighten the mounting screws to these specified values (do not over tighten to avoid<br />
damage to the finish washers);<br />
• Torque tighten the screws in the back panel of the ventilator to 60 in-oz (0.42 Nm)<br />
• Torque tighten the screws in the sides of the ventilator to 20 in-oz (0.14 Nm)<br />
71 Refer to Appendix C - Installation and Checkout for information concerning the appropriate accessories<br />
mounting screws or accessories replacement screws location, type and length to use when removing or<br />
exchanging external accessories on an <strong>LTV</strong> ® ventilator.<br />
Operator’s <strong>Manual</strong> <strong>LTV</strong> ® <strong>1200</strong> Ventilator Page C-3<br />
p/n 18247-001, Rev. G
• Item (1), Protective Boot, Upper (1), P/N 19033-001 (Purple)<br />
• Item (2), Protective Boot, Lower (1), P/N 19032-001 (Purple)<br />
• Item (3), #4-40 X 3/16” Pan-head screw (1), P/N 10438 72<br />
• Item (4), #4-40 X 1/4” Pan-head mounting screws (2), P/N 10435 72<br />
• Item (5), #4-40 X 1/4” Flat-head mounting screws (6), P/N 10430 72<br />
• Item (6), Finish Washers (6), P/N 10191, 19119-001, or 19119-002 72<br />
72 Contained in Pulmonetic Systems Replacement Screws kit, P/N 11149.<br />
Page C-4 <strong>LTV</strong> ® <strong>1200</strong> Ventilator Operator’s <strong>Manual</strong><br />
p/n 18247-001, Rev. G
To Remove the Lower Protective Boot 73 :<br />
1) Lay the ventilator down (front up) and use a Phillips-head screwdriver to remove the four flathead<br />
mounting screws and finish washers in the sides of the lower protective boot (2), as<br />
indicated in the illustration.<br />
2) Remove the lower boot (2) and insert and thread four #4-40 X 1/4” flat-head mounting screws (5)<br />
with finish washers (6) into the screw holes in the ventilator’s side panels, as indicated in the<br />
illustration.<br />
• Finish washers (6) should be already in place.<br />
3) Torque tighten all four screws to 20 in-oz (0.14 Nm) (do not over tighten to avoid damage to the<br />
finish washers).<br />
• Item (1), Protective Boot, Upper (1), P/N 19033-001 (Purple)<br />
• Item (2), Protective Boot, Lower (1), P/N 19032-001 (Purple)<br />
• Item (3), #4-40 X 3/16” Pan-head screw (1), P/N 10438 74<br />
• Item (4), #4-40 X 1/4” Pan-head mounting screws (2), P/N 10435 74<br />
• Item (5), #4-40 X 1/4” Flat-head mounting screws (6), P/N 10430 74<br />
• Item (6), Finish Washers (6), P/N 10191, 19119-001, or 19119-002 74<br />
73 Refer to Appendix C - Installation and Checkout for information concerning the appropriate accessories<br />
mounting screws or accessories replacement screws location, type and length to use when removing or<br />
exchanging external accessories on an <strong>LTV</strong> ® ventilator.<br />
74 Contained in Pulmonetic Systems Replacement Screws kit, P/N 11149.<br />
Operator’s <strong>Manual</strong> <strong>LTV</strong> ® <strong>1200</strong> Ventilator Page C-5<br />
p/n 18247-001, Rev. G
Protective Boot Installation<br />
Supplies/Tools Required:<br />
• Item (1), Protective Boot, Upper (1) P/N 19033-001 (Purple)<br />
• Item (2), Protective Boot, Lower (1) P/N 19032-001 (Purple)<br />
• Replacement Screws Kit, P/N 11149<br />
• Torque wrench (20 in-oz / 0.14 Nm to 60 in-oz / 0.42 Nm range)<br />
• Phillips-head screwdriver<br />
To Install the Upper Protective Boot 75 :<br />
1) Carefully place and support the disconnected ventilator in an upright position on a clean, dry<br />
surface.<br />
2) Using a Phillips-head screwdriver, remove the two upper back panel pan-head and two side<br />
panel flat-head mounting screws indicated in the illustration.<br />
• Do not remove the mating finish washers.<br />
3) Orient the upper protective boot (1) over the ventilator as shown in the illustration (next page).<br />
Move the boot down into position on the top of the ventilator and align its four screw holes with<br />
the corresponding holes in the ventilator back and side panels.<br />
4) Insert and thread two #4-40 flat-head mounting screws with finish washers (6) through the screw<br />
holes in the legs of the upper boot, as indicated in the illustration (next page).<br />
75 Refer to page C-8 for information concerning the appropriate accessories mounting screws or accessories<br />
replacement screws location, type and length to use when removing or exchanging external accessories on an<br />
<strong>LTV</strong> ® ventilator.<br />
Page C-6 <strong>LTV</strong> ® <strong>1200</strong> Ventilator Operator’s <strong>Manual</strong><br />
p/n 18247-001, Rev. G
• Item (5), #4-40 X 1/4” Flat-head mounting screw (1) P/N 10430 76<br />
• Item (6), Finish Washers (8) P/N 10191, 19119-001, or 19119-002 76<br />
• Item (7), #4-40 X 1/2” Flat-head mounting screws (6) P/N 10338 76<br />
• Item (8), #4-40 X 3/8” Flat-head mounting screws (2) P/N 10474 76<br />
5) Insert and thread two #4-40 X 1/2” flat-head mounting screws (7) with finish washers (6) through<br />
the screw holes in the sides of the upper boot, as indicated in the illustration.<br />
6) Torque tighten the mounting screws to these specified values (do not over tighten to avoid<br />
damage to the finish washers).<br />
• Torque tighten the screws in the legs of the boot to 60 in-oz (0.42 Nm)<br />
• Torque tighten the screws in the sides of the boot to 20 in-oz (0.14 Nm)<br />
76 Contained in Pulmonetic Systems Replacement Screws kit, P/N 11149.<br />
Operator’s <strong>Manual</strong> <strong>LTV</strong> ® <strong>1200</strong> Ventilator Page C-7<br />
p/n 18247-001, Rev. G
To Install the Lower Protective Boot 77 :<br />
1) Lay the ventilator down (front up) and use a Phillips-head screwdriver to remove the four flathead<br />
mounting screws in the ventilator’s side panels, as indicated in the illustration.<br />
• Do not remove the mating finish washers.<br />
2) Orient the lower protective boot (2) to the ventilator as shown in the illustration. Move the boot<br />
into position on the bottom of the ventilator and align its four screw holes with the corresponding<br />
holes in the ventilator side panels.<br />
3) Insert and thread four #4-40 X 1/2” flat-head mounting screws (7) with finish washers (6) through<br />
the screw holes in the sides of the lower boot; as indicated in the illustration below.<br />
4) Torque tighten all four screws in the boot to 20 in-oz (0.14 Nm) (do not over tighten to avoid<br />
damage to the finish washers).<br />
• Item (5), #4-40 X 1/4” Flat-head mounting screw (1) P/N 10430 78<br />
• Item (6), Finish Washers (8) P/N 10191, 19119-001, or 19119-002 78<br />
• Item (7), #4-40 X 1/2” Flat-head mounting screws (6) P/N 10338 78<br />
• Item (8), #4-40 X 3/8” Flat-head mounting screws (2) P/N 10474 78<br />
77 Refer to page C-8 for information concerning the appropriate accessories mounting screws or accessories<br />
replacement screws location, type and length to use when removing or exchanging external accessories on an<br />
<strong>LTV</strong> ® ventilator.<br />
78 Contained in Pulmonetic Systems Replacement Screws kit, P/N 11149.<br />
Page C-8 <strong>LTV</strong> ® <strong>1200</strong> Ventilator Operator’s <strong>Manual</strong><br />
p/n 18247-001, Rev. G
Operator’s <strong>Manual</strong> <strong>LTV</strong> ® <strong>1200</strong> Ventilator Page C-9<br />
p/n 18247-001, Rev. G
Patient Breathing Circuit – Connection Instructions<br />
1) Connect the main breathing tube to the 22 mm outlet port on the right side of the ventilator.<br />
2) Connect the two exhalation flow transducer sense lines to the ports marked Flow Xducer on the<br />
right side of the ventilator. These are non-interchangeable Luer fittings.<br />
3) Connect the exhalation valve drive line to the port marked Exh Valve on the right side of the<br />
ventilator.<br />
CAUTION<br />
Patient Wye Installation – After cleaning, install the patient wye in the patient circuit so the proximal<br />
sense lines are oriented up while operating.<br />
ATTENTION<br />
Installation de la soupape d'expiration - Après le nettoyage, installez la soupape d'expiration dans<br />
le circuit du patient de sorte que les lignes de détection soient alignées vers le haut pendant<br />
l’opération.<br />
Page C-10 <strong>LTV</strong> ® <strong>1200</strong> Ventilator Operator’s <strong>Manual</strong><br />
p/n 18247-001, Rev. G
Ventilator without Humidifier<br />
1) Connect the main breathing tube to the 22mm outlet port on the right side of the ventilator.<br />
2) Connect the two exhalation flow transducer sense lines to the ports marked Flow Xdcer on the<br />
right side of the ventilator. These are non-interchangeable Luer fittings.<br />
3) Connect the exhalation valve drive line to the port marked Exh Valve on the right side of the<br />
ventilator.<br />
Ventilator with Humidifier<br />
1) Attach the main breathing tube to the outlet port on the humidifier.<br />
2) Connect the humidifier circuit tube (not included in reusable circuit configurations) to the 22mm<br />
outlet port on the right side of the ventilator and to the inlet port of the humidifier.<br />
3) Connect the two exhalation flow transducer sense lines to the ports marked Flow Xdcer on the<br />
right side of the ventilator. These are non-interchangeable luer fittings.<br />
4) Connect the exhalation valve driveline to the port marked Exh Valve on the right side of the<br />
ventilator.<br />
Operator’s <strong>Manual</strong> <strong>LTV</strong> ® <strong>1200</strong> Ventilator Page C-11<br />
p/n 18247-001, Rev. G
Oxygen Lines – Connection Instructions<br />
CAUTION<br />
Oxygen Supply Contamination - The accuracy of the oxygen delivery capabilities of <strong>LTV</strong> ®<br />
ventilators can be compromised by foreign debris contamination in the oxygen supply system. To<br />
reduce the risk of airborne contaminants entering the ventilator, ensure that any oxygen supply<br />
connected to the ventilator is clean, properly filtered 79 and that the ventilator’s O2 Inlet Port Cap is<br />
securely installed on the O2 Inlet Port whenever the ventilator is not connected to an external oxygen<br />
supply.<br />
ATTENTION<br />
Contamination de la réserve d’oxygène — La précision de la capacité d’alimentation en oxygène<br />
des ventilateurs <strong>LTV</strong> ® peut être compromise par la présence de corps étrangers dans le système<br />
d’alimentation en oxygène. Afin de diminuer le risque de présence d’agents contaminants<br />
atmosphériques dans le ventilateur, assurez-vous que la réserve d’oxygène reliée au ventilateur est<br />
propre et filtrée de manière adéquate 79 , et que le bouchon de l’orifice d’alimentation en oxygène est<br />
correctement installé à chaque fois que le ventilateur n’est pas relié à une source d'oxygène externe.<br />
79<br />
In addition to the existing internal O2 Inlet filter, P/N 14313, an External, In-Line Oxygen Filter (P/N 14470) is<br />
available from Pulmonetic Systems.<br />
Page C-12 <strong>LTV</strong> ® <strong>1200</strong> Ventilator Operator’s <strong>Manual</strong><br />
p/n 18247-001, Rev. G
For Operation from a High Pressure Oxygen Source:<br />
To operate from a high pressure (40 - 80 PSIG) oxygen source, connect an oxygen hose to the<br />
female DISS 80 oxygen inlet fitting labeled O2 INLET on the left side of the ventilator.<br />
For Operation from a Low Pressure Oxygen Source:<br />
High pressure O2<br />
hose<br />
For operation from a low pressure oxygen source such as an oxygen concentrator, attach the low<br />
pressure adapter to the inlet fitting labeled O2 INLET located on the left side of the ventilator. Then<br />
attach the oxygen supply line to the hose barb on the adapter.<br />
Low Pressure O2<br />
adapter.<br />
80 An NIST adapter (P/N 10702) for this connection is available from Pulmonetic Systems upon request.<br />
Operator’s <strong>Manual</strong> <strong>LTV</strong> ® <strong>1200</strong> Ventilator Page C-13<br />
p/n 18247-001, Rev. G
Patient Assist Call System – Connection Instructions<br />
The ventilator is configured to interface with a Patient Assist Call system requiring either normallyclosed<br />
or normally-open contact sets. Devices connected to the Patient Assist port must be IEC<br />
60601-1-1 certified.<br />
• If your patient assist system is Normally Open, use Patient Assist Cable, Normally Open P/N<br />
10780.<br />
• If your patient assist system is Normally Closed, use Patient Assist Cable, Normally Closed P/N<br />
10779.<br />
To connect the ventilator to the patient assist system:<br />
1) Insert the telephone jack connector (RJ11-4) into the port labeled PATIENT ASSIST on the left<br />
hand side of the ventilator.<br />
2) Connect the jack on the other end of the cable to your patient assist system.<br />
3) Test the connection by performing an Alarm test (see Chapter 11 - Ventilator Checkout Tests) or<br />
by causing an alarm and verifying the patient assist call activates.<br />
WARNING<br />
Unapproved Adapters – Only Pulmonetic Systems Accessories should be used to connect the<br />
ventilator to Patient Assist Call Systems. These accessories incorporate safety features to reduce the<br />
risk of shock. Do not attempt to modify these accessories in any way.<br />
Patient Assist Call Connector – Do not apply more than 25V rms or 32VDC to the Patient Assist<br />
Call connector.<br />
AVERTISSEMENT<br />
Accessoires non approuvés – L’utilisation d’accessoires qui ne sont pas expressément approuvés<br />
par Pulmonetic Systems pourrait entraîner des conditions dangereuses. Seuls les accessoires de<br />
Pulmonetic Systems devraient être utilisés pour brancher les ventilateurs aux systèmes d’aide aux<br />
patients. Ces accessoires comportent des caractéristiques de sécurité pour réduire les risques de<br />
choc. N’essayez pas de modifier ces accessoires d’aucune façon.<br />
Connecteur d’appel d’aide aux patients – Ne mettez pas plus de 25 V efficace ou 32 V c.c. au<br />
connecteur d’appel d’aide aux patients.<br />
Page C-14 <strong>LTV</strong> ® <strong>1200</strong> Ventilator Operator’s <strong>Manual</strong><br />
p/n 18247-001, Rev. G
Communications Port<br />
The Communications Port on the <strong>LTV</strong> ® <strong>1200</strong> ventilator allows for attachment to, and communication<br />
with, accessories such as graphics monitors or printers. Currently the printer option is only available<br />
for use by service personnel.<br />
Use the Communications Setting option in the Extended Features menu to modify the<br />
communications protocol (see Chapter 10 - Extended Features, Communications Setting for<br />
instructions).<br />
LTM Graphics Monitor<br />
The LTM Graphics Monitor is a thin, lightweight color graphics monitor accessory for LTM<br />
compatible <strong>LTV</strong> ® ventilators.<br />
• For additional information regarding the LTM Graphics Monitor, contact Pulmonetic Systems.<br />
To install and setup an LTM Graphics Monitor, refer to the LTM Graphics Monitor Operator’s<br />
<strong>Manual</strong> included with your Monitor.<br />
Operator’s <strong>Manual</strong> <strong>LTV</strong> ® <strong>1200</strong> Ventilator Page C-15<br />
p/n 18247-001, Rev. G
Using the Remote Alarm Cable<br />
Use the Remote Alarm Cable (P/N 10893) to connect the <strong>LTV</strong> ® ventilator to third party, single or dual<br />
tone remote alarm systems requiring a normally closed input signal terminated with a 51K ohm series<br />
resistor. Devices connected to the Patient Assist port must be IEC 60601-1-1 certified.<br />
• See Chapter 10 - Extended Features, Alarm Operations, for instructions on setting the Patient<br />
Assist Port output signal for use with single or dual tone remote alarm systems.<br />
Because the ventilator does not include an internal series resistor in the Patient Assist output, a<br />
special cable has been designed which incorporates the resistor into the cable assembly itself. The<br />
series resistor allows the remote alarm to detect and report both ventilator alarms and a disconnected<br />
remote alarm cable.<br />
Do not apply more than 120 Volts AC (VAC) to a remote alarm when it is connected to the ventilator.<br />
CAUTION<br />
Remote Alarm – Always verify that the remote alarm properly reports the <strong>LTV</strong> ® ventilator alarms<br />
before use.<br />
Remote Alarm – Always follow the remote alarm manufacturer’s usage and maintenance<br />
requirements to guarantee proper function of the device.<br />
ATTENTION<br />
Alarme à distance – Assurez-vous toujours que l’alarme à distance indique de façon adéquate les<br />
alarmes du ventilateur <strong>LTV</strong> ® avant d’utiliser le ventilateur.<br />
Alarme à distance – Suivez toujours les exigences d’utilisation et d’entretien du fabricant de l’alarme<br />
à distance afin d’assurer le fonctionnement adéquat de l’appareil.<br />
To connect the ventilator to the remote alarm:<br />
1) Plug the cable’s modular jack into the Patient Assist port on the side of the ventilator.<br />
2) If the remote alarm has a female BNC plug, connect the cable directly to the remote alarm's input<br />
cable or connector and twist to secure.<br />
Page C-16 <strong>LTV</strong> ® <strong>1200</strong> Ventilator Operator’s <strong>Manual</strong><br />
p/n 18247-001, Rev. G
3) If the remote alarm has a male BNC plug, insert the included BNC adapter into the cable's<br />
connector and twist to secure. Then connect the adapter to the remote alarm's input cable or<br />
connector.<br />
4) Create an alarm condition at the ventilator and verify that the remote alarm reflects the alarm<br />
state properly.<br />
5) Clear the ventilator alarm condition and verify that the remote alarm reflects the alarm state<br />
properly.<br />
Operator’s <strong>Manual</strong> <strong>LTV</strong> ® <strong>1200</strong> Ventilator Page C-17<br />
p/n 18247-001, Rev. G
Checking the Ventilator for Proper Operation<br />
1) Verify that the ventilator is functioning properly by performing the Ventilator Checkout Tests. 81<br />
• Disconnect the patient from the ventilator and ventilate the patient using an alternative<br />
method before running the Ventilator Checkout tests.<br />
2) Connect the AC adapter to a valid AC power source. Connect the patient circuit to the ventilator<br />
and to a test lung with a compliance of 10 ml/cmH2O and a resistance of 5 cm/L/sec. Do not<br />
connect the Oxygen supply. Turn the ventilator on and proceed with the checkout as defined in<br />
the following table:<br />
Ventilator Settings and Procedure Performance Requirement<br />
A) Configure the ventilator settings as<br />
follows, and run the equipment for at<br />
least two minutes:<br />
Mode: Volume, Assist/Ctrl<br />
Low Press 02: Off<br />
Breath Rate: 12<br />
Tidal Volume: 500<br />
Insp. Time: 1 sec<br />
Pressure Support: 0<br />
O2%: 21<br />
Sensitivity: 3<br />
High Pressure Limit: 100<br />
Low Pressure Alarm: 5<br />
Low Min Vol: 1.0<br />
PEEP: 0<br />
Selected Monitors should read as follows:<br />
• Exhaled Tidal Volume: 383 to 633 ml<br />
• I:E Ratio : 1:3.8 to 1:4.2<br />
• Total Breath Rate: 12 bpm<br />
• Total Minute Vol: 4.6 to 7.6 L<br />
• No alarms<br />
B) Set the O2% control to 22% LOW O2 PRES alarm activates after a short<br />
pause<br />
C) Reset O2% to 21 and clear the<br />
alarm. Set the Low Min. Vol. alarm<br />
to 10 L<br />
D) Reset the Low Min. Vol. alarm to<br />
1.0 and clear the alarm. Set the Low<br />
Pressure alarm to 60.<br />
E) Set the Low Pressure alarm to 5 and<br />
clear the alarm. Set the High Pres.<br />
Limit to 10 cmH2O below the Peak<br />
Inspiratory Pressure.<br />
F) Reset the High Pres. Limit alarm to<br />
100 and clear the alarm.<br />
81 See Chapter 11 - Ventilator Checkout Tests for more information<br />
LOW MIN VOL alarm activates<br />
LOW PRES alarm activates<br />
HIGH PRES alarm activates<br />
Page C-18 <strong>LTV</strong> ® <strong>1200</strong> Ventilator Operator’s <strong>Manual</strong><br />
p/n 18247-001, Rev. G
Ventilator Settings and Procedure Performance Requirement<br />
G) Disconnect the high pressure sense<br />
line from the ventilator<br />
(see the illustration in Appendix C -<br />
Patient Breathing Circuit –<br />
Connection Instructions)<br />
H) Reconnect the high pressure sense<br />
line and clear the alarm<br />
I) Change control settings as follows:<br />
Mode: Pressure, Assist/Cntl<br />
Pressure Control: 20<br />
PEEP: 20<br />
J) Disconnect AC Adapter from<br />
Ventilator at pigtail cable connector<br />
• DISC/SENSE alarm activates on the next<br />
breath<br />
Selected Monitors should read as follows:<br />
• PIP: 36 to 44 cmH2O<br />
• PEEP: 17 to 23 cmH2O<br />
• No alarms activate<br />
• POWER LOST alarm activates<br />
• Battery Level LED illuminates showing the<br />
charge level<br />
• Ventilator continues to operate from the<br />
internal battery<br />
Operator’s <strong>Manual</strong> <strong>LTV</strong> ® <strong>1200</strong> Ventilator Page C-19<br />
p/n 18247-001, Rev. G
Ventilator Proper Operation Worksheet<br />
SERIAL NUMBER: ________________ CONDUCTED BY: _______________________<br />
DATE: ________________<br />
TEST<br />
DESCRIPTION<br />
PAGE /<br />
STEP<br />
Ventilator Checkout Tests (Chapter 11 -)<br />
MEAS.<br />
VALUE<br />
REQUIREMENT PASS /<br />
FAIL<br />
Alarm Test 11-3<br />
Audible alarm must activate for minimum 2<br />
sec’s.<br />
Confirming audible Chirp must activate<br />
after alarm is silenced<br />
Display Test 11-4 All displays must light except Vent Inop<br />
Control Test 11-6 Correct messages displayed in window<br />
Leak Test 11-8 “X.X PASS”, Record value displayed<br />
Vent Inop Alarm Test 11-10<br />
Alarm sounded and Inop LED illuminated<br />
15 sec’s.<br />
Confirming audible Chirp must activate<br />
after alarm is silenced<br />
Checking the Ventilator for Proper Operation (Appendix C - Installation and Checkout):<br />
Ventilator Settings:<br />
Settings:<br />
Mode: Volume, Assist/Ctrl<br />
Low Press O2: Off<br />
Breath Rate: 12<br />
Tidal Volume: 500<br />
Insp. Time: 1 sec<br />
O2%: 21<br />
Sensitivity: 3<br />
High Pressure Limit: 100<br />
Low Pressure Alarm: 5<br />
Low Min Vol: 1.0<br />
PEEP: 0<br />
C-18<br />
2) A)<br />
Selected Monitors should read as follows:<br />
Exhaled Tidal Volume: 383 to 633 ml<br />
I:E Ratio : 1:3.8 to 1:4.2<br />
Total Breath Rate: 12 bpm<br />
Total Minute Vol: 4.6 to 7.6 L<br />
No alarms<br />
Page C-20 <strong>LTV</strong> ® <strong>1200</strong> Ventilator Operator’s <strong>Manual</strong><br />
p/n 18247-001, Rev. G
Procedure:<br />
Set the O2% control to 22% C-18<br />
2) B)<br />
Reset O2% to 21 and clear the C-18<br />
alarm. Set the Low Min. Vol. alarm<br />
to 10 L<br />
2) C)<br />
Reset the Low Min. Vol. alarm to C-18<br />
1.0 and clear the alarm.<br />
Set the Low Pressure alarm to 60.<br />
2) D)<br />
Set the Low Pressure alarm to 5 C-18<br />
and clear the alarm.<br />
Set the High Pres Limit to 10<br />
cmH2O below the Peak Inspiratory<br />
Pressure.<br />
2) E)<br />
Reset the High Pres. Limit alarm to C-18<br />
100 and clear the alarm.<br />
2) F)<br />
Disconnect the high pressure sense C-19<br />
line from the ventilator<br />
2) G)<br />
Reconnect the high pressure sense C-19<br />
line and clear the alarm<br />
2) H)<br />
Change control settings as follows: C-19<br />
Mode: Pressure, Assist/Cntl<br />
Pressure Control: 20<br />
PEEP: 20<br />
2) I)<br />
Disconnect AC Adapter from<br />
Ventilator at pigtail cable connector.<br />
C-19<br />
2) J)<br />
LOW O2 PRES alarm activates after a short<br />
pause<br />
LOW MIN VOL alarm activates<br />
LOW PRES alarm activates<br />
HIGH PRES alarm activates.<br />
DISC/SENSE alarm activates on the next<br />
breath<br />
Selected Monitors should read as follows:<br />
PIP: 36 to 44 cmH2O<br />
PEEP: 17 to 23 cmH2O<br />
No alarms activate<br />
POWER LOST alarm activates<br />
Battery Level LED illuminates showing the<br />
charge level.<br />
Ventilator continues to operate from the<br />
internal battery<br />
Operator’s <strong>Manual</strong> <strong>LTV</strong> ® <strong>1200</strong> Ventilator Page C-21<br />
p/n 18247-001, Rev. G
Page C-22 <strong>LTV</strong> ® <strong>1200</strong> Ventilator Operator’s <strong>Manual</strong><br />
p/n 18247-001, Rev. G
Appendix D - PRINCIPLES OF OPERATION<br />
Overview<br />
The <strong>LTV</strong> ® <strong>1200</strong> ventilator utilizes an electromechanical pneumatic system under the control of a<br />
microprocessor to deliver patient ventilation. The following diagram and description illustrates the<br />
major components of the ventilator and their respective functions.<br />
Room air enters the ventilator through a flexible foam Inlet Filter. After exiting the filter, the air enters<br />
an Accumulator/Silencer where it mixes with oxygen delivered from the Oxygen Blender. In<br />
addition, this chamber provides acoustic silencing to reduce the Rotary Compressor input noise.<br />
Mixed gas then enters the Rotary Compressor, where energy is added to the gas stream as<br />
required to meet the pressure and flow delivery requirements of the current ventilation settings.<br />
Gas exiting the Rotary Compressor output port enters another Silencer. This chamber dampens<br />
acoustic noise from the Rotary Compressor. Upon exiting the silencing chamber, the gas flow splits<br />
in two paths. Gas flow for ventilation diverts to the Flow Valve, while excess flow is recirculated<br />
through the Bypass Valve to the inlet Accumulator/Silencer. The Bypass Valve maintains Flow<br />
Valve inlet pressure high enough above Flow Valve outlet pressure to ensure a positive differential<br />
pressure across the valve, yet low enough to ensure that excess energy is not wasted when<br />
operating from batteries.<br />
Operator’s <strong>Manual</strong> <strong>LTV</strong> ® <strong>1200</strong> Ventilator Page D-1<br />
p/n 18247-001, Rev. G
Ventilation flow enters the Flow Valve, which controls all inspiratory gas flow to the patient. The valve<br />
is driven by a rotary actuator, and translates circular motion to a poppet position, which in turn meters<br />
flow to the patient. The valve is characterized such that gas flow is a known function of differential<br />
pressure across the valve and actuator position. A Differential Pressure Transducer is provided to<br />
measure the differential flow valve pressure.<br />
Ventilation gas exiting the Flow Valve is connected to the Exhalation Valve by a patient circuit. The<br />
Exhalation Valve provides the following functions:<br />
1) Closes the exhalation port during inspiration to divert gas to the patient.<br />
2) Opens the exhalation port during exhalation to allow patient gases to be exhausted to the<br />
atmosphere.<br />
3) Measures the exhaled flow using a fixed orifice type transducer. Transducer sensor ports are<br />
located between the patient and ventilator connection ports.<br />
The Solenoids (Pilot-in and Pilot-out) are used to control the pressure in the new pressure<br />
accumulator that is used to control the exhalation valve on the patient circuit. The activation of the<br />
exhalation circuit controls the PEEP (positive end expiratory pressure) at the patient wye during the<br />
expiratory phase.<br />
A PEEP Transducer is used to monitor the pilot pressure in the accumulator. This pilot pressure is<br />
used in conjunction with the airway pressure transducer by the <strong>LTV</strong> software to control delivered<br />
PEEP.<br />
A Differential Pressure Transducer is provided to measure the delta pressure developed across the<br />
flow transducer at the patient wye. This transducer also monitors volume and flow to trigger alarms.<br />
The transducer is autozeroed to ambient pressure and the sense lines are purged to prevent moisture<br />
migration into the transducer.<br />
The Oxygen Blender accepts pressurized oxygen from an external source and as directed by the<br />
control system meters the oxygen flow to meet the requirements of the current O2 % setting and<br />
ventilation flow demand. The O2 Pressure Transducer measures inlet pressure and is used by the<br />
blender control system to compensate the oxygen delivery for variations in oxygen inlet pressure.<br />
The Sub-Ambient Relief Valve allows the patient to inspire spontaneously from room air in the event<br />
of a failure of the main ventilator system. The Over Pressure Relief Valve provides an independent<br />
mechanical means to limit the maximum inspiratory pressure. Both of these functions are physically<br />
included in the Flow Valve Body.<br />
The Airway Pressure Transducer measures pressure at the patient airway and is used for a<br />
feedback signal during the delivery of pressure breaths. This transducer also monitors airway<br />
pressure to trigger alarms. The transducer is autozeroed to ambient pressure and the sense lines are<br />
purged to prevent moisture migration into the transducer.<br />
Page D-2 <strong>LTV</strong> ® <strong>1200</strong> Ventilator Operator’s <strong>Manual</strong><br />
p/n 18247-001, Rev. G
Appendix E - EVENT TRACE<br />
The Event Trace is a list of events recorded by the ventilator. These events may be normal<br />
conditions, such as turning the ventilator on or off, or alarm conditions such as HW FAULT or HIGH<br />
PRES.<br />
• Initial occurrences of events are recorded the first time they occur after power up, along with the<br />
date, time and associated data, if any.<br />
• A second occurrence of the same type of event (same event code) will be recorded as a<br />
separate line item along with the latest date, time and associated data. The quantity of<br />
occurrences is increased by one (1) (i.e. a quantity of two (2) will be displayed)).<br />
• Additional occurrences (3 rd or more) of the same type of event will update the secondary<br />
occurrence line items with the latest date, time, and associated data. The quantity of<br />
occurrences will be increased by one (1) for each additional occurrence (i.e. the quantity of 2 will<br />
be increased to 3).<br />
NOTE<br />
Event log entries are only one of many diagnostic tools used to troubleshoot the ventilator. Additional<br />
information is often required to accurately identify the root cause of a problem. See Chapter 15 -<br />
Troubleshooting for more information.<br />
REMARQUE<br />
Les entrées du journal d’événements ne représentent que l’un des nombreux outils de diagnostic<br />
utilisés pour localiser les pannes du ventilateur. Des informations supplémentaires sont souvent<br />
nécessaires pour identifier de façon précise la source d’un problème. Reportez-vous au Chapitre 15 –<br />
Dépannage, pour de plus amples informations.<br />
To view the events:<br />
1) Enter the Extended Features menu by pushing and holding the Select button for 3 seconds.<br />
2) Turn the Set Value knob until EVENT TRACE is displayed.<br />
3) Push the Select button while EVENT TRACE is displayed.<br />
• xx:eventname is displayed.<br />
• xx is the chronological number of the event occurrence.<br />
• eventname is the name of the event.<br />
4) Push the Select button.<br />
• xx:EyCz is displayed.<br />
• xx is the chronological number of the event occurrence.<br />
• y is the event code number of the event.<br />
• z is the quantity of occurrences since power up 82 .<br />
82 The maximum number of occurrences recorded is 255.<br />
Operator’s <strong>Manual</strong> <strong>LTV</strong> ® <strong>1200</strong> Ventilator Page E-1<br />
p/n 18247-001, Rev. G
5) Push the Select button.<br />
• xx:eventdate is displayed.<br />
• xx is the chronological number of the event occurrence.<br />
• eventdate is the date 83 of the first occurrence.<br />
6) Push the Select button.<br />
• xx:hh:mm:ss is displayed.<br />
• xx is the chronological number of the event occurrence.<br />
• hh:mm:ss is the time of the first occurrence.<br />
7) Push the Select button.<br />
• xx:data is displayed.<br />
• xx is the chronological number of the event occurrence.<br />
• data is the data associated with the first occurrence of this event.<br />
For some events, the data field will be blank.<br />
8) Push the Select button to return to the initial display.<br />
9) Turn the Set Value knob clockwise or counterclockwise to view other events.<br />
10) To exit the EVENT TRACE, turn to EXIT and push the Select button or push Control Lock.<br />
For more information about how these codes are used, see the <strong>LTV</strong> ® <strong>1200</strong> / 1150 Ventilator Service<br />
<strong>Manual</strong> (P/N 18603-001) or contact a certified Pulmonetic Systems’ service technician.<br />
83 Date is displayed in the currently selected date format.<br />
Page E-2 <strong>LTV</strong> ® <strong>1200</strong> Ventilator Operator’s <strong>Manual</strong><br />
p/n 18247-001, Rev. G
Event Codes<br />
This section includes a list of the event codes that can be recorded in the Event Trace.<br />
Event Codes by Code #<br />
Code Event Name Event Associated Alarm<br />
01 VENT 1 Power on None<br />
02 VENT 0 Power off None<br />
03 HOUR MTR Set hour meter None<br />
04 VENT CHK Set vent check Entered VENT CHECK mode<br />
05 APNEA 1 Apnea mode entered APNEA<br />
06 APNEA 0 Apnea mode exited APNEA<br />
07 N/A<br />
08 HIGH DIS High side disconnect DISC/SENSE<br />
09 LOW DIS Low side disconnect DISC/SENSE<br />
10 DISC 0 Circuit disconnect exited DISC/SENSE<br />
11 BATMPT1 Internal battery empty occurred BAT EMPTY<br />
12 BATMPT0 Internal battery empty exited BAT EMPTY<br />
13 BATLOW1 Internal battery low occurred BAT LOW<br />
14 BATLOW0 Internal battery low exited BAT LOW<br />
15 EXT LST1 External power lost occurred POWER LOST<br />
16 EXT LST0 External power lost exited POWER LOST<br />
17 EXT LOW1 External power low occurred POWER LOW<br />
18 EXT LOW0 External power low exited POWER LOW<br />
19 XDC FLT1 XDCR fault occurred XDCR FAULT<br />
20 XDC FLT0 XDCR fault exited XDCR FAULT<br />
21 O2 LOW 1 O2 pressure low occurred LOW O2 PRES<br />
22 O2 LOW 0 O2 pressure low exited LOW O2 PRES<br />
23 O2 HI 1 O2 pressure high occurred HIGH O2 PRES<br />
24 O2 HI 0 O2 pressure high exited HIGH O2 PRES<br />
25 DEFAULTS Defaults, or Set Defaults occurred DEFAULTS / DEFAULTS SET<br />
26 NO CAL No calibration data found NO CAL DATA<br />
27 FAN FLT1 Fan fault occurred HW FAULT<br />
28 FAN FLT0 Fan fault exited HW FAULT<br />
29 N/A<br />
30 N/A<br />
31 INTRRPT1 Spurious interrupt occurred ms RESET 1<br />
32 INTRRPT2 Spurious interrupt occurred ls RESET 1<br />
33 AD MMTCH ADC mismatch HW FAULT<br />
34 AD MTCH1 ADC mismatch occurred HW FAULT<br />
35 AD MTCH0 ADC mismatch cleared HW FAULT<br />
36 SYNCER1 Stepper motor lost sync occurred HW FAULT<br />
Operator’s <strong>Manual</strong> <strong>LTV</strong> ® <strong>1200</strong> Ventilator Page E-3<br />
p/n 18247-001, Rev. G
Code Event Name Event Associated Alarm<br />
37 SYNCER0 Stepper motor lost sync exited HW FAULT<br />
38 HOME ER1 Stepper motor home failure occurred HW FAULT<br />
39 HOME ER0 Stepper motor home failure exited HW FAULT<br />
40 EEPROM EEPROM degraded HW FAULT<br />
41 CRC Memory CRC check failed RESET<br />
42 HI PRES1 High pressure occurred HIGH PRES<br />
43 HI PRES0 High pressure exited HIGH PRES<br />
44 TBN ISTP Turbine immediate stop occurred HIGH PRES<br />
45 TBN ZERO Turbine set to zero flow occurred HIGH PRES<br />
46 TBN ESTP Turbine emergency stop occurred HIGH PRES<br />
47 LOW VE 1 Low minute volume occurred LOW MIN VOL<br />
48 LOW VE 0 Low minute volume exited LOW MIN VOL<br />
49 LO PRES1 Low peak pressure occurred LOW PRES<br />
50 LO PRES0 Low peak pressure exited LOW PRES<br />
51 CLR EVNT Event log cleared N/A<br />
52 CLR CTRL Control settings cleared N/A<br />
53 SET DATE Date set N/A<br />
54 SET TIME Time set N/A<br />
55 N/A<br />
56 STACK Stack overflow detected RESET<br />
57 POST POST failure RESET<br />
58 RUNAWAY Code runaway detected RESET<br />
59 WDOG TST Watchdog test run Inop<br />
60 CLR CAL Calibration records cleared N/A<br />
61 XDCR NAR<br />
62 XDCR WID<br />
63 XDCR BI<br />
Differential pressure transducer -<br />
Narrow channel fault<br />
Differential pressure transducer -<br />
Wide channel fault<br />
Differential pressure transducer - Bidirectional<br />
channel fault<br />
XDC FLT1<br />
XDC FLT1<br />
XDC FLT1<br />
64 XDCR AIR Airway pressure transducer fault XDC FLT1<br />
65 ADC1 VAL<br />
AD mismatch primary channel fault<br />
value<br />
HW FAULT<br />
66 TBN HSTP Turbine Hold Stop occurred HIGH PRES<br />
67 LN VENT1<br />
68 FLUSH ER<br />
69 RAC ERR1<br />
70 RAC ERR0<br />
Shutdown for other than pressing<br />
On/Standby button<br />
A problem is detected writing data to<br />
the EEPROM during system<br />
shutdown.<br />
Problem detected with primary and/or<br />
redundant audible alarm circuitry<br />
Recovery from problem detected with<br />
primary and/or redundant audible<br />
alarm circuitry<br />
RESET<br />
HW FAULT<br />
HW FAULT<br />
HW FAULT<br />
71 SNDRERR1 Alarm sounder error HW FAULT<br />
Page E-4 <strong>LTV</strong> ® <strong>1200</strong> Ventilator Operator’s <strong>Manual</strong><br />
p/n 18247-001, Rev. G
Code Event Name Event Associated Alarm<br />
72 SNDRERR0 Recovery from alarm sounder error HW FAULT<br />
73 HIGH f1 High breath rate alarm occurred HIGH f<br />
74 HIGH f0 High breath rate alarm recovered HIGH f<br />
75 HI PEEP1 Monitored PEEP HIGH PEEP<br />
76 HI PEEP0 Monitored PEEP HIGH PEEP<br />
77 HI SBTf1 Total Breath Rate SBT > f<br />
78 HI SBTf0 Total Breath Rate SBT > f<br />
79 LO SBTf1 Total Breath Rate SBT < f<br />
80 LO SBTf2 Total Breath Rate SBT < f<br />
81 HI f/VtT1 Rapid Shallow Breathing Index SBT > f/Vt<br />
82 HI f/VtT0 Rapid Shallow Breathing Index SBT > f/Vt<br />
83 LO f/VtT1 Rapid Shallow Breathing Index SBT < f/Vt<br />
84 LO f/VtT0 Rapid Shallow Breathing Index SBT < f/Vt<br />
85 SBT1 N/A N/A<br />
86 MON f/Vt f/Vt value at SBT exit N/A<br />
87 SBT0 SBT exit reason N/A<br />
88 CLR BREC<br />
Reclaims all incorrectly recognized<br />
bad EEPROM records<br />
89 LO PEEP1 Monitored PEEP LOW PEEP<br />
90 LO PEEP0 Monitored PEEP LOW PEEP<br />
Operator’s <strong>Manual</strong> <strong>LTV</strong> ® <strong>1200</strong> Ventilator Page E-5<br />
p/n 18247-001, Rev. G<br />
N/A<br />
91 NEW PTNT New patient setup N/A
Event Codes by Event Name<br />
Event Name Code Event Associated Alarm<br />
AD MMTCH 33 ADC mismatch HW FAULT<br />
AD MTCH0 35 ADC mismatch cleared HW FAULT<br />
AD MTCH1 34 ADC mismatch occurred HW FAULT<br />
ADC1 VAL 65 AD mismatch primary channel fault value HW FAULT<br />
APNEA 0 06 Apnea mode exited APNEA<br />
APNEA 1 05 Apnea mode entered APNEA<br />
BATLOW0 14 Internal battery low exited BAT LOW<br />
BATLOW1 13 Internal battery low occurred BAT LOW<br />
BATMPT0 12 Internal battery empty exited BAT EMPTY<br />
BATMPT1 11 Internal battery empty occurred BAT EMPTY<br />
CLR BREC 88<br />
Reclaims all incorrectly recognized bad<br />
EEPROM records<br />
CLR CAL 60 Calibration records cleared N/A<br />
CLR CTRL 52 Control settings cleared N/A<br />
CLR EVNT 51 Event log cleared N/A<br />
CRC 41 Memory CRC check failed RESET<br />
DEFAULTS 25 Defaults, or Set Defaults occurred<br />
DEFAULTS / DEFAULTS,<br />
SET<br />
DISC 0 10 Circuit disconnect exited DISC/SENSE<br />
EEPROM 40 EEPROM degraded HW FAULT<br />
EXT LOW0 18 External power low exited POWER LOW<br />
EXT LOW1 17 External power low occurred POWER LOW<br />
EXT LST0 16 External power lost exited POWER LOST<br />
EXT LST1 15 External power lost occurred POWER LOST<br />
FAN FLT0 28 Fan fault exited HW FAULT<br />
FAN FLT1 27 Fan fault occurred HW FAULT<br />
FLUSH ER 68<br />
A problem is detected writing data to the<br />
EEPROM during system shutdown.<br />
Page E-6 <strong>LTV</strong> ® <strong>1200</strong> Ventilator Operator’s <strong>Manual</strong><br />
p/n 18247-001, Rev. G<br />
N/A<br />
HW FAULT<br />
HI f/VtT0 82 Rapid Shallow Breathing Index SBT > f/Vt<br />
HI f/VtT1 81 Rapid Shallow Breathing Index SBT > f/Vt<br />
HI PEEP0 76 Monitored PEEP HIGH PEEP<br />
HI PEEP1 75 Monitored PEEP HIGH PEEP<br />
HI PRES0 43 High pressure exited HIGH PRES<br />
HI PRES1 42 High pressure occurred HIGH PRES<br />
HI SBTf0 78 Total Breath Rate SBT > f<br />
HI SBTf1 77 Total Breath Rate SBT > f<br />
HIGH DIS 08 High side disconnect DISC/SENSE<br />
HIGH f0 74 High breath rate alarm recovered HIGH f<br />
HIGH f1 73 High breath rate alarm occurred HIGH f<br />
HOME ER0 39 Stepper motor home failure exited HW FAULT
Event Name Code Event Associated Alarm<br />
HOME ER1 38 Stepper motor home failure occurred HW FAULT<br />
HOUR MTR 03 Set hour meter None<br />
INTRRPT1 31 Spurious interrupt occurred ms RESET 1<br />
INTRRPT2 32 Spurious interrupt occurred ls RESET 1<br />
LN VENT1 67 Shutdown for other than pressing On/Standby RESET<br />
LO f/VtT0 84 Rapid Shallow Breathing Index SBT < f/Vt<br />
LO f/VtT1 83 Rapid Shallow Breathing Index SBT < f/Vt<br />
LO PEEP0 90 Monitored PEEP LOW PEEP<br />
LO PEEP1 89 Monitored PEEP LOW PEEP<br />
LO PRES0 50 Low peak pressure exited LOW PRES<br />
LO PRES1 49 Low peak pressure occurred LOW PRES<br />
LO SBTf1 79 Total Breath Rate SBT < f<br />
LO SBTf2 80 Total Breath Rate SBT < f<br />
LOW DIS 09 Low side disconnect DISC/SENSE<br />
LOW VE 0 48 Low minute volume exited LOW MIN VOL<br />
LOW VE 1 47 Low minute volume occurred LOW MIN VOL<br />
MON f/Vt 86 f/Vt value at SBT exit N/A<br />
NEW PTNT 91 New patient setup N/A<br />
NO CAL 26 No calibration data found NO CAL DATA<br />
O2 HI 0 24 O2 pressure high exited HIGH O2 PRES<br />
O2 HI 1 23 O2 pressure high occurred HIGH O2 PRES<br />
O2 LOW 0 22 O2 pressure low exited LOW O2 PRES<br />
O2 LOW 1 21 O2 pressure low occurred LOW O2 PRES<br />
POST 57 POST failure RESET<br />
RAC ERR0 70<br />
RAC ERR1 69<br />
Recovery from problem detected with primary<br />
and/or redundant audible alarm circuitry<br />
Problem detected with primary and/or<br />
redundant audible alarm circuitry<br />
HW FAULT<br />
HW FAULT<br />
RUNAWAY 58 Code runaway detected RESET<br />
SBT0 87 SBT exit reason N/A<br />
SBT1 85 N/A N/A<br />
SET DATE 53 Date set N/A<br />
SET TIME 54 Time set N/A<br />
SNDRERR0 72 Recovery from alarm sounder error HW FAULT<br />
SNDRERR1 71 Alarm sounder error HW FAULT<br />
STACK 56 Stack overflow detected RESET<br />
SYNC ER1 36 Stepper motor lost sync occurred HW FAULT<br />
SYNCER0 37 Stepper motor lost sync exited HW FAULT<br />
TBN ESTP 46 Turbine emergency stop occurred HIGH PRES<br />
TBN HSTP 66 Turbine Hold Stop occurred HIGH PRES<br />
TBN ISTP 44 Turbine immediate stop occurred HIGH PRES<br />
TBN ZERO 45 Turbine set to zero flow occurred HIGH PRES<br />
VENT 0 02 Power off None<br />
Operator’s <strong>Manual</strong> <strong>LTV</strong> ® <strong>1200</strong> Ventilator Page E-7<br />
p/n 18247-001, Rev. G
Event Name Code Event Associated Alarm<br />
VENT 1 01 Power on None<br />
VENT CHK 04 Set vent check<br />
Entered VENT CHECK<br />
mode<br />
WDOG TST 59 Watchdog test run Inop<br />
XDC FLT0 20 XDCR fault exited XDCR FAULT<br />
XDC FLT1 19 XDCR fault occurred XDCR FAULT<br />
XDCR AIR 64 Airway pressure transducer fault XDC FLT1<br />
XDCR BI 63<br />
XDCR NAR 61<br />
XDCR WID 62<br />
Differential pressure transducer - Bidirectional<br />
channel fault<br />
Differential pressure transducer - Narrow<br />
channel fault<br />
Differential pressure transducer - Wide<br />
channel fault<br />
XDC FLT1<br />
XDC FLT1<br />
XDC FLT1<br />
Page E-8 <strong>LTV</strong> ® <strong>1200</strong> Ventilator Operator’s <strong>Manual</strong><br />
p/n 18247-001, Rev. G
Appendix F - GLOSSARY<br />
TERM DEFINITION<br />
AC Alternating Current.<br />
Airway circuit The airway tubing that connects the ventilator and the patient.<br />
Airway pressure The airway pressure measured at the exhalation valve.<br />
Airway pressure display A bar graph type display composed of 60 LEDs. This display shows<br />
the real-time airway circuit pressure from –10 cmH2O to 108 cmH2O.<br />
Alarm An audible and visual announcement that an alarm condition has been<br />
met. Audible notification includes an oscillating or continuous tone.<br />
Visual notification may include flashing displays, illuminated LEDs, and<br />
text messages shown in the display window.<br />
Apnea Apnea happens when the time between breath starts exceeds the set<br />
apnea interval.<br />
Apnea backup<br />
ventilation<br />
Apnea Backup Ventilation begins when an apnea alarm occurs and<br />
continues until the patient initiates 2 consecutive breaths or the alarm<br />
is canceled by an operator. Apnea Backup Ventilation is given in the<br />
Assist/Control mode.<br />
Apnea interval The maximum period of time allowed between breath starts. If the time<br />
between breath starts exceeds this interval, an Apnea alarm occurs.<br />
Assist/Control mode A mode of ventilation where the patient receives a minimum number of<br />
machine and assist breaths. The available breath types are Volume<br />
Control and Pressure Control.<br />
Assist breath A volume or pressure breath that the patient triggers, and which is<br />
then controlled and cycled by the ventilator. Assist breaths may occur<br />
in Assist/Control and SIMV modes.<br />
Autozero The procedure for determining the transducer zero offset for ambient<br />
pressure.<br />
Bias flow A constant stream of gas through the patient circuit during the<br />
exhalation phase of the breath.<br />
bpm Breaths Per Minute.<br />
Breath period The time between consecutive ventilator started breaths. The Breath<br />
Period is determined by the Breath Rate per minute setting. For<br />
instance, a Breath Rate of 6 would give a Breath Period of 10 seconds<br />
(60 seconds divided by 6 bpm).<br />
Breath rate, set The minimum quantity of machine breaths given in a minute.<br />
BTPD Body Temperature, Pressure Dry.<br />
Circuit See airway circuit.<br />
Circuit pressure See airway pressure.<br />
cmH2O Centimeters of water. A unit of measure for pressure.<br />
Operator’s <strong>Manual</strong> <strong>LTV</strong> ® <strong>1200</strong> Ventilator Page F-1<br />
p/n 18247-001, Rev. G
TERM DEFINITION<br />
Control mode A ventilation mode where the ventilator delivers machine breaths at a<br />
set rate. In Control Mode, patient triggers are not allowed.<br />
CPAP Continuous Positive Airway Pressure. The ventilator continuously<br />
maintains Positive gas pressure through the patient circuit during the<br />
entire breath cycle.<br />
CPAP mode A ventilation mode where the patient triggers all breaths. Available<br />
breath types are Pressure Support and Spontaneous.<br />
Display window A set of 12 dot-matrix displays used to show monitored data, alarm<br />
messages and Extended Feature menu items.<br />
EEPROM Electrically Erasable Programmable Read Only Memory. Nonvolatile<br />
electronic memory that is used by the ventilator to maintain calibration<br />
data, control setting and other data when power is not applied to the<br />
ventilator.<br />
EPAP Expiratory Positive Airway Pressure. The positive gas pressure in the<br />
patient circuit during breath exhalation.<br />
Event Any condition noted in the ventilator’s event trace. This may include<br />
both error conditions and normal operational events.<br />
Exhaled tidal volume See Tidal Volume.<br />
Expiratory hold A maneuver which holds the expiratory phase of a delivered breath for<br />
a duration sufficient to determine the AutoPEEP of a patient.<br />
Extended features A set of ventilator controls and options that are not associated with<br />
front panel controls. Extended Features are accessed through a menu<br />
shown in the display window.<br />
f See Total Breath Rate, monitored.<br />
Flow The velocity of gas delivery to the patient, quantified in lpm.<br />
Flow trigger A patient effort in which the amount of bias flow routed into the<br />
patient’s lungs exceeds the Sensitivity setting. A flow trigger will result<br />
in delivery of an Assist or Patient breath, according to the ventilation<br />
mode.<br />
f/Vt Total Breath Rate divided by the average Exhaled Tidal Volume.<br />
f/Vt f Total Breath Rate divided by the average Exhaled Tidal Volume, and<br />
the Total Breath Rate.<br />
I:E ratio, monitored The ratio of the inspiration period to the expiration period for a breath.<br />
The lesser value is normalized to 1.<br />
I:E ratio, calculated Calculated Inspiratory:Expiratory ratio, based upon the Inspiratory<br />
Time setting and the Breath Rate setting<br />
Inspiratory hold A maneuver which holds the inspiratory phase of a volume delivered<br />
breath for a duration sufficient to determine Δ Pres pressure and static<br />
lung compliance of the patient.<br />
IPAP Inspiratory Positive Airway Pressure. The positive gas pressure in the<br />
patient circuit during breath inhalation.<br />
L Liters<br />
Leak compensation Leak Compensation improves triggering when a circuit leak is present.<br />
Page F-2 <strong>LTV</strong> ® <strong>1200</strong> Ventilator Operator’s <strong>Manual</strong><br />
p/n 18247-001, Rev. G
TERM DEFINITION<br />
LED Light Emitting Diode. An indicator that is illuminated on the front panel.<br />
lpm Liters Per Minute. Flow rate.<br />
Machine breath A volume or pressure breath that is started by the operator or the<br />
ventilator, and is controlled and cycled by the ventilator. Machine<br />
Breaths may occur in Control and Assist/Control modes. The operator<br />
may cause a machine breath in any mode using the <strong>Manual</strong> Breath<br />
Button.<br />
<strong>Manual</strong> breath A Machine Breath initiated by the operator pushing the <strong>Manual</strong> Breath<br />
Button.<br />
MAP Mean Airway Pressure.<br />
Mean airway pressure,<br />
monitored<br />
The average airway pressure over a series of breaths.<br />
Minimum exhalation time The minimum time required for exhalation is 346 msec. Control<br />
settings are limited to ensure the Minimum Exhalation Time is<br />
provided. Breaths may not be triggered during the Minimum Exhalation<br />
Time.<br />
Minimum inspiratory<br />
time<br />
Minute volume,<br />
monitored (VE)<br />
MR Conditional<br />
MR Safe<br />
MR Unsafe<br />
The minimum time required for inspiration is 300 msec. Control<br />
settings are limited to ensure the Minimum Inspiratory Time is<br />
provided.<br />
The total volume exhaled by the patient for the last 60 seconds. VE is<br />
refreshed at the conclusion of each breath and is based on the last 8<br />
breaths.<br />
A designation given to an item that has been demonstrated to pose no<br />
known hazards in a specified magnetic resonance (MR) environment<br />
with specific conditions of use.<br />
A designation given to an item that poses no known hazards in all MR<br />
environments.<br />
A designation given to an item that is known to pose hazards in all MR<br />
environments.<br />
msec Millisecond: One one-thousandth of a second.<br />
Non-volatile memory Memory that is retained when ventilator is in Standby mode or<br />
powered off.<br />
O2<br />
Oxygen.<br />
Patient breath A Pressure Support or Spontaneous breath that is started by the<br />
patient, controlled by the ventilator and cycled by the patient. Patient<br />
breaths may occur in SIMV and CPAP ventilation modes.<br />
Patient effort Inspiratory effort by the patient.<br />
Peak inspiratory<br />
pressure, monitored (PIP)<br />
The maximum circuit pressure occurring during the inspiration and first<br />
300 ms exhalation phase of a breath. PIP is measured at the patient<br />
wye.<br />
PEEP Positive End Expiratory Pressure.<br />
Operator’s <strong>Manual</strong> <strong>LTV</strong> ® <strong>1200</strong> Ventilator Page F-3<br />
p/n 18247-001, Rev. G
TERM DEFINITION<br />
PIP Peak Inspiratory Pressure.<br />
Positive end expiratory<br />
pressure, monitored<br />
(PEEP)<br />
The circuit pressure measured at the end of exhalation.<br />
POST Power On Self Tests. A set of self-tests the ventilator performs when<br />
turned on to verify the operational integrity of the Processor, Displays,<br />
Audible alarm, Confirming Audible Chirp, SRAM, Program Memory<br />
and EEPROM (some tests require operator visual and/or audible<br />
verification).<br />
PreSet A feature allowing ventilator parameters to be “preset” for an infant,<br />
pediatric, or an adult patient.<br />
Pressure control breath A machine or assist breath where the circuit pressure is elevated to a<br />
operator-set pressure for a operator-set period of time. Pressure<br />
Control breaths have an optional flow termination criteria.<br />
Pressure support breath A patient breath where the circuit pressure is raised to an operator-set<br />
pressure and maintained until flow decreases to an operator-set<br />
percentage of the peak flow achieved. Pressure Support Breaths may<br />
also be terminated by an operator-set maximum time, or by exceeding<br />
2 breath periods.<br />
Pressure Trigger A patient effort in which the pressure below PEEP is less than the<br />
Sensitivity setting. A pressure trigger will result in a delivered breath.<br />
PSIG Pounds per Square Inch Gauge. A unit for measuring pressure.<br />
rpm Revolutions per minute. Turbine speed is measured in rpm.<br />
Scrolling, monitored data<br />
display<br />
Displays the monitored values statically or allows for automatic scroll<br />
ing. While scrolling is active, each monitored value will be displayed<br />
for 3 seconds then the next value will be automatically displayed.<br />
SIMV Synchronized Intermittent Mandatory Ventilation.<br />
SIMV mode A ventilation mode where a minimum number of machine or assist<br />
breaths are given, and the patient is allowed to trigger additional<br />
Patient breaths. Available breath types are volume control, pressure<br />
control, pressure support, and spontaneous.<br />
Spontaneous breath A breath which the patient starts and cycles. Spontaneous breaths are<br />
cycled at 10% of peak flow, set variable time termination, or when they<br />
exceed 2 breath periods.<br />
Spontaneous Breathing<br />
Trial (SBT)<br />
Tidal volume, monitored<br />
(Vte)<br />
Total breath rate,<br />
monitored (f)<br />
A ventilation mode used to temporarily minimize ventilatory support<br />
and perform clinical assessments of a patient’s dependence on, or<br />
ability to be removed from positive pressure ventilation.<br />
The exhaled volume quantified at the patient wye. Exhaled volume is<br />
measured for all breath types.<br />
The quantity of breaths given per minute; includes all breath types.<br />
Transducer A measuring device. Transducers can be used to quantify flow or<br />
pressure.<br />
Vcalc A monitor that displays the calculated peak flow for volume control<br />
breaths. Vcalc is calculated based on the set tidal volume and the set<br />
inspiratory time.<br />
VE See minute volume, monitored.<br />
Page F-4 <strong>LTV</strong> ® <strong>1200</strong> Ventilator Operator’s <strong>Manual</strong><br />
p/n 18247-001, Rev. G
TERM DEFINITION<br />
Volume control breath A machine or assist breath where a operator-set volume is delivered<br />
over a operator-set time. Flow is delivered in a decelerating waveform<br />
where the peak and final flows are calculated so that the final flow is<br />
50% of the peak flow.<br />
Vte See tidal volume, monitored.<br />
Operator’s <strong>Manual</strong> <strong>LTV</strong> ® <strong>1200</strong> Ventilator Page F-5<br />
p/n 18247-001, Rev. G
Page F-6 <strong>LTV</strong> ® <strong>1200</strong> Ventilator Operator’s <strong>Manual</strong><br />
p/n 18247-001, Rev. G
Appendix G - INDEX<br />
A<br />
AC Adapter · 14-2<br />
AC Power Source · 14-2<br />
Active Alarm · 6-27<br />
Airway Pressure Display · See Displays:Airway Pressure<br />
ALARM · 11-3, 15-24<br />
Alarm Clearing · 6-27<br />
ALARM OP · 10-3<br />
Alarm Operations · 10-3<br />
Alarm Silencing · 6-27<br />
Alarm Status Messages<br />
f PEEP OFF · 9-33<br />
H&L PEEP OFF · 9-34<br />
HI f/Vt OFF · 9-33<br />
HI PEEP OFF · 9-33<br />
HIGH f OFF · 9-34<br />
LMV LPPS OFF · 9-34<br />
LMV OFF · 9-35<br />
LO f/Vt OFF · 9-36<br />
LO PEEP OFF · 9-35<br />
LOCKED · 9-35<br />
LPPS OFF · 9-36<br />
SBT f OFF · 9-36<br />
SBT f/Vt OFF · 9-37<br />
SBT HI f OFF · 9-37<br />
SBT LO f OFF · 9-37<br />
SBT TIME · 9-38<br />
WARMUP xx · 9-38<br />
Alarm Test · 11-3, 15-24<br />
ALARM VOL · 10-3, 15-24<br />
Alarm Volume · 10-3, 15-24<br />
Alarms<br />
APNEA · 4-2, 4-3, 9-2, 10-4<br />
APNEA xx bpm · 4-2, 4-3, 9-2<br />
BAT EMPTY · 9-3<br />
BAT LOW · 9-5<br />
DEFAULTS · 9-7, 15-22<br />
DEFAULTS SET · 9-9<br />
DISC/SENSE · 9-10, 15-20, 15-21<br />
HIGH f · 9-11, 9-20<br />
HIGH O2 PRES · 9-12, 15-2<br />
HIGH PEEP · 9-13<br />
HIGH PEEP · 10-5<br />
HIGH PRES · 6-4, 9-14, 10-4, 15-2, 15-19<br />
HW FAULT · 9-16, 13-2, 15-21<br />
INOP · 9-17<br />
LOCKED · 5-6<br />
LOW MIN VOL · 6-11, 9-18, 15-2<br />
LOW O2 PRES · 9-19, 15-2<br />
LOW PEEP · 9-20<br />
LOW PEEP · 10-5<br />
LOW PRES · 6-12, 9-21, 10-4, 15-2<br />
NO CAL · 8-1, 9-22<br />
NO CAL DATA · 9-22, 15-21<br />
POWER LOST · 1-5, 9-23, 14-6<br />
POWER LOW · 9-24<br />
REMOVE PTNT · 9-25<br />
RESET · 9-26, 15-21<br />
SBT < f · 9-27<br />
SBT < f/Vt · 9-29<br />
SBT > f · 9-28<br />
SBT > f/Vt · 9-30<br />
SBT OFF · 9-31<br />
XDCR FAULT · 9-32, 15-21<br />
Apnea · 4-2, 4-3, 9-2<br />
Apnea Backup · 4-2, 4-3, 4-5, 9-2<br />
Apnea Backup Rate · 4-5<br />
APNEA INT · 10-4<br />
Apnea Interval · 4-5, 10-4<br />
APNEA xx bpm · 4-2, 4-3, 9-2<br />
Assist / Control Mode · 4-1<br />
Assist/Control/SIMV/CPAP/NPPV Mode · 6-1<br />
Audible Alarm Test · 11-3<br />
Audible Alarm Volume · 10-3<br />
Autocycling · 15-6<br />
Automatic High O 2 Switch Over · 6-13, 9-12<br />
Automatic Scrolling · 8-2<br />
Automobile Cigarette Lighter Adapter · 14-8<br />
Autozero · 9-32, 10-28<br />
Operator’s <strong>Manual</strong> <strong>LTV</strong> ® <strong>1200</strong> Ventilator Page G-1<br />
p/n 18247-001, Rev. G<br />
B<br />
Backup Pressure Trigger · See Triggers<br />
BAT EMPTY · 9-3<br />
BAT LOW · 9-5<br />
Battery · See Internal or External Battery<br />
Battery Charge Status · 7-4, 14-1<br />
Battery Level · 7-2<br />
Bias Flow · 4-6<br />
Blanked Controls, Displays · 5-4<br />
Boot, Installation · C-6<br />
Boot, Removal · C-3<br />
Boots · C-2<br />
Breath Type<br />
Pressure Control · 3-3<br />
Pressure Support · 3-5, 4-4<br />
Spontaneous · 3-6<br />
Volume Control · 3-2
Button Controls · 5-3<br />
C<br />
Calculated Peak Flow · 6-28, 8-2, 8-4<br />
Calibration · B-1<br />
Car Lighter Adapter · 14-8<br />
Cautions · iv<br />
Charge Status · 7-4, 14-1, 14-12<br />
Checklist, Ventilator Settings · 12-10<br />
Checkout Tests · 11-1<br />
Cigarette Lighter Adapter · 14-8<br />
Cleaning · 13-1<br />
Fan Filter · 13-2<br />
Inlet Filter · 13-3<br />
O2 Inlet Filter · 13-4<br />
Clearing Alarms · See Alarms:Clearing<br />
Com Port · C-15<br />
COM SETTING · 10-16<br />
Communications Port · C-15<br />
Communications Setting · 10-16, C-15<br />
Connecting to a Patient · 12-2<br />
Continuous Flow · See Bias Flow<br />
CONTROL · 11-6<br />
Control Lock · 5-6, 6-3, 9-35, 15-3<br />
Control Mode · 4-1<br />
Control Test · 11-6<br />
Control Unlock · 10-15<br />
Controls · 5-1, 5-2, 5-3, 6-1<br />
Assist/Control/SIMV/CPAP/NPPV Mode · 6-1<br />
Blank · 5-4<br />
Dashes · 5-5<br />
Dimmed · 5-4, 15-3<br />
Flashing · 5-5<br />
High Pressure Limit · 14-5, 15-2<br />
Inspiratory Time · 6-10<br />
Limiting · 5-5<br />
Lock · 5-6, 6-3, 9-35, 10-15, 15-3<br />
Low Minute Volume · 6-11, 15-2<br />
Low Pressure · 6-12, 15-2<br />
Low Pressure O 2 Source · 6-13, 9-12<br />
<strong>Manual</strong> Breath · 6-17<br />
O 2% (O 2 Flush) · 6-14, 6-18, 6-19, 9-19, 15-2, 15-<br />
4<br />
On/Standby · 6-20<br />
PEEP Control · 6-21<br />
Pressure Control · 6-22, 15-2<br />
Pressure Support · 6-23, 15-2<br />
Select · 6-24<br />
Sensitivity · 6-25<br />
Set Value Knob · 5-3, 6-26<br />
Setting · 5-2<br />
Silence / Reset · 6-27<br />
Tidal Volume · 6-28<br />
Unlock · 10-15<br />
Volume Pressure Mode · 6-29, 15-4<br />
CPAP Mode · 4-3<br />
CRC · 15-21<br />
CTRL UNLOCK · 10-15, 15-4<br />
Page G-2 <strong>LTV</strong> ® <strong>1200</strong> Ventilator Operator’s <strong>Manual</strong><br />
p/n 18247-001, Rev. G<br />
D<br />
Dashes in Display · 5-5<br />
Date · 10-17, 10-18<br />
DATE FORMAT · 10-18<br />
Decelerating Waveform · 3-2, 6-28<br />
Default Controls Settings · 9-8<br />
Default Extended Features Settings · 9-8<br />
DEFAULTS · 9-7, 15-22<br />
DEFAULTS SET · 9-9<br />
Dimmed Controls, Displays · 5-4, 15-3<br />
DISC/SENSE · 9-10, 15-20, 15-21<br />
Disconnect, Sense Line · 9-10<br />
DISPLAY · 11-4<br />
DISPLAY f/Vt · 10-27<br />
Display Language · 10-15<br />
Display Select · 11-7, A-1<br />
Display Test · 11-4<br />
Display Window · 7-1<br />
Displays · 5-1, 7-1<br />
Airway Pressure · 7-1, 10-19<br />
Battery Level · 7-2<br />
Blank · 5-4<br />
Charge Status · 7-4<br />
Dashes · 5-5<br />
Dimmed · 5-4, 15-3<br />
External Power · 7-5<br />
Flashing · 5-5<br />
NPPV · 7-6<br />
Patient Effort · 7-6<br />
Vent Inop · 7-6<br />
Window · 7-1<br />
E<br />
Effort LED · 6-25<br />
EMC · iii<br />
EPAP · 4-4, 6-1, 6-21, 12-8<br />
ET Tube · 15-26<br />
Event Codes · E-3<br />
Event Trace · E-1<br />
Exhaled Minute Volume · 8-3<br />
Exhaled Tidal Volume · 8-2, 8-3<br />
EXP HOLD · 6-5, A-1<br />
Expiratory Hold · 6-5, 6-8, A-1, F-2<br />
Extended Features · 5-3, 6-24, 6-26<br />
Navigation · 10-2<br />
External Battery · 14-3<br />
Disposal · 14-4<br />
External Power · 7-5, 14-4, 14-9
F<br />
f · 8-2, 8-3<br />
f PEEP OFF · 9-33<br />
f/Vt f · 8-2, 8-4<br />
Fan Filter · 13-2<br />
Filter<br />
O 2 Inlet · 13-4<br />
Flashing Controls, Displays · 5-5<br />
FLOW TERM · 3-4, 3-5, 6-22, 6-23, 10-9, 10-11<br />
Flow Trigger · See Triggers<br />
H<br />
H&L PEEP OFF · 9-34<br />
Help · 2-4, B-2<br />
HI f/Vt OFF · 9-33<br />
HI PEEP OFF · 9-33<br />
HIGH f · 9-11, 9-20, 10-5, 15-22<br />
HIGH f OFF · 9-34<br />
HIGH f/Vt · 10-27<br />
HIGH O2 PRES · 9-12, 15-2<br />
HIGH PEEP · 9-13, 10-5, 15-22<br />
HIGH PRES · 6-4, 9-14, 10-4, 15-2, 15-19, 15-20<br />
High Pressure Alarm Delay · See HP DELAY<br />
High Pressure Limit · 14-5, 15-2<br />
High Rate Alarm · See HIGH f<br />
Hours in Operation · 10-16<br />
HP DELAY · 10-4, 15-19<br />
Humidifier · C-11<br />
HW FAULT · 9-16, 13-2, 15-21<br />
I<br />
IE Ratio · 8-2, 8-3<br />
Inactive Alarm · 6-27<br />
Inlet Filter · 13-3<br />
INOP · 9-17<br />
INSP HOLD · 6-5, A-1<br />
Insp/Exp · 6-5, 6-6, 6-8<br />
Inspiratory Hold · 6-6, A-1, F-2<br />
Inspiratory Time · 6-10<br />
Inspiratory/Expiratory · 6-5, 6-6, 6-8, 9-8, A-1<br />
Internal Battery · 14-12<br />
Battery Life · 14-12<br />
Charge Status · 14-12<br />
Charging · 14-12<br />
Disposal · 14-12<br />
Replacing · 14-12<br />
IPAP · 4-4, 6-1, 6-23, 12-8<br />
L<br />
LANGUAGE · 10-15<br />
LEAK · 11-8<br />
Leak Compensation · F-2<br />
Leak Test · 11-8<br />
Limiting · 5-5, 15-3<br />
LMV LPPS OFF · 9-34<br />
LMV OFF · 9-35<br />
LO f/Vt OFF · 9-36<br />
LO PEEP OFF · 9-35<br />
LOCKED · 5-6, 9-35, 15-3<br />
LOW f/Vt · 10-27<br />
LOW MIN VOL · 6-11, 9-18, 15-2<br />
Low Minute Volume · 6-11, 9-18, 15-2<br />
LOW O2 PRES · 9-19, 15-2<br />
Low Peak Pressure Alarm · See LPP ALARM, See Low<br />
Pressure Alarm<br />
LOW PEEP · 9-20, 10-5<br />
LOW PRES · 6-12, 9-21, 10-4, 15-2<br />
Low Pressure Alarm · 6-12, 10-4, 15-2<br />
Low Pressure O 2 Source · 6-13, 9-12<br />
LPP ALARM · 6-12, 10-4<br />
LPPS OFF · 9-36<br />
LTM Compatibility · 10-19<br />
LTM Graphics Monitor · C-15<br />
<strong>LTV</strong><strong>1200</strong> · 10-19<br />
Operator’s <strong>Manual</strong> <strong>LTV</strong> ® <strong>1200</strong> Ventilator Page G-3<br />
p/n 18247-001, Rev. G<br />
M<br />
Maintenance · B-1<br />
Manometer · See Displays:Airway Pressure<br />
<strong>Manual</strong> Breath Button · 6-17<br />
MAP · 8-2, 8-3<br />
Mean Airway Pressure · 8-2, 8-3<br />
Message Window · See Displays:Window<br />
Minimum Exhalation Time · 3-1<br />
Minimum Inspiratory Time · 3-1<br />
Minute Volume · 8-2, 8-3<br />
MINUTES · 10-27<br />
Mode Buttons · 5-3<br />
Model Number · 10-19<br />
Modes · 4-1<br />
Apnea Backup · 4-2, 4-3, 4-5<br />
Assist / Control · 4-1<br />
Control · 4-1<br />
CPAP · 4-3<br />
NPPV · 4-4<br />
Pressure · 4-6, 6-29<br />
SIMV · 4-2<br />
Volume · 4-6, 6-29<br />
Monitor Window · See Displays:Window<br />
Monitored Data · See Monitors<br />
Monitored Data Displays · 6-24, 8-2<br />
Monitors · 6-24<br />
Calculated Peak Flow · 8-2, 8-4<br />
Exhaled Minute Volume · 8-3<br />
Exhaled Tidal Volume · 8-2, 8-3<br />
f · 8-3<br />
f/Vt f · 8-2, 8-4<br />
IE Ratio · 8-2, 8-3<br />
MAP · 8-2, 8-3
Mean Airway Pressure · 8-2, 8-3<br />
Minute Volume · 8-2<br />
NO CAL · 9-22, 15-21<br />
Peak Inspiratory Pressure · 8-2, 8-3<br />
PEEP · 8-2, 8-3<br />
PIP · 8-2, 8-3<br />
SBT min · 8-2, 8-4<br />
Total Breath Rate · 8-2, 8-3<br />
Vcalc · 8-2, 8-4<br />
VE · 8-2, 8-3<br />
Vte · 8-2, 8-3<br />
MR Conditional System · 16-1<br />
N<br />
NIST Adapter · C-13<br />
NO CAL · 8-1, 9-22, 15-21<br />
NO CAL DATA · 9-22, 15-21<br />
Non-Invasive Positive Pressure Ventilation · See NPPV<br />
mode<br />
NPPV Mode<br />
Indicator · 7-6<br />
Nurse Call · See Patient Assist Call<br />
O<br />
O 2 Bleed In · 6-16<br />
O2 Conserve · 10-13<br />
O 2 Cylinder Duration · 10-21<br />
O2 Flush · 10-14<br />
O 2 Inlet Filter · 13-4<br />
O2% · 15-2<br />
O 2% (O 2 Flush) · 6-14, 6-18, 6-19, 9-19, 15-4<br />
On/Standby Button · 6-20<br />
Operating Procedures · 12-1<br />
Connect to a Patient · 12-2<br />
Operating Theory · D-1<br />
Oxygen<br />
Blending · 6-18<br />
Concentration, Bleed In · 6-16<br />
Concentrator · 6-13<br />
Connecting · C-13<br />
Source · 2-3<br />
P<br />
Patient Assist Call · C-14<br />
Patient Assist Call System · 15-23<br />
Patient Circuit<br />
Connecting · C-10<br />
Humidifier · C-11<br />
Patient Connection · 12-2<br />
Patient Effort · 6-25, 7-6<br />
Patient Query · 10-23<br />
Patient size · 10-23<br />
PC FLOW TERM · 3-4, 6-22, 10-9, 10-11, 15-2<br />
Peak Flow · 6-28<br />
Peak Inspiratory Pressure · 8-2, 8-3<br />
PEEP · 10-26<br />
PEEP Control · 6-21<br />
PEEP, Monitored · 8-2, 8-3<br />
PIP · 8-2, 8-3, 10-19<br />
PIP LED · 10-19<br />
PNT ASSIST · 10-6, 15-22, 15-23<br />
Positive End Expiratory Pressure · See PEEP,<br />
Monitors:PEEP<br />
POST · 15-21<br />
POWER LOST · 1-5, 9-23, 14-6<br />
POWER LOW · 9-24<br />
Power Source · 2-3, 14-1<br />
AC · 14-2<br />
Automobile Cigarette Lighter Adapter · 14-8<br />
External Battery · 14-3<br />
PRES SUPPORT · 10-26<br />
Presets · 10-23<br />
Presets Table · 10-24<br />
Pressure Control · 6-22, 15-2<br />
Pressure Control Breath · 3-3<br />
Pressure Control Flow Termination · See PC FLOW<br />
TERM<br />
Pressure Mode · 4-6, 6-29<br />
Pressure Support · 6-23, 15-2<br />
Pressure Support Breath · 3-5, 4-4<br />
Pressure Trigger · See Triggers<br />
Preventative Maintenance · B-1<br />
Protective Boot, Installation · C-6<br />
Protective Boot, Removal · C-3<br />
Protective Boots · C-2<br />
Page G-4 <strong>LTV</strong> ® <strong>1200</strong> Ventilator Operator’s <strong>Manual</strong><br />
p/n 18247-001, Rev. G<br />
R<br />
Real Time Transducers · 10-32<br />
Remote Alarm Cable · C-16<br />
Remote Alarm System · 15-22<br />
REMOVE PTNT · 9-25, 11-2<br />
RESET · 9-26, 15-21<br />
RISE TIME · 3-3, 6-22, 6-23, 10-8<br />
Rise Time Profile · See RISE TIME<br />
RT XDCR DATA · 10-32, 15-6<br />
RUNAWAY · 15-21<br />
S<br />
SBT < f · 9-27, 15-23<br />
SBT < f/Vt · 9-29<br />
SBT > f · 9-28, 15-23<br />
SBT > f/Vt · 9-30, 15-24<br />
SBT f OFF · 9-36<br />
SBT f/Vt OFF · 9-37<br />
SBT FIO2 · 10-27<br />
SBT HI f OFF · 9-37
SBT HIGH f · 10-27<br />
SBT LO f OFF · 9-37<br />
SBT LOW f · 10-27<br />
SBT min · 8-2, 8-4<br />
SBT OFF · 9-31<br />
SBT OP · 10-25<br />
SBT Operations · 10-25<br />
SBT Operations, DISPLAY f/Vt · 10-27<br />
SBT Operations, HIGH f/Vt · 10-27<br />
SBT Operations, LOW f/Vt · 10-27<br />
SBT Operations, MINUTES · 10-27<br />
SBT Operations, PEEP · 10-26<br />
SBT Operations, PRES SUPPORT · 10-26<br />
SBT Operations, SBT FIO2 · 10-27<br />
SBT Operations, SBT HIGH f · 10-27<br />
SBT Operations, SBT LOW f · 10-27<br />
SBT Operations, SBT OP · 10-25<br />
SBT Operations, SBT START · 10-26<br />
SBT START · 10-26<br />
SBT TIME · 9-38<br />
Scrolled Automatically · 9-33, 9-34, 9-35, 9-36, 9-37,<br />
9-38<br />
Scrolling · 8-2, F-4<br />
Select Button · 6-24<br />
Sensitivity · 6-25<br />
Serial Number · 10-19<br />
Service · 2-4, B-2<br />
SET DATE · 10-17<br />
Set Defaults · 10-20<br />
SET TIME · 10-18<br />
Set Up<br />
Assist / Control Mode · 12-5<br />
Control Mode · 12-4<br />
CPAP Mode · 12-7<br />
NPPV Mode · 12-8<br />
SIMV Mode · 12-6<br />
Set Value Knob · 6-26<br />
Setting a Control · See Controls:Setting<br />
Settings, Ventilator Checklist · 12-10<br />
Silence / Reset Button · 6-27<br />
Silence Period · 6-27<br />
Silencing Alarms · See Alarms:Silencing<br />
SIMV Mode · 4-2<br />
Software Version · 10-16<br />
Specifications · A-1<br />
Spontaneous Breath · 3-6<br />
Spontaneous Breathing Trial (SBT) · 10-25<br />
STACK · 15-21<br />
Standby · 6-20<br />
Sterilizing · 13-1<br />
T<br />
Taper Waveform · 3-2, 6-28<br />
Test<br />
Alarm · 15-24<br />
Tidal Volume · 6-28, 8-3<br />
Time · 10-18<br />
TIME TERM · 3-5, 6-23, 10-10, 15-2<br />
Total Breath Rate · 8-2, 8-3<br />
Transducer Autozero · 10-28<br />
Transport Battery System · 14-10, 14-11<br />
Triggers · 3-1, 4-6, 6-25, 7-6<br />
Troubleshooting · 15-1<br />
Operator’s <strong>Manual</strong> <strong>LTV</strong> ® <strong>1200</strong> Ventilator Page G-5<br />
p/n 18247-001, Rev. G<br />
U<br />
Universal Power Supply kit · 14-10<br />
Unlock · 10-15, 15-3, 15-4<br />
Usage Meter · 10-16<br />
USAGE xxxxx.x · 10-16<br />
V<br />
Valve Home Position · 10-20<br />
Variable Flow Termination · See FLOW TERM<br />
Variable Rise Time · See RISE TIME<br />
Variable Time Termination · See TIME TERM<br />
Vcalc · 8-2, 8-4<br />
VE · 8-2, 8-3<br />
VENT CHECK<br />
exit · 11-12<br />
VENT CHECK Menu · 11-1<br />
Vent Inop · 7-6<br />
Vent Inop Alarm Test · 11-10<br />
VENT OP · 10-7<br />
Vent Operations · 10-7<br />
Ventilator Checkout · C-18<br />
Ventilator Checkout Test<br />
Alarm Test · 11-3<br />
Control Test · 11-6<br />
Display Test · 11-4<br />
Leak Test · 11-8<br />
Vent Inop Alarm Test · 11-10<br />
Ventilator Checkout Tests · 11-1<br />
Ventilator Proper Operation Checkout<br />
Worksheet · C-20<br />
VER xx.xx X · 10-16<br />
VHome · 10-20, 15-7, 15-8, 15-10, 15-12<br />
Volume Control Breath · 3-2<br />
Volume Mode · 4-6, 6-29<br />
Volume Pressure Mode · 6-29, 15-4<br />
Vte · 8-2, 8-3<br />
W<br />
WARMUP xx · 9-38<br />
Warnings · iv<br />
Warranty · ii<br />
Waveform · 3-2, 6-28<br />
Worksheets<br />
Ventilator Proper Operation Checkout · C-20
X<br />
XDCR FAULT · 9-32, 15-21<br />
XDCR ZERO · 10-28, 15-7, 15-8, 15-9, 15-10, 15-<br />
11, 15-13<br />
Page G-6 <strong>LTV</strong> ® <strong>1200</strong> Ventilator Operator’s <strong>Manual</strong><br />
p/n 18247-001, Rev. G