Red Hawk D GB F E
Red Hawk D GB F E
Red Hawk D GB F E

You also want an ePaper? Increase the reach of your titles
YUMPU automatically turns print PDFs into web optimized ePapers that Google loves.
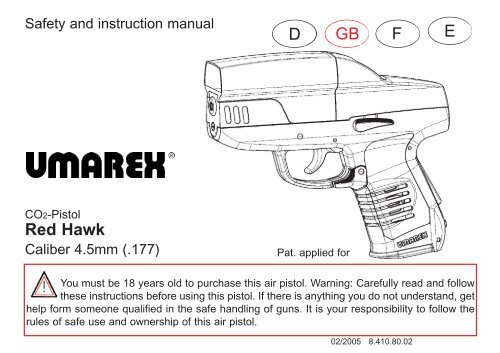
Safety and instruction manual<br />
CO2-Pistol<br />
<strong>Red</strong> <strong>Hawk</strong><br />
Caliber 4.5mm (.177) Pat. applied for<br />
D <strong>GB</strong> F E<br />
You must be 18 years old to purchase this air pistol. Warning: Carefully read and follow<br />
these instructions before using this pistol. If there is anything you do not understand, get<br />
help form someone qualified in the safe handling of guns. It is your responsibility to follow the<br />
rules of safe use and ownership of this air pistol.<br />
02/2005 8.410.80.02
This symbol marks safety warnings in this instruction manual. When you see this symbol you should pay close<br />
attention to the warning.<br />
Read the instruction manual carefully. Only load the pistol immediately before you intend to shoot. If you have<br />
charged the gun and will not shoot, unload the pistol as described. Only an unloaded gun with the safety on is<br />
really safe. Accidents can happen very quickly! Warning: If this gun is carelessly or improperly handled, unintentional<br />
discharge could result causing injury, death or damage to property.<br />
Please be very careful when shooting!<br />
The chapter "Safe aiming and shooting" in this instriction manual will inform you about the rules for safe shooting. Read this<br />
chapter! Follow these rules and be sure that everybody handling this gun is familiar with the rules. Also read the chapter<br />
"Safe handling of guns" to avoid accidents.<br />
Your air pistol should be treated with the same respect as a firearm. Always be aware that the most important safety aspect<br />
of a gun is the shooter. All safeties are mechanical and the shooter is responsible for its proper use. Do not rely on mechanical<br />
safeties, think in advance and avoid situations which may lead to an accident.<br />
Every gun differs in function. You should never shoot a gun you are not familar with. Read the following instruction manual<br />
and practice safety handling your gun prior to loading it.<br />
See the following sections for information<br />
on safe shooting:<br />
1. Refer to the parts illustration to become familiar with<br />
your new air pistol<br />
2. Use of the safety<br />
3. Installing and changing the CO2 cartridge<br />
4. Loading and unloading the air pistol<br />
5. Safe aiming and shooting<br />
6. Use and handling of CO2 cartridges<br />
7. Adjusting the rear sight<br />
8. Battery change<br />
9. Storage<br />
10.Maintenance<br />
11. Problems<br />
12. Modifications to the gun<br />
13. Repair of Walther air pistols<br />
14. Warranty for Walther air pistols<br />
15. Safe handling of guns<br />
16. Technical specifications<br />
17. Parts illustration
Never leave an unattended gun loaded and ready to fire!<br />
Always keep and carry your pistol unloaded. Put the safety to the lower position and be sure that there is no<br />
pellet in the chamber. During storage, remove the pellet in the chamber. During storage, remove the pellet cylinder and<br />
CO2 cartridge and store them in a seperate location. Keep out of reach children and unauthorised persons.<br />
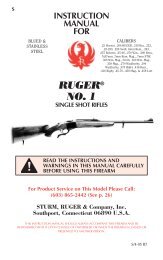
1. Refer to the parts illustration to become familiar with your new air pistol<br />
It is your responsibility to become familiar with the components and parts of your pistol. You will understand this instruction<br />
manual properly with this knowledge.<br />
Windage and elevation adjustment Slide<br />
Muzzle<br />
Frame<br />
Safety<br />
Trigger<br />
Delocking lever<br />
Magazine catch<br />
Magazine<br />
On-button<br />
Backstrap<br />
brightness<br />
adjustment
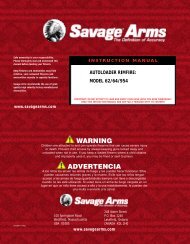
2. Use of the safety<br />
a) To engage the safety, push the safety to the forward position as shown<br />
in illustration 1. (red marking not visible)<br />
b) When handling this gun the safety should be ON and the mussle<br />
pointed in a safe direcion.<br />
c) Locate the latch on the safety (Fig. 2)<br />
Push in the latch on the safety (1.) and slide the safety<br />
rearward (2.) toward the rear sight (red marking visible).<br />
The pistol is now ready to fire (illustration 2).<br />
WARNING:<br />
We recommend that the safety lever always be in the<br />
"SAFE" position until you intend to shoot.<br />
safe<br />
ready to fire<br />
2.<br />
1.<br />
Illustr. 1<br />
Illustr. 2
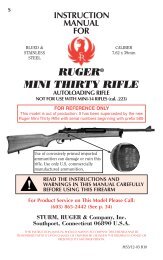
3. Inserting and changing the CO2 cartridge<br />
A. Inserting a CO2 cartridge<br />
WARNING: Before inserting a CO2 cartridge, insure that the safety in ON and the muzzle is pointed in a safe<br />
direction!<br />
Note: Use only 12g CO2 cartridges! Do not use cartridges containing other gases!<br />
Actuate the magazine holder (illustr. 3) to remove the magazine. Turn the magazine lever towards “OPEN” and now turn<br />
the cylinder retaining screw (illustr. 4) all the way down. Allow remaining CO2-gas to escape. Now the gas cylinder can be<br />
removed. Insert the gas cylinder with its narrow end ahead (illustr. 5), lock the gas cylinder by turning the cylinder retaining<br />
screw up and close the magazine shoe into the direction "POWER" (illustr. 6). The CO2 cylinder is now pierced and sealed.<br />
Insert the magazine until it locks, with the safety of the weapon engaged (illustr. 7)<br />
To make sure the cartridge has been properly pierced, check to make sure that the pistol is unloaded, disengage the safety<br />
and shoot in a safe direction. If the pistole will not fire repeat the cartridge loading procedure as decribed above.<br />
WARNING: Do not use force to insert the CO2 cartridge. If you are not going to use the weapon for an extended<br />
period, we recommend removing the die CO2 cylinder in order to prevent strain on the valve.<br />
Illustr. 3 Illustr. 4 Illustr. 5 Illustr. 6 Illustr. 7
B. Remove the CO2 cartridge<br />
Engage the safety of the weapon. Use the other hand to move the magazine shoe into the direction "OPEN". Now press<br />
the magazine catch (illustr. 3) to remove the magazine and turn the gas cylinder retaining screw ((illustr. 4) all the way<br />
down. Residual CO2-gas is now allowed to flow out. The gas cylinder can now be removed.<br />
WARNING: Keep face and hands in a safe distance and use caution when removing the CO2 cartridge, escaping<br />
CO2 gas can cause frostbite.<br />
WARNING! CO2-cartridges can explode in temperatures above 122 degrees Fahrenheit. Do not dispose of cartridges<br />
in a fire. Do not store cartridges in temperature above 122 degrees Fahrenheit. Do not use spent CO2<br />
cartridges for any other purpose. Do not leave CO2 cartridges in a automobile in direct sunlight.<br />
4. Loading and unloading the pistol<br />
WARNING: Use only .177 caliber (4.5mm) Diabolo pellets with a maximum lengh of 6.5mm.<br />
Do not use BBs or other unsuitable pellets.
A. Loading the pistol<br />
- Engage the safety of the pistol.<br />
- Open the slide by slightly pressing the unlocking lever down (illustr. 8). Keep the gun in a<br />
horizontal position in order to prevent the cylinder magazine from falling out.<br />
- A safety prevents the trigger from being pulled when the weapon is open.<br />
- Remove the pellet cylinder and load the Diabolo pellets head first (see illustration 9) insuring that each is completely<br />
inserted.<br />
- In order to prevent malfunctions it is to be made sure that the pellets are seated flush in the chambers of the rotary<br />
magazine, or, even better, that they are seated somewhat countersunk in the chambers.<br />
- Insert the magazine (illustr. 10) and close the breech by gripping the front part and push it back until it locks (illustr. 11).<br />
WARNING: Do not put your hand over the muzzle! Do not put your finger on the trigger! Make sure that<br />
muzzle is pointed in a safe direction! Never aim at people or pets.<br />
Illustr. 8 Illustr. 9 Illustr. 10 Illustr. 11
B.Unloading the pistol<br />
- Put the safety on.<br />
- Open the slide by pushing the release lever<br />
downward (see illustration 8).<br />
- Remove the pellet cylinder and carefully push the<br />
pellets out of the cylinder with the cleaning rod.<br />
Illustr. 12<br />
WARNING: Never use a metal object to remove the pellets.<br />
Damage to cylinder or barrel impairs the function.<br />
- Make sure that there is no pellet in the barrel.<br />
- If there is a pellet in the barrel, push it out with a cleaning rod.<br />
- Never shoot with a used pellet. It could damage cylinder and barrel.
5. Safe aiming and shooting<br />
WARNING: Always point the muzzle of the gun in a safe direction. Never aim at people or pets.<br />
Always handle your pistol as if it is loaded and ready to fire.<br />
Make sure the safety is ON, insert the CO2 cartridge, and load the pistol as described.<br />
WARNING: Be very careful where you aim this high effeciency pistol. Aim only at objects that cannot be penetrated.<br />
Never shoot at hard surfaces or water. A Diabolo pellet may ricochet and travel in another direction.<br />
When you are certain that the target, backstop und surrounding area are safe, go through the proper steps to ready the<br />
weapon for fireing. Only then should you shoot. Squeeze the trigger with steady pressure until the pistol fires.
WARNING: Do not assume that the pistol is unloaded if it fails to fire properly!<br />
WARNING: Insufficient CO2 pressure could cause a pellet to lodge in the barrel. See chapter 6, "Use and handling of<br />
CO2 cartridges" for further instructions.<br />
If a pellet fails to be shot after execution of the operation steps mentioned before this could be due to a feed jam.<br />
A feed jam is dangerous.<br />
· Put the safety on.<br />
· Open the slide and remove the pellet cylinder.<br />
· Check that each pellet is properly inserted in the cylinder.<br />
· Check the barrel with the cleaning rod to insure that no pellet is lodged in the barrel.<br />
· Close the breech by gripping the front part of the slide and push it back until it locks (illustr. 11).<br />
· Aim in a safe direction, turn the safety OFF and shoot the pistol to test the CO2 pressure.<br />
· If no CO2 pressure is evident, change the CO2 cartridge.<br />
WARNING: Keep hands and face at safe distance from the CO2 cartridge. Escaping CO2 gas can lead to<br />
frostbite!
6. Use and handling fo CO2 cartridges<br />
Certain conditions such as improper storage or very rapid firing can negatively effect the efficient performance or your CO2<br />
pistol.<br />
1. Do not store your pistol in an area of unusually high or low temperature. High temperature can cause increased pressure<br />
in the CO2 cartridge leading to a malfuction or permanent damage to the pistol. Low temperatures can reduce pressure<br />
in a CO2 cartridge leading to weak shots. Do not leave your gun unattended in bright sunlight. The CO2 cartridge can get<br />
too hot and explode, damaging the gun and injuring or killing anyone nearby.<br />
2. Rapid-fire shooting will quickly chill a CO2 cartridge leading to reduced pressure and pellet velocity.<br />
3. Rapid fire shooting leads to reduced shooting effeciency.<br />
4. As the cartridge loses pressure you will notice several characteristics:<br />
A) The sound of the actual shot will not be as loud.<br />
B) Pellet impact will be lower on the target.<br />
WARNING: Continued shooting when the cartridge has lost pressure could cause a pellet to lodge in the barrel!<br />
See the warning on feed jam.
7. Sights<br />
A. <strong>Red</strong> Dot Sight<br />
Aim at a safe target:<br />
This integrated electronic red dot sight is operated by means of a switch situated<br />
on the backstrap of the grip, a red dot is projected on the lens on the target<br />
level.<br />
The brightness adjustment is used two vary the brightness of the aiming point<br />
in two steps.<br />
Point of impact too high: Turn elevation adjustment screw clockwise<br />
Point of impact too low: Turn elevation adjustment screw anti-clockwise<br />
Point of impact too far right: Turn windage adjustment screw anti-clockwise<br />
Point of impact too far left: Turn windage adjustment screw clockwise<br />
The weapon is zeroed at a distance of 10 m.<br />
Illustr. 13<br />
Illustr. 14
target<br />
auxiliary front sight<br />
diode carrier<br />
B.Backup sights<br />
In case of a battery failure or with no battery inserted in the unit, sighting is still possible by means of the auxiliary<br />
front sight printed on the projection screen.The airgun is correctly aimed when the auxiliary front sight is positioned<br />
around the diode carrier. The bulls-eye should appear to rest on the top of the front sight.<br />
WARNING: Setting of the auxiliary sight is independently from the red dot sight.
8. Battery change<br />
The battery has to be changed when the red aiming dot loses its brightness or<br />
disappears altogether.<br />
CAUTION! The weapon must not be loaded.<br />
Power supply of the red dot sight is by a 3 volt lithium battery (CR 2032).<br />
Remove the magazine. Lift the grip plate off as shown in fig. 15 and change<br />
the battery.<br />
After the battery change, put the upper section of the grip plate back into position<br />
first (fig. 16). In order to lock the bottom part of the plate, it is slightly to be<br />
bent. To do so, insert your index finger into the magazine well and use it to<br />
press against the grip plate, then press it back home with your thumb.<br />
Illustr. 15<br />
Illustr. 16<br />
Illustr. 17
9. Storage<br />
Never leave a loaded gun unattended!<br />
Always store your gun unloaded. Open the slide and remove the pellet cylinder and check to insure that no pellet remains<br />
in the barrel. Remove the CO2 cartridge. Store your pistol in a separate location from the pellets and CO2 cartridges. Keep<br />
out of reach of children and unauthorized persons.<br />
10. Maintenance<br />
With the proper maintenance your pistole will give you years of pleasant shooting.<br />
WARNINIG: Do not attempt to clean your pistol without first having put the safety on, removing the pellet<br />
cylinder and CO2 cartridge, and checking to insure that no pellet remains in the barrel.<br />
To insure continued proper function, place 2-3 drops of gun oil on the slide rails and magazine catch after every 250 shots.<br />
Perfect long-lasting operation is guaranteed form your gun if it is cleaned at regular intervals with maintenance capsules<br />
and cleaning slugs (see chapter on special accessories).<br />
11. Problems<br />
Problems<br />
Bad shooting efficiency<br />
Gun does not function<br />
Low pellet velocity<br />
POSSIBLE<br />
REASONS<br />
safety is on<br />
CO 2 -cartridge is empty<br />
barrel is dirty<br />
CO<br />
is defective<br />
2 -cartridge<br />
extreme<br />
temperatures<br />
incorrect pellets<br />
pellets inserted in the<br />
pellet cylinder incorrectly<br />
slide is not properly<br />
closed and locked<br />
Incorrect side<br />
adjustment
12. Modifications<br />
13. Repair<br />
WARNING: This pistol has been designed and manufactured for optimum functioning and efficiency. Do not<br />
make any modifications as they could lead to malfunction or unsafe conditions.<br />
Do not attempt to repair this pistol if it needs service. Incorrect assembly could lead to dangerous malfunction.<br />
Repairs should only be completed by UMAREX authorized service.<br />
14. Warranty on Umarex CO2-air pistol<br />
Within one year from date of purchase Umarex will repair or replace the pistol free of charge if the defect was not caused<br />
by you. Return the gun to the authorised dealer where you have bought it.<br />
WARNING: When carrying the gun make sure that the safety is ON, the pistol is unloaded and the CO2 cartridge<br />
is removed.<br />
Weapons, too, are subject to a certain amount of wear and tear. Intensive use will lead to some wear which, however, will<br />
not impair the functioning of the gun. The magazines for the pellets are subject to extensive wear and will therefore have<br />
to be replaced in due time (refer to the chapter on special accessories).
15. Safe handling of your pistol<br />
It is your responsibility to be familiar with the safe and correct use of your pistol.<br />
· Always handle your pistol as if is loaded.<br />
· When loading your pistol, insure that the safety in ON, and do not put your finger near the trigger.<br />
· Use only the recommended pellets and CO2 cartridges.<br />
· Always point the muzzle in an safe direction.<br />
· Remember that this is a high efficiency pistol capable of propelling a pellet over 400 yards.<br />
· Always check a gun to see if it is loaded when removed from storage or received from another person.<br />
· Never transport your pistol when loaded.<br />
· Do not aim at people or pets. Never shoot at a hard surface or water.<br />
· Be sure that your target and backstop are safe.<br />
· Make sure you can control the direction of the muzzle if you stumble or fall.<br />
· Unload your airgun before giving it to another person.<br />
· Always wear shooting glasses when shooting your pistol.<br />
· Always store your pistol in a secure location out of the reach of children or unskilled useres.<br />
· Store your pellets and CO2 cartridges in a seperate location.<br />
· When transferring this pistol be sure to include this instruction manual.<br />
· Repairs to this pistol should only be done by Walther authorized service.<br />
· Never leave a loaded gun unattended.
16. Technical Data<br />
Mechanical system : CO2-Pistol<br />
Caliber : .177 (4.5mm)<br />
Cylinder capacity : 8 rounds<br />
Total length : 184 mm<br />
Weight : 630 g<br />
Muzzle velocity : up to 110 m/sec. (360 FPS)<br />
Barrel lenght : 85mm, (3.3”)<br />
Function : 12g CO2<br />
Safety : - manually operated safety slide<br />
- trigger safety when breech is open<br />
Power supply : 3 volt lithium battery CR 2032
17. Parts illustration and list<br />
Pos. Discription Code No. Pos. Discription Code No. Pos. Discription Code No.<br />
1 Frame 410.20.01.1<br />
2 Safety rivet 412.20.29.3<br />
3 Trigger bar spring 410.20.24.1<br />
4 Magazine ejector 410.20.14.1<br />
5 wedge 410.20.13.1<br />
6 Magazine ejector spring 410.20.23.1<br />
7 Spring 303.40.05.1<br />
8 Magazine catch 410.20.20.1<br />
9 Grip plate, right 410.20.11.1<br />
10 Grip plate, left 410.20.12.1<br />
11 Pin 410.20.08.0<br />
12 Slide front part 410.40.01.0<br />
13 Inner slide, left 412.400.02.0<br />
14 Inner slide, right 412.400.03.0<br />
15 Cylinder pin 416.40.09.1<br />
16 O-ring 416.40.07.2<br />
17 O-ring 416.40.08.2<br />
18 Barrel sleeve 412.40.04.1<br />
19 Safety rivet 365.23.01.3<br />
20 Receiver, right 412.20.03.1<br />
21 Receiver, left 412.20.04.1<br />
22 Cylinder latch 416.20.17.0<br />
23 Cylinder latch spring 370.20.13.1<br />
24 Pawl spring 417.20.41.1<br />
25 Pawl 416.20.19.0<br />
26 Screw 412.20.35.0<br />
27 Spring 417.20.36.1<br />
28 Screw 412.20.21.0<br />
29 Locking lever latch 412.20.34.0<br />
30 Pin 346.73.03.3<br />
31 Locking lever 412.20.16.0<br />
32 Release lever 410.20.17.0<br />
33 Valve bushing 412.20.12.1<br />
34 Valve spring 412.20.26.1<br />
35 Trigger lock nut 416.20.21.0<br />
36 Screw 318.70.05.0<br />
37 Spring 448.20.26.1<br />
38 Trigger lock 416.20.20.0<br />
39 Guide rod 412.200.06.0<br />
40 O-ring 416.60.06.2<br />
41 Spring 412.20.37.1<br />
42 Slide spring 410.40.05.1<br />
43 Screw 412.400.04.0<br />
44 Glass lens 410.40.02.1<br />
45 Ring 410.40.03.1<br />
46 Slide,front part 410.40.04.1<br />
47 Trigger bar 412.20.13.0<br />
48 Transfer link 412.20.15.0<br />
49 Trigger 410.20.10.1<br />
50 Spring 412.20.30.1<br />
51 Safety 412.20.38<br />
52 Pin for frame 412.20.22.0<br />
53 Pin for frame 412.20.23.0<br />
54 Valve body 412.60.01.0<br />
55 O-ring 416.60.06.2<br />
56 Disk at pestle 416.60.05.1<br />
57 Pestle spring 416.60.07.1<br />
58 Pestle 412.60.02.1<br />
59 Spring clip 416.60.13.1<br />
60 O-ring 416.60.04.2<br />
61 O-ring 416.60.06.2<br />
62 Valve nut 416.60.03.1<br />
63 Filter 416.60.08.1<br />
64 Piercing disk 416.60.09.1<br />
65 Packing at detonater 416.60.10.1<br />
66 Nut at detonator 412.60.09.1<br />
67 Pin 412.60.06.0<br />
68 Magazine shoe 412.60.04.1<br />
69 Nut 412.60.05.1<br />
70 Magazine body 412.60.03.1<br />
71 Pin 412.60.08.0<br />
72 Cardridge screw 419.20.21.1<br />
73 Cylinder 416.20.16.0<br />
74 Circuit board, complete 410.20.21<br />
75 Backstrap 410.20.02.1<br />
76 Brightness adjustment 410.20.04.1<br />
77 Spacer 410.20.15.1<br />
78 On-button 410.20.03.1<br />
79 Pressure spring for on-button 410.20.22.1<br />
80 Pin 410.20.16.0<br />
81 3 volt lithium battery (CR 2032) 410.20.07.2<br />
82 Receiver housing 410.20.05.0<br />
83 Pin 412.20.24.1<br />
84 Hammer 410.20.06.0<br />
85 Hammer spring 412.20.07.1<br />
86 Hammer pin 412.20.24.1<br />
87 Firing pin 412.20.28.1<br />
88 Shrouded hammer 410.20.27.1<br />
89 Spring 412.20.33.1<br />
90 Slide rear part 410.30.01.0<br />
91 Windage adjustment screw 410.30.08.0<br />
92 Elevation adjustment screw 410.30.07.0<br />
93 Sight cover 410.30.03.1<br />
94 Sight 410.30.02.1<br />
95 Nut 410.30.09.1<br />
96 Nut 410.30.05.1<br />
97 Spring 316.40.06.1<br />
98 Diode 410.30.04<br />
99 Trigger pivot pin 412.20.22.3<br />
100 Battery tray 410.20.25.1<br />
101 Locking plate 412.20.36.1<br />
102 Sear 412.20.08.0<br />
103 Sear spring 412.20.25.1
CO2-Capsules<br />
Pack of 10; contents12g; for all CO2 airguns<br />
Part. no.: 4.1682<br />
Maintenance capsule de CO2<br />
Pack of 5; for all CO2 airguns<br />
Part. no.: 4.1683<br />
Cleaning slugs Part. no.: 3.2055<br />
Targets<br />
17*17cm, for Pellet trap<br />
3.2071 per 250 pieces<br />
Part. no.: 3.2095<br />
Special accessories for Umarex Mod. <strong>Red</strong> <strong>Hawk</strong><br />
Pellet trap<br />
for targets 10-17cm<br />
Part. no.: 3.2071<br />
Magnetic Pellet Trap<br />
4 targets are knocked down when a hit is scored.<br />
When the center target is hit; all targets return to the upright position.<br />
Dimensions: 49*22*30 cm<br />
Part. no.: 3.2080<br />
Waisted Match<br />
pellets “Diablo”<br />
cal. 4.5mm(.177)<br />
smooth<br />
(5000 Pack)<br />
4.1951<br />
Protective Shooting<br />
glaces<br />
yellow Part. no.: 2.5013<br />
clear Part. no.: 2.50133<br />
Cylinder magazine<br />
Pack of 3<br />
Part. no.: 416.120<br />
Pointed waisted<br />
pellets “Diablo”<br />
cal. 4.5mm(.177)<br />
copper<br />
(5000 Pack)<br />
4.1952<br />
Subject to change without prior notice<br />
Finale Match<br />
cal. 4.5mm(.177)<br />
Air pistol pellets<br />
(5000 Pack)<br />
4.1940<br />
Magazine, complete<br />
Part. no.: 412.102<br />
High Power Pellet<br />
cal. 4.5mm(.177)<br />
Air pistole pellets<br />
(400 Pack)<br />
4.1675<br />
Five Pack Set, cal. 4.5mm(.177)<br />
Waisted pellets “Diablo”, ribbed;<br />
Waisted Match pellets “Diablo”, smooth;<br />
Pointed waisted pellets “Diablo”, cooper;<br />
Pointed waisted pellets “Diablo”, ribbed;<br />
Hollow Point Semi Wadcutter; smooth<br />
(a 500 pieces)<br />
Part. no.: 4.1950
Service:<br />
Umarex Sportwaffen<br />
Postfach 2720<br />
59717 Arnsberg<br />
Neheim, Donnerfeld 2<br />
59757 Arnsberg<br />
Telefon 02932 / 638-01<br />
Telefax 02932 / 638-222<br />
E-Mail: sales@umarex.de<br />
Inernet: www.umarex.com