TL-WN881ND 300Mbps Wireless N PCI Express Adapter - TP-Link
TL-WN881ND 300Mbps Wireless N PCI Express Adapter - TP-Link
TL-WN881ND 300Mbps Wireless N PCI Express Adapter - TP-Link

Create successful ePaper yourself
Turn your PDF publications into a flip-book with our unique Google optimized e-Paper software.
<strong>TL</strong>-<strong>WN881ND</strong><br />
<strong>300Mbps</strong> <strong>Wireless</strong> N <strong>PCI</strong> <strong>Express</strong> <strong>Adapter</strong><br />
Rev: 1.0.0<br />
1910010532
COPYRIGHT & TRADEMARKS<br />
Specifications are subject to change without notice. is a registered trademark of<br />
<strong>TP</strong>-LINK TECHNOLOGIES CO., LTD. Other brands and product names are trademarks or<br />
registered trademarks of their respective holders.<br />
No part of the specifications may be reproduced in any form or by any means or used to make<br />
any derivative such as translation, transformation, or adaptation without permission from<br />
<strong>TP</strong>-LINK TECHNOLOGIES CO., LTD. Copyright © 2011 <strong>TP</strong>-LINK TECHNOLOGIES CO., LTD.<br />
All rights reserved.<br />
http://www.tp-link.com
FCC STATEMENT<br />
This equipment has been tested and found to comply with the limits for a Class B digital device,<br />
pursuant to part 15 of the FCC Rules. These limits are designed to provide reasonable<br />
protection against harmful interference in a residential installation. This equipment generates,<br />
uses and can radiate radio frequency energy and, if not installed and used in accordance with<br />
the instructions, may cause harmful interference to radio communications. However, there is no<br />
guarantee that interference will not occur in a particular installation. If this equipment does<br />
cause harmful interference to radio or television reception, which can be determined by turning<br />
the equipment off and on, the user is encouraged to try to correct the interference by one or<br />
more of the following measures:<br />
• Reorient or relocate the receiving antenna.<br />
• Increase the separation between the equipment and receiver.<br />
• Connect the equipment into an outlet on a circuit different from that to which the<br />
receiver is connected.<br />
• Consult the dealer or an experienced radio/ TV technician for help.<br />
This device complies with part 15 of the FCC Rules. Operation is subject to the following two<br />
conditions:<br />
1) This device may not cause harmful interference.<br />
2) This device must accept any interference received, including interference that may cause<br />
undesired operation.<br />
Any changes or modifications not expressly approved by the party responsible for compliance<br />
could void the user’s authority to operate the equipment.<br />
Note: The manufacturer is not responsible for any radio or TV interference caused by<br />
unauthorized modifications to this equipment. Such modifications could void the user’s authority<br />
to operate the equipment.<br />
FCC RF Radiation Exposure Statement<br />
This equipment complies with FCC RF radiation exposure limits set forth for an uncontrolled<br />
environment. This device and its antenna must not be co-located or operating in conjunction<br />
with any other antenna or transmitter.<br />
“To comply with FCC RF exposure compliance requirements, this grant is applicable to only<br />
Mobile Configurations. The antennas used for this transmitter must be installed to provide a<br />
separation distance of at least 20 cm from all persons and must not be co-located or operating<br />
in conjunction with any other antenna or transmitter.”
CE Mark Warning<br />
This is a class B product. In a domestic environment, this product may cause radio interference,<br />
in which case the user may be required to take adequate measures.<br />
National Restrictions<br />
2400.0-2483.5 MHz<br />
Country Restriction Reason/remark<br />
Bulgaria<br />
France<br />
Italy<br />
Luxembourg None<br />
Outdoor use limited to 10 mW<br />
e.i.r.p. within the band<br />
2454-2483.5 MHz<br />
Norway Implemented<br />
General authorization required for outdoor use and<br />
public service<br />
Military Radiolocation use. Refarming of the 2.4 GHz<br />
band has been ongoing in recent years to allow current<br />
relaxed regulation. Full implementation planned 2012<br />
If used outside of own premises, general authorization<br />
is required<br />
General authorization required for network and service<br />
supply(not for spectrum)<br />
This subsection does not apply for the geographical<br />
area within a radius of 20 km from the centre of<br />
Ny-Ålesund<br />
Russian Federation Only for indoor applications<br />
Note: Please don’t use the product outdoors in France.<br />
This device has been designed to operate with the antennas listed below which have a<br />
maximum gain of 2 dBi. Antennas not included in this list or having a gain greater than 2 dBi are<br />
strictly prohibited for use with this device. The required antenna impedance is 50 ohms.<br />
To reduce potential radio interference to other users, the antenna type and its gain should be so<br />
chosen that the equivalent isotropically radiated power (e.i.r.p.) is not more than that permitted<br />
for successful communication.
For the following equipment:<br />
<strong>TP</strong>-LINK TECHNOLOGIES CO., LTD<br />
DECLARATION OF CONFORMITY<br />
Product Description: <strong>300Mbps</strong> <strong>Wireless</strong> N <strong>PCI</strong> <strong>Express</strong> <strong>Adapter</strong><br />
Model No.: <strong>TL</strong>-<strong>WN881ND</strong><br />
Trademark: <strong>TP</strong>-LINK<br />
We declare under our own responsibility that the above products satisfy all the technical<br />
regulations applicable to the product within the scope of Council Directives:<br />
Directives 1999/5/EC<br />
The above product is in conformity with the following standards or other normative documents:<br />
ETSI EN 300 328 V1.7.1: 2006<br />
ETSI EN 301 489-1 V1.8.1:2008 & ETSI EN 301 489-17 V1.3.2:2008<br />
EN60950-1:2006<br />
EN62311:2008<br />
Person is responsible for marking this declaration:<br />
Yang Hongliang<br />
Product Manager of International Business<br />
<strong>TP</strong>-LINK TECHNOLOGIES CO., LTD\<br />
South Building, No.5 Keyuan Road, Central Zone, Science & Technology Park, Nanshan,<br />
Shenzhen, P. R. China
CONTENTS<br />
Package Contents .................................................................................................... 1<br />
Chapter 1 Introduction ........................................................................................ 2<br />
1.1 Product Overview...................................................................................................... 2<br />
1.2 Features .................................................................................................................... 2<br />
1.3 Hardware Overview................................................................................................... 2<br />
Chapter 2 Installation .......................................................................................... 4<br />
2.1 Hardware Installation ................................................................................................ 4<br />
2.2 Software Installation.................................................................................................. 4<br />
Chapter 3 Connect to a <strong>Wireless</strong> Network......................................................... 9<br />
3.1 To connect using TWCU ........................................................................................... 9<br />
3.2 To connect using QSS ............................................................................................ 12<br />
3.2.1 PBC (Push Button Configuration) method .....................................................................12<br />
3.2.2 PIN method ....................................................................................................................14<br />
3.3 To connect using Windows built-in wireless utility................................................... 17<br />
3.3.1 In Windows 7..................................................................................................................17<br />
3.3.2 In Windows Vista............................................................................................................18<br />
3.3.3 In Windows XP ...............................................................................................................20<br />
Chapter 4 Management ..................................................................................... 23<br />
4.1 Profile ...................................................................................................................... 23<br />
4.1.1 Add a profile ...................................................................................................................23<br />
4.1.2 Modify a profile ...............................................................................................................25<br />
4.1.3 Delete a profile ...............................................................................................................25<br />
4.2 Advanced ................................................................................................................ 26<br />
4.3 About....................................................................................................................... 27<br />
Chapter 5 AP Mode............................................................................................ 28<br />
Chapter 6 Uninstall Software ............................................................................ 30<br />
6.1 Uninstall the utility software from your PC............................................................... 30<br />
6.2 Uninstall the driver software from your PC.............................................................. 31<br />
Appendix A: Specifications................................................................................... 32<br />
Appendix B: Glossary............................................................................................ 33
Package Contents<br />
Please verify that all the package contents below are available.<br />
One <strong>TL</strong>-<strong>WN881ND</strong> <strong>300Mbps</strong> <strong>Wireless</strong> N <strong>PCI</strong> <strong>Express</strong> <strong>Adapter</strong><br />
Quick Installation Guide<br />
One Resource CD for <strong>TL</strong>-<strong>WN881ND</strong>, including:<br />
• <strong>TP</strong>-LINK <strong>Wireless</strong> Configuration Utility (TWCU) and Drivers<br />
• User Guide<br />
• Other helpful information<br />
Note:<br />
Make sure that the above items are contained in the package. If any of the above items are<br />
damaged or missing, please contact your distributor.<br />
Conventions<br />
The ‘adapter’ mentioned in this User Guide stands for <strong>TL</strong>-<strong>WN881ND</strong> <strong>300Mbps</strong> <strong>Wireless</strong> N <strong>PCI</strong><br />
<strong>Express</strong> <strong>Adapter</strong> without any explanations.<br />
1
<strong>TL</strong>-<strong>WN881ND</strong> <strong>300Mbps</strong> <strong>Wireless</strong> N <strong>PCI</strong> <strong>Express</strong> <strong>Adapter</strong> User Guide<br />
Chapter 1 Introduction<br />
1.1 Product Overview<br />
The adapter is an 802.11n client device designed to deliver a high-speed and unrivaled wireless<br />
performance for your desktop. With a faster wireless connection, you can get a better Internet<br />
experience, such as downloading, gaming, video streaming.<br />
With the 802.11n technology, higher throughput improvements using MIMO (multiple input,<br />
multiple output antennas), the <strong>TL</strong>-<strong>WN881ND</strong>’s auto-sensing capability allows high packet transfer<br />
rate of up to <strong>300Mbps</strong> for maximum throughput. It has good capability on anti-jamming, and it can<br />
also interoperate with other wireless (802.11b) products. The adapter supports WEP, WPA and<br />
WPA2 encryption to prevent outside intrusion and protect your personal information from being<br />
exposed.<br />
The adapter is easy to install and manage with the Quick Setup Wizard guiding you step-by-step<br />
through the installation process and the <strong>TP</strong>-LINK <strong>Wireless</strong> Configuration Utility instructing you to<br />
quickly set up a wireless connection.<br />
With unmatched wireless performance, reception, and security protection, the <strong>TL</strong>-<strong>WN881ND</strong> is<br />
the best choice for easily adding or upgrading wireless connectivity to your desktop.<br />
1.2 Features<br />
Complies with IEEE 802.11n, IEEE 802.11g, IEEE 802.11b standards<br />
Supports WPA/WPA2 data security, TKIP/AES encryption<br />
Supports high rate of up to <strong>300Mbps</strong> for maximum throughput, supports automatically<br />
adjust to lower speeds due to distance or other operating limitations<br />
Provides <strong>PCI</strong> <strong>Express</strong> x1 interface<br />
Supports Ad Hoc and Infrastructure modes<br />
Good capability on anti-jamming<br />
Supports roaming between access points when configured under Infrastructure mode<br />
Easy to configure and provides monitoring information<br />
Supports Windows XP, Windows Vista and Windows 7<br />
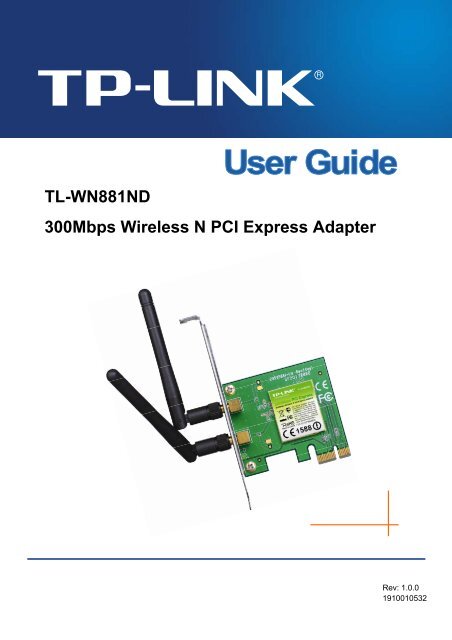
Two antennas which are listed in a format of 2x2 for two receivers and two transmitters<br />
2
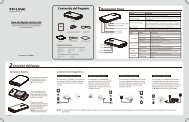
1.3 Hardware Overview<br />
LED status:<br />
<strong>TL</strong>-<strong>WN881ND</strong> <strong>300Mbps</strong> <strong>Wireless</strong> N <strong>PCI</strong> <strong>Express</strong> <strong>Adapter</strong> User Guide<br />
Status Working Status<br />
Off<br />
Flashing Slowly<br />
The driver has not been installed;<br />
The adapter's radio has been disabled.<br />
The driver has been installed but no data is being transmitted or<br />
received.<br />
Flashing Quickly Data is being transmitted or received.<br />
3
Chapter 2 Installation<br />
<strong>TL</strong>-<strong>WN881ND</strong> <strong>300Mbps</strong> <strong>Wireless</strong> N <strong>PCI</strong> <strong>Express</strong> <strong>Adapter</strong> User Guide<br />
Please install the <strong>PCI</strong> <strong>Express</strong> adapter into your computer before installing the driver software<br />
from the Resource CD.<br />
2.1 Hardware Installation<br />
1. Turn off your computer and unplug the power cord from the computer.<br />
2. Open the case and locate an available <strong>PCI</strong> <strong>Express</strong> slot. Remove the metal slot cover on the<br />
back of the PC. Keep the screws. Turn to your computer manufacturer for instructions if<br />
needed.<br />
3. Insert the <strong>PCI</strong> <strong>Express</strong> adapter into the <strong>PCI</strong> <strong>Express</strong> slot. Make sure that all of its pins have<br />
touched the slot's contacts. Once the adapter has been firmly inserted, screw its fastening<br />
tab. Then, close your PC case.<br />
4. Insert the power cable back into the computer and turn on your computer.<br />
When the Found New Hardware wizard appears, click Cancel.<br />
2.2 Software Installation<br />
The adapter’s Setup Wizard will guide you through the installation procedures for Windows 7,<br />
Windows Vista, and Windows XP. The procedures in different systems are quite similar,<br />
therefore here takes the procedures in Windows XP for example.<br />
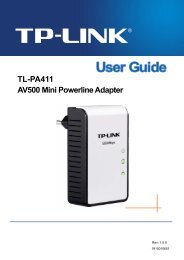
1. Insert the Resource CD into your CD-ROM drive, and the window below will appear. Select<br />
model <strong>TL</strong>-<strong>WN881ND</strong>. There will be a menu including: Install Driver&Utility and User<br />
Guide. Click Install Driver&Utility to begin.<br />
Figure 2-1<br />
4
<strong>TL</strong>-<strong>WN881ND</strong> <strong>300Mbps</strong> <strong>Wireless</strong> N <strong>PCI</strong> <strong>Express</strong> <strong>Adapter</strong> User Guide<br />
2. The InstallShield Wizard window will appear. Click Next to continue.<br />
Figure 2-2<br />
3. Choose a setup type. It is recommended to select Install <strong>TP</strong>-LINK <strong>Wireless</strong><br />
Configuration Utility and Driver. Selecting Install Driver Only will only install driver.<br />
Click Next to continue.<br />
Figure 2-3<br />
5
<strong>TL</strong>-<strong>WN881ND</strong> <strong>300Mbps</strong> <strong>Wireless</strong> N <strong>PCI</strong> <strong>Express</strong> <strong>Adapter</strong> User Guide<br />
4. Click Change to specify the destination location for the software or you can leave it default.<br />
Click Next in the screen below to continue.<br />
5. Click Install to continue the setup.<br />
Figure 2-4<br />
Figure 2-5<br />
6
<strong>TL</strong>-<strong>WN881ND</strong> <strong>300Mbps</strong> <strong>Wireless</strong> N <strong>PCI</strong> <strong>Express</strong> <strong>Adapter</strong> User Guide<br />
6. The utility and drivers will install. This may take 1~2 minutes.<br />
Figure 2-6<br />
7. After all the steps above, you will see the screen below. Click Finish to complete the setup.<br />
Figure 2-7<br />
7
<strong>TL</strong>-<strong>WN881ND</strong> <strong>300Mbps</strong> <strong>Wireless</strong> N <strong>PCI</strong> <strong>Express</strong> <strong>Adapter</strong> User Guide<br />
8. After installation, the utility configuration page will automatically pop up as shown in the<br />
following figure and the icon will appear in your system tray. To connect to a network,<br />
please refer to Chapter 3 Connect to a <strong>Wireless</strong> Network.<br />
Figure 2-8<br />
8
<strong>TL</strong>-<strong>WN881ND</strong> <strong>300Mbps</strong> <strong>Wireless</strong> N <strong>PCI</strong> <strong>Express</strong> <strong>Adapter</strong> User Guide<br />
Chapter 3 Connect to a <strong>Wireless</strong> Network<br />
With both the hardware and software successfully installed into your computer, you can quickly<br />
connect to a wireless network using one of the following methods.<br />
Method One:<br />
To connect using TWCU<br />
<strong>TL</strong>-<strong>WN881ND</strong> uses the <strong>TP</strong>-LINK <strong>Wireless</strong> Configuration Utility as the management software.<br />
The utility provides you an easy interface to connect to a network and to change any settings<br />
related to the wireless adapter.<br />
Method Two:<br />
To connect using QSS<br />
By this method, you can connect to your network quickly on the condition that your router or<br />
access point supports QSS or WPS as is called by some other brands.<br />
Method Three:<br />
To connect using Windows built-in wireless utility<br />
Windows users may use the built-in wireless utility to connect to a wireless network. For specific<br />
operations, please go to To connect using Windows built-in wireless utility.<br />
3.1 To connect using TWCU<br />
1. After installation, the utility configuration page will automatically pop up on the screen. If the<br />
utility page does not pop up, you can also launch the utility by double-clicking on the<br />
icon on your desktop or the icon in your system tray.<br />
Figure 3-1<br />
2. The Network page will display all wireless networks that are available in your area. To<br />
connect to a network, simply highlight the wireless network name and click Connect.<br />
9
<strong>TL</strong>-<strong>WN881ND</strong> <strong>300Mbps</strong> <strong>Wireless</strong> N <strong>PCI</strong> <strong>Express</strong> <strong>Adapter</strong> User Guide<br />
SSID (Service Set Identifier) is the name of the wireless network. The adapter will<br />
automatically connect to your target network next time if you tick Connect automatically.<br />
Figure 3-2<br />
3. If word None appears behind the SSID, this means the network to be connected is not<br />
security-enabled and you can connect to the network without entering a key. To prevent<br />
outside intrusion and safeguard your network, it is strongly recommended to set a<br />
password to your router or access point.<br />
Figure 3-3<br />
If there is a “lock” icon behind the SSID, this means the wireless network is secure and the<br />
corresponding security type will display. You must know the encryption key/security<br />
settings to connect.<br />
10
<strong>TL</strong>-<strong>WN881ND</strong> <strong>300Mbps</strong> <strong>Wireless</strong> N <strong>PCI</strong> <strong>Express</strong> <strong>Adapter</strong> User Guide<br />
Input the password which can be found on the configuration page of your router or access<br />
point, then click OK to continue. Or push the QSS/WPS button on your router if your router<br />
features the QSS/WPS function to quickly build a connection without having to enter a key.<br />
Figure 3-4<br />
4. You have now successfully connected to your network. Click Close to enjoy the Internet.<br />
Figure 3-5<br />
5. To view more information about the network currently connected, click Status in the tools<br />
section and the page will display information such as the network type, link quality and<br />
wireless mode.<br />
11
3.2 To connect using QSS<br />
<strong>TL</strong>-<strong>WN881ND</strong> <strong>300Mbps</strong> <strong>Wireless</strong> N <strong>PCI</strong> <strong>Express</strong> <strong>Adapter</strong> User Guide<br />
Figure 3-6<br />
QSS (Quick Secure Setup) function allows you to add a new wireless device to an existing<br />
network quickly.<br />
If the wireless router supports QSS or Wi-Fi Protected Setup (WPS), you can establish a<br />
wireless connection between wireless card and router using either Push Button Configuration<br />
(PBC) method or PIN method. Three QSS connection methods are listed in the following parts<br />
while the third method is only supported in Windows XP and Windows Vista.<br />
3.2.1 PBC (Push Button Configuration) method<br />
1. Press the QSS button on the back panel of the router. Here takes router <strong>TL</strong>-WR741ND for<br />
example.<br />
2. Open TWCU and click QSS tab. Select Push the button on my access point or wireless<br />
router and then click Connect.<br />
12
<strong>TL</strong>-<strong>WN881ND</strong> <strong>300Mbps</strong> <strong>Wireless</strong> N <strong>PCI</strong> <strong>Express</strong> <strong>Adapter</strong> User Guide<br />
Figure 3-7<br />
3. The adapter will be connecting to the target network.<br />
Figure 3-8<br />
13
<strong>TL</strong>-<strong>WN881ND</strong> <strong>300Mbps</strong> <strong>Wireless</strong> N <strong>PCI</strong> <strong>Express</strong> <strong>Adapter</strong> User Guide<br />
4. When the following window appears, you have successfully connected to the network.<br />
3.2.2 PIN method<br />
Figure 3-9<br />
There are two ways to configure the QSS by PIN method:<br />
1) Enter the PIN from your AP device.<br />
2) Enter a PIN into your AP device.<br />
Following are detailed configuration procedures of each way.<br />
3.2.2.1. Enter the PIN from your AP device<br />
1. Open TWCU and click QSS tab. Select Enter the PIN of my access point or wireless<br />
router. In the empty field beside PIN, enter the PIN labeled on the bottom of the router<br />
(here takes 13492564 for example). If you have generated a new PIN code for your router,<br />
please enter the new one instead. Click Connect to continue.<br />
Figure 3-10<br />
14
<strong>TL</strong>-<strong>WN881ND</strong> <strong>300Mbps</strong> <strong>Wireless</strong> N <strong>PCI</strong> <strong>Express</strong> <strong>Adapter</strong> User Guide<br />
2. The adapter will be connecting to the target network.<br />
Figure 3-11<br />
3. When Figure 3-9 appears, you have successfully connected to the network.<br />
3.2.2.2. Enter a PIN into your AP device<br />
This method is only available in Windows XP and Windows Vista.<br />
1. Open TWCU and click QSS tab. Select Enter the PIN of this device into my access<br />
point or wireless router. In the field beside PIN, you will see the PIN value of the adapter<br />
which is randomly generated. Click Connect to continue.<br />
Figure 3-12<br />
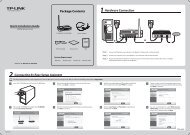
2. Open your router’s Web-based Utility and click QSS link on the left of the main menu. Then<br />
click Add device and the following figure will appear. Enter the PIN value of the adapter in<br />
the empty field beside PIN and then click Connect.<br />
15
<strong>TL</strong>-<strong>WN881ND</strong> <strong>300Mbps</strong> <strong>Wireless</strong> N <strong>PCI</strong> <strong>Express</strong> <strong>Adapter</strong> User Guide<br />
Figure 3-13<br />
3. When Connect successfully appears on the screen, the QSS configuration is complete.<br />
Or you can view the adapter’s utility page to see whether the connection has been<br />
successful as shown in Figure 3-15.<br />
Figure 3-14<br />
Figure 3-15<br />
16
<strong>TL</strong>-<strong>WN881ND</strong> <strong>300Mbps</strong> <strong>Wireless</strong> N <strong>PCI</strong> <strong>Express</strong> <strong>Adapter</strong> User Guide<br />
3.3 To connect using Windows built-in wireless utility<br />
3.3.1 In Windows 7<br />
Windows 7 users may use the built-in wireless utility. Follow the steps below.<br />
1. Left-click the wireless icon in your system tray (lower-right corner). The utility will<br />
display any available wireless networks in your area. Highlight the wireless network<br />
(displayed using the SSID) to be connected and then click Connect.<br />
Figure 3-16<br />
2. If the network you would like to connect is security-enabled, enter the same security key or<br />
passphrase that is on your router. Or push the QSS button (other brands may call it WPS)<br />
on the router or access point (You will be prompted to push the button on the window if<br />
QSS function is supported as shown in the figure below). If the network to be connected is<br />
not secure, the connection will be built without entering a key.<br />
17
<strong>TL</strong>-<strong>WN881ND</strong> <strong>300Mbps</strong> <strong>Wireless</strong> N <strong>PCI</strong> <strong>Express</strong> <strong>Adapter</strong> User Guide<br />
Figure 3-17<br />
3. You have now successfully connected to the network.<br />
3.3.2 In Windows Vista<br />
Figure 3-18<br />
Windows Vista users may use the built-in wireless utility. Follow the steps below.<br />
1. Open the wireless utility by right-clicking on the wireless computer icon in your system tray<br />
as shown in the figure below. Select Connect to a network.<br />
18
<strong>TL</strong>-<strong>WN881ND</strong> <strong>300Mbps</strong> <strong>Wireless</strong> N <strong>PCI</strong> <strong>Express</strong> <strong>Adapter</strong> User Guide<br />
Figure 3-19<br />
2. The utility will display any available wireless networks in your area. Highlight the wireless<br />
network you would like to connect and then click Connect.<br />
Figure 3-20<br />
3. If the network you would like to connect is security-enabled, enter the same security key or<br />
passphrase that is on your router. If the network to be connected is not secure, the<br />
connection will be built without entering a key.<br />
19
<strong>TL</strong>-<strong>WN881ND</strong> <strong>300Mbps</strong> <strong>Wireless</strong> N <strong>PCI</strong> <strong>Express</strong> <strong>Adapter</strong> User Guide<br />
Figure 3-21<br />
4. You have now successfully connected to the network.<br />
3.3.3 In Windows XP<br />
Figure 3-22<br />
Windows XP users may use the built-in wireless utility. Follow the steps below.<br />
1. Right-click on the utility icon in your system tray (lower-right corner). Select Switch to<br />
<strong>TP</strong>-LINK <strong>Wireless</strong> configuration Utility.<br />
20
<strong>TL</strong>-<strong>WN881ND</strong> <strong>300Mbps</strong> <strong>Wireless</strong> N <strong>PCI</strong> <strong>Express</strong> <strong>Adapter</strong> User Guide<br />
Figure 3-23<br />
Or double-click the utility icon to load the utility configuration page. Click Advanced in the<br />
tools section and then select Use Windows wireless configuration tool in the figure<br />
shown below. Click OK when Figure 3-25 appears to continue.<br />
Figure 3-24<br />
Figure 3-25<br />
2. Right-click on the wireless computer icon in your system tray (lower-right corner). Select<br />
View Available <strong>Wireless</strong> Networks.<br />
21
<strong>TL</strong>-<strong>WN881ND</strong> <strong>300Mbps</strong> <strong>Wireless</strong> N <strong>PCI</strong> <strong>Express</strong> <strong>Adapter</strong> User Guide<br />
Figure 3-26<br />
3. The utility will display any available wireless networks in your area. Click on a network<br />
(displayed using the SSID) and click the Connect button.<br />
Figure 3-27<br />
4. If the network is security-enabled, you will be prompted to enter the key as shown below. If<br />
not, you will connect to the network directly without entering a key.<br />
Figure 3-28<br />
22
<strong>TL</strong>-<strong>WN881ND</strong> <strong>300Mbps</strong> <strong>Wireless</strong> N <strong>PCI</strong> <strong>Express</strong> <strong>Adapter</strong> User Guide<br />
Chapter 4 Management<br />
This section will show you how to configure your <strong>TL</strong>-<strong>WN881ND</strong> adapter using the <strong>TP</strong>-LINK<br />
<strong>Wireless</strong> Configuration Utility (TWCU).<br />
The <strong>TL</strong>-<strong>WN881ND</strong> adapter uses the <strong>TP</strong>-LINK <strong>Wireless</strong> Configuration Utility as the management<br />
software. The utility provides users with an easy interface to change any settings related to the<br />
adapter. Double-clicking on the icon on your desktop will start the utility.<br />
4.1 Profile<br />
Your wireless networks may vary in different places like home, office or coffee shop. With<br />
Profile management, you can easily save and manage various networks to be connected,<br />
saving you the trouble of having to repeat the same configurations. Click Profile in the tools<br />
section, the following page will appear.<br />
4.1.1 Add a profile<br />
Figure 4-1<br />
To add a profile, click the Add button on the bottom of the screen. Then the configuration<br />
window will appear.<br />
23
<strong>TL</strong>-<strong>WN881ND</strong> <strong>300Mbps</strong> <strong>Wireless</strong> N <strong>PCI</strong> <strong>Express</strong> <strong>Adapter</strong> User Guide<br />
Figure 4-2<br />
The following items can be found on the screen.<br />
Profile Name: Enter a name for your profile (e.g. Home, Office, CoffeeShop). The same<br />
name is not allowed. Please also note that no space is allowed between words.<br />
SSID: Select the target network from the drop-down list.<br />
Network Type: Select the network type. If you are connecting to a wireless router or<br />
access point, select Infrastructure. If you are connecting to another wireless client such as<br />
an adapter, select ad-hoc.<br />
Security Type: Select the security type from the list. Three options are available:<br />
WPA-PSK/WPA2-PSK, WEP and None. The security type should be the same as on your<br />
router or access point, otherwise, you will not be able to build a successful connection.<br />
WPA-PSK/WPA2-PSK uses a passphrase or key to authenticate your wireless connection.<br />
The key must be the exact same key entered on your wireless router or access point. None<br />
stands for no security. It is recommended to enable WPA-PSK/WPA2-PSK on your<br />
wireless router or access point before configuring your wireless adapter.<br />
Encryption Type: From the drop-down menu, select the encryption type that is the same<br />
as on your router or access point.<br />
Security Key: Enter the passphrase exactly as it is on your wireless router or access point.<br />
Click the Show characters box to see the passphrase. Unchecking it will hide it.<br />
Start this connection automatically: check this box to automatically connect to this<br />
network next time.<br />
Save: Click Save to save your settings.<br />
Complete the above settings, the Profile page should look like the following figure. To connect<br />
to a desired network, just highlight the network you would like to connect to and click the<br />
Connect button on the bottom of the window.<br />
24
4.1.2 Modify a profile<br />
<strong>TL</strong>-<strong>WN881ND</strong> <strong>300Mbps</strong> <strong>Wireless</strong> N <strong>PCI</strong> <strong>Express</strong> <strong>Adapter</strong> User Guide<br />
Figure 4-3<br />
You may edit an existing profile by clicking the Modify button from the Profile page. For<br />
instance, you may like to change the profile name from Home to Home1 or you may want to<br />
specify another SSID for profile Home. After all the changes, click Save to make the changes<br />
take effect.<br />
4.1.3 Delete a profile<br />
Figure 4-4<br />
To delete an existing profile, highlight the profile name and click Remove on the bottom of the<br />
screen or press the Delete button on your keyboard. When the following figure appears, click<br />
OK to continue.<br />
25
4.2 Advanced<br />
<strong>TL</strong>-<strong>WN881ND</strong> <strong>300Mbps</strong> <strong>Wireless</strong> N <strong>PCI</strong> <strong>Express</strong> <strong>Adapter</strong> User Guide<br />
Figure 4-5<br />
The following configurations can be made on the Advanced page:<br />
1) To select wireless configuration tool.<br />
Here you can decide which tool to use, either the <strong>TP</strong>-LINK Configuration Utility or the<br />
Windows wireless configuration tool. This option is available only in Windows XP.<br />
2) To switch to another wireless network adapter.<br />
Here you can switch to another adapter installed in your computer. The adapters<br />
successfully installed in your computer will be listed in the drop-down menu if the adapters<br />
are supported by this utility.<br />
3) To switch to SoftAP mode.<br />
Once enabled, the adapter will be able to work as an AP. This option is only available in<br />
Windows 7.<br />
4) To change the power save mode. The default option is ON.<br />
Figure 4-6<br />
26
4.3 About<br />
<strong>TL</strong>-<strong>WN881ND</strong> <strong>300Mbps</strong> <strong>Wireless</strong> N <strong>PCI</strong> <strong>Express</strong> <strong>Adapter</strong> User Guide<br />
The About screen gives you information about the Driver and Utility versions of the adapter.<br />
Right-click on the icon in your system tray and select About from the list.<br />
Figure 4-7<br />
27
Chapter 5 AP Mode<br />
<strong>TL</strong>-<strong>WN881ND</strong> <strong>300Mbps</strong> <strong>Wireless</strong> N <strong>PCI</strong> <strong>Express</strong> <strong>Adapter</strong> User Guide<br />
In Soft AP mode, the adapter will work as an AP. This function is available only in Windows7.<br />
Suppose that only one computer in your house can access the Internet for various reasons like<br />
only one WLAN port is available on your wired broadband router, however, other<br />
wireless-capable devices also want to share the Internet. Then the adapter can be configured<br />
as an AP under the Soft AP mode, saving you the trouble of having to get a separate access<br />
point or a router.<br />
With this feature, a computer can use a single physical wireless adapter to connect as a client<br />
to a hardware access point while at the same time acting as a software AP allowing other<br />
wireless-capable devices to connect to it.<br />
To switch to this mode, right-click on the utility icon in your system tray and select Switch to<br />
SoftAP mode.<br />
Figure 5-1<br />
Or from the Advanced page of the utility, tick ON under the SoftAP mode as shown in the<br />
following figure. Click OK when prompted to confirm the setting.<br />
Figure 5-2<br />
28
<strong>TL</strong>-<strong>WN881ND</strong> <strong>300Mbps</strong> <strong>Wireless</strong> N <strong>PCI</strong> <strong>Express</strong> <strong>Adapter</strong> User Guide<br />
The Soft AP icon should then appear beside Advanced icon in the utility.<br />
Figure 5-3<br />
SoftAP mode: Select to enable or disable the function.<br />
Internet Connecting Share(ICS): Specify a connection through which devices connected<br />
to your AP can access the Internet.<br />
SSID: Enter the name for your soft AP (for example, Jone) so that others can know which<br />
AP is yours when trying to connect to it. The default name (SSID) is “tp-link”.<br />
Security Type: The security type here is set to be WPA2-PSK which is based on 802.11i<br />
and uses Advanced Encryption Standard instead of TKIP. It was designed to improve the<br />
security features of WEP. WPA2-PSK uses a passphrase or key to authenticate your<br />
wireless connection. You needn’t make any configuration here.<br />
Encryption Type: The encryption type here is set to be AES.<br />
Security Key: Enter the Key in the field to make your AP security enabled. It is<br />
recommended that you specify another key instead of the default key 12345678. Only by<br />
entering the corresponding key can other computers establish a successful connection with<br />
your AP.<br />
IP Address: Here displays the IP address of the SoftAP.<br />
29
<strong>TL</strong>-<strong>WN881ND</strong> <strong>300Mbps</strong> <strong>Wireless</strong> N <strong>PCI</strong> <strong>Express</strong> <strong>Adapter</strong> User Guide<br />
Chapter 6 Uninstall Software<br />
6.1 Uninstall the utility software from your PC<br />
1. On the Windows taskbar, click the Start button, click All programs<strong>TP</strong>-LINK, and then<br />
click Uninstall-<strong>TP</strong>-LINK <strong>Wireless</strong> Configuration Utility.<br />
Figure 6-1 Uninstall Utility<br />
2. Follow the Install Shield Wizard to uninstall the utility software from your PC.<br />
Figure 6-2<br />
3. Click Finish when the figure below appears.<br />
30
<strong>TL</strong>-<strong>WN881ND</strong> <strong>300Mbps</strong> <strong>Wireless</strong> N <strong>PCI</strong> <strong>Express</strong> <strong>Adapter</strong> User Guide<br />
Figure 6-3<br />
6.2 Uninstall the driver software from your PC<br />
1. On the Windows taskbar, click the Start button, click All programs<strong>TP</strong>-LINK, and then<br />
click Uninstall-<strong>TL</strong>-<strong>WN881ND</strong> Driver.<br />
Figure 6-4 Uninstall Driver<br />
2. Click Uninstall shown in above Figure 6-4, the system will uninstall the driver software of<br />
the adapter from your PC.<br />
31
<strong>TL</strong>-<strong>WN881ND</strong> <strong>300Mbps</strong> <strong>Wireless</strong> N <strong>PCI</strong> <strong>Express</strong> <strong>Adapter</strong> User Guide<br />
Appendix A: Specifications<br />
Normal<br />
Interface 32 bit <strong>PCI</strong>-E Interface<br />
Standards IEEE 802.11n, IEEE 802.11g, IEEE 802.11b<br />
Operating System Windows XP, Windows Vista, Windows 7<br />
Throughput <strong>300Mbps</strong> (Maximal)<br />
11b: 1/2/5.5/11Mbps<br />
Radio Data Rate<br />
11g: 6/9/12/18/24/36/48/54Mbps<br />
11n: Up to <strong>300Mbps</strong><br />
11b:CCK,QPSK,BPSK<br />
Modulation<br />
11g:OFDM<br />
11n: QPSK, BPSK, 16-QAM, 64-QAM<br />
Media Access Protocol CSMA/CA with ACK<br />
Data Security WPA/WPA2, WEP, TKIP/AES<br />
Frequency* 2.4 ~ 2.4835GHz<br />
Spread Spectrum Direct Sequence Spread Spectrum (DSSS)<br />
Safety & Emissions FCC, CE<br />
Environmental and Physical<br />
Working Temperature 0℃~40 ℃ (32℉<br />
~104℉)<br />
Working Humidity 10% ~ 90% RH, Non-condensing<br />
Storage Temperature -40 ℃ ~70 ℃ ( -40 ℉ ~158℉<br />
)<br />
Storage Humidity 5% ~ 90% RH, Non-condensing<br />
* Only 2.412GHz~2.462GHz is allowed to be used in USA, which means only channel 1~11 is<br />
available for American users to choose.<br />
32
Appendix B: Glossary<br />
<strong>TL</strong>-<strong>WN881ND</strong> <strong>300Mbps</strong> <strong>Wireless</strong> N <strong>PCI</strong> <strong>Express</strong> <strong>Adapter</strong> User Guide<br />
802.11b - The 802.11b standard specifies a wireless product networking at 11 Mbps using<br />
direct-sequence spread-spectrum (DSSS) technology and operating in the unlicensed radio<br />
spectrum at 2.4GHz, and WEP encryption for security. 802.11b networks are also referred to<br />
as Wi-Fi networks.<br />
802.11g - specification for wireless networking at 54 Mbps using direct-sequence<br />
spread-spectrum (DSSS) technology, using OFDM modulation and operating in the<br />
unlicensed radio spectrum at 2.4GHz, and backward compatibility with IEEE 802.11b devices,<br />
and WEP encryption for security.<br />
802.11n - 802.11n builds upon previous 802.11 standards by adding MIMO (multiple-input<br />
multiple-output). MIMO uses multiple transmitter and receiver antennas to allow for increased<br />
data throughput via spatial multiplexing and increased range by exploiting the spatial diversity,<br />
perhaps through coding schemes like Alamouti coding. The Enhanced <strong>Wireless</strong> Consortium<br />
(EWC) was formed to help accelerate the IEEE 802.11n development process and promote a<br />
technology specification for interoperability of next-generation wireless local area networking<br />
(WLAN) products.<br />
Ad hoc Network - An ad hoc network is a group of computers, each with a <strong>Wireless</strong> <strong>Adapter</strong>,<br />
connected as an independent 802.11 wireless LAN. Ad hoc wireless computers operate on a<br />
peer-to-peer basis, communicating directly with each other without the use of an access point.<br />
Ad hoc mode is also referred to as an Independent Basic Service Set (IBSS) or as<br />
peer-to-peer mode, and is useful at a departmental scale or SOHO operation.<br />
DSSS - (Direct-Sequence Spread Spectrum) - DSSS generates a redundant bit pattern for all<br />
data transmitted. This bit pattern is called a chip (or chipping code). Even if one or more bits<br />
in the chip are damaged during transmission, statistical techniques embedded in the receiver<br />
can recover the original data without the need of retransmission. To an unintended receiver,<br />
DSSS appears as low power wideband noise and is rejected (ignored) by most narrowband<br />
receivers. However, to an intended receiver (i.e. another wireless LAN endpoint), the DSSS<br />
signal is recognized as the only valid signal, and interference is inherently rejected (ignored).<br />
FHSS - (Frequency Hopping Spread Spectrum) - FHSS continuously changes (hops) the<br />
carrier frequency of a conventional carrier several times per second according to a<br />
pseudo-random set of channels. Because a fixed frequency is not used, and only the<br />
transmitter and receiver know the hop patterns, interception of FHSS is extremely difficult.<br />
Infrastructure Network - An infrastructure network is a group of computers or other devices,<br />
each with a <strong>Wireless</strong> <strong>Adapter</strong>, connected as an 802.11 wireless LAN. In infrastructure mode,<br />
the wireless devices communicate with each other and to a wired network by first going<br />
through an access point. An infrastructure wireless network connected to a wired network is<br />
referred to as a Basic Service Set (BSS). A set of two or more BSS in a single network is<br />
referred to as an Extended Service Set (ESS). Infrastructure mode is useful at a corporation<br />
scale, or when it is necessary to connect the wired and wireless networks.<br />
33
<strong>TL</strong>-<strong>WN881ND</strong> <strong>300Mbps</strong> <strong>Wireless</strong> N <strong>PCI</strong> <strong>Express</strong> <strong>Adapter</strong> User Guide<br />
Spread Spectrum - Spread Spectrum technology is a wideband radio frequency technique<br />
developed by the military for use in reliable, secure, mission-critical communications systems.<br />
It is designed to trade off bandwidth efficiency for reliability, integrity, and security. In other<br />
words, more bandwidth is consumed than in the case of narrowband transmission, but the<br />
trade off produces a signal that is, in effect, louder and thus easier to detect, provided that the<br />
receiver knows the parameters of the spread-spectrum signal being broadcast. If a receiver is<br />
not tuned to the right frequency, a spread-spectrum signal looks like background noise.<br />
There are two main alternatives, Direct Sequence Spread Spectrum (DSSS) and Frequency<br />
Hopping Spread Spectrum (FHSS).<br />
SSID - A Service Set Identification is a thirty-two character (maximum) alphanumeric key<br />
identifying a wireless local area network. For the wireless devices in a network to<br />
communicate with each other, all devices must be configured with the same SSID. This is<br />
typically the configuration parameter for a wireless PC card. It corresponds to the ESSID in<br />
the wireless Access Point and to the wireless network name. See also <strong>Wireless</strong> Network<br />
Name and ESSID.<br />
WEP - (Wired Equivalent Privacy) - A data privacy mechanism based on a 64-bit or 128-bit or<br />
152-bit shared key algorithm, as described in the IEEE 802.11 standard. To gain access to a<br />
WEP network, you must know the key. The key is a string of characters that you create.<br />
When using WEP, you must determine the level of encryption. The type of encryption<br />
determines the key length. 128-bit encryption requires a longer key than 64-bit encryption.<br />
Keys are defined by entering in a string in HEX (hexadecimal - using characters 0-9, A-F) or<br />
ASCII (American Standard Code for Information Interchange – alphanumeric characters)<br />
format. ASCII format is provided so you can enter a string that is easier to remember. The<br />
ASCII string is converted to HEX for use over the network. Four keys can be defined so that<br />
you can change keys easily.<br />
Wi-Fi - A trade name for the 802.11b wireless networking standard, given by the <strong>Wireless</strong><br />
Ethernet Compatibility Alliance (WECA, see http://www.wi-fi.net), an industry standards<br />
group promoting interoperability among 802.11b devices.<br />
WLAN - (<strong>Wireless</strong> Local Area Network) - A group of computers and associated devices<br />
communicate with each other wirelessly, which network serving users are limited in a local<br />
area.<br />
WPA - (Wi-Fi Protected Access) - A wireless security protocol uses TKIP (Temporal Key<br />
Integrity Protocol) encryption, which can be used in conjunction with a RADIUS server.<br />
34