AQ 6688 Stereo Radio Cassette Player - Philips
AQ 6688 Stereo Radio Cassette Player - Philips
AQ 6688 Stereo Radio Cassette Player - Philips

Create successful ePaper yourself
Turn your PDF publications into a flip-book with our unique Google optimized e-Paper software.
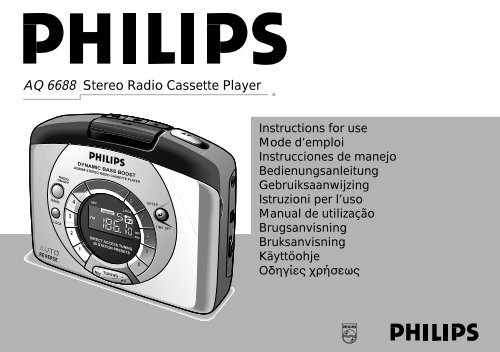
<strong>AQ</strong> <strong>6688</strong> <strong>Stereo</strong> <strong>Radio</strong> <strong>Cassette</strong> <strong>Player</strong><br />
BAND BAND<br />
RADIO RADIO<br />
ON•OFF<br />
LOCK LOCK<br />
REVERSE REVERSE<br />
ON•OFF<br />
3<br />
3<br />
4<br />
22<br />
DYNAMIC DYNAMIC BASS BASS BOOST BOOST<br />
<strong>AQ</strong><strong>6688</strong> STEREO RADIO CASSETTE PLAYER<br />
<strong>AQ</strong><strong>6688</strong> STEREO RADIO CASSETTE PLAYER<br />
5<br />
SEC SEC<br />
FM FM<br />
PRESET<br />
LOCK LOCK<br />
DIRECT DIRECT ACCESS ACCESS TUNING TUNING<br />
20 20 STATION STATION PRESETS PRESETS<br />
7<br />
MH. MH.<br />
kHz kHz<br />
10<br />
10<br />
– –<br />
MIN MIN<br />
6<br />
6<br />
+<br />
HR<br />
ENTER ENTER<br />
8<br />
9<br />
9<br />
TIME TIME SET SET<br />
VOLUME VOLUME<br />
DOL DOL<br />
Instructions for use<br />
Mode d’emploi<br />
Instrucciones de manejo<br />
Bedienungsanleitung<br />
Gebruiksaanwijzing<br />
Istruzioni per l’uso<br />
Manual de utilização<br />
Brugsanvisning<br />
Bruksanvisning<br />
Käyttöohje<br />
δηγίες ρήσεως
n Norge<br />
Typeskilt finnes på apparatens underside.<br />
Observer<br />
Nettbryteren er sekundert innkoplet. Den innebygde netdelen<br />
er derfor ikke frakoplet nettet så lenge apparatet er tilsluttet<br />
nettkontakten.<br />
i Italia<br />
DICHIARAZIONE DI CONFORMITA’<br />
Si dichiara che l’apparecchio <strong>AQ</strong> <strong>6688</strong> <strong>Philips</strong> risponde alle<br />
prescrizioni dell’art. 2 comma 1 del D. M. 28 Agosto 1995 n.<br />
548.<br />
Fatto a Eindhoven, il 09 -04 - 1998<br />
2<br />
<strong>Philips</strong> Sound & Vision<br />
<strong>Philips</strong>, Glaslaan 2, SFF 10<br />
5616 JB Eindhoven, The Netherlands<br />
INDEX<br />
English ................................................................... 4<br />
Français .............................................................. 11<br />
Español ............................................................... 18<br />
Deutsch .............................................................. 25<br />
Nederlands .................................................... 32<br />
Italiano ................................................................ 39<br />
Portugûes ....................................................... 46<br />
Dansk ..................................................................... 53<br />
Svenska ............................................................. 60<br />
Suomi ................................................................... 67<br />
Έλληνικά ....................................................... 74
3<br />
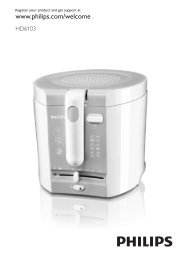
DC 3V ->+<br />
RESET<br />
RADIO ON-OFF<br />
LOCK<br />
display<br />
preset memory buttons<br />
TUNING<br />
ENTER<br />
FAST WIND 11 REWIND 22<br />
PLAY 1 2 STOP 9<br />
BAND BAND<br />
RADIO RADIO<br />
ON•OFF ON•OFF<br />
LOCK LOCK<br />
REVERSE REVERSE<br />
3<br />
3<br />
DYNAMIC DYNAMIC BASS BASS BOOST BOOST<br />
<strong>AQ</strong><strong>6688</strong> <strong>AQ</strong><strong>6688</strong> STEREO STEREO RADIO RADIO CASSETTE CASSETTE PLAYER PLAYER<br />
4<br />
22<br />
5<br />
SEC<br />
FM<br />
PRESET<br />
LOCK<br />
DIRECT ACCESS TUNING<br />
20 STATION PRESETS<br />
7<br />
MH.<br />
kHz<br />
10<br />
10<br />
–<br />
MIN<br />
+<br />
HR<br />
battery door<br />
6<br />
6<br />
ENTER ENTER<br />
8<br />
99<br />
TIME TIME SET SET<br />
direction 1 2<br />
VOLUME<br />
DOL<br />
p socket<br />
DBB<br />
VOLUME
English<br />
POWER SUPPLY<br />
Mains adapter<br />
The voltage of the 3V adapter must match with the local<br />
voltage. The 3.5 mm adapter plug’s 1.3 mm centre pin must<br />
also be connected to the minus pole -.<br />
• Connect the mains adapter to the set’s DC 3V socket.<br />
• Always disconnect the mains adapter if you are not using it.<br />
Battery (optional)<br />
• Open battery door and insert two alkaline batteries, type R6,<br />
UM3 or AA as indicated.Use of <strong>Philips</strong> POWER LIFE<br />
batteries gives up to 18 hours of cassette playback.<br />
• Remove the batteries from the set if they are exhausted or<br />
not to be used for a long time.<br />
When the batteries are running low, will flash<br />
briefly in the display and you should insert new batteries.<br />
If the radio is on, it will automatically switch off.<br />
It may be necessary to reprogramme your preset stations.<br />
4<br />
MEMORY PROTECTION<br />
The memory protection acts as a backup should there be a<br />
power failure or interruption.<br />
When changing batteries or power supply, the time setting,<br />
presets and the last station listened to are retained for<br />
approximately 2 minutes. This allows you to change batteries<br />
or power supply without having to set your stored data all over<br />
again.
GENERAL FEATURES SETTING THE CLOCK<br />
Reset button<br />
Should you receive external interference e.g. static electricity<br />
from carpets, thunderstorms, etc. which affects the display and<br />
electronic functions of your set, the reset button allows you to<br />
clear all data (e.g. tuning step, presets) from your set and to<br />
start up again.<br />
• Use a ball point pen to press the RESET button, found on<br />
the back of the cassette door.<br />
Locking<br />
This button helps you to prevent any of the other front panel<br />
controls from being accidentally pressed when you are<br />
listening to the radio or when you are not using the radio.<br />
1 Press the LOCK button<br />
appears in the display when LOCK is activated.<br />
2 To deactivate the LOCK function, press LOCK again.<br />
disappears from the display.<br />
CLOCK DISPLAY<br />
The time is displayed using either the 12 or 24-hour clock<br />
system. The seconds are synchronized with the flashing colon<br />
‘:’ second by second, and also by the 12-segment analogue<br />
clock display, where each segment represents 5 seconds.<br />
1 In the time mode, press ENTER.<br />
The clock digits will flash for 5 seconds.<br />
2 To set the hour/ minutes for the clock time, press HR or MIN<br />
while the display is still flashing.<br />
With your finger held down on HR , the hour will increase<br />
steadily as a number from 1-12 or 0-23. Release HR when<br />
you reach the approximate time setting.<br />
With your finger held down on MIN, the minutes will<br />
increase rapidly and continuously. Press briefly and<br />
repeatedly if you need to adjust the minutes slowly.<br />
3 Press the ENTER button a second time to confirm the time<br />
setting.<br />
The clock digits will stop flashing.<br />
5<br />
English
English<br />
SETTING THE CLOCK RADIO RECEPTION<br />
CHANGING THE TUNING STEPS AND 12/24-HR CLOCK<br />
In North and South America the frequency step between<br />
adjacent channels in the AM (MW) band is 10 KHz. In the<br />
rest of the world this step is 9 KHz. Usually the frequency step<br />
has been preset in the factory for your area.<br />
The tuning step on this set is also combined with the hour clock<br />
display where:<br />
10 KHz uses the 12-hr clock<br />
9 KHz uses the 24-hr clock<br />
All preset stations will be lost and need to be programmed<br />
again when you change the tuning step.<br />
1 In the radio mode, press and hold ENTER.<br />
The radio station frequency will disappear from the<br />
display.<br />
2 Without releasing ENTER, press and also hold down:<br />
• TUNING + (up) 5 seconds or more to select a tuning step of<br />
10 KHz and the 12-hr clock.<br />
The display shows ‘U’ briefly.<br />
• TUNING – (down) 5 seconds or more to select a tuning step<br />
of 9 KHz and the 24-hr clock.<br />
The display shows ‘E’ briefly.<br />
6<br />
1 Connect the headphones to the p socket.<br />
2 To switch on the radio and select your waveband:<br />
• press RADIO ON-OFF once for AM (MW)<br />
• press RADIO ON-OFF twice to select FM<br />
STEREO appears on the display when you are receiving a<br />
FM stereo transmission.<br />
3 Select your station by one of the following:<br />
by using the – TUNING + control (down or up);<br />
pressing one of the Preset memory buttons 0-9 for a preset<br />
station;<br />
Direct Access Tuning, by entering the known band<br />
frequency.<br />
4 Adjust the sound with VOLUME and DBB (Dynamic Bass<br />
Boost) controls.<br />
5 To turn off the radio, press RADIO ON-OFF once or until the<br />
display shows OFF and reverts to the clock mode.<br />
To improve reception:<br />
FM: The headphone cord functions as the FM-aerial. Extend it<br />
fully and position the cord.<br />
AM: Uses the built-in aerial. Turn the set to find the best<br />
position.
RADIO RECEPTION<br />
TUNING<br />
Direct Access tuning<br />
The frequency of the station you wish to tune to must be<br />
known. You can find these frequencies in station tables or<br />
radio guides.<br />
1 In the radio mode, press ENTER.<br />
The current frequency in the display disappears.<br />
2 Use the Preset memory buttons to enter the digits of your<br />
desired frequency within a 5 second period.<br />
3 Press ENTER again to confirm your radio station.<br />
The display shows the selected frequency or the nearest<br />
frequency.<br />
If you have made an incorrect entry, Err will appear in<br />
the display.<br />
Entry examples of bands and frequencies:<br />
e.g.i 98.1 MHz, FM: Press 9,8,1 and ENTER<br />
e.g.ii 603 KHz, AM (MW): Press 6,0,3 and ENTER<br />
Manual tuning<br />
• Press TUNING – or + briefly, once or as often as required<br />
until the right frequency is found. In this way, the frequency<br />
can be changed step by step.<br />
Automatic tuning<br />
1 Press and hold down the TUNING – or + control until the<br />
display frequency starts to run.<br />
2 When a station of sufficient strength has been found, tuning<br />
will stop, or you can stop the automatic tuning by pressing<br />
the TUNING – or + control again.<br />
3 Repeat until you have found the desired station.<br />
SELECTING & STORING FREQUENCIES: PRESETS<br />
You can store the frequencies of 20 radio stations in the<br />
memory, 10 on each waveband. A stored frequency is only<br />
erased from the memory by storing another frequency in its<br />
place, or if you reset your unit.<br />
1 Select the waveband and tune to your desired station.<br />
2 Select and press one of the Preset memory buttons 0-9 for<br />
more than two seconds to store your station.<br />
PRESET and your selected number will appear in the display.<br />
7<br />
English
English<br />
RADIO RECEPTION CASSETTE PLAYBACK<br />
Finding your Preset station<br />
1 Preset RADIO ON-OFF once or more to select the desired<br />
waveband.<br />
2 Press the preset number of your desired station.<br />
Erasing the Preset Memory by RESET<br />
Use a ball-point pen to press the RESET button.<br />
You will hear a click to indicate that all preset stations<br />
stored and the last station tuned to have been cleared.<br />
All settings must now be reprogrammed into the memory.<br />
8<br />
CASSETTE PLAYBACK<br />
1 Open the cassette door and insert a tape.<br />
2 Press the cassette door lightly to shut.<br />
3 Connect headphones to the p socket.<br />
4 To start playback, press 1 2<br />
The display shows tAPE and the analog clock<br />
segments throughout the tape mode<br />
5 Adjust the sound with the VOLUME and DBB controls.<br />
6 To fast wind, press 11, to rewind press 22. Press 9 to stop<br />
fast winding.<br />
7 To reverse the tape direction during playback, adjust the<br />
DIRECTION 1 2 control.<br />
8 To stop playback, press 9 and the set is switched off.<br />
The display shows OFF before reverting to the clock<br />
mode.<br />
AUTO REVERSE<br />
The tape direction will be automatically reversed each time the<br />
tape reaches the end. <strong>Cassette</strong> playback continues in this way<br />
unless you press 9 or until batteries are exhausted.
GENERAL INFORMATION<br />
Accessories (included)<br />
1 x AY 3660 stereo headphones, 1 x Belt clip<br />
Using the Belt Clip<br />
1 To attach the belt clip, position the shaped grip on the<br />
reverse so that it fits into the belt clip hole.<br />
2 Simultaneously, press and turn the clip to LOCK as indicated<br />
on the set.<br />
3 To detach, gently lift the belt clip and turn to RELEASE as<br />
indicated on the set.<br />
TAKE CARE WHEN USING HEADPHONES<br />
Hearing Safety:<br />
Listen at a moderate volume. Use at high volume can impair<br />
your hearing!<br />
Traffic Safety:<br />
Do not use headphones while driving or cycling as you may<br />
cause a traffic accident!<br />
MAINTENANCE<br />
• For quality playback, clean the magnetic head after every 50<br />
hours of operation or, on average once a month by playing<br />
through a cleaning tape.<br />
• Do not expose the set and cassettes to rain, moisture, sand,<br />
or to excessive heat e.g. heating equipment, cars parked in<br />
direct sunlight.<br />
ENVIRONMENTAL NOTE<br />
1 The packaging has been minimized so that it is easy to<br />
separate into two mono-materials: cardboard, and<br />
polyethylene. Please observe the local regulations regarding<br />
the disposal of these packaging materials.<br />
2 Please inquire about local regulations on how to hand in<br />
your old set for recycling.<br />
3 Batteries contain chemical substances, so they<br />
should be disposed of properly.<br />
9<br />
English
English<br />
TROUBLESHOOTING<br />
If a fault occurs, first check the points listed below before taking the set for repair. If you are unable to remedy a problem by<br />
following these hints, consult your dealer or service centre.<br />
WARNING: Under no circumstances should you try to repair the set yourself, as this will invalidate your<br />
guarantee.<br />
PROBLEM<br />
– POSSIBLE CAUSE<br />
• REMEDY<br />
Hum when using mains adapter<br />
– Adapter used is unsuitable<br />
• Use a <strong>Philips</strong> SBC6650 or other standard regulated 3V DC<br />
adapters<br />
Poor sound/ no sound<br />
– Headphones plug not fully inserted<br />
• Insert plug fully<br />
– Volume is turned down<br />
• Turn up volume<br />
– Tape head dirty<br />
• Clean tape head (see MAINTENANCE)<br />
10<br />
Severe radio hum/ distortion<br />
– FM aerial (headphones cord) not fully extended<br />
• Extend FM aerial fully<br />
– Set too close to TV, computer, etc.<br />
• Move set away from other electrical equipment<br />
– Batteries weak<br />
• Insert new batteries<br />
Front panel controls/ display does not function properly<br />
– Electrostatic discharge<br />
• Use a ball-point pen to press the RESET button and then<br />
reprogramme settings<br />
Auto reverse occurs before end of tape<br />
– High friction on tape<br />
• Try fast winding the tape once<br />
The model number is found at the bottom of the set and the production number in the battery compartment.<br />
This set complies with the radio interference requirements of the European Union.