DIGIGR8
DIGIGR8
DIGIGR8

Create successful ePaper yourself
Turn your PDF publications into a flip-book with our unique Google optimized e-Paper software.
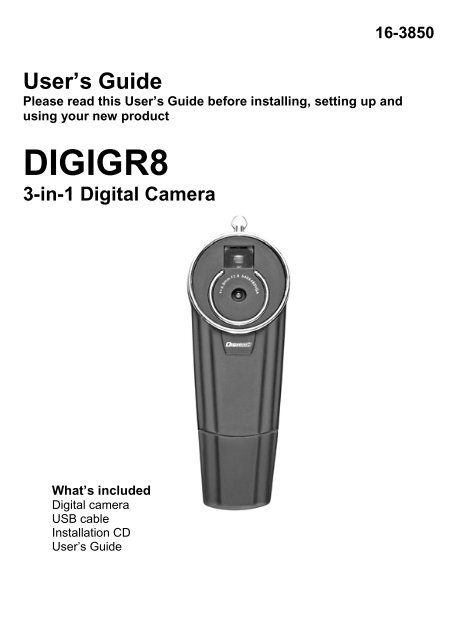
16-3850<br />
User’s Guide<br />
Please read this User’s Guide before installing, setting up and<br />
using your new product<br />
<strong>DIGIGR8</strong><br />
3-in-1 Digital Camera<br />
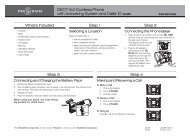
What’s included<br />
Digital camera<br />
USB cable<br />
Installation CD<br />
User’s Guide
Contents<br />
Introduction<br />
Introduction to the Camera…………………………………………….. 2<br />
Parts……………………………………………………………………… 2<br />
LCD Display information……………………………………………….. 3<br />
System requirements…………..……………………………………..... 3<br />
Getting Started<br />
Software Installation…………………………………………………..... 4<br />
Charging your camera…………..……………………………………... 5<br />
Power On/ Off…………..……………………………………………….. 5<br />
Taking Pictures and Video Clips<br />
Single Shot mode…………..……………………………………........... 6<br />
Self-Timer mode…………..…………………………………………….. 6<br />
Video Clip mode………..……..……………………………………........ 6<br />
Continuous Shot mode…..……..…………………………………........ 6<br />
Deleting Images<br />
Deleting All photos…………..…………………………………………... 7<br />
Deleting Last photo ………...…………..………………………………… 7<br />
Camera Settings<br />
Switching to VGA Format…………..……………………………………... 7<br />
Switching to QVGA Format…………..…………………………………... 7<br />
Switching to Compressed mode….……………………………………... 7<br />
Switching to Uncompressed mode…………..………………………….. 8<br />
Switching to 50/ 60Hz Frequency mode……..…………………………. 8<br />
Downloading Photos and Video………..…………………………………… 9<br />
Editing Photos with PhotoImpression 4.0………….……..…………….. 11<br />
Using VideoImpression 1.6…………..…………………………………….. 12<br />
PC Cam Mode……..………..……………………………………................... 13<br />
Video Conference…………..……………………………………................... 14<br />
Caring for your camera……………………………………………………… 15<br />
Specifications…………..……………………………………........................ 15<br />
The FCC wants you to know…………..………………………………….... 16<br />
1
Introduction<br />
Introduction to the Camera<br />
You can take photos and video clips and store them on the built in<br />
64Mb USB drive then download the files to your computer later with the<br />
supplied software. You can also use the camera as a webcam to hold<br />
video conferences via the Internet or chat face-to-face with your friends<br />
online.<br />
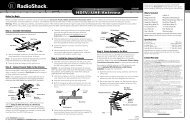
Parts<br />
A. Clasp<br />
B. Viewfinder<br />
C. Camera lens<br />
D. USB port<br />
E. Cover<br />
F. Mode button<br />
G. LCD display<br />
H. Shot button<br />
A<br />
B<br />
C<br />
D<br />
E<br />
2<br />
F<br />
G<br />
H
LCD Display information<br />
25*:Number of photos that can be taken<br />
(*varies according to image quality and compression)<br />
oF: Power off mode<br />
St: Self-timer mode<br />
d8: Video clip function<br />
CS: Continuous Shot (3 photos)<br />
CA: Clear All photos<br />
CL: Clear Last photo<br />
Lo: VGA format<br />
Hi: QVGA format<br />
Hd: High resolution (no compression)<br />
Ld: Low resolution (reduced file size)<br />
60: to select 50Hz (~220v Voltage)<br />
50: to select 60Hz (~110v Voltage)<br />
System requirements<br />
- Microsoft Windows 98SE/ 2000/ ME/ XP<br />
- 125MB or above free hard disk space, 32MB or more RAM<br />
- USB port 1.1 or higher<br />
- CD-ROM drive<br />
- VGA or SVGA color monitor<br />
Important!<br />
You MUST install the supplied driver and Arcsoft Imaging<br />
Software first, BEFORE you connect the camera to your<br />
computer. See the following software installation chapters.<br />
3
Getting Started<br />
Software Installation<br />
IMPORTANT!<br />
For Windows 98SE users: before you install the driver for your<br />
camera, you must run the installer DIRECTX 8.1b at<br />
E:\Win\DIRECTX8.1b REDISTPACKAGE.EXE (where "E:" is your CD<br />
drive).<br />
1. Insert the CD-ROM. The installation should start automatically. If it<br />
doesn't start, select Start and Run and type "E:\autorun.exe" (where<br />
"E:" is your CD drive).<br />
2. Click Install DC Driver.<br />
3. The wizard will guide you through the installation process.<br />
4. Repeat installation procedure for the ArcSoft Imaging Software including<br />
PhotoImpression 4.0 and VideoImpression 1.6.<br />
5. To uninstall, select Start Control Panel Add/Remove Programs.<br />
You have to uninstall DC Driver, PhotoImpression and<br />
VideoImpression separately.<br />
4
Charging your camera<br />
1. Turn on your PC.<br />
2. Remove the camera’s USB cover and connect it directly to the USB port<br />
on your PC. If necessary, use the USB cable to connect the camera to<br />
your PC.<br />
3. Charge time is approximately four hours.<br />
4. Disconnect from the PC, and replace the USB cover.<br />
Notes<br />
• To prolong battery life, connect and charge your camera for no more than<br />
12 hours and disconnect the camera from your PC when fully charged or<br />
not in use.<br />
• You can use the camera without waiting for the battery to charge when it<br />
is connected directly to the computer.<br />
Power On/ Off<br />
1. To turn on the camera, press MODE once. 00 or the number of photos<br />
taken appear on the LCD.<br />
2. To turn off the camera, press MODE once or more until oF appears, then<br />
press SHOT within 5 seconds.<br />
• The camera also automatically powers off in 30 seconds if idle.<br />
Note:<br />
• The camera cannot be turned off when it is connected to the computer<br />
via the USB cable.<br />
5
Taking Pictures and Video Clips<br />
Single Shot mode<br />
1. To take a photo, use the viewfinder to frame your subject.<br />
2. Keep your hand steady and press SHOT. A single beep indicates your<br />
photo is successfully saved.<br />
3. When the camera memory is full, FL displays briefly and a double beep<br />
will sound if you press SHOT.<br />
Self-Timer mode<br />
1. Press MODE repeatedly until St appears.<br />
2. Within 5 seconds, press SHOT to start the 10 second self-timer.<br />
• The camera will beep at 1-second intervals during the countdown, and<br />
end with a long beep when a photo is taken.<br />
Video Clip mode<br />
1. Press MODE repeatedly until d8 appears.<br />
2. Press and hold SHOT to start the video clip function.<br />
• The video function stops when you release SHOT or when the memory is<br />
full.<br />
Continuous Shot Mode<br />
1. Press MODE repeatedly until CS appears.<br />
2. Press SHOT to take 3 photos in succession.<br />
Notes:<br />
• Photos and videos cannot be taken in low light environments and a<br />
double beep will sound if you press SHOT.<br />
• The number of photos and video clip length varies according to image<br />
quality and compression (See the chapters on Switching formats and<br />
Compression modes).<br />
• The LCD is limited to showing 99 as the highest number of photos taken,<br />
irrespective of maximum storage capacity (179).<br />
6
Deleting Images<br />
Whenever the camera memory is full, you can clear the memory in one of 2<br />
ways directly on your camera.<br />
IMPORTANT!<br />
Make sure you download and save all your images first, if you wish to view<br />
and keep them. (See Downloading Photos and Video chapter).<br />
Deleting All photos<br />
1. Press MODE repeatedly until CA appears, then press SHOT once.<br />
2. CA flashes in the display, press SHOT again to confirm deletion of all<br />
images on your camera.<br />
Deleting Last photo<br />
1. Press MODE repeatedly until CL appears, and then press SHOT once.<br />
2. CL flashes in the display, press SHOT again to confirm deletion. The<br />
photo capacity will then increase by one.<br />
Camera Settings<br />
Switching to VGA Format<br />
In general, this format produces larger images with a higher resolution.<br />
• Press MODE repeatedly until HI appears, and then press SHOT to<br />
confirm. The LCD shows Lo, when you next toggle through the functions<br />
using the MODE button.<br />
Switching to QVGA Format<br />
In general, this format produces smaller images with a lower resolution.<br />
• Press MODE repeatedly until Lo appears, and then press SHOT to<br />
confirm. The LCD shows HI, when you next toggle through the functions<br />
using the MODE button.<br />
Switching to Compressed Mode<br />
• Press MODE repeatedly until Hd appears, and then press SHOT to<br />
change.<br />
7
• The LCD displays Ld and your camera is now in the compressed mode.<br />
You can now take up to 76 photos in VGA format, or up to 179 in QVGA<br />
format.<br />
Switching to Uncompressed Mode<br />
• Press MODE repeatedly until Ld appears, and then press SHOT to<br />
change.<br />
• The LCD displays Hd and your camera is now in the uncompressed<br />
mode. You can take 25 in VGA format, or up to 100 photos in QVGA<br />
format.<br />
Switching 50/ 60Hz Frequency Mode<br />
When taking photos in a room with fluorescent lighting, you can change the<br />
frequency mode to match with the AC power voltage of your country or<br />
region. For areas operating AC voltage on 220V use 50Hz, and where the<br />
AC is 110V use 60Hz.<br />
• To select 50Hz, press MODE repeatedly until 50 appears, and then<br />
press SHOT to confirm.<br />
• To select 60Hz, press MODE repeatedly until 60 appears, and then<br />
press SHOT to confirm.<br />
Note:<br />
• The 50Hz/60Hz frequency of AC power supply varies for different<br />
countries:<br />
50Hz: Europe, Africa, Australia and China<br />
60Hz: United States, Canada and Mexico.<br />
• The camera frequency setting is optional, and the effects negligible if you<br />
choose not to change it.<br />
8
Downloading Photos and Videos<br />
1. After verifying that the appropriate software has been installed, connect<br />
the USB cable to your camera and the other end of the USB cable to<br />
your computer.<br />
2. On your computer, select Start Programs PhotoImpression 4.0.<br />
3. Click the Get Photo button and select Camera /Scanner.<br />
4. In the Select Source menu, choose DualCamera.<br />
5. Click the Acquire button, and the My DSC interface will pop<br />
up.<br />
9
6. Click the Download photos button to download photos and videos.<br />
7. To select all pictures and videos which appear, click on the Select all on<br />
this page button .You can also click on only the photos and videos<br />
you want. Selected items are framed in red.<br />
8. Click the Save button, to save. The Save As dialogue box appears.<br />
Note: Before saving videos, you can change the AVI frame rate.<br />
10
Editing photos with PhotoImpression 4.0<br />
PhotoImpression is a full-featured and easy to use program, adding fun and<br />
creativity to photo editing.<br />
1. On your computer, select under Windows Start Program <br />
PhotoImpression 4.0.<br />
2. Click Get Photo and select From Folder. Double-click the thumbnail of<br />
the photo to be edited.<br />
3. Click the Edit button to edit the photo.<br />
4. To learn more about the editing tools, click the Help icon ? in the top right<br />
corner.<br />
11
Using VideoImpression 1.6<br />
With VideoImpression, you can edit and combine your video clips and<br />
photos quickly and easily, and share with friends and family.<br />
1. On your computer, select under Windows Start Program <br />
Videoimpression1.6.<br />
2. Click the new button and get button to open the videos<br />
and photos to be edited.<br />
3. Drag and drop the videos and images together in the desired order in the<br />
storyboard.<br />
4. Click the play movie button . The movie screen appears. Click on<br />
the play button to view your video.<br />
5. To learn more about the editing tools, click<br />
the Help icon ? in the top right<br />
corner.<br />
12
PC Cam Mode<br />
You can adjust various settings for your camera in the PC camera mode to<br />
capture<br />
still or live pictures.<br />
IMPORTANT!<br />
To<br />
avoid losing photos stored on the camera download them first<br />
before using the PC<br />
camera mode.<br />
1. Connect the camera to your computer. If necessary,<br />
use the supplied<br />
USB cable.<br />
2. On your computer, select under Windows Start Program <br />
PhotoImpression<br />
4.0.<br />
3. Click the Camera/ Scanner button. From Select Source, select<br />
DualCamera.<br />
4. Click<br />
on the Video Camera icon. The Capture Image from Video<br />
Camera dialog box appears. Verify that DualCamera is selected in the<br />
Drivers field.<br />
13
5. Adjust PC camera properties with<br />
the Capture Image from Video<br />
Camera buttons:<br />
• Source - adjusts Brightness, Contrast, Saturation,<br />
Sharpness and<br />
White balance.<br />
• Format - adjusts Video Frame Rate, Output size<br />
and<br />
compression.<br />
• Live - Real-time video mode.<br />
• Capture - capture a still picture from live video, and save<br />
to the<br />
Album.<br />
• Done - closes the dialog box.<br />
Video Conference<br />
You can hold a video conference<br />
or video chat with friends over the internet,<br />
with conference software<br />
(not supplied)<br />
and your camera in the PC camera<br />
function.<br />
1. Connect the digital camera to your computer. If necessary, use the<br />
supplied USB cable.<br />
2. Open video conference software such as Microsoft’s NetMeeting, MSN<br />
or Messenger and follow the onscreen instructions.<br />
14
Caring for your camera<br />
• To ensure stable performance, do not get your camera wet, store in<br />
humid environments, expose to direct sunlight, or use by heating<br />
equipment.<br />
• Avoid touching the lens or viewfinder. To remove fingerprints, use a soft,<br />
moist cloth.<br />
• Do not use chemicals such as alcohol, ammonia or benzene to clean<br />
your camera.<br />
Specifications<br />
Image sensor: CMOS sensor 300K pixels<br />
Memory size: Built-in 4x 16Mb (SDRAM)<br />
Modes video clip (no sound)/ single shot/<br />
PC camera<br />
Image resolution: 640 x 480 pixels (VGA)<br />
320 x 240 pixels (QVGA)<br />
Memory capacity (Uncompressed Mode): 25 photos (VGA) or<br />
100 photos (QVGA)<br />
Memory capacity (Compressed Mode): 76 photos (VGA) or<br />
179 photos (QVGA)<br />
LCD: monochrome, two digit<br />
Viewfinder: Built-in<br />
Lens: fixed, f=6.0mm<br />
Focus: 30cm - infinity (normal)<br />
Aperture: F2.8<br />
Self-timer delay: 10 second<br />
Shutter speed: 1/6 second –1/15000 second<br />
Exposure mode: Automatic<br />
White balance: Automatic<br />
Built-in battery: lithium polymer rechargeable battery<br />
(via USB)<br />
Power Save mode: Automatic power off in 30 seconds if idle<br />
Interface: USB 1.1<br />
Dimensions: 85mm (L) x 31mm (W) x 18mm (D)<br />
Weight: 30g<br />
15
The FCC wants you to know<br />
This equipment has been tested and found to comply with the limits for a Class<br />
B digital device, pursuant to Part 15 of the FCC Rules. These limits are<br />
designed to provide reasonable protection against harmful interference in a<br />
residential installation. This equipment generates, uses, and can radiate radio<br />
frequency energy and, if not installed and used in accordance with the<br />
instructions, may cause harmful interference to radio communications.<br />
However, there is no guarantee that interference will not occur in a particular<br />
installation. If this equipment does cause harmful interference to radio or<br />
television reception, which can be determined by turning the equipment off<br />
and on, the user is encouraged to try to correct the interference by one or<br />
more of the following measures:<br />
• Reorient or relocate the receiving antenna.<br />
• increase the separation between the equipment and receiver.<br />
• Connect the equipment into an outlet on a circuit different from that to<br />
which the receiver is connected.<br />
• Consult your local RadioShack dealer or an experienced radio/TV technician<br />
for help. If you cannot eliminate the interference, the FCC requires that you<br />
stop using your phone.<br />
WARNING:<br />
Changes or modifications not expressly approved by RadioShack may cause<br />
interference and void the user’s authority to operate the equipment.<br />
This device complies with Part 15 of the FCC Rules. Operation is subject to the<br />
following two conditions:<br />
(1) this device may not cause harmful interference, and<br />
(2) this device must accept any interference received, including interference<br />
that may cause undesired operation.<br />
Product 3-in-1 Digital Camera<br />
Model 16-3850<br />
Responsible RadioShack Corporation,<br />
Party 300 RadioShack Circle Fort Worth, TX 76102<br />
Phone 817-415-3200<br />
This Class B digital apparatus complies with Canadian ICES-003.<br />
Cet appareil numerique de la classe B est conformé à la norme NMB-003 du<br />
Canada.<br />
16
Limited 90-Day Warranty<br />
This product is warranted by RadioShack against manufacturing defects in<br />
material and workmanship under normal use for 90 (ninety) days from the date<br />
of purchase from RadioShack company-owned stores and authorized<br />
RadioShack franchisees and dealers. For complete warranty details and<br />
exclusions, check with your local RadioShack store.<br />
RadioShack Customer Relations<br />
300 RadioShack Circle, Fort Worth, TX 76102<br />
16-3850<br />
© 2005. RadioShack Corporation. 11A05<br />
All Rights Reserved. Published in China