User Manual for the NETGEAR 54 Mbps Wireless PC Card WG511v2
User Manual for the NETGEAR 54 Mbps Wireless PC Card WG511v2
User Manual for the NETGEAR 54 Mbps Wireless PC Card WG511v2
- No tags were found...

Create successful ePaper yourself
Turn your PDF publications into a flip-book with our unique Google optimized e-Paper software.
Technical SupportPlease refer to <strong>the</strong> support in<strong>for</strong>mation card that shipped with your product. By registering yourproduct at www.netgear.com/register, we can provide you with faster expert technical support andtimely notices of product and software upgrades.<strong>NETGEAR</strong>, INC. Support In<strong>for</strong>mationPhone: 1-888-<strong>NETGEAR</strong>, <strong>for</strong> US & Canada only. For o<strong>the</strong>r countries, see your Supportin<strong>for</strong>mation card.E-mail: support@netgear.comWeb site: www.netgear.comStatement of ConditionsIn <strong>the</strong> interest of improving internal design, operational function, and/or reliability, <strong>NETGEAR</strong> reserves <strong>the</strong> right tomake changes to <strong>the</strong> products described in this document without notice.<strong>NETGEAR</strong> does not assume any liability that may occur due to <strong>the</strong> use or application of <strong>the</strong> product(s) or circuitlayout(s) described herein.©2004 <strong>NETGEAR</strong>, Inc. <strong>NETGEAR</strong>, <strong>the</strong> <strong>NETGEAR</strong> logo, The Gear Guy and Everybody's Connecting aretrademarks or registered trademarks of <strong>NETGEAR</strong>, Inc. in <strong>the</strong> United States and/or o<strong>the</strong>r countries.Microsoft and Windows are registered trademarks of Microsoft Corporation in <strong>the</strong> United States and/oro<strong>the</strong>r countries. O<strong>the</strong>r brand and product names are trademarks or registered trademarks of <strong>the</strong>ir respectiveholders. In<strong>for</strong>mation is subject to change without notice. All rights reserved.September 2004Certificate of <strong>the</strong> Manufacturer/ImporterIt is hereby certified that <strong>the</strong> Model <strong>WG511v2</strong> <strong>Wireless</strong> <strong>PC</strong> <strong>Card</strong> has been suppressed in accordance with <strong>the</strong> conditionsset out in <strong>the</strong> BMPT- AmtsblVfg 243/1991 and Vfg 46/1992. The operation of some equipment (<strong>for</strong> example, testtransmitters) in accordance with <strong>the</strong> regulations may, however, be subject to certain restrictions. Please refer to <strong>the</strong> notesii
in <strong>the</strong> operating instructions.Federal Office <strong>for</strong> Telecommunications Approvals has been notified of <strong>the</strong> placing of this equipment on <strong>the</strong> market andhas been granted <strong>the</strong> right to test <strong>the</strong> series <strong>for</strong> compliance with <strong>the</strong> regulations.Federal Communications Commission (FCC) Compliance Notice: Radio Frequency Notice<strong>NETGEAR</strong> <strong>54</strong> <strong>Mbps</strong> <strong>Wireless</strong> <strong>PC</strong> <strong>Card</strong> <strong>WG511v2</strong>Tested to Complywith FCC StandardsFOR HOME OR OFFICE USEWarning!To comply with <strong>the</strong> FCC’s of exposure requirementsyou must maintain a distance of at least 1 cm from<strong>the</strong> antenna of this device while it is in use. Thisdevice should not be co-located with o<strong>the</strong>rtransmitters.This device complies with part 15 of <strong>the</strong> FCC Rules. Operation is subject to <strong>the</strong> following two conditions:1. This device may not cause harmful interference.2. This device must accept any interference received, including interference that may cause undesired operation.Note: This equipment has been tested and found to comply with <strong>the</strong> limits <strong>for</strong> a Class B digital device, pursuant to part15 of <strong>the</strong> FCC Rules. These limits are designed to provide reasonable protection against harmful interference in aresidential installation. This equipment generates, uses, and can radiate radio frequency energy and, if not installed andused in accordance with <strong>the</strong> instructions, may cause harmful interference to radio communications. However, <strong>the</strong>re is noguarantee that interference will not occur in a particular installation. If this equipment does cause harmful interference toradio or television reception, which can be determined by turning <strong>the</strong> equipment off and on, <strong>the</strong> user is encouraged to tryto correct <strong>the</strong> interference by one of more of <strong>the</strong> following measures: (1) Reorient or relocate <strong>the</strong> receiving antenna, (2)Increase <strong>the</strong> separation between <strong>the</strong> equipment and receiver, (3) Connect <strong>the</strong> equipment into an outlet on a circuitdifferent from that to which <strong>the</strong> receiver is connected, (4) Consult <strong>the</strong> dealer or an experienced radio/TV technician <strong>for</strong>help.Federal Communications Commission (FCC) Radiation Exposure StatementThis equipment complies with FCC radiation exposure limits set <strong>for</strong>th <strong>for</strong> an uncontrolled environment. In order to avoid<strong>the</strong> possibility of exceeding <strong>the</strong> FCC radio frequency exposure limits, human proximity to <strong>the</strong> antenna shall not be lessthan 20 cm (8 inches) during normal operation.Canadian Department of Communications Radio InterferenceRegulationsThis digital apparatus (<strong>NETGEAR</strong> <strong>54</strong> <strong>Mbps</strong> <strong>Wireless</strong> <strong>PC</strong> <strong>Card</strong> <strong>WG511v2</strong>) does not exceed <strong>the</strong> Class B limits <strong>for</strong>radio-noise emissions from digital apparatus as set out in <strong>the</strong> Radio Interference Regulations of <strong>the</strong> CanadianDepartment of Communications.FCC: PY3WG511V2H1Canada ID: 40<strong>54</strong>A-WG511V21CE0470!iii
ContentsChapter 1IntroductionAbout <strong>the</strong> <strong>NETGEAR</strong> <strong>54</strong> <strong>Mbps</strong> <strong>Wireless</strong> <strong>PC</strong> <strong>Card</strong> <strong>WG511v2</strong> .........................................1-1Key Features and Related <strong>NETGEAR</strong> Products ............................................................1-1What’s in <strong>the</strong> Box? ..........................................................................................................1-2A Road Map <strong>for</strong> ‘How to Get There From Here’ .............................................................1-3Chapter 2Basic SetupWhat You Need Be<strong>for</strong>e You Begin ..................................................................................2-1Verifying System Requirements ...............................................................................2-1Observing Location and Range Guidelines ..............................................................2-2Two Basic Operating Modes ...........................................................................................2-2<strong>WG511v2</strong> Default <strong>Wireless</strong> Configuration Settings ........................................................2-3Basic Installation Instructions .........................................................................................2-4For Windows XP <strong>User</strong>s Installing a <strong>WG511v2</strong> .........................................................2-4For Windows 2000 & 98SE/Me <strong>User</strong>s Installing a <strong>WG511v2</strong> ...................................2-8<strong>WG511v2</strong> <strong>Wireless</strong> Connection Indicators ...................................................................2-12Interpreting <strong>the</strong> LEDs on <strong>the</strong> <strong>WG511v2</strong> .................................................................2-12Interpreting System Tray Icon Colors .....................................................................2-13Chapter 3ConfigurationUnderstanding <strong>the</strong> Configuration Options ......................................................................3-1Using Configuration Profiles ...........................................................................................3-1Connecting to an Access Point in Infrastructure Mode ............................................3-2How to Configure an Infrastructure Mode Profile .....................................................3-3Connecting to Ano<strong>the</strong>r <strong>PC</strong> in Ad Hoc Mode ...................................................................3-4How to Configure an Ad Hoc Mode Profile ..............................................................3-5How to Start a Computer-to-Computer (Ad Hoc) Network .......................................3-7Enabling <strong>Wireless</strong> Security Features ..............................................................................3-8Identifying <strong>the</strong> <strong>Wireless</strong> Network Name (SSID) and WEP Security Settings ...........3-8How to Configure WEP Encryption Security ............................................................3-9Contentsv
How to Configure WPA-PSK Encryption Security .................................................. 3-11Networks Page .............................................................................................................3-12Statistics Page ..............................................................................................................3-13About Page ...................................................................................................................3-14Chapter 4TroubleshootingBasic Troubleshooting Tips ......................................................................................4-1Frequently Asked Questions ..........................................................................................4-2The <strong>WG511v2</strong> Smart Configuration Utility keeps asking me to save my settings ....4-2Ad Hoc mode is not working correctly ......................................................................4-2How to know if <strong>the</strong> <strong>WG511v2</strong> card has received a valid IP address from <strong>the</strong> <strong>Wireless</strong>Router/AP .................................................................................................................4-3How to use XP’s own <strong>Wireless</strong> configuration utility that comes with Windows XP ..4-3How to remove <strong>the</strong> <strong>WG511v2</strong> utility and software ...................................................4-3I cannot connect to <strong>the</strong> AP that I want from <strong>the</strong> Networks browser list. ...................4-3The <strong>WG511v2</strong> is not getting an IP address ..............................................................4-4Why do I see two <strong>WG511v2</strong> utilities icons in <strong>the</strong> System Tray? ...............................4-4XP Professional and XP Home occasional connection problems ............................4-4Appendix ATechnical SpecificationsAppendix B<strong>Wireless</strong> Networking Basics<strong>Wireless</strong> Networking Overview ...................................................................................... B-1Infrastructure Mode ................................................................................................. B-1Ad Hoc Mode (Peer-to-Peer Workgroup) ................................................................ B-2Network Name: Extended Service Set Identification (ESSID) ................................ B-2Au<strong>the</strong>ntication and WEP ................................................................................................ B-2802.11 Au<strong>the</strong>ntication .............................................................................................. B-3Open System Au<strong>the</strong>ntication ................................................................................... B-3Shared Key Au<strong>the</strong>ntication ...................................................................................... B-4Overview of WEP Parameters ................................................................................ B-5Key Size .................................................................................................................. B-6WEP Configuration Options .................................................................................... B-6<strong>Wireless</strong> Channels ......................................................................................................... B-7WPA <strong>Wireless</strong> Security .................................................................................................. B-8How Does WPA Compare to WEP? ........................................................................ B-9viContents
How Does WPA Compare to IEEE 802.11i? ........................................................ B-10What are <strong>the</strong> Key Features of WPA Security? ...................................................... B-10WPA Au<strong>the</strong>ntication: Enterprise-level <strong>User</strong>Au<strong>the</strong>ntication via 802.1x/EAP and RADIUS .................................................. B-12WPA Data Encryption Key Management ........................................................ B-14Is WPA Perfect? .................................................................................................... B-16Product Support <strong>for</strong> WPA ...................................................................................... B-16Supporting a Mixture of WPA and WEP <strong>Wireless</strong> Clients is Discouraged ...... B-16Changes to <strong>Wireless</strong> Access Points ............................................................... B-17Changes to <strong>Wireless</strong> Network Adapters ......................................................... B-17Changes to <strong>Wireless</strong> Client Programs ............................................................ B-18Appendix CPreparing Your <strong>PC</strong>s <strong>for</strong> Network AccessPreparing Your Computers <strong>for</strong> TCP/IP Networking ....................................................... C-1Configuring Windows 98 and Me <strong>for</strong> TCP/IP Networking .............................................. C-1Install or Verify Windows Networking Components ................................................. C-1Enabling DHCP to Automatically Configure TCP/IP Settings in Windows 98 and Me C-3Selecting Windows’ Internet Access Method .......................................................... C-5Verifying TCP/IP Properties .................................................................................... C-5Configuring Windows 2000 or XP <strong>for</strong> TCP/IP Networking ............................................. C-6Install or Verify Windows Networking Components ................................................. C-6DHCP Configuration of TCP/IP in Windows XP or 2000 ......................................... C-7DHCP Configuration of TCP/IP in Windows XP ..................................................... C-7DHCP Configuration of TCP/IP in Windows 2000 .................................................. C-9Verifying TCP/IP Properties <strong>for</strong> Windows XP or 2000 ........................................... C-11GlossaryList of Glossary Terms ................................................................................................... D-1IndexContentsvii
viiiContents
<strong>User</strong> <strong>Manual</strong> <strong>for</strong> <strong>the</strong> <strong>NETGEAR</strong> <strong>54</strong> <strong>Mbps</strong> <strong>Wireless</strong> <strong>PC</strong> <strong>Card</strong> <strong>WG511v2</strong>Chapter 1IntroductionThis chapter introduces <strong>the</strong> features, package contents, and appearance of <strong>the</strong> <strong>NETGEAR</strong> <strong>54</strong> <strong>Mbps</strong><strong>Wireless</strong> <strong>PC</strong> <strong>Card</strong> <strong>WG511v2</strong>.About <strong>the</strong> <strong>NETGEAR</strong> <strong>54</strong> <strong>Mbps</strong> <strong>Wireless</strong> <strong>PC</strong> <strong>Card</strong> <strong>WG511v2</strong>The <strong>NETGEAR</strong> <strong>54</strong> <strong>Mbps</strong> <strong>Wireless</strong> <strong>PC</strong> <strong>Card</strong> <strong>WG511v2</strong> gives you ultimate mobility in your officeor while you are traveling. It frees you from traditional E<strong>the</strong>rnet wiring and helps you create awireless network <strong>for</strong> sharing your broadband cable or DSL Internet access among multiple <strong>PC</strong>s inand around your home. It is designed <strong>for</strong> notebook computers running Microsoft ® Windows ® . It isboth 16-bit <strong>PC</strong>MCIA and 32-bit <strong>Card</strong>Bus compatible and works in any available <strong>PC</strong>MCIA or<strong>Card</strong>Bus slot.Its auto-sensing capability allows high packet transfer at up to <strong>54</strong> <strong>Mbps</strong> <strong>for</strong> maximum throughputor dynamic range shifting to lower speeds due to distance or operating limitations in anenvironment with a lot of electromagnetic interference.The <strong>WG511v2</strong> <strong>Wireless</strong> <strong>PC</strong> <strong>Card</strong> provides reliable, standards-based 802.11b 11 <strong>Mbps</strong> WLANconnectivity that is protected with industry-standard security. In addition, it offers <strong>the</strong> faster speedsof <strong>the</strong> 802.11g standard. It works with Windows 98SE, Me, 2000 Professional, and XP operatingsystems.Key Features and Related <strong>NETGEAR</strong> ProductsThe <strong>WG511v2</strong> <strong>Wireless</strong> <strong>PC</strong> <strong>Card</strong> provides <strong>the</strong> following features:• Reliable IEEE 802.11g and b standards-based wireless technology.• Supports roaming between access points when configured in Infrastructure mode.• <strong>54</strong> <strong>Mbps</strong> high speed data transfer. <strong>Wireless</strong> nodes negotiate to operate in <strong>the</strong> optimal datatransfer rate. In a noisy environment or when <strong>the</strong> distance between <strong>the</strong> wireless nodes is far,<strong>the</strong> wireless nodes automatically fall back to operate at lower transfer rates.Introduction 1-1
<strong>User</strong> <strong>Manual</strong> <strong>for</strong> <strong>the</strong> <strong>NETGEAR</strong> <strong>54</strong> <strong>Mbps</strong> <strong>Wireless</strong> <strong>PC</strong> <strong>Card</strong> <strong>WG511v2</strong>• High level of data encryption using128-bit Shared Key WEP data encryption method. A lowerlevel of data encryption or no data encryption is available to simplify your network setup or toimprove data transfer rate.• WPA PSK (Wi-Fi Protected Access Pre-Shared Key) support.The following <strong>NETGEAR</strong> products can be configured to communicate with <strong>the</strong> <strong>WG511v2</strong><strong>Wireless</strong> <strong>PC</strong> <strong>Card</strong>:• WGT614 <strong>54</strong> <strong>Mbps</strong> <strong>Wireless</strong> Firewall Router• WGT624 108 <strong>Mbps</strong> <strong>Wireless</strong> Firewall Router• WG602 <strong>54</strong> <strong>Mbps</strong> <strong>Wireless</strong> Access Point• WAB102 Dual Band Access Point• WAB501 Dual Band <strong>PC</strong> <strong>Card</strong>• MA101 802.11b <strong>Wireless</strong> USB Adapter• ME102 802.11b <strong>Wireless</strong> Access Point• MA311 802.11b <strong>Wireless</strong> <strong>PC</strong>I Adapter• MR314 and MR814 802.11b <strong>Wireless</strong> Cable/DSL Routers• MA701 802.11b <strong>Wireless</strong> Compact Flash <strong>Card</strong>What’s in <strong>the</strong> Box?The product package should contain <strong>the</strong> following items:• <strong>NETGEAR</strong> <strong>54</strong> <strong>Mbps</strong> <strong>Wireless</strong> <strong>PC</strong> <strong>Card</strong> <strong>WG511v2</strong>• Installation Guide <strong>for</strong> <strong>the</strong> <strong>NETGEAR</strong> <strong>54</strong> <strong>Mbps</strong> <strong>Wireless</strong> <strong>PC</strong> <strong>Card</strong> <strong>WG511v2</strong>• <strong>NETGEAR</strong> <strong>54</strong> <strong>Mbps</strong> <strong>Wireless</strong> <strong>PC</strong> <strong>Card</strong> <strong>WG511v2</strong> Resource CD, including:— Driver and Configuration Utility Software— <strong>User</strong> <strong>Manual</strong> <strong>for</strong> <strong>the</strong> <strong>NETGEAR</strong> <strong>54</strong> <strong>Mbps</strong> <strong>Wireless</strong> <strong>PC</strong> <strong>Card</strong> <strong>WG511v2</strong>• Warranty card• Support in<strong>for</strong>mation cardIf any of <strong>the</strong> parts are incorrect, missing, or damaged, contact your <strong>NETGEAR</strong> dealer. Keep <strong>the</strong>carton, including <strong>the</strong> original packing materials, in case you need to return <strong>the</strong> product <strong>for</strong> repair.1-2 Introduction
<strong>User</strong> <strong>Manual</strong> <strong>for</strong> <strong>the</strong> <strong>NETGEAR</strong> <strong>54</strong> <strong>Mbps</strong> <strong>Wireless</strong> <strong>PC</strong> <strong>Card</strong> <strong>WG511v2</strong>The <strong>NETGEAR</strong> <strong>54</strong> <strong>Mbps</strong> <strong>Wireless</strong> <strong>PC</strong> <strong>Card</strong> <strong>WG511v2</strong> has two interfaces:• The <strong>PC</strong>MCIA Type II connector connects to any notebook <strong>PC</strong> with an available <strong>PC</strong>MCIA or<strong>Card</strong>Bus slot.• The wireless interface of <strong>the</strong> <strong>NETGEAR</strong> <strong>54</strong> <strong>Mbps</strong> <strong>Wireless</strong> <strong>PC</strong> <strong>Card</strong> <strong>WG511v2</strong> remainsoutside of <strong>the</strong> notebook <strong>PC</strong> chassis when <strong>the</strong> wireless <strong>PC</strong> card is inserted into a notebook. TheLED indicates <strong>the</strong> wireless link condition and signal quality of <strong>the</strong> <strong>NETGEAR</strong> <strong>54</strong> <strong>Mbps</strong><strong>Wireless</strong> <strong>PC</strong> <strong>Card</strong> <strong>WG511v2</strong> with ano<strong>the</strong>r wireless node or <strong>the</strong> associated access point.A Road Map <strong>for</strong> ‘How to Get There From Here’The introduction and adoption of any new technology can be a difficult process. <strong>Wireless</strong>technology has removed one of <strong>the</strong> barriers to networking—running wires. It allows more peopleto try networking while at <strong>the</strong> same time exposes <strong>the</strong>m to <strong>the</strong> inherent complexity of networking.General networking concepts, setup, and maintenance can be difficult to understand. In addition,wireless technology adds issues, such as range, interference, signal quality, and security to <strong>the</strong>picture.To help overcome potential barriers to successfully using wireless networks, <strong>the</strong> table belowidentifies how to accomplish such things as connecting to a wireless network, assuring appropriatesecurity measures are taken, browsing <strong>the</strong> Internet through your wireless connection, exchangingfiles with o<strong>the</strong>r computers and using printers in <strong>the</strong> combined wireless and wired network.Introduction 1-3
<strong>User</strong> <strong>Manual</strong> <strong>for</strong> <strong>the</strong> <strong>NETGEAR</strong> <strong>54</strong> <strong>Mbps</strong> <strong>Wireless</strong> <strong>PC</strong> <strong>Card</strong> <strong>WG511v2</strong>Table 1-1. A Road Map <strong>for</strong> How to Get There From Here ...If I Want To ... ? What Do I Do? What’s Needed? How Do I?Connect to awirelessnetworkProtect mywirelessconnection fromsnooping,hacking, orin<strong>for</strong>mation<strong>the</strong>ft.1. Identify <strong>the</strong>wirelessnetwork name(SSID) and, ifused, <strong>the</strong>wirelesssecuritysettings.2. Set up <strong>the</strong><strong>NETGEAR</strong> <strong>54</strong><strong>Mbps</strong> <strong>Wireless</strong><strong>PC</strong> <strong>Card</strong><strong>WG511v2</strong> with<strong>the</strong> settingsfrom step 1.1. Assure that <strong>the</strong>wirelessnetwork hassecurityfeaturesenabled.2. Configure my<strong>WG511v2</strong> with<strong>the</strong> securitysettings of <strong>the</strong>wirelessnetwork.3. Use Windowssecurityfeatures.1. A wireless network2. A notebook <strong>PC</strong> within <strong>the</strong>operating range of <strong>the</strong> wirelessnetwork. For guidelines about<strong>the</strong> range of wireless networks,see “Observing Location andRange Guidelines” onpage 2-2.1. A wireless network withau<strong>the</strong>ntication and WEP orWPA encryption enabled.2. <strong>Wireless</strong> networkingequipment that supports WEPencryption, such as <strong>the</strong><strong>WG511v2</strong> and all <strong>NETGEAR</strong>wireless networking products.To set up <strong>the</strong> <strong>WG511v2</strong>, seeChapter 2, “Basic Setup” andfollow <strong>the</strong> instructions provided.To learn about wirelessnetworking technology, seeAppendix B, “<strong>Wireless</strong>Networking Basics” <strong>for</strong> ageneral introduction.To learn about wirelessnetworking security, see“Au<strong>the</strong>ntication and WEP” onpage B-2.To use WEP security features,see “Enabling <strong>Wireless</strong> SecurityFeatures” on page 3-8 andconfigure your <strong>WG511v2</strong>accordingly.To use WPA security features,see “WPA <strong>Wireless</strong> Security” onpage B-8.Note: Secure Internet sites such as banks and online merchants use encryption security built into browserslike Internet Explorer and Netscape. Any wireless networking security features you might implement are inaddition to those already in place on secure Internet sites.1-4 Introduction
<strong>User</strong> <strong>Manual</strong> <strong>for</strong> <strong>the</strong> <strong>NETGEAR</strong> <strong>54</strong> <strong>Mbps</strong> <strong>Wireless</strong> <strong>PC</strong> <strong>Card</strong> <strong>WG511v2</strong>Table 1-1. A Road Map <strong>for</strong> How to Get There From Here ...If I Want To ... ? What Do I Do? What’s Needed? How Do I?Connect to <strong>the</strong>Internet over mywirelessnetwork.1. Activate mywireless linkand verify mynetworkconnection.2. Open anInternetbrowser suchas InternetExplorer orNetscapeNavigator.1. An active Internet connectionlike those from cable or DSLservice providers.2. A wireless network connectedto <strong>the</strong> cable or DSL Internetservice through a cable/DSLrouter as illustrated in“Connecting to an AccessPoint in Infrastructure Mode”on page 3-2.3. TCP/IP Internet networkingsoftware installed andconfigured on my notebook <strong>PC</strong>according to <strong>the</strong> requirementsof <strong>the</strong> Internet service provider.4. A browser like InternetExplorer or NetscapeNavigator.To configure your <strong>WG511v2</strong> inInfrastructure Mode, see “BasicInstallation Instructions” onpage 2-4, and locate <strong>the</strong> section<strong>for</strong> your version of Windows.For assistance with configuring<strong>the</strong> TCP/IP Internet software ona <strong>PC</strong>, see “Preparing YourComputers <strong>for</strong> TCP/IPNetworking” on page C-1 or referto <strong>the</strong> <strong>PC</strong> Networking Tutorial on<strong>the</strong> <strong>NETGEAR</strong> <strong>54</strong> <strong>Mbps</strong><strong>Wireless</strong> <strong>PC</strong> <strong>Card</strong> <strong>WG511v2</strong>Resource CD and <strong>the</strong> Helpin<strong>for</strong>mation provided in <strong>the</strong>Windows system you are using..Introduction 1-5
<strong>User</strong> <strong>Manual</strong> <strong>for</strong> <strong>the</strong> <strong>NETGEAR</strong> <strong>54</strong> <strong>Mbps</strong> <strong>Wireless</strong> <strong>PC</strong> <strong>Card</strong> <strong>WG511v2</strong>Table 1-1. A Road Map <strong>for</strong> How to Get There From Here ...If I Want To ... ? What Do I Do? What’s Needed? How Do I?Exchange filesbetween awirelesslyconnectednotebookcomputer ando<strong>the</strong>rcomputers in amy combinedwireless andwirednetwork.1. Use <strong>the</strong>WindowsNetworkNeighborhoodfeature tobrowse <strong>for</strong>computers in<strong>the</strong> combinedwireless andwired network.2. Browse <strong>the</strong>hard drive of<strong>the</strong> targetcomputer in<strong>the</strong> network inorder to locate<strong>the</strong> directory orfiles you wantto work with.3. Use <strong>the</strong>WindowsExplorer copyand pastefunctions toexchange filesbetween <strong>the</strong>computers.1. The notebook computer I amusing to connect to <strong>the</strong>wireless network needs to beconfigured with <strong>the</strong> WindowsClient and File and PrintSharing.2. The notebook computer I amusing to connect to <strong>the</strong>wireless network needs to beconfigured with <strong>the</strong> sameWindows Workgroup orDomain settings as <strong>the</strong> o<strong>the</strong>rWindows computers in <strong>the</strong>combined wireless and wirednetwork.3. Any Windows networkingsecurity access rights such aslogin user name/ passwordthat have been assigned in <strong>the</strong>Windows network or <strong>for</strong>sharing particular files must beprovided when Windowsprompts <strong>for</strong> such in<strong>for</strong>mation.4. If so-called Windows ‘peer’Workgroup networking is beingused, <strong>the</strong> drive, file systemdirectory, or file need to beenabled <strong>for</strong> sharing.For assistance with Windowsnetworking software, seeAppendix C, “Preparing Your<strong>PC</strong>s <strong>for</strong> Network Access” <strong>for</strong>configuration scenarios or referto <strong>the</strong> Help system included withyour version of Windows.Windows Domain settings areusually managed by corporatecomputer support groups.Windows Workgroup settingsare commonly managed byindividuals who want to set upsmall networks in <strong>the</strong>ir homes, orsmall offices.For assistance with setting upWindows networking, refer to <strong>the</strong><strong>PC</strong> Networking Tutorial on <strong>the</strong><strong>NETGEAR</strong> <strong>54</strong> <strong>Mbps</strong> <strong>Wireless</strong><strong>PC</strong> <strong>Card</strong> <strong>WG511v2</strong> ResourceCD and <strong>the</strong> Help in<strong>for</strong>mationprovided in <strong>the</strong> Windows systemyou are using.1-6 Introduction
<strong>User</strong> <strong>Manual</strong> <strong>for</strong> <strong>the</strong> <strong>NETGEAR</strong> <strong>54</strong> <strong>Mbps</strong> <strong>Wireless</strong> <strong>PC</strong> <strong>Card</strong> <strong>WG511v2</strong>Table 1-1. A Road Map <strong>for</strong> How to Get There From Here ...If I Want To ... ? What Do I Do? What’s Needed? How Do I?Use printers ina combinedwireless andwirednetwork.1. Use <strong>the</strong>WindowsPrinters andFax features tolocateavailableprinters in <strong>the</strong>combinedwireless andwired network.2. Use <strong>the</strong>Windows Adda Printerwizard to addaccess to anetwork printerfrom <strong>the</strong>notebook <strong>PC</strong>you are usingto wirelesslyconnect to <strong>the</strong>network.3. From <strong>the</strong> Filemenu of anapplicationsuch asMicrosoftWord, use <strong>the</strong>Print Setupfeature todirect yourprint output to<strong>the</strong> printer in<strong>the</strong> network.1. The notebook computer I amusing to connect to <strong>the</strong>wireless network needs to beconfigured with <strong>the</strong> WindowsClient and File and PrintSharing.2. The notebook computer I amusing to connect to <strong>the</strong>wireless network needs to beconfigured with <strong>the</strong> sameWindows Workgroup orDomain settings as <strong>the</strong> o<strong>the</strong>rWindows computers in <strong>the</strong>combined wireless and wirednetwork.3. Any Windows networkingsecurity access rights such aslogin user name/ passwordthat have been assigned in <strong>the</strong>Windows network must beprovided when Windowsprompts <strong>for</strong> such in<strong>for</strong>mation.4. If so-called Windows ‘peer’networking is being used, <strong>the</strong>printer needs to be enabled <strong>for</strong>sharing.Windows Domain settings areusually managed by corporatecomputer support groups.Windows Workgroup settingsare commonly managed byindividuals who want to set upsmall networks in <strong>the</strong>ir homes, orsmall offices.For assistance with setting upWindows networking, refer to <strong>the</strong><strong>PC</strong> Networking Tutorial on <strong>the</strong><strong>NETGEAR</strong> <strong>54</strong> <strong>Mbps</strong> <strong>Wireless</strong><strong>PC</strong> <strong>Card</strong> <strong>WG511v2</strong> ResourceCD and <strong>the</strong> Help in<strong>for</strong>mationprovided in <strong>the</strong> Windows systemyou are using.For assistance with setting upprinters in Windows, refer to <strong>the</strong>Help and Support in<strong>for</strong>mationthat comes with <strong>the</strong> version of<strong>the</strong> Windows operating systemsyou are using.Introduction 1-7
<strong>User</strong> <strong>Manual</strong> <strong>for</strong> <strong>the</strong> <strong>NETGEAR</strong> <strong>54</strong> <strong>Mbps</strong> <strong>Wireless</strong> <strong>PC</strong> <strong>Card</strong> <strong>WG511v2</strong>1-8 Introduction
Chapter 2Basic SetupThis chapter describes how to install your <strong>NETGEAR</strong> <strong>54</strong> <strong>Mbps</strong> <strong>Wireless</strong> <strong>PC</strong> <strong>Card</strong> <strong>WG511v2</strong> andset up basic wireless connectivity on your <strong>Wireless</strong> Local Area Network (WLAN). Advancedwireless network configuration is covered in Chapter 3, “Configuration” in this manual.Note: Indoors, computers can easily connect to 802.11 wireless networks at distances ofseveral hundred feet. Because walls do not always block wireless signals, o<strong>the</strong>rs outsideyour immediate area could access your network. It is important to take appropriate stepsto secure your network from unauthorized access. The <strong>NETGEAR</strong> <strong>54</strong> <strong>Mbps</strong> <strong>Wireless</strong><strong>PC</strong> <strong>Card</strong> <strong>WG511v2</strong> provides highly effective security features which are covered in“Enabling <strong>Wireless</strong> Security Features” on page 3-8 in this manual. Deploy <strong>the</strong> securityfeatures appropriate to your needs.What You Need Be<strong>for</strong>e You BeginYou need to verify your computer meets <strong>the</strong> minimum system requirements and identify <strong>the</strong>wireless network configuration settings of <strong>the</strong> WLAN where you will connect be<strong>for</strong>e you canconfigure your wireless <strong>PC</strong> card and connect.Verifying System RequirementsBe<strong>for</strong>e installing <strong>the</strong> <strong>NETGEAR</strong> <strong>54</strong> <strong>Mbps</strong> <strong>Wireless</strong> <strong>PC</strong> <strong>Card</strong> <strong>WG511v2</strong>, please make sure that<strong>the</strong>se minimum requirements have been met:• You must have a Pentium ® Class notebook computer with an available <strong>Card</strong>bus slot.• A CD-ROM drive.• 5 MB of free hard disk space.• Windows XP Home, Windows XP Professional, 2000 Professional, Me, or 98SE.• Some versions of Windows may ask <strong>for</strong> <strong>the</strong> original Windows operating system installationfiles to complete <strong>the</strong> installation of <strong>the</strong> <strong>WG511v2</strong> driver software.Basic Setup 2-1
<strong>User</strong> <strong>Manual</strong> <strong>for</strong> <strong>the</strong> <strong>NETGEAR</strong> <strong>54</strong> <strong>Mbps</strong> <strong>Wireless</strong> <strong>PC</strong> <strong>Card</strong> <strong>WG511v2</strong>Observing Location and Range GuidelinesComputers can connect over wireless networks indoors at a range which vary significantly basedon <strong>the</strong> physical location of <strong>the</strong> computer with <strong>the</strong> <strong>NETGEAR</strong> <strong>54</strong> <strong>Mbps</strong> <strong>Wireless</strong> <strong>PC</strong> <strong>Card</strong><strong>WG511v2</strong>. For best results, avoid potential sources of interference, such as:• Large metal surfaces• Microwaves• 2.4 GHz Cordless phonesIn general, wireless devices can communicate through walls. However, if <strong>the</strong> walls are constructedwith concrete, or have metal, or metal mesh, <strong>the</strong> effective range will decrease if such materials arebetween <strong>the</strong> devices.Two Basic Operating ModesThe <strong>WG511v2</strong> <strong>Wireless</strong> <strong>PC</strong> <strong>Card</strong> can operate in <strong>the</strong> following two basic modes:• Infrastructure Mode: An 802.11 networking framework in which devices and computerscommunicate with each o<strong>the</strong>r by first going through an access point (AP). For example, thismode is used when computers in a house connect to an Access Point that is attached to a routerwhich lets multiple computers share a single Cable or DSL broadband Internet connection.• Ad Hoc Mode: An 802.11 networking framework in which devices or computerscommunicate directly with each o<strong>the</strong>r, without <strong>the</strong> use of an AP. For example, Ad Hoc Mode isused when two Windows computers are configured with file and print sharing enabled and youwant to exchange files directly between <strong>the</strong>m.Both of <strong>the</strong>se configuration options are available with <strong>the</strong> <strong>WG511v2</strong> <strong>Wireless</strong> <strong>PC</strong> <strong>Card</strong>.Infrastructure configuration procedures <strong>for</strong> basic network connectivity are covered below.Advanced infrastructure configuration procedures and Ad Hoc configuration are covered inChapter 3, “Configuration” of this manual.2-2 Basic Setup
<strong>User</strong> <strong>Manual</strong> <strong>for</strong> <strong>the</strong> <strong>NETGEAR</strong> <strong>54</strong> <strong>Mbps</strong> <strong>Wireless</strong> <strong>PC</strong> <strong>Card</strong> <strong>WG511v2</strong><strong>WG511v2</strong> Default <strong>Wireless</strong> Configuration SettingsIf this is a new wireless network installation, use <strong>the</strong> factory default settings to set up <strong>the</strong> networkand verify wireless connectivity. If this is an addition to an existing wireless network, you willneed to identify <strong>the</strong> wireless configuration and security parameters already defined.Your <strong>NETGEAR</strong> <strong>54</strong> <strong>Mbps</strong> <strong>Wireless</strong> <strong>PC</strong> <strong>Card</strong> <strong>WG511v2</strong> factory default basic settings are:• Network Name Service Set Identification (SSID): Any (First available network)Note: In order <strong>for</strong> <strong>the</strong> <strong>WG511v2</strong> <strong>Wireless</strong> <strong>PC</strong> <strong>Card</strong> to communicate with a wireless accesspoint or wireless adapter, all devices must be configured with <strong>the</strong> same wireless network name(SSID).• Network Mode (Infrastructure or Ad Hoc): Infrastructure• Data security WEP encryption: DisabledThe section below provides instructions <strong>for</strong> setting up <strong>the</strong> <strong>NETGEAR</strong> <strong>54</strong> <strong>Mbps</strong> <strong>Wireless</strong> <strong>PC</strong> <strong>Card</strong><strong>WG511v2</strong> <strong>for</strong> basic wireless connectivity to an access point. The procedures below providestep-by-step installation instructions <strong>for</strong> Windows <strong>PC</strong>s. Use <strong>the</strong> procedure that corresponds to <strong>the</strong>version of Windows you are using.Basic Setup 2-3
<strong>User</strong> <strong>Manual</strong> <strong>for</strong> <strong>the</strong> <strong>NETGEAR</strong> <strong>54</strong> <strong>Mbps</strong> <strong>Wireless</strong> <strong>PC</strong> <strong>Card</strong> <strong>WG511v2</strong>Basic Installation InstructionsUse <strong>the</strong> procedure below that corresponds to <strong>the</strong> version of Windows you are using.For Windows XP <strong>User</strong>s Installing a <strong>WG511v2</strong>Install <strong>the</strong> <strong>WG511v2</strong> driver andconfiguration utility software.a. Power on your notebook, let <strong>the</strong>operating system boot up completely,and log in as needed.b. Insert <strong>the</strong> Resource CD <strong>for</strong> <strong>the</strong><strong>WG511v2</strong> into your CD-ROM drive.The CD main page shown at <strong>the</strong> rightwill load.c. Click <strong>the</strong> “Install Driver & Utility” link.d. Follow <strong>the</strong> InstallShield Wizard steps,and click Finish when done to restartyour computer.<strong>WG511v2</strong> Resource CDInstallShield WizardNote: If a Windows XP Certification warningappears, click Continue Anyway to proceed.2-4 Basic Setup
<strong>User</strong> <strong>Manual</strong> <strong>for</strong> <strong>the</strong> <strong>NETGEAR</strong> <strong>54</strong> <strong>Mbps</strong> <strong>Wireless</strong> <strong>PC</strong> <strong>Card</strong> <strong>WG511v2</strong>Install <strong>the</strong> <strong>NETGEAR</strong> <strong>54</strong> <strong>Mbps</strong> <strong>Wireless</strong> <strong>PC</strong><strong>Card</strong> <strong>WG511v2</strong>.a. Locate an available <strong>Card</strong>Bus slot on <strong>the</strong>side of your notebook. Hold <strong>the</strong> <strong>PC</strong> <strong>Card</strong>with <strong>the</strong> <strong>NETGEAR</strong> logo facing up andinsert it into <strong>the</strong> <strong>Card</strong>Bus slot.The Found New Hardware Wizarddisplays.Note: Click Continue Anyway if youare prompted with a Windows XP Logotesting message.b. Next you will be prompted to enable <strong>the</strong><strong>NETGEAR</strong> Smart <strong>Wireless</strong> SettingsUtility configuration utility.Click Yes to accept this option.If you choose No, you must read <strong>the</strong>Windows XP documentation <strong>for</strong> anexplanation of how to use <strong>the</strong> WindowsXP wireless network configurationutility.You will also be prompted to choose <strong>the</strong>country you are located in. Select yourlocation from <strong>the</strong> list.c. Click Finish to complete <strong>the</strong> installation.You will see <strong>the</strong> <strong>WG511v2</strong> system trayicon on <strong>the</strong> lower right portion of <strong>the</strong>Windows task bar.Add New Hardware WizardEnable <strong>NETGEAR</strong> Utility Configuration<strong>WG511v2</strong> System Tray IconBasic Setup 2-5
<strong>User</strong> <strong>Manual</strong> <strong>for</strong> <strong>the</strong> <strong>NETGEAR</strong> <strong>54</strong> <strong>Mbps</strong> <strong>Wireless</strong> <strong>PC</strong> <strong>Card</strong> <strong>WG511v2</strong>Configure your <strong>WG511v2</strong>.a. Click <strong>the</strong> icon in <strong>the</strong> Windowssystem tray to open <strong>the</strong> <strong>WG511v2</strong> Smart<strong>Wireless</strong> Settings Utility.The utility opens to <strong>the</strong> Settings tabpage.b. Change <strong>the</strong> Network Name SSID tomatch your network.Tip: As an alternative to typing in <strong>the</strong>SSID, you can use <strong>the</strong> drop-down list or<strong>the</strong> Networks tab to view <strong>the</strong> availablewireless networks, and choose <strong>the</strong> oneyou want.c. Click Apply to activate <strong>the</strong> connection.You can also enter a profile name andclick Save Profile to store <strong>the</strong> currentsettings.Tip: Create profiles called work andhome. Then, activate whichever one youneed <strong>for</strong> your current location.Smart <strong>Wireless</strong> Utility Settings pageTip: Click Help to view <strong>the</strong> context-sensitivehelp in<strong>for</strong>mation.2-6 Basic Setup
<strong>User</strong> <strong>Manual</strong> <strong>for</strong> <strong>the</strong> <strong>NETGEAR</strong> <strong>54</strong> <strong>Mbps</strong> <strong>Wireless</strong> <strong>PC</strong> <strong>Card</strong> <strong>WG511v2</strong>Verify wireless connectivity to your network.a. Verify that your Connection and Status Monitor in<strong>for</strong>mation matches your wirelessnetwork.b. Check <strong>the</strong> two LEDs on <strong>the</strong> <strong>WG511v2</strong>:Activity LEDLink LEDTable 2-1:LED DescriptionsLED Activity DescriptionLink - GreenActivity -AmberOnBlinkingOn/BlinkingOffThe card is plugged in to <strong>the</strong> notebook <strong>PC</strong>.Blinking indicates <strong>the</strong> WG511 is trying to establish aconnection but is unable to do so.If blinking, <strong>the</strong> WG511 has a connection and istransmitting or receiving data.There is no data transmission on <strong>the</strong> wireless network.c. Verify connectivity to <strong>the</strong> Internet or network resources.Note: If you are unable to connect, see troubleshooting tips in <strong>the</strong> Basic Installation section of<strong>the</strong> Reference <strong>Manual</strong> on <strong>the</strong> <strong>NETGEAR</strong> <strong>54</strong> <strong>Mbps</strong> <strong>Wireless</strong> <strong>PC</strong> <strong>Card</strong> <strong>WG511v2</strong> Resource CD.Basic Setup 2-7
<strong>User</strong> <strong>Manual</strong> <strong>for</strong> <strong>the</strong> <strong>NETGEAR</strong> <strong>54</strong> <strong>Mbps</strong> <strong>Wireless</strong> <strong>PC</strong> <strong>Card</strong> <strong>WG511v2</strong>For Windows 2000 & 98SE/Me <strong>User</strong>s Installing a <strong>WG511v2</strong>Install <strong>the</strong> <strong>WG511v2</strong> driver andconfiguration utility software.Note: Windows 2000 may require you to belogged on with administrator rights.a. Power on your notebook, let <strong>the</strong>operating system boot up completely,and log in as needed.b. Insert <strong>the</strong> Resource CD <strong>for</strong> <strong>the</strong><strong>WG511v2</strong> into your CD-ROM drive.The CD main page shown at <strong>the</strong> rightwill load.c. Click <strong>the</strong> “Install Driver & Utility” link.d. Follow <strong>the</strong> InstallShield Wizard steps,click Finish when done, and if prompted,restart your computer.<strong>WG511v2</strong> Resource CDInstallShield Wizard2-8 Basic Setup
<strong>User</strong> <strong>Manual</strong> <strong>for</strong> <strong>the</strong> <strong>NETGEAR</strong> <strong>54</strong> <strong>Mbps</strong> <strong>Wireless</strong> <strong>PC</strong> <strong>Card</strong> <strong>WG511v2</strong>Install <strong>the</strong> <strong>NETGEAR</strong> <strong>54</strong> <strong>Mbps</strong> <strong>Wireless</strong> <strong>PC</strong><strong>Card</strong> <strong>WG511v2</strong>.a. Locate an available <strong>Card</strong>Bus slot on <strong>the</strong>side of your notebook. Hold <strong>the</strong> <strong>PC</strong> <strong>Card</strong>with <strong>the</strong> NETFGEAR logo facing up andinsert it into <strong>the</strong> <strong>Card</strong>Bus slot.After a short delay, <strong>the</strong> Found NewHardware Wizard displays.b. Follow <strong>the</strong> Found New HardwareWizard steps, click Finish when done,and if prompted, restart your computer.c. Next, you will be prompted to choose <strong>the</strong>country where you are located. Selectyour location from <strong>the</strong> list.You should see <strong>the</strong> <strong>WG511v2</strong> systemtray icon on <strong>the</strong> right in <strong>the</strong> lower rightportion of <strong>the</strong> Windows task bar.Add New Hardware WizardNote: If Windows warns about a DigitalSignature Not Found, click Yes to continue.<strong>WG511v2</strong> System Tray IconBasic Setup 2-9
<strong>User</strong> <strong>Manual</strong> <strong>for</strong> <strong>the</strong> <strong>NETGEAR</strong> <strong>54</strong> <strong>Mbps</strong> <strong>Wireless</strong> <strong>PC</strong> <strong>Card</strong> <strong>WG511v2</strong>Configure your <strong>WG511v2</strong> and save <strong>the</strong>Profile.a. Click on <strong>the</strong> <strong>WG511v2</strong> systray icon toopen <strong>the</strong> <strong>WG511v2</strong> configuration utility.The utility opens to <strong>the</strong> Settings tabpage.b. For <strong>the</strong> Network Name (SSID), use <strong>the</strong>default of Any (First available network)or type an SSID <strong>for</strong> your network.Tip: As an alternative to typing in <strong>the</strong>SSID, you can use <strong>the</strong> drop-down list or<strong>the</strong> Networks tab to view <strong>the</strong> availablewireless networks, and choose <strong>the</strong> oneyou want.c. Click Apply to activate <strong>the</strong> connection.d. You can also enter a profile name andclick Save Profile to store <strong>the</strong> currentsettings.Tip: If you use your desktop <strong>PC</strong> toconnect to a wireless network at workand at home, create profiles called workand home. Then, activate whichever oneyou need <strong>for</strong> wherever you are located.Click here to open <strong>the</strong> configuration utility.<strong>WG511v2</strong> system tray icon<strong>WG511v2</strong> Configuration UtilityNote: The <strong>NETGEAR</strong> default settings areInfrastructure mode, with Any (case sensitive)<strong>for</strong> <strong>the</strong> wireless network name SSID, and WEPdisabled. If your WLAN settings are different from<strong>the</strong> <strong>NETGEAR</strong> default settings, you will notconnect. Set up your <strong>WG511v2</strong> accordingly.Note: This procedure assumes you areconnecting to a wireless network which is notusing WEP security. If your network includes WEPsettings, click <strong>the</strong> Security tab page and configure<strong>the</strong> <strong>WG511v2</strong> accordingly. For help with <strong>the</strong>sesteps, click <strong>the</strong> Help button in <strong>the</strong> <strong>WG511v2</strong>Configuration Utility to view context- sensitivehelp in<strong>for</strong>mation, or see “Enabling <strong>Wireless</strong>Security Features” on page 3-8.2-10 Basic Setup
<strong>User</strong> <strong>Manual</strong> <strong>for</strong> <strong>the</strong> <strong>NETGEAR</strong> <strong>54</strong> <strong>Mbps</strong> <strong>Wireless</strong> <strong>PC</strong> <strong>Card</strong> <strong>WG511v2</strong>Verify wireless connectivity to your network.a. Verify that your Connection and Status Monitor in<strong>for</strong>mation matches your wirelessnetwork.b. Check <strong>the</strong> two LEDs on <strong>the</strong> <strong>WG511v2</strong>:Activity LEDLink LEDTable 2-2:LED DescriptionsLED Activity DescriptionLink - GreenActivity -AmberOnBlinkingOn/BlinkingOffThe card is plugged in to <strong>the</strong> notebook <strong>PC</strong>.Blinking indicates <strong>the</strong> WG511 is trying to establish aconnection but is unable to do so.If blinking, <strong>the</strong> WG511 has a connection and istransmitting or receiving data.There is no data transmission on <strong>the</strong> wireless network.c. Verify connectivity to <strong>the</strong> Internet or network resources.Note: If you are unable to connect, see troubleshooting tips in <strong>the</strong> Basic Installation section of<strong>the</strong> Reference <strong>Manual</strong> on <strong>the</strong> <strong>NETGEAR</strong> <strong>54</strong> <strong>Mbps</strong> <strong>Wireless</strong> <strong>PC</strong> <strong>Card</strong> <strong>WG511v2</strong> Resource CD.Basic Setup 2-11
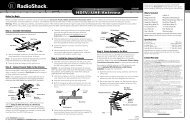
<strong>User</strong> <strong>Manual</strong> <strong>for</strong> <strong>the</strong> <strong>NETGEAR</strong> <strong>54</strong> <strong>Mbps</strong> <strong>Wireless</strong> <strong>PC</strong> <strong>Card</strong> <strong>WG511v2</strong><strong>WG511v2</strong> <strong>Wireless</strong> Connection IndicatorsThe <strong>NETGEAR</strong> <strong>54</strong> <strong>Mbps</strong> <strong>Wireless</strong> <strong>PC</strong> <strong>Card</strong> <strong>WG511v2</strong> provides <strong>the</strong> following three indicatorswhich give you feedback on <strong>the</strong> status of your wireless connection:• The two LEDs on <strong>the</strong> <strong>NETGEAR</strong> <strong>54</strong> <strong>Mbps</strong> <strong>Wireless</strong> <strong>PC</strong> <strong>Card</strong> <strong>WG511v2</strong> indicate <strong>the</strong> conditionof wireless link.• The color of <strong>the</strong> SysTray icon is on <strong>the</strong> System Tray portion of <strong>the</strong> taskbar in <strong>the</strong> MicrosoftWindows desktop indicates <strong>the</strong> status of <strong>the</strong> connection.Interpreting <strong>the</strong> LEDs on <strong>the</strong> <strong>WG511v2</strong>Activity LEDLink LEDFigure 2-1: <strong>WG511v2</strong> LEDsThese LEDs are described in this table.Table 2-1: LED DescriptionsLED Activity DescriptionLink - GreenActivity - AmberOnBlinkingOn/BlinkingOffThe card is plugged in to <strong>the</strong> notebook <strong>PC</strong>.Blinking indicates <strong>the</strong> WG511 is trying to establish a connection but isunable to do so.If blinking, <strong>the</strong> WG511 has a connection and is transmitting or receivingdata.There is no data transmission on <strong>the</strong> wireless network.2-12 Basic Setup
<strong>User</strong> <strong>Manual</strong> <strong>for</strong> <strong>the</strong> <strong>NETGEAR</strong> <strong>54</strong> <strong>Mbps</strong> <strong>Wireless</strong> <strong>PC</strong> <strong>Card</strong> <strong>WG511v2</strong>Interpreting System Tray Icon ColorsThe System Tray (SysTray) resides on one end of <strong>the</strong> taskbar in <strong>the</strong> Microsoft Windows desktop.Color Condition DescriptionRedThe wireless <strong>PC</strong> <strong>Card</strong> hasno connection to anyo<strong>the</strong>r wireless node.The wireless <strong>PC</strong> <strong>Card</strong> is not able to link to any o<strong>the</strong>rwireless node or <strong>the</strong> link is lost. Check yourconfiguration or try moving to a location where <strong>the</strong>wireless signal quality is better.YellowThe wireless <strong>PC</strong> <strong>Card</strong> hasa connection with ano<strong>the</strong>rwireless node.The wireless link is weak. You may deed to move to abetter spot, such as closer to <strong>the</strong> wireless access point.Also, look <strong>for</strong> possible interference such as a 2.4 GHzcordless phone or large metal surface.GreenThe wireless <strong>PC</strong> <strong>Card</strong> hasa connection with ano<strong>the</strong>rwireless node.The wireless <strong>PC</strong> <strong>Card</strong> has established goodcommunication with an access point and <strong>the</strong> signalquality is strong.Basic Setup 2-13
<strong>User</strong> <strong>Manual</strong> <strong>for</strong> <strong>the</strong> <strong>NETGEAR</strong> <strong>54</strong> <strong>Mbps</strong> <strong>Wireless</strong> <strong>PC</strong> <strong>Card</strong> <strong>WG511v2</strong>2-14 Basic Setup
Chapter 3ConfigurationThis chapter describes how to configure your <strong>NETGEAR</strong> <strong>54</strong> <strong>Mbps</strong> <strong>Wireless</strong> <strong>PC</strong> <strong>Card</strong> <strong>WG511v2</strong><strong>for</strong> wireless connectivity on your <strong>Wireless</strong> Local Area Network (WLAN) and use <strong>the</strong> data securityencryption features.Note: The instructions in this section refer to <strong>the</strong> <strong>NETGEAR</strong> <strong>WG511v2</strong> configurationutility. For Windows XP users to use <strong>the</strong> <strong>NETGEAR</strong> configuration utility, you must firstdisable <strong>the</strong> Windows XP configuration utility. Open <strong>the</strong> network connections from <strong>the</strong>system tray icon, click <strong>the</strong> Properties button, click <strong>the</strong> <strong>Wireless</strong> Networks tab and <strong>the</strong>nclear <strong>the</strong> “Use Windows to configure my wireless network settings” check box.Understanding <strong>the</strong> Configuration OptionsThe <strong>WG511v2</strong> configuration utility provides a complete and easy to use set of tools to:• Configure wireless settings• Monitor wireless network connections• Save your settings in configuration profilesThe section below introduces <strong>the</strong>se capabilities of <strong>the</strong> configuration utility.Using Configuration ProfilesThe <strong>WG511v2</strong> configuration utility uses profiles to store all <strong>the</strong> configuration settings <strong>for</strong> aparticular wireless network. You can store multiple profiles and recall <strong>the</strong> one which matches <strong>the</strong>network you want to join.Configuration 3-1
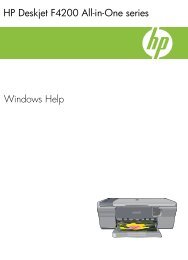
<strong>User</strong> <strong>Manual</strong> <strong>for</strong> <strong>the</strong> <strong>NETGEAR</strong> <strong>54</strong> <strong>Mbps</strong> <strong>Wireless</strong> <strong>PC</strong> <strong>Card</strong> <strong>WG511v2</strong>For example, if you use your notebook <strong>PC</strong> to connect to a wireless network in an office and awireless network in your home, you can create a profile <strong>for</strong> each wireless network. Then, you caneasily load <strong>the</strong> profile that has all <strong>the</strong> configuration settings you need to join <strong>the</strong> network you areusing at <strong>the</strong> time.There are two types of wireless network connections you can configure:• Infrastructure Mode — uses <strong>the</strong> 802.11 infrastructure mode.• Ad Hoc Mode — uses <strong>the</strong> 802.11 Ad Hoc mode.For more in<strong>for</strong>mation on 802.11 wireless network modes, see “<strong>Wireless</strong> Networking Overview”on page B-1 of this manual.Connecting to an Access Point in Infrastructure Mode<strong>Wireless</strong> Access Point<strong>NETGEAR</strong> <strong>54</strong> <strong>Mbps</strong> <strong>Wireless</strong><strong>PC</strong> <strong>Card</strong> WG511 in aNotebook ComputerCable/DSL RouterCable or DSL modemFigure 3-1: <strong>WG511v2</strong> <strong>Wireless</strong> <strong>PC</strong> <strong>Card</strong> connecting to a wireless access point.Infrastructure mode is used when configuring <strong>the</strong> <strong>NETGEAR</strong> <strong>54</strong> <strong>Mbps</strong> <strong>Wireless</strong> <strong>PC</strong> <strong>Card</strong><strong>WG511v2</strong> to connect to a wireless access point or wireless router.3-2 Configuration
<strong>User</strong> <strong>Manual</strong> <strong>for</strong> <strong>the</strong> <strong>NETGEAR</strong> <strong>54</strong> <strong>Mbps</strong> <strong>Wireless</strong> <strong>PC</strong> <strong>Card</strong> <strong>WG511v2</strong>How to Configure an Infrastructure Mode ProfileFollow <strong>the</strong> instructions below to configure an infrastructure mode profile <strong>for</strong> connecting to anaccess point.1. Run <strong>the</strong> <strong>WG511v2</strong> Configuration Utility.a. Make sure <strong>the</strong> <strong>WG511v2</strong> software is installed and <strong>the</strong> <strong>WG511v2</strong> is fully inserted in anavailable <strong>Card</strong>Bus slot in your <strong>PC</strong>.b. Open <strong>the</strong> configuration utility by clicking on <strong>the</strong> <strong>WG511v2</strong> icon in <strong>the</strong> Windowssystem tray.Figure 3-2: Settings page, Infrastructure configurationc. Click <strong>the</strong> Settings tab to display <strong>the</strong> view shown above.2. Configure <strong>the</strong> wireless network settings.a. In <strong>the</strong> Network Type section, be sure that Access Point (Infrastructure) is selected.b. Enter <strong>the</strong> SSID. This is also called <strong>the</strong> <strong>Wireless</strong> Network Name.Note: You will not get a wireless network connection unless <strong>the</strong> network SSID matchesexactly what is configured in <strong>the</strong> access point.Tip: You can click <strong>the</strong> Networks tab to view a list of <strong>the</strong> available wireless networks and<strong>the</strong>ir SSIDs at <strong>the</strong> location where you are.Configuration 3-3
<strong>User</strong> <strong>Manual</strong> <strong>for</strong> <strong>the</strong> <strong>NETGEAR</strong> <strong>54</strong> <strong>Mbps</strong> <strong>Wireless</strong> <strong>PC</strong> <strong>Card</strong> <strong>WG511v2</strong>3. Save your settings in a Profile.a. Type a descriptive name <strong>for</strong> <strong>the</strong> Profile in <strong>the</strong> Profiles field.b. Click Save Profile. All <strong>the</strong> configuration settings are saved in this profile.c. Click Apply.d. Click Close to exit <strong>the</strong> configuration utility or Cancel to return to <strong>the</strong> previous settings.4. Verify wireless connectivity to your network.Verify connectivity by using a browser such as Netscape or Internet Explorer to connect to <strong>the</strong>Internet, or check <strong>for</strong> file and printer access on your network.You can check <strong>the</strong> status bar in <strong>the</strong> configuration utility <strong>for</strong> <strong>the</strong> current connection status.Note: If you cannot connect, see “Troubleshooting” on page 4-1. Also, <strong>for</strong> problems withaccessing network resources, <strong>the</strong> Windows Client and File and Print Sharing software mightnot be installed and configured properly on your computers. Please refer to “Preparing YourComputers <strong>for</strong> TCP/IP Networking” on page C-1.Connecting to Ano<strong>the</strong>r <strong>PC</strong> in Ad Hoc ModeNotebook with 802.11b or gwireless adapterFigure 3-3: <strong>NETGEAR</strong> <strong>WG511v2</strong> <strong>Wireless</strong> <strong>PC</strong> <strong>Card</strong> in Peer-to-Peer Mode3-4 Configuration
<strong>User</strong> <strong>Manual</strong> <strong>for</strong> <strong>the</strong> <strong>NETGEAR</strong> <strong>54</strong> <strong>Mbps</strong> <strong>Wireless</strong> <strong>PC</strong> <strong>Card</strong> <strong>WG511v2</strong>The peer-to-peer setting of <strong>the</strong> <strong>WG511v2</strong> uses Ad Hoc mode. Ad Hoc mode is an 802.11networking framework in which devices or computers communicate directly with each o<strong>the</strong>r,without <strong>the</strong> use of an access point. For example, this mode is used when two Windows computersare configured with file and print sharing enabled and you want to exchange files directly between<strong>the</strong>m.How to Configure an Ad Hoc Mode ProfileNote: Ad Hoc mode will not work using DHCP settings. Ad Hoc mode requires ei<strong>the</strong>r static IPaddresses (such as 192.168.0.1) or <strong>the</strong> IPX protocol. For instructions on setting up static IPaddresses on a Windows <strong>PC</strong>, refer to <strong>the</strong> <strong>PC</strong> Networking Tutorial included on <strong>the</strong> <strong>NETGEAR</strong> <strong>54</strong><strong>Mbps</strong> <strong>Wireless</strong> <strong>PC</strong> <strong>Card</strong> <strong>WG511v2</strong> Resource CD.Follow <strong>the</strong> instructions below to configure an Ad Hoc mode profile.1. Run <strong>the</strong> <strong>WG511v2</strong> Configuration Utility.a. Make sure <strong>the</strong> <strong>WG511v2</strong> software is installed and <strong>the</strong> <strong>WG511v2</strong> is fully inserted in anavailable <strong>Card</strong>Bus slot in your <strong>PC</strong>.b. Open <strong>the</strong> configuration utility by clicking on <strong>the</strong> <strong>WG511v2</strong> icon in <strong>the</strong> Windowssystem tray.Figure 3-4: Settings page, Ad Hoc configurationConfiguration 3-5
<strong>User</strong> <strong>Manual</strong> <strong>for</strong> <strong>the</strong> <strong>NETGEAR</strong> <strong>54</strong> <strong>Mbps</strong> <strong>Wireless</strong> <strong>PC</strong> <strong>Card</strong> <strong>WG511v2</strong>c. Click <strong>the</strong> Settings tab to display <strong>the</strong> view shown above.d. Select Computer-to-Computer (Ad Hoc) <strong>for</strong> <strong>the</strong> Network Type.e. Enter <strong>the</strong> SSID <strong>for</strong> <strong>the</strong> Ad Hoc network.f. Click Apply.2. Save your settings in a Profile.a. Type a descriptive name in <strong>the</strong> “Profiles” field.b. Click Save Profile. All <strong>the</strong> configuration settings are saved in this profile.c. Click Apply.d. Click Close to exit <strong>the</strong> configuration utility.3. Configure <strong>the</strong> <strong>PC</strong> network settings.a. Configure each <strong>PC</strong> with ei<strong>the</strong>r a static IP address or with <strong>the</strong> IPX protocol.Note: For instructions on configuring static IP addresses, refer to <strong>the</strong> networking tutorialon your <strong>NETGEAR</strong> <strong>54</strong> <strong>Mbps</strong> <strong>Wireless</strong> <strong>PC</strong> <strong>Card</strong> <strong>WG511v2</strong> Resource CD.b. Restart <strong>the</strong> <strong>PC</strong>s.4. Verify wireless connectivity between your peer devices.Verify connectivity by using <strong>the</strong> Ping program:a. On <strong>the</strong> Windows taskbar click <strong>the</strong> Start button, and <strong>the</strong>n click Run.b. Assuming <strong>the</strong> target <strong>PC</strong> is configured with 192.168.0.1 as its IP address, type ping -t192.168.0.1 and <strong>the</strong>n click OK.c. This will cause a continuous ping to be sent to <strong>the</strong> device with <strong>the</strong> 192.168.0.1 static IPaddress. The ping response should change to “reply”.3-6 Configuration
<strong>User</strong> <strong>Manual</strong> <strong>for</strong> <strong>the</strong> <strong>NETGEAR</strong> <strong>54</strong> <strong>Mbps</strong> <strong>Wireless</strong> <strong>PC</strong> <strong>Card</strong> <strong>WG511v2</strong>At this point <strong>the</strong> connection is established.You may need to reboot in certain Windows operating systems such as Windows 98SE.Note: If you cannot connect, see “Troubleshooting” on page 4-1. Also, <strong>for</strong> problems withaccessing network resources, <strong>the</strong> Windows Client and File and Print Sharing software mightnot be installed and configured properly on your computers. Please refer to “Preparing YourComputers <strong>for</strong> TCP/IP Networking” on page C-1.How to Start a Computer-to-Computer (Ad Hoc) Network1. Fill in <strong>the</strong> Network Name (SSID).2. Select <strong>the</strong> Computer-to-Computer (Ad Hoc) network type.3. Click Initiate Ad Hoc. The Ad Hoc Setting dialog box will appear, as shown below.Figure 3-5: Ad Hoc Setting page4. In <strong>the</strong> Start Ad Hoc field, choose <strong>the</strong> wireless standard (802.11a, 802.11b, or 802.11g) <strong>for</strong> yourAd Hoc computer-to-computer network.5. In <strong>the</strong> Channel field, Automatic should work. If you notice interference problems with ano<strong>the</strong>rnearby wireless device, select a channel that is not being used by any o<strong>the</strong>r wireless networksnear your wireless adapter. Use <strong>the</strong> Networks tab page to identify <strong>the</strong> channels in use in yourarea.6. Click OK.Note: The channel number differs depending on <strong>the</strong> country. The connection speed automaticallydefaults to <strong>the</strong> highest speed.Configuration 3-7
<strong>User</strong> <strong>Manual</strong> <strong>for</strong> <strong>the</strong> <strong>NETGEAR</strong> <strong>54</strong> <strong>Mbps</strong> <strong>Wireless</strong> <strong>PC</strong> <strong>Card</strong> <strong>WG511v2</strong>Enabling <strong>Wireless</strong> Security FeaturesYou can streng<strong>the</strong>n <strong>the</strong> security of your wireless connection by enabling Wired Equivalent Privacy(WEP) encryption of <strong>the</strong> wireless data communications. For more in<strong>for</strong>mation on 802.11 wirelesssecurity, see “Au<strong>the</strong>ntication and WEP” on page B-2.Alternatively, you can use WPA-PSK (Wi-Fi Protected Access Pre-Shared Key) encryption. Formore in<strong>for</strong>mation on WPA security, see “WPA <strong>Wireless</strong> Security” on page B-8.In addition to <strong>the</strong> <strong>WG511v2</strong> wireless security features, you should also configure appropriate LANnetwork security features such as requiring a user name and password to access <strong>the</strong> sharedresources in your network.The procedures below identify how to configure <strong>the</strong> WEP encryption settings of your <strong>NETGEAR</strong><strong>54</strong> <strong>Mbps</strong> <strong>Wireless</strong> <strong>PC</strong> <strong>Card</strong> <strong>WG511v2</strong>.Identifying <strong>the</strong> <strong>Wireless</strong> Network Name (SSID) and WEP SecuritySettingsPrint this <strong>for</strong>m, fill in <strong>the</strong> configuration parameters and put it in a safe place <strong>for</strong> possible futurereference. For an existing wireless network, <strong>the</strong> person who set up <strong>the</strong> network will be able toprovide this in<strong>for</strong>mation.• <strong>Wireless</strong> Network Name (SSID): The Service Set Identification (SSID) identifies <strong>the</strong> wirelesslocal area network. Any (First available network) is <strong>the</strong> default <strong>WG511v2</strong> wireless networkname (SSID). You may customize it using up to 32 alphanumeric characters. Write yourcustomized wireless network name (SSID) on <strong>the</strong> line below.Note: The SSID in <strong>the</strong> wireless access point is <strong>the</strong> SSID you configure in <strong>the</strong> wireless <strong>PC</strong> card.For <strong>the</strong> access point and wireless nodes to communicate with each o<strong>the</strong>r, all must beconfigured with <strong>the</strong> same SSID.<strong>Wireless</strong> network name (SSID): ______________________________• WEP Security Encryption key: The default WEP encryption key number is 1, and <strong>the</strong> defaultkey size is 64 bits.Note: The key number as well as <strong>the</strong> key value used by all wireless nodes must be <strong>the</strong> same. If<strong>the</strong>y are different, you will not be able to connect.WEP Encryption Key Size, circle one: 64 or 128 bitsWEP Encryption Passphrase, if used: ____________________________3-8 Configuration
<strong>User</strong> <strong>Manual</strong> <strong>for</strong> <strong>the</strong> <strong>NETGEAR</strong> <strong>54</strong> <strong>Mbps</strong> <strong>Wireless</strong> <strong>PC</strong> <strong>Card</strong> <strong>WG511v2</strong>A Passphrase is used to automatically generate <strong>the</strong> WEP hexadecimal numbers <strong>for</strong> <strong>the</strong> key. If<strong>the</strong> wireless network Access Point uses a Passphrase, you can also use that here. O<strong>the</strong>rwise,you will have to manually enter <strong>the</strong> hexadecimal numbers.WEP Hexadecimal Numbers: ______________________________The WEP Hexadecimal Numbers are needed if a Passphrase is not used in <strong>the</strong> wirelessnetwork access point, but ra<strong>the</strong>r if <strong>the</strong> key is manually entered.Use <strong>the</strong> procedures below to configure basic security settings in <strong>the</strong> <strong>WG511v2</strong>.How to Configure WEP Encryption SecurityFollow <strong>the</strong> steps below to configure WEP Encryption Security.1. Run <strong>the</strong> <strong>WG511v2</strong> Configuration Utility.a. Make sure <strong>the</strong> <strong>WG511v2</strong> software is installed and <strong>the</strong> <strong>WG511v2</strong> is fully inserted in anavailable <strong>Card</strong>Bus slot in your <strong>PC</strong>.b. Open <strong>the</strong> configuration utility by clicking on <strong>the</strong> <strong>WG511v2</strong> icon in <strong>the</strong> Windowssystem tray.c. Click on <strong>the</strong> Settings tab to display <strong>the</strong> view shown below.Figure 3-6: Settings tab pageConfiguration 3-9
<strong>User</strong> <strong>Manual</strong> <strong>for</strong> <strong>the</strong> <strong>NETGEAR</strong> <strong>54</strong> <strong>Mbps</strong> <strong>Wireless</strong> <strong>PC</strong> <strong>Card</strong> <strong>WG511v2</strong>2. Configure <strong>the</strong> Security settings.a. Enter <strong>the</strong> SSID. This is also called <strong>the</strong> <strong>Wireless</strong> Network Name.Note: You will not get a wireless network connection unless <strong>the</strong> network SSID matchesexactly what is configured in <strong>the</strong> access point.Tip: You can click <strong>the</strong> Networks tab to view a list of <strong>the</strong> available wireless networks and<strong>the</strong>ir SSIDs at your location.b. In <strong>the</strong> Security section, select WEP.3. Select <strong>the</strong> WEP encryption strength you will use.The choices are:• 64-bit WEP data encryption• 128-bit WEP data encryptionNote: Larger encryption keys require more processing and may slow <strong>the</strong> communicationsresponse times.4. Select Create with Passphrase and enter <strong>the</strong> passphrase. The configuration utility willautomatically generate <strong>the</strong> WEP keys.Note: The characters are case sensitive. Be sure to use <strong>the</strong> same passphrase <strong>for</strong> all <strong>the</strong> wirelessdevices in <strong>the</strong> network.If <strong>the</strong> passphrase method is not available in <strong>the</strong> o<strong>the</strong>r devices, you must manually enter <strong>the</strong>keys to match exactly what is in <strong>the</strong> access point and o<strong>the</strong>r 802.11b wireless devices.5. Save your settings in a Profile.a. Type a descriptive name in <strong>the</strong> Profiles field.b. Click Save Profile. All <strong>the</strong> configuration settings are saved in this profile.c. Click Apply.6. Click Close to exit <strong>the</strong> configuration utility.3-10 Configuration
<strong>User</strong> <strong>Manual</strong> <strong>for</strong> <strong>the</strong> <strong>NETGEAR</strong> <strong>54</strong> <strong>Mbps</strong> <strong>Wireless</strong> <strong>PC</strong> <strong>Card</strong> <strong>WG511v2</strong>How to Configure WPA-PSK Encryption SecurityWi-Fi Protected Access (WPA) is wireless security with far greater protection than WEP.WPS-PSK (pre-shared key) uses encryption of a shared key as <strong>the</strong> starting point. WPA has asignificant advantages over WEP — an encryption key differing in every packet. It is extremelydifficult <strong>for</strong> hackers to read messages even if <strong>the</strong>y have intercepted <strong>the</strong> data.The Advanced Security button is used to set WPA-PSK security. It is located in <strong>the</strong> Settings page,Security section.1. Open <strong>the</strong> configuration utility by clicking on <strong>the</strong> <strong>WG511v2</strong> icon in <strong>the</strong> Windowssystem tray.2. Select WPA-PSK to display <strong>the</strong> passphrase text box.3. Enter a Passphrase. The Passphrase can be between 8 and 63 characters.4. Click Apply.For more in<strong>for</strong>mation on WPA security, see “WPA <strong>Wireless</strong> Security” on page B-8.Configuration 3-11
<strong>User</strong> <strong>Manual</strong> <strong>for</strong> <strong>the</strong> <strong>NETGEAR</strong> <strong>54</strong> <strong>Mbps</strong> <strong>Wireless</strong> <strong>PC</strong> <strong>Card</strong> <strong>WG511v2</strong>Networks PageThe Networks Page scans and displays all available wireless networks in your area.Figure 3-7: Networks pageThe following in<strong>for</strong>mation is displayed <strong>for</strong> each network scanned:• <strong>Wireless</strong> Network Name (SSID): <strong>Wireless</strong> Network Name (SSID) is <strong>the</strong> name assigned to awireless network. This is <strong>the</strong> same as <strong>the</strong> SSID or ESSID configuration parameter. Note that asa security measure, some wireless access points do not broadcast <strong>the</strong>ir SSID. In such cases, <strong>the</strong>SSID field will be blank even though <strong>the</strong> rest of <strong>the</strong> in<strong>for</strong>mation will still be displayed.• Channel: The channel determines which operating frequency will be used.• Au<strong>the</strong>ntication: Identifies whe<strong>the</strong>r <strong>the</strong> wireless network requires au<strong>the</strong>ntication.• Encryption: Identifies whe<strong>the</strong>r <strong>the</strong> wireless network requires WEP or WPA-PSK securitysettings.• Signal: Identifies <strong>the</strong> signal strength of <strong>the</strong> communications.• MAC Address: Identifies <strong>the</strong> hardware address (MAC Address) of <strong>the</strong> wireless devicebroadcasting this in<strong>for</strong>mation.• Mode: Identifies <strong>the</strong> type of wireless network — Access Point (Infrastructure) orComputer-to-Computer (Ad Hoc).3-12 Configuration
<strong>User</strong> <strong>Manual</strong> <strong>for</strong> <strong>the</strong> <strong>NETGEAR</strong> <strong>54</strong> <strong>Mbps</strong> <strong>Wireless</strong> <strong>PC</strong> <strong>Card</strong> <strong>WG511v2</strong>Statistics PageThe Statistics page provides real time and historical trend in<strong>for</strong>mation on <strong>the</strong> data traffic andper<strong>for</strong>mance of your wireless adapter.Figure 3-8: Statistics tab page• Transmit/Receive Per<strong>for</strong>mance (%): A real time graph identifying <strong>the</strong> transmit, receive, ortotal utilization as a percentage <strong>the</strong> total possible. The Transmit, Receive, and Total (TxRx)radio buttons let you select whe<strong>the</strong>r to display <strong>the</strong> transmit per<strong>for</strong>mance, <strong>the</strong> receiveper<strong>for</strong>mance, or <strong>the</strong> total of both in <strong>the</strong> same graph. Total is <strong>the</strong> default.• Transmit Statistics: Identifies transmit megabits per second (<strong>Mbps</strong>), transmit packets persecond (Tx Packets/s), total transmitted packets, and transmit errors.• Receive Statistics: Identifies receive megabits per second (<strong>Mbps</strong>), receive packets per second(Rx Packets/s), total received packets, and reception errors.Configuration 3-13
<strong>User</strong> <strong>Manual</strong> <strong>for</strong> <strong>the</strong> <strong>NETGEAR</strong> <strong>54</strong> <strong>Mbps</strong> <strong>Wireless</strong> <strong>PC</strong> <strong>Card</strong> <strong>WG511v2</strong>About PageThe About page displays <strong>the</strong> current software version in<strong>for</strong>mation.Figure 3-9: About pageThe following in<strong>for</strong>mation is displayed in <strong>the</strong> About page:• Regional Domain: This is <strong>the</strong> region setting <strong>for</strong> <strong>the</strong> wireless adapter. The approved channels<strong>for</strong> <strong>the</strong> region are automatically scanned. Governments regulate <strong>the</strong> channels used <strong>for</strong> wirelesstransmission. Operating <strong>the</strong> wireless adapter in a different region may violate local laws.• Driver Version: The wireless adapter driver version.• Driver Date: The wireless adapter driver release date.• MAC Address: The MAC address of <strong>the</strong> adapter. The Media Access Control address is aunique 48-bit hardware address assigned to every network interface card. Some wirelessnetworks will restrict access based on a list of known MAC addresses. If you arecommunicating with such a network, you would have to provide <strong>the</strong> address shown here to <strong>the</strong>network administrator be<strong>for</strong>e you would be allowed to connect. Restricting access by MACaddress adds an obstacle against unwanted access to your network. However, unless you usedata encryption security, <strong>the</strong> data broadcast over <strong>the</strong> wireless link is fully exposed.• IP Address: The IP address assigned to this adapter.• Smart Wizard <strong>Wireless</strong> Utility: The version and release date of this utility.3-14 Configuration
Chapter 4TroubleshootingThis chapter provides in<strong>for</strong>mation about troubleshooting your <strong>NETGEAR</strong> <strong>54</strong> <strong>Mbps</strong> <strong>Wireless</strong> <strong>PC</strong><strong>Card</strong> <strong>WG511v2</strong>. After each problem description, instructions are given to help you diagnose andsolve <strong>the</strong> problem.Also, <strong>for</strong> problems with accessing network resources, <strong>the</strong> Windows software might not be installedand configured properly on your computers. Please refer to Appendix C, “Preparing Your <strong>PC</strong>s <strong>for</strong>Network Access”.Basic Troubleshooting TipsIf you have problems connecting to your wireless network, try <strong>the</strong> tips below.Symptom Cause SolutionThe <strong>PC</strong> <strong>Card</strong>LEDs are not lit.The LEDs blinkalternately andcannot connectto an accesspoint.The <strong>WG511v2</strong> isnot inserted into<strong>the</strong> slot properlyor <strong>the</strong> <strong>WG511v2</strong>software is notloaded.The <strong>WG511v2</strong> isattempting toconnect to anaccess point, butcannot connect.Remove and reinsert <strong>the</strong> <strong>WG511v2</strong>.Check <strong>the</strong> Windows device manager to see if <strong>the</strong> <strong>PC</strong><strong>Card</strong> is recognized and enabled. Reload <strong>the</strong> <strong>WG511v2</strong>software, if necessary.The access point may not be powered on. Or, <strong>the</strong>access point and <strong>the</strong> <strong>PC</strong> card are not configured with<strong>the</strong> same wireless parameters. Check <strong>the</strong> SSID andWEP settings.Troubleshooting 4-1
<strong>User</strong> <strong>Manual</strong> <strong>for</strong> <strong>the</strong> <strong>NETGEAR</strong> <strong>54</strong> <strong>Mbps</strong> <strong>Wireless</strong> <strong>PC</strong> <strong>Card</strong> <strong>WG511v2</strong>I can connect toan access point,but I cannotconnect to o<strong>the</strong>rcomputers on<strong>the</strong> network or<strong>the</strong> Internet.This could be aphysical layerproblem or anetworkconfigurationproblem.Check to make sure that <strong>the</strong> access point is physicallyconnected to <strong>the</strong> E<strong>the</strong>rnet network.Make sure that <strong>the</strong> IP addresses and <strong>the</strong> Windowsnetworking parameters are all configured correctly.Restart <strong>the</strong> cable or DSL modem, router, access point,and notebook <strong>PC</strong>.Frequently Asked QuestionsUse <strong>the</strong> in<strong>for</strong>mation below to solve common problems you may encounter. Also, please refer to <strong>the</strong>knowledge base on <strong>the</strong> <strong>NETGEAR</strong> web site at www.netgear.com/support/main.asp.The <strong>WG511v2</strong> Smart Configuration Utility keeps asking me tosave my settingsThis is because you have made changes to <strong>the</strong> settings and <strong>the</strong> utility is offering you <strong>the</strong> chance tosave <strong>the</strong> changes. If you want to avoid <strong>the</strong>se Profile setting prompts, simply click Apply be<strong>for</strong>eyou close <strong>the</strong> utility program.Ad Hoc mode is not working correctlyYou need to click <strong>the</strong> Initiate Ad Hoc button be<strong>for</strong>e you click Apply. Here is how you start an AdHoc network:1. Fill in <strong>the</strong> Network Name (SSID).2. Select <strong>the</strong> Computer-to-Computer (Ad Hoc) Network Type.3. Click Initiate Ad Hoc.4. Accept <strong>the</strong> default settings or make your changes and click OK.5. Click Apply.Note: Be sure all computers in your Ad Hoc network are configured with static IP addresses in <strong>the</strong>same subnet.4-2 Troubleshooting
<strong>User</strong> <strong>Manual</strong> <strong>for</strong> <strong>the</strong> <strong>NETGEAR</strong> <strong>54</strong> <strong>Mbps</strong> <strong>Wireless</strong> <strong>PC</strong> <strong>Card</strong> <strong>WG511v2</strong>How to know if <strong>the</strong> <strong>WG511v2</strong> card has received a valid IP addressfrom <strong>the</strong> <strong>Wireless</strong> Router/APThe easiest way is to open up <strong>the</strong> <strong>WG511v2</strong> utility program and check <strong>the</strong> IP address in <strong>the</strong> Aboutpage.How to use XP’s own <strong>Wireless</strong> configuration utility that comeswith Windows XPThe <strong>NETGEAR</strong> <strong>WG511v2</strong> software is designed so that <strong>the</strong> user will be asked to choose one of <strong>the</strong>utility programs during initial software installation. Be sure <strong>the</strong> <strong>WG511v2</strong> is connected to <strong>the</strong> <strong>PC</strong>and follow <strong>the</strong>se instructions to change your selection.1. Go to Control Panel and select Network Connections.2. Right click on <strong>the</strong> connection and select Properties.3. Click <strong>the</strong> <strong>Wireless</strong> Networks tab.4. Select or clear <strong>the</strong> <strong>WG511v2</strong> “Use Windows to configure my wireless network settings” checkbox.How to remove <strong>the</strong> <strong>WG511v2</strong> utility and softwareTo remove <strong>the</strong> WG511 software, go to Windows Start > Programs > <strong>NETGEAR</strong> WG511 Adapter.Select Uninstall WG511 software.I cannot connect to <strong>the</strong> AP that I want from <strong>the</strong> Networks browserlist.The access point is available and <strong>the</strong>re is good signal strength. There are a few possibilities:• If <strong>the</strong> access point (AP) is WPA-PSK protected, you will need to have <strong>the</strong> correct WPA-PSKpassphrase. O<strong>the</strong>rwise, <strong>the</strong> <strong>WG511v2</strong> will still be connected to <strong>the</strong> previous access point andyou will not be able to change to <strong>the</strong> WPA-PSA access point.• If <strong>the</strong> access point is WEP protected (ei<strong>the</strong>r 64 or 128 bit encryption), you will be prompted toenter <strong>the</strong> WEP encryption security in<strong>for</strong>mation.Troubleshooting 4-3
<strong>User</strong> <strong>Manual</strong> <strong>for</strong> <strong>the</strong> <strong>NETGEAR</strong> <strong>54</strong> <strong>Mbps</strong> <strong>Wireless</strong> <strong>PC</strong> <strong>Card</strong> <strong>WG511v2</strong>The <strong>WG511v2</strong> is not getting an IP addressYou probably upgraded your <strong>WG511v2</strong> software and did not reboot your system.To get an IP address assigned, you can ei<strong>the</strong>r restart your computer or choose ano<strong>the</strong>r access pointto connect to. If <strong>the</strong>re are no additional access points <strong>for</strong> you to choose from, restart your systemand connect to your desired access point again.Note: It does not usually help to shut down <strong>the</strong> utility or disable/enable <strong>the</strong> card.Why do I see two <strong>WG511v2</strong> utilities icons in <strong>the</strong> System Tray?If you see two WG511 utilities icons in <strong>the</strong> System Tray at <strong>the</strong> bottom right corner of <strong>the</strong> screen,you have <strong>the</strong> previous <strong>WG511v2</strong> software installed on your system and it needs to be removed.Follow <strong>the</strong> procedures below to remove <strong>the</strong> old <strong>WG511v2</strong> software.To remove <strong>the</strong> WG511 software, use “Add or Remove Programs” in <strong>the</strong> Control Panel and remove<strong>the</strong> <strong>NETGEAR</strong> WG511 <strong>54</strong><strong>Mbps</strong> <strong>Wireless</strong> <strong>PC</strong> <strong>Card</strong>.If you would like to keep <strong>the</strong> original WG511 utility and use it interchangeably, you can do so byupgrading your current WG511 software from v1.1 or v1.2 to v1.5. The v1.5 utility will co-existwith <strong>the</strong> new WG511T utility. In this way, <strong>the</strong> correct utility will be activated <strong>for</strong> <strong>the</strong> correspondingcard.To upgrade your software from v1.1 or v1.2 to v1.5, follow <strong>the</strong> procedure below:1. Run WG511v15.exe.2. Select Repair from <strong>the</strong> InstallShield Wizard prompt and click Next.3. Click Finish when done to restart your computer.Your WG511v1.5 upgrade is complete. This should solve <strong>the</strong> two utility display issue.XP Professional and XP Home occasional connection problemsSome WG511T XP users will experience inability to connect to <strong>the</strong> Internet, dropped wirelessconnections, or both after applying <strong>the</strong> Windows HotFix #Q81<strong>54</strong>85 from <strong>the</strong> Windows XP UpdateService.You can delete <strong>the</strong> Q81<strong>54</strong>85 from <strong>the</strong> Add or Remove Program utility in <strong>the</strong> Control Panel. (TheOfficial name is Windows XP Hotfix (SP2) Q81<strong>54</strong>85).4-4 Troubleshooting
<strong>User</strong> <strong>Manual</strong> <strong>for</strong> <strong>the</strong> <strong>NETGEAR</strong> <strong>54</strong> <strong>Mbps</strong> <strong>Wireless</strong> <strong>PC</strong> <strong>Card</strong> <strong>WG511v2</strong>Follow this removal procedure:1. Click Start, point to Control Panel, and <strong>the</strong>n double-click Add/Remove Programs.2. Click Windows XP Hotfix (SP2) Q81<strong>54</strong>85, and <strong>the</strong>n click Remove.3. You may receive an error message that states that some program on <strong>the</strong> computer may notwork correctly if <strong>the</strong> update is removed.4. You can ignore this error message, and <strong>the</strong>n click Yes to remove <strong>the</strong> update.5. Restart your computer and rerun <strong>the</strong> Smart Display Setup Wizard.This should solve your connection issue.You can restore this hotfix by following <strong>the</strong> link below:URL: http://microsoft.com/downloads/details.aspx?FamilyId=009D8425-CE2B-47A4-ABEC-274845DC9E91&displaylang=enTroubleshooting 4-5
<strong>User</strong> <strong>Manual</strong> <strong>for</strong> <strong>the</strong> <strong>NETGEAR</strong> <strong>54</strong> <strong>Mbps</strong> <strong>Wireless</strong> <strong>PC</strong> <strong>Card</strong> <strong>WG511v2</strong>4-6 Troubleshooting
Appendix ATechnical SpecificationsThis appendix provides technical specifications <strong>for</strong> <strong>the</strong> <strong>NETGEAR</strong> <strong>54</strong> <strong>Mbps</strong> <strong>Wireless</strong> <strong>PC</strong> <strong>Card</strong><strong>WG511v2</strong>.AntennaeRadio Data RateFrequencyPower ConsumptionEmissionsBus interfaceProvided driversDimensionsWeightStatus LEDOperating EnvironmentEncryptionWarranty2 Integrated internal diversity antennae1, 2, 5.5, 6, 9, 12, 18, 24, 36, 48, and <strong>54</strong> <strong>Mbps</strong> (Auto Rate Sensing)2.4GHz to 2.5GHz CCK and OFDM Modulation)3.3V DC, typically 450mA in full Transmit (TX), 280mA in full Receive (RX)FCC, CE, IC<strong>Card</strong>busMicrosoft Windows 98SE, 2000 Professional, ME, XPL: 120mmW: <strong>54</strong> mmH: 7 mm40 g<strong>Wireless</strong> Link, DataOperating temperature: 0 to 55 degrees C40-bit (also called 64-bit) and 128-bit WEP data encryptionLimited 1-year warrantyTechnical Specifications A-1
<strong>User</strong> <strong>Manual</strong> <strong>for</strong> <strong>the</strong> <strong>NETGEAR</strong> <strong>54</strong> <strong>Mbps</strong> <strong>Wireless</strong> <strong>PC</strong> <strong>Card</strong> <strong>WG511v2</strong>A-2 Technical Specifications
Appendix B<strong>Wireless</strong> Networking BasicsThis chapter provides an overview of <strong>Wireless</strong> networking.<strong>Wireless</strong> Networking OverviewThe <strong>WG511v2</strong> <strong>Wireless</strong> <strong>PC</strong> <strong>Card</strong> con<strong>for</strong>ms to <strong>the</strong> Institute of Electrical and Electronics Engineers(IEEE) 802.11b standard <strong>for</strong> wireless LANs (WLANs) and a product update will bring <strong>the</strong><strong>WG511v2</strong> into con<strong>for</strong>mance to <strong>the</strong> 802.11g standard when it is ratified. On an 802.11b or gwireless link, data is encoded using direct-sequence spread-spectrum (DSSS) technology and istransmitted in <strong>the</strong> unlicensed radio spectrum at 2.5GHz. The maximum data rate <strong>for</strong> <strong>the</strong> wirelesslink is 11 <strong>Mbps</strong>, but it will automatically back down from 11 <strong>Mbps</strong> to 5.5, 2, and 1 <strong>Mbps</strong> when <strong>the</strong>radio signal is weak or when interference is detected. The 802.11g auto rate sensing rates are 1, 2,5.5, 6, 9, 12, 18, 24, 36, 48, and <strong>54</strong> <strong>Mbps</strong>.The 802.11 standard is also called <strong>Wireless</strong> E<strong>the</strong>rnet or Wi-Fi by <strong>the</strong> <strong>Wireless</strong> E<strong>the</strong>rnetCompatibility Alliance (WECA, see http://www.wi-fi.net), an industry standard group promotinginteroperability among 802.11 devices. The 802.11 standard offers two methods <strong>for</strong> configuring awireless network - ad hoc and infrastructure.Infrastructure ModeWith a wireless Access Point, you can operate <strong>the</strong> wireless LAN in <strong>the</strong> infrastructure mode. Thismode provides wireless connectivity to multiple wireless network devices within a fixed range orarea of coverage, interacting with wireless nodes via an antenna.In <strong>the</strong> infrastructure mode, <strong>the</strong> wireless access point converts airwave data into wired E<strong>the</strong>rnetdata, acting as a bridge between <strong>the</strong> wired LAN and wireless clients. Connecting multiple AccessPoints via a wired E<strong>the</strong>rnet backbone can fur<strong>the</strong>r extend <strong>the</strong> wireless network coverage. As amobile computing device moves out of <strong>the</strong> range of one access point, it moves into <strong>the</strong> range ofano<strong>the</strong>r. As a result, wireless clients can freely roam from one Access Point domain to ano<strong>the</strong>r andstill maintain seamless network connection.<strong>Wireless</strong> Networking Basics B-1
<strong>User</strong> <strong>Manual</strong> <strong>for</strong> <strong>the</strong> <strong>NETGEAR</strong> <strong>54</strong> <strong>Mbps</strong> <strong>Wireless</strong> <strong>PC</strong> <strong>Card</strong> <strong>WG511v2</strong>Ad Hoc Mode (Peer-to-Peer Workgroup)In an ad hoc network, computers are brought toge<strong>the</strong>r as needed; thus, <strong>the</strong>re is no structure or fixedpoints to <strong>the</strong> network - each node can generally communicate with any o<strong>the</strong>r node. There is noAccess Point involved in this configuration. This mode enables you to quickly set up a smallwireless workgroup and allows workgroup members to exchange data or share printers assupported by Microsoft networking in <strong>the</strong> various Windows operating systems. Some vendors alsorefer to ad hoc networking as peer-to-peer group networking.In this configuration, network packets are directly sent and received by <strong>the</strong> intended transmittingand receiving stations. As long as <strong>the</strong> stations are within range of one ano<strong>the</strong>r, this is <strong>the</strong> easiestand least expensive way to set up a wireless network.Network Name: Extended Service Set Identification (ESSID)The Extended Service Set Identification (ESSID) is one of two types of Service Set Identification(SSID). In an ad hoc wireless network with no access points, <strong>the</strong> Basic Service Set Identification(BSSID) is used. In an infrastructure wireless network that includes an access point, <strong>the</strong> ESSID isused, but may still be referred to as SSID.An SSID is a thirty-two character (maximum) alphanumeric key identifying <strong>the</strong> name of <strong>the</strong>wireless local area network. Some vendors refer to <strong>the</strong> SSID as network name. For <strong>the</strong> wirelessdevices in a network to communicate with each o<strong>the</strong>r, all devices must be configured with <strong>the</strong>same SSID.Au<strong>the</strong>ntication and WEPThe absence of a physical connection between nodes makes <strong>the</strong> wireless links vulnerable toeavesdropping and in<strong>for</strong>mation <strong>the</strong>ft. To provide a certain level of security, <strong>the</strong> IEEE 802.11standard has defined two types of au<strong>the</strong>ntication methods, Open System and Shared Key. WithOpen System au<strong>the</strong>ntication, a wireless <strong>PC</strong> can join any network and receive any messages that arenot encrypted. With Shared Key au<strong>the</strong>ntication, only those <strong>PC</strong>s that possess <strong>the</strong> correctau<strong>the</strong>ntication key can join <strong>the</strong> network. By default, IEEE 802.11 wireless devices operate in anOpen System network.Wired Equivalent Privacy (WEP) data encryption is used when <strong>the</strong> wireless devices are configuredto operate in Shared Key au<strong>the</strong>ntication mode. There are two shared key methods implemented inmost commercially available products, 64-bit and 128-bit WEP data encryption.B-2 <strong>Wireless</strong> Networking Basics
<strong>User</strong> <strong>Manual</strong> <strong>for</strong> <strong>the</strong> <strong>NETGEAR</strong> <strong>54</strong> <strong>Mbps</strong> <strong>Wireless</strong> <strong>PC</strong> <strong>Card</strong> <strong>WG511v2</strong>802.11 Au<strong>the</strong>nticationThe 802.11 standard defines several services that govern how two 802.11 devices communicate.The following events must occur be<strong>for</strong>e an 802.11 Station can communicate with an E<strong>the</strong>rnetnetwork through an access point such as <strong>the</strong> one built in to <strong>the</strong> <strong>WG511v2</strong>:1. Turn on <strong>the</strong> wireless station.2. The station listens <strong>for</strong> messages from any access points that are in range.3. The station finds a message from an access point that has a matching SSID.4. The station sends an au<strong>the</strong>ntication request to <strong>the</strong> access point.5. The access point au<strong>the</strong>nticates <strong>the</strong> station.6. The station sends an association request to <strong>the</strong> access point.7. The access point associates with <strong>the</strong> station.8. The station can now communicate with <strong>the</strong> E<strong>the</strong>rnet network through <strong>the</strong> access point.An access point must au<strong>the</strong>nticate a station be<strong>for</strong>e <strong>the</strong> station can associate with <strong>the</strong> access point orcommunicate with <strong>the</strong> network. The IEEE 802.11 standard defines two types of au<strong>the</strong>ntication:Open System and Shared Key.• Open System Au<strong>the</strong>ntication allows any device to join <strong>the</strong> network, assuming that <strong>the</strong> deviceSSID matches <strong>the</strong> access point SSID. Alternatively, <strong>the</strong> device can use <strong>the</strong> “ANY” SSIDoption to associate with any available Access Point within range, regardless of its SSID.• Shared Key Au<strong>the</strong>ntication requires that <strong>the</strong> station and <strong>the</strong> access point have <strong>the</strong> same WEPKey to au<strong>the</strong>nticate. These two au<strong>the</strong>ntication procedures are described below.Open System Au<strong>the</strong>nticationThe following steps occur when two devices use Open System Au<strong>the</strong>ntication:1. The station sends an au<strong>the</strong>ntication request to <strong>the</strong> access point.2. The access point au<strong>the</strong>nticates <strong>the</strong> station.3. The station associates with <strong>the</strong> access point and joins <strong>the</strong> network.This process is illustrated in below.<strong>Wireless</strong> Networking Basics B-3
Cable/DSLProSafe<strong>Wireless</strong>VPN Security FirewallPWRTESTIN TERN ETLNKACTMODELWLANLOCALFVM318100EnableLNK/ACT1 2 3 4 5 6 7 8<strong>User</strong> <strong>Manual</strong> <strong>for</strong> <strong>the</strong> <strong>NETGEAR</strong> <strong>54</strong> <strong>Mbps</strong> <strong>Wireless</strong> <strong>PC</strong> <strong>Card</strong> <strong>WG511v2</strong>802.11 Au<strong>the</strong>nticationOpen System Steps1) Au<strong>the</strong>ntication request sent to APAccess Point (AP)2) AP au<strong>the</strong>nticatesClientattemptingto connect3) Client connects to networkCable orDLS modemFigure 4-1: 802.11 open system au<strong>the</strong>nticationShared Key Au<strong>the</strong>nticationThe following steps occur when two devices use Shared Key Au<strong>the</strong>ntication:1. The station sends an au<strong>the</strong>ntication request to <strong>the</strong> access point.2. The access point sends challenge text to <strong>the</strong> station.3. The station uses its configured 64-bit or 128-bit default key to encrypt <strong>the</strong> challenge text, andsends <strong>the</strong> encrypted text to <strong>the</strong> access point.4. The access point decrypts <strong>the</strong> encrypted text using its configured WEP Key that correspondsto <strong>the</strong> station’s default key. The access point compares <strong>the</strong> decrypted text with <strong>the</strong> originalchallenge text. If <strong>the</strong> decrypted text matches <strong>the</strong> original challenge text, <strong>the</strong>n <strong>the</strong> access pointand <strong>the</strong> station share <strong>the</strong> same WEP Key and <strong>the</strong> access point au<strong>the</strong>nticates <strong>the</strong> station.5. The station connects to <strong>the</strong> network.If <strong>the</strong> decrypted text does not match <strong>the</strong> original challenge text (i.e., <strong>the</strong> access point and station donot share <strong>the</strong> same WEP Key), <strong>the</strong>n <strong>the</strong> access point will refuse to au<strong>the</strong>nticate <strong>the</strong> station and <strong>the</strong>station will be unable to communicate with ei<strong>the</strong>r <strong>the</strong> 802.11 network or E<strong>the</strong>rnet network.This process is illustrated in below.B-4 <strong>Wireless</strong> Networking Basics
Cable/DSLProSafe<strong>Wireless</strong>VPN Security FirewallPWRTESTIN TERN ETLNKACTMODELWLANLOCALFVM318100EnableLNK/ACT1 2 3 4 5 6 7 8<strong>User</strong> <strong>Manual</strong> <strong>for</strong> <strong>the</strong> <strong>NETGEAR</strong> <strong>54</strong> <strong>Mbps</strong> <strong>Wireless</strong> <strong>PC</strong> <strong>Card</strong> <strong>WG511v2</strong>802.11 Au<strong>the</strong>nticationShared Key Steps1) Au<strong>the</strong>nticationrequest sent to APAccess Point (AP)Clientattemptingto connect3) Client encryptschallenge text andsends it back to AP2) AP sends challenge textCable orDLS modem4) AP decrypts, and if correct,au<strong>the</strong>nticates client5) Client connects to networkFigure 4-2: 802.11 shared key au<strong>the</strong>nticationOverview of WEP ParametersBe<strong>for</strong>e enabling WEP on an 802.11 network, you must first consider what type of encryption yourequire and <strong>the</strong> key size you want to use. Typically, <strong>the</strong>re are three WEP Encryption optionsavailable <strong>for</strong> 802.11 products:1. Do Not Use WEP: The 802.11 network does not encrypt data. For au<strong>the</strong>ntication purposes, <strong>the</strong>network uses Open System Au<strong>the</strong>ntication.2. Use WEP <strong>for</strong> Encryption: A transmitting 802.11 device encrypts <strong>the</strong> data portion of everypacket it sends using a configured WEP Key. The receiving 802.11b device decrypts <strong>the</strong> data using<strong>the</strong> same WEP Key. For au<strong>the</strong>ntication purposes, <strong>the</strong> 802.11b network uses Open SystemAu<strong>the</strong>ntication.3. Use WEP <strong>for</strong> Au<strong>the</strong>ntication and Encryption: A transmitting 802.11 device encrypts <strong>the</strong> dataportion of every packet it sends using a configured WEP Key. The receiving 802.11 devicedecrypts <strong>the</strong> data using <strong>the</strong> same WEP Key. For au<strong>the</strong>ntication purposes, <strong>the</strong> 802.11 network usesShared Key Au<strong>the</strong>ntication.Note: Some 802.11 access points also support Use WEP <strong>for</strong> Au<strong>the</strong>ntication Only (Shared KeyAu<strong>the</strong>ntication without data encryption).<strong>Wireless</strong> Networking Basics B-5
<strong>User</strong> <strong>Manual</strong> <strong>for</strong> <strong>the</strong> <strong>NETGEAR</strong> <strong>54</strong> <strong>Mbps</strong> <strong>Wireless</strong> <strong>PC</strong> <strong>Card</strong> <strong>WG511v2</strong>Key SizeThe IEEE 802.11 standard supports two types of WEP encryption: 40-bit and 128-bit.The 64-bit WEP data encryption method, allows <strong>for</strong> a five-character (40-bit) input. Additionally,24 factory-set bits are added to <strong>the</strong> <strong>for</strong>ty-bit input to generate a 64-bit encryption key. (The 24factory-set bits are not user-configurable). This encryption key will be used to encrypt/decrypt alldata transmitted via <strong>the</strong> wireless interface. Some vendors refer to <strong>the</strong> 64-bit WEP data encryptionas 40-bit WEP data encryption since <strong>the</strong> user-configurable portion of <strong>the</strong> encryption key is 40 bitswide.The 128-bit WEP data encryption method consists of 104 user-configurable bits. Similar to <strong>the</strong><strong>for</strong>ty-bit WEP data encryption method, <strong>the</strong> remaining 24 bits are factory set and not userconfigurable. Some vendors allow passphrases to be entered instead of <strong>the</strong> cryptic hexadecimalcharacters to ease encryption key entry.128-bit encryption is stronger than 40-bit encryption, but 128-bit encryption may not be availableoutside of <strong>the</strong> United States due to U.S. export regulations.When configured <strong>for</strong> 40-bit encryption, 802.11 products typically support up to four WEP Keys.Each 40-bit WEP Key is expressed as 5 sets of two hexadecimal digits (0-9 and A-F). Forexample, “12 34 56 78 90” is a 40-bit WEP Key.When configured <strong>for</strong> 128-bit encryption, 802.11b products typically support four WEP Keys butsome manufacturers support only one 128-bit key. The 128-bit WEP Key is expressed as 13 sets oftwo hexadecimal digits (0-9 and A-F). For example, “12 34 56 78 90 AB CD EF 12 34 56 78 90”is a 128-bit WEP Key.Note: Typically, 802.11 access points can store up to four 128-bit WEP Keys but some 802.11client adapters can only store one. There<strong>for</strong>e, make sure that your 802.11 access and clientadapters configurations match.WEP Configuration OptionsThe WEP settings must match on all 802.11 devices that are within <strong>the</strong> same wireless network asidentified by <strong>the</strong> SSID. In general, if your mobile clients will roam between access points, <strong>the</strong>n allof <strong>the</strong> 802.11 access points and all of <strong>the</strong> 802.11 client adapters on <strong>the</strong> network must have <strong>the</strong> sameWEP settings.B-6 <strong>Wireless</strong> Networking Basics
<strong>User</strong> <strong>Manual</strong> <strong>for</strong> <strong>the</strong> <strong>NETGEAR</strong> <strong>54</strong> <strong>Mbps</strong> <strong>Wireless</strong> <strong>PC</strong> <strong>Card</strong> <strong>WG511v2</strong>Note: Whatever keys you enter <strong>for</strong> an AP, you must also enter <strong>the</strong> same keys <strong>for</strong> <strong>the</strong> client adapterin <strong>the</strong> same order. In o<strong>the</strong>r words, WEP key 1 on <strong>the</strong> AP must match WEP key 1 on <strong>the</strong> clientadapter, WEP key 2 on <strong>the</strong> AP must match WEP key 2 on <strong>the</strong> client adapter, etc.Note: The AP and <strong>the</strong> client adapters can have different default WEP Keys as long as <strong>the</strong> keys arein <strong>the</strong> same order. In o<strong>the</strong>r words, <strong>the</strong> AP can use WEP key 2 as its default key to transmit while aclient adapter can use WEP key 3 as its default key to transmit. The two devices will communicateas long as <strong>the</strong> AP’s WEP key 2 is <strong>the</strong> same as <strong>the</strong> client’s WEP key 2 and <strong>the</strong> AP’s WEP key 3 is<strong>the</strong> same as <strong>the</strong> client’s WEP key 3.<strong>Wireless</strong> ChannelsIEEE 802.11b and g wireless nodes communicate with each o<strong>the</strong>r using radio frequency signals in<strong>the</strong> ISM (Industrial, Scientific, and Medical) band between 2.4 GHz and 2.5 GHz. Neighboringchannels are 5 MHz apart. However, due to spread spectrum effect of <strong>the</strong> signals, a node sendingsignals using a particular channel will utilize frequency spectrum 12.5 MHz above and below <strong>the</strong>center channel frequency. As a result, two separate wireless networks using neighboring channels(<strong>for</strong> example, channel 1 and channel 2) in <strong>the</strong> same general vicinity will interfere with each o<strong>the</strong>r.Applying two channels that allow <strong>the</strong> maximum channel separation will decrease <strong>the</strong> amount ofchannel cross-talk, and provide a noticeable per<strong>for</strong>mance increase over networks with minimalchannel separation.<strong>Wireless</strong> Networking Basics B-7
<strong>User</strong> <strong>Manual</strong> <strong>for</strong> <strong>the</strong> <strong>NETGEAR</strong> <strong>54</strong> <strong>Mbps</strong> <strong>Wireless</strong> <strong>PC</strong> <strong>Card</strong> <strong>WG511v2</strong>The radio frequency channels used are listed in Table 4-1:Table 4-1.802.11b and g Radio Frequency ChannelsChannel Center Frequency Frequency Spread1 2412 MHz 2399.5 MHz - 2424.5 MHz2 2417 MHz 2404.5 MHz - 2429.5 MHz3 2422 MHz 2409.5 MHz - 2434.5 MHz4 2427 MHz 2414.5 MHz - 2439.5 MHz5 2432 MHz 2419.5 MHz - 2444.5 MHz6 2437 MHz 2424.5 MHz - 2449.5 MHz7 2442 MHz 2429.5 MHz - 24<strong>54</strong>.5 MHz8 2447 MHz 2434.5 MHz - 2459.5 MHz9 2452 MHz 2439.5 MHz - 2464.5 MHz10 2457 MHz 2444.5 MHz - 2469.5 MHz11 2462 MHz 2449.5 MHz - 2474.5 MHz12 2467 MHz 24<strong>54</strong>.5 MHz - 2479.5 MHz13 2472 MHz 2459.5 MHz - 2484.5 MHzNote: The available channels supported by <strong>the</strong> wireless products in various countries are different.The preferred channel separation between <strong>the</strong> channels in neighboring wireless networks is 25MHz (5 channels). This means that you can apply up to three different channels within yourwireless network. There are only 11 usable wireless channels in <strong>the</strong> United States. It isrecommended that you start using channel 1 and grow to use channel 6, and 11 when necessary, as<strong>the</strong>se three channels do not overlap.WPA <strong>Wireless</strong> SecurityWi-Fi Protected Access (WPA) is a specification of standards-based, interoperable securityenhancements that increase <strong>the</strong> level of data protection and access control <strong>for</strong> existing and futurewireless LAN systems.B-8 <strong>Wireless</strong> Networking Basics
<strong>User</strong> <strong>Manual</strong> <strong>for</strong> <strong>the</strong> <strong>NETGEAR</strong> <strong>54</strong> <strong>Mbps</strong> <strong>Wireless</strong> <strong>PC</strong> <strong>Card</strong> <strong>WG511v2</strong>The IEEE introduced <strong>the</strong> WEP as an optional security measure to secure 802.11b (Wi-Fi) WLANs,but inherent weaknesses in <strong>the</strong> standard soon became obvious. In response to this situation, <strong>the</strong>Wi-Fi Alliance announced a new security architecture in October 2002 that remedies <strong>the</strong>shortcomings of WEP. This standard, <strong>for</strong>merly known as Safe Secure Network (SSN), is designedto work with existing 802.11 products and offers <strong>for</strong>ward compatibility with 802.11i, <strong>the</strong> newwireless security architecture being defined in <strong>the</strong> IEEE.WPA offers <strong>the</strong> following benefits:• Enhanced data privacy• Robust key management• Data origin au<strong>the</strong>ntication• Data integrity protectionThe Wi-Fi Alliance is now per<strong>for</strong>ming interoperability certification testing on Wi-Fi ProtectedAccess products. Starting August of 2003, all new Wi-Fi certified products will have to supportWPA. <strong>NETGEAR</strong> will implement WPA on client and access point products and make thisavailable in <strong>the</strong> second half of 2003. Existing Wi-Fi certified products will have one year to addWPA support or <strong>the</strong>y will lose <strong>the</strong>ir Wi-Fi certification.The 802.11i standard is currently in draft <strong>for</strong>m, with ratification due at <strong>the</strong> end of 2003. While <strong>the</strong>new IEEE 802.11i standard is being ratified, wireless vendors have agreed on WPA as aninteroperable interim standard.How Does WPA Compare to WEP?WEP is a data encryption method and is not intended as a user au<strong>the</strong>ntication mechanism. WPAuser au<strong>the</strong>ntication is implemented using 802.1x and <strong>the</strong> Extensible Au<strong>the</strong>ntication Protocol(EAP). Support <strong>for</strong> 802.1x au<strong>the</strong>ntication is required in WPA. In <strong>the</strong> 802.11 standard, 802.1xau<strong>the</strong>ntication was optional. For details on EAP specifically, refer to IETF's RFC 2284.With 802.11 WEP, all access points and client wireless adapters on a particular wireless LAN mustuse <strong>the</strong> same encryption key. A major problem with <strong>the</strong> 802.11 standard is that <strong>the</strong> keys arecumbersome to change. If you do not update <strong>the</strong> WEP keys often, an unauthorized person with asniffing tool can monitor your network <strong>for</strong> less than a day and decode <strong>the</strong> encrypted messages.Products based on <strong>the</strong> 802.11 standard alone offer system administrators no effective method toupdate <strong>the</strong> keys.<strong>Wireless</strong> Networking Basics B-9
<strong>User</strong> <strong>Manual</strong> <strong>for</strong> <strong>the</strong> <strong>NETGEAR</strong> <strong>54</strong> <strong>Mbps</strong> <strong>Wireless</strong> <strong>PC</strong> <strong>Card</strong> <strong>WG511v2</strong>For 802.11, WEP encryption is optional. For WPA, encryption using Temporal Key IntegrityProtocol (TKIP) is required. TKIP replaces WEP with a new encryption algorithm that is strongerthan <strong>the</strong> WEP algorithm, but that uses <strong>the</strong> calculation facilities present on existing wireless devicesto per<strong>for</strong>m encryption operations. TKIP provides important data encryption enhancementsincluding a per-packet key mixing function, a message integrity check (MIC) named Michael, anextended initialization vector (IV) with sequencing rules, and a re-keying mechanism. Through<strong>the</strong>se enhancements, TKIP addresses all of known WEP vulnerabilities.How Does WPA Compare to IEEE 802.11i?WPA will be <strong>for</strong>ward compatible with <strong>the</strong> IEEE 802.11i security specification currently underdevelopment. WPA is a subset of <strong>the</strong> current 802.11i draft and uses certain pieces of <strong>the</strong> 802.11idraft that are ready to bring to market today, such as 802.1x and TKIP. The main pieces of <strong>the</strong>802.11i draft that are not included in WPA are secure IBSS (Ad Hoc mode), secure fast handoff(<strong>for</strong> specialized 802.11 VoIP phones), as well as enhanced encryption protocols, such asAES-CCMP. These features are ei<strong>the</strong>r not yet ready <strong>for</strong> market or will require hardware upgradesto implement.What are <strong>the</strong> Key Features of WPA Security?The following security features are included in <strong>the</strong> WPA standard:• WPA Au<strong>the</strong>ntication• WPA Encryption Key Management– Temporal Key Integrity Protocol (TKIP)– Michael message integrity code (MIC)– AES Support (to be phased in)• Support <strong>for</strong> a Mixture of WPA and WEP <strong>Wireless</strong> Clients, but mixing WEP and WPA isdiscouragedThese features are discussed below.WPA addresses most of <strong>the</strong> known WEP vulnerabilities and is primarily intended <strong>for</strong> wirelessinfrastructure networks as found in <strong>the</strong> enterprise. This infrastructure includes stations, accesspoints, and au<strong>the</strong>ntication servers (typically RADIUS servers). The RADIUS server holds (or hasaccess to) user credentials (<strong>for</strong> example, user names and passwords) and au<strong>the</strong>nticates wirelessusers be<strong>for</strong>e <strong>the</strong>y gain access to <strong>the</strong> network.B-10 <strong>Wireless</strong> Networking Basics
<strong>User</strong> <strong>Manual</strong> <strong>for</strong> <strong>the</strong> <strong>NETGEAR</strong> <strong>54</strong> <strong>Mbps</strong> <strong>Wireless</strong> <strong>PC</strong> <strong>Card</strong> <strong>WG511v2</strong>The strength of WPA comes from an integrated sequence of operations that encompass 802.1X/EAP au<strong>the</strong>ntication and sophisticated key management and encryption techniques. Its majoroperations include:• Network security capability determination. This occurs at <strong>the</strong> 802.11 level and iscommunicated through WPA in<strong>for</strong>mation elements in Beacon, Probe Response, and (Re)Association Requests. In<strong>for</strong>mation in <strong>the</strong>se elements includes <strong>the</strong> au<strong>the</strong>ntication method(802.1X or Pre-shared key) and <strong>the</strong> preferred cipher suite (WEP, TKIP, or AES).The primary in<strong>for</strong>mation conveyed in <strong>the</strong> Beacon frames is <strong>the</strong> au<strong>the</strong>ntication method and <strong>the</strong>cipher suite. Possible au<strong>the</strong>ntication methods include 802.1X and Pre-shared key. Pre-sharedkey is an au<strong>the</strong>ntication method that uses a statically configured pass phrase on both <strong>the</strong>stations and <strong>the</strong> access point. This obviates <strong>the</strong> need <strong>for</strong> an au<strong>the</strong>ntication server, which inmany home and small office environments will not be available nor desirable. Possible ciphersuites include: WEP, TKIP, and AES (Advanced Encryption Standard). We talk more aboutTKIP and AES when addressing data privacy below.• Au<strong>the</strong>ntication. EAP over 802.1X is used <strong>for</strong> au<strong>the</strong>ntication. Mutual au<strong>the</strong>ntication is gainedby choosing an EAP type supporting this feature and is required by WPA. 802.1X port accesscontrol prevents full access to <strong>the</strong> network until au<strong>the</strong>ntication completes. 802.1XEAPOL-Key packets are used by WPA to distribute per-session keys to those stationssuccessfully au<strong>the</strong>nticated.The supplicant in <strong>the</strong> station uses <strong>the</strong> au<strong>the</strong>ntication and cipher suite in<strong>for</strong>mation contained in<strong>the</strong> in<strong>for</strong>mation elements to decide which au<strong>the</strong>ntication method and cipher suite to use. Forexample, if <strong>the</strong> access point is using <strong>the</strong> pre-shared key method <strong>the</strong>n <strong>the</strong> supplicant need notau<strong>the</strong>nticate using full-blown 802.1X. Ra<strong>the</strong>r, <strong>the</strong> supplicant must simply prove to <strong>the</strong> accesspoint that it is in possession of <strong>the</strong> pre-shared key. If <strong>the</strong> supplicant detects that <strong>the</strong> service setdoes not contain a WPA in<strong>for</strong>mation element <strong>the</strong>n it knows it must use pre-WPA 802.1Xau<strong>the</strong>ntication and key management in order to access <strong>the</strong> network.• Key management. WPA features a robust key generation/management system that integrates<strong>the</strong> au<strong>the</strong>ntication and data privacy functions. Keys are generated after successfulau<strong>the</strong>ntication and through a subsequent 4-way handshake between <strong>the</strong> station and AccessPoint (AP).• Data Privacy (Encryption). Temporal Key Integrity Protocol (TKIP) is used to wrap WEP insophisticated cryptographic and security techniques to overcome most of its weaknesses.• Data integrity. TKIP includes a message integrity code (MIC) at <strong>the</strong> end of each plaintextmessage to ensure messages are not being spoofed.<strong>Wireless</strong> Networking Basics B-11
<strong>User</strong> <strong>Manual</strong> <strong>for</strong> <strong>the</strong> <strong>NETGEAR</strong> <strong>54</strong> <strong>Mbps</strong> <strong>Wireless</strong> <strong>PC</strong> <strong>Card</strong> <strong>WG511v2</strong>WPA Au<strong>the</strong>ntication: Enterprise-level <strong>User</strong>Au<strong>the</strong>ntication via 802.1x/EAP and RADIUS<strong>Wireless</strong> LANWired Network with Optional802.1x Port Based NetworkAccess ControlWPAenabledwirelessclient with“supplicant”WPA enabledAccess Pointusingpre-shared keyor802.1xTCP/IPPorts ClosedUntilTCP/IPPorts OpenedAfterAu<strong>the</strong>nticatedRADIUS ServerLoginAu<strong>the</strong>nticationCertificateAuthority(<strong>for</strong>exampleWin Server,VeriSign)Figure B-1: WPA OverviewIEEE 802.1x offers an effective framework <strong>for</strong> au<strong>the</strong>nticating and controlling user traffic to aprotected network, as well as providing a vehicle <strong>for</strong> dynamically varying data encryption keys viaEAP from a RADIUS server, <strong>for</strong> example. This framework enables using a central au<strong>the</strong>nticationserver, which employs mutual au<strong>the</strong>ntication so that a rogue wireless user does not join <strong>the</strong>network.It is important to note that 802.1x does not provide <strong>the</strong> actual au<strong>the</strong>ntication mechanisms. Whenusing 802.1x, <strong>the</strong> EAP type, such as Transport Layer Security (EAP-TLS), or EAP TunneledTransport Layer Security (EAP-TTLS), defines how <strong>the</strong> au<strong>the</strong>ntication takes place.Note: For environments with a Remote Au<strong>the</strong>ntication Dial-In <strong>User</strong> Service (RADIUS)infrastructure, WPA supports Extensible Au<strong>the</strong>ntication Protocol (EAP). For environmentswithout a RADIUS infrastructure, WPA supports <strong>the</strong> use of a pre-shared key.Toge<strong>the</strong>r, <strong>the</strong>se technologies provide a framework <strong>for</strong> strong user au<strong>the</strong>ntication.Windows XP implements 802.1x natively, and several <strong>NETGEAR</strong> switch and wireless accesspoint products support 802.1x.B-12 <strong>Wireless</strong> Networking Basics
<strong>User</strong> <strong>Manual</strong> <strong>for</strong> <strong>the</strong> <strong>NETGEAR</strong> <strong>54</strong> <strong>Mbps</strong> <strong>Wireless</strong> <strong>PC</strong> <strong>Card</strong> <strong>WG511v2</strong>Client with a WPAenabledwirelessadapter and supplicant(Win XP, Funk,Meetinghouse)For example, aWPA-enabled APFor example, aRADIUS serverFigure B-2: 802.1x Au<strong>the</strong>ntication SequenceThe AP sends Beacon Frames with WPA in<strong>for</strong>mation element to <strong>the</strong> stations in <strong>the</strong> service set.In<strong>for</strong>mation elements include <strong>the</strong> required au<strong>the</strong>ntication method (802.1x or Pre-shared key) and<strong>the</strong> preferred cipher suite (WEP, TKIP, or AES). Probe Responses (AP to station) and AssociationRequests (station to AP) also contain WPA in<strong>for</strong>mation elements.1. Initial 802.1x communications begin with an unau<strong>the</strong>nticated supplicant (client device)attempting to connect with an au<strong>the</strong>nticator (802.11 access point). The client sends anEAP-start message. This begins a series of message exchanges to au<strong>the</strong>nticate <strong>the</strong> client.2. The access point replies with an EAP-request identity message.<strong>Wireless</strong> Networking Basics B-13
<strong>User</strong> <strong>Manual</strong> <strong>for</strong> <strong>the</strong> <strong>NETGEAR</strong> <strong>54</strong> <strong>Mbps</strong> <strong>Wireless</strong> <strong>PC</strong> <strong>Card</strong> <strong>WG511v2</strong>3. The client sends an EAP-response packet containing <strong>the</strong> identity to <strong>the</strong> au<strong>the</strong>ntication server.The access point responds by enabling a port <strong>for</strong> passing only EAP packets from <strong>the</strong> client toan au<strong>the</strong>ntication server located on <strong>the</strong> wired side of <strong>the</strong> access point. The access point blocksall o<strong>the</strong>r traffic, such as HTTP, DHCP, and POP3 packets, until <strong>the</strong> access point can verify <strong>the</strong>client's identity using an au<strong>the</strong>ntication server (<strong>for</strong> example, RADIUS).4. The au<strong>the</strong>ntication server uses a specific au<strong>the</strong>ntication algorithm to verify <strong>the</strong> client's identity.This could be through <strong>the</strong> use of digital certificates or some o<strong>the</strong>r EAP au<strong>the</strong>ntication type.5. The au<strong>the</strong>ntication server will ei<strong>the</strong>r send an accept or reject message to <strong>the</strong> access point.6. The access point sends an EAP-success packet (or reject packet) to <strong>the</strong> client.7. If <strong>the</strong> au<strong>the</strong>ntication server accepts <strong>the</strong> client, <strong>the</strong>n <strong>the</strong> access point will transition <strong>the</strong> client'sport to an authorized state and <strong>for</strong>ward additional traffic.The important part to know at this point is that <strong>the</strong> software supporting <strong>the</strong> specific EAP typeresides on <strong>the</strong> au<strong>the</strong>ntication server and within <strong>the</strong> operating system or application “supplicant”software on <strong>the</strong> client devices. The access point acts as a “pass through” <strong>for</strong> 802.1x messages,which means that you can specify any EAP type without needing to upgrade an 802.1x-compliantaccess point. As a result, you can update <strong>the</strong> EAP au<strong>the</strong>ntication type to such devices as tokencards (Smart <strong>Card</strong>s), Kerberos, one-time passwords, certificates, and public key au<strong>the</strong>ntication, oras newer types become available and your requirements <strong>for</strong> security change.WPA Data Encryption Key ManagementWith 802.1x, <strong>the</strong> rekeying of unicast encryption keys is optional. Additionally, 802.11 and 802.1xprovide no mechanism to change <strong>the</strong> global encryption key used <strong>for</strong> multicast and broadcasttraffic. With WPA, rekeying of both unicast and global encryption keys is required.For <strong>the</strong> unicast encryption key, <strong>the</strong> Temporal Key Integrity Protocol (TKIP) changes <strong>the</strong> key <strong>for</strong>every frame, and <strong>the</strong> change is synchronized between <strong>the</strong> wireless client and <strong>the</strong> wireless accesspoint (AP). For <strong>the</strong> global encryption key, WPA includes a facility (<strong>the</strong> In<strong>for</strong>mation Element) <strong>for</strong><strong>the</strong> wireless AP to advertise <strong>the</strong> changed key to <strong>the</strong> connected wireless clients.If configured to implement dynamic key exchange, <strong>the</strong> 802.1x au<strong>the</strong>ntication server can returnsession keys to <strong>the</strong> access point along with <strong>the</strong> accept message. The access point uses <strong>the</strong> sessionkeys to build, sign and encrypt an EAP key message that is sent to <strong>the</strong> client immediately aftersending <strong>the</strong> success message. The client can <strong>the</strong>n use contents of <strong>the</strong> key message to defineapplicable encryption keys. In typical 802.1x implementations, <strong>the</strong> client can automatically changeencryption keys as often as necessary to minimize <strong>the</strong> possibility of eavesdroppers having enoughtime to crack <strong>the</strong> key in current use.B-14 <strong>Wireless</strong> Networking Basics
<strong>User</strong> <strong>Manual</strong> <strong>for</strong> <strong>the</strong> <strong>NETGEAR</strong> <strong>54</strong> <strong>Mbps</strong> <strong>Wireless</strong> <strong>PC</strong> <strong>Card</strong> <strong>WG511v2</strong>Temporal Key Integrity Protocol (TKIP)WPA uses TKIP to provide important data encryption enhancements including a per-packet keymixing function, a message integrity check (MIC) named Michael, an extended initializationvector (IV) with sequencing rules, and a re-keying mechanism. TKIP also provides <strong>for</strong> <strong>the</strong>following:• The verification of <strong>the</strong> security configuration after <strong>the</strong> encryption keys are determined.• The synchronized changing of <strong>the</strong> unicast encryption key <strong>for</strong> each frame.• The determination of a unique starting unicast encryption key <strong>for</strong> each preshared keyau<strong>the</strong>ntication.MichaelWith 802.11 and WEP, data integrity is provided by a 32-bit integrity check value (ICV) that isappended to <strong>the</strong> 802.11 payload and encrypted with WEP. Although <strong>the</strong> ICV is encrypted, you canuse cryptanalysis to change bits in <strong>the</strong> encrypted payload and update <strong>the</strong> encrypted ICV withoutbeing detected by <strong>the</strong> receiver.With WPA, a method known as Michael specifies a new algorithm that calculates an 8-bytemessage integrity check (MIC) using <strong>the</strong> calculation facilities available on existing wirelessdevices. The MIC is placed between <strong>the</strong> data portion of <strong>the</strong> IEEE 802.11 frame and <strong>the</strong> 4-byte ICV.The MIC field is encrypted toge<strong>the</strong>r with <strong>the</strong> frame data and <strong>the</strong> ICV.Michael also provides replay protection. A new frame counter in <strong>the</strong> IEEE 802.11 frame is used toprevent replay attacks.Optional AES Support to be Phased InOne of <strong>the</strong> encryption methods supported by WPA, besides TKIP, is <strong>the</strong> advanced encryptionstandard (AES), although AES support will not be required initially <strong>for</strong> Wi-Fi certification. This isviewed as <strong>the</strong> optimal choice <strong>for</strong> security conscience organizations, but <strong>the</strong> problem with AES isthat it requires a fundamental redesign of <strong>the</strong> NIC’s hardware in both <strong>the</strong> station and <strong>the</strong> accesspoint. TKIP is a pragmatic compromise that allows organizations to deploy better security whileAES capable equipment is being designed, manufactured, and incrementally deployed.<strong>Wireless</strong> Networking Basics B-15
<strong>User</strong> <strong>Manual</strong> <strong>for</strong> <strong>the</strong> <strong>NETGEAR</strong> <strong>54</strong> <strong>Mbps</strong> <strong>Wireless</strong> <strong>PC</strong> <strong>Card</strong> <strong>WG511v2</strong>Is WPA Perfect?WPA is not without its vulnerabilities. Specifically, it is susceptible to denial of service (DoS)attacks. If <strong>the</strong> access point receives two data packets that fail <strong>the</strong> message integrity code (MIC)within 60 seconds of each o<strong>the</strong>r, <strong>the</strong>n <strong>the</strong> network is under an active attack, and as a result, <strong>the</strong>access point employs counter measures, which include disassociating each station using <strong>the</strong> accesspoint. This prevents an attacker from gleaning in<strong>for</strong>mation about <strong>the</strong> encryption key and alertsadministrators, but it also causes users to lose network connectivity <strong>for</strong> 60 seconds. More thananything else, this may just prove that no single security tactic is completely invulnerable. WPA isa definite step <strong>for</strong>ward in WLAN security over WEP and has to be thought of as a single part of anend-to-end network security strategy.Product Support <strong>for</strong> WPAStarting in August, 2003, <strong>NETGEAR</strong>, Inc. wireless Wi-Fi certified products will support <strong>the</strong> WPAstandard. <strong>NETGEAR</strong>, Inc. wireless products that had <strong>the</strong>ir Wi-Fi certification approved be<strong>for</strong>eAugust, 2003 will have one year to add WPA so as to maintain <strong>the</strong>ir Wi-Fi certification.WPA requires software changes to <strong>the</strong> following:• <strong>Wireless</strong> access points• <strong>Wireless</strong> network adapters• <strong>Wireless</strong> client programsSupporting a Mixture of WPA and WEP <strong>Wireless</strong> Clients is DiscouragedTo support <strong>the</strong> gradual transition of WEP-based wireless networks to WPA, a wireless AP cansupport both WEP and WPA clients at <strong>the</strong> same time. During <strong>the</strong> association, <strong>the</strong> wireless APdetermines which clients use WEP and which clients use WPA. The disadvantage to supporting amixture of WEP and WPA clients is that <strong>the</strong> global encryption key is not dynamic. This is becauseWEP-based clients cannot support it. All o<strong>the</strong>r benefits to <strong>the</strong> WPA clients, such as integrity, aremaintained.However, a mixed mode supporting WPA and non-WPA clients would offer network security thatis no better than that obtained with a non-WPA network, and thus this mode of operation isdiscouraged.B-16 <strong>Wireless</strong> Networking Basics
<strong>User</strong> <strong>Manual</strong> <strong>for</strong> <strong>the</strong> <strong>NETGEAR</strong> <strong>54</strong> <strong>Mbps</strong> <strong>Wireless</strong> <strong>PC</strong> <strong>Card</strong> <strong>WG511v2</strong>Changes to <strong>Wireless</strong> Access Points<strong>Wireless</strong> access points must have <strong>the</strong>ir firmware updated to support <strong>the</strong> following:• The new WPA in<strong>for</strong>mation elementTo advertise <strong>the</strong>ir support of WPA, wireless APs send <strong>the</strong> beacon frame with a new 802.11WPA in<strong>for</strong>mation element that contains <strong>the</strong> wireless AP's security configuration (encryptionalgorithms and wireless security configuration in<strong>for</strong>mation).• The WPA two-phase au<strong>the</strong>nticationOpen system, <strong>the</strong>n 802.1x (EAP with RADIUS or preshared key).• TKIP• Michael• AES (optional)To upgrade your wireless access points to support WPA, obtain a WPA firmware update from yourwireless AP vendor and upload it to your wireless AP.Changes to <strong>Wireless</strong> Network Adapters<strong>Wireless</strong> networking software in <strong>the</strong> adapter, and possibly in <strong>the</strong> OS or client application, must beupdated to support <strong>the</strong> following:• The new WPA in<strong>for</strong>mation element<strong>Wireless</strong> clients must be able to process <strong>the</strong> WPA in<strong>for</strong>mation element and respond with aspecific security configuration.• The WPA two-phase au<strong>the</strong>nticationOpen system, <strong>the</strong>n 802.1x supplicant (EAP or preshared key).• TKIP• Michael• AES (optional)To upgrade your wireless network adapters to support WPA, obtain a WPA update from yourwireless network adapter vendor and update <strong>the</strong> wireless network adapter driver.For Windows wireless clients, you must obtain an updated network adapter driver that supportsWPA. For wireless network adapter drivers that are compatible with Windows XP (Service Pack 1)and Windows Server 2003, <strong>the</strong> updated network adapter driver must be able to pass <strong>the</strong> adapter'sWPA capabilities and security configuration to <strong>the</strong> <strong>Wireless</strong> Zero Configuration service.<strong>Wireless</strong> Networking Basics B-17
<strong>User</strong> <strong>Manual</strong> <strong>for</strong> <strong>the</strong> <strong>NETGEAR</strong> <strong>54</strong> <strong>Mbps</strong> <strong>Wireless</strong> <strong>PC</strong> <strong>Card</strong> <strong>WG511v2</strong>Microsoft has worked with many wireless vendors to embed <strong>the</strong> WPA firmware update in <strong>the</strong>wireless adapter driver. So, to update your Microsoft Windows wireless client, all you have to do isobtain <strong>the</strong> new WPA-compatible driver and install <strong>the</strong> driver. The firmware is automaticallyupdated when <strong>the</strong> wireless network adapter driver is loaded in Windows.Changes to <strong>Wireless</strong> Client Programs<strong>Wireless</strong> client programs must be updated to permit <strong>the</strong> configuration of WPA au<strong>the</strong>ntication (andpreshared key) and <strong>the</strong> new WPA encryption algorithms (TKIP and <strong>the</strong> optional AES component).To obtain <strong>the</strong> Microsoft WPA client program, visit <strong>the</strong> Microsoft Web site.B-18 <strong>Wireless</strong> Networking Basics
Appendix CPreparing Your <strong>PC</strong>s <strong>for</strong> Network AccessThis appendix describes how to prepare your <strong>PC</strong>s to connect to <strong>the</strong> Internet through <strong>the</strong><strong>NETGEAR</strong> <strong>54</strong> <strong>Mbps</strong> <strong>Wireless</strong> <strong>PC</strong> <strong>Card</strong> <strong>WG511v2</strong>.For adding file and print sharing to your network, please consult <strong>the</strong> Windows help in<strong>for</strong>mationincluded with <strong>the</strong> version of Windows installed on each computer on your network.Preparing Your Computers <strong>for</strong> TCP/IP NetworkingComputers access <strong>the</strong> Internet using a protocol called TCP/IP (Transmission Control Protocol/Internet Protocol). Each computer on your network must have TCP/IP installed and selected as itsnetworking protocol. If a Network Interface <strong>Card</strong> (NIC) is already installed in your <strong>PC</strong>, <strong>the</strong>n TCP/IP is probably already installed as well.Most operating systems include <strong>the</strong> software components you need <strong>for</strong> networking with TCP/IP.Windows 95 or later includes <strong>the</strong> software components <strong>for</strong> establishing a TCP/IP network.In your TCP/IP network, each <strong>PC</strong> and <strong>the</strong> wireless access point must be assigned a unique IPaddresses. Each <strong>PC</strong> must also have certain o<strong>the</strong>r TCP/IP configuration in<strong>for</strong>mation such as asubnet mask (netmask), a domain name server (DNS) address, and a default gateway address. Inmost cases, you should install TCP/IP so that <strong>the</strong> <strong>PC</strong> obtains its specific network configurationin<strong>for</strong>mation automatically from a DHCP server during startup.Configuring Windows 98 and Me <strong>for</strong> TCP/IP NetworkingAs part of <strong>the</strong> <strong>PC</strong> preparation process, you may need to install and configureTCP/IP on your <strong>PC</strong>. Be<strong>for</strong>e starting, locate your Windows CD; you may need to insert it during <strong>the</strong>TCP/IP installation process.Install or Verify Windows Networking ComponentsTo install or verify <strong>the</strong> necessary components <strong>for</strong> IP networking:Preparing Your <strong>PC</strong>s <strong>for</strong> Network Access C-1
<strong>User</strong> <strong>Manual</strong> <strong>for</strong> <strong>the</strong> <strong>NETGEAR</strong> <strong>54</strong> <strong>Mbps</strong> <strong>Wireless</strong> <strong>PC</strong> <strong>Card</strong> <strong>WG511v2</strong>1. On <strong>the</strong> Windows taskbar, click <strong>the</strong> Start button, point to Settings, and <strong>the</strong>n click Control Panel.2. Double-click <strong>the</strong> Network icon.The Network window opens, which displays a list of installed components:You must have an E<strong>the</strong>rnet adapter or an <strong>WG511v2</strong>, <strong>the</strong> TCP/IP protocol, and <strong>the</strong> Client <strong>for</strong>Microsoft Networks.Note: It is not necessary to remove any o<strong>the</strong>r network components shown in <strong>the</strong>Network window in order to install <strong>the</strong> adapter, TCP/IP, or Client <strong>for</strong> MicrosoftNetworks.If you need to add TCP/IP:a. Click <strong>the</strong> Add button.b. Select Protocol, and <strong>the</strong>n click Add.c. Select Microsoft.d. Select TCP/IP, and <strong>the</strong>n click OK.If you need to add <strong>the</strong> Client <strong>for</strong> Microsoft Networks:a. Click <strong>the</strong> Add button.b. Select Client, and <strong>the</strong>n click Add.c. Select Microsoft.d. Select Client <strong>for</strong> Microsoft Networks, and <strong>the</strong>n click OK.If you need to add File and Print Sharing <strong>for</strong> Microsoft Networks:C-2 Preparing Your <strong>PC</strong>s <strong>for</strong> Network Access
<strong>User</strong> <strong>Manual</strong> <strong>for</strong> <strong>the</strong> <strong>NETGEAR</strong> <strong>54</strong> <strong>Mbps</strong> <strong>Wireless</strong> <strong>PC</strong> <strong>Card</strong> <strong>WG511v2</strong>a. Click <strong>the</strong> Add button.b. Select Client, and <strong>the</strong>n click Add.c. Select Microsoft.d. Select File and Print Sharing <strong>for</strong> Microsoft Networks, and <strong>the</strong>n click OK.3. Restart your <strong>PC</strong> <strong>for</strong> <strong>the</strong> changes to take effect.Enabling DHCP to Automatically Configure TCP/IP Settings inWindows 98 and MeAfter <strong>the</strong> TCP/IP protocol components are installed, each <strong>PC</strong> must be assigned specificin<strong>for</strong>mation about itself and resources that are available on its network. The simplest way toconfigure this in<strong>for</strong>mation is to allow <strong>the</strong> <strong>PC</strong> to obtain <strong>the</strong> in<strong>for</strong>mation from a DHCP server in <strong>the</strong>network.You will find <strong>the</strong>re are many similarities in <strong>the</strong> procedures <strong>for</strong> different Windows systemswhen using DHCP to configure TCP/IP.The following steps will walk you through <strong>the</strong> configuration process <strong>for</strong> each of <strong>the</strong>seversions of Windows.Locate your Network Neighborhood icon.• If <strong>the</strong> Network Neighborhood icon is on <strong>the</strong> Windows desktop, position yourmouse pointer over it and right-click your mouse button.• If <strong>the</strong> icon is not on <strong>the</strong> desktop,• Click Start on <strong>the</strong> task bar located at <strong>the</strong> bottom left of <strong>the</strong> window.• Choose Settings, and <strong>the</strong>n Control Panel.• Locate <strong>the</strong> Network Neighborhood icon and click on it. This will open<strong>the</strong> Network panel as shown below.Preparing Your <strong>PC</strong>s <strong>for</strong> Network Access C-3
<strong>User</strong> <strong>Manual</strong> <strong>for</strong> <strong>the</strong> <strong>NETGEAR</strong> <strong>54</strong> <strong>Mbps</strong> <strong>Wireless</strong> <strong>PC</strong> <strong>Card</strong> <strong>WG511v2</strong>Verify <strong>the</strong> following settings as shown:• Client <strong>for</strong> Microsoft Network exists• E<strong>the</strong>rnet adapter is present• TCP/IP is present• Primary Network Logon is set toWindows logonClick on <strong>the</strong> Properties button. Thefollowing TCP/IP Properties window willdisplay.C-4 Preparing Your <strong>PC</strong>s <strong>for</strong> Network Access
<strong>User</strong> <strong>Manual</strong> <strong>for</strong> <strong>the</strong> <strong>NETGEAR</strong> <strong>54</strong> <strong>Mbps</strong> <strong>Wireless</strong> <strong>PC</strong> <strong>Card</strong> <strong>WG511v2</strong>By default, <strong>the</strong> IP Address tab is open onthis window.• Verify <strong>the</strong> following:Obtain an IP address automatically isselected. If not selected, click in <strong>the</strong>radio button to <strong>the</strong> left of it to select it.This setting is required to enable <strong>the</strong>DHCP server to automatically assign anIP address.• Click OK to continue.Restart <strong>the</strong> <strong>PC</strong>.Repeat <strong>the</strong>se steps <strong>for</strong> each <strong>PC</strong> with thisversion of Windows on your network.Selecting Windows’ Internet Access Method1. On <strong>the</strong> Windows taskbar, click <strong>the</strong> Start button, point to Settings, and <strong>the</strong>n click Control Panel.2. Double-click <strong>the</strong> Internet Options icon.3. Select “I want to set up my Internet connection manually” or “I want to connect through aLocal Area Network” and click Next.4. Select “I want to connect through a Local Area Network” and click Next.5. Uncheck all boxes in <strong>the</strong> LAN Internet Configuration screen and click Next.6. Proceed to <strong>the</strong> end of <strong>the</strong> Wizard.Verifying TCP/IP PropertiesAfter your <strong>PC</strong> is configured and has rebooted, you can check <strong>the</strong> TCP/IP configuration using <strong>the</strong>utility winipcfg.exe:1. On <strong>the</strong> Windows taskbar, click <strong>the</strong> Start button, and <strong>the</strong>n click Run.Preparing Your <strong>PC</strong>s <strong>for</strong> Network Access C-5
<strong>User</strong> <strong>Manual</strong> <strong>for</strong> <strong>the</strong> <strong>NETGEAR</strong> <strong>54</strong> <strong>Mbps</strong> <strong>Wireless</strong> <strong>PC</strong> <strong>Card</strong> <strong>WG511v2</strong>2. Type winipcfg, and <strong>the</strong>n click OK.The IP Configuration window opens, which lists (among o<strong>the</strong>r things), your IP address, subnetmask, and default gateway.3. From <strong>the</strong> drop-down box, select your E<strong>the</strong>rnet adapter.The window is updated to show your settings, which should match <strong>the</strong> values below if you areusing <strong>the</strong> default TCP/IP settings that <strong>NETGEAR</strong> recommends <strong>for</strong> connecting through arouter or gateway:• The IP address is between 192.168.0.2 and 192.168.0.2<strong>54</strong>• The subnet mask is 255.255.255.0• The default gateway is 192.168.0.1Configuring Windows 2000 or XP <strong>for</strong> TCP/IP NetworkingAs part of <strong>the</strong> <strong>PC</strong> preparation process, you may need to install and configureTCP/IP on each networked <strong>PC</strong>. Be<strong>for</strong>e starting, locate your Windows CD; you may need to insertit during <strong>the</strong> TCP/IP installation process.Install or Verify Windows Networking ComponentsTo install or verify <strong>the</strong> necessary components <strong>for</strong> IP networking:1. On <strong>the</strong> Windows taskbar, click <strong>the</strong> Start button, point to Settings, and <strong>the</strong>n click Control Panel.2. Double-click <strong>the</strong> Network and Dialup Connections icon.3. If an E<strong>the</strong>rnet adapter is present in your <strong>PC</strong>, you should see an entry <strong>for</strong> Local AreaConnection. Double-click that entry.4. Select Properties.5. Verify that ‘Client <strong>for</strong> Microsoft Networks’ and ‘Internet Protocol (TCP/IP)’ are present. Ifnot, select Install and add <strong>the</strong>m.6. Select ‘Internet Protocol (TCP/IP)’, click Properties, and verify that “Obtain an IP addressautomatically is selected.7. Click OK and close all Network and Dialup Connections windows.8. Then, restart your <strong>PC</strong>.C-6 Preparing Your <strong>PC</strong>s <strong>for</strong> Network Access
<strong>User</strong> <strong>Manual</strong> <strong>for</strong> <strong>the</strong> <strong>NETGEAR</strong> <strong>54</strong> <strong>Mbps</strong> <strong>Wireless</strong> <strong>PC</strong> <strong>Card</strong> <strong>WG511v2</strong>DHCP Configuration of TCP/IP in Windows XP or 2000You will find <strong>the</strong>re are many similarities in <strong>the</strong> procedures <strong>for</strong> different Windows systems whenusing DHCP to configure TCP/IP.The following steps will walk you through <strong>the</strong> configuration process <strong>for</strong> each of <strong>the</strong>se versions ofWindows.DHCP Configuration of TCP/IP in Windows XPLocate your Network Neighborhood icon.• Select Control Panel from <strong>the</strong> Windows XP Start Menu.• Select <strong>the</strong> Network Connections icon on <strong>the</strong> Control Panel. This will take you to <strong>the</strong> nextstep.Now <strong>the</strong> Network Connection windowdisplays.The Connections List that shows all <strong>the</strong>network connections set up on <strong>the</strong> <strong>PC</strong>,located to <strong>the</strong> right of <strong>the</strong> window.• Right-click on <strong>the</strong> Connection with <strong>the</strong>wireless icon and choose Status.Preparing Your <strong>PC</strong>s <strong>for</strong> Network Access C-7
<strong>User</strong> <strong>Manual</strong> <strong>for</strong> <strong>the</strong> <strong>NETGEAR</strong> <strong>54</strong> <strong>Mbps</strong> <strong>Wireless</strong> <strong>PC</strong> <strong>Card</strong> <strong>WG511v2</strong>Now you should be at <strong>the</strong> Local AreaNetwork Connection Status window. Thisbox displays <strong>the</strong> connection status,duration, speed, and activity statistics.Administrator logon access rights areneeded to use this window.• Click <strong>the</strong> Properties button to viewdetails about <strong>the</strong> connection.The TCP/IP details are presented on <strong>the</strong>Support tab page.• Select Internet Protocol, and clickProperties to view <strong>the</strong> configurationin<strong>for</strong>mation.C-8 Preparing Your <strong>PC</strong>s <strong>for</strong> Network Access
<strong>User</strong> <strong>Manual</strong> <strong>for</strong> <strong>the</strong> <strong>NETGEAR</strong> <strong>54</strong> <strong>Mbps</strong> <strong>Wireless</strong> <strong>PC</strong> <strong>Card</strong> <strong>WG511v2</strong>Verify that Obtain an IP addressautomatically radio button is selected andthat <strong>the</strong> Obtain DNS server addressautomatically radio button is selected.• Click <strong>the</strong> OK button.This completes <strong>the</strong> DHCP configuration inWindows XP.Repeat <strong>the</strong>se steps <strong>for</strong> each <strong>PC</strong> with thisversion of Windows on your network.DHCP Configuration of TCP/IP in Windows 2000After you install a network card, TCP/IP <strong>for</strong> Windows 2000 is configured and set to DHCPwithout your having to configure it. However, if <strong>the</strong>re are problems, following <strong>the</strong> steps below toconfigure TCP/IP with DHCP <strong>for</strong> Windows 2000.Click on <strong>the</strong> My Network Places icon on <strong>the</strong> Windows desktop. This will bring up a windowcalled Network and Dial-up Connections.• Right click on Local Area Connection and select Properties.Preparing Your <strong>PC</strong>s <strong>for</strong> Network Access C-9
<strong>User</strong> <strong>Manual</strong> <strong>for</strong> <strong>the</strong> <strong>NETGEAR</strong> <strong>54</strong> <strong>Mbps</strong> <strong>Wireless</strong> <strong>PC</strong> <strong>Card</strong> <strong>WG511v2</strong>The Local Area Connection Propertiesdialog box appears. Verify that you have<strong>the</strong> correct E<strong>the</strong>rnet card selected in <strong>the</strong>Connect using: box and that <strong>the</strong> followingtwo items are displayed and selected in <strong>the</strong>box of “Components checked are used bythis connection:”• Client <strong>for</strong> Microsoft Networks and• Internet Protocol (TCP/IP)Click OK.With Internet Protocol (TCP/IP) selected,click on Properties to open <strong>the</strong> InternetProtocol (TCP/IP) Properties dialoguebox. Verify that• Obtain an IP addressautomatically is selected.• Obtain DNS server addressautomatically is selected.Click OK to return to Local AreaConnection Properties. Click OK again tocomplete <strong>the</strong> configuration process.Restart <strong>the</strong> <strong>PC</strong>. Repeat <strong>the</strong>se steps <strong>for</strong> each<strong>PC</strong> with this version of Windows on yournetwork.C-10 Preparing Your <strong>PC</strong>s <strong>for</strong> Network Access
<strong>User</strong> <strong>Manual</strong> <strong>for</strong> <strong>the</strong> <strong>NETGEAR</strong> <strong>54</strong> <strong>Mbps</strong> <strong>Wireless</strong> <strong>PC</strong> <strong>Card</strong> <strong>WG511v2</strong>Verifying TCP/IP Properties <strong>for</strong> Windows XP or 2000To check your <strong>PC</strong>’s TCP/IP configuration:1. On <strong>the</strong> Windows taskbar, click <strong>the</strong> Start button, and <strong>the</strong>n click Run.The Run window opens.2. Type cmd and <strong>the</strong>n click OK.A command window opens3. Type ipconfig /allYour IP Configuration in<strong>for</strong>mation will be listed, and should match <strong>the</strong> values below if you areusing <strong>the</strong> default TCP/IP settings that <strong>NETGEAR</strong> recommends <strong>for</strong> connecting through arouter or gateway:• The IP address is between 192.168.0.2 and 192.168.0.2<strong>54</strong>• The subnet mask is 255.255.255.0• The default gateway is 192.168.0.14. Type exitPreparing Your <strong>PC</strong>s <strong>for</strong> Network Access C-11
<strong>User</strong> <strong>Manual</strong> <strong>for</strong> <strong>the</strong> <strong>NETGEAR</strong> <strong>54</strong> <strong>Mbps</strong> <strong>Wireless</strong> <strong>PC</strong> <strong>Card</strong> <strong>WG511v2</strong>C-12 Preparing Your <strong>PC</strong>s <strong>for</strong> Network Access
GlossaryList of Glossary TermsUse <strong>the</strong> list below to find definitions <strong>for</strong> technical terms used in this manual.10BASE-TIEEE 802.3 specification <strong>for</strong> 10 <strong>Mbps</strong> E<strong>the</strong>rnet over twisted pair wiring.100BASE-TxIEEE 802.3 specification <strong>for</strong> 100 <strong>Mbps</strong> E<strong>the</strong>rnet over twisted pair wiring.802.11bIEEE specification <strong>for</strong> wireless networking at 11 <strong>Mbps</strong> using direct-sequence spread-spectrum (DSSS)technology and operating in <strong>the</strong> unlicensed radio spectrum at 2.5GHz.802.11gA soon to be ratified IEEE specification <strong>for</strong> wireless networking at <strong>54</strong> <strong>Mbps</strong> using direct-sequencespread-spectrum (DSSS) technology and operating in <strong>the</strong> unlicensed radio spectrum at 2.5GHz. 802.11g isbackwards compatible with 802.11b.ADSLShort <strong>for</strong> asymmetric digital subscriber line, a technology that allows data to be sent over existing coppertelephone lines at data rates of from 1.5 to 9 <strong>Mbps</strong> when receiving data (known as <strong>the</strong> downstream rate) andfrom 16 to 640 Kbps when sending data (known as <strong>the</strong> upstream rate).ADSL requires a special ADSL modem. ADSL is growing in popularity as more areas around <strong>the</strong> worldgain access.DHCPAn E<strong>the</strong>rnet protocol specifying how a centralized DHCP server can assign network configurationin<strong>for</strong>mation to multiple DHCP clients. The assigned in<strong>for</strong>mation includes IP addresses, DNS addresses, andgateway (router) addresses.DNSShort <strong>for</strong> Domain Name System (or Service), an Internet service that translates domain names into IPaddresses.Because domain names are alphabetic, <strong>the</strong>y're easier to remember. The Internet however, is really based onIP addresses. Every time you use a domain name, <strong>the</strong>re<strong>for</strong>e, a DNS service must translate <strong>the</strong> name into <strong>the</strong>corresponding IP address. For example, <strong>the</strong> domain name www.example.com might translate toGlossary 1
<strong>User</strong> <strong>Manual</strong> <strong>for</strong> <strong>the</strong> <strong>NETGEAR</strong> <strong>54</strong> <strong>Mbps</strong> <strong>Wireless</strong> <strong>PC</strong> <strong>Card</strong> <strong>WG511v2</strong>198.105.232.4. The DNS system is, in fact, its own network. If one DNS server doesn't know how totranslate a particular domain name, it asks ano<strong>the</strong>r one, and so on, until <strong>the</strong> correct IP address is returned.Domain NameA descriptive name <strong>for</strong> an address or group of addresses on <strong>the</strong> Internet. Domain names are of <strong>the</strong> <strong>for</strong>m of aregistered entity name plus one of a number of predefined top level suffixes such as .com, .edu, .uk, etc. Forexample, in <strong>the</strong> address mail.<strong>NETGEAR</strong>.com, mail is a server name and <strong>NETGEAR</strong>.com is <strong>the</strong> domain.DSLShort <strong>for</strong> digital subscriber line, but is commonly used in reference to <strong>the</strong> asymmetric version of thistechnology (ADSL) that allows data to be sent over existing copper telephone lines at data rates of from 1.5to 9 <strong>Mbps</strong> when receiving data (known as <strong>the</strong> downstream rate) and from 16 to 640 Kbps when sending data(known as <strong>the</strong> upstream rate).ADSL requires a special ADSL modem. ADSL is growing in popularity as more areas around <strong>the</strong> worldgain access.Dynamic Host Configuration ProtocolDHCP. An E<strong>the</strong>rnet protocol specifying how a centralized DHCP server can assign network configurationin<strong>for</strong>mation to multiple DHCP clients. The assigned in<strong>for</strong>mation includes IP addresses, DNS addresses, andgateway (router) addresses.ESSIDThe Extended Service Set Identification (ESSID) is a thirty-two character (maximum) alphanumeric keyidentifying <strong>the</strong> wireless local area network.GatewayA local device, usually a router, that connects hosts on a local network to o<strong>the</strong>r networks.IETFInternet Engineering Task Force. Working groups of <strong>the</strong> IETF propose standard protocols and procedures <strong>for</strong><strong>the</strong> Internet, which are published as RFCs (Request <strong>for</strong> Comment) at www.ietf.org.An open international community of network designers, operators, vendors, and researchers concerned with<strong>the</strong> evolution of <strong>the</strong> Internet architecture and <strong>the</strong> smooth operation of <strong>the</strong> Internet.IPInternet Protocol is <strong>the</strong> main internetworking protocol used in <strong>the</strong> Internet. Used in conjunction with <strong>the</strong>Transfer Control Protocol (TCP) to <strong>for</strong>m TCP/IP.IP AddressA four-byte number uniquely defining each host on <strong>the</strong> Internet, usually written in dotted-decimal notationwith periods separating <strong>the</strong> bytes (<strong>for</strong> example, 134.177.244.57).Ranges of addresses are assigned by Internic, an organization <strong>for</strong>med <strong>for</strong> this purpose.2 Glossary
<strong>User</strong> <strong>Manual</strong> <strong>for</strong> <strong>the</strong> <strong>NETGEAR</strong> <strong>54</strong> <strong>Mbps</strong> <strong>Wireless</strong> <strong>PC</strong> <strong>Card</strong> <strong>WG511v2</strong>IPXShort <strong>for</strong> Internetwork Packet Exchange, a networking protocol used by <strong>the</strong> Novell NetWare operatingsystems.Like UDP/IP, IPX is a datagram protocol used <strong>for</strong> connectionless communications. Higher-level protocols,such as SPX and NCP, are used <strong>for</strong> additional error recovery services.ISPInternet service provider.Internet ProtocolThe main internetworking protocol used in <strong>the</strong> Internet. Used in conjunction with <strong>the</strong> Transfer ControlProtocol (TCP) to <strong>for</strong>m TCP/IP.LANA communications network serving users within a limited area, such as one floor of a building.local area networkLAN. A communications network serving users within a limited area, such as one floor of a building.A LAN typically connects multiple personal computers and shared network devices such as storage andprinters. Although many technologies exist to implement a LAN, E<strong>the</strong>rnet is <strong>the</strong> most common <strong>for</strong>connecting personal computers.MAC addressThe Media Access Control address is a unique 48-bit hardware address assigned to every network interfacecard. Usually written in <strong>the</strong> <strong>for</strong>m 01:23:45:67:89:ab.<strong>Mbps</strong>Megabits per second.NetBIOSThe Network Basic Input Output System is an application programming interface (API) <strong>for</strong> sharing servicesand in<strong>for</strong>mation on local-area networks (LANs).Provides <strong>for</strong> communication between stations of a network where each station is given a name. These namesare alphanumeric names, up to 16 characters in length.Network Address TranslationNAT. A technique by which several hosts share a single IP address <strong>for</strong> access to <strong>the</strong> Internet.NICNetwork Interface <strong>Card</strong>. An adapter in a computer which provides connectivity to a network.Glossary 3
<strong>User</strong> <strong>Manual</strong> <strong>for</strong> <strong>the</strong> <strong>NETGEAR</strong> <strong>54</strong> <strong>Mbps</strong> <strong>Wireless</strong> <strong>PC</strong> <strong>Card</strong> <strong>WG511v2</strong>packetA block of in<strong>for</strong>mation sent over a network. A packet typically contains a source and destination networkaddress, some protocol and length in<strong>for</strong>mation, a block of data, and a checksum.routerA device that <strong>for</strong>wards data between networks. An IP router <strong>for</strong>wards data based on IP source anddestination addresses.Routing In<strong>for</strong>mation ProtocolRIP. A protocol in which routers periodically exchange in<strong>for</strong>mation with one ano<strong>the</strong>r so that <strong>the</strong>y candetermine minimum distance paths between sources and destinations.routerA device that <strong>for</strong>wards data between networks. An IP router <strong>for</strong>wards data based on IP source anddestination addresses.SSIDA Service Set Identification is a thirty-two character (maximum) alphanumeric key identifying a wirelesslocal area network. For <strong>the</strong> wireless devices in a network to communicate with each o<strong>the</strong>r, all devices mustbe configured with <strong>the</strong> same SSID.This is typically <strong>the</strong> configuration parameter <strong>for</strong> a wireless <strong>PC</strong> card. It corresponds to <strong>the</strong> ESSID in <strong>the</strong>wireless Access Point and to <strong>the</strong> wireless network name. See also <strong>Wireless</strong> Network Name and ESSID.Subnet MaskA mask used to determine what subnet an IP address belongs to. Subnetting enables a network administratorto fur<strong>the</strong>r divide an IP address into two or more subnets.TCP/IPThe main internetworking protocols used in <strong>the</strong> Internet. The Internet Protocol (IP) used in conjunction with<strong>the</strong> Transfer Control Protocol (TCP) <strong>for</strong>m TCP/IP.WANA long distance link used to extend or connect remotely located local area networks. The Internet is a largeWAN.WEB Proxy ServerA Web proxy server is a specialized HTTP server that allows clients access to <strong>the</strong> Internet from behind afirewall.The proxy server listens <strong>for</strong> requests from clients within <strong>the</strong> firewall and <strong>for</strong>wards <strong>the</strong>se requests to remoteInternet servers outside <strong>the</strong> firewall. The proxy server reads responses from <strong>the</strong> external servers and <strong>the</strong>nsends <strong>the</strong>m to internal client clients.4 Glossary
<strong>User</strong> <strong>Manual</strong> <strong>for</strong> <strong>the</strong> <strong>NETGEAR</strong> <strong>54</strong> <strong>Mbps</strong> <strong>Wireless</strong> <strong>PC</strong> <strong>Card</strong> <strong>WG511v2</strong>WEPWired Equivalent Privacy is a data encryption protocol <strong>for</strong> 802.11b wireless networks.All wireless nodes and access points on <strong>the</strong> network are configured with a 64-bit or 128-bit Shared Key <strong>for</strong>data encryption.wide area networkWAN. A long distance link used to extend or connect remotely located local area networks. The Internet is alarge WAN.Wi-FiA trade name <strong>for</strong> <strong>the</strong> 802.11b wireless networking standard, given by <strong>the</strong> <strong>Wireless</strong> E<strong>the</strong>rnet CompatibilityAlliance (WECA, see http://www.wi-fi.net), an industry standards group promoting interoperability among802.11b devices.Windows Internet Naming ServiceWINS. Windows Internet Naming Service is a server process <strong>for</strong> resolving Windows-based computer namesto IP addresses.If a remote network contains a WINS server, your Windows <strong>PC</strong>s can ga<strong>the</strong>r in<strong>for</strong>mation from that WINSserver about its local hosts. This allows your <strong>PC</strong>s to browse that remote network using <strong>the</strong> WindowsNetwork Neighborhood feature.WINSWINS. Windows Internet Naming Service is a server process <strong>for</strong> resolving Windows-based computer namesto IP addresses.<strong>Wireless</strong> Network Name (SSID)<strong>Wireless</strong> Network Name (SSID) is <strong>the</strong> name assigned to a wireless network. This is <strong>the</strong> same as <strong>the</strong> SSID orESSID configuration parameter.WPAWi-Fi Protected Access (WPA) is data encryption protocol <strong>for</strong> 802.11 wireless networks. With WPA-PSK(pre-shared key), all wireless nodes and access points on <strong>the</strong> network are configured with a Shared Key <strong>for</strong>data encryption.Glossary 5
<strong>User</strong> <strong>Manual</strong> <strong>for</strong> <strong>the</strong> <strong>NETGEAR</strong> <strong>54</strong> <strong>Mbps</strong> <strong>Wireless</strong> <strong>PC</strong> <strong>Card</strong> <strong>WG511v2</strong>6 Glossary
IndexNumerics802.11b 1Aad-hoc mode 2BBSSID 2EESSID 2WWEP 4, 8, 2Wi-Fi 1Wi-Fi Protected Access (WPA) 11Wi-Fi Protected Access Pre-Shared Key (WPA-PSK)2Windows, configuring <strong>for</strong> IP routing 1, 6winipcfg utility 5Wired Equivalent Privacy. See WEP<strong>Wireless</strong> E<strong>the</strong>rnet 1wireless network name 4WPA 2, 11Ffeatures 1Iinfrastructure mode 2IP networking<strong>for</strong> Windows 1, 6LLEDsdescription 7, 11, 12OOpen System au<strong>the</strong>ntication 2SShared Key au<strong>the</strong>ntication 2SSID 4, 3, 2TTCP/IP propertiesverifying <strong>for</strong> Windows 5troubleshooting 1Index 1