RS 6in1 Easy Setup Owners Manual.fm
RS 6in1 Easy Setup Owners Manual.fm
RS 6in1 Easy Setup Owners Manual.fm

You also want an ePaper? Increase the reach of your titles
YUMPU automatically turns print PDFs into web optimized ePapers that Google loves.
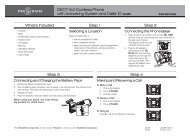
RADIOSHACK 6-IN-1 EASY SETUP VOICE REMOTEINTRODUCTIONThe RadioShack 6-in-1 <strong>Easy</strong> <strong>Setup</strong> Voice Remote is arevolutionary universal remote control that featuresvoice prompts to help you set up the remote. Moreover,it allows you to consolidate the clutter of all of youroriginal remote controls into one easy-to-use product.Advanced features include:• Macros – for instant activation of favoritekey sequences• Learning – to capture unique functions fromyour devices’ original remote controls• Direct Code <strong>Setup</strong> – for easy voice-promptedprogramming with setup codes• Favorite Channel Scan – for easy channelsurfing of favorite channels• Volume Lock – to assign volume controls toindividual devices or to one global device• Extensive Code Library – largest and mostefficient group of IR remote control codes forvirtually every current brand and makeAfter installing four (4) new AAA alkaline batteries(not included, see next page), you can immediatelyuse the unit to control a RCA DVD Player, a PioneerCD Player and Audio Receiver, and a RCA TV,VCR,and Satellite Receiver. To control other brands thanthe default ones, see Programming Device Controlon page 6.INSTALLING BATTERIES1. Press the tab on the battery compartmentcover (located on the back of the remote) andlift off the cover.❶2. Place the AAA batteries in the compartment asindicated by the polarity symbols (+ and -)marked inside.❷3. Align the cover with the compartment openingand replace it.❸BATTERY USE AND SAFETY• Dispose of old batteries promptly andproperly.• Do not burn or bury batteries.• Use only new batteries of the required size.• Do not mix old and new batteries, differenttypes of batteries (e.g., standard, alkaline, orrechargeable), or rechargeable batteries ofdifferent capacities.• If you do not plan to use the remote control foran extended period, remove the batteries.They can leak chemicals that can destroyelectronic parts.ABOUT BATTERY LIFEAs with all battery-operated devices, battery lifewill vary depending on use, including frequencyand duration of key presses. The LED will flash andthe remote will say “Low batteries” when thebatteries in your RadioShack 6-in-1 <strong>Easy</strong> <strong>Setup</strong>Voice Remote are running low.INSTALLING BATTERIESYour remote requires four AAA batteries (notsupplied) for power.2 Introduction
FEATURES AND FUNCTIONSUse the illustration below to locate features on theRadioShack 6-in-1 <strong>Easy</strong> <strong>Setup</strong> Voice Remote andthen refer to the “Key Chart” (starting on the right)to learn how they function.To find out what type of devices can be controlledby each device key after programming, see the“Device Table” on page 5.KEY CHARTOWNER’S MANUALPress a Device Key once toselect a desired homeentertainment device tocontrol (e.g., DVD).Press POWER to turn aselected device on or off.Press (Light) to turn thebacklight on or offIn the CBL/SAT mode, pressPAGE+ or PAGE– to page upor down through channels inthe program guide.Use the navigation keys asfollows:Press MENU to display theyour device's main menu.Press GUIDE to display yourdevice's program guide, orsetup or program menu.Press INFO to display thecurrent channel andprogram information.Press EXIT to exit from yourdevice's guide or menu.Use the cursor keys (,,,or ) to navigatethrough the program guideand menu screens.In the AUD mode, press(or ) to raise (orlower) rear channel volumeor navigate through menusand press or tobalance audio left (or right).Press OK to choose optionsfrom your device's menu orguide.After programming, pressM1 or M2 once to run amacro (see “Using Macros”on page 8).Press SLEEP to turn on thesleep function. See “Settingthe Sleep Timer” on page 8.Features And Functions 3
RADIOSHACK 6-IN-1 EASY SETUP VOICE REMOTEIn the TV, VCR, or DVD mode,press TV/VCR to switch theTV's input to view TV orvideo programs.In the AUD mode, press TV/VCR to switch between audioinputs.In the CBL/SAT mode pressA/B to change your cableboxes A/B or Bypassfunction, or input on yourSAT.In all modes except AUD andDVD, press LAST once torecall the last channel.Press PVR Menu to open themenu for your PVR device.Press VOL (or VOL ) toraise (or lower) the soundvolume for the selecteddevice (also see ChangingVolume Lock on page 7).In the CBL/SAT, VCR, DVD,and TV modes, press FAVSCAN to scan through allchannels, or afterprogramming, to scanthrough 10 favoritechannels.Press MUTE once to turn thesound off or on.Press CH (or CH ) toselect the next higher (orlower) channel.In all modes except AUDIO,use the Number Keys (1 – 9and 0) to directly selectchannels (e.g., 009 or 031)or enter numbers. In theAUDIO mode, use theNumber Keys to directlyselect inputs 1 – 9 and 10.Press +100 to enter channelsover 100 (for example,+100, 3, 1 = 131). For aDVD player, press +100 toaccess chapters over 10 (forexample, +100, 3 = 13).For certain brands in allmodes except CD and AUDIO,press ENTER once afterentering numbers (ifrequired on your originalremote control).In the all modes, use theTransport Keys to control thedevice’s transport if thatfunction is available.In all modes, press RECtwice to record a program onyour device (if function isavailable).In the TV mode, use the PIPkeys to control the followingPicture-In-Picture features(if available) on your TV:Press PIP to switch thePicture-In-Picture feature onor off.Press MOVE to move thewindow picture to differentplaces in the main picture.Press SWAP to switch imagesand sound between the mainand window pictures.4 Features And Functions
OWNER’S MANUALDEVICE TABLEIn the CBL/SAT, VCR, or DVDmodes, use the PVR/DVRKeys as follows:Press the REPLAY key toinstantly replay the last 7seconds of a program youare watching (if the feature isavailable).Press the ADV key to skippast commercials or otheruninteresting scenes (if thefeature is available).In the DVD or CD mode, pressthe advance key to changediscs.Press LIVE TV to switchbetween live TV and videoprogramming (if the featureis available).Press BACK to replay theprevious setup commandmenu. Press and hold BACKfor 3 seconds to completelyexit programming at anytime.Press SETUP to programyour remote. See “<strong>Setup</strong>Menu Overview” on page 5for more information.Press REPEAT to replay thecurrent voice commandmenu.NOTE: Please refer to the table below whenperforming the instructions in “Programming DeviceControl” on page 6.After programming, the RadioShack 6-in-1 <strong>Easy</strong><strong>Setup</strong> Voice Remote will be able to control thefollowing types of devices:DEVICE KEYCONTROLS THESE DEVICESAudio Amplifier, Audio Receiver,or CD PlayerCable Box (Converter), SatelliteReceiver, Cable/PVR, or Satellite/PVR ComboTelevision, TV/VCR Combo, TV/VCR/DVD Combo, or TV/DVDComboDEVICE KEYCONTROLS THESE DEVICESAudio Amplifier, Audio Receiver,or CD PlayerVCR, DVD, Home-Theater-in-a-Box, or PVR (DVR)VCR, DVD, Home-Theater-in-a-Box, or PVR (DVR)SETUP MENU OVERVIEWYour new RadioShack 6-in-1 <strong>Easy</strong> <strong>Setup</strong> VoiceRemote includes an audio menu to help guide youthrough setup options. Press and hold SETUP tohear the top-level menu through the speaker on thefront of the remote. Once you’ve accessed the toplevelmenu), press VOLor VOLto increase ordecrease the volume of the product’s voice. Themain setup menu options are:• “Press one to set up a device, such as TV orCable/SAT.”See “Programming Device Control” on page 6.• “Press two to set up favorite channels.”See “Programming Favorite Channel Scan” onpage 7.• “Press three to program multiple commands,known as a macro.”See “Programming a Macro” on page 8.• “Press four to enable sleep.”See “Enabling Sleep” on page 9• “Press five for learning.”“Programming a Learned Key” on page 9• “Press six for volume lock.”See “Locking Volume Control to One Mode(Global Volume Lock)” on page 10.• “Press seven to reassign a device key.”See “Reassigning Device Keys” on page 11.• “Press eight to reset the remote.”See “Resetting the Remote” on page 11.Use the number pad to select any of these setupoptions. After you select an option, moreinstructions will be provided. See the sections listedabove for details.Features And Functions 5
RADIOSHACK 6-IN-1 EASY SETUP VOICE REMOTEPROGRAMMING DEVICECONTROLThe RadioShack 6-in-1 <strong>Easy</strong> <strong>Setup</strong> Voice Remote ispreset at the factory to operate an RCA TV, VCR,DVD Player, or Satellite Receiver, Pioneer CD Playerand Audio Receiver.To begin programming device control:1. Press and hold SETUP until you hear theprogramming menu.2. Press 1. The Programming Device Controloptions play:• “Press one to enter a device code.”See “Enter a Device Code” on page 6.• “Press two to search for a device code.”See “Searching For Your Code” on page 7.• “Press three to retrieve a device code youfound during search.”See “Checking The Codes” on page 7.ENTER A DEVICE CODETo control devices other than the default brands,perform the following steps; otherwise skip thissection:1. Turn on a desired device (e.g.,VCR or DVDplayer) and, if applicable, insert media (e.g.,cassette or disc).NOTE: Please read steps 2 through 9 completelybefore proceeding. Before starting step 2, reviewthe “Manufacturer’s Codes” (starting on page30). Brands are listed alphabetically in order o<strong>fm</strong>ost popular ones first. Highlight or write downthe devices and the codes you wish to program.2. Press and hold SETUP until you hear theprogramming menu, then press 1.NOTE: If more than 15 seconds pass between keypresses, the remote says “Goodbye” and exitsprogramming.3. Press 1 again.NOTE: To stop programming at any time, press andhold BACK.NOTE: If more than 15 seconds pass between keypresses, the remote says “Goodbye” and exitsprogramming.4. At the prompt, press a device key once (i.e.,CBL/SAT, AUX, TV, DVD, AUDIO, or VCR).NOTE: Please refer to the “Device Table” on page 5when choosing a device key for programming.5. Use the Manufacturer’s Codes (starting on page30) to locate the type of device and brandname. At the prompt, use the Number Keys toenter the first four-digit code for your device.If performed correctly, the LED blinks twice,the remote says “Success”.NOTE: If the LED displayed one long flash instead,and the remote played “Try again”, a mistake hasoccurred and the remote returns to the prompt forstep 4. Try entering the same code again.6. The remote prompts “Press a test key, such aspower or play. If your device performs the testfunction, press <strong>Setup</strong> to save, or enter the nextcode from the manual.” Press a test key.NOTE: Do not use number keys as test functions. Theremote will think you are entering a different code.7. If the device performs the test function, pressSETUP to save the code. The remote says“Success”, and returns to the prompt forstep 3.NOTE: If the device does not respond, repeat steps 5through 7 with the next code for your device.8. Hold BACK until the remote states “Goodbye.”Aim the remote control at the device and pressPOWER once.The device should turn off.If it does not, repeat steps 2 through 6, tryingeach code for your brand until you find onethat works. If it still doesn’t work, try“Searching For Your Code” on page 7.9. If the code works, repeat steps 2 through 6 toprogram another device or press and holdSETUP to exit programming.10. For future reference, write down each workingdevice code in the following boxes:CBL/SAT Code:Brand Name:_______________________AUX Code:Brand Name:_______________________DVD Code:Brand Name:_______________________TV Code:Brand Name:_______________________AUDIO Code:Brand Name:_______________________6 Programming Device Control
OWNER’S MANUALVCR Code:Brand Name:_______________________SEARCHING FOR YOUR CODEIf your device does not respond to the remotecontrol after trying all codes listed for your brand,or if your brand is not listed at all, try searching foryour code:NOTE: Before performing a code search for a CD orDVD player or a VCR, turn on the device and insertthe required media.1. Press and hold SETUP until you hear theprogramming menu, then press 1.NOTE: If more than 15 seconds pass between keypresses, the remote says “Goodbye” and exitsprogramming.2. Press 2.3. At the prompt, press a device key (i.e., CBL/SAT, AUX, TV, DVD, AUDIO, or VCR).4. At the prompt, press a test key, such as POWER.NOTE: If your device or its original remote controldoes not have a Power key, select a different testfunction in this step (e.g., VOL+, Play, etc.).5. At the prompt, aim the remote control at thedevice (e.g., TV) and press CH+ one or moretimes to try each code. Stop when a codeperforms the test function selected in step 4. Ifdesired, use CH- to try a previous code.NOTE: In the search mode, the remote control willsend IR codes from its library to the selected device,starting with the most popular code first.6. To lock in the code, press SETUP once.The LEDblinks twice and the remote plays “Success”and returns to the Device Programmingoptions.7. Repeat steps 2 through 6 to program anotherdevice or press and hold SETUP to exitprogramming.NOTE: Use the appropriate device key and testfunction key for the device you are searching for.CHECKING THE CODESIf you have set up the remote control using theSearching For Your Code procedure (on page 7), youmay need to find out which four-digit code isoperating your equipment. To do so:1. Press and hold SETUP until you hear theprogramming menu, then press 1.2. Press 3.3. At the prompt, press a device key (i.e., CBL/SAT, AUX, TV, DVD, AUDIO, or VCR). The remotewill state the code.4. Write down the code digits in the appropriatecode boxes on page 6.5. Repeat steps 2 through 3 to hear anotherdevice’s code or press and hold SETUP to exitprogramming.NOTE: Use the appropriate device key for the deviceyou are noting.USING CHANNEL SCANIn the VCR, DVD, CBL/SAT, or TV mode, use the FAVSCAN key to start a 3-second scan of all channels. Ifprogrammed, use the FAV SCAN key to scan onlyyour favorite channels (see “Programming FavoriteChannel Scan” on page 7).1. Press VCR, DVD, CBL/SAT, or TV to select thatdevice.2. Press FAV SCAN once.The LED will blink aseach channel is changed.• If Favorite Channel Scan has been set up,scanning of favorite channels will startand cycle through stored channels for3 minutes or until stopped by pressingany key.• If Favorite Channel Scan has not been setup, scanning will start with the currentchannel, then proceed to the next channelup and cycle through all channels for 3minutes or until stopped by pressing anykey.3. To stop scanning channels at any time, pressany key once.PROGRAMMING FAVORITE CHANNEL SCANIn the VCR, DVD, CBL/SAT, or TV mode, you can storea list of up to 10 favorite channels, in any order, thatwill be immediately scanned when you press FAVScan (see “Using Channel Scan” on page 7).NOTE: You can only program Favorite Channels forone mode. After programming, if you press FAV Scanwhile in another mode, the remote control will start anormal channel scan instead (if applicable to theselected device).1. Press and hold SETUP until you hear theprogramming menu, then press 2.NOTE: If more than 15 seconds pass between keypresses, the remote says “Goodbye” and exitsprogramming.2. At the prompt, select a Favorite Channel Modeby pressing VCR, DVD, CBL/SAT, or TV.3. At the prompt, use the Number Keys to enter afavorite channel number (e.g., 0 1 2),including +100 or Enter, if your devicerequires this.Using Channel Scan 7
RADIOSHACK 6-IN-1 EASY SETUP VOICE REMOTENOTE: Each channel entry must be five characters orfewer. If you press more than five characters, theremote says “Try again” and repeats the prompt forstep 3.4. Press SETUP to save this channel.5. Repeat steps 3 and 4 for each channel to bestored, up to a total of 10 channels, or pressand hold SETUP to return to the programmingmenu. Press and hold BACK to exitprogramming.NOTE: The remote automatically saves and exitsFavorite Channel Programming after you enter the10th channel.CLEARING THE FAVORITE CHANNEL LISTIf you no longer want to scan favorite channels, or ifyou want to program a completely new list, you canerase the saved channels. To do so:1. Press and hold SETUP until you hear theprogramming menu, then press 2.NOTE: If more than 15 seconds pass between keypresses, the remote says “Goodbye” and exitsprogramming.2. At the prompt, select a Favorite Channel Modeby pressing VCR, DVD, CBL/SAT, or TV.3. Press and hold SETUP to erase the savedchannels and return to the programmingmenu. Press and hold BACK to exitprogramming.USING MACROSThe RadioShack 6-in-1 <strong>Easy</strong> <strong>Setup</strong> Voice Remoteincludes two Macro Keys, M1, and M2. Each one canbe set up to perform a repetitive, time-consumingoperation with the press of a single key. You can alsoprogram a macro onto any other key, except modekeys, SLEEP, FAV SCAN, SETUP, BACK, or REPEAT.A macro can be used to control a home theateroperation, to set a favorite channel, or for othermultiple functions you would like to control withone key press. Moreover, each Macro Key can holdup to 15 key presses total.NOTE: Programming a new macro over an existingone will erase the original macro.PROGRAMMING A MACROTo program a macro to perform a sequence ofcommands:1. Press and hold SETUP until you hear theprogramming menu, then press 3.NOTE: If more than 15 seconds pass between keypresses, the remote says “Goodbye” and exitsprogramming.2. At the prompt, press an open Macro Key(e.g.,M1 or M2) or the POWER key.NOTE: If you program a macro onto the POWER key,you must press and hold the POWER key for about 2seconds to activate the macro. Otherwise, the POWERkey will function normally (i.e., turn on the selecteddevice only).3. At the prompt, enter a series of up to 15commands.For example, press TV once, then POWER, thenenter 0 3 for the TV’s channel number. Next,press CBL/SAT once, then POWER, then enter 07 1 for the Cable Box’s channel number (a totalof 9 key presses). This example turns the TVon, sets it to channel 3, turns the cable orsatellite box on, then sets it to channel 71.NOTE: If there are more than 15 key presses in thesequence, the LED displays a long flash denoting anerror and the remote says “Try again” and returns tothe prompt for step 2.4. To save the macro, press and hold SETUP untilthe remote says “Success”, the LED blinkstwice and the remote returns to theprogramming menu.5. Press 3 and repeat steps 2 through 4 toprogram another macro or press and holdBACK to exit programming.CLEARING A MACRO1. Press and hold SETUP until you hear theprogramming menu, then press 3.NOTE: If more than 15 seconds pass between keypresses, the remote says “Goodbye” and exitsprogramming.2. At the prompt, press an open Macro Key(e.g.,M1 or M2) or the POWER key.3. Press and hold SETUP until the remote says“Success”, the LED blinks twice and theremote returns to the programming menu.4. Press 3 and repeat steps 2 and 3 to clearanother macro or press and hold BACK to exitprogramming.SETTING THE SLEEP TIMERThe RadioShack 6-in-1 <strong>Easy</strong> <strong>Setup</strong> Voice Remoteincludes a sleep timer that lets you set your devicesto be turned off after a specified time, even if thedevice does not have a sleep function.SETTING THE SLEEP TIMERIf you want to set any device to turn off after aspecified time:1. Press a mode key (AUD, CD, TV, VCR, DVD, CBL/SAT).8 Using Macros
OWNER’S MANUAL2. Press the Sleep key until the desired time isset. The timer increases by 15 minutes eachtime you press the key, up to 60 minutes.When the timer counts down to 0, the remote sendsa “power off ” signal to the selected device.The sleep timer will work even if you havereassigned the mode key to a different mode (see“Reassigning Device Keys” on page 11).If you turn off the device yourself, the sleep timerturns off as well.ENABLING SLEEPIf the SLEEP key does not operate your device’sbuilt-in sleep timer or if your device does not have asleep mode, you must enable the sleep timer forthat mode:1. Press and hold SETUP until you hear theprogramming menu, then press 4.NOTE: If more than 15 seconds pass between keypresses, the remote says “Goodbye” and exitsprogramming.2. At the prompt, press 1.3. At the prompt, press a device key (i.e., CBL/SAT, AUX, TV, DVD, AUDIO, or VCR). The LEDblinks twice and the remote says “Success”and returns to the programming menu.4. Press 4 and repeat steps 2 and 3 for anotherdevice or press and hold BACK to exitprogramming.DISABLING THE SLEEP TIMERTo disable the sleep timer for a mode:1. Press and hold SETUP until you hear theprogramming menu, then press 4.NOTE: If more than 15 seconds pass between keypresses, the remote says “Goodbye” and exitsprogramming.2. At the prompt, press 2.3. At the prompt, press a device key (i.e., CBL/SAT, AUX, TV, DVD, AUDIO, or VCR). The LEDblinks twice and the remote says “Success”and returns to the programming menu.4. Press 4 and repeat steps 2 and 3 for anotherdevice or press and hold SETUP to exitprogramming.USING LEARNINGThe RadioShack 6-in-1 <strong>Easy</strong> <strong>Setup</strong> Voice Remoteincludes a Learning feature so you can addfunctions that are unique to your homeentertainment devices (e.g.,VCR Tracking Up orDown).However, there are some considerations:LEARNING PRECAUTIONS• Your original remote controls must be inworking order for learning to work properly.• Learned keys are mode specific, so each onecan store a unique function for each mode.• Learned keys can be used in macros (see UsingMacros on page 8).• Do not use the following keys for learning:Device Keys, SETUP, BACK, REPEAT, FAV SCAN,SLEEP, or Record (•) Key.• Learning capacity is approximately 16 to 25keys, depending on the code being learned.• Certain device codes are not learnableincluding multi-frequency types, some highfrequency ones, and other unusual formats.• For optimum learning, avoid high levels ofambient light such as natural sunlight orenergy-efficient fluorescent lights.NOTE: Please have your original remote controlshandy before programming learning.PROGRAMMING A LEARNED KEY1. Press and hold SETUP until you hear theprogramming menu, then press 5.NOTE: If more than 15 seconds pass between keypresses, the remote says “Goodbye” and exitsprogramming.2. At the prompt, press 1 to learn a function.3. At the prompt, press a device key once (i.e.,CBL/SAT, AUX, TV, DVD, AUDIO, or VCR) to assigna mode for learning.4. Place the RadioShack 6-in-1 <strong>Easy</strong> <strong>Setup</strong> VoiceRemote head-to-head (about 2" apart) fromyour original remote control. Also locate thekey (on your original remote control) that willserve as the teaching function.2"5. On the RadioShack 6-in-1 <strong>Easy</strong> <strong>Setup</strong> VoiceRemote, press a key where the learnedfunction will be stored.6. On the original remote, press and hold the keyto be learned. The RadioShack 6-in-1 <strong>Easy</strong><strong>Setup</strong> Voice Remote’s LED will turn off.Continue holding the key on the originalremote until the RadioShack 6-in-1 <strong>Easy</strong> <strong>Setup</strong>Voice Remote’s LED blinks twice, and theremote says “Success” and returns to theprompt for step 3.Using Learning 9
RADIOSHACK 6-IN-1 EASY SETUP VOICE REMOTENOTE: If the LED displays one long blink, a learningerror has occurred.Try repeating this step again untila successful capture occurs. If the function is stillnot captured, press and hold BACK to exitprogramming and review the “Learning Precautions”on the previous page. If needed, also see“Troubleshooting” on page 11.After review, startprogramming again at step 1.7. Press 5 and repeat steps 3 through 6 foranother device and/or key or press and holdBACK to exit programming.DELETING A SINGLE LEARNING KEY1. Press and hold SETUP until you hear theprogramming menu, then press 5.NOTE: If more than 15 seconds pass between keypresses, the remote says “Goodbye” and exitsprogramming.2. At the prompt, press 2 to delete a learnedfunction.3. At the prompt, press 1 to delete a singlelearned key.4. At the prompt, press a device key once (i.e.,CBL/SAT, AUX, TV, DVD, AUDIO, or VCR) toindicate the mode where the learned key to bedeleted is stored.5. At the prompt, press the key containing thelearned function to be deleted.6. At the prompt, press this key again. Theremote says “Success” and returns to theprogramming menu.7. Press 5 and repeat steps 3 through 6 foranother key or press and hold BACK to exitprogramming.DELETING ALL LEARNED KEYS IN A SPECIFIC MODE1. Press and hold SETUP until you hear theprogramming menu, then press 5.NOTE: If more than 15 seconds pass between keypresses, the remote says “Goodbye” and exitsprogramming.2. At the prompt, press 2 to delete a learnedfunction.3. At the prompt, press 2 to delete all the learnedkeys for a particular device.4. At the prompt, press a device key (i.e., CBL/SAT, AUX, TV, DVD, AUDIO, or VCR) to indicatethe mode to be cleared of learned keys.5. Press the same device key again. The remotesays “Success” and returns to the prompt forstep 3.6. Press 5 and repeat steps 3 through 5 foranother device or press and hold SETUP to exitprogramming.CHANGING VOLUME LOCKThe RadioShack 6-in-1 <strong>Easy</strong> <strong>Setup</strong> Voice Remote isset at the factory for independent volume control ofeach selected device.However, you may change the Volume Lock settingto Global Volume Lock so that a device’s volume willbe locked to one mode (e.g., to control TV volumein all other modes).After that, if desired, you canperform Individual Volume Unlock on a selecteddevice to set its volume control for independentoperation.LOCKING VOLUME CONTROL TO ONE MODE(GLOBAL VOLUME LOCK)1. Press and hold SETUP until you hear theprogramming menu, then press 6.NOTE: If more than 15 seconds pass between keypresses, the remote says “Goodbye” and exitsprogramming.2. At the prompt, press 1 to lock all volumecontrol to a single device.3. At the prompt, press the device key (i.e., CBL/SAT, AUX, TV, DVD, AUDIO, or VCR) to which youwant the volume controls locked. The remotesays “Success” and returns to the prompt forstep 2.4. Press and hold BACK to exit programming.Now, when you press VOL, VOL, or MUTE, theselected device’s volume will be controlled,regardless of the mode selected. For example, if youlock the volume to the TV, the buttons listed abovewill control the volume, even if the remote is inCBL/SAT mode.UNLOCKING VOLUME CONTROL FOR ASINGLE DEVICE (INDIVIDUAL VOLUMEUNLOCK)1. Press and hold SETUP until you hear theprogramming menu, then press 6.NOTE: If more than 15 seconds pass between keypresses, the remote says “Goodbye” and exitsprogramming.2. At the prompt, press 2 to unlock all volumecontrol for a single device.3. At the prompt, press the device key (i.e., CBL/SAT, AUX, TV, DVD, AUDIO, or VCR) for which youwant the volume controls unlocked. Theremote says “Success” and returns to theprompt for step 2.4. Press and hold BACK to exit programming.Now, after you select a device that has volumeunlocked, pressing VOL, VOL, or MUTE willcontrol the device’s volume only in its own mode.10 Changing Volume Lock
OWNER’S MANUALUNLOCKING ALL VOLUME CONTROL (RESTORINGDEFAULT SETTING)1. Press and hold SETUP until you hear theprogramming menu, then press 6.NOTE: If more than 15 seconds pass between keypresses, the remote says “Goodbye” and exitsprogramming.2. At the prompt, press 3 to unlock all volumecontrol. The remote says “Success” and returnsto the prompt at the beginning of this step.3. Press and hold BACK to exit programming.Volume will again be independently controlledaccording to its default states for all programmeddevices.REASSIGNING DEVICE KEYSThe RadioShack 6-in-1 <strong>Easy</strong> <strong>Setup</strong> Voice Remotecan be set to control a second device. For example,to control a TV, a cable box, and two DVD players,you can reassign the unused AUD key to operate thesecond DVD player. To reassign a device key:1. Press and hold SETUP until you hear theprogramming menu, then press 7.NOTE: If more than 15 seconds pass between keypresses, the remote says “Goodbye” and exitsprogramming.2. At the prompt, press a device key (i.e., CBL/SAT, CD, TV, DVD, AUDIO, VCR) of the type youwant to move.NOTE: Only one device can be assigned to an unuseddevice key at a time.3. At the prompt, press the device key (i.e., CBL/SAT, CD, TV, DVD, AUDIO, VCR) that will now beused for the moved device. The remote says“Success” and returns to the programmingmenu. It will also announce the new mode forthe mode key.4. Press 7 then repeat steps 2 and 3 for any otherdevices you want to move or press and holdBACK to exit programming.RESETTING THE REMOTEThe RadioShack 6-in-1 <strong>Easy</strong> <strong>Setup</strong> Voice Remoteincludes a <strong>Setup</strong> Code Reset program.You can use itto restore all your programmed codes to factorysettings and delete all custom programming.CLEARING CUSTOM SETTINGS (BASIC USER RESET)IMPORTANT: Executing this program will eraseall custom settings for Macros, Learned Keys,Reassigned Device Keys, Favorite Channels, andSleep and Volume Lock.1. Press and hold SETUP until you hear theprogramming menu, then press 8.NOTE: If more than 15 seconds pass between keypresses, the remote says “Goodbye” and exitsprogramming.2. At the prompt, press 1 to reset Macros,Learned Keys, Reassigned Device Keys,Favorite Channels, and Sleep and Volume Lockto the default factory settings. The remote says“Success” and returns to the programmingmenu.3. Press and hold BACK to exit programming.CLEARING ALL CUSTOM PROGRAMMINGIMPORTANT: Executing this program will eraseall custom settings including device codes.1. Press and hold SETUP until you hear theprogramming menu, then press 8.NOTE: If more than 15 seconds pass between keypresses, the remote says “Goodbye” and exitsprogramming.2. At the prompt, press 2 to reset Macros,Learned Keys, Reassigned Device Keys,Favorite Channels, Sleep and Volume Lock,and all device codes to the default factorysettings. The remote says “Success” andreturns to the programming menu.3. Press and hold BACK to exit programming.TROUBLESHOOTINGPROBLEM:SOLUTION:PROBLEM:SOLUTION:PROBLEM:SOLUTION:PROBLEM:SOLUTION:The LED is flashing and theremote is saying “Low batteries”.Replace batteries with four newAAA alkaline batteries.The remote said “Goodbye” andexited programming.Programming has ended due toinactivity. Start programmingagain and do not pause more than15 seconds while performinginstructions.During programming, the LEDdisplayed a long flash.An invalid entry has occurred.Check the keys to be pressed andstart program again.How do I stop programming?Press and hold SETUP until theremote says “Goodbye”.Reassigning Device Keys 11
RADIOSHACK 6-IN-1 EASY SETUP VOICE REMOTEPROBLEM:SOLUTION:PROBLEM:SOLUTION:PROBLEM:SOLUTION:PROBLEM:SOLUTION:PROBLEM:SOLUTION:PROBLEM:SOLUTION:The unit does not control homeentertainment devices orcommands are not workingproperly.Try all listed codes for the devicebrands being set up. Make surethey can be operated with aninfrared remote control.Tried Searching For Your Codemethod and still could not find aworking code.Perform Restoring Factory DefaultSettings on page 11. Then repeatSearching For Your Code on page7.Cannot program a macro onto M1– M2 or POWER keys.Make sure the total number of keypresses being programmed foreach macro is less than 15.Power macro does not execute.Press and hold POWER for morethan 2 seconds.Favorite channel function doesnot work properly.Some devices (e.g.,Cable Boxes orSatellite Receivers) use two-digitchannel numbers. Duringprogramming, press ENTER or OKonce after entering a channelnumber (e.g., 0 2 ENTER forchannel 2). See ProgrammingFavorite Channel Scan on page 7.Changing channels does not workproperly.If the original remote controlrequired pressing ENTER tochange channels, then pressENTER on the remote control afterentering channel numbers.SOLUTION:PROBLEM:For more help, or if your issue is not listed, visitwww.radioshack.com or call 866-269-8705.SPECIFICATIONSRemote Power ..............................(4) AAA BatteriesRemote Dimensions(H x W x D) ..............................9.01 x 2.68 x 1.19 in..................................... (228.79 x 68.15 x 30.13 mm)Remote Weight (no batteries) ...... . 5.6 oz (158.75 g)NOTE: Specifications are typical. Individual unitsmight vary. Specifications are subject to change andimprovement without notice.CAREMake sure the remote control isaimed at your homeentertainment device and is notfarther than 15 feet away.CH and CHdo not work foryour RCA TV.SOLUTION: Due to RCA design (1983-1987),only the original remote controlwill operate these functions.• Keep the remote dry. If the remote gets wet,wipe it dry immediately.• Handle the remote gently and carefully. Don'tdrop it.• Use and store the remote only in normaltemperature environments.• Keep the remote away from dust and dirt.• Wipe the remote with a damp cloth to keep itlooking new.• Modifying or tampering with internal partscan cause damage and invalidate the warranty.If your remote is not performing as it should,please contact us at:www.radioshack.comor visit your local RadioShack store for help.PROBLEM:SOLUTION:PROBLEM:No remote control of volume.See Changing Volume Lock onpage 7 to lock/unlock volume.LED flashes when a key ispressed, but home entertainmentdevice does not respond.12 Specifications
OWNER’S MANUALADDITIONAL INFORMATION© 2004 Universal Electronics.No part of thispublication may be reproduced, transmitted,transcribed, stored in any retrieval system, ortranslated to any language, in any form or by anymeans, electronic, mechanical, magnetic, optical,manual, or otherwise, without the prior writtenpermission of Universal Electronics.© 2004 RadioShack Corporation. All RightsReserved.RadioShack and RadioShack.com aretrademarks used by RadioShack Corporation.The RadioShack 6-in-1 <strong>Easy</strong> <strong>Setup</strong> Voice Remote iscompatible for use in North America. This productuses technologies licensed under one or more of thefollowing U.S. patents: 6,587,067; 6,496,135;5,515,052, 6,014,092; 6,195,033; 5,959,751;6,587,067; 5,481,256; 6,330,09; 6,097,309,6,522,262, and patents pending.M6135FCC COMPLIANCEThis equipment has been tested and found tocomply with the limits for a class B digital device,pursuant to part 15 of the FCC Rules.These limitsare designed to provide a reasonable protectionagainst harmful interference in a residentialinstallation.This equipment generates, uses, andcan radiated radio frequency energy and if notinstalled and used in accordance with theinstructions, may cause harmful interference toradio communications.However, there is no guarantee that interference willnot occur in a particular installation. If thisequipment does cause harmful interference to radioor television reception, which can be determined byturning the equipment off and on, the user isencouraged to try to correct the interference by oneor more of the following measures:• Reorient or relocate the receiving antenna.• Increase the separation between theequipment and receiver.• Connect the equipment into an outlet or acircuit different from that to which the receiveris connected.• Consult the dealer or an experienced radio/TVtechnician for helpLIMITED 90-DAY WARRANTYThis product is warranted by RadioShack againstmanufacturing defects in material andworkmanship under normal use for ninety (90)days from the date of purchase from RadioShackcompany-owned stores and authorized RadioShackfranchisees and dealers.EXCEPT AS PROVIDED HEREIN, RadioShackMAKES NO EXPRESS WARRANTIES AND ANYIMPLIED WARRANTIES, INCLUDING THOSE OFMERCHANTABILITY AND FITNESS FOR APARTICULAR PURPOSE, ARE LIMITED INDURATION TO THE DURATION OF THEWRITTEN LIMITED WARRANTIES CONTAINEDHEREIN. EXCEPT AS PROVIDED HEREIN,RadioShack SHALL HAVE NO LIABILITY ORRESPONSIBILITY TO CUSTOMER OR ANYOTHER PE<strong>RS</strong>ON OR ENTITY WITH RESPECT TOANY LIABILITY, LOSS OR DAMAGE CAUSEDDIRECTLY OR INDIRECTLY BY USE ORPERFORMANCE OF THE PRODUCT OR ARISINGOUT OF ANY BREACH OF THIS WARRANTY,INCLUDING, BUT NOT LIMITED TO, ANYDAMAGES RESULTING FROM INCONVENIENCE,LOSS OF TIME, DATA, PROPERTY, REVENUE, ORPROFIT OR ANY INDIRECT, SPECIAL,INCIDENTAL, OR CONSEQUENTIAL DAMAGES,EVEN IF RadioShack HAS BEEN ADVISED OF THEPOSSIBILITY OF SUCH DAMAGES.Some states do not allow limitations on how long animplied warranty lasts or the exclusion or limitationof incidental or consequential damages, so theabove limitations or exclusions may not apply toyou.In the event of a product defect during the warrantyperiod, take the product and the RadioShack salesreceipt as proof of purchase date to any RadioShackstore. RadioShack will, at its option, unlessotherwise provided by law: (a) correct the defect byproduct repair without charge for parts and labor;(b) replace the product with one of the same orsimilar design; or (c) refund the purchase price.All replaced parts and products, and products onwhich a refund is made, become the property ofRadioShack.New or reconditioned parts andproducts may be used in the performance ofwarranty service. Repaired or replaced parts andproducts are warranted for the remainder of theoriginal warranty period.You will be charged forrepair or replacement of the product made after theexpiration of the warranty period.This warranty does not cover: (a) damage or failurecaused by or attributable to acts of God, abuse,accident, misuse, improper or abnormal usage,failure to follow instructions, improper installationor maintenance, alteration, lightning or otherincidence of excess voltage or current; (b) anyAdditional Information 13
epairs other than those provided by a RadioShackAuthorized Service Facility; (c) consumables suchas fuses or batteries; (d) cosmetic damage; (e)transportation, shipping or insurance costs; or (f)costs of product removal, installation, set-upservice adjustment or reinstallation.This warranty gives you specific legal rights, andyou may also have other rights which vary fromstate to state.RadioShack Customer Relations,200 Taylor Street, 6th Floor,Fort Worth, TX 76102Cat.No. 15-2146 10/04RADIOSHACK 6-IN-1 EASY SETUP VOICE REMOTEFort Worth, Texas 7610214 Limited 90-Day Warranty
OWNER’S MANUALÍNDICE DE MATERIASIntroducción . . . . . . . . . . . . . . . . . . . . . . . . . . . . . . . . . . . . . 16Instalación de las Baterías . . . . . . . . . . . . . . . . . . . . . . . . . . 16Uso y Seguridad de las Baterías. . . . . . . . . . . . . . . . . . . . 16Acerca de la Vida de las Baterías . . . . . . . . . . . . . . . . . . 16Instalación de las Baterías en el Control Remoto . . . . . . 16Características y Funciones . . . . . . . . . . . . . . . . . . . . . . . . . 17Funciones de las Teclas . . . . . . . . . . . . . . . . . . . . . . . . . . 17Tabla de Dispositivos . . . . . . . . . . . . . . . . . . . . . . . . . . . . 19Introducción al Menú de Programación . . . . . . . . . . . . . 19Programación de un Dispositivo (Aparato) . . . . . . . . . . . . . . 20Introduzca un Código de Dispositivo . . . . . . . . . . . . . . . . 20Búsqueda de su Código . . . . . . . . . . . . . . . . . . . . . . . . . . 21Verificación de los Códigos . . . . . . . . . . . . . . . . . . . . . . . 21Uso de la Exploración de Canales . . . . . . . . . . . . . . . . . . . . . 22Programación de una Exploración de Canales Favoritos 22Borrar la Lista de Canales Favoritos . . . . . . . . . . . . . . . . 22Uso de los Macros . . . . . . . . . . . . . . . . . . . . . . . . . . . . . . . . . 22Programación de un Macro . . . . . . . . . . . . . . . . . . . . . . . 23Borrar Función de un Macro . . . . . . . . . . . . . . . . . . . . . . 23Programación del Cronómetro de Dormido . . . . . . . . . . . . . 23Programación del Cronómetro de Dormido. . . . . . . . . . . 23Activación del Cronómetro de Dormido . . . . . . . . . . . . . . 23Desactivación del Cronómetro de Dormido . . . . . . . . . . . 24Uso de la Función Aprendizaje . . . . . . . . . . . . . . . . . . . . . . . 24Precauciones sobre la Función Aprendizaje . . . . . . . . . . 24Programación de una Tecla de Aprendizaje . . . . . . . . . . 24Borrar Función de una Sola Tecla Aprendida. . . . . . . . . . 25Borrar Función de Todas las Teclas Aprendidas en un ModoEspecífico . . . . . . . . . . . . . . . . . . . . . . . . . . . . . . . . . . . . . 25Cambio del Bloqueo del Volumen . . . . . . . . . . . . . . . . . . . . . 25Bloqueo del Control de Volumen a un Modo (Bloqueo Globalde Volumen) . . . . . . . . . . . . . . . . . . . . . . . . . . . . . . . . . . . 25Desbloqueo del Control de Volumen para un SoloDispositivo (Desbloqueo Individual de Volumen) . . . . . . . 25Desbloqueo de Todo el Control de Volumen (Restauraciónde los Parámetros de Fábrica). . . . . . . . . . . . . . . . . . . . . 26Reasignación de las Teclas de Dispositivos . . . . . . . . . . . . . 26Restauración de los Valores Fijados en la Fábrica . . . . . . . 26Borrar la Programación a la Medida (Restauración Básica)26Remoción de Toda la Programación al Gusto . . . . . . . . . 26Localización de Fallas . . . . . . . . . . . . . . . . . . . . . . . . . . . . . .27Especificaciones . . . . . . . . . . . . . . . . . . . . . . . . . . . . . . . . . . .28Cuidado . . . . . . . . . . . . . . . . . . . . . . . . . . . . . . . . . . . . . . . . . .28Información Adicional. . . . . . . . . . . . . . . . . . . . . . . . . . . . . . .28Conformidad con la FCC . . . . . . . . . . . . . . . . . . . . . . . . . . . . .28Garantía Limitada de 90 Días . . . . . . . . . . . . . . . . . . . . . . . . .29Manufacturer’s Codes (Códigos del Fabricante) . . . . . . . . . .30<strong>Setup</strong> Codes for Audio Amplifiers (Códigos de Configuraciónpara Amplificadores de Audio) . . . . . . . . . . . . . . . . . . . . .30<strong>Setup</strong> Codes for Audio Amp/Tuners (Códigos deConfiguración para Amplificadores de Audio/Sintonizadores) . . . . . . . . . . . . . . . . . . . . . . . . . . . . . . . . .30<strong>Setup</strong> Codes for Cable Boxes (Códigos de Configuraciónpara Cajas/Convertidores de Cable) . . . . . . . . . . . . . . . . .31<strong>Setup</strong> Codes for Cable Boxes/PVR Combos (Códigos deConfiguración para Aparatos Combinados Cajas/Convertidores de Cable/DVR/PVR). . . . . . . . . . . . . . . . . . .32<strong>Setup</strong> Codes for CD Players (Códigos de Configuración paraReproductores de CDs) . . . . . . . . . . . . . . . . . . . . . . . . . . .33<strong>Setup</strong> Codes for DVD Players (Códigos de Configuraciónpara Reproductores DVD) . . . . . . . . . . . . . . . . . . . . . . . . .33<strong>Setup</strong> Codes for DVD Player/VCR Combos (Códigos deConfiguración para Aparatos Combinados ReproductoresDVD/VCR) . . . . . . . . . . . . . . . . . . . . . . . . . . . . . . . . . . . . . .35<strong>Setup</strong> Codes for Home-Theater-in-a-Box Systems (Códigosde Configuración para Dispositivos Sistema de Teatro enCasa) . . . . . . . . . . . . . . . . . . . . . . . . . . . . . . . . . . . . . . . . .35<strong>Setup</strong> Codes for PVRs (Códigos de Configuración para DVR/PVRs, Grabadores Personales en Disco Duro) . . . . . . . . .36<strong>Setup</strong> Codes for Satellite Receivers (Códigos deConfiguración para Receptores de Satélite). . . . . . . . . . .36<strong>Setup</strong> Codes for Satellite Receivers/PVR Combos (Códigosde Configuración para Aparatos Combinados Receptor deSatélite/ DVR/PVR) . . . . . . . . . . . . . . . . . . . . . . . . . . . . . . .37<strong>Setup</strong> Codes for TVs (Códigos de Configuración paraTelevisores) . . . . . . . . . . . . . . . . . . . . . . . . . . . . . . . . . . . .37<strong>Setup</strong> Codes for TV/DVD Player Combos (Códigos deConfiguración para Aparatos Combinados TV/DVD) . . . . .39<strong>Setup</strong> Codes for TV/VCR Combos (Códigos de Configuraciónpara Aparatos Combinados TV/VCR) . . . . . . . . . . . . . . . . .40<strong>Setup</strong> Codes for TV/VCR/DVD Player Combos (Códigos deConfiguración para Aparatos Combinados TV/VCR/DVD) .41<strong>Setup</strong> Codes for VCRs (Códigos de Configuración paraVideograbadoras). . . . . . . . . . . . . . . . . . . . . . . . . . . . . . . .41Índice de Materias 15
RADIOSHACK 6-IN-1 EASY SETUP VOICE REMOTEINTRODUCCIÓNSu Control Remoto 6 en Uno con ProgramaciónFácil por Voz de RadioShack es un control remotouniversal revolucionario con un programa de vozque le ayuda con la programación. Además, elcontrol remoto le permite combinar las funcionesde sus varios remotos en un solo producto que esfácil usar. Disfrute de las siguientes funcionesavanzadas:• Macros – activar instantáneamente unasecuencia de sus teclas favoritas• Aprendizaje – aprender funciones únicas delos remotos de los dispositivos originales• Programación Directa de Códigos –programación fácil por voz de dispositivosusando los códigos disponibles• Exploración de Canales Favoritos –navigación fácil de sus canales favoritos• Bloqueo del Volumen – optar por controlar elvolumen de un dipositivo individual, ocontrolar el volumen de una manera global• Una Biblioteca de Códigos Extenso – la listamás grande y eficaz de códigos infrarrojos queincluye prácticamente cada marca actualDespués de instalar cuatro (4) baterías alcalinasnuevas de tamaño AAA (no vienen incluidas, vea lasiguiente página), el control remoto se puede usarde inmediato para controlar un reproductor DVDde la marca RCA, un reproductor de CDs y receptorde audio de la marca Pioneer, y un televisor, unavideograbadora (VCR), y un receptor de satélite dela marca RCA. Para controlar otras marcas, lleve acabo las instrucciones de la “Programación de unDispositivo (Aparato)” en la página 20.baterías varía de acuerdo con el uso, incluyendo lafrecuencia y la duración con que se oprimen lasteclas. El LED parpadeará cuando las baterías de suControl Remoto 6 en Uno con Programación Fácilpor Voz de RadioShack escasean.INSTALACIÓN DE LAS BATERÍAS EN EL CONTROLREMOTOSu control remoto necesita cuatro baterías AAA (novienen incluidas) para funcionar.1. Empuje adelante en la cubierta delcompartimento de baterías hacia abajo (en elrespaldo del control remoto) y levántela.❶2. Deslice las baterías AAA en el compartimentocomo se indica por los símbolos de polaridad(+ y -) que se muestran adentro.❷3. Alinee la tapa con la abertura delcompartimento y deslícela de nuevo en sulugar.❸INSTALACIÓN DE LAS BATERÍASUSO Y SEGURIDAD DE LAS BATERÍAS• Deseche las baterías viejas rápida yadecuadamente.• No queme las baterías ni las entierre.• Utilice únicamente baterías frescas del tamañorequerido.• No mezcle baterías viejas y nuevas, diferentestipos de baterías (v.g., estándar, alcalinas, orecargables), ni baterías recargables dediferentes capacidades.• Si no va a usar el control remoto durante unlargo tiempo, quítele las baterías. Éstaspueden derramar substancias químicas quepueden destruir los componentes electrónicos.ACERCA DE LA VIDA DE LAS BATERÍASAl igual que con todos los dispositivos quefuncionan con baterías (pilas), la vida de las16 Introducción
OWNER’S MANUALCARACTERÍSTICAS YFUNCIONESUtilice la ilustración abajo para localizar loscontroles del Control Remoto 6 en Uno conProgramación Fácil por Voz de RadioShack yestudiar las "Funciones de las Teclas" (comenzandoa la derecha) y así aprender cómo funcionan.Para saber qué tipo de dispositivo se puedecontrolar por cada tecla de dispositivo después de laprogramación, vea la “Tabla de Dispositivos” en lapágina 19.FUNCIONES DE LAS TECLASPresione la tecla dedispositivo correspondienteuna vez para seleccionar eldispositivo que se va acontrolar (v.g., DVD).Presione POWER paraencender o apagar eldispositivo seleccionado.Presione (Luz) paraencender o apagar lailuminación del teclado.En el modo CBL/SAT,presione PAGE+ o PAGEparaavanzar o pararetroceder a través de loscanales en la guía deprogramas.Use las teclas de navegaciónde la siguiente manera:Presione MENU para mostrarel menú principal de sudispositivo.Presione GUIDE (guía) paramostrar la guía deprogramas de su dispositivo,o el menú de configuración ode programación.Presione INFO (información)para mostrar la informaciónactual del canal y delprograma.Presione EXIT (salida) parasalirse de la guía o del menúde su dispositivo.Use las teclas de cursor(,, ,or ) paranavegar a través de la guía deprogramas y de las pantallasde menúes.En el modo AUD, presiona(o ) para subir/bajarel volumen del canal traseroo para navegar a través delos menúes. Presione o para balancear el audioderecho e izquierdo.Presione OK para escoger lasopciones en el menú o en laguía de su dispositivo.Características y Funciones 17
RADIOSHACK 6-IN-1 EASY SETUP VOICE REMOTEDespués de laprogramación, presione M1o M2 una vez para activar unmacro (vea “Uso de losMacros” en la página 22).Presione SLEEP (dormir)para activar el cronómetrode dormido. Vea“Programación delCronómetro de Dormido” enla página 23.En el modo TV, VCR, o DVD,presione TV/VCR paraconmutar la entrada deltelevisor con el fin de verprogramas de TV o deVídeo.En el modo AUD, presioneTV/VCR para conmutar entrelas entradas del sonido.En el modo CBL/SAT,presione A/B para quefuncione como el interruptorA/B de su caja de cablevisióno de su receptor de satélite.En todos los modos, exceptoAUD y DVD, presione LAST(último) una vez pararecobrar el último canalvisto.Presione PVR Menu paraabrir el menú de su aparatoPVR.Presione VOL (o VOL )para subir o bajar el nivel delsonido (volumen) en eldispositivo seleccionado(vea también “Cambio delBloqueo del Volumen” en lapágina 25).En los modos CBL/SAT, VCR,DVD y TV, presione FAV SCAN(exploración de canalesfavoritos) para explorartodos los canales, o despuésde programarlos, paraexplorar sus 10 canalesfavoritos.Presione MUTE una vez paraapagar o encender el sonido.Presione CH (o CH )Presione para seleccionar elsiguiente canal con númeromás alto (o más bajo).En todos los modos exceptoAUDIO, use las teclasnuméricas (1 - 9 y 0) paraseleccionar directamente loscanales (v.g., 009 o 031) oteclee los números. En elmodo AUDIO, use las teclasnuméricas para seleccionardirectamente las entradas1 - 9 y 0.Presione +100 paraintroducir números mayoresde 100 (v.g., +100, 3, 1 =131). Para un reproductorDVD, presione +100 paraintroducir capítulos mayoresde 10 (v.g., +100, 3, 1 =131).Para ciertas marcas, entodos los modos excepto CDy AUDIO, presione ENTER(seleccionar) una vezdespués de introducir losnúmeros (si así se requeríaen el control remotooriginal).En todos los modos, use lasteclas de transporte paracontrolar el transporte deldispositivo (si la funciónestá disponible).En todos los modos,presione REC dos veces paragrabar un programa en sudispositivo (si la funciónestá disponible).En el modo TV, use las teclasPIP (Imagen en Imagen)para controlar las siguientesfunciones Imagen en Imagen(si la función estádisponible):Presione PIP para encendero apagar la función Imagenen Imagen.Presione MOVE para mover laventanilla a lugares distintosen la pantalla principal.Presione SWAP(permutación) para pasarlas imágenes y sonidos entrela imagen principal y la de laventanilla.18 Características y Funciones
OWNER’S MANUALTABLA DE DISPOSITIVOSEn el modo CBL/SAT, VCR, oDVD, use las teclas DVR/PVRde la siguiente manera:Presione REPLAY(reproducir) para queinstantáneamente sereproduzcan los últimos 7segundos de un programaque usted está viendo (siesta función estádisponible).Presione ADV (avanzar) parasaltarse los comercialespasados u otras escenas nointeresantes (si esta funciónestá disponible).En el modo DVD o CD,presione ADV para cambiardiscos.Presione LIVE TV (TV envivo) para conmutar entrelos programas de TV en vivoy de vídeo (si la función estádisponible).Presione BACK parareproducir el menú deprogramación anterior.Presione y mantengapresionada por 3 segundosla tecla BACK para salir de laprogramación en cualquiermomento.Presione SETUP paraprogramar su controlremoto. Vea “Introducción alMenú de Programación” enla página 19 para másinformación.Presione REPEAT parareproducir el menú demandos de voz actual.NOTA: Por favor consulte la tabla de abajo al seguirlas instrucciones de “Programación de un Dispositivo(Aparato)” en la página 20.Después de la programación, el Control Remoto 6en Uno con Programación Fácil por Voz deRadioShack podrá controlar los siguientes tipos dedispositivos:ESTA TECLACONTROLA ESTOSDISPOSITIVOSAmplificador de Sonido, Receptorde Audio, o Reproductor de CDsCaja (Convertidor) deCablevisión, Receptor de Satélite,Combinación Cable/PVR, oCombinación Satélite/PVRTelevisión, Combinación TV/VCR, Combinación TV/VCR/DVD, o Combinación TV/DVDAmplificador de Sonido, Receptorde Audio, o Reproductor de CDsVCR, Reproductor DVD,Dispositivo Sistema de Teatro enCasa (HTiB), o DVR/PVRVCR, Reproductor DVD,Dispositivo Sistema de Teatro enCasa (HTiB), o DVR/PVRINTRODUCCIÓN AL MENú DE PROGRAMACIÓNSu nuevo Control Remoto 6 en Uno conProgramación Fácil por Voz de RadioShack incluyeun menú de audio que le ayuda manejar la opcionesde programación. Presione y mantenga presionadala tecla SETUP para escuchar el menú principal porla altavoz que se encuentra en la parte delantera delcontrol remoto. Una vez que usted haya entrado enel menú principal, presione VOL (o VOL parasubir o bajar el nivel del sonido (volumen) de la vozde su control remoto. Las opciones del menúprincipal son:• “Presione la una para programar un aparato,como un televisor o receptor de satélite/cable.”Vea “Programación de un Dispositivo(Aparato)” en la página 20.• “Presione la dos para programar unaexploración de canales favoritos.”Vea “Programación de una Exploración deCanales Favoritos” en la página 22.• “Presione la tres para programar unasecuencia de mandos (un macro).”Vea “Programación de un Macro” en lapágina 23.• “Presione la cuatro para activar el cronómetrode dormido.”Vea “Activación del Cronómetro de Dormido”en la página 23.• “Presione la cinco para el aprendizaje.”Características y Funciones 19
RADIOSHACK 6-IN-1 EASY SETUP VOICE REMOTEVea “Programación de una Tecla deAprendizaje” en la página 24.• “Presione la seis para el bloqueo de volumen.”Vea “Bloqueo del Control de Volumen a unModo (Bloqueo Global de Volumen)” en lapágina 25.• “Presione la siete para reasignar una tecla dedipositivo.”Vea “Reasignación de las Teclas deDispositivos” en la página 26.• “Presione la ocho para restaurar los valoresfijados en la fábrica.”Vea “Restauración de los Valores Fijados en laFábrica” en la página 26.Use la teclada para seleccionar una de estasopciones. Después de que usted seleccione unaopción, el control remoto le proporcionará másinstrucciones. Vea las secciones de la lista másarriba para los detalles.PROGRAMACIÓN DE UNDISPOSITIVO (APARATO)El Control Remoto 6 en Uno con ProgramaciónFácil por Voz de RadioShack está prefijado en lafábrica para que opere un televisor, un VCR, unreproductor DVD, o un receptor de Satélite demarca RCA, un reproductor CD y un receptor deaudio de marca Pioneer.Para comenzar la programación de un dispositivo:1. Presione y mantenga presionada la tecla SETUPhasta que usted oiga el menú deprogramación.2. Presione la 1. Se oye las opciones del menú deprogramación:• “Presione la una para introducir uncódigo de dispositivo.”Vea “Introduzca un Código deDispositivo” en la página 20.• “Presione la dos para buscar un código dedispositivo.”Vea “Búsqueda de su Código” en lapágina 21.• “Presione la tres para recobrar un códigode dispositivo usted consiguió por unabúsqueda.”Vea “Verificación de los Códigos” en lapágina 21.INTRODUZCA UN CÓDIGO DE DISPOSITIVOPara controlar dispositivos que no sean de lasmarcas fijadas en la fábrica, lleve a cabo lossiguientes pasos; de otra forma sáltese esta sección.1. Encienda el dispositivo deseado (v.g., lavideograbadora o el reproductor de DVDs) y,si fuese necesario, póngale el medio que usa(v.g., casete o disco).NOTA: Antes de proceder, por favor lea los pasos2 al 9 completamente. Antes de comenzar con elpaso 2, revise los "Manufacturer's Codes(Códigos del Fabricante)" (comenzando en lapágina 30). Las marcas aparecen en la lista enorden alfabético y con los códigos más popularesprimero. Reslate o anote los nombres de losdispositivos y los números de los códigos quedesea programar.2. Presione y mantenga presionada la tecla SETUPhasta que usted oiga el menú de programacióny luego presione la 1.NOTA: Si pasan más de 15 segundos sin ningunapresión de tecla, el control remoto dice “adios” y salede la programación.3. Vuelva a presionar la 1.NOTA: Para salir de la programación en cualquiermomento, presione y mantenga presionada la teclaBACK .NOTA: Si pasan más de 15 segundos sin ningunapresión de tecla, el control remoto dice “adios” y salede la programación.4. Al oir el mando, presione una tecla dedispositivo (v.g., CBL/SAT, AUX, TV, DVD, AUDIO,o VCR) una vez.NOTA: Vea la “Tabla de Dispositivos” en la página 19al seleccionar una tecla de dispositivo paraprogramarla.5. Use los “Manufacturer’s Codes (Códigos delFabricante)” (comenzando en la página 30)para localizar el tipo de dispositivo y la marca.Al oir el mando, use las teclas numéricas paraintroducir el primer código de cuatro dígitospara su dispositivo. Si se realizacorrectamente, el LED parpadeará dos veces,el control remoto dirá “éxito, y volverá almando del paso 3.NOTA: Si el LED muestra un parpadeo largo y elcontrol remoto dice “inténtelo de nuevo” en lugar delo anterior, es que ha ocurrido un error. Vuelva aintroducir el mismo código una vez más.6. El remoto dice “Presione una tecla de prueba,como la power o la play. Si su dispositivo llevaa cabo la función de prueba, presione <strong>Setup</strong>para guardar el código, o introduzca elpróximo código del manual.” Presione unatecla de prueba.NOTA: No use las teclas numéricas para la función deprueba. El control remoto lo interpretará como uncódigo nuevo.20 Programación de un Dispositivo (Aparato)
OWNER’S MANUAL7. Si el dispositivo lleva a cabo la función deprueba, presione SETUP para guardar elcódigo. El remoto dice “Éxito”, y vuelve almando para el paso 3.NOTA: Si el dispositivo no respone, repita los pasos 5al 7 usando el próximo código en la lista para sudispositivo.8. Mantenga presionada la tecla BACK hasta queel remoto diga “adios.” Apunte el controlremoto al dispositivo y presione la teclaPOWER una vez. El dispositivo deberáapagarse.Si no lo hace, repita los pasos 2 al 6, probandocada uno de los códigos de su marca hasta queencuentre uno que funcione. Si aún así nofunciona, pruebe con la sección “Búsqueda desu Código” en la página 21.9. Si el código funciona, repita los pasos 2 al 6para programar otro dispositivo, o presione ymantenga presionada la tecla SETUP para salirde la programación.10. Para referencia futura, anote cada uno de loscódigos de los dispositivos que funcionan enlos cuadrados de abajo:Código CBL/SAT:Marca: ________________________Código AUX:Marca: ________________________Código DVD:Marca: ________________________Código TV:Marca: ________________________Código AUDIO:Marca: ________________________Código VCR:Marca: ________________________BúSQUEDA DE SU CÓDIGOSi su dispositivo no le responde al control remotodespués de haber probado todos los códigoslistados para su marca, o si su marca no está listadaen lo absoluto, trate de buscar su código.NOTA: Antes de llevar a cabo la búsqueda de uncódigo para un reproductor de CD o DVD, o de unaVCR, encienda el dispositivo e inserte el medio degrabación requerido.1. Presione y mantenga presionada la tecla SETUPhasta que usted oiga el menú deprogramación.NOTA: Si pasan más de 15 segundos sin ningunapresión de tecla, el control remoto dice “adios” y salede la programación.2. Presione 2.3. Al oir el mando, presione una tecla dedispositivo (v.g., CBL/SAT, AUX, TV, DVD, AUDIO,o VCR).4. Al oir el mando, presione una tecla (porejemplo, la tecla POWER) para seleccionarlacomo la función de prueba en la búsqueda.NOTA: Si su dispositivo o el control remoto original deese dispositivo no tiene una tecla de encendido(POWER), escoja una función de prueba diferente eneste paso (v.g., VOL+, Play, etc.).5. Al oir el mando, apunte el control remoto aldispositivo (v.g., el TV) y presione CH+ unavez o más para probar cada código. Deténgasecuando uno de los códigos que funcionó llevaa cabo la función de prueba seleccionada en elpaso 4. Si desea, use CH- para probar uncódigo previo.NOTA: En el modo de búsqueda, el control remotoenviará códigos infrarrojos desde su base de datoshacia el dispositivo seleccionado, comenzando con elcódigo más popular primero.6. Para seleccionar el código, presione SETUP unavez. El LED parpadea dos veces, el controlremoto dice “éxito” y vuelve a las opciones deprogramación.7. Repita los pasos 2 al 6 para programar otrodispositivo, o presione y mantenga presionadala tecla SETUP para salir de la programación.NOTA: Use la tecla de dispositivo y la tecla de funciónadecuada para el dispositivo usted está buscando.VERIFICACIÓN DE LOS CÓDIGOSSi configuró el control remoto usando elprocedimiento de “Búsqueda de su Código” (en lapágina 21), tal vez tenga que averiguar cuál es elcódigo de cuatro dígitos que está operando suequipo. Para hacer esto:1. Presione y mantenga presionada la tecla SETUPhasta que usted oiga el menú de programacióny luego presione la 1.2. Presione la 3.Programación de un Dispositivo (Aparato) 21
RADIOSHACK 6-IN-1 EASY SETUP VOICE REMOTE3. Al oir el mando, presione una tecla dedispositivo (v.g., CBL/SAT, AUX, TV, DVD, AUDIO,o VCR). El control remoto dirá el código.4. Anote los dígitos del código en los cuadradosapropiados en la página 21.5. Repita los pasos 2 al 3 para oir el código paraotro dispositivo, o presione y mantengapresionada la tecla SETUP para salir de laprogramación.NOTE: Use la tecla de dispositivo adecuada para eldispositivo usted está anotando.USO DE LA EXPLORACIÓN DECANALESEn los modos VCR, DVD, CBL/SAT, o TV, use la teclaFAV SCAN para iniciar una exploración de todos loscanales cada 3 segundos. Si la haya programado,use la tecla FAV SCAN para explorar sólo sus canalesfavoritos (vea “Programación de una Exploraciónde Canales Favoritos” en la página 22).1. Presione VCR, DVD, CBL/SAT, o TV paraseleccionar el dispositivo.2. Presione FAV SCAN una vez. El LED se animaráal ir cambiando de canal.• Si se configuró la Exploración de CanalesFavoritos, comenzará la exploración(recorrido) de los canales favoritos y sehará el ciclo a través de los canalesguardados durante 3 minutos o hasta quese le detenga presionando cualquier tecla.• Si no se configuró la Exploración deCanales Favoritos, la exploracióncomenzará con el canal actual, despuésprocederá al siguiente canal ascendente yhará el ciclo a través de todos los canalesdurante 3 minutos o hasta que se ledetenga presionando cualquier tecla.3. Para suspender la exploración de canales encualquier momento, presione cualquier teclauna vez.PROGRAMACIÓN DE UNA EXPLORACIÓN DE CANALESFAVORITOSEn los modos VCR, DVD, CBL/SAT, o TV, puedeguardar una lista de hasta 10 canales favoritos, encualquier orden, que serán exploradosinmediatamente cuando usted presione FAV SCAN(vea “Uso de la Exploración de Canales” en lapágina 22).NOTA: Los canales favoritos sólo se puedenprogramar para un modo. Después de laprogramación, si se presiona FAV SCAN mientras seestá en otro modo, el control remoto comenzará unaexploración (recorrido) de canales normal (si esto esaplicable al modo seleccionado).1. Presione y mantenga presionada la tecla SETUPhasta que usted oiga el menú de programacióny luego presione la 2.NOTA: Si pasan más de 15 segundos sin ningunapresión de tecla, el control remoto dice “adios” y salede la programación.2. Al oir el mando, presione VCR, DVD, CBL/SAT, oTV para seleccionarlo como el modo para laexploración de canales.3. Al oir el mando, use la teclada para introducirun número de canal favorito (v.g., 0 1 2).También presione +100 o Enter si así serequiere el dispositivo seleccionado.NOTA: Cada entrada de canal favorito debe tenercinco o menos carácteres. Si usted introduzca más decinco carácteres, el control remoto dirá “inténtelo denuevo” y repetirá el mando para el paso 3.4. Presione SETUP para guardar el canal.5. Repita los pasos 3 y 4 por cada canal que sequiere guardar, hasta un total de 10 canales, opresione y mantenga presionada la tecla SETUPpara volver al menú de programación.Presione y mantenga presionada la tecla BACKpara salir de la programación.NOTA: Después de guardar 10 canales, el controlremoto se saldrá de la programación de CanalesFavoritos.BORRAR LA LISTA DE CANALES FAVORITOSSi usted ya no quiere explorar sus canales favoritos,o si quiere programar los canales de nuevo, puedeborrar la lista de canales guardados:1. Presione y mantenga presionada la tecla SETUPhasta que usted oiga el menú de programacióny luego presione la 2.NOTA: Si pasan más de 15 segundos sin ningunapresión de tecla, el control remoto dice “adios” y salede la programación.2. Al oir el mando, presione VCR, DVD, CBL/SAT, oTV para asignar un modo para la exploraciónde canales favoritos.3. Presione y mantenga presionada la tecla SETUPpara borrar los canales guardados y volver almenú de programación. Presione y mantengapresionada la tecla BACK para salir de laprogramación.USO DE LOS MACROSEl Control Remoto 6 en Uno con ProgramaciónFácil por Voz de RadioShack incluye dos teclasmacro: M1 y M2. Cada una se puede configurar paraque realice una operación repetitiva, quedesperdicia tiempo, con sólo presionar una solatecla. También se puede configurar cualquiera otra22 Uso de la Exploración de Canales
OWNER’S MANUALtecla (excepto las teclas de modo, SLEEP, FAV SCAN,SETUP. BACK, o REPEAT) para que ejecute un macro.Un macro se puede usar para controlar lasoperaciones de teatro/cine en el hogar, para fijar uncanal favorito, o para otras funciones múltiples quea usted le gustaría controlar con sólo presionar unatecla. Más aún, cada macro puede guardar hasta 15presiones de tecla en total.NOTA: La programación de un nuevo macro porencima de uno existente borrará el macro original.PROGRAMACIÓN DE UN MACRO1. Presione y mantenga presionada la tecla SETUPhasta que usted oiga el menú de programacióny luego presione la 3.NOTA: Si pasan más de 15 segundos sin ningunapresión de tecla, el control remoto dice “adios” y salede la programación.2. Al oir el mando, presione una tecla de macrosin usar (v.g., M1 o M2) o la tecla POWER.NOTA: Si usted use la tecla POWER para un macro,debe presionar y mantener presionada la teclaPOWER por 2 segundos para activar el macro. Deotra manera la tecla funciona sólo para encender oapagar el dispositivo seleccionado.3. Al oir el mando, introduzca la secuencia de unmacro deseado hasta de 15 presiones de tecla.Por ejemplo, presione TV una vez, luegoPOWER, y luego introduzca 0 3 para el númerode canal de TV. Después, presione CBL/SAT unavez, luego POWER, y luego introduzca 0 7 1para el número de canal de la Caja /Convertidor de Cablevisión (un total de 9presiones). Ahora cuando usted presione latecla de macro, el TV encenderá y se cambiaráal canal 3, y el la Caja /Convertidor deCablevisión encenderá y se cambiará al canal71.NOTA: Si hay más de 15 presiones de tecla en lasecuencia, el LED mostrará un parpadeo largo,indicando un error y el control remoto dirá “inténtelode nuevo” y repetirá el mando para el paso 2.4. Para guardar el macro, presione y mantengapresionada la tecla SETUP hasta que el controlremoto dirá “éxito”, el LED parpadeará dosveces, y volverá al menú de programación.5. Presione la 3 y repita los pasos 2 al 4 paraprogramar otro macro, o presione y mantengapresionada la tecla BACK para salir de laprogramación.BORRAR FUNCIÓN DE UN MACRO1. Presione y mantenga presionada la tecla SETUPhasta que usted oiga el menú de programacióny luego presione la 3.NOTA: Si pasan más de 15 segundos sin ningunapresión de tecla, el control remoto dice “adios” y salede la programación.2. Al oir el mando, presione una tecla de macrosin usar (v.g., M1 o M2) o la tecla POWER.3. Presione y mantenga presionada la tecla SETUPhasta que el control remoto dirá “éxito”, elLED parpadeará dos veces, y volverá al menúde programación.4. Presione la 3 y repita los pasos 2 y 3 paraborrar otro macro, o presione y mantengapresionada la tecla BACK para salir de laprogramación.PROGRAMACIÓN DELCRONÓMETRO DE DORMIDOEl Control Remoto 6 en Uno con ProgramaciónFácil por Voz de RadioShack incluye un cronómetrode dormido que le permite programar susdispositivos para que apaguen después de untiempo determinado aún si el dispositivo no tengauna función de dormido.PROGRAMACIÓN DEL CRONÓMETRO DE DORMIDOPara programar un dispositivo para que apaguedespués de un tiempo determinado:1. Presione la tecla de un dispositivo (AUD, CD, TV,VCR, DVD, CBL/SAT).2. Presione la tecla Sleep hasta que fije el tiempodeseado. El cronómetro aumenta por 15minutos cada vez usted presione la tecla, hasta60 minutos.Cuando el cronómetro cuenta atrás al 0, el remoto leenvie una señal “apagar” al dispositivoseleccionado.El cronómetro de dormido funcionará aún si ustedha reasignado la tecla de dispositivo (vea“Reasignación de las Teclas de Dispositivos” en lapágina 26).Si usted apaga el dispositivo, el cronómetro dedormido apagará también.ACTIVACIÓN DEL CRONÓMETRO DE DORMIDOSi la tecla SLEEP no activa el cronómetro dedormido de su dispositivo o si no la activa en elcontrol remoto, tiene que activar el cronómetro dedormido para ese modo:1. Presione y mantenga presionada la tecla SETUPhasta que usted oiga el menú de programacióny luego presione la 4.Si pasan más de 15 segundos sin ninguna presión detecla, el control remoto dice “adios” y sale de laprogramación.2. Al oir el mando, presione la tecla 1.Programación del Cronómetro de Dormido 23
RADIOSHACK 6-IN-1 EASY SETUP VOICE REMOTE3. Al oir el mando, presione la tecla de undispositivo (CBL/SAT, AUX, TV, DVD, AUDIO, oVCR). El control remoto dirá “éxito”, el LEDparpadeará dos veces, y volverá al menú deprogramación.4. Presione la 4 y repita los pasos 2 y 3 para otrodispositivo, o presione y mantenga presionadala tecla BACK para salir de la programación.DESACTIVACIÓN DEL CRONÓMETRO DE DORMIDOPara desactivar el cronómetro de dormido para unmodo espécifico:1. Presione y mantenga presionada la tecla SETUPhasta que usted oiga el menú de programacióny luego presione la 4.NOTA: Si pasan más de 15 segundos sin ningunapresión de tecla, el control remoto dice “adios” y salede la programación.2. Al oir el mando, presione la tecla 2.3. Al oir el mando, presione la tecla de undispositivo (CBL/SAT, AUX, TV, DVD, AUDIO, oVCR). El control remoto dirá “éxito”, el LEDparpadeará dos veces, y volverá al menú deprogramación.4. Presione la 4 y repita los pasos 2 y 3 para otrodispositivo, o presione y mantenga presionadala tecla BACK para salir de la programación.USO DE LA FUNCIÓNAPRENDIZAJEEl Control Remoto 6 en Uno con ProgramaciónFácil por Voz de RadioShack incluye una función deAprendizaje para que usted pueda añadir funcionesque son únicas a los dispositivos de suentretenimiento en el hogar (v.g., exploración haciaadelante o hacia atrás de su VCR). Sin embargo, hayalgunas consideraciones:PRECAUCIONES SOBRE LA FUNCIÓN APRENDIZAJE• Sus controles remotos originales tienen queestar trabajando bien para que la función deaprendizaje funcione adecuadamente.• Las teclas aprendidas son específicas al modo,de manera que cada una puede guardar unafunción única para cada modo.• Las teclas aprendidas se pueden usar enmacros (vea “Uso de los Macros” en lapágina 22).• No use las siguientes teclas para elaprendizaje: las teclas de dispositivo, SETUP,BACK, REPEAT, FAV SCAN, SLEEP, ni la tecla degrabar (•).• La capacidad de aprendizaje esaproximadamente de 16 a 25 teclas,dependiendo del código que se estéaprendiendo.• Algunos códigos de dispositivos no se puedenaprender, incluyendo los tipos demultifrecuencias, algunos de alta frecuencia, yotros formatos inusuales.• Para un aprendizaje óptimo, evite niveles altosde luz ambiental como la luz del sol o las lucesfluorescentes de consumo eficiente de energía.NOTA: Por favor, tenga a la mano sus controlesremotos originales antes de programar elaprendizaje.PROGRAMACIÓN DE UNA TECLA DE APRENDIZAJE1. Presione y mantenga presionada la tecla SETUPhasta que usted oiga el menú de programacióny luego presione la 5.NOTA: Si pasan más de 15 segundos sin ningunapresión de tecla, el control remoto dice “adios” y salede la programación.2. Al oir el mando, presione la tecla 1 paraaprender una función.3. Al oir el mando, presione la tecla de undispositivo (CBL/SAT, AUX, TV, DVD, AUDIO, oVCR) una vez para asignar un modo para elaprendizaje.4. Coloque el Control Remoto 6 en Uno conProgramación Fácil por Voz de RadioShackcabeza contra cabeza (a unos 2 pulgadas dedistancia) de su control remoto original.También ubique la tecla (en su control remotooriginal) que servirá como la función aenseñar.2"5. En su Control Remoto 6 en Uno conProgramación Fácil por Voz de RadioShack,seleccione y presione la tecla deseada donde seguardará la función aprendida. El LED delControl Remoto 6 en Uno con ProgramaciónFácil por Voz de RadioShack se apagará.Mantenga presionada la tecla que va a enseñarla función en su control remoto original hastaque el LED del Control Remoto 6 en Uno conProgramación Fácil por Voz de RadioShack separpadee dos veces, diga “éxito”, y se vuelva almando para el paso 3.NOTA: Si el LED muestra un parpadeo largo, haocurrido un error de aprendizaje. Pruebe repitiendoeste paso de nuevo hasta que haya una capturaexitosa. Si todavía no se captura la función, presioney mantenga presionada la tecla BACK para salirse de24 Uso de la Función Aprendizaje
OWNER’S MANUALla programación y revisar las “Precauciones sobre laFunción Aprendizaje” en la página anterior. Si fuesenecesario, consulte también “Localización de Fallas”en la página 27. Después de la revisión, comience aprogramar desde el paso 1.6. Presione la 5 y repita los pasos 3 al 6 para otrodispositivo y/o tecla, o presione y mantengapresionada la tecla BACK para salir de laprogramación.BORRAR FUNCIÓN DE UNA SOLA TECLA APRENDIDA1. Presione y mantenga presionada la tecla SETUPhasta que usted oiga el menú de programacióny luego presione la 5.NOTA: Si pasan más de 15 segundos sin ningunapresión de tecla, el control remoto dice “adios” y salede la programación.2. Al oir el mando, presione la 2 para borrar unafunción aprendida.3. Al oir el mando, presione la 1 para borrar unasóla tecla aprendida.4. Al oir el mando, presione una tecla dedispositivo (v.g., CBL/SAT, AUX, TV, DVD, AUDIO,o VCR) para el modo donde reside la teclaaprendida que se va a borrar.5. Al oir el mando, presione la tecla con lafunción aprendida que se va a borrar.6. Al oir el mando, vuelva a presionar la tecla delpaso 5. El control remoto dice “éxito” y vuelveal menú de programación.7. Presione la 5 y repita los pasos 3 al 6 para otratecla, o presione y mantenga presionada latecla BACK para salir de la programación.BORRAR FUNCIÓN DE TODAS LAS TECLASAPRENDIDAS EN UN MODO ESPECÍFICO1. Presione y mantenga presionada la tecla SETUPhasta que usted oiga el menú de programacióny luego presione la 5.NOTA: Si pasan más de 15 segundos sin ningunapresión de tecla, el control remoto dice “adios” y salede la programación.2. Al oir el mando, presione la 2 para borrar unafunción aprendida.3. Al oir el mando, presione la 2 para borrartodas las teclas aprendidas para un dispositivoespecífico.4. Al oir el mando, presione una tecla dedispositivo (es decir, CBL/SAT, AUX, TV, DVD,AUDIO, o VCR) para el modo donde residen lasteclas aprendidas que se va a borrar.5. Vuelva a presionar la tecla del de dispositivodel paso 4. El control remoto dice “éxito” yvuelve al mando para el paso 3.6. Presione la 5 y repita los pasos 3 al 5 para otrodispositivo, o presione y mantenga presionadala tecla BACK para salir de la programación.CAMBIO DEL BLOQUEO DELVOLUMENEl Control Remoto 6 en Uno con ProgramaciónFácil por Voz de RadioShack se programa en lafábrica para que haya un control independiente delvolumen en cada dispositivo seleccionado.Sin embargo, usted puede cambiar la programaciondel Bloqueo del Volumen a la de Bloqueo Global deVolumen de tal manera que el volumen de undispositivo quede bloqueado a un modo (v.g., paracontrolar el volumen del televisor en todos los otrosmodos). Después de esto, si gusta, puede llevar acabo un Desbloqueo Individual de Volumen en undispositivo seleccionado para fijarle el control devolumen como una operación independiente.BLOQUEO DEL CONTROL DE VOLUMEN A UN MODO(BLOQUEO GLOBAL DE VOLUMEN)1. Presione y mantenga presionada la tecla SETUPhasta que usted oiga el menú de programacióny luego presione la 6.NOTA: Si pasan más de 15 segundos sin ningunapresión de tecla, el control remoto dice “adios” y salede la programación.2. Al oir el mando, presione la 1 para bloquearlos controles del volumen a un sólodispositivo.3. Al oir el mando, presione la tecla de undispositivo (v.g., CBL/SAT, AUX, TV, DVD, AUDIO,o VCR) en el que quiere bloquear los controlesdel volumen. El control remoto dice “éxito” yvuelve al mando para el paso 2.4. Presione y mantenga presionada la tecla BACKpara salir de la programación.Ahora, cuando presione VOL, VOL, o MUTE(enmudecer), controlará el volumen del dispositivoseleccionado, independientemente del modoseleccionado. Por ejemplo, si usted bloquea elvolumen al TV, las teclas VOL, VOL o MUTEcontrolarán el volumen, incluso si el modoseleccionado sea CBL/SAT.DESBLOQUEO DEL CONTROL DE VOLUMEN PARA UNSOLO DISPOSITIVO (DESBLOQUEO INDIVIDUAL DEVOLUMEN)1. Presione y mantenga presionada la tecla SETUPhasta que usted oiga el menú de programacióny luego presione la 6.NOTA: Si pasan más de 15 segundos sin ningunapresión de tecla, el control remoto dice “adios” y salede la programación.Cambio del Bloqueo del Volumen 25
RADIOSHACK 6-IN-1 EASY SETUP VOICE REMOTE2. Al oir el mando, presione la 2 paradesbloquear los controles del volumen en unsólo dispositivo.3. Al oir el mando, presione la tecla de undispositivo (v.g., CBL/SAT, AUX, TV, DVD, AUDIO,o VCR) en el que quiere desbloquear loscontroles del volumen. El control remoto dice“éxito” y vuelve al mando para el paso 2.4. Presione y mantenga presionada la tecla BACKpara salir de la programación.Ahora, después de que seleccione un dispositivoque tiene desbloqueado el volumen, si presionaVOL, VOL, o MUTE, controlará el volumen deldispositivo únicamente en el modo seleccionado.DESBLOQUEO DE TODO EL CONTROL DE VOLUMEN(RESTAURACIÓN DE LOS PARÁMETROS DE FÁBRICA)1. Presione y mantenga presionada la tecla SETUPhasta que usted oiga el menú de programacióny luego presione la 6.NOTA: Si pasan más de 15 segundos sin ningunapresión de tecla, el control remoto dice “adios” y salede la programación.2. Al oir el mando, presione la 3 paradesbloquear todo el control del volumen. Elcontrol remoto dice “éxito” y vuelve al mandodel principio de este paso.3. Presione y mantenga presionada la tecla BACKpara salir de la programación.El volumen se controlará de nuevo en formaindependiente de acuerdo con los parámetros defábrica de todos los dispositivos programados.REASIGNACIÓN DE LAS TECLASDE DISPOSITIVOSEl Control Remoto 6 en Uno con ProgramaciónFácil por Voz de RadioShack se puede configurarpara que controle un segundo dispositivo. Porejemplo, para controlar una TV, una Caja deCablevisión, y dos reproductores de DVDs, ustedpuede reasignar la tecla AUD no usada para operarun segundo Reproductor DVD, de la siguientemanera:1. Presione y mantenga presionada la tecla SETUPhasta que usted oiga el menú de programacióny luego presione la 7.NOTA: Si pasan más de 15 segundos sin ningunapresión de tecla, el control remoto dice “adios” y salede la programación.2. Al oir el mando, presione la tecla de undispositivo (v.g., CBL/SAT, AUX, TV, DVD, AUDIO,o VCR) que quiere reasignar.NOTA: Sólo un dispositivo se puede asignar a la teclade un dispositivo no usado a la vez.3. Para el modo destino, presione la tecla de undispositivo (v.g., CBL/SAT, AUX, TV, DVD, AUDIO,o VCR). El control remoto dice “éxito” y vuelveal menú de programación. También anuncia elmodo nuevo para la tecla seleccionada.4. Presione la 7 y repita los pasos 2 y 3 para otrodispositivo, o presione y mantenga presionadala tecla BACK para salir de la programación.RESTAURACIÓN DE LOSVALORES FIJADOS EN LAFÁBRICAEl Control Remoto 6 en Uno con ProgramaciónFácil por Voz de RadioShack incluye un programade Reposición de los Códigos de Configuración.Usted lo puede usar para restaurar todos suscódigos programados a los valores fijados en lafábrica y así borrar toda la programación a lamedida.BORRAR LA PROGRAMACIÓN A LA MEDIDA(RESTAURACIÓN BÁSICA)IMPORTANTE: Al ejecutar este programa seborrarán todas los parámetros modificados a lamedida para Macros, Teclas Aprendidas, TeclasReasignadas de Dispositivos, Canales Favoritos,Cronómetro de Dormido, y Bloqueo del Volumen.1. Presione y mantenga presionada la tecla SETUPhasta que usted oiga el menú de programacióny luego presione la 8.NOTA: Si pasan más de 15 segundos sin ningunapresión de tecla, el control remoto dice “adios” y salede la programación.2. Al oir el mando, presione la 1 para restaurarMacros, Teclas Aprendidas, TeclasReasignadas de Dispositivos, CanalesFavoritos, Cronómetro de Dormido, y Bloqueodel Volumen a los valores fijados en la fábrica.3. Presione y mantenga presionada la tecla BACKpara salir de la programación.REMOCIÓN DE TODA LA PROGRAMACIÓN AL GUSTOIMPORTANTE: Si ejecuta este programa, borrarátodas las fijaciones al gusto incluyendo lasfijaciones de los códigos.1. Presione y mantenga presionada la tecla SETUPhasta que usted oiga el menú de programacióny luego presione la 8.NOTA: Si pasan más de 15 segundos sin ningunapresión de tecla, el control remoto dice “adios” y salede la programación.2. Al oir el mando, presione la 2 para restaurarMacros, Teclas Aprendidas, TeclasReasignadas de Dispositivos, Canales26 Reasignación de las Teclas de Dispositivos
OWNER’S MANUALFavoritos, Cronómetro de Dormido, Bloqueodel Volumen, y los códigos a los valores fijadosen la fábrica.3. Presione y mantenga presionada la tecla BACKpara salir de la programación.LOCALIZACIÓN DE FALLASPROBLEMA:SOLUCIÓN:PROBLEMA:SOLUCIÓN:PROBLEMA:SOLUCIÓN:PROBLEMA:SOLUCIÓN:PROBLEMA:SOLUCIÓN:PROBLEMA:SOLUCIÓN:El LED está parpadeando y elcontrol remoto está diciendo quelas baterías están bajas(descargadas).Reemplace las baterías por cuatrobaterías alcalinas nuevas tamañoAAA.El control remoto dijo “adios” y sesalió de la programación.La programación se ha acabadopor inactividad. Vuelva acomenzar la programación y nohaga una pausa de más de 15segundos mientras está llevandoa cabo las instrucciones.Durante la programación, el LEDmostró un parpadeo largo.Ocurrió una introducción noválida (v.g., una teclaequivocada). Vuelva a introducirla secuencia.¿Cómo dejo de programar?Presione y mantenga presionadala tecla SETUP hasta que el controlremoto diga “Adios”.La unidad no controla losdispositivos del centro deentretenimiento en el hogar o losmandos no están trabajandoadecuadamente.Pruebe con todos los códigos en lalista para las marcas de losdispositivos que se estánconfigurando. Asegúrese de queéstos puedan operarse con uncontrol remoto que use rayosinfrarrojos.Traté el método de Búsqueda de suCódigo y aún así no puedo hallaun código que funcione.Lleve a cabo la “Restauración delos Valores Fijados en la Fábrica”en la página 26. Después repita la“Búsqueda de su Código” en lapágina 21.PROBLEMA:SOLUCIÓN:PROBLEMA:SOLUCIÓN:PROBLEMA:SOLUCIÓN:PROBLEMA:SOLUCIÓN:PROBLEMA:SOLUCIÓN:PROBLEMA:SOLUCIÓN:PROBLEMA:SOLUCIÓN:No puedo programar un macro enlas teclas M1 - M2 ni POWER.Asegúrese de que el número totalde presiones de teclas que se estáprogramando sea menos de 15.El macro de la tecla POWER nofunciona.Presione y mantenga presionadala tecla POWER por más de 2segundos.La función de canales favoritos notrabaja en la forma adecuada.Algunos dispositivos (v.g., lascajas de cablevisión o losreceptores de satélite) usannúmeros de canales de dosdígitos. Durante la programación,presione ENTER u OK una vezdespués de introducir el númerodel canal (v.g., 0 2 ENTER para elcanal 2). Vea “Programación deuna Exploración de CanalesFavoritos” en la página 22.El cambio de canales no funcionabien.Si el control remoto originalrequería que se presionara la teclaEnter para cambiar de canales,entonces presione Enter en elcontrol remoto después deintroducir los números del canal.No se puede controlar el volumenusando el control remoto.Vea “Cambio del Bloqueo delVolumen” en la página 25 parabloquear/desbloquear elvolumen.El LED parpadea cuando sepresiona una tecla, pero eldispositivo no responde.Asegúrese de que el remoto estéapuntando hacia su dispositivo yque no se encuentre a más de 15pies de distancia.CH y CHno funcionan con sutelevisor marca RCA.Debido al diseño RCA (1983 a1987), sólo el control remotooriginal puede realizar estasfunciones.Para más ayuda, o si su problema no aparezca en lalista, visite www.radioshack.com o llame porteléfono a 866-269-8705.Localización de Fallas 27
RADIOSHACK 6-IN-1 EASY SETUP VOICE REMOTEESPECIFICACIONESEnergía del Control Remoto ........ (4) Baterías AAADimensiones del Control Remoto(H x A x P) ............................... 9.01 x 2.68 x 1.19 in(H x A x P) ....................228.79 x 68.15 x 30.13 mmPeso del Control Remoto(sin baterías)................................. 5.6 oz (158.76 g)Las especificaciones son típicas. Las unidadesindividuales podrían variar. Las especificacionesquedan sujetas a cambios y mejoras sin previoaviso.CUIDADO• Mantenga seco el control remoto. Si éste semoja, séquelo con un paño de inmediato.• Maneje el control remoto delicada ycuidadosamente. No lo deje caer.• Use y guarde el control remoto sólo enambientes con temperatura normal.• Mantenga el control remoto alejado del polvo yde la mugre.• Limpie el control remoto con un paño húmedopara conservarlo luciendo como nuevo.• La modificación o alteración de piezasinternas puede causar daños y anular lagarantía.Si su remoto no está funcionando como debe,por favor contáctenos en:www.radioshack.como visite la tienda RadioShack de su localidadpara obtener ayuda.INFORMACIÓN ADICIONALDerechos de autor, © 2004 de Universal Electronics.Ninguna porción de esta publicación podráreproducirse, transmitirse, transcribirse, guardarseen algún sistema de recuperación, o traducirse acualquier idioma, en cualquier forma o mediantecualquier medio, sea electrónico, mecánico,magnético, óptico, manual, o de otro tipo, sin elpermiso previo y por escrito de UniversalElectronics. Kameleon es una marca comercial (suregistro está en trámite) de Universal Electronics.Derechos de autor © 2004 de RadioShackCorporation. Se reservan todos los derechos.RadioShack y RadioShack.com son marcascomerciales usadas por RadioShack Corporation.El Control Remoto 6 en Uno con ProgramaciónFácil por Voz de RadioShack es compatible parausarse en Estados Unidos. Este producto usatecnologías con licencia bajo una o más de lassiguientes patentes estadounidenses: 6,587,067;6,496,135; 5,515,052, 6,014,092; 6,195,033;5,959,751; 6,587,067; 5,481,256; 6,330,09;6,097,309, 6,522,262, y patentes en trámite.CONFORMIDAD CON LA FCCEste equipo fue probado y demostró que cumplecon los límites para los dispositivos digitales declase B, de acuerdo con la parte 15 de las Reglas dela FCC. Estos límites están diseñados paraproporcionar una protección razonable contrainterferencias dañinas en una instalaciónresidencial. Este equipo genera, usa y puedeirradiar energía de radiofrecuencia y si no se leinstala y usa de acuerdo con las instrucciones,podría causar interferencias dañinas a lascomunicaciones por radio.Sin embargo, no hay garantía de que no ocurriráuna interferencia en una instalación en particular.Si este equipo causa interferencias dañinas a larecepción de radio o televisión, lo cual se puededeterminar apagando y encendiendo el equipo, seanima al usuario a que trate de corregir lainterferencia mediante una o más de las siguientesmedidas:• Reoriente o reubique la antena receptora.• Aumente la separación que hay entre el equipoy el receptor.• Conecte el equipo a un tomacorriente en uncircuito diferente a donde está conectado elreceptor.• Consulte al distribuidor o a un técnico conexperiencia en radio y televisión para que leasista.Se verificó que este equipo cumple con los límitesde un dispositivo de computación de clase B, deacuerdo con las Reglas de la FCC. Para podermantener el cumplimiento con los reglamentos dela FCC, tienen que usarse cables blindados con esteequipo. La operación con equipos no aprobados ocon cables no blindados puede resultar en unainterferencia en la recepción de radio y televisión.Se cauciona al usuario que los cambios y lasmodificaciones que se hagan al equipo sin laaprobación del fabricante podrían nulificar laautoridad del usuario para operar este equipo.28 Especificaciones
OWNER’S MANUALGARANTÍA LIMITADA DE 90 DÍASEste producto está garantizado por RadioShackcontra defectos de fabricación en su material ymano de obra bajo un uso normal durante noventa(90) días a partir de la fecha de compra en unatienda propiedad de la compañía RadioShack o deconcesionarios y distribuidores autorizadosRadioShack.EXCEPTO A LO PROVISTO AQUÍ, RadioShack NOBRINDA NINGUNA GARANTÍA EXPRESA YCUALESQUIERA GARANTÍAS IMPLÍCITAS,INCLUYENDO LAS DE COMERCIABILIDAD YADECUACIÓN PARA UN PROPÓSITOPARTICULAR, ESTÁN LIMITADAS EN SUDURACIÓN A LA DURACIÓN DE LASGARANTÍAS LIMITADAS ESCRITASCONTENIDAS AQUÍ. EXCEPTO A LO PROVISTOAQUÍ, RadioShack NO SERÁ RESPONSABLEANTE EL CLIENTE NI ANTE ALGUNA OTRAPE<strong>RS</strong>ONA O ENTIDAD EN LO TOCANTE ACUALQUIER RESPONSABILIDAD, PÉRDIDA ODAÑO CAUSADO DIRECTA O INDIRECTAMENTEPOR EL USO O FUNCIONAMIENTO DELPRODUCTO O QUE SURJA DE CUALQUIERINCUMPLIMIENTO DE ESTA GARANTÍA,INCLUYENDO, PERO SIN LIMITA<strong>RS</strong>EA,CUALESQUIERA DAÑOS QUE SURJAN DE UNAINCONVENIENCIA,PÉRDIDA DE TIEMPO,DEDATOS,DE PROPIEDAD,DE INGRESOS, O DEGANANCIAS O CUALESQUIERA DAÑOSINDIRECTOS, ESPECIALES, INCIDENTALES,OEMERGENTES, AUN CUANDO RadioShack HAYASIDO NOTIFICADA DE LA POSIBILIDAD DETALES DAÑOS.Algunos estados no permiten limitaciones respectoa cuánto dura una garantía implícita o a la exclusióno limitación de daños incidentales o emergentes, demanera que las limitaciones o exclusiones de arribapodrían no aplicársele a usted.En caso de que se presente un defecto en elproducto durante el plazo de garantía, lleve elproducto y el recibo de venta de RadioShack comoprueba de la fecha de compra a cualquier tiendaRadioShack. RadioShack, a su opción, a no ser quela ley prevea otra cosa: (a) corregirá el defectomediante la reparación del producto sin cargo porlas piezas ni por la mano de obra; (b) reemplazaráel producto por otro igual o de diseño similar; o (c)reembolsará el precio de compra.Todas las piezas y productos reemplazados, y losproductos sobre los cuales se otorgó un reembolso,se convierten en la propiedad de RadioShack. Laspiezas o productos nuevos o reacondicionadospodrían usarse en el desempeño del servicio degarantía. Las piezas y productos reparados oreemplazados están garantizados por el resto delplazo de la garantía original.Usted tendrá que pagarpor las reparaciones o reemplazos del producto quese realicen después de la fecha de vencimiento delperíodo de garantía.Esta garantía no cubre: (a) daño o falla causadospor o atribuibles a fuerza mayor, abuso, accidente,mal uso, uso inadecuado o anormal, no seguir lasinstrucciones, instalación o mantenimientoinadecuados, alteración, rayos u otros incidentes deexceso de voltaje o corriente; (b) cualesquierareparaciones que no sean las proporcionadas poruna Instalación de Servicios AutorizadaRadioShack; (c) fungibles como los fusibles o lasbaterías; (d) daño cosmético; (e) costos detransporte, flete o seguro; o (f) costos de remocióndel producto, instalación, ajuste por servicio deconfiguración o reinstalación.Esta garantía le brinda derechos legales específicos,y usted podría tener otros derechos que varían deacuerdo con el estado donde vive.Departamento RadioShack de Relaciones con elCliente,200 Taylor Street, 6th Floor,Fort Worth, TX 76102Cat.No. 15-2146 10/04Fort Worth, Texas 76102Garantía Limitada de 90 Días 29
RADIOSHACK 6-IN-1 EASY SETUP VOICE REMOTEMANUFACTURER’S CODES(CÓDIGOS DEL FABRICANTE)SETUP CODES FOR AUDIO AMPLIFIE<strong>RS</strong> (CÓDIGOSDE CONFIGURACIÓN PARA AMPLIFICADORES DEAUDIO)Accuphase 0382Acurus 0765Adcom 1100, 0577Aiwa 0406AudioSource 0011Bel Canto Design 1583Bose 0674Carver 0269Classe 1462, 1461Curtis Mathes 0300Denon 0160Durabrand 1561GE 0078GoldStar 0031Harman/Kardon 0892JVC 0331Kenwood 0356Left Coast 0892Lenoxx 1561Linn 0269Logitech 1408Luxman 0165Magnavox 0269Marantz 0892, 0321, 0269Mark Levinson 1483Nakamichi 0321NEC 0264Optimus 0395, 0300, 0823Panasonic 0521, 0308Parasound 0246Philips 0892, 0269Pioneer 0823, 0300, 0013Polk Audio 0892, 0269RCA 0823, 0300Realistic 0395Sansui 0321Shure 0264Sony 0689, 0220, 1126Soundesign 0078, 0211Technics 0521, 0308Victor 0331Wards 0078, 0013, 0211Yamaha 0354, 0133, 0504, 0143SETUP CODES FOR AUDIO AMP/TUNE<strong>RS</strong> (CÓDIGOSDE CONFIGURACIÓN PARA AMPLIFICADORES DEAUDIO/SINTONIZADORES)ADC 0531Adcom 0616Admiral 0182Aiwa 1405, 0158, 0189, 1388, 1243,1641, 1089, 0121, 0405Akai 0076, 1255, 0224, 0115, 1512Alco 1390Amphion Media 1563, 1615WorksAMW 1615, 1563Anam 1609, 1074Apex Digital 1430, 1257Arcam 1120Audiotronic 1189Audiovox 1390Bose 1229, 1253, 0639Brix 1602Cambridge 1370SoundworksCapetronic 0531, 0690Carver 1189, 0189, 0042, 1089, 0008,0360Casio 0195Clarinette 0195Classic 1352Coby 1389, 1263Compaq 1136Criterion 1420Curtis 0797Curtis Mathes 0080Daewoo 1250Dell 1383Denon 1360, 1142, 0004, 1104, 0771,0273Emerson 0424Fisher 0042, 1801, 0360, 0219Garrard 0440, 0424, 0744, 0286, 0463Gateway 1517, 1567Glory Horse 1263Go Video 1532GPX 0744Hanwah 0741Harman/Kardon 0110, 0189, 0891Hewlett Packard 1181Hitachi 1273, 1801Initial 1426Inkel 0062Integra 1298, 0135JBL 0110, 1306Jensen 0754JVC 0074, 1263, 1643, 1495, 137430 Manufacturer’s Codes (Códigos del Fabricante)
OWNER’S MANUALKansai 0440Kenwood 1313, 1570, 1569, 0027, 0042,0569, 1052,0186, 0314, 1051,0077, 0313, 1027KLH 1390, 1664, 1428, 1412Koss 1366, 0744, 0424, 1497Lasonic 1798Lenoxx 1437Lexicon 1076LG 1293Linn 0189Liquid Video 1497Lloyd's 0195LXI 0744, 0181Magnavox 1189, 1269, 0189, 0195, 0531,0391, 0128, 0364, 1089, 1514Marantz 1189, 1269, 0039, 0189, 0128,1089, 1289MCS 0039, 0346Memorex 0335Mitsubishi 1393Modulaire 0195Musicmagic 1089NAD 0320Nakamichi 0097, 1642, 1555, 0347NEC 0235Nikko 0609Niro 1634Norcent 1389NTDE Geniesom 0744Onkyo 0380, 1531, 0135, 1298, 0842Optimus 1023, 0229, 0531, 0690, 0754,0177, 0803, 0219, 1074, 0440,0670, 0744, 0080, 0801, 0186,0286, 0622, 0738, 0042, 0797,0181, 0849Orient Power 0744Oritron 1497, 1366Panasonic 1518, 0039, 0518, 1763, 0367,1316, 1633, 0309, 1288, 1548,1764Penney 0195Philco 1390Philips 1189, 1269, 0189, 1120, 1089,1266, 0391Pioneer 1023, 0150, 0630, 1384, 0080,0531, 1123, 0014, 0244Polaroid 1508Polk Audio 0189, 1289Proscan 1254Quasar 0039RadioShack 1263, 0744RCA 1023, 1609, 1254, 1123, 1390,0346, 0531, 1122, 0080, 0530,1074, 1154, 1511, 0054, 0360Realistic 0001, 0178, 0195, 0163, 0182,0025, 0181, 0534Regent 1437Rio 1869, 1383Saba 1519Samsung 1500, 1295Sansui 0189, 0346, 0193, 1089Sanyo 0801, 0219, 1469, 1251Schneider 0364Scott 0418, 0322, 0163Sharp 0186, 1286Sharper Image 1263, 0797, 1556Sherwood 0491, 1423, 0062, 1077, 0502,1653Shinsonic 1426Sonic Blue 1383, 1869, 1532Sontec 0068Sony 1058, 1441, 1258, 1759, 0158,0474, 1158, 1406, 1558, 1758,0415, 1658, 0168, 1858, 1042,1649Soundesign 0670Stereophonics 1023Sunfire 1313, 1052, 0314, 0313Sylvania 0797Symphonic 0182Teac 1074, 1528, 0463, 1390, 0163,1267Technics 1308, 1518, 0039, 0518, 0309,1309, 0208Techwood 0690, 0609, 0364Thorens 1189Venturer 1390, 0849Victor 0074Wards 0158, 0189, 0080, 0054, 0014Yamaha 0176, 1276, 1176, 1375, 0186,1331Yorx 0195Zenith 0857, 0744, 1652, 0622, 1293SETUP CODES FOR CABLE BOXES (CÓDIGOS DECONFIGURACIÓN PARA CAJAS/CONVERTIDORES DECABLE)ABC 0003, 0008, 0014, 0007, 0013,0011, 0017Allegro 0315, 0153Americast 0899Antronix 0207, 0022Archer 0022, 0207, 0153, 0039, 0797Belcor 0056Bell & Howell 0014Bell South 0899Cable Star 0056Cabletenna 0022Manufacturer’s Codes (Códigos del Fabricante) 31
RADIOSHACK 6-IN-1 EASY SETUP VOICE REMOTECableview 0022Century 0153Citizen 0315, 0153Clearmaster 0883ClearMax 0883Colour Voice 0025Comtronics 0040Contec 0019Coolmax 0883Digi 0637Director 0476Dumont 0637Eastern 0002Emerson 0797Everquest 0015, 0040Focus 0400Garrard 0153GC Electronics 0056, 0207Gemini 0797, 0015General Instrument 0476, 0810, 0276, 0003, 0011GoldStar 0144, 0040Goodmind 0797Hamlin 0009, 0273, 0259, 0034, 0020Hitachi 0011Hytex 0007Jasco 0015, 0315, 0153Jerrold 0476, 0810, 0276, 0003, 0012,0014, 0011, 0015Memorex 0000Motorola 0476, 0810, 0276, 1254, 1106,1376Movie Time 0063MultiVision 0012NSC 0063Oak 0019, 0007Optimus 0021Pace 1877, 0237Panasonic 0000, 0107, 0021Panther 0637Paragon 0000Philips 0317, 0153, 0025, 1305Pioneer 1877, 0877, 0144, 0533Popular Mechanics 0400Pulsar 0000Quasar 0000RadioShack 0797, 0315, 0303, 0883, 0015RCA 1256, 0021Realistic 0207Recoton 0400Regal 0279, 0273, 0020, 0259Regency 0002Rembrandt 0011Runco 0000Samsung 0144, 0040Scientific Atlanta 1877, 0877, 0477, 0008, 0017Signal 0040, 0015Signature 0011SL Marx 0040Sony 1006Sprucer 0021Starcom 0003, 0015Stargate 0015, 0797, 0040Starquest 0015Supercable 0276Supermax 0883Tandy 0258Teleview 0040Thomson 1256Timeless 0040Tocom 0012, 0013Torx 0003Toshiba 0000Tristar 0883Tusa 0015TV86 0063Unika 0207, 0153, 0022United Artists 0007Universal 0056, 0207, 0039, 0191, 0022,0153V2 0883Viewmaster 0883ViewmaxPro 1544Viewstar 0258, 0063Vision 0883Vortex View 0883Zenith 0000, 0525, 0899Zentek 0400SETUP CODES FOR CABLE BOXES/PVR COMBOS(CÓDIGOS DE CONFIGURACIÓN PARA APARATOSCOMBINADOS CAJAS/CONVERTIDORES DE CABLE/DVR/PVR)Americast 0899General Instrument 0476, 0810Jerrold 0476, 0810Motorola 0476, 0810, 1106, 1376Pace 1877, 0237Pioneer 1877, 0877RCA 1256Scientific Atlanta 1877, 0877Sony 1006Supercable 0276Thomson 1256Zenith 089932 Manufacturer’s Codes (Códigos del Fabricante)
OWNER’S MANUALSETUP CODES FOR CD PLAYE<strong>RS</strong> (CÓDIGOS DECONFIGURACIÓN PARA REPRODUCTORES DE CDS)ADC 0018Adcom 0155, 0234Aiwa 0157, 0124Akai 0156Audio Alchemy 0194Audio-Technica 0170BSR 0245, 0194Burmester 0420California Audio 0029, 0303LabsCarrera 0194Carver 0157, 0437, 0179Classic 1297DAK 0245Denon 0873, 0003DKK 0000DMX Electronics 0157Emerson 0155, 0469, 0305, 0164Fisher 0342, 0179, 0174, 1325, 0088Garrard 0280, 0245, 0420, 0393GE 0009Genexxa 0032, 0305, 0164GPX 1296Harman/Kardon 0157, 0173, 1202, 0426Hitachi 0032, 0155Integra 0101JVC 0072, 1294Kenwood 0681, 0826, 0626, 0028, 0037,0190KLH 1711, 1318Kodak 0287Koss 1317Krell 0157Kyocera 0018LG 1208Linn 0157Luxman 0093LXI 0305Magnavox 0157, 0305Marantz 0626, 0029, 0157, 0180Mark Levinson 1484McIntosh 0287MCS 0029Miro 0000Mission 0157MTC 0420NEC 0234Nikko 0174, 0170, 0164NSM 0157Onkyo 0868, 0101Optimus 1063, 0000, 0032, 0037, 0280,0420, 0468, 0775, 0175, 1075,0196, 0342, 0437, 0671, 0145,0194, 0305, 0426, 0536, 0087,0850, 0179Panasonic 0029, 0752, 0303Parasound 0194, 0420Philips 0626, 0157, 0287Pioneer 1063, 1062, 0032, 0305, 0468,1087Polk Audio 0157Proton 0157QED 0157Quad 0157Quasar 0029RadioShack 1075, 1083RCA 1062, 0032, 0179, 0468, 0009,0155, 0420, 0053, 0305, 0764Realistic 0180, 0155, 0179, 0175, 0420,0164Rotel 0157, 0420SAE 0157Sansui 0157, 0202, 0305Sanyo 0179, 0087Scott 0305, 0164, 0155Sears 0305Sharp 0861, 0037, 0180Sherwood 1067, 0426, 0196, 0180Sonic Frontiers 0157Sony 0490, 0000, 1364, 0185, 0605,0100, 0604Soundesign 0145Staron 0398STS 0018Symphonic 0305TAG McLaren 0157Tascam 0420TDK 1208Teac 0393, 0180, 0174, 0420Technics 0029, 0303Tivoli Audio 1553Vector Research 0194Victor 0072Wards 0157, 0559, 0053Yamaha 0888, 0036, 0187, 0170, 1292Yorx 0461Zonda 0157SETUP CODES FOR DVD PLAYE<strong>RS</strong> (CÓDIGOS DECONFIGURACIÓN PARA REPRODUCTORES DVD)Adcom 1094Advent 1016Aiwa 0641, 1912Akai 1089, 0899, 0770, 1975Manufacturer’s Codes (Códigos del Fabricante) 33
RADIOSHACK 6-IN-1 EASY SETUP VOICE REMOTEAllegro 0869Amphion Media 0872, 2016, 2001, 1176WorksAMW 2001, 1176, 0872, 2016Anam 1913Apex Digital 0672, 0717, 0796, 1004, 1061,1937, 0794, 0830, 1056, 1915,0755, 0797, 1020, 1100Aspire Digital 1168Audiologic 0736Audiovox 1071, 1122, 1041, 1121, 1072Axion 1072, 1071B & K 0655, 0662Bel Canto Design 1571Blaupunkt 0717Blue Parade 0571Bose 2023Broksonic 0695, 0868Cambridge 1916, 0690SoundworksCAVS 1057CineVision 0876, 0869Citizen 1277Classic 1917Coby 0852, 1165, 0778, 1107, 1086,1923Criterion 2007Curtis Mathes 1087CyberHome 1024, 1023, 1129, 1019, 1117,0816Daewoo 0784, 0705, 0869, 1918, 0833,1242, 1172Denon 0490, 0634Digix 1272Disney 1270Dual 1085, 1068DVD2000 0521Emerson 0591, 0821, 0675Enterprise 0591ESA 2022Fisher 0670, 1919Funai 0675Gateway 1073, 1158, 1077GE 0522, 0815, 0717Go Video 0744, 0869, 1099, 1730, 0715,0833, 1075, 1304, 0783, 1044,1144, 1970GPX 0769, 0699Greenhill 0717Harman/Kardon 0702, 0582Hitachi 0573, 0664, 1919, 1247Hiteker 0672Initial 0717, 1931Integra 0627, 1924Jamo 2003Jaton 1078JBL 1926, 0702Jensen 1016JVC 0558, 0623, 0867, 1940, 1901,1275jWin 1051, 1049Kenwood 0490, 0534, 0737, 0682KLH 0717, 1149, 1020, 1939, 1261Konka 0719, 0711, 0721, 0720Koss 0651, 1980Landel 0826Lasonic 0798, 1173Lenoxx 1938LG 0591, 1906, 0869Liquid Video 1980Lite-On 1058, 1158Magnavox 0503, 0539, 1914, 0821, 0675,1976Malata 1159, 0782Marantz 0539McIntosh 1273Memorex 0695, 1270Microsoft 0522Mintek 0839, 0717Mitsubishi 1521, 0521MixSonic 1130Momitsu 1082Nakamichi 2047Nesa 0717Next Base 0826Niro 2024Norcent 1003, 0872, 1923, 1107Onkyo 0503, 0627, 1985, 1924Oritron 0651, 1980Panasonic 0490, 2017, 1462, 1907, 1910,1990, 1362, 1762, 1909, 1986,0632, 1490, 1908, 1925Philco 2000, 0690Philips 0503, 0539, 0646, 0854, 1267,1260, 0885, 1914Pioneer 0525, 0571, 1902, 0632Polaroid 1086, 1061, 1998, 1200Polk Audio 0539Portland 0770Prima 1016Princeton 0674Proscan 0522ProVision 0778Qwestar 0651RCA 0522, 0571, 0717, 1193, 1974,1132, 1965, 1022, 1913, 0822Regent 1938Rio 2002, 086934 Manufacturer’s Codes (Códigos del Fabricante)
OWNER’S MANUALRotel 0623Rowa 0823Saba 1977Sampo 0752, 0698Samsung 0490, 0573, 1044, 1979, 0899,1932, 0820, 1075Sansui 0695Sanyo 0695, 0670, 1967, 0873Sharp 0630, 0752Sharper Image 1995, 1117Sherwood 1077, 1043, 0770, 0633Shinsonic 0533, 0839, 1931Sigma Designs 0674Sonic Blue 1099, 0869, 2002, 1970Sony 0533, 1533, 0864, 1981, 1934,2043, 1033, 1904, 2020, 1903Sungale 1074Superscan 0821SVA 1105, 0860Sylvania 0821, 0675Symphonic 0675Teac 1984Technics 0490Technosonic 0730Techwood 0692Terapin 1031Theta Digital 0571Tivo 1996Toshiba 0503, 1045, 1996, 0695, 1988,1154, 2006Tredex 0800, 0799, 0804, 0803TYT 0705Urban Concepts 0503US Logic 0839V Inc. 1226, 1064Vocopro 1027Xbox 0522Xwave 1001Yamaha 0490, 0539, 0545Zenith 0503, 0591, 0869, 1906, 1806SETUP CODES FOR DVD PLAYER/VCR COMBOS(CÓDIGOS DE CONFIGURACIÓN PARA APARATOSCOMBINADOS REPRODUCTORES DVD/VCR)Controlled through DVD Mode (Controlado por latecla DVD)Allegro 0869Apex Digital 1061CineVision 0869Daewoo 0833, 0869Go Video 0744, 1075, 1044, 0715, 0869,0833Hitachi 0664JVC 0867Memorex 0695Panasonic 1762Philips 1267Polaroid 1061RCA 0822Rio 2002Samsung 0820, 1075, 1044Sansui 0695Sanyo 0873Sharp 0630Sonic Blue 2002Sony 0864Sylvania 0675Symphonic 0675Toshiba 0503Zenith 1806, 0869SETUP CODES FOR HOME-THEATER-IN-A-BOXSYSTEMS (CÓDIGOS DE CONFIGURACIÓN PARADISPOSITIVOS SISTEMA DE TEATRO EN CASA)Aiwa 0641, 1912Akai 1975Amphion Media 2001, 2016WorksAMW 2016, 2001Anam 1913Apex Digital 1937, 1915Bose 2023Cambridge 1916SoundworksClassic 1917Coby 1923Criterion 2007Daewoo 1918ESA 2022Fisher 1919Go Video 1970Hitachi 1919Initial 1931Jamo 2003JBL 1926JVC 1940, 1901KLH 1939Koss 0651, 1980LG 1906Liquid Video 1980Magnavox 1976Nakamichi 2047Norcent 1923Onkyo 0627, 1985, 1924Oritron 0651, 1980Panasonic 1925, 2017, 1907, 1910, 1990,1909, 1986, 1908Philco 2000Manufacturer’s Codes (Códigos del Fabricante) 35
RADIOSHACK 6-IN-1 EASY SETUP VOICE REMOTEPhilips 1914, 0885Pioneer 1902Polaroid 1998Polk Audio 0539RCA 1974, 1965, 1913Regent 1938Rio 2002, 0869Saba 1977Samsung 1979, 1932Sanyo 1967Sharper Image 1995Sonic Blue 1970, 0869, 2002Sony 1904, 2020, 1903, 1981, 1934,2043Teac 1984Toshiba 2006Zenith 1806, 1906SETUP CODES FOR PV<strong>RS</strong> (CÓDIGOS DECONFIGURACIÓN PARA DVR/PV<strong>RS</strong>, GRABADORESPE<strong>RS</strong>ONALES EN DISCO DURO)ABS 1972Alienware 1972CyberPower 1972Dell 1972DirecTV 1989, 1954, 1949Dish Network 1946, 1945, 1944, 1943SystemDishpro 1944, 1943Echostar 1943, 1946, 1945, 1944Expressvu 1944Gateway 1972GOI 1944Hauppauge 1992Hewlett Packard 1972Howard Computers 1972HP 1972HTS 1944Hughes Network 1949SystemsHyundai 1951iBUYPOWER 1972JVC 1945, 1944LG 2010Media Center PC 1972Microsoft 1972Mind 1972Northgate 1972Panasonic 0616Philips 1949, 0739, 0618Proscan 1954RCA 1989, 1954, 0880ReplayTV 0616, 0614Sonic Blue 0614, 0616Sony 1956, 0636, 1972, 1957Systemax 1972Tagar Systems 1972Tivo 0636, 1957, 0618, 1956, 0739Toshiba 1008, 1972Touch 1972UltimateTV 1989Viewsonic 1972ZT Group 1972SETUP CODES FOR SATELLITE RECEIVE<strong>RS</strong>(CÓDIGOS DE CONFIGURACIÓN PARA RECEPTORESDE SATÉLITE)AlphaStar 0772Chaparral 0216Crossdigital 1109DirecTV 0392, 0566, 0639, 1639, 1142,0247, 0749, 1749, 0724, 0819,1856, 1076, 1109, 0099, 1442,1750, 1414, 1444, 1108, 1392,1443, 1640Dish Network 1005, 0775, 1775, 1505, 1170SystemDishpro 1005, 0775, 1775, 1505Echostar 1005, 0775, 1505, 0269, 1170,0218, 1775Expressvu 0775, 1775Fortec Star 1550GE 0566General Instrument 0869GOI 0775, 1775Goodmans 1246Hisense 1535Hitachi 0819, 1250HTS 0775, 1775Hughes Network 1142, 0749, 1749, 1444, 1443,Systems1750, 1442I-Lo 1535JVC 0775, 1775, 1170Legend 0269LG 1750, 1414, 1226Magnavox 0724, 0722Memorex 0724, 0269Mitsubishi 0749Motorola 0869NEC 1270Next Level 0869Panasonic 0247, 0701Pansat 1551Paysat 0724Philips 1142, 0749, 1749, 0724, 1076,0722, 0099, 1442Proscan 0392, 0566Proton 153536 Manufacturer’s Codes (Códigos del Fabricante)
OWNER’S MANUALRadioShack 0869RCA 0392, 0566, 0855, 0143, 1392Realistic 0052, 0051Samsung 1276, 1109, 0270, 1243, 1108Sanyo 1219SatCruiser 1143SKY 0856Sony 0639, 1639, 1640Star Choice 0869Tivo 1142, 1442, 1444, 1443Toshiba 0749, 1749, 0790, 1285UltimateTV 1640, 1392Uniden 0724, 0722, 0052US Digital 1535USDTV 1535Voom 0869Zenith 0856, 1856SETUP CODES FOR SATELLITE RECEIVE<strong>RS</strong>/PVRCOMBOS (CÓDIGOS DE CONFIGURACIÓN PARAAPARATOS COMBINADOS RECEPTOR DE SATÉLITE/DVR/PVR)Echostar 0775, 1505, 1170Expressvu 0775Hughes Network 1142, 1443, 1442, 1444SystemsJVC 1170Philips 1142, 1442Proscan 0392RCA 1392Sony 0639, 1640SETUP CODES FOR TVS (CÓDIGOS DECONFIGURACIÓN PARA TELEVISORES)A-Mark 0003Abex 0032Admiral 0093, 0463Advent 0761, 0783, 0842, 0817, 0815,1933Adventura 0046Aiko 0092Aiwa 1914Akai 0812, 0702, 0030, 0672, 1903Alaron 0179Albatron 0843, 0700Ambassador 0177America Action 0180Ampro 0751Anam 0180Anam National 0055AOC 0030, 0019, 0185, 0003, 0052Apex Digital 0748, 0765, 0879, 0767, 1943Archer 0003Audiovox 0451, 0180, 1952, 0003, 0802,1951, 0710, 1937, 0092, 0623,0875Axion 1937Belcor 0019Bell & Howell 0154, 0016BenQ 1032Bradford 0180Brockwood 0019Broksonic 0236, 0463, 1911, 1938, 0003,1905, 1935, 1929Candle 0030, 0186, 0056, 0046Carnivale 0030Carver 0054CCE 0217Celebrity 0000Celera 0765Changhong 0765Citizen 0060, 0030, 0186, 0046, 0092,1928, 0039, 0280, 0056Clairtone 0185Clarion 0180Colt 1906Commercial 1447, 0047SolutionsConcerto 0056Contec 0180, 0157, 0185Craig 0180Crosley 0054Crown 0180, 0039Curtis Mathes 0047, 0054, 0154, 0451, 0093,0060, 0702, 0030, 0145, 0166,0016, 1347, 0466, 1147, 0039,0056, 0747, 1919CXC 0180Daewoo 0451, 1661, 0019, 0672, 1928,0092, 0661, 1909, 0039, 0623Daytron 0019Dell 1080Denon 0145Dumont 0017, 0019Durabrand 0463, 0180, 0178, 0171, 0003,1034Dwin 0774, 0720Electroband 0000, 0185Electrohome 0381, 0409Elektra 0017, 1661Emerson 0154, 0236, 0463, 0180, 0178,0171, 0019, 1909, 1929, 0185,0282, 1905, 0039, 1928, 0177,0280, 0623, 0038, 1911, 1944,0179Envision 0030, 0813Epson 1122, 0840, 0833Fisher 0154, 0159Manufacturer’s Codes (Códigos del Fabricante) 37
RADIOSHACK 6-IN-1 EASY SETUP VOICE REMOTEFlexVision 0710Fujitsu 0853, 0809, 0683, 0179Funai 0180, 0171, 0179, 1904Futuretech 0180Gateway 1755, 1756GE 1447, 0047, 0051, 0451, 0178,1347, 1917, 0027, 0055, 0282,1147, 1907, 0021, 1922, 0747,1919, 0135Gibralter 0017, 0030, 0019Go Video 0886GoldStar 0030, 0178, 0032, 1926, 0409,0019, 0001Grunpy 0180, 0179Haier 0768, 1034Hallmark 0178Harley Davidson 0179, 1904Harman/Kardon 0054Harvard 0180Havermy 0093Helios 0865Hello Kitty 0451Himitsu 0180, 0628Hisense 0748Hitachi 1145, 0145, 0016, 0056, 0409,1960, 0038, 0151, 1904, 0032Hyundai 0849Infinity 0054InFocus 1164Inteq 0017Janeil 0046JBL 0054JCB 0000Jensen 0761, 0817, 0815, 1933JVC 0053, 1253, 1923Kaypani 0052KEC 0180Kenwood 0030, 0019KLH 0765, 0767Kloss 0046, 0024Konka 0628, 0703, 1940, 0638, 1939,0632, 0707KTV 0180, 0030, 0280, 0039, 0217,0185LG 0178, 1178, 0856, 0700, 0026Lloyd's 1904Logik 0016Luxman 0056LXI 0047, 0054, 0154, 0156, 0178,0747Magnasonic 1928, 1913Magnavox 1454, 0054, 0030, 0706, 0024,0096, 0187, 1254, 1913, 0020,0186, 1904, 1944, 0179, 0386,1931Magnin 1907Majestic 0016Marantz 0054, 0030, 0704, 1154, 0855,0854Matsushita 0250, 0650Maxent 1755Megapower 0700Megatron 0178, 0145, 0003MEI 0185Memorex 0154, 0463, 0150, 0178, 0179,1920, 1927, 0016, 1911, 1926,1924MGA 0150, 0030, 0178, 1907, 0019Midland 0047, 0017, 0051, 0032, 0747,0039, 0135Minutz 0021Mitsubishi 0093, 1250, 0150, 0178, 0868,0836, 1917, 0019Monivision 0843, 0700Motorola 0093, 0055MTC 0060, 0030, 0019, 0056, 0185Multitech 0180, 0217NAD 0156, 0178, 0866NEC 0030, 0497, 0056, 1704, 0882,0019Nikko 0030, 0178, 0092Norcent 0748, 0824Noshi 0018NTC 0092Onwa 0180Optimus 0154, 0250, 0166, 1924, 1913,0650, 1927Optoma 0887Optonica 0093, 0165Orion 0236, 0463, 1905, 0179, 1463,1929, 1911Panasonic 0250, 0051, 1410, 1927, 1947,0650, 1924, 1946, 1919, 1941,0055Penney 0047, 0156, 0051, 0060, 0030,0178, 1347, 0019, 1926, 0135,0747, 0018, 1919, 0027, 0039,0003, 1907, 0021, 0032Philco 0054, 0030, 0020, 0096, 0019Philips 1454, 0054, 0690, 1154Pilot 0030, 0019, 0039Pioneer 0166, 0038, 0866, 0679Portland 0092, 0039, 0019Prima 0761, 0817, 0815, 0783, 1933Princeton 0717, 0700Prism 005138 Manufacturer’s Codes (Códigos del Fabricante)
OWNER’S MANUALProscan 1447, 0047, 0747, 1922, 1347Proton 0178, 0052, 0003, 0466Pulsar 0017, 0019Quasar 0250, 0051, 1924, 0165, 1919,0055, 0650RadioShack 0047, 0154, 0180, 0030, 0178,1904, 0032, 0056, 0747, 0165,0409, 1920, 0019, 0039RCA 1447, 0047, 1347, 1907, 0019,1922, 0090, 1958, 0747, 1247,1547, 0018, 1919, 1953, 0679,1147, 1917, 0038, 1948, 0135,1047Realistic 0154, 0180, 0030, 0178, 0165,0032, 0056, 0019, 0039Rhapsody 0185Runco 0017, 0030, 0497, 0603Sampo 0030, 0032, 1755, 0052, 0039Samsung 0060, 0812, 0702, 0030, 0178,0056, 0814, 0032, 1903, 0766,1060, 0019Samsux 0039Sansui 0463, 1911, 1904, 1935, 1929Sanyo 0154, 0893, 0146, 0799, 0159,1907Scimitsu 0019Scotch 0178Scott 0236, 0180, 0178, 0179, 0019Sears 0047, 0054, 0154, 0156, 0178,0171, 0159, 0179, 1926, 0146,1904, 0056, 0747Sharp 0093, 1917, 0157, 0491, 0851,0386, 0689, 0039, 0165, 0688Sharper Image 1950Sheng Chia 0093Shogun 0019Signature 0016Simpson 0187, 0186Sony 1100, 0000, 0111, 1904, 0080,0834, 1925Soundesign 0180, 0178, 0179, 0186Spectricon 0003Squareview 0171SSS 0180, 0019Starlite 0180Studio Experience 0843Supre-Macy 0046Supreme 0000SVA 0748, 0872, 0768, 0871, 0870,0587, 0865Sylvania 0054, 0030, 0171, 0381, 1944,0020, 0096, 1931Symphonic 0180, 0171, 1913, 1904Syntax 1144Tandy 0093, 0218Tatung 0003, 1756, 0055Technics 0250, 0051Technol Ace 0179Techview 0847Techwood 0051, 0056, 0003Teco 1040Teknika 0054, 0180, 0150, 0060, 0179,0019, 0056, 0186, 0016, 0092,0039Telefunken 0702, 0056Thomas 1904TMK 0178, 0056, 0177TNCi 0017Toshiba 0154, 1256, 0156, 0060, 0650,1156, 1356, 1918, 1945, 0845,1704, 1936, 0832, 1164, 1656,1935Tosonic 0185Totevision 0039Trical 0157TVS 0463Universal 0027V Inc. 0885, 0864, 1756Vector Research 0030Victor 0053Vidikron 0054Vidtech 0178, 0019Viewsonic 0885, 0864, 0857, 1755Viking 0046Wards 0054, 0030, 0178, 0019, 0027,0056, 0111, 0179, 0016, 0021,0096, 1156, 0020, 0080, 0165,0866Waycon 0156Westinghouse 0889White0463, 1909, 0623WestinghouseYamaha 0030, 0769, 0839, 0019, 0833Zenith 0017, 0463, 0178, 1911, 0016,1909, 0092, 1904, 1929Zonda 0003SETUP CODES FOR TV/DVD PLAYER COMBOS(CÓDIGOS DE CONFIGURACIÓN PARA APARATOSCOMBINADOS TV/DVD)Controlled Through TV Mode (Controlado por latecla TV)Advent 1933Apex Digital 1943Audiovox 1951, 1937, 1952Axion 1937Broksonic 1935Hitachi 1960Jensen 1933Konka 1940, 1939Manufacturer’s Codes (Códigos del Fabricante) 39
RADIOSHACK 6-IN-1 EASY SETUP VOICE REMOTEPanasonic 1941Prima 1933RCA 1948, 1958Samsung 1903Sansui 1935Sylvania 0171Toshiba 1935Controlled Through DVD Mode (Controlado por latecla DVD)Advent 1016Apex Digital 0830Audiovox 1121, 1071, 1122Axion 1071Broksonic 0695Hitachi 1247Jensen 1016KLH 1261Konka 0719, 0720Panasonic 1490Philips 0854, 1260Prima 1016RCA 1022, 1193Samsung 0899Sansui 0695Sylvania 0675Toshiba 0695SETUP CODES FOR TV/VCR COMBOS (CÓDIGOS DECONFIGURACIÓN PARA APARATOS COMBINADOSTV/VCR)Controlled Through TV Mode (Controlado por latecla TV)Aiwa 1914America Action 0180Audiovox 0180Broksonic 1905, 1929, 1911Citizen 1928Colt 1906Curtis Mathes 1919Daewoo 1928, 1909Emerson 0236, 1909, 1929, 1905, 1928,1911Funai 1904GE 1917, 1907, 1922, 1919GoldStar 1926Harley Davidson 1904Hitachi 1904JVC 1923Lloyd's 1904Magnasonic 1928, 1913Magnavox 1904, 1931, 1913Magnin 1907Memorex 1926, 1924, 1920, 1927MGA 1907Mitsubishi 1917Optimus 1927, 1924, 1913Orion 1905, 1929, 1911Panasonic 1919, 1927, 1924Penney 1907, 1926, 1919Quasar 1919, 1924RadioShack 1920, 1904RCA 1922, 1919, 1917, 1907Sansui 1929, 1911, 1904Sanyo 1907Sears 1926, 1904Sony 1925, 1904Sylvania 1931Symphonic 1913, 1904Thomas 1904Toshiba 1936, 1918White1909WestinghouseZenith 1904, 1929, 1911Controlled Through VCR Mode (Controlado por latecla VCR)America Action 0278Audiovox 0278Broksonic 0002, 0479, 1479Citizen 1278Colt 0072Curtis Mathes 1035Daewoo 1278Emerson 0002, 0479, 1479, 1278Funai 0000GE 0240, 1035, 0807, 1060GoldStar 1237Harley Davidson 0000Hitachi 0000LG 1037, 0480Lloyd's 0000Magnasonic 1278, 0593Magnavox 0000, 1781, 0593Magnin 0240Memorex 0162, 1037, 1262, 0454, 1237,1162MGA 0240Mitsubishi 0807Optimus 0454, 1262, 1162, 0593Orion 0002, 1479, 0479Panasonic 0162, 1262, 1162, 1035Penney 0240, 1237, 1035Philco 0479Quasar 0162, 1035, 1162RadioShack 0000, 1037RCA 0240, 1060, 1035, 0807Samsung 101440 Manufacturer’s Codes (Códigos del Fabricante)
OWNER’S MANUALSansui 0000, 0479, 1479Sanyo 0240Sears 0000, 1237Sony 0000, 1232Sylvania 1781Symphonic 0000, 0593Thomas 0000Toshiba 1145, 0845Zenith 0000, 1479, 0479SETUP CODES FOR TV/VCR/DVD PLAYER COMBOS(CÓDIGOS DE CONFIGURACIÓN PARA APARATOSCOMBINADOS TV/VCR/DVD)Controlled Through TV Mode (Controlado por latecla TV)Akai 1903Broksonic 1938Emerson 1944Panasonic 1946, 1947RCA 1953Sharp 1917Sylvania 1944Toshiba 1945Controlled Through VCR Mode (Controlado por latecla VCR)Sharp 0807Controlled Through DVD Mode (Controlado por latecla DVD)Akai 0899Broksonic 0868Emerson 0821Magnavox 0821Panasonic 1462, 1362RCA 1132Sharp 0630Superscan 0821Sylvania 0821Toshiba 1045SETUP CODES FOR VC<strong>RS</strong> (CÓDIGOS DECONFIGURACIÓN PARA VIDEOGRABADORAS)ABS 1972Admiral 0048, 0209Adventura 0000Aiko 0278Aiwa 0037, 0000, 0307Akai 0041Alienware 1972America Action 0278American High 0035Asha 0240Audiovox 0037, 0278Beaumark 0240Bell & Howell 0104Broksonic 0184, 0121, 0209, 0002, 1479,0479Calix 0037Canon 0035Carver 0081CCE 0072, 0278Citizen 0037, 0278, 1278Colt 0072Craig 0037, 0047, 0240, 0072Curtis Mathes 0060, 0035, 0162, 0041, 1035Cybernex 0240CyberPower 1972Daewoo 0045, 0278, 1278Dell 1972Denon 0042DirecTV 0739, 1989, 1954, 1949Dish Network 1945, 1944, 1943, 1946SystemDishpro 1944, 1943Durabrand 0039, 0038Dynatech 0000Echostar 1943, 1946, 1945, 1944Electrohome 0037Electrophonic 0037Emerex 0032Emerson 0037, 0184, 0000, 0121, 0043,0209, 0002, 0278, 1278, 0479,1593, 1479Euro1 1962Expressvu 1944Fisher 0047, 0104, 0066Fuji 0035, 0033Funai 0000, 1593Garrard 0000Gateway 1972GE 0060, 0035, 0240, 0202, 1035,0807, 1060Go Video 0432GOI 1944GoldStar 0037, 0038, 0480, 1237Gradiente 0000Harley Davidson 0000Harman/Kardon 0081, 0038Harwood 0072Hauppauge 1992Headquarter 0046Hewlett Packard 1972HI-Q 0047Hitachi 0000, 0042, 0041Howard Computers 1972HP 1972HTS 1944Manufacturer’s Codes (Códigos del Fabricante) 41
RADIOSHACK 6-IN-1 EASY SETUP VOICE REMOTEHughes Network 0042, 1949, 0739SystemsHyundai 1951iBUYPOWER 1972Jensen 0041JVC 0067, 0041, 1945, 1944KEC 0037, 0278Kenwood 0067, 0041, 0038KLH 0072Kodak 0035, 0037LG 0480, 2010, 1037Lloyd's 0000Logik 0072LXI 0037Magnasonic 1278, 0593Magnavox 0035, 0039, 0081, 0000, 0149,0563, 1781, 0593Magnin 0240Marantz 0035, 0081Marta 0037Matsushita 0035, 0162, 1162Media Center PC 1972MEI 0035Memorex 0035, 0162, 0037, 0048, 0039,0047, 0240, 0000, 0104, 0209,0268, 0454, 1162, 0046, 0307,1037, 1262, 0299, 0479, 1237MGA 0240, 0043MGN Technology 0240Microsoft 1972Mind 1972Minolta 0042Mitsubishi 0067, 0043, 0807Motorola 0035, 0048MTC 0240, 0000Multitech 0000, 0072NAD 0058NEC 0104, 0067, 0041, 0038Nikko 0037Noblex 0240Northgate 1972Olympus 0035Optimus 1062, 0162, 0037, 0048, 0104,0058, 0432, 0593, 0568, 1048,1262, 0454, 0619, 1162Optonica 0062Orion 0184, 0209, 0002, 0479, 1479Panarex 1950Panasonic 1062, 0035, 0162, 0454, 0225,1035, 1262, 0616, 1162Pansat 1950Penney 0035, 0037, 0240, 0042, 0038,1237, 1035Pentax 0042Philco 0035, 0479Philips 0035, 0081, 1181, 1081, 1949,0062, 0739, 1266, 0618Pilot 0037Pioneer 0067, 0058Polk Audio 0081Profitronic 0240Proscan 0060, 0202, 1954, 1060Protec 0072Pulsar 0039Quarter 0046Quartz 0046Quasar 0035, 0162, 1035, 0454, 1162RadioShack 0000, 1037Radix 0037Randex 0037RCA 0060, 0240, 0042, 0149, 0807,1060, 1989, 0619, 1035, 1964,0880, 1954, 0058, 0202Realistic 0035, 0037, 0048, 0047, 0000,0104, 0066, 0046, 0062ReplayTV 0614, 0616Runco 0039Samsung 0240, 0045, 1014Sanky 0048, 0039Sansui 0000, 0067, 0209, 0041, 0479,1479Sanyo 0047, 0240, 0104, 0268, 0046Scott 0184, 0045, 0121, 0043Sears 0035, 0037, 0047, 0000, 0042,0104, 1237, 0046, 0066Sharp 0048, 0848, 0807, 0062Shintom 0072Shogun 0240Singer 0072Sonic Blue 0616, 0614Sony 0035, 0032, 0033, 0000, 1956,1232, 1972, 1032, 1957, 0636STS 0042Sylvania 0035, 0081, 0000, 0043, 1593,0593, 1781Symphonic 0000, 0593, 1593Systemax 1972Tagar Systems 1972Tatung 0041Teac 0000, 0041Technics 0035, 0162Teknika 0035, 0037, 0000Thomas 0000Tivo 0618, 1503, 0739, 1957, 0636,1956TMK 0240Toshiba 0045, 0043, 0845, 1503, 0066,1145, 1008, 197242 Manufacturer’s Codes (Códigos del Fabricante)
OWNER’S MANUALTotevision 0037, 0240Touch 1972UltimateTV 1989Unitech 0240Vector 0045Vector Research 0038Video Concepts 0045Videomagic 0037Videosonic 0240Viewsonic 1972Villain 0000Wards 0060, 0035, 0048, 0047, 0081,0240, 0000, 0042, 0072, 0149,0062White0209, 0072WestinghouseXR-1000 0035, 0000, 0072Yamaha 0038Zenith 0039, 0033, 0000, 0209, 0479,1479, 1139ZT Group 1972Manufacturer’s Codes (Códigos del Fabricante) 43