Making a Rogaine Map - NSW Rogaining Association
Making a Rogaine Map - NSW Rogaining Association
Making a Rogaine Map - NSW Rogaining Association

You also want an ePaper? Increase the reach of your titles
YUMPU automatically turns print PDFs into web optimized ePapers that Google loves.
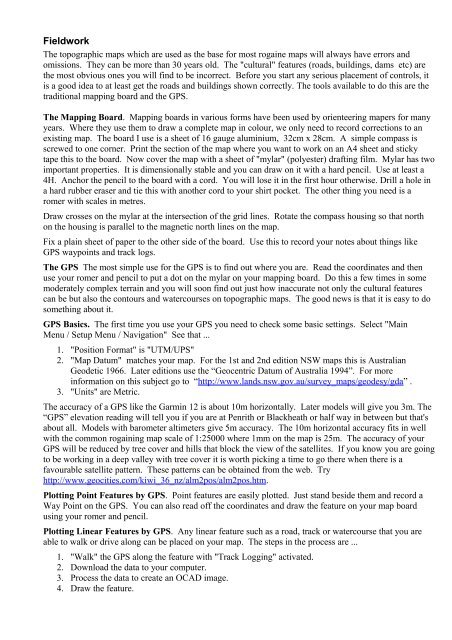
Fieldwork<br />
The topographic maps which are used as the base for most rogaine maps will always have errors and<br />
omissions. They can be more than 30 years old. The "cultural" features (roads, buildings, dams etc) are<br />
the most obvious ones you will find to be incorrect. Before you start any serious placement of controls, it<br />
is a good idea to at least get the roads and buildings shown correctly. The tools available to do this are the<br />
traditional mapping board and the GPS.<br />
The <strong>Map</strong>ping Board. <strong>Map</strong>ping boards in various forms have been used by orienteering mapers for many<br />
years. Where they use them to draw a complete map in colour, we only need to record corrections to an<br />
existing map. The board I use is a sheet of 16 gauge aluminium, 32cm x 28cm. A simple compass is<br />
screwed to one corner. Print the section of the map where you want to work on an A4 sheet and sticky<br />
tape this to the board. Now cover the map with a sheet of "mylar" (polyester) drafting film. Mylar has two<br />
important properties. It is dimensionally stable and you can draw on it with a hard pencil. Use at least a<br />
4H. Anchor the pencil to the board with a cord. You will lose it in the first hour otherwise. Drill a hole in<br />
a hard rubber eraser and tie this with another cord to your shirt pocket. The other thing you need is a<br />
romer with scales in metres.<br />
Draw crosses on the mylar at the intersection of the grid lines. Rotate the compass housing so that north<br />
on the housing is parallel to the magnetic north lines on the map.<br />
Fix a plain sheet of paper to the other side of the board. Use this to record your notes about things like<br />
GPS waypoints and track logs.<br />
The GPS The most simple use for the GPS is to find out where you are. Read the coordinates and then<br />
use your romer and pencil to put a dot on the mylar on your mapping board. Do this a few times in some<br />
moderately complex terrain and you will soon find out just how inaccurate not only the cultural features<br />
can be but also the contours and watercourses on topographic maps. The good news is that it is easy to do<br />
something about it.<br />
GPS Basics. The first time you use your GPS you need to check some basic settings. Select "Main<br />
Menu / Setup Menu / Navigation" See that ...<br />
1. "Position Format" is "UTM/UPS"<br />
2. "<strong>Map</strong> Datum" matches your map. For the 1st and 2nd edition <strong>NSW</strong> maps this is Australian<br />
Geodetic 1966. Later editions use the “Geocentric Datum of Australia 1994”. For more<br />
information on this subject go to “http://www.lands.nsw.gov.au/survey_maps/geodesy/gda” .<br />
3. "Units" are Metric.<br />
The accuracy of a GPS like the Garmin 12 is about 10m horizontally. Later models will give you 3m. The<br />
“GPS” elevation reading will tell you if you are at Penrith or Blackheath or half way in between but that's<br />
about all. Models with barometer altimeters give 5m accuracy. The 10m horizontal accuracy fits in well<br />
with the common rogaining map scale of 1:25000 where 1mm on the map is 25m. The accuracy of your<br />
GPS will be reduced by tree cover and hills that block the view of the satellites. If you know you are going<br />
to be working in a deep valley with tree cover it is worth picking a time to go there when there is a<br />
favourable satellite pattern. These patterns can be obtained from the web. Try<br />
http://www.geocities.com/kiwi_36_nz/alm2pos/alm2pos.htm.<br />
Plotting Point Features by GPS. Point features are easily plotted. Just stand beside them and record a<br />
Way Point on the GPS. You can also read off the coordinates and draw the feature on your map board<br />
using your romer and pencil.<br />
Plotting Linear Features by GPS. Any linear feature such as a road, track or watercourse that you are<br />
able to walk or drive along can be placed on your map. The steps in the process are ...<br />
1. "Walk" the GPS along the feature with "Track Logging" activated.<br />
2. Download the data to your computer.<br />
3. Process the data to create an OCAD image.<br />
4. Draw the feature.