ATTIX 751-01/-11 - Nilfisk-ALTO
ATTIX 751-01/-11 - Nilfisk-ALTO
ATTIX 751-01/-11 - Nilfisk-ALTO

Create successful ePaper yourself
Turn your PDF publications into a flip-book with our unique Google optimized e-Paper software.
<strong>Nilfisk</strong><br />
<strong>ALTO</strong><br />
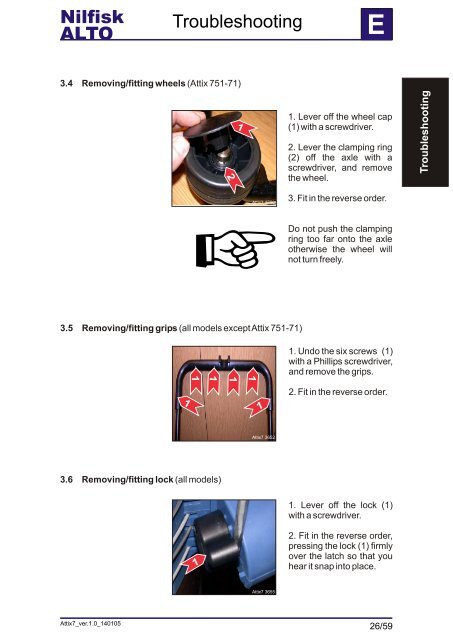
3.4 Removing/fitting wheels (Attix <strong>751</strong>-71)<br />
3.5 Removing/fitting grips (all models except Attix <strong>751</strong>-71)<br />
3.6 Removing/fitting lock (all models)<br />
Attix7_ver.1.0_14<strong>01</strong>05<br />
Troubleshooting<br />
1<br />
Attix7 3650<br />
☞<br />
1<br />
1<br />
1<br />
2<br />
1<br />
1<br />
1<br />
1<br />
Attix7 3652<br />
Attix7 3655<br />
E<br />
1. Lever off the wheel cap<br />
(1) with a screwdriver.<br />
2. Lever the clamping ring<br />
(2) off the axle with a<br />
screwdriver, and remove<br />
the wheel.<br />
3. Fit in the reverse order.<br />
Do not push the clamping<br />
ring too far onto the axle<br />
otherwise the wheel will<br />
not turn freely.<br />
1. Undo the six screws (1)<br />
with a Phillips screwdriver,<br />
and remove the grips.<br />
2. Fit in the reverse order.<br />
1. Lever off the lock (1)<br />
with a screwdriver.<br />
2. Fit in the reverse order,<br />
pressing the lock (1) firmly<br />
over the latch so that you<br />
hear it snap into place.<br />
26/59<br />
Troubleshooting