Application Note 162 - Keil
Application Note 162 - Keil
Application Note 162 - Keil

Create successful ePaper yourself
Turn your PDF publications into a flip-book with our unique Google optimized e-Paper software.
<strong>Application</strong> <strong>Note</strong><br />
T89C51CC01 CAN Bus Programming and Simulation APNT_165<br />
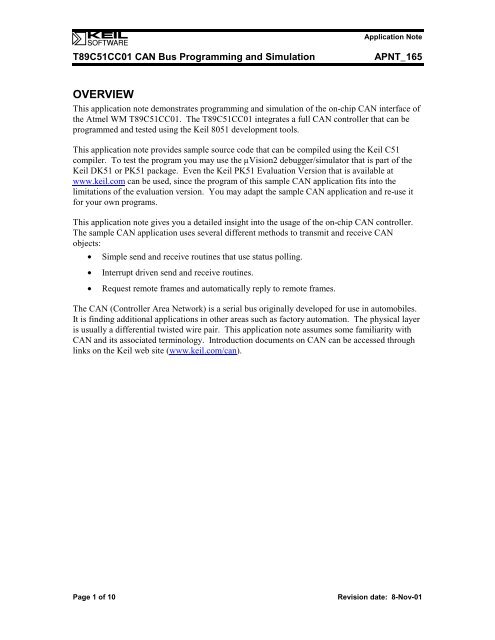
OVERVIEW<br />
This application note demonstrates programming and simulation of the on-chip CAN interface of<br />
the Atmel WM T89C51CC01. The T89C51CC01 integrates a full CAN controller that can be<br />
programmed and tested using the <strong>Keil</strong> 8051 development tools.<br />
This application note provides sample source code that can be compiled using the <strong>Keil</strong> C51<br />
compiler. To test the program you may use the µVision2 debugger/simulator that is part of the<br />
<strong>Keil</strong> DK51 or PK51 package. Even the <strong>Keil</strong> PK51 Evaluation Version that is available at<br />
www.keil.com can be used, since the program of this sample CAN application fits into the<br />
limitations of the evaluation version. You may adapt the sample CAN application and re-use it<br />
for your own programs.<br />
This application note gives you a detailed insight into the usage of the on-chip CAN controller.<br />
The sample CAN application uses several different methods to transmit and receive CAN<br />
objects:<br />
• Simple send and receive routines that use status polling.<br />
• Interrupt driven send and receive routines.<br />
• Request remote frames and automatically reply to remote frames.<br />
The CAN (Controller Area Network) is a serial bus originally developed for use in automobiles.<br />
It is finding additional applications in other areas such as factory automation. The physical layer<br />
is usually a differential twisted wire pair. This application note assumes some familiarity with<br />
CAN and its associated terminology. Introduction documents on CAN can be accessed through<br />
links on the <strong>Keil</strong> web site (www.keil.com/can).<br />
Page 1 of 10 Revision date: 8-Nov-01
<strong>Application</strong> <strong>Note</strong><br />
T89C51CC01 CAN Bus Programming and Simulation APNT_165<br />
HARDWARE<br />
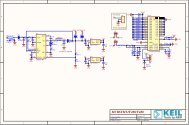
The sample CAN application can be executed on a single chip device that uses only a few<br />
external hardware components. This single chip hardware is shown in the schematic below.<br />
The sample CAN application uses the hardware components as follows:<br />
• The CAN connector is used to connect the board to a CAN bus.<br />
• The push buttons S1 and S2 trigger the outgoing CAN messages.<br />
• The two LEDs signal the status of one of the incoming CAN messages.<br />
• The analog inputs provide input for the remote frames.<br />
• The RS232 connector is used to output text messages.<br />
• The switch S5 configures the CAN ID’s so that two identical boards can be connected<br />
together.<br />
The functions are described in detail under “Re-use of the sample CAN application” on page 4.<br />
If you do not want to create such a system, you may use the µVision2 simulator to test the sample<br />
CAN application without real hardware.<br />
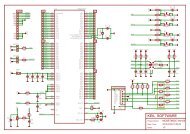
Another alternative is to use pre-build boards, like the PHYTEC PhyCORE T89C51CC01. This<br />
standard hardware provides all components needed for running the sample CAN application.<br />
Compared to single chip hardware shown before, you need a few software modifications since<br />
LEDs and switches are connected to memory mapped I/O ports rather than direct 8051 Port I/O<br />
lines.<br />
The sample CAN application that we are supplying, is configured for the PHYTEC PhyCORE<br />
T89C51CC01.<br />
The picture below shows the PHYTEC PhyCORE T89C51CC01 board. To provide input for<br />
the A/D converter we have connected four photo transistors to the A/D inputs.<br />
Page 2 of 10 Revision date: 8-Nov-01
<strong>Application</strong> <strong>Note</strong><br />
T89C51CC01 CAN Bus Programming and Simulation APNT_165<br />
CAN Bus<br />
Interface<br />
RS232<br />
Interface<br />
Atmel W&M<br />
89C51CC01<br />
with<br />
on-chip CAN<br />
Photo<br />
Transistors<br />
connected to<br />
A/D inputs 0 - 3<br />
Push Buttons S1 & S2<br />
DIP Switch S5; both<br />
accessed via memory<br />
mapped I/O spaced.<br />
LEDs D1 & D2;<br />
accessed via<br />
memory mapped<br />
I/O space.<br />
To run the sample CAN application you may use two identical hardware boards that are<br />
connected via CAN Bus. For text output, each hardware board might be connected to a PC with<br />
terminal emulation or a real terminal. The complete hardware is shown below:<br />
T89C51<br />
CC01<br />
CAN Bus<br />
RS232 RS232<br />
1 st PHYTEC PhyCORE Board 2 nd PHYTEC PhyCORE Board<br />
Terminal Terminal<br />
Page 3 of 10 Revision date: 8-Nov-01<br />
T89C51<br />
CC01
<strong>Application</strong> <strong>Note</strong><br />
T89C51CC01 CAN Bus Programming and Simulation APNT_165<br />
USING THE SOFTWARE<br />
The push buttons S1 and S2 trigger outgoing CAN messages. Any status change of these buttons<br />
is transmitted via CAN object 1 to the opposite CAN board. In addition, the push buttons are<br />
used to generate additional messages that are listed in the table below:<br />
Button Description<br />
Press S1 The application will send a long text string over channel 3 in interrupt mode.<br />
Press S2 The application sends a remote frame request over channel 5.<br />
Channel 1sends the status of the switches S1 & S2 in polling mode.<br />
The two LEDs signal the status of the push buttons S1 and S2 of the opposite CAN board.<br />
The A/D input values AIN0-AIN3 are captured and stored to the automatic reply message object<br />
for the remote frame mode. If button S2 on the opposite controller is pressed, this data is<br />
requested.<br />
The RS232 connector is used to output text messages. Text messages are the text strings, that are<br />
send when pressing S1or S2. The switch S2 displays the A/D values.<br />
The switch S5 configures the CAN ID’s so that two identical boards can be connected together.<br />
If the DIP switch is set to a logical 1, the CAN initialization routine in CAN_DRV.C inverts the<br />
lowest bit of all CAN message object ID’s.<br />
SOURCE FILES<br />
The following table gives you an overview of the files that are included in this application note:<br />
Filename Description<br />
CAN_CC01.UV2<br />
CAN_CC01.OPT<br />
µVision2 project file that allows you to built and test the sample CAN application.<br />
MAIN.C Includes the main routine and calls the CAN interface routines.<br />
CAN_DRV.C Includes the CAN interface routines and configures the message objects including the CAN ID’s for<br />
the user application.<br />
CAN_DRV.H Extern definitions for the CAN interface routines.<br />
DEBUGGER.INI Debug-Script that defines functions for I/O Simulation.<br />
You can build the project within µVison2 with the following commands:<br />
• Open the project file CAN_CC01.UV2 with Project – Open Project.<br />
Page 4 of 10 Revision date: 8-Nov-01
<strong>Application</strong> <strong>Note</strong><br />
T89C51CC01 CAN Bus Programming and Simulation APNT_165<br />
Translate and link the project with Project – Build Target. This generates object files,<br />
listing files, and the executable program in absolute and Intel HEX format.<br />
PROGRAMMING OF THE ON-CHIP FLASH ROM<br />
The executable HEX file can be programmed into the on-chip flash memory of the T89C51CC01<br />
with the FLIP flash tool. The FLIP flash tool is available along with documentation from the<br />
Atmel W&M website (www.atmel-wm.com). The setup of the T89C51CC01 for flash<br />
programming is described in the T89C51CC01 data sheet. The flash programming on the Phytec<br />
board is enabled with Jumper JP2 in position 2+4.<br />
Page 5 of 10 Revision date: 8-Nov-01
<strong>Application</strong> <strong>Note</strong><br />
T89C51CC01 CAN Bus Programming and Simulation APNT_165<br />
SIMULATION WITH THE µVISION2 DEBUGGER<br />
Start the µVision2 simulator with Debug – Start/Stop Debug Session.<br />
• µVision2 simulates the behavior of all on-chip peripherals. In case of the Atmel W&M<br />
T89C51CC01, also the CAN controller is fully simulated. You can review the status by<br />
using the Peripherals menu items.<br />
• Peripherals – CAN opens the CAN dialog, that shows the CAN configuration, the CAN<br />
channels, and the CAN messages that are transmitted via the CAN network.<br />
The project in this application note includes a Debugger.INI file. This file defines<br />
µVision2 debug functions that provide simulation for CAN message I/O. The Debugger.INI<br />
file is specified under Options for Target – Debug – Initialization File and therefore<br />
automatically loaded at startup of the µVision2 simulator. This file defines also Toolbox<br />
buttons that allow quick access to the debug functions. The Toolbox opens with View –<br />
Toolbox and provides the following buttons:<br />
Toolbox Button Description<br />
Press S1 Simulates a pressed button S1 of the PHYTEC board<br />
Press S2 Simulates a pressed button S2 of the PHYTEC board<br />
Press Both Simulates two pressed buttons S1 and S2 of the PHYTEC board.<br />
Send Switches = ON Simulate an incoming “Switches on” status message, which is send with CAN ID 101h;<br />
Send Switches = OFF Simulate an incoming “Switches off” status message, which is send with CAN ID 101h;<br />
Send Remote Frame Generates the reply frame for the remote frame, requested by ID 104h<br />
Send 40-Byte String Send a 5*8 Bytes long string, which is received by buffered channel 3/4 in interrupt mode<br />
Each toolbox button invokes a debug function that is defined in the Debugger.INI file. Details of the<br />
CAN simulation with µVision2 can be found in the <strong>Application</strong> <strong>Note</strong> 147, CAN Simulation in µVision2.<br />
Page 6 of 10 Revision date: 8-Nov-01
<strong>Application</strong> <strong>Note</strong><br />
T89C51CC01 CAN Bus Programming and Simulation APNT_165<br />
When you execute the program with Debug – Go you can review the CAN traffic in the<br />
CAN communication dialog page. By using the Toolbox buttons described above you can<br />
generate CAN messages.<br />
• You may use all features of the µVision2 debugger. You may single-step through the code<br />
or set breakpoints. You can use the memory windows, the performance analyzer, the code<br />
coverage feature, or just view some variables.<br />
The content of the file DEBUGGER.INI is listed below. The functions of this file are available<br />
during debugging. This .INI file is automatically loaded at start of a debug session since it is<br />
specified under Options for Target – Debug.<br />
/* ========================DEBUGGER.INI=============================<br />
* Contains debug functions for the sample CAN project (App_Nt 165).<br />
*<br />
* - PressSwitch enables simulation of buttons on memory mapped I/O<br />
* - CANMessage prints message information of send messages<br />
* - SendInfo sends 8Byte messages on a arbitrary ID<br />
* - SimTraffic simulates sending of messages in a short interval<br />
*<br />
* =================================================================<br />
*/<br />
/*<br />
* Simulate a 0.1 Second Click on Switch I/O Port (for S1 & S2)<br />
*/<br />
SIGNAL void PressSwitch (unsigned char v) {<br />
unsigned char cx;<br />
}<br />
cx = _rbyte (X:0xFFA0); // get current value on I/O Port<br />
_wbyte (X:0xFFA0, cx | v); // set I/O Port value for switch v<br />
swatch (0.1); // press switch for 0.1 seconds<br />
cx = _rbyte (X:0xFFA0); // get current value on I/O Port<br />
_wbyte (X:0xFFA0, cx & (~v)); // reset I/O Port value switch v<br />
/*<br />
* Define Buttons for the toolbox with presets for PressSwitch<br />
*/<br />
define button "Press S1", "PressSwitch (1)"<br />
define button "Press S2", "PressSwitch (2)"<br />
define button "Press Both", "PressSwitch (3)"<br />
/*<br />
* Print the last message sent by the controller<br />
*/<br />
FUNC void CANmessage (void) {<br />
switch (CAN0OUT) {<br />
case 1: printf("\nSend Message (11-bit ID=%04X)", CAN0ID); break;<br />
case 2: printf("\nSend Message (29-bit ID=%08X)", CAN0ID); break;<br />
case 3: printf("\nRequest Message (11-bit ID=%04X)", CAN0ID); return;<br />
case 4: printf("\nRequest Message (29-bit ID=%08X)", CAN0ID); return;<br />
}<br />
printf("\nMessage Length %d, Data: ", CAN0L);<br />
printf("%02X %02X %02X %02X ", CAN0B0, CAN0B1, CAN0B2, CAN0B3);<br />
printf("%02X %02X %02X %02X\n", CAN0B4, CAN0B5, CAN0B6, CAN0B7);<br />
}<br />
Page 7 of 10 Revision date: 8-Nov-01
<strong>Application</strong> <strong>Note</strong><br />
T89C51CC01 CAN Bus Programming and Simulation APNT_165<br />
/*<br />
* Set Breakpoint on CAN Output VTREG<br />
*/<br />
BS WRITE CAN0OUT, 1, "CANmessage()"<br />
/*<br />
* Send Information on any ID<br />
*/<br />
FUNC void SendInfo (unsigned long id, // message ID<br />
unsigned char len, // message length<br />
unsigned char val) { // 1. value byte<br />
CAN0ID = id; // Set VTREG that keeps next ID<br />
CAN0L = len; // Set VTREG with message length<br />
CAN0B0 = val; // Set the data registers<br />
CAN0B1 = val+1;<br />
CAN0B2 = val+2;<br />
CAN0B3 = val+3;<br />
CAN0B4 = val+4;<br />
CAN0B5 = val+5;<br />
CAN0B6 = val+6;<br />
CAN0B7 = val+7;<br />
CAN0IN = 2; // Send message to simulated controller<br />
}<br />
/*<br />
* Send 5 messages in short intervals on ID 103h<br />
*/<br />
SIGNAL void SimTraffic (void) {<br />
int i;<br />
for (i=0; i
<strong>Application</strong> <strong>Note</strong><br />
T89C51CC01 CAN Bus Programming and Simulation APNT_165<br />
RE-USE OF THE SAMPLE CAN APPLICATION<br />
The files candrv.h and candrv.c of this application note can be re-used in your own CAN<br />
projects. The can driver provides the following functions:<br />
Functions Description<br />
CanInit Initialization of the CAN Controller.<br />
CanSend Sends a message over a channel. The message length must not exceed channel definition<br />
CanRead Reads a message received by a channel. The message length is specified in the channel definition.<br />
CanSendIsr Interrupt driven Send Routine.<br />
CanReadIsr Interrupt driven Receive Routine.<br />
CanInterrupt The interrupt service routine for the CAN Controller.<br />
The file candrv.c needs to be adapted for your application as described below:<br />
• The section CAN ID definitions specifies the CAN message objects.<br />
• The table id_typ needs entries for all CAN message objects.<br />
• Under CAN baud rate calculation you can configure the baud rate of the CAN bus.<br />
• In the function CanInit all CAN message objects need to be initialized.<br />
• Adapt the interrupt driven CAN I/O routines to the requirements of your application.<br />
• To add or remove interrupt driven CAN message objects, adapt the function CanInterrupt.<br />
The include file can_drv.h enables you to access the functions of the file candrv.c in own source<br />
files.<br />
Page 9 of 10 Revision date: 8-Nov-01
<strong>Application</strong> <strong>Note</strong><br />
T89C51CC01 CAN Bus Programming and Simulation APNT_165<br />
CONCLUSION<br />
This sample CAN application shows that the implementation of a CAN interface is<br />
straightforward. The application note also shows most features of that T89C51CC01 CAN<br />
controller. You may adapt this sample CAN application for your own software projects. You<br />
may also convert this application software for other on-chip CAN controllers.<br />
The <strong>Keil</strong> 8051 development tools allow you fast and reliable development of complete<br />
applications. With the µVision2 simulator you can debug the application without real hardware.<br />
µVision2 simulates the behavior of all on-chip peripherals, including complex peripherals like<br />
the CAN controller and the A/D converter. In fact, this sample CAN application was completely<br />
tested with the simulator before we checked it in real hardware.<br />
This application note uses the µVision2 debug functions to simulate external hardware<br />
components as well as CAN communication. Specific information on CAN simulation can be<br />
found in <strong>Application</strong> <strong>Note</strong> 147 “CAN Simulation in µVison2”.<br />
It is even possible to extend the build-in peripherals of uVision2 with custom define peripherals.<br />
This is described in the <strong>Application</strong> <strong>Note</strong> 154 “Implementing µVision2 DLLs for Simulating<br />
User Defined Hardware”.<br />
Copyright © 2001 <strong>Keil</strong> Software, Inc. All rights reserved.<br />
In the USA: In Europe:<br />
<strong>Keil</strong> Software, Inc. <strong>Keil</strong> Elektronik GmbH<br />
1501 10 th Street, Suite 110 Bretonischer Ring 15<br />
Plano, TC 75074 D-85630 Grasbrunn b. Munchen<br />
USA Germany<br />
Sales: 800-348-8051 Phone: (49) (089) 45 60 40 - 0<br />
Phone: 972-312-1107 FAX: (49) (089) 46 81 62<br />
FAX: 972-312-1159<br />
E-mail: sales.us@keil.com Internet: http://www.keil.com/ E-mail: sales.intl@keil.com<br />
support.us@keil.com support.intl@keil.com<br />
Page 10 of 10 Revision date: 8-Nov-01