


Create successful ePaper yourself
Turn your PDF publications into a flip-book with our unique Google optimized e-Paper software.
Figure 17<br />
Figure 18<br />
Figure 19<br />
Figure 20<br />
44 <strong>LVI</strong> VISIONS • JANUARY • FEBRUARY • MARCH • APRIL 2008<br />
schedule, the photo was taken on the same day but normally the temp photos<br />
should be taken at least 24 hours after the treatment as the anaesthesia can affect<br />
the soft tissue information in a negative way and make it inaccurate. The<br />
patient was “over the moon” with the result, so little change was required. Even<br />
so, I can see some areas that could be improved which I will address in the<br />
build-up.<br />
The Coping Design<br />
I believe it is a big challenge for ceramists to achieve individual looking<br />
bridges. Personally, to be able to achieve a good result, the first element that<br />
crosses my mind is the position of the connector. If you get this wrong, regardless<br />
of what you do subsequently, it will look like a bridge rather than single<br />
teeth. It is fairly easy to place the connector in a correct position. I want you<br />
to go back to Figure 12. You can see the contact points and with a bridge, normally<br />
contact points = the position of the connector. So all we have to do is just<br />
follow the principles. Another tip is that I tend to place the connector slightly<br />
towards palatal for a couple of reasons:<br />
1. I get more room to play with during the build-up labially and this will help<br />
the separation and make it slightly easier to make them appear individual.<br />
2. The palatal region is not in the aesthetic zone so it is better to put greater<br />
strength in this area. 99% of the time, the patients just want smooth anatomy at<br />
the back of the teeth so I simply create a nice and smooth area with Zirconia<br />
and polish it after glazing without putting much porcelain on it. It’s important<br />
to use both the aesthetics and function wisely.<br />
It is essential, however, to check the bite before you place the connector or<br />
add support, as the last thing you want is to have the connector in occlusion or<br />
a heavy bite.<br />
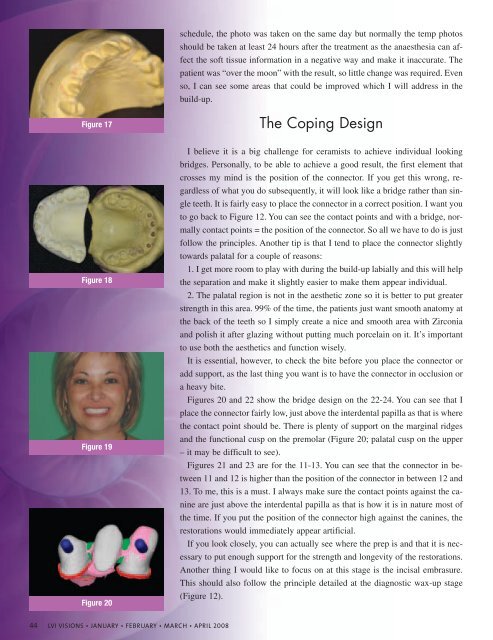
Figures 20 and 22 show the bridge design on the 22-24. You can see that I<br />
place the connector fairly low, just above the interdental papilla as that is where<br />
the contact point should be. There is plenty of support on the marginal ridges<br />
and the functional cusp on the premolar (Figure 20; palatal cusp on the upper<br />
– it may be difficult to see).<br />
Figures 21 and 23 are for the 11-13. You can see that the connector in between<br />
11 and 12 is higher than the position of the connector in between 12 and<br />
13. To me, this is a must. I always make sure the contact points against the canine<br />
are just above the interdental papilla as that is how it is in nature most of<br />
the time. If you put the position of the connector high against the canines, the<br />
restorations would immediately appear artificial.<br />
If you look closely, you can actually see where the prep is and that it is necessary<br />
to put enough support for the strength and longevity of the restorations.<br />
Another thing I would like to focus on at this stage is the incisal embrasure.<br />
This should also follow the principle detailed at the diagnostic wax-up stage<br />
(Figure 12).