Dynamic Clothing Tutorial for DAZ Studio Draping with Pins
Dynamic Clothing Tutorial for DAZ Studio Draping with Pins
Dynamic Clothing Tutorial for DAZ Studio Draping with Pins

Create successful ePaper yourself
Turn your PDF publications into a flip-book with our unique Google optimized e-Paper software.
<strong>Dynamic</strong> <strong>Clothing</strong> <strong>Tutorial</strong> <strong>for</strong> <strong>DAZ</strong> <strong>Studio</strong><br />
<strong>Draping</strong> <strong>with</strong> <strong>Pins</strong><br />
By: David Gillon<br />
So, you have a pose in mind, clothing draped over an arm or a shoulder or a foot, but<br />
it keeps falling off be<strong>for</strong>e it gets to a suitably draped position. What can you do?<br />
There are at least two ways to influence the drape of dynamic clothing in such a<br />
situation, and each is fairly easy to implement.<br />
The first method is to put ‘pins’ into the clothing, so that they affect it as it drapes. A<br />
simple cylindrical primitive positioned to intersect the piece of dynamic clothing<br />
works as a pin, I usually start <strong>with</strong> a 1cm by 5cm pin and then scale it until it has the<br />
effect I want, small pins in the 1-2cm range seem to have little effect (remember to set<br />
the clothing to collide-<strong>with</strong> the pin). The series of pictures below show how it works<br />
<strong>for</strong> a simple pose <strong>with</strong> the dynamic tablecloth posed over V4’s arm. Without the pin<br />
in place the tablecloth falls off the arm during the second drape cycle. With the pin in<br />
place (scaled to 500% in this example), the effects are shown below:<br />
Initial Setup 2 Drape Cycles<br />
4 Drape Cycles 8 Drape Cycles<br />
We can get a bit more ambitious <strong>with</strong> our poses and still use the same technique. The<br />
first step is to approximate the final pose, so that the drape is as simple as possible, so<br />
here we have V4 <strong>with</strong> the Empire Sweater draped over her shoulders. The sleeves are<br />
brought over her shoulders and crossed. In order to pose the sleeves like this, you<br />
must go into the Scene tab and expand the dynamic clothing figures rig. Then, you
may access the x, y, and z-rotate parameters of each node. This will allow you to do<br />
some basic manipulation of the clothing included rig and put it into a different starting<br />
position than that of simply having it “Fit to…” the figure.<br />
After the shirt is positioned properly, a pin is placed so that it intersects through both<br />
sleeves.<br />
The drape is then applied, giving this result:
The back view is usable, but probably slung lower than most people would prefer, the<br />
front view, obviously, can’t be used as is, even making the pin completely translucent<br />
via the surfaces tab will still leave the sleeves rucked-up over and around it. An option<br />
here is to change the collide-<strong>with</strong> settings after the initial drape, taking the pin off the<br />
list so that a second drape then flattens out the rucked-up cloth. Changing the number<br />
of iterations in a drape cycle at this point under the <strong>Dynamic</strong> <strong>Clothing</strong> Preferences tab<br />
will allow precise control of the drape process so that only the minimum number of<br />
iterations are used to smooth out the rucking, while having the least effect on the<br />
overall drape, you can also try to just time it and cancel the drape be<strong>for</strong>e it completes<br />
all the iterations (stopping at 10, 20, or 50%, etc).<br />
Initial placement of the dynamic clothing is fairly important as the drape calculation<br />
may abort if the calculations become too complex, but if the drape process aborts it<br />
may take only a small adjustment to make it workable – so experiment until you find<br />
a position that works. Getting as close to the target draped position as possible seems<br />
to be the best approach.<br />
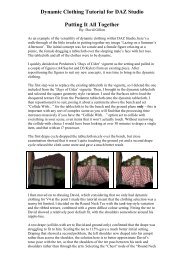
If the effect <strong>with</strong> pins isn’t good enough, then this is where we can substitute our<br />
second technique, which takes advantage of the ability to alter the weight and other<br />
characteristics of individual panels of dynamic clothing. Using a slightly different<br />
initial position, <strong>with</strong> the pin left in just to illustrate the previous position, the weight<br />
and friction of the sleeves are boosted to 340 and 1.5 respectively:<br />
Running the drape gives us the following:
In this case the end result is clearly superior to the result <strong>with</strong> pins, but the pins offer a<br />
degree of flexibility in being able to affect the drape at multiple precise points,<br />
whereas weight and friction are applied across entire panels of clothing. As a further<br />
development, both methods can be used together.<br />
So pins give us a way to impact a drape at specific points, while tweaking clothing<br />
panel settings affect entire panel areas. The size of a pin determines how much effect<br />
it has, while there are multiple factors associated <strong>with</strong> each panel of clothing, each<br />
capable of being tweaked over a range of values, together <strong>with</strong> global factors such as<br />
the <strong>for</strong>ce of gravity and the ‘Internal Pressure’ of the clothing, all of which can be<br />
used singly or in conjunction <strong>with</strong> each other to shape the way that a drape develops.<br />
Fit-to and then drape will get the job done in many cases, but that doesn’t have to be<br />
the end of it, dynamics are capable of a whole lot more.<br />
(My thanks to ReDave and adamr001 <strong>for</strong> coming up <strong>with</strong> the ideas <strong>for</strong> using panel<br />
settings.)