Dynamic Clothing Tutorial For DAZ Studio Putting It
Dynamic Clothing Tutorial For DAZ Studio Putting It
Dynamic Clothing Tutorial For DAZ Studio Putting It

Create successful ePaper yourself
Turn your PDF publications into a flip-book with our unique Google optimized e-Paper software.
<strong>Dynamic</strong> <strong>Clothing</strong> <strong>Tutorial</strong> for <strong>DAZ</strong> <strong>Studio</strong><br />
<strong>Putting</strong> <strong>It</strong> All Together<br />
By: David Gillon<br />
As an example of the versatility of dynamic clothing within <strong>DAZ</strong> <strong>Studio</strong>, here’s a<br />
walk-through of the little tweaks in putting together my image ‘Lazing on a Summer’s<br />
Afternoon’. The initial concept was for a male and a female figure relaxing at a<br />
picnic, the female dragging a tablecloth over the sleeping male’s face with her toes.<br />
The tablecloth and all of the clothes were to be dynamic.<br />
I quickly decided on Predatron’s ‘Days of Cider’ vignette as the setting and pulled in<br />
a couple of figures (A4/Saylor and D3/Kyler) from an existing piece. After<br />
repositioning the figures to suit my new concepts, it was time to bring in the dynamic<br />
clothing.<br />
The first step was to replace the existing tablecloth in the vignette, so I deleted the one<br />
included from the ‘Days of Cider’ vignette. Then, I brought in the dynamic tablecloth<br />
and selected the square geometry style variation. I used the Surfaces tab to load the<br />
chequered texture file from the Predatron tablecloth onto the dynamic tablecloth. I<br />
then repositioned it to suit, posing it about a centimetre above the bench and set<br />
“Collide With…” for the tablecloth to be the bench and the ground plane only – this is<br />
important with any sort of complex scene as you will find that the processing time<br />
increases massively if you have the “Collide With…” option set to collide with<br />
everything in your scene, even items that it won’t actually touch. Without narrowing<br />
the collide-with choice I would have been looking at over 30 minutes to drape a single<br />
item, and that with an i7 processor.<br />
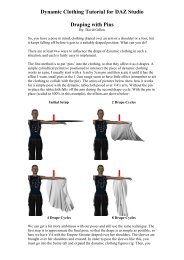
The first drape cycle dropped the tablecloth nicely over the bench, but close<br />
examination showed that it wasn’t quite touching the ground yet and a second drape<br />
cycle relaxed the cloth some more and gave a much better result.<br />
I then moved on to dressing David, which considering that we only had dynamic<br />
clothing for V4 at the point I made this tutorial meant that the clothing selection was a<br />
teensy bit limited. I decided on the Round Neck Tee with the tank-top style variation<br />
and the ribbed texture, combined with a green diffuse colour setting. Fitting the tee to<br />
David showed a relatively poor default fit, with the shoulders somewhere around his<br />
nipple-line.<br />
A test drape (collide-with set to David and ground only) confirmed that the drape was<br />
struggling to fit to him. Scaling the tee to 115% gave a much better initial setting.<br />
Draping that showed a second problem, the left shoulder now draped into his armpit<br />
rather than across the shoulder, the solution here is to better approximate David’s<br />
torso pose with the tee, so that the shoulders of the tee pass between his neck and<br />
shoulders rather than through the arm. Selecting the “Chest” node of the “Round Neck
Tee Rig’ in the Scene tab, I dialed the Z-Rotate to 6.5 and this time the drape was<br />
fine.<br />
100%<br />
115%<br />
115%<br />
Moving down below the belt, the Urban Cargo Pants have a shorts style variation, and<br />
a camouflage texture which will pass for male clothing, so that is what I went for. The<br />
initial drape (collide-with set to David, Tee and ground only) had some poke through<br />
on the buttocks, which I initially thought was due to differences in figure geometry.<br />
This can often be worked around by tweaking the scaling on individual body parts<br />
before the drape – much as you might do with poke through on conforming clothing.<br />
Pushing the overall scale to 110% solved the poke through, but on checking I realised<br />
that David’s buttocks were actually projecting through the Days of Cider ground<br />
plane. This makes things much more complicated for the drape algorithm, so I<br />
repositioned him above the ground plane so there was no intersection of geometry<br />
between the two. I also dropped the shorts scale back to 100% and the drape worked<br />
fine this time.
I decided to dress Aiko next, as I wanted a rough idea of where her skirt was going to<br />
be while I positioned the second tablecloth over her foot and David’s face. I picked<br />
the Fitted Tank with its white floral texture (set to collide with Aiko and the skirt<br />
only) and the Flounce Skirt (initially set to collide with Aiko and the ground only,<br />
although I would need to watch for collisions with David, the bench or tablecloth and<br />
adjust as appropriate). I then draped both the Tank and the Skirt to see what the initial<br />
situation was. The drape showed that David’s arms would probably affect the skirt in<br />
its eventual position, so I added those to the collide-with list.<br />
I now added the second tablecloth, the one being dangled in a sleepy David’s face by<br />
that minx, Aiko…. There were two ways this could work, 1) with the cloth draped<br />
from the bench, over Aiko’s foot, above David’s head, or 2) from the ground, to<br />
Aiko’s foot, to David’s head. My preference was for the first scenario. Thinking about<br />
the positioning, I realised that her skirt might well touch his head, so David’s head<br />
was also added to the collide-with. The tablecloth had the square geometry set and<br />
again had the texture from the Days of Cider added, although this time I also dialed in<br />
a green diffuse texture to give some variety. Aiko’s toes were now positioned about<br />
10cm above David’s nose, with the cloth positioned diagonally, one corner above her<br />
toes and the opposite one over the bench. The aim was to have the cloth just tickling<br />
his nose, so the positioning was adjusted by eye to give approximately the needed<br />
length of cloth projecting beyond Aiko’s toes.<br />
Positioning Aiko turned out to be more of a problem than expected and in the end I<br />
had to move her back towards the bench and turn David’s head to his right instead of<br />
his left to get it to work. The tablecloth was set to collide-with the bench, the other<br />
tablecloth, the ground, Aiko’s left foot and shin, her right leg, her right hand (holding<br />
it to the bench) and David’s head and arms.
As both figures positions had been changed, all of the clothes needed to be re-draped.<br />
Doing this revealed a problem with the new position: the skirt now pooled around<br />
Aiko’s hips with her crotch bared to the world (I quickly added the Basic Wear<br />
panties for the render!). This is a good example of the sheer flexibility of the<br />
dynamics at work, but not at all what I had in mind for the image. I wanted to keep<br />
the pose, but also keep the skirt draped over her knee and shin.<br />
The available options to solve the issues with the skirt are discussed more fully in my<br />
‘<strong>Dynamic</strong> <strong>Clothing</strong>: Pin-Up Girl’ tutorial. I first tried changing the panel settings on<br />
the Panel tab, selecting the entire Flare Skirt and pushing the friction up to its<br />
maximum value of 2.0 while lessening weight to 30. If the skirt had been created with<br />
separate panels that would have fallen below the knee, then I would have increased<br />
their weight while lessening that of panels above the knee, in order to weigh the<br />
dynamics down. But, as the skirt exists, I was stuck with lessening weight generally in<br />
the hope of maximizing the effect of increased friction. Draping this gave a better, but<br />
still not entirely satisfactory result.<br />
My next step was to add two ‘pins’ to slow the drape of the skirt up past her knees. To<br />
do this, I created two primitive cylinders and positioned them so that they intersected<br />
through V4’s knee joints. As the initial drape position of the skirt did not intersect the<br />
pin through her right leg I increased the length of the pin until it did.
The idea behind using these “pins” was to try to help control the initial drape of the<br />
skirt. After two complete drape cycles (at default settings) I had a more reasonable<br />
starting position from which I could try a final drape without the aid of the pins.<br />
I removed the pins from the collide-with settings for the skirt and set their opacity to<br />
zero to render them invisible. As I wanted reasonably precise control of how the drape<br />
developed from this point forward, I changed the “<strong>It</strong>erations” setting on the<br />
Preferences tab from 50 to just 5. I could potentially have gone down to 1 iteration at<br />
a time, but 5 was a more reasonable compromise, allowing me to select a drape that<br />
was about right without having to spend hours clicking the Drape button. After 6<br />
drape cycles (30 iterations) I had a result I was happy with. As it had taken a while to<br />
get the skirt sorted I immediately saved a copy of the scene to allow me to revert to<br />
this point if need be.
Having re-draped Aiko’s tank-top I was finally in a position to drape the second<br />
tablecloth. The first thing to do was to reset the iterations count back to 50. I then ran<br />
a full drape cycle. This was almost perfect, the only apparent problem being some<br />
minor poke-through on her toes.<br />
I decided that the toes could justifiably be taken care of by simply making them<br />
invisible, which meant that after a few final tweaks of Aiko’s expression and hair I<br />
was done with posing and ready to set up the lighting for a final image.<br />
The lighting was done with Lightdome Pro 2, selecting Stockholm 70 as I wanted a<br />
sunny day, but without the sun vertically overhead. The render window I set as 1500<br />
by 1200, positioning the frame so that David’s feet were towards the lower right while<br />
his body drew the eye across the image and up to Aiko in the centre.<br />
The ‘final’ image turned out to have several issues. <strong>It</strong> was too bright, the cider jars<br />
were reflecting in a most un-stoneware-like fashion, while the second tablecloth<br />
turned out not to be hanging vertically at back left, and the chequerboard pattern<br />
really made that apparent.
Trying a second drape cycle for the tablecloth just pulled it nearly all of the way off<br />
Aiko’s foot, losing the effect I wanted. Rather than try tweaking pins and friction<br />
when the front was already giving the effect I wanted, I decided to change the<br />
environment the rear section of the cloth was draping over. I did this by moving one<br />
of the cider jars down to the ground at the end of the bench and adding it to the<br />
tablecloth’s collide-with list.<br />
Having tweaked the reflection on the cider jar by turning the specular strength down<br />
to 50%, and turned down the overall lighting to 70%, I also decided to go for a<br />
slightly higher camera angle to better show the picnic on the bench behind them and<br />
rotated the Lightdome Pro sun around to light from the front of scene to put more<br />
light on the tablecloth and Aiko’s skirt, which were likely to lose detail in the<br />
shadows. The revised image was much better, but still too dark under the skirt, so I<br />
tweaked the gamma up and got something I could live with.<br />
FINAL IMAGE<br />
I hope that this simple walk-through was helpful to you in finding ways to get the<br />
results you want when working with dynamic clothing within a scene. While dynamic<br />
clothing provides unique challenges to overcome in creating a final rendered image, I<br />
hope you can begin to see some of the many benefits it will bring to your 3D<br />
illustrations.