StoTherm® EIFS: Installation Guide
StoTherm® EIFS: Installation Guide
StoTherm® EIFS: Installation Guide

You also want an ePaper? Increase the reach of your titles
YUMPU automatically turns print PDFs into web optimized ePapers that Google loves.
StoTherm ® <strong>EIFS</strong>:<br />
<strong>Installation</strong> <strong>Guide</strong>
Sto is the innovative world leader in cladding, coating and restoration systems.<br />
Sto was an Exterior Insulation and Finish Systems pioneer - introducing StoTherm ®<br />
to Europe in 1963. Headquartered in Atlanta, Georgia, ISO 9001:2000 and<br />
14001:2004 Certified Sto Corp., continues to lead the North American industry in<br />
innovation; providing the highest quality products and services to enhance our<br />
customers’ projects. Our industry leading <strong>EIFS</strong>, Stucco, Coatings and Concrete<br />
Restoration products are manufactured in four plants located strategically across<br />
North America to serve over more than 200 distributor locations in the U.S. and<br />
Canada. We continue to revolutionize the industry with StoMachine Technology<br />
– a faster, more economic way to apply <strong>EIFS</strong>; StoDesign, consultative design<br />
and color services, and the Sto Institute, which trains building professionals in<br />
proper techniques to ensure lasting results. Application Technology… Design…<br />
Education, and the highest quality products make Sto the innovative world leader<br />
in cladding, coating and restoration systems.<br />
Sto pioneered <strong>EIFS</strong> in Europe - 1963<br />
• Products include: <strong>EIFS</strong>, Stucco, Coatings,<br />
Waterproof Air Barriers and Concrete Restoration<br />
Headquartered in Atlanta<br />
• ISO 9001:2000 and 14001:2004 Certified<br />
• 200+ Distributor locations<br />
Revolutionizing the Industry!<br />
• StoMachine Technology<br />
– StoSilo<br />
– Sto Continuous Mixer<br />
– Sto M-8 Spray Pump<br />
• StoStudio<br />
• Sto Institute<br />
• StoTherm ® NExT<br />
• StoSilco ® Silicone Emulsion Technology<br />
• Optilink ® Advanced Polymer Technology<br />
• Lotusan ® Lotus-Effect ® Technology<br />
2<br />
ATTENTION<br />
Sto products are intended for use by qualified professional contractors, not consumers,<br />
as a component of a larger construction assembly as specified by a qualified<br />
design professional, general contractor or builder. They should be installed in accordance<br />
with those specifications and Sto’s instructions. Sto Corp. disclaims all, and<br />
assumes no, liability for on-site inspections, for its products applied improperly, or by<br />
unqualified persons or entities, or as part of an improperly designed or constructed<br />
building, for the nonperformance of adjacent building components or assemblies, or<br />
for other construction activities beyond Sto’s control. Improper use of Sto products<br />
or use as part of an improperly designed or constructed larger assembly or building<br />
may result in serious damage to this product, and to the structure of the building or<br />
its components. STO CORP. DISCLAIMS ALL WARRANTIES EXPRESSED OR<br />
IMPLIED EXCEPT FOR EXPLICIT LIMITED WRITTEN WARRANTIES ISSUED<br />
TO AND ACCEPTED BY BUILDING OWNERS IN ACCORDANCE WITH STO’S<br />
WARRANTY PROGRAMS WHICH ARE SUBJECT TO CHANGE FROM TIME TO<br />
TIME. For the fullest, most current information on proper application, clean-up, mixing<br />
and other specifications and warranties, cautions and disclaimers, please refer to<br />
the Sto Corp. website,www.stocorp.com.
Table of Contents<br />
StoTherm ® <strong>EIFS</strong><br />
Introduction . . . . . . . . . . . . . . . . . . . . . . . . . . . . . . . . .6<br />
Project Preparation . . . . . . . . . . . . . . . . . . . . . . . . . . . .7<br />
Material Storage and Handling . . . . . . . . . . . . . . . . . . . . 7<br />
Substrates . . . . . . . . . . . . . . . . . . . . . . . . . . . . . . . . . . .8<br />
Liquid-applied Waterproof Air Barrier . . . . . . . . . . . . . . .8<br />
Attachments . . . . . . . . . . . . . . . . . . . . . . . . . . . . . . . . .9<br />
Mechanical Fasteners . . . . . . . . . . . . . . . . . . . . . . . . .10<br />
Backwrapping . . . . . . . . . . . . . . . . . . . . . . . . . . . . . . .10<br />
Insulation Boards . . . . . . . . . . . . . . . . . . . . . . . . . . . .11<br />
Expanded Polystyrene (EPS) Quality Test . . . . . .11<br />
Storage . . . . . . . . . . . . . . . . . . . . . . . . . . . . . . .12<br />
Cutting EPS Boards . . . . . . . . . . . . . . . . . . . . . . . . . . .12<br />
Adhesive Application . . . . . . . . . . . . . . . . . . . . . . . . . .13<br />
EPS Board Application . . . . . . . . . . . . . . . . . . . . . . . . .13<br />
Filling EPS Voids . . . . . . . . . . . . . . . . . . . . . . . . . . . . .15<br />
Rasping . . . . . . . . . . . . . . . . . . . . . . . . . . . . . . . . . . . .16<br />
Base Coat & Mesh Application . . . . . . . . . . . . . . . . . .16<br />
Primer Application . . . . . . . . . . . . . . . . . . . . . . . . . . . .19<br />
Finish Application . . . . . . . . . . . . . . . . . . . . . . . . . . . .19<br />
Floating or Spraying Textures . . . . . . . . . . . . . . . . . . . .20<br />
Sealants . . . . . . . . . . . . . . . . . . . . . . . . . . . . . . . . . . .22<br />
Expansion Joints . . . . . . . . . . . . . . . . . . . . . . . . . . . . .23<br />
StoTherm ® <strong>EIFS</strong> NExT <strong>Installation</strong> . . . . . . . . . . . . . . . .24<br />
Failure Prevention . . . . . . . . . . . . . . . . . . . . . . . . .27<br />
Moisture Intrusion and Critical Details . . . . . . . . . . . . .28<br />
The List of NEVERS . . . . . . . . . . . . . . . . . . . . . . . .29-31<br />
Systems and Products . . . . . . . . . . . . . . . . . . . . .33<br />
StoTherm ® EIF Systems . . . . . . . . . . . . . . . . . . . . .34-35<br />
StoTherm ® <strong>EIFS</strong> Products . . . . . . . . . . . . . . . . . . . .36-38<br />
Average Coverages for Sto Products . . . . . . . . . . . .39-41<br />
<strong>EIFS</strong> Industry Adhesives Coverage . . . . . . . . . . . . . . . .41<br />
StoMachine Technology . . . . . . . . . . . . . . . . . . .43<br />
StoSilo . . . . . . . . . . . . . . . . . . . . . . . . . . . . . . . . . . . .44<br />
Comparative Job Data . . . . . . . . . . . . . . . . . . . . . . . . .46<br />
Portable Equipment . . . . . . . . . . . . . . . . . . . . . . . . . . .47<br />
Product Reference Charts . . . . . . . . . . . . . . . . . . . .48-50<br />
Sto Jet Mixer . . . . . . . . . . . . . . . . . . . . . . . . . . . . . . . .51<br />
Estimating . . . . . . . . . . . . . . . . . . . . . . . . . . . . . . . . . .53<br />
Average Labor Production . . . . . . . . . . . . . . . . . . . . . .54<br />
Estimator Checklist . . . . . . . . . . . . . . . . . . . . . . . . . . .55<br />
General Information . . . . . . . . . . . . . . . . . . . . . . .57<br />
StoTherm ® <strong>EIFS</strong> <strong>Installation</strong> Inspection Checklists . .58-60<br />
Technical Support . . . . . . . . . . . . . . . . . . . . . . . . . . . .61<br />
3
The<br />
Exterior<br />
Insulation<br />
and Finish<br />
System<br />
(<strong>EIFS</strong>)<br />
5
Introduction<br />
A traditional <strong>EIFS</strong>, also known as a Class PB <strong>EIFS</strong>, is a non-load bearing<br />
exterior wall cladding consisting of:<br />
1. Adhesive and/or mechanical attachment<br />
2. Insulation board<br />
3. Glass fiber reinforcing mesh<br />
4. Base Coat<br />
5. Finish Coat<br />
Traditional <strong>EIFS</strong> offer many advantages in comparison to other<br />
claddings, including:<br />
• Energy savings<br />
• Excellent weather resistance<br />
• Seamless wall covering<br />
• Low installed cost<br />
• Aesthetic versatility<br />
• Low maintenance<br />
Because it provides moisture protection at the outer plane of the wall<br />
a traditional <strong>EIFS</strong> is often called a barrier, or face seal, wall design. In<br />
combination with other components of construction - windows, flashings<br />
and sealants - it resists moisture penetration at the outermost surface<br />
of the wall.<br />
StoTherm NExT is the next generation of <strong>EIFS</strong> which adds a seamless<br />
waterproof air barrier behind the <strong>EIFS</strong> wall covering. StoTherm NExT<br />
provides all the same benefits of traditional <strong>EIFS</strong>, plus it provides:<br />
• Secondary moisture protection<br />
• Increased air infiltration/exfiltration resistance<br />
• Drainage of incidental moisture in the event of a breach in the <strong>EIFS</strong><br />
wall covering (much like a cavity wall design), when combined with<br />
starter track with weep holes and vertical ribbons of adhesive.<br />
Important Note: <strong>EIFS</strong> require building code evaluation reports that recognize<br />
a particular system as an equivalent to the materials/methods of construction<br />
prescribed in the code. Most StoTherm <strong>EIFS</strong> have model building code recognition.<br />
Often these reports are required for issuance of a building permit or to<br />
comply with architectural specifications.<br />
6<br />
Traditional or<br />
Class PB <strong>EIFS</strong><br />
1. Adhesive<br />
2. Insulation Board<br />
3. Reinforcing Mesh<br />
4. Base Coat<br />
5. Finish Coat<br />
StoTherm ®<br />
NExT:<br />
the Next<br />
Generation<br />
of <strong>EIFS</strong><br />
1. Waterproof Air Barrier<br />
2. Adhesive<br />
3. Insulation board<br />
4. Reinforcing mesh<br />
5. Base coat<br />
6. Finish coat
As a manufacturer of high quality, technologically advanced products,<br />
Sto wishes to provide you with as much information as possible to<br />
ensure that you, the professional installer, achieve a successful, high<br />
quality installation. This installation handbook presents in a brief form<br />
the essential guidelines and information you need to install StoTherm<br />
Classic, Essence, and Lotusan and StoTherm NExT Systems. This handbook<br />
was compiled with expert input from Sto Technical Personnel and<br />
from experienced applicators in the U.S.<br />
As we at Sto commit ourselves to manufacturing superior quality products<br />
and to innovating and introducing new technologies and products,<br />
we value and rely on your experience in the field. We hope that you<br />
will continue to share it with us. If you have any suggestions, please<br />
contact Sto at our headquarters in Atlanta, Georgia.<br />
Project Preparation<br />
Completing the following tasks before beginning installation can help<br />
save you time and speed production.<br />
• Set up correct scaffolding the day before you want to work on it.<br />
Much time is lost when workers wait for scaffolding or work on<br />
inadequate scaffolding. Make sure scaffolding is erected in<br />
accordance with OSHA safety regulations.<br />
• Protect necessary areas using masking tape and/or plastic coverings<br />
BEFORE you start working. Sto materials, which are designed to<br />
stick, cannot be cleaned off easily after they have dried.<br />
• Make sure the correct materials are on the job and properly stored.<br />
• Follow the StoTherm <strong>EIFS</strong> <strong>Installation</strong> Inspection Checklist at the<br />
back of this book to verify conformance of work to installation<br />
requirements.<br />
Material Storage and Handling<br />
• Pail Products: store and apply all pail products above 40°F (4°C).<br />
Store out of sunlight. Do not apply to frozen surfaces.<br />
• Bag Products: store all bag products off the ground in a cool,<br />
dry location.<br />
• Do not apply materials to frozen surfaces.<br />
• Sto EPS Insulation Board: store flat (not on edge) in a dry area and<br />
protect from sunlight.<br />
7
Substrates<br />
StoTherm <strong>EIFS</strong> may be installed over the following substrates:<br />
Sheathing:<br />
• Glass mat faced gypsum sheathing in compliance with ASTM C1177<br />
• Water-resistant exterior fiber-reinforced gypsum sheathing panels<br />
in compliance with ASTM C1278<br />
• Gypsum sheathing in compliance with ASTM C79<br />
• Exterior or exposure1 wood - based sheathing - plywood and OSB<br />
(Oriented Strand Board)<br />
• Sound, prepared masonry, concrete or Portland cement plaster/<br />
stucco<br />
All sheathing substrates listed above can be treated with StoGuard ® -<br />
a liquid-applied waterproof air barrier, for added moisture protection<br />
and air infiltration resistance.<br />
All sheathing substrates should be handled and installed in<br />
accordance with code requirements and manufacturer recommendations.<br />
Sheathing should be free from surface defects or moisture damage.<br />
Damaged sheathing should be replaced. Poured concrete must be<br />
free of form oil, curing compounds or release agents. A detergent<br />
wash, waterblasting or sandblasting is typically required to remove<br />
such surface contaminants. Other masonry surfaces - brick or concrete<br />
block - should be free of surface contamination such as efflorescence.<br />
Efflorescence is a white chalky deposit on the surface that is caused<br />
by moisture migration through the masonry. Generally wire brushing<br />
will remove efflorescence from masonry surfaces. Failure to properly<br />
prepare the substrate can result in delamination of the <strong>EIFS</strong>.<br />
Mechanical attachment is discouraged because fasteners are thermals<br />
bridges to the exterior that defeat the purpose of exterior insulation.<br />
They can also “telegraph” through the finished wall surface as the<br />
<strong>EIFS</strong> ages and they may limit wind load resistance of the system. The<br />
only instance in which mechanical attachment is advised is when<br />
adhesion to the substrate is not possible or questionable, such as a<br />
painted substrate.<br />
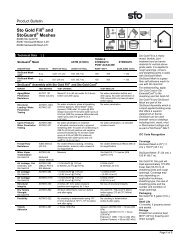
StoGuard ® Liquid Applied Waterproof Air Barrier<br />
The StoGuard assembly is a two-component, liquid-applied system<br />
that creates a continuous, seamless waterproof air barrier beneath<br />
StoTherm EIF Systems as well as other claddings. Tough and durable,<br />
StoGuard will not tear like building wraps or paper and resists water<br />
penetration 5 times longer than leading brand building wraps and 28<br />
times longer than conventional building paper.<br />
8
The StoGuard assembly consists of:<br />
Sto Gold Fill ® – A flexible, trowel-applied joint<br />
treatment that, combined with StoGuard Mesh or Sto<br />
Detail Mesh, bridges sheathing joints and protects rough<br />
openings for windows and doors, and building corners. Sto<br />
Gold Fill is applied to sheathing joints and a minimum of<br />
4" (100 mm) wide StoGuard Mesh or Sto Detail Mesh is<br />
immediately embedded and troweled smooth.<br />
Sto Gold Coat ® – A ready-mixed flexible coating that<br />
is applied by roller directly to the wall sheathing and over<br />
sheathing joints filled with Sto Gold Fill. It may also be<br />
spray applied. Sto Gold Coat may be used over exterior<br />
gypsum Sheathing, Dens-Glass ® Gold, Aqua Tough ,<br />
exterior or exposure 1 plywood and oriented strand<br />
board (OSB).<br />
Attachments<br />
The most common way to attach the insulation on the building is with<br />
an adhesive. The most popular Sto adhesives are:<br />
1. Sto Dispersion Adhesive – Ready-to-use adhesive with high<br />
strength and flexibility, used on most smooth, uniform surfaces. Most<br />
commonly used over gypsum sheathings or exterior grade wood-based<br />
sheathings. Ribbons of adhesive are applied with a 3/16" x 3/8"<br />
(5 x 9 mm) U-notched trowel. Not recommended over damp or<br />
irregular surfaces such as new concrete or masonry.<br />
2. Sto BTS ® Plus – A pre-blended adhesive mixed with 5-6.5 quarts<br />
(4.7-6.2 L) of clean water for each 47 lb. (21 Kg) bag. Ribbons of Sto<br />
BTS-Plus shall be applied to the insulation board using a 5/8"x 5/8"<br />
(16 x 16 mm) square-notched or 1/2" x 1/2" (13 x 13 mm) U-notched<br />
trowel. It is typically used over concrete, masonry, portland cement<br />
plaster, gypsum or cement sheathings.<br />
3. Sto Primer/Adhesive-B – A one component polymer modified<br />
cement based adhesive. Mix with 5-6.5 quarts (4.7-6.2 L) of clean<br />
water for each 50 lb. (23kg) bag. Apply with a 1/2" x 1/2"<br />
(13 x 13 mm) U-notched trowel or 5/8" x 5/8" (16 x 16 mm) squarenotched<br />
trowel. It is typically used over concrete, masonry, portland<br />
cement plaster, gypsum or cement sheathings.<br />
4. Sto Primer/Adhesive – An acrylic-based adhesive that is mixed<br />
at the job-site with Portland cement and applied similar to Sto<br />
Primer/Adhesive-B.<br />
9
5. Sto BTS ® Xtra – A one-component, polymer-modified lightweight<br />
cement-based adhesive. Mix with 4.75-5 quarts (4.5-4.7 L) of clean<br />
water for each 38-lb (17-kg) bag. Apply ribbons of Sto BTS Xtra to the<br />
insulation board using a 1/2" x 1/2" (13 x 13 mm) U-notched trowel<br />
or a 5/8" x 5/8" (16 x 16 mm) square-notched trowel, depending on<br />
the substrate.<br />
6. Sto BTS ® Silo – A one-component, polymer-modified cementbased<br />
adhesive designed for use with StoSilo spray equipment over<br />
exterior gypsum sheathing, Dens Glass ® Gold sheathing, exterior<br />
cementitious sheathing and masonry/concrete substrates.<br />
Note: when wood-based sheathings are protected with StoGuard, Sto BTS Plus,<br />
Sto BTS Xtra, Sto Primer/Adhesive, Sto Primer/Adhesive-B and Sto BTS Silo may<br />
be applied over the protected wood-based sheathings.<br />
Mechanical Fasteners<br />
Sto does not generally recommend the use of mechanical fasteners,<br />
except when the substrate is incompatible with adhesive or its condition<br />
is questionable, such as painted substrates. As an added security<br />
some architects will specify mechanical attachment. When they are<br />
required, the mechanical fastener supplier should be consulted. A minimum<br />
1-1/2" (38 mm) insulation board is recommended with mechanical<br />
attachment.<br />
NOTE: Depending on climate, surface mount fasteners may “telegraph”<br />
through the finish because of surface irregularities and the “thermal bridging”<br />
effect of fasteners.<br />
Backwrapping<br />
Prior to applying the insulation boards to the wall, a strip of reinforcing<br />
mesh is adhered to the base of the substrate. This mesh will eventually<br />
wrap around the edge of the insulation. We refer to this procedure as<br />
“backwrapping.”<br />
The two main purposes of backwrapping are:<br />
1. To ensure the edges of insulation boards will be protected<br />
2. To ensure the entire edge of the insulation system will be well<br />
adhered.<br />
10
Note: Sto Detail Mesh, a flexible mesh that is pre-cut in 9” (229 mm) wide rolls<br />
is convenient for backwrapping and other detail work.<br />
Procedure<br />
Using the proper adhesive and strips of Sto Mesh or Sto Detail Mesh,<br />
adhere approximately 4" (100 mm) of mesh to the base of the wall.<br />
Allow the remaining mesh to hang down; this will be “wrapped”<br />
around the insulation board at a later time with a minimum of 2-1/2"<br />
(64 mm) on the face of the board. Care should be taken to prevent the<br />
adhesive from collecting on the portion of mesh which will be used to<br />
wrap the insulation.<br />
This “backwrapping” procedure must be used wherever the insulation<br />
system starts or stops, including the following:<br />
• At the base of the system<br />
• At transitions where the insulation board meets<br />
window and door frames<br />
• At roofs<br />
• At expansion joints<br />
• At openings around meter or utility boxes, pipes, etc.<br />
• At any other system termination<br />
Insulation Boards<br />
The insulation boards used are Expanded Polystyrene or “EPS” boards.<br />
Various thicknesses are available. The minimum thickness allowable is<br />
3/4" (19 mm). The maximum allowable thickness permitted by most<br />
building codes for most commercial construction is 4" (100 mm). The<br />
maximum size board allowable is 2' x 4' (610 mm x 1,219 mm).<br />
Expanded Polystyrene Quality Test:<br />
Prior to applying, EPS boards should be checked to ensure they meet<br />
Sto Specifications. All EPS boards must be produced by a Sto licensed<br />
manufacturer and can be checked in the field as follows:<br />
1. Upon Delivery<br />
A. EPS boards are to be delivered in plastic bags labeled “Sto.”<br />
B. Each bag should identify technical properties of the Sto Board.<br />
11
C. Each board should be clearly marked with the Sto Brand name<br />
and the manufacturer quality control number.<br />
D. All boards are to be wire cut (not cast formed) and the edges<br />
are to be square cut.<br />
E. Make sure the EPS boards have not been damaged in<br />
handling.<br />
2. Random Sample Tests<br />
A. Proper bead fusion:<br />
Break a sample and examine beads; 80% of beads should<br />
be split. If beads are broken in round shapes, do not use<br />
boards.<br />
B. Proper Curing:<br />
1. Break and smell for pentane gas (smells like lighter fluid).<br />
If smell is present, do not use boards.<br />
2. Hold a match near broken insulation. If there is a blue flash<br />
flame, do not use boards.<br />
C. Proper treatment for fire retardant:<br />
Test burn a sample. When the flame is removed, the insulation<br />
board should not continue to burn.<br />
3. Storage<br />
A. Protect from direct sunlight during storage and after<br />
application.<br />
B. Store flat in a dry area (not on edge).<br />
Cutting EPS Boards<br />
Commonly, EPS boards are cut with a knife using a square to guide<br />
the cut.<br />
Always keep the knife sharp and hold the blade at a low angle<br />
(approximately 30º or less ) when cutting the board. The low angle<br />
allows the knife to “slice” through the insulation.<br />
EPS boards may also be cut easily and accurately using the following<br />
tools: table saw or hot wire machine.<br />
12
Adhesive Application<br />
Apply the adhesive to the insulation board using the correct size<br />
notched trowel. (See pages 9-10 for correct sizes.)<br />
Always hold the notched trowel at a minimum 30° angle to produce<br />
the correct size ribbons. When forming the ribbons, press the trowel<br />
firmly (this will prevent excess adhesive from collecting between the<br />
ribbons). Keep the trowel clean to prevent any adhesive build-up in<br />
the notches.<br />
The ribbons should run horizontally (parallel to the long dimension<br />
of the board) when the boards are applied to the wall. Exception:<br />
StoTherm NExT - when StoTherm <strong>EIFS</strong> are installed with StoGuard, the<br />
ribbons of adhesive are applied vertically (parallel to the short dimension<br />
of the board). This creates channels for moisture drainage.<br />
To make application easier and quicker, build an “easel” to hold the<br />
insulation boards as you apply the adhesive.<br />
Adhesive may also be applied directly to the wall using the StoSilo<br />
Combo systems. These automated silo/mixer/spray machines will save<br />
you time and money and allow you to get to the next job more quickly.<br />
EPS Board Application<br />
Prior to placing the EPS boards on the wall, be sure to wipe or scrape<br />
any excess adhesive from the edges of the boards. Any adhesive collecting<br />
between the boards will create “thermal bridges”. When<br />
applying the boards, butt them tightly together. This will prevent<br />
any “thermal breaks” in the system. Gaps between the EPS boards<br />
can cause cracking in the <strong>EIFS</strong> base coat and finish and telegraphing<br />
of joints through the finished wall surface.<br />
13
Always place the boards so all vertical joints are staggered.<br />
When placing the boards on the wall, always apply the correct amount<br />
of pressure for the adhesive to “grab.”<br />
• When using Sto Dispersion Adhesive, just press the boards on;<br />
the adhesive will do the rest.<br />
• When using other Sto adhesives, press harder or “tamp” the board<br />
to ensure a good “grab.” To apply uniform pressure over the entire<br />
board, use a “Rasping Board” (see page 15) or a large block of<br />
similar size.<br />
At all inside and outside corners always stagger or interlock the<br />
boards. Offset joints in sheathing by a minimum of 6" (152 mm).<br />
This prevents cracking in the <strong>EIFS</strong> coatings in the event of movement<br />
at the sheathing joints.<br />
Important note: Make sure no adhesive is between the interlocked boards<br />
at the outside corner.<br />
Cut insulation to fit around openings. Do not align board joints with<br />
corners of openings.<br />
14
Filling EPS Voids<br />
As noted in the previous section, the EPS board should be butted tightly<br />
together during application. A thorough inspection should be made<br />
for any voids or spaces larger than 1/16" (1.6 mm) between the EPS<br />
boards. (If you can slip a credit card into the void, it must be filled.)<br />
ALL VOIDS MUST BE FILLED WITH AN INSULATING MATERIAL, either a<br />
low expanding polyurethane spray foam or slivers of scrap EPS board.<br />
Insulating all open joints between the boards achieves the following<br />
important objectives:<br />
• Eliminates thermal breaks so the wall will be<br />
properly insulated<br />
• Future problems with the finish due to uneven<br />
“vapor diffusion” will be prevented<br />
• Base coat consumption will be reduced.<br />
15
Rasping<br />
The entire surface of the EPS wall must be level and uniform. EPS<br />
boards are very easy to level and shape using a “rasping board.”<br />
To make a rasping board, simply cut a straight scrap of 1/2" (13 mm)<br />
plywood, install a wooden handle on one face, then glue a piece of<br />
12 grit floor sanding paper to the other face of the plywood. Floor<br />
sanding paper is approximately 8" x 22" (203 x 559 mm) and should<br />
be available at local equipment rental shops.<br />
When rasping the insulation boards level and even, it is important that<br />
you rasp the entire surface of the boards, not just the joints or edges.<br />
If you rasp just the edges/joints, then the wall will appear to have<br />
waves in it during “critical” light.<br />
Rasping boards are also available commercially.<br />
Base Coat & Mesh Application<br />
After the wall has been prepared or leveled, it must be protected from<br />
sun/water damage. If EPS board is exposed to sunlight for extended<br />
periods, a powdery film develops on the surface. This film must be<br />
removed by rasping. Reinforcement is then added to all the boards for<br />
impact protection.<br />
To achieve this, apply the proper Sto base coat and embed appropriate<br />
mesh. This procedure is known as the “base coat application.”<br />
16
The most popular Sto base coats are:<br />
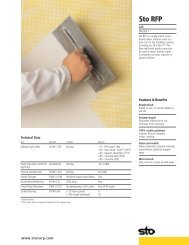
Sto RFP - A ready-mixed 100% synthetic base coat. Note: Because<br />
Sto RFP is non-cementitious and dries by evaporation only, weather<br />
conditions will affect drying times; cool or damp conditions lengthen<br />
drying times.<br />
Sto Flexyl - An acrylic-based, fiber-reinforced, flexible waterproofer<br />
combined with equal parts of Portland cement by weight. Sto Flexyl<br />
functions as an air and moisture barrier on concrete, masonry or gypsum<br />
sheathing surfaces. It also functions as a waterproof base coat in<br />
Sto <strong>EIFS</strong> for use on properly sloped trim or accents and splash areas<br />
near grade.<br />
Sto BTS ® Plus - A polymer-modified, cementitious material.<br />
Just add water.<br />
Sto Primer/Adhesive-B - A polymer-modified cementitious material.<br />
Just add water.<br />
Sto Primer/Adhesive - An acrylic base coat to which Portland<br />
cement is added at the job site, equal parts by volume.<br />
Sto BTS ® Xtra Base Coat - A polymer-modified lightweight cementitious<br />
material, used as a high-build base coat, up to 1/4” (6 mm).<br />
Just add water.<br />
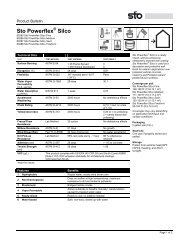
Sto BTS ® Silo - A polymer-modified cementitious material for use<br />
with StoSilo spray equipment.<br />
Application at Detail Work<br />
Additional protection at doors and windows is achieved by applying<br />
“butterflies” or small strips of mesh diagonally at the sills and headers<br />
prior to application of field mesh.<br />
17
Application at Corners<br />
All inside and outside corners must have two layers of mesh. This can<br />
be achieved in one of two ways:<br />
• Double wrap Sto Mesh minimum 8" (204 mm) in each direction<br />
• Apply Sto Detail Mesh and overlap with Sto Mesh minimum<br />
8" (204 mm) onto adjacent wall<br />
Application at Wall Areas<br />
Apply the Sto base coat on the insulation boards in a layer approximately<br />
1/8" (3 mm) thick. Work vertically or horizontally in strips of<br />
40" (1016 mm). Immediately imbed the Sto Mesh in the wet base<br />
coat. Trowel off any excess base coat from the surface. The mesh must<br />
be fully embedded so that no mesh color is visible. Apply additional<br />
base coat if mesh color is visible when the base coat is dry. Do not<br />
butt mesh strips. Overlap the strip edges a minimum of 2-1/2"<br />
(64 mm). If the mesh is butted it will cause cracks in the base and<br />
finish coats. Feather the base coat at mesh overlaps.<br />
Application for Level 1 (Ultra High) Impact Areas<br />
StoTherm <strong>EIFS</strong> are engineered wall cladding systems and can be<br />
enhanced in several ways to accommodate higher impact needs.<br />
Where additional impact resistance is required, such as on ground<br />
floors, garage areas, and areas accessible to pedestrian traffic, Sto<br />
recommends the use of Sto Armor Mat to a minimum height of 6'-0"<br />
(1.8 m). First apply a base coat layer and imbed Sto Armor Mat (ultrahigh<br />
impact mesh). When using Sto Armor Mat, the edges must be<br />
butted, not overlapped, due to the thickness of the mesh. After this<br />
application has dried, apply the base coat with regular Sto Mesh as<br />
previously described.<br />
18
Drying before Finish Application<br />
IMPORTANT: All EPS boards are to be covered with the base coat and<br />
mesh application and allowed to dry prior to applying any finish.<br />
Primer Application (Optional System Component)<br />
Priming with tinted Sto primers is recommended as a color base for<br />
Stolit ® R finishes, or fine aggregate finishes such as .75 mm or 1 mm<br />
finishes. If Sto RFP base coat is tinted to the same shade as the finish,<br />
the primer is not necessary. In addition, priming provides uniform substrate<br />
absorption, enhances finish color and inhibits efflorescence in<br />
cementitious substrates. The primer is applied with a paint roller or<br />
brush to the substrate. Certain finishes, including Sto Decocoat, Sto<br />
GraniTex , and StoCreativ ® Granite always require the base coat<br />
to be primed with Sto primer, tinted to the finish color.<br />
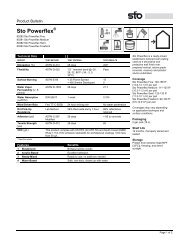
Finish Application<br />
Plan the finish application so enough workers are available to finish<br />
entire sections of wall area at one time without interruption.<br />
Mix the finish with a clean, rust-free mixer. Small amounts of clean<br />
water may be added to aid workability. Limit water to amount needed<br />
to achieve the finish texture. Use only stainless steel trowels to apply<br />
the finish. Work in pairs with the first person applying the finish to the<br />
wall, and the second person floating the finish to the proper texture<br />
(refer to page 20 for “floating textures”).<br />
By following the guidelines listed below and shown in the adjacent<br />
pictures, problems can be prevented and an aesthetically pleasing wall<br />
surface will be the result:<br />
1. Apply finish directly over the base coat (or primed base coat as specified)<br />
ONLY AFTER THE BASE COAT/PRIMER HAS THOROUGHLY DRIED.<br />
24 hours minimum drying time is recommended. If cool and/or damp<br />
conditions exist, allow additional drying time, minimum 72 hours.<br />
2. Avoid application in direct sunlight. This can cause shadow lines<br />
from scaffolding.<br />
19
3. Apply finish in a continuous application, always working a wet edge<br />
toward the unfinished area.<br />
4. Aesthetic V-grooves may be designed into the system to accommodate<br />
workability on multi-level buildings. However, a minimum of 3/4"<br />
(19 mm) insulation board must be left after any grooves are cut. Refer<br />
to Sto Detail 1.03 in the Sto Information Manual.<br />
5. “R” (rilled texture) finishes must be floated with a plastic trowel to<br />
achieve proper textures and avoid discoloration of the finish.<br />
6. Avoid installing separate batches of finish side-by-side.<br />
7. Interrupt application at natural breaks in construction: expansion<br />
joints, changes of plane, system terminations, etc.<br />
NOTE: Weather conditions affect application and drying time. Hot or dry conditions<br />
limit working time and accelerate drying and may require adjustments in<br />
the scheduling of work to achieve desired results. Cool or damp conditions<br />
extend working time and slow down drying and may require added measures<br />
of protection against wind, dust, dirt, rain and freezing.<br />
Floating or Spraying Textures<br />
There are basically five different floating or spraying procedures using<br />
specific Sto finishes to produce five types of textures:<br />
1. Pebbled Texture: To achieve this texture, any of these finishes is<br />
applied to the wall to approximately the thickness of the aggregate in<br />
the finish. The finish is then scraped down to ensure it is no thicker<br />
than the largest aggregate size. Next, using a stainless steel trowel in a<br />
figure “8” motion, float the finish to disperse the aggregates evenly.<br />
NOTE: A plastic float may be used to float the finish but the appearance may<br />
vary from a stainless steel float.<br />
20
2. Rilled Pattern Texture: Any of these finishes is applied to the wall<br />
to approximately the thickness of the largest aggregate in the finish.<br />
The finish is then scraped down to ensure it is no thicker than the<br />
largest aggregate size. Next, using a plastic float, float the finish in<br />
either a figure “8”, horizontal or vertical direction to produce the rills<br />
in the finish. When floating you can either float it immediately (wet<br />
float) or allow the finish to set a short time and float it (dry float). By<br />
allowing the finish to set and dry float, the finish will produce more<br />
flat areas (rills).<br />
NOTE: After applying pebbled or rilled texture finishes, if the plastic or stainless<br />
steel float sticks to the finish, then too much finish is on the wall. Remove the<br />
excess finish by scraping with a stainless steel trowel down to the largest<br />
aggregate size. Then float the finish. This will save material and create a more<br />
uniform finish texture.<br />
3. Freestyle Stucco Pattern Texture using Stolit Freeform. This finish<br />
is applied to the wall in a uniform thickness and textured using a<br />
putty knife, sponge, trowel, brush or roller.<br />
4. Limestone Finish Texture is accomplished by first installing<br />
Stolit 1.0 or 1.5, then applying Stolit Freeform in a tight coat on top<br />
of the dry Stolit with both products tinted to the same color.<br />
5. Variegated Bead Texture using Sto Decocoat. This finish is<br />
applied to the wall to approximately 1-1/2 times the thickness of the<br />
bead in the finish. Next work the trowel in one direction to make the<br />
surface smooth. Press down firmly with the trowel held nearly flat. For<br />
spray application, spray in a circular motion with proper spray equipment<br />
to achieve a smooth, uniform coating. Adjust spray pressure and<br />
orifice to achieve desired texture.<br />
6. Natural Stone Finish using Sto GraniTex. This finish is applied<br />
to the wall by spray application in two coats. Apply the first coat moving<br />
the spray vertically and the second coat moving the spray horizontally<br />
to achieve full and uniform coverage to a thickness of not less<br />
than 1/8" (3.2 mm). After the finish is dry, a sealer, Sto Clear Coat<br />
Sealer, is then applied over the entire surface by roller.<br />
7. Natural Stone Finish using StoCreativ ® Granite. Applied in a<br />
thickness slightly greater than the largest aggregate in the finish.<br />
Use a flat trowel method to smooth the finish. If trowel ”chatter“<br />
marks appear remove them by smoothing along the chatter mark lines.<br />
21
NOTE: When selecting a finish color always select a color with a lightness value<br />
of 20 or greater. The lightness value for each Sto color is printed on the Sto<br />
Color Chart. The use of dark color finishes (lightness value less than 20) over<br />
<strong>EIFS</strong> should be avoided because dark colors absorb light energy from the sun<br />
and heat up. This can cause EPS board deformation and delamination of the<br />
<strong>EIFS</strong> base coat/mesh from the surface. The surface temperature limit of EPS<br />
board is approximately 160°F (71°C).<br />
Sealants<br />
Wherever the insulation system or the EPS boards meet another material,<br />
i.e., door/window frame, roof, pipes, meter boxes, exterior faucets,<br />
etc., a minimum 1/2" (13 mm) wide sealant joint must be provided.<br />
To properly install sealant, you need to provide a joint between two<br />
materials. Sealant works like a rubber band or a shock absorber bonded<br />
between two surfaces, stretching back and forth as the two surfaces<br />
move.<br />
There are two important factors to remember when applying sealant.<br />
22<br />
1. The sealant must bond to only two surfaces such as the coated<br />
EPS board edge and a window frame. It should never bond to<br />
a third surface such as the substrate. If you bond to the third<br />
surface, the “rubber band” will not be able to stretch back and<br />
forth and the sealant will crack.<br />
2. There must be enough sealant material (minimum 1/2") (13 mm)<br />
to stretch, yet not too much material (maximum 1") (25 mm).<br />
There is an easy way to solve both the above problems: use a closed<br />
cell “backer rod” material sized so that it can be pushed into the joint<br />
under compression. This will provide a backing to hold the size of the<br />
joint correctly and provide a third surface that the sealant will NOT<br />
bond to.<br />
NOTE: In some cases, the two surfaces to be sealed are not deep enough to<br />
allow a backer rod to be installed. In such cases “bond breaker” tapes are<br />
available that may be used in place of a backer rod.<br />
Sealing Between EPS and Dissimilar Materials<br />
As you apply the EPS board, whenever you meet a dissimilar material<br />
as mentioned above, you should leave a space between the EPS and<br />
dissimilar material.<br />
When sealing, the space between the EPS board and the dissimilar<br />
material should generally be a minimum of 1/2" (13 mm) but no<br />
larger than 1" (25 mm).
NOTE: All edges to receive sealant must also be encapsulated with base coat<br />
and mesh. Whenever possible avoid installing finish in the joint. The preferred<br />
surface to seal to is the base coat, not the finish coat.<br />
Expansion Joints<br />
Expansion joints are required in StoTherm <strong>EIFS</strong> at the following<br />
locations:<br />
1. Floor lines in multi-level wood frame construction.<br />
2. At dissimilar substrates, materials or construction.<br />
3. Where joints already exist in the substrate or<br />
supporting construction.<br />
4. At changes in building height,shape or structural system<br />
5. At other areas of anticipated movement.<br />
6. Between pre-fabricated panels.<br />
NOTE: Use appropriate sealant/primer and backer rod following sealant manufacturer’s<br />
recommendations to prevent water from getting into or behind the<br />
EIF system. Do not apply base coat/mesh or finish over the expansion joint.<br />
Whenever possible apply sealant to the <strong>EIFS</strong> base coat, not the finish coat.<br />
23
StoTherm ® NExT <strong>Installation</strong><br />
StoTherm NExT is the next generation of <strong>EIFS</strong>. It differs from traditional<br />
Class PB <strong>EIFS</strong> in that it adds a StoGuard ® waterproof air barrier<br />
component on the substrate.<br />
As a waterproof air barrier StoGuard is one component in the air barrier<br />
system and the moisture protection for the structure. <strong>Installation</strong> of<br />
the waterproof air barrier must be integrated with flashing and other<br />
air and moisture barrier components to ensure that where water is<br />
likely to penetrate the wall assembly, it will be drained to the exterior<br />
at the source of the leak. Proper air barrier connections and integration<br />
of the moisture barrier with flashing through sequencing of work and<br />
coordination of trades is necessary for a complete air barrier system<br />
and complete moisture protection (see Moisture Intrusion and Critical<br />
Details (page 28).<br />
To install StoGuard ® over Exterior or Exposure 1 Plywood,<br />
Gypsum Sheathing in compliance with ASTM C 79, Glass Mat<br />
Faced Gypsum Sheathing in compliance with ASTM C 1177<br />
and Fiber Reinforced Gypsum Sheathing Panels in compliance<br />
with ASTM C1278:<br />
1. Protect rough openings, joints and parapets: apply joint treatment<br />
by trowel over rough openings, sheathing joints, inside and outside<br />
corners, and tops of parapets.<br />
Immediately embed reinforcing<br />
mesh in the wet joint treatment<br />
and trowel smooth. Embed minimum<br />
4 inch (101 mm) wide mesh*<br />
at sheathing joints and minimum<br />
9 inch (229 mm) wide mesh at<br />
rough openings, inside and outside<br />
corners and tops of parapets (refer<br />
to Sto detail 10.23a for detailed<br />
information on proper protection<br />
of rough openings and sequencing<br />
of work at rough openings).<br />
24<br />
2. Spot fasteners with joint<br />
treatment.<br />
* Use StoGuard Mesh (self-adhesive), Sto Mesh, or Sto Detail Mesh for<br />
these applications.
3. Apply Sto Gold Coat ® by roller over sheathing surface, including<br />
the dry joint treatment, to a uniform wet mil thickness of 10 mils in<br />
one coat. Use 1/2 inch (13 mm) nap roller for plywood and gypsum<br />
sheathing. Use 3/4 inch (19 mm) nap roller for glass mat faced<br />
gypsum sheathing. Protect from weather until dry.<br />
4. Coordinate installation of connecting air barrier components with<br />
other trades to provide a continuous air tight membrane.<br />
5. Coordinate installation of flashing and other moisture protection<br />
components with other trades to achieve complete moisture protection<br />
such that water is directed to the exterior, not into the wall assembly,<br />
and drained to the exterior at sources of leaks (windows, doors and<br />
similar penetrations through the wall assembly).<br />
For <strong>Installation</strong> over Exposure 1 OSB (Oriented Strand Board)<br />
sheathing:<br />
1. Apply Sto Gold Coat with a 3/4 inch (19 mm) nap roller to sheathing<br />
surface to a uniform wet mil thickness of 10 mils. Protect from<br />
weather until dry. Then follow steps 1-5 above.<br />
Note: windows and doors are typically installed immediately following installation<br />
of the air/moisture barrier and work should be sequenced accordingly.<br />
Consult with window manufacturer for installation requirements to maintain<br />
air barrier continuity and for head, jamb, sill flashing and perimeter sealant<br />
requirements.<br />
<strong>Installation</strong> of Starter Track (use starter track with weep<br />
holes along the bottom):<br />
1. Strike a level line at the base of the wall to mark where the top of<br />
the starter track terminates.<br />
2. Attach the starter track even with the line into the structure a maximum<br />
of 16 inches (406 mm) on center with the proper fastener: Type<br />
S-12 corrosion resistant screws for steel framing with minimum 3/8<br />
inch (9 mm) penetration, and galvanized or zinc coated nails for wood<br />
framing with minimum 3/4 inch (19 mm) penetration. Attach between<br />
studs into sheathing as needed to secure the track flat against the wall<br />
surface. For solid sheathing attach directly into sheathing at 12 inches<br />
(305 mm) on center maximum.<br />
3. Butt sections of starter track together. Miter cut outside corners and<br />
abut. Snip front flange of one inside corner piece (to allow EPS Board<br />
to be seated inside of track) and abut.<br />
25
<strong>Installation</strong> of splice strips for Starter Track and Flashing<br />
1. Starter Track, Window/Door Head Flashing and Side Wall Step<br />
Flashing: install 2 inch (51 mm) wide diagonal splice strips of detail<br />
mesh at ends of head flashings. Install minimum 4 inch (100 mm)<br />
wide splice strips of detail mesh between back flange of starter track,<br />
head flashings and roof/side wall step flashing. Center the mesh so it<br />
spans evenly between the back flange of the Starter Track or flashing<br />
and the sheathing. Embed the mesh in the wet joint treatment and<br />
trowel smooth. Refer to Sto details 10.23a,10.23b, 10.23c, 10.62a,<br />
10.65a, and 10.70 for detailed illustrations of StoGuard installation.<br />
2. Apply waterproof coating over the splice strip when the joint<br />
treatment is dry.<br />
3. Allow waterproof coating to dry and install the StoTherm <strong>EIFS</strong> with<br />
vertical ribbons of adhesive.<br />
26
Failure<br />
Prevention<br />
27
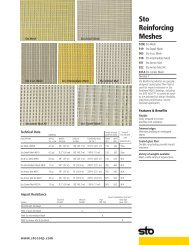
Failure Prevention<br />
Moisture Intrusion and Critical Details<br />
Most moisture intrusion problems do not<br />
occur because of material failures. They<br />
occur because of poorly designed or constructed<br />
details that allow water to enter<br />
walls rather than direct water to the exterior.<br />
To avoid costly water intrusion problems a<br />
few simple principles must be followed in<br />
the detailing of the construction. Many of<br />
these details rely on flashing to make a<br />
leakproof transition between abutting construction<br />
elements.<br />
28<br />
2. Kick-out flashing<br />
at lower roof<br />
terminations<br />
5. Expansion<br />
joint at floor<br />
lines & sealant<br />
9. Cap flashing<br />
over parapets<br />
6. Finish above<br />
grade<br />
3. Sealant around<br />
windows & doors<br />
10. Saddle flashing<br />
at lower/higher<br />
walls<br />
7. Head flashing<br />
above window<br />
11. Flashing<br />
at decks<br />
1. Sill flashing<br />
beneath window<br />
4. Sealant at<br />
penetrations<br />
8. Flashing over<br />
buildouts<br />
12. Protection<br />
of rough<br />
openings
The following list of NEVERS was prepared from field experience and<br />
testing over the past 30 years. Observing these “rules” helps ensure<br />
successful, quality installations that are durable.<br />
General:<br />
1. Never deviate from published specifications.<br />
2. Never apply StoTherm <strong>EIFS</strong> materials below 40°F (4°C).<br />
3. Never mix additives such as rapid binders, anti-freeze<br />
accelerators, etc. to any Sto Materials under any<br />
circumstances.<br />
4. Never use any material that has not been specified by Sto.<br />
5. Never use products that have frozen. Never apply products<br />
on frozen surfaces.<br />
6. Never apply adhesive (except Sto Flexyl or Sto BTS Silo<br />
Adhesive) directly on the substrate. Always apply adhesive<br />
to the back of the insulation boards.<br />
7. Never use unapproved accessories.<br />
8. Never apply StoTherm <strong>EIFS</strong> on horizontal weather exposed<br />
surfaces, or on surfaces subject to continuous or intermittent<br />
water immersion or hydrostatic pressure. Minimum required<br />
slope is 1:2 (27 degrees) and Sto Flexyl with Sto Mesh<br />
embedded is required (refer to Sto details1.04a & b). Protect<br />
large projecting <strong>EIFS</strong> features with flashing with drip edge.<br />
9. Never use StoTherm <strong>EIFS</strong> on low slope horizontal weather<br />
exposed surfaces, as a roof covering, in a pool, pond or other<br />
water-immersed condition, as an interior finish, or below<br />
grade (unless especially designed for use below grade).<br />
10. Never slope StoTherm <strong>EIFS</strong> trim or accents less than 27°.<br />
11. Never incorporate a vapor retarder on the inside of walls in<br />
warm humid climates.<br />
12. Never direct water from roofs, decks or leaking windows into<br />
or behind the StoTherm <strong>EIFS</strong>. Always direct water to the<br />
exterior beyond the face of the StoTherm <strong>EIFS</strong> through the<br />
proper use of flashing.<br />
29
Insulation:<br />
13. Never allow adhesives or base coats to fill joints between<br />
EPS boards. Always fill joints with insulation.<br />
30<br />
14. Never allow any open joints in the insulated wall system.<br />
Always fill voids with insulation.<br />
15. Never penetrate the insulation system with any foreign<br />
materials, i.e., screws, nails, etc.<br />
16. Never use EPS board larger than 2' x 4' (610 mm x<br />
1,219 mm) or less than 3/4" (19 mm) thick.<br />
17. Never use insulation board other than Sto specified board.<br />
18. Never store EPS board on edge or in sunlight.<br />
19. Never apply any products over loose EPS boards.<br />
20. Never leave any areas of the insulation system open to<br />
penetration of water or moisture. Always protect edges of<br />
system with base coat/mesh, then use appropriate sealant.<br />
21. Never rasp just the EPS board joints. Always rasp the entire<br />
wall surface.<br />
22. Never allow EPS board joints to be in line with sheathing<br />
joints. Always bridge joints by a minimum of 6" (152 mm).<br />
23. Never have less than 3/4" (19 mm) of EPS on the wall,<br />
especially when cutting aesthetic grooves.<br />
Base Coat/Mesh:<br />
24. Never leave any areas of EPS boards unprotected without<br />
mesh.<br />
25. Never butt Sto Mesh. Always overlap it a minimum of<br />
2-1/2" (64 mm).<br />
26. Never overlap Sto Armor Mat. Butt the edges together.<br />
27. Never allow mesh to protrude through base coat or finish.<br />
Always apply sufficient base coat to hide the mesh color.<br />
28. Never apply any materials over a damp or frozen surface.
29. Never use only a single wrap of Sto Mesh on inside and<br />
outside corners. Always double wrap these areas.<br />
Finish Coat:<br />
30. Never apply Sto Finishes thinner or thicker than<br />
recommended.<br />
31. Never apply Sto Finishes in direct sunlight.<br />
32. Never use steel trowels. Always use stainless steel.<br />
33. Never put finish over caulks or sealants.<br />
34. Never put finish on horizontal weather exposed surfaces,<br />
below grade, or on surfaces subject to continuous or<br />
intermittent water immersion or hydrostatic pressure.<br />
35. Never use dark colors (LV less than 20) as the<br />
<strong>EIFS</strong> finish color.<br />
31
StoTherm ®<br />
<strong>EIFS</strong><br />
33
34<br />
StoTherm ® NExT Systems<br />
<strong>EIFS</strong> with Drainage<br />
StoTherm Essence NExT ®<br />
1. StoGuard<br />
2. Sto Primer/Adhesive-B Adhesive<br />
3. Sto EPS Insulation<br />
4. Sto Mesh<br />
5. Sto Primer/Adhesive-B Base Coat<br />
6. Sto Essence DPR Finish<br />
10 year Warranty<br />
The adhesive applied in vertical ribbons provides a cavity/drainage plane<br />
between the StoGuard protected sheathing and the insulation board.<br />
1. StoGuard<br />
2. Sto BTS ® Adhesive<br />
3. Sto EPS Insulation<br />
4. Sto Mesh<br />
5. Sto BTS ® Base Coat<br />
6. Stolit ® StoTherm Classic NExT<br />
Finish<br />
12 year Warranty<br />
The adhesive applied in vertical ribbons provides a cavity/drainage plane<br />
between the StoGuard protected sheathing and the insulation board.<br />
®<br />
StoTherm Lotusan NExT<br />
1. StoGuard<br />
2. Sto BTS ® Adhesive<br />
3. Sto EPS Insulation<br />
4. Sto Mesh<br />
5. Sto BTS ® Base Coat<br />
6. Stolit ® Lotusan ® Finish<br />
15 year Warranty<br />
The adhesive applied in vertical ribbons provides a cavity/drainage plane<br />
between the StoGuard protected sheathing and the insulation board.<br />
StoTherm NExT is the next generation of <strong>EIFS</strong>. It differs from traditional Class PB <strong>EIFS</strong> in<br />
that it adds a waterproof air barrier component on the substrate—StoGuard, which can be<br />
added to the StoTherm Essence, Classic and Lotusan EIF Systems. StoGuard consists of two<br />
components—joint treatment, Sto Gold Fill, and waterproof coating—Sto Gold Coat.<br />
When combined with starter track and vertical ribbons of adhesive, the system is designed<br />
to drain incidental moisture, and is classified as an <strong>EIFS</strong> with drainage.<br />
The waterproofing protection provided by StoGuard protects wall sheathing against moisture<br />
damage during the construction process and in the event of a breach in the <strong>EIFS</strong> wall<br />
cladding while in service. It is not intended to correct faulty workmanship such as the<br />
absence or improper integration of flashing with the <strong>EIFS</strong>, nor is it intended to correct other<br />
defective components of construction such as windows that leak into the wall assembly.<br />
Flashing should always be integrated with the cladding to direct water to the exterior, not<br />
into the wall assembly, particularly at potential leak sources such as windows (see Moisture<br />
Intrusion and Critical Details).<br />
As a component of an air barrier system StoGuard minimizes the risk of condensation within<br />
the building envelope by eliminating mass transfer of warm moisture laden interior air to<br />
the exterior. Typically an air barrier system is advantageous in cold climates to prevent the<br />
passage of moisture through the wall assembly where it can condense. A complete air barrier<br />
system consists of individual air barrier components and the connections between
them. The air barrier components must be continuous to become an effective air barrier system.<br />
The design/construction professional must take material compatibility and construction<br />
sequencing into account when designing an “air tight” assembly to ensure continuity and<br />
long term durability. The effects of air tightness on mechanical ventilation should also be<br />
included in the overall project evaluation.<br />
An air barrier should not be confused with a vapor retarder which may also be used in<br />
the wall assembly to retard water vapor diffusion and reduce the risk of condensation.<br />
Generally a vapor retarder is placed on the warm side of the wall. Specifically, it is placed<br />
on the interior side in cold climates. A vapor retarder may not be necessary depending on<br />
the wall components and the range of temperature/humidity conditions inside and outside.<br />
A vapor retarder should not be used on the inside of walls in warm humid climates.<br />
Traditional or Class PB <strong>EIFS</strong><br />
StoTherm ® Essence<br />
1. Sto Primer/Adhesive-B Adhesive<br />
2. Sto EPS Insulation Board<br />
3. Sto Mesh<br />
4. Sto Primer/Adhesive-B Base Coat<br />
5. Sto Essence DPR Finish<br />
5 year Warranty<br />
StoTherm ® Classic<br />
1. Sto BTS ® Adhesive<br />
2. Sto EPS Insulation Board<br />
3. Sto Mesh<br />
4. Sto BTS ® Base Coat<br />
5. Stolit ® Finish<br />
7 year Warranty<br />
StoTherm ® Lotusan ®<br />
1. Sto BTS ® Adhesive<br />
2. Sto EPS Insulation Board<br />
3. Sto Mesh<br />
4. Sto BTS ® Base Coat<br />
5. StoLit ® Lotusan ® Finish<br />
10 year Warranty<br />
The StoTherm Essence, Classic and Lotusan <strong>EIFS</strong> are five component exterior insulation and<br />
finish systems (<strong>EIFS</strong>) consisting of adhesive, insulation board, base coat, reinforcing mesh<br />
and finish coat. These components, when properly integrated with other components of<br />
construction, form a barrier wall which is intended to resist water penetration at its outer<br />
surface. A barrier wall is not designed to drain or eliminate moisture behind it. The accumulation<br />
of moisture behind the StoTherm Essence, Classic or Lotusan <strong>EIFS</strong> could result in<br />
building damage. As with any wall cladding, proper detailing and integration with other<br />
components of construction by a qualified design or construction professional, including the<br />
proper use of flashing, to prevent the accumulation of moisture within the wall assembly<br />
are essential. Sto Corp. assumes no liability for workmanship, design or engineering.<br />
35
StoTherm ® <strong>EIFS</strong> Products<br />
Sto BTS ® Xtra<br />
A one-component, polymer-modified lightweight , cement-based adhesive<br />
and high-build base coat for use in StoTherm <strong>EIFS</strong>. It is self-gauging to<br />
help achieve correct base coat thickness in a single coat application and is<br />
lightweight, with over 17% recycled content, and buildable to 1/4” (6 mm).<br />
Sto BTS ® Plus<br />
A one-component, polymer-modified, cement-based material used as<br />
an adhesive and base coat in the StoTherm Classic and StoTherm<br />
Lotusan <strong>EIFS</strong>. It is self-gauging to help achieve correct base coat thickness<br />
in a single coat application. It is factory blended to ensure proper<br />
mix ratio.<br />
Sto BTS ® Silo<br />
A one-component, polymer-modified, cement-based adhesive and base<br />
coat engineered for use in StoTherm <strong>EIFS</strong> with the StoSilo system equipment<br />
which mixes, pumps and sprays Sto BTS-Silo. It is self-gauging to<br />
help achieve correct base coat thickness in a single coat application.<br />
Sto Dispersion Adhesive<br />
A ready-mixed, acrylic-based adhesive used to attach Sto EPS Insulation<br />
Board to prepared sheathing in StoTherm <strong>EIFS</strong>.<br />
Sto Primer/Adhesive-B<br />
A one-component, polymer-modified, cementitious adhesive and base<br />
coat material that is factory blended to ensure proper mix ratio. It is used<br />
to attach Sto EPS Insulation Board to prepared sheathing, concrete or<br />
masonry substrates and as a base coat in StoTherm Essence.<br />
Sto Primer/Adhesive<br />
An acrylic-based adhesive and base coat material that is mixed at the<br />
jobsite with Portland cement in equal parts by volume and used to<br />
attach Sto EPS Insulation Board to prepared sheathing, concrete or<br />
masonry substrates and as a base coat in StoTherm Essence.<br />
Sto RFP<br />
A ready-mixed, acrylic-based material used as a base coat in Sto <strong>EIFS</strong>.<br />
It may be used as an alternative base coat to Sto BTS Plus in StoTherm<br />
Classic and Lotusan. Eliminates risk of efflorescence.<br />
Sto Flexyl<br />
An acrylic-based, fiber-reinforced, flexible waterproofer combined with<br />
equal parts of Portland cement by weight. Sto Flexyl functions as an air<br />
and moisture barrier on concrete, masonry or gypsum based sheathing<br />
surfaces. It also functions as a waterproof base coat in StoTherm <strong>EIFS</strong><br />
for use on properly sloped trim or accents and splash areas near grade.<br />
(Sto Watertight Coat is a suitable substitue for Sto Flexyl)<br />
36
Sto Primer<br />
A ready-mixed, tinted acrylic primer for use as an undercoat with<br />
all Sto finishes to enhance color consistency, finish coverage, and<br />
finish coat adhesion, and to reduce the chance of efflorescence.<br />
Recommended beneath Stolit R, Sto Swirl, Stolit .75, Stolit 1.0,<br />
and Sto Fine Sand Finishes. Required beneath Sto Decocoat, Sto<br />
GraniTex, and StoCreativ Granite. In most cases, Sto Primer is an<br />
optional component for use with StoTherm <strong>EIFS</strong>. The benefits of using<br />
Sto Primer far outweigh the small additional cost. Benefits of using Sto<br />
Primer include:<br />
• Promotes uniform substrate absorption<br />
• Improves finish coat adhesion<br />
• Improves finish coat coverage<br />
• Improves water resistance<br />
• Reduces the chance of efflorescence<br />
• Tinted to the same color as the finish to improve color uniformity<br />
Finishes<br />
Stolit ® : A ready-mixed, acrylic-based integrally-colored textured wall<br />
coating used as a finish in StoTherm Classic. Available in a wide variety of<br />
textures and in popular and custom colors, Stolit provides a versatile decorative<br />
and protective outer layer. Enhanced by the addition of Optilink<br />
advanced polymer technology, Stolit exceeds the performance of competitor’s<br />
top-line finish products for higher levels of weather, fade, mildew and<br />
dirt pick-up resistance!<br />
Sto Essence DPR Finish: A ready-mixed, acrylic-based, integrallycolored<br />
textured wall coating used as a finish in StoTherm Essence.<br />
This attractive finish provides a versatile decorative and protective outer<br />
layer and meets industry performance standards. Sto Essence Finish comes<br />
in popular and custom colors, and in three textures: Swirl, Medium Sand<br />
and Fine Sand.<br />
Stolit ® Lotusan ® : A ready-mixed, acrylic-based, Lotus-Effect, integrally-colored,<br />
textured wall coating used as finish coat in StoTherm<br />
Lotusan. Replicating the lotus plants ability to send rain drops falling<br />
gently off its leaves, Stolit Lotusan resists dirt pickup while keeping<br />
walls clean and attractive. Simply put, Stolit Lotusan walls are cleansed<br />
by rainfall.<br />
Sto Limestone provides the look of smooth cut natural limestone<br />
in an acrylic finish. It is a two-step application of two separate Stolit<br />
finishes, either Stolit 1.0 or 1.5 as the first application, then a tight<br />
coat of Stolit Freeform to achieve the smooth look.<br />
37
Sto Decocoat, Sto GraniTex, and StoCreativ ® Granite are<br />
natural-aggregate finishes in a clear acrylic matrix that provide classic<br />
looks of natural stone in a lightweight finish.<br />
StoCreativ ® Brick is a lightweight wall finish that can be used with<br />
StoTherm ® to achieve the look of brick without the added expense<br />
and design limitations.<br />
Optilink ® : Stolit ® finishes are improved even further with the addition<br />
of Sto Optilink ® , a remarkable polymer technology development<br />
by Sto that improves the curing and film formation process that occurs<br />
as these premium finishes dry. It works by forming intermolecular associations<br />
among key finish ingredients such as polymer, fillers, biocide,<br />
aggregates and pigments. Optilink acts as a sort of “coordinator” to<br />
help arrange, or link these primary components into a very ordered<br />
structure.<br />
The addition of Optilink allows these Sto finishes to go beyond the performance<br />
levels of standard acrylic finishes. Film integrity and key performance<br />
properties like dirt pickup resistance, mildew and algae<br />
resistance, and color, stability are optimized.<br />
38<br />
Sto, optimizing and linking > > Optilink ®<br />
With Optilink, the ingredients that are critical to the performance of<br />
the finish are distributed more evenly throughout the finish, to allow<br />
them to perform their individual functions is better harmony and with<br />
better results.<br />
StoSilco ® Products<br />
StoSilco products ensure a better-looking, better-protected building<br />
with less need for cleaning and recoating. And with costs comparable<br />
to those of high-quality non-silicone acrylics, StoSilco products promise<br />
unprecedented long-term value.<br />
• Superior weather resistance, water-repellent<br />
• Superior vapor permeability, breathability<br />
• Superior resistance to dirt pick-up, mildew and algae<br />
• Superior UV resistance<br />
• Superior durability; less deterioration
Average Coverages for StoTherm ® <strong>EIFS</strong> Products<br />
CONDITIONERS PACKAGE SMOOTH SURFACE TEXTURED SURFACE<br />
Sto Primer 5 gal. pail 1050-1100 ft2 750-850 ft2 depending upon<br />
application technique<br />
Sto Plex W 5 gal. pail 1150-1200 ft2 850-950 ft2 depending upon<br />
application technique<br />
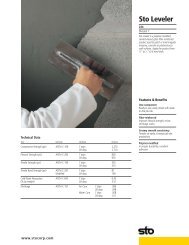
Sto Leveler 60 lb. bag N/A 50-60 ft2 @ 1/8"<br />
ADHESIVES PACKAGE SHEATHING OR IRREGULAR BLOCK,<br />
SMOOTH CONCRETE CONCRETE, BRICK<br />
Sto BTS ® 38-47 lb. bag 120-135 ft2 95-105 ft2 (1/2" Trowel) (5/8" Trowel)<br />
Sto Primer/Adhesive-B 50 lb. bag 115-125 ft2 90-100 ft2 (1/2" Trowel) (5/8" Trowel)<br />
Sto Dispersion Adhesive 5 gal. pail 350-385 ft2 (3/16" Trowel)<br />
Not Recommended<br />
Sto Primer/Adhesive 5 gal. pail 240-250 ft2 220-230 ft2 (1/2" Trowel) (5/8" Trowel)<br />
Sto BTS ® Silo 60 lb. bag 150-170 ft2 120-130 ft2 (1/2" Trowel) (5/8" Trowel)<br />
Sto Flexyl 5 gal. pail 100-110 ft2 80-90 ft2 (Flat Trowel) (Flat Trowel)<br />
MESHES OVERLAP 2.5" WEIGHT ROLL SIZE<br />
Sto Mesh Yes 4.5 oz./yd2 150' x 38"/475 ft2 Sto Detail Mesh Yes 4.2 oz./yd2 150' x 9-1/2"119 ft2 Sto Armor Mat No 15 oz./yd2 75' x 38"/238 ft2 Sto Intermediate Mesh Yes 11 oz./yd2 75' x 38"/238 ft2 Sto Armor Mat XX No 20 oz./yd2 75' x 38"/238 ft2 BASE COATS PACKAGE EPS SURFACE WITH SHEATHING OR<br />
STANDARD MESH MASONRY<br />
Sto RFP 5 gal. pail 120-130 ft2 110-120 ft2 Sto Primer/Adhesive-B 50 lb. bag 105-115 ft2 100-110 ft2 Sto Primer/Adhesive 5 gal. pail 200-210 ft2 180-190 ft2 Sto Flexyl 5 gal. pail 170-180 ft2 150-160 ft2 BASE COATS PACKAGE EPS SURFACE WITH SHEATHING<br />
REC. ASTM 1/16" STANDARD MESH OR MASONRY<br />
Sto BTS ® 38-47 lb. bag 110-125 ft2 95-110 ft2 Sto RFP 5 gal. pail 85-100 ft2 85-100 ft2 Sto Primer/Adhesive-B 50 lb. bag 95-110 ft2 80-95 ft2 Sto Primer/Adhesive 5 gal. pail 165-175 ft2 145-155 ft2 Sto BTS ® Silo 60 lb. bag 140-160 ft2 120-140 ft2 39
ADH/BASE COAT PACKAGE SHEATHING OR MASONRY<br />
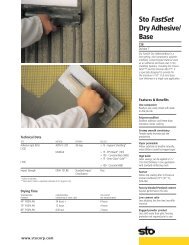
Sto BTS ® 38-47 lb. bag 55-70 ft 2<br />
Sto BTS ® FastSet 60 lb. bag 65-85 ft 2<br />
Sto Primer/Adhesive-B 50 lb. bag 55-70 ft 2<br />
Sto Primer/Adhesive 5 gal. pail 95-115 ft 2<br />
Sto BTS ® Silo 60 lb. bag 65-85 ft 2<br />
1/2 TIME PRODUCTS PACKAGE VARIOUS COVERAGE INFORMATION<br />
Sto BTS ® FastSet 60 lb. bag 65-85 ft 2 as combined adhesive/base coat<br />
FINISHES PACKAGE RFP OR PRIMED UNPRIMED<br />
SURFACE SMOOTH SURFACE<br />
Stolit ® 1.0 5 gal. pail 155-165 ft2 140-155 ft2 Stolit ® 1.5 5 gal. pail 135-145 ft2 120-130 ft2 Stolit R1.5 5 gal. pail 145-155 ft2 135-145 ft2 Stolit Freeform 5 gal. pail 130 ft2 @ 1/16" Approx. 10% less<br />
65 ft2@ 1/8" Approx. 10% less<br />
40 ft2 @ 3/16" Approx. 10% less<br />
Sto Swirl Finish 5 gal. pail 130-140 ft2 120-130 ft2 Sto Medium Sand Finish 5 gal. pail 120-130 ft2 110-120 ft2 Sto Fine Sand Finish 5 gal. pail 150-160 ft2 140-150 ft2 Stolit ® Lotusan ® 1.0 5 gal. pail 155-165 ft2 145-155 ft2 Stolit ® Lotusan ® 1.5 5 gal. pail 135-145 ft2 120-130 ft2 FINISHES PACKAGE RFP OR PRIMED UNPRIMED<br />
SURFACE SMOOTH SURFACE<br />
Sto Decocoat 5 gal. pail 125 ft2 sprayed<br />
135 ft<br />
Not Recommended<br />
2 troweled<br />
Sto GraniTex 5 gal. pail 60-80 ft2 Not Recommended<br />
StoCreativ Granite 5 gal. pail 75-85 ft2 Not Recommended<br />
Stolit 2.0 5 gal. pail 90-100 ft2 75-85 ft2 Stolit 3.0 5 gal. pail 60-70 ft2 55-65 ft2 Stolit R2.0 5 gal. pail 90-100 ft2 85-95 ft2 Stolit R3.0 5 gal. pail 60-70 ft2 55-65 ft2 Stolit .75 5 gal. pail 180-190 ft2 170-180 ft2 NOTE: Sto Limestone finish is achieved in a two step application - first a finish coat of Stolit 1.0, then a<br />
finish coat of Stolit Freeform, installed “tight” over the dried Stolit 1.0<br />
COATINGS PACKAGE RECOATING MASONRY<br />
StoSilco Lastic 5 gal. pail 250-300 ft2-2 coats 250-300 ft2-2 coats<br />
Stolastic Smooth 5 gal. pail 250-300 ft2-2 coats 250-300 ft2-2 coats<br />
StoCoat Acryl 5 gal. pail 500-550 ft2-2 coats 400-450 ft2 Sto Concrete Coating<br />
-2 coats<br />
Smooth 5 gal. pail 300-350 ft2-2 coats 250-300 ft2-2 coats<br />
StoCoat Lotusan 5 gal. pail 500-600 ft2-2 coats 400-500 ft2-2 coats<br />
40
STOGUARD PACKAGE COVERAGE<br />
Sto Gold Fill 5 gal. pail 175-250 linear feet (53-76 m)<br />
Sto Gold Coat 5 gal. pail Dens-Glass ® Gold: 425-525 ft2 (39-49m2 )<br />
Exterior Gypsum: 550-650 ft2 (51-60 m2 )<br />
Plywood: 550-650 ft2 (51-60 m2 )<br />
OSB: (2 coats): 300-400 ft2 (28-37 m2 )<br />
StoGuard Mesh 4.25" 150' Roll 150 linear feet<br />
StoGuard Mesh 9.5" 150' Roll 150 linear feet; 118 ft2 *Dens-Glass Gold is a registered trademark of G-P Gypsum Corp.<br />
Note: Coverage rates are based upon actual field experience and are believed to<br />
be reliable. Please be advised that coverage rates can vary based upon the type<br />
of application methods employed and level of craftsmanship. Sto Corp. hereby<br />
disclaims any and all liability for rates of coverage which may differ from those<br />
published herein.<br />
<strong>EIFS</strong> Industry Adhesives Coverage<br />
PRODUCT LBS/PAIL TROWEL TROWEL SPACE SF/PAIL<br />
NOTCH NOTCH BETWEEN<br />
WIDTH HEIGHT NOTCHES<br />
Sto Dispersion Adhesive 64 3/16" 3/8" 1-3/4" 350<br />
Dryvit ADEPS 60 3/8" 1/2' 1-1/2" 160<br />
Senergy Senerquick 50 3/16" 3/16" 3/16" 275<br />
Parex 3.03 55 5/16" 5/16" 3/4" 270<br />
Metric Conversions<br />
ft. to m, multiply by 0.3048<br />
in. to mm, multiply by 25.4<br />
gal. to liters (L), multiply by 3.78541<br />
lbs. to kg, multiply by 0.453592<br />
ft2 to m2, multiply by 0.09290304<br />
Where to find help:<br />
• Visit Sto’s Web site: www.stocorp.com<br />
• Technical Service Hotline:1-800-221-2397<br />
• Your local Sto Distributor<br />
• Your Sto Sales Representative<br />
41
StoMachine<br />
Technology<br />
43
StoSilo<br />
The StoSilo System was introduced in Europe in the mid 1990’s. In that<br />
short time, it has revolutionized the application of <strong>EIFS</strong> adhesives and<br />
base coats. Now the StoMachine Technology Program is bringing this<br />
unique technology to North America, giving customers a competitive<br />
edge by shortening the length of time on jobs and reducing labor costs.<br />
The StoSilo Combo<br />
The StoSilo Combo consists of a dry material hopper, an integral continuous mixer,<br />
and variable speed pump. The remote control pump allows the person at the spray<br />
nozzle to be in full control of the machine up to 210 feet (64 m) away. No one is<br />
needed to attend the machine or hand mix pails of material.<br />
The StoSilo Combo comes in two sizes: 1.0 m3 and 3.0 m3 . The 1.0 m3 StoSilo holds<br />
approximately, 40 x 60-lb (27 kg) bags of Sto BTS Silo, while the 3.0 m3 StoSilo holds<br />
approximately, 120 x 60-lb (27 kg) bags of material. Sto BTS Silo is a specially engineered<br />
material developed for use with the StoSilo System.<br />
Features Benefits<br />
One self-contained system Easy to handle; saves time and space in loading<br />
Large dry storage capacity Reduces need to handle or move bags<br />
Weathertight, secure storage Reduces material loss due to weather<br />
container conditions or theft<br />
Totally automated system Reduces labor costs; enhances quality control<br />
Spray application of adhesive<br />
and base coat<br />
Increases productivity<br />
Adhesive/base coat formulated and<br />
tested for StoMachine Technology<br />
Optimum material consistency for spraying<br />
Variable speed settings Provides flexibility for specific job conditions<br />
Continuously controlled<br />
water addition<br />
Consistent mix every time<br />
Single source supply for Streamlines set-up and production; no need to<br />
equipment deal with multiple organizations<br />
Quick change components Reduces down-time for part changes<br />
44
Three StoSilo Packages Available<br />
The StoMachine Technology Program offers short-term and long-term leases on three<br />
different StoSilo packages to fit your specific job site needs. If problems do occur, call<br />
the StoMachine Technology Helpline: (888)-522-0184 available 8 a.m. - 5 p.m. (EDT) for<br />
operational assistance by a StoMachine Technology technician. If there is no answer,<br />
leave a message and calls will be returned within one hour during hours of operation or<br />
normal business hours.<br />
StoSilo System<br />
Includes the StoSilo Combo, air<br />
compressor and water pump.<br />
StoSilo Power<br />
Includes the StoSilo System components<br />
with a portable generator.<br />
StoSilo Mobile<br />
Includes the StoSilo Combo, air compressor, water pump and generator mounted<br />
on a truck with one ton (907) kg) of towing capacity” TO “3/4 ton or larger truck<br />
with a Class III towing package equipped with electric brakes; a 2-15/16" ball is required.<br />
The StoSilo Finish Hopper is a galvanized aluminum<br />
hopper that may be used with the StoSilo pump to<br />
spray various Sto “bucket” products (see productequipment<br />
matrix for specific products). The StoSilo<br />
Finish Hopper is attached to the StoSilo pump<br />
drawer and allows spraying of some products up<br />
to 210 feet.<br />
45
StoSilo Comparative Job Data<br />
46<br />
Project Type:<br />
Project Description:<br />
Project Location:<br />
Project Size (SF):<br />
Conventional/StoSilo<br />
Crew Size:<br />
Adhesive<br />
Square feet (ft 2 ) per man per day<br />
Production per day<br />
(crew size * ft 2 /man/day)<br />
Number of production days<br />
(project size / daily prod)<br />
Base Coat<br />
Square feet (ft 2 ) per man per day<br />
Production per day (ft 2 )<br />
(crew size * ft 2 /man/day)<br />
Number of production days<br />
(project size/daily production)<br />
Adhesive + Basecoat Totals<br />
Adhesive Production Days<br />
Base Coat Production Days<br />
Total BC + ADH Production Days<br />
Total BC + ADH Man Hours<br />
(crew size * prod days * 8 hrs)<br />
Average Man Cost Per Hour<br />
(wages, benefits, comp, etc)<br />
Total Labor Costs<br />
(Total Man Hours *<br />
Man Cost Per Hour)<br />
LABOR SAVINGS<br />
Project #1<br />
Church Building<br />
L-shaped two<br />
story church<br />
building with<br />
partial one-story<br />
elevation.<br />
Medallions<br />
around windows<br />
and doors.<br />
Shawnee, Kansas<br />
Conv.<br />
Appl.<br />
20,000 (SF)<br />
StoSilo<br />
System<br />
Tech<br />
Project #2<br />
Hotel<br />
28' tall L-shaped<br />
hotel with windows<br />
and seven<br />
150 ft 2 gables<br />
Chicago, Illinois<br />
27,500 (SF)<br />
Conv.<br />
Appl.<br />
6 5 4 4<br />
450 1,000 400 1,000<br />
2,700 5,000 1,600 4,000<br />
7 4 17 7<br />
450 1,000 400 1,000<br />
2,700 5,000 1,600 4,000<br />
7 4 17 7<br />
7 4 17 7<br />
7 4 17 7<br />
14 8 34 14<br />
672 320 1,088 448<br />
$35 $35 $48 $48<br />
$23,520 $11,200 $52,224 $21,504<br />
$12,320 $33,720<br />
StoSilo<br />
System<br />
Tech<br />
Compare YOUR<br />
numbers<br />
Conv.<br />
Appl.<br />
StoSilo<br />
System<br />
Tech
Portable Equipment<br />
Sto M-8 Spray Pump<br />
The Sto M-8 Spray Pump reduces the<br />
amount of labor required to hand-apply<br />
basecoats, adhesives, primers, coatings<br />
and finishes. Additionally, the Sto M-8<br />
contains a technologically advanced and<br />
patented peristaltic pump. The advantage:<br />
rhythmic, wavelike motion of the pressure<br />
disc allows for the pumping of low- and<br />
high-viscosity materials. Its lightweight and portable frame can be moved quickly and<br />
used on interior and exterior applications.<br />
Features Benefits<br />
• Versatile, spray application of<br />
• Reduces labor; one pump for<br />
most Sto products many products<br />
• Portable and lightweight • Use interior and exterior<br />
• Optional mobile cart • Additional ease of movement around<br />
job sites<br />
• Operates on 110V power<br />
• Variable pressure setting<br />
• Reversible pump<br />
• Reduces pressure in hose safely<br />
when needed<br />
• Low maintenance<br />
• Little to no downtime<br />
• Remote control On/Off at nozzle • Eliminates need to tend the pump<br />
• Various hose lengths<br />
• Configure hose as needed;<br />
eliminates staging on scaffolding<br />
• Interchangeable accessory parts • StoSilo users stock one set of parts<br />
with the StoSilo for both<br />
• Multiple accessory kits available;<br />
various tips and hose sizes<br />
• Versatile for different job and<br />
product applications<br />
• Power Roller optional attachment • Roll smooth coatings with continuous<br />
material flow<br />
• Easy clean-up<br />
• Reduces time and labor<br />
47
Mixing and Spraying Equipment<br />
StoMachine Technology Product Reference<br />
Equipment for Mixing and Spraying Sto Products<br />
The following chart provides general guidance for selection of spraying equipment to be<br />
used with Sto products. Because all spray application projects are different, we cannot<br />
recommend a specific orifice size or pressure setting for each material. Test areas are<br />
always recommended to be sure of desired results.<br />
48<br />
Product Airless Hopper Bottom-Feed Pressure Sto M-8 S-25 Mixer StoSilo Combo<br />
Sprayer Sprayer Pistol Pot Spray Pump<br />
CONDITIONERS<br />
Sto Plex W Yes NR Yes Yes Yes, w/Power NR NR<br />
Roller<br />
Sto Leveler NR Yes NR NR NR Yes Recommended<br />
Sto Primer Sand Requires Filter Yes Yes NR Recommended NR Yes w/Hopper Attachment<br />
Removal<br />
Sto Primer Smooth Yes Yes Yes Yes Recommended NR Yes w/Hopper Attachment<br />
ADHESIVES<br />
Sto BTS ® Silo NR Yes NR NR Yes Recommended Recommended<br />
Sto BTS ® NR Yes NR NR Yes Recommended NR<br />
Sto Primer/Adhesive-B NR Yes NR NR Yes Recommended NR<br />
Sto Primer Adhesive NR Yes NR NR Yes NR NR<br />
Sto Flexyl NR Yes Yes Yes Recommended NR Yes<br />
BASE COATS<br />
Sto BTS ® Silo NR Yes NR NR Yes Recommended Recommended<br />
Sto BTS ® NR Yes NR NR Yes Recommended NR<br />
Sto Primer/Adhesive-B NR Yes NR NR Yes Recommended NR<br />
Sto Primer Adhesive NR Yes NR NR Yes NR NR<br />
Sto RFP NR Yes NR NR Recommended NR Yes w/ Hopper Attachment<br />
Sto Flexyl NR Yes Yes Yes Recommended NR Yes<br />
FINISHES<br />
Sto Finishes (all; see NR Yes Limited by NR Recommended NR Yes w/Hopper Attachment<br />
also coatings) Aggregate Size
StoMachine Technology Product Reference<br />
Equipment for Mixing and Spraying Sto Products<br />
Mixing and Spraying Equipment<br />
Product Airless Hopper Bottom-Feed Pressure Sto M-8 S-25 Mixer StoSilo Combo<br />
Sprayer Sprayer Pistol Pot Spray Pump<br />
COATINGS<br />
Sto DécorTex NR Yes Yes NR Recommended NR Yes w/Hopper Attachment<br />
StoCoat Acryl Yes Yes Yes Yes Recommended NR Yes w/Hopper Attachment<br />
StoSilco ® Shield Yes Yes Yes Yes Recommended NR Yes w/Hopper Attachment<br />
Stolastic Yes Yes Yes Yes Recommended NR Yes w/Hopper Attachment<br />
StoSilco ® Lastic Yes Yes Yes Yes Recommended NR Yes w/Hopper Attachment<br />
Sto Decocoat NR Yes NR NR Recommended NR NR<br />
Sto GraniTex NR Recommended NR NR NR NR NR<br />
StoCoat Yes Yes Yes Yes Recommended NR Yes w/Hopper Attachment<br />
Acryl Plus<br />
StoCoat NR Yes Limited by NR Recommended NR Yes w/Hopper Attachment<br />
Color Sand Aggregate Size<br />
WATERPROOFING/<br />
AIR BARRIERS<br />
Sto Gold Coat ® NR Yes Yes NR Recommended NR Yes w/Hopper Attachment<br />
Sto Gold Fill ® NR NR NR NR Recommended NR Yes w/Hopper Attachment<br />
49
StoMachine Technology Product Reference<br />
Equipment for Mixing and Spraying Sto Products<br />
Mixing and Spraying Equipment<br />
50<br />
Product Airless Hopper Bottom-Feed Pressure Pot Sto M-8 S-25 Mixer StoSilo Combo<br />
Sprayer Sprayer Pistol Spray Pump<br />
CONCRETE FAÇADE &<br />
EXTERIOR REPAIR<br />
Sto Bonding and NR Recommended NR NR NR NR NR<br />
Anti-corrosion agent<br />
Sto Clear Coat Sealer Yes NR Yes Yes Yes, w/Power NR NR<br />
Roller<br />
Sto Penetrating Sealer Yes NR Yes Yes Yes, w/Power NR NR<br />
Roller<br />
Sto Full Depth NR NR NR NR NR Recommended NR<br />
Repair Mortar CI<br />
Sto Flowable Mortar NR Yes NR NR NR Recommended NR<br />
Sto High-Strength NR NR NR NR NR NR NR<br />
Shotcrete<br />
StoPatch Repair Mortar NR NR NR NR NR NR NR<br />
Sto Thin-Coat Mortar NR NR NR NR NR NR NR<br />
Sto Trowel Grade Mortar NR NR NR NR NR NR NR<br />
Sto Skim Coat NR Yes NR NR NR Yes Recommended<br />
Sto Texture Coat NR Yes NR NR Recommended NR Yes w/Hopper<br />
Attachment<br />
Sto Watertight Coat* NR Yes Yes Yes Recommended NR Yes<br />
Notes:<br />
1) If the Sto product that interests you does not appear above, it is not currently recommended<br />
for mixing or spraying applications.<br />
2) “Yes” – mixing and/or spraying the subject product with this type of equipment is possible.<br />
“Recommended” - this equipment is the best choice for mixing and/or spraying the product.<br />
“NR” – this equipment is not recommended for mixing and/or spraying this product.<br />
3) We cannot recommend specific orifice sizes and pressure settings because they will vary with<br />
the equipment being used and the desired finished appearance. We suggest preparing a test<br />
area for review using the equipment, materials and methods proposed for the job.<br />
4) Specific questions about use of the Sto M-8 Spray Pump, the Sto S-25 Continuous Mixer and<br />
the StoSilo Combo should be directed to the StoMachine Technology group at (888) 522-0184.<br />
*Call the StoMachine Technology Hotline at (888) 522-0184 for special instructions for spraying Sto Watertight Coat.
Sto Jet Mixer Technology<br />
Provides Fast Delivery of Finishes<br />
Most Sto Distributors now have the Sto Jet Mixer Technology Program:<br />
• On-site color mixing for finishes<br />
• Pre-programmed with Sto color formulations for exact pigment dispensing<br />
• Patented mixing cups produce smooth, even blend<br />
• Internet tint formula access<br />
• Better system than competitors’ mixing systems<br />
• Result – faster delivery, more accurate color<br />
Features Benefits<br />
Over 85,000 color formulas immediately Correct color when you need it<br />
available for point of sale tinting via<br />
Distributor Internet Tint Formula Access<br />
Half gallon sample program Fast point of sale sample production<br />
Custom color formulas Developed and furnished same or<br />
next day<br />
Utilization of Sto Corp. Distributor An easy-to-use custom computer<br />
Tinting Application program developed to manage point<br />
of sale color (via the internet)<br />
Centralized automated color lab Over 60 years of combined color<br />
formulation experience<br />
51
Estimating<br />
53
Average Labor Production<br />
Sto Product: Production<br />
(1 man per 8 hr. day)<br />
Adhesives/Fasteners<br />
• Sto BTS w/EPS boards 400 sq. ft. (37.2 sq. m)<br />
• Sto Dispersion Adhesive w/EPS Boards 700 sq. ft. (65.0 sq. m)<br />
• Sto Flexyl w/Extruded Boards 500 sq. ft. (46.5 sq. m)<br />
Base Coat:<br />
• Sto Base Coat: Sto RFP and Sto Mesh 500 sq. ft. (46.5 sq. m)<br />
• Sto Base Coat: Sto BTS<br />
and Sto Mesh 400 sq. ft. (37.2 sq. m)<br />
• Sto Base Coat: Sto RFP and<br />
Sto Armor Mat 400 sq. ft. (37.2 sq. m)<br />
• Sto Base Coat: Sto BTS<br />
and Sto Armor Mat 350 sq. ft. (32.5 sq. m)<br />
Finishes<br />
• Stolit 1.0, Stolit Lotusan 1.0, 900 sq. ft. (83.6 sq. m)<br />
Sto Fine Sand<br />
• Stolit 1.5, Stolit Lotusan 1.5, 800 sq. ft. (74.3 sq. m)<br />
Sto Medium Sand<br />
• Stolit R 1.5, Sto Swirl 800 sq. ft. (74.3 sq. m)<br />
• Stolit 2.0 700 sq. ft. (65.0 sq. m)<br />
• Stolit R2 600 sq. ft. (55.7 sq. m)<br />
• Stolit Freeform 600 sq. ft. (55.7 sq. m)<br />
• Sto Decocoat 800 sq. ft. (74.3 sq. m)<br />
Miscellaneous<br />
• Roller applied paints, primers, sealers 1600 sq. ft. (148.6 sq. m)<br />
• Fill & rasping 900 sq. ft. (83.6 sq. m)<br />
54
Estimator Checklist<br />
Job ______________________ Date ____________________<br />
Estimator __________________<br />
________ Removal of trees, shrubs, etc.<br />
________Ground coverings<br />
________ Excavation/leveling of terrain<br />
________ Scaffolding & Setup<br />
________ Demolition<br />
________Chipping or scraping substrate<br />
________ Sandblasting<br />
________Cleaning<br />
________ Masking<br />
________ Tenting<br />
________ Heating<br />
________ Sto Plex W<br />
________ Leveling w/ _____________<br />
________ Moisture Protection<br />
________ Backwrapping<br />
________ Fastening w/ ______________<br />
________ Insulation<br />
________ Fill & Rasp<br />
________ Rout Grooves<br />
________ Sto Base Coat w/<br />
________ Sto Armor Mat<br />
________ Sto Mesh<br />
________ Sto Primer<br />
________ Caulking (Dissimilar Mat.)<br />
________ Sto Finish<br />
________ Expansion Joints<br />
________ Windowsill Flashing<br />
________ Parapet Top Flashing<br />
________ Cleanup<br />
________ Shipping<br />
55
General<br />
Information<br />
57
StoTherm ® <strong>EIFS</strong> <strong>Installation</strong> Inspection Checklists<br />
Job Name ____________________________________________<br />
Location ____________________________________________<br />
58<br />
No. Inspection Item Description Conformance<br />
Yes No<br />
Pre-Construction<br />
• Verify roles and responsibilities<br />
• Verify sequencing of work<br />
• Verify conformance of details<br />
• Verify dew point analysis and location of<br />
vapor retarder (if needed)<br />
1 Terminations at grade<br />
2 Ultra-High impact resistance<br />
3 Window and door sill flashing<br />
4 Window and door head flashing<br />
5 Roof/Wall diverter flashing<br />
6 Saddle Flashing<br />
7 Location of expansion joints<br />
8 Slope and thickness of trim and features<br />
9 Parapet or eave condition<br />
10 Expansion joints with sealant and sealant<br />
at all penetrations and attachments through system<br />
Site Conditions<br />
1 Material Storage–verify adequacy of material<br />
storage areas and that materials are properly stored.<br />
2 Substrate–verify that the substrate is correct , substrate<br />
condition is clean, dry, free from defects, in plane, and<br />
verify substrate installation and attachment in<br />
conformance with manufacturer’s recommendations.<br />
Moisture Protection<br />
• Barrier <strong>EIFS</strong><br />
3a Verify protection of rough openings in conformance<br />
with Sto Details 1.23a and 1.24a.<br />
• <strong>EIFS</strong> with Drainage<br />
3b StoGuard ® –verify protection of rough openings in<br />
conformance with Sto Detail 10.23a. Note if any<br />
areas of sheathing are not covered with Sto Gold Coat ®.<br />
3c Building Paper–verify protection of rough openings in<br />
conformance with Sto Details 8.23 or 9.23.<br />
3d House Wrap–verify protection of rough openings<br />
in conformance with Sto Details 8.23 or 9.23.<br />
Verify installation of house wrap in conformance<br />
with manufacturer’s instructions.<br />
4 Flashing–note critical flashing locations on the<br />
structure and verify that flashing is present. Verify<br />
that flashing end dams are incorporated into the<br />
flashing material beneath windows and doors.
No. Inspection Item Description Conformance<br />
Yes No<br />
<strong>EIFS</strong> <strong>Installation</strong><br />
1 Backwrapping–verify the presence and attachment of<br />
backwrap reinforcing mesh (Sto Detail Mesh) at system<br />
terminations prior to the application of EPS board.<br />
Adhesive <strong>Installation</strong><br />
2 Verify application of adhesive in the proper direction<br />
with proper size notched trowel.<br />
EPS Board <strong>Installation</strong><br />
3 Verify minimum 6" overlap of sheathing joints.<br />
4 Verify EPS board joints tightly abutted.<br />
5 Verify EPS board joints staggered.<br />
6 Verify EPS boards interlocked at inside and outside<br />
corners.<br />
7 Verify “L” cut of EPS board around openings.<br />
8 Verify adequate attachment of EPS board by pulling<br />
freshly applied board and checking for roughly equal<br />
amount of adhesive on substrate and on EPS board.<br />
9 Verify termination of EPS board with proper gap at<br />
abutting elements such as windows, doors, other<br />
penetrations, and at expansion joints.<br />
10 Verify proper thickness of EPS board at reveals<br />
(minimum 3/4") and projecting features (maximum 4")<br />
and proper slope (minimum 27°).<br />
Rasping and Slivering of EPS Board<br />
11 Identify areas of EPS board joints that must be slivered<br />
or filled with spray foam.<br />
12 Verify that entire EPS board surface has been rasped.<br />
Base Coat and Mesh <strong>Installation</strong><br />
13 Verify full embedment of backwrap reinforcing mesh<br />
along edges - no voids, or mesh color visible.<br />
14 Verify installation of diagonal mesh strips at corners of<br />
all openings.<br />
15 Verify installation of Sto Armor Mat with butt joints<br />
at areas indicated on drawings.<br />
16 Verify reveals reinforced with mesh and no excess base<br />
coat.<br />
17 Verify mesh overlaps of minimum 2-1/2".<br />
18 Verify double mesh reinforcement at corners.<br />
19 Verify no mesh color visible in the completed base coat<br />
application.<br />
Primer Application<br />
20 Verify complete coverage of base coat with primer.<br />
Finish Application<br />
21 Verify finish application in advance of direct sunlight<br />
exposure, working a wet edge toward unfinished area.<br />
22 Verify consistency of texture and color with sample or<br />
mock-up.<br />
23 Verify finish not installed into or over construction<br />
joints.<br />
59
60<br />
No. Inspection Item Description Conformance<br />
Yes No<br />
Sealants<br />
1 Verify priming (if required) of joint surfaces.<br />
2 Verify properly sized backer rod installed to proper<br />
depth in joint.<br />
3 Verify installation of sealant to <strong>EIFS</strong> base coat and<br />
tooling of sealant.<br />
Final Inspection<br />
1 Verify flashings extend beyond the outer face of the wall.<br />
2 Verify sealants are in place at system terminations and<br />
are fully adhered to joint surfaces.<br />
3 Verify uniform appearance of finished wall surface.<br />
4 Note dirt accumulation or physical damage that may<br />
have occurred during construction.<br />
5 Verify that at least one pail of finish is on hand or<br />
stored for touch-up and color matching in the event<br />
of future repairs or additions.<br />
6 Verify removal of construction materials and<br />
equipment, and waste material.<br />
Notes:<br />
__________________________________________________________<br />
__________________________________________________________<br />
__________________________________________________________<br />
__________________________________________________________<br />
__________________________________________________________<br />
__________________________________________________________<br />
__________________________________________________________<br />
__________________________________________________________<br />
__________________________________________________________<br />
__________________________________________________________<br />
__________________________________________________________<br />
__________________________________________________________<br />
__________________________________________________________<br />
__________________________________________________________
Technical Support<br />
To better serve the industry with technical assistance in design and<br />
application, Sto Corp. has set up a network of technicians experienced<br />
and trained in all aspects of Sto Products and systems. These technicians<br />
are employed by Sto Corp. and are available to assist you.<br />
For the number of the technician in your area, contact your local<br />
Sto Distributor or call 1-800-221-2397 (Atlanta, Georgia).<br />
www.stocorp.com Features<br />
An easy to use reference source for the building professional to view,<br />
download and print:<br />
• System guide specifications<br />
• <strong>Guide</strong> detail drawings<br />
• Building Code Approvals<br />
• Product bulletins<br />
• Tech Hotlines<br />
• Material Safety Data Sheets (MSDS)<br />
• Distributor locations<br />
• Company information<br />
• Color selection charts<br />
Sto Electronic Submittal System (ESS)<br />
• Prepare a complete submittal package<br />
Including systems and product information;<br />
Optional inclusion of Specification, Warranty Schedule, Sample Warranty<br />
61
Notes:<br />
62
Notes:<br />
63
Sto Corp.<br />
3800 Camp Creek Parkway<br />
Building 1400, Suite 120,<br />
Atlanta, GA. 30331<br />
Tel: 404-346-3666<br />
Toll Free: 1-800-221-2397<br />
Fax: 404-346-3119<br />
www.stocorp.com<br />
S118F 12/09 VEN 5609