
Create successful ePaper yourself
Turn your PDF publications into a flip-book with our unique Google optimized e-Paper software.
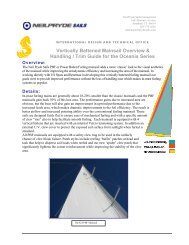
INTERNATIONAL DESIGN AND TECHNICAL OFFICE<br />
Lazy Bag Installation Guide<br />
© <strong>Neil</strong> <strong>Pryde</strong> <strong>Sails</strong> International<br />
1681 Barnum Avenue<br />
Stratford, CONN. 06614<br />
Phone: 203-375-2626 • Fax: 203-376-2627<br />
Email: admin@neilprydesails.com<br />
Web: www.neilprydesails.com<br />
All material herein<br />
Copyright 2006-2007 <strong>Neil</strong> <strong>Pryde</strong> <strong>Sails</strong> International<br />
All Rights Reserved
OVERVIEW<br />
The <strong>Neil</strong> <strong>Pryde</strong> <strong>Sails</strong> Mainsail Lazy Bag (MLB) is designed to be easily used and modular in design. It can conveniently be<br />
fitted and removed independently of the sail.<br />
• The MLB includes a zippered flap at the front of<br />
the bag that wraps around the mast to the<br />
opposite side of the bag and zippers closed. This<br />
is designed to reduce U.V. damage and keep<br />
birds from nesting inside the mainsail!<br />
• The front flap can be left in place while sailing,<br />
or folded back inside the bag and secured with a<br />
hook & loop strip.<br />
• The top zipper is also provided with a flap to<br />
help decrease water ingress.<br />
• The MLB is attached to the boom using<br />
slug/slides. The bag is NOT sewn between each<br />
slide so that rain water AND reefing lines can be<br />
led from the sail through the bag to the boom<br />
attachment points.<br />
• Two adjustable webbing straps provide Fore/aft<br />
tension; one strap is passed through the clew ring<br />
of the mainsail and the forward strap goes<br />
around the mast (and inside the halyards). The<br />
straps are inside the bag to reduce U.V. exposure and allow the bag to be pulled aft over the sail, covering it<br />
completely. A third strap at the front/top can be used to tighten up the forward girth of the bag.<br />
• The battens are inserted from the forward end of the bag. The design is such, that the battens themselves become<br />
the attachment point for the lazy jacks. This reduces point loading and makes the bag smooth and taunt. The<br />
battens are locked in place with the internal Velcro closure system. (Identical to the mainsail batten pocket<br />
system)<br />
The following pictorial guide will outline the basic steps to installation.<br />
2
Installation Procedure<br />
Getting Started:<br />
Assuming the sail is already in place, pull the entire sail to<br />
one side of the boom. This allows you to access the boom<br />
slot opening at the front of the boom, just behind the<br />
gooseneck.<br />
Starting with aft most end (short end) insert the furthest aft<br />
slug into the boom at the forward end of the boom just aft of<br />
the gooseneck and slide it aft. Add each succeeding slug<br />
until the cover is pulled aft completely. Both halves of the<br />
bag will be on the same side at this time. (Starboard in the<br />
photo)<br />
Pull one half of the bag underneath the sail and to the<br />
opposite side.
The aft webbing strap is led through the clew ring of the sail<br />
and back into the buckle. The webbing should be pulled tight<br />
enough so that the bag covers the aft end of the sail. In the<br />
photo at right you can see the sail clew slug is pull out to the<br />
black band on the boom. The bag itself extends aft, past the<br />
black band.<br />
With this preliminary adjustment made now insert each<br />
batten into the pocket. The ‘butterfly’ fitting is designed to<br />
seat with the webbing retainer. This means the unfinished<br />
batten end is inserted first. Make sure it is completely seated<br />
at the very aft end of the bag. At each opening along the sock<br />
mark the batten and remove the batten. We suggest that you<br />
make a 2” / 50mm wrap of white riggers tape at these<br />
locations…as it will provide good friction and holding power<br />
for the lazy jack lines.<br />
Re-insert the battens. Pulling the bag tight and with a fair<br />
amount of tension on the battens, the battens should be just<br />
inside of the pocket fronts. If this is not the case, they are<br />
easily trimmed with a hacksaw.<br />
Now insert the webbing/Velcro strap folding the webbing<br />
over the butterfly end. This will lock the battens in place.<br />
This is the very same system as used on the mainsail battens<br />
and will require the ‘pusher stick’ that came with your<br />
mainsail for this operation.<br />
4
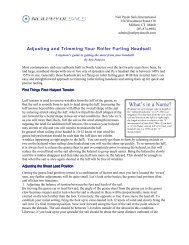
Jackline Setup:<br />
The jacklines are composed of three parts; the upper line that<br />
connects to the mast, the aft line that runs from the aft most<br />
connection point on the bag, to the upper ring and the<br />
forward line.<br />
Take your aft line and tie it around the rigging tape on the<br />
batten at the last most connection point on the bag. A double<br />
or triple clove hitch or fisherman’s bend are both very good<br />
knots that will resist slipping and be quite permanent.<br />
Tie the forward line in a similar fashion to the midattachment<br />
point on the bag.<br />
Take one turn on the forward line around the batten and pull<br />
the entire jackline system tight. The bag side should be<br />
pulled up smoothly and tightly.<br />
Later should you want, you can tie a overhand ‘shortening<br />
loop’ above the bag on the forward line and turn the rope end<br />
around the batten and back up to the loop, making a purchase<br />
system that can be secured with a couple of overhands.<br />
Do the opposite side in the same fashion.<br />
With both sides of the bag now pulled up and tight you need<br />
to check the fore/aft location of the bag. Do this by bringing<br />
the forward flap around the mast (inside the halyards) and<br />
zip it closed. If you cannot zip it or if it zips and is quite<br />
loose, the bag needs to be adjusted fore or aft depending on<br />
location.<br />
You will need to slide each slide backward or forward in<br />
small increments until the overall position is correct.<br />
Once achieved, readjust the webbing and the aft end and at<br />
the forward end take the lower strap around the mast (inside<br />
the halyards) and make it fast to the other side.<br />
The bag should be taut and smooth along the bottom as in<br />
photo at right.<br />
5<br />
Aft Line<br />
Upper Line<br />
Forward<br />
Line
Both sets of reef lines can now be led down the inside of the<br />
bag and out the bottom and tied securely at the reef eye<br />
location.<br />
The forward upper webbing strap can now be fitted and is<br />
normally adjusted to be snug when the front flap is zipped<br />
closed. You can tighten it more to squeeze together the girth<br />
of the bag if you choose. This strap provides support should<br />
you choose to sail with the front flap tucked inside the bag.<br />
The aft eyelets can optionally be used to tidy up the trailing<br />
edge of the cover should you choose. Some like to tie a small<br />
line from the upper eyelets around the topping lift and back<br />
for an upward pull. In this photo we have utilized the eyelet<br />
on the rear of the boom to secure the lower eyelets.<br />
NOTE: In this picture you can clearly see that we have<br />
stretched the bag aft over the sail (which actually stops at the<br />
black band).<br />
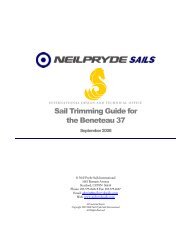
Last Look:<br />
These final photographs illustrate the bag from a few vantage<br />
points.<br />
6<br />
Forward starboard view
With forward flap folded back inside and secured to the hook<br />
and loop strip.<br />
Clove hitch at batten<br />
Close up view looking aft.<br />
7<br />
Forward line with shortening loop and hitch.<br />
Portside view with front flap closed and zipped.<br />
Top view looking forward