Adjusting and Trimming Your Roller Furling ... - Neil Pryde Sails
Adjusting and Trimming Your Roller Furling ... - Neil Pryde Sails
Adjusting and Trimming Your Roller Furling ... - Neil Pryde Sails

You also want an ePaper? Increase the reach of your titles
YUMPU automatically turns print PDFs into web optimized ePapers that Google loves.
<strong>Neil</strong> <strong>Pryde</strong> <strong>Sails</strong> International<br />
354 Woodmont Road #18<br />
Milford, CT 06460<br />
203-874-6984<br />
admin@neilprydesails.com<br />
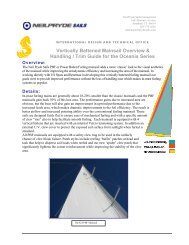
<strong>Adjusting</strong> <strong>and</strong> <strong>Trimming</strong> <strong>Your</strong> <strong>Roller</strong> <strong>Furling</strong> Headsail<br />
A layman’s guide to getting the most from your headsail<br />
By Bob Pattison<br />
Most contemporary mid-size sailboats built in North America over the last twenty years have been, by<br />
<strong>and</strong> large, masthead sloops with one or two sets of spreaders <strong>and</strong> fly a headsail that is between 140% <strong>and</strong><br />
155% in size. Generally these headsails are set flying on roller furling gear. With this in mind, here’s an<br />
easy <strong>and</strong> straightforward approach to trimming roller furling headsails <strong>and</strong> setting them up for quick <strong>and</strong><br />
precise reefing.<br />
789 789 789 789 %38 %38 %38 %38 789 789 789 789 ,,7/ ,,7/ ,,7/ ,,7/ %03843 %03843 %03843 %03843<br />
Luff tension is used to remove wrinkles from the luff of the genoa, so<br />
that the sail is smooth from to tack to head along the luff. Increasing the<br />
luff tension beyond this amount will affect the overall shape of the sail<br />
by inducing stretch along the luff, which will pull the draft (shape) of the<br />
sail forward for a better shape in heavier wind conditions. Don’t do it (!),<br />
as you will more than likely, furl the sail as the wind strength increases<br />
negating the need for additional luff tension. On occasion your halyard<br />
may stretch or slip <strong>and</strong> you will need to re-tension the luff.<br />
In general when sailing close hauled in 10-12 knots of true wind the<br />
genoa halyard tension should be such that the luff does not exhibit<br />
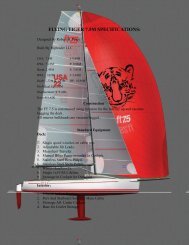
What’s in a Name?<br />
Headsail size percentages refer to length of<br />
the “luff perpendicular’ or L.P. This is an<br />
imaginary line that runs from the clew of the<br />
sail <strong>and</strong> intersects the luff at a right angle,<br />
the length of which is relative to the “J”<br />
measurement of your boat. Thus, if you have<br />
a “J” of 10-feet, <strong>and</strong> an L.P. of 15-feet, your<br />
headsail size is a 150% of the “J”<br />
measurement.<br />
wrinkles (appearing at right angles to the luff). You can easily get them to form by releasing an inch or<br />
two on the halyard when sailing close hauled <strong>and</strong> you will see the show up quickly. To re-tension the luff,<br />
it is always best to release the genoa sheet in part or completely prior to raising the halyard, as this will<br />
reduce the overall load on the sail allowing the halyard to go up much easier. Bring the halyard in slowly<br />
until the wrinkles disappear <strong>and</strong> then take one half turn more on the halyard. This should be enough so<br />
that when the sail is once again sheeted in the luff will be free of wrinkles.<br />
/:893 /:893 /:893 /:893 90 90 90 90 $009 $009 $009 $009 0,/ 0,/ 0,/ 0,/ !48943 !48943 !48943 !48943<br />
Getting the genoa lead position correct is a combination of factors <strong>and</strong> once you have located the ‘sweet’<br />
spot, any further adjustments will be quite small. Let’s look at the basics; the genoa lead position (fore<br />
<strong>and</strong> aft) has two functions:<br />
1. <strong>Adjusting</strong> the balance of tension between the foot <strong>and</strong> leech of the sail.<br />
By moving the genoa car or lead forward, the angle of the genoa sheet from the genoa car to the genoa<br />
clew becomes steeper <strong>and</strong> in turn when the sail is sheeted in there will be proportionally more load<br />
exerted on the leech rather than the foot. Conversely, the opposite is true if you move the lead aft. To<br />
establish your initial setting, bring the boat up to close-hauled in 8-12 knots of wind <strong>and</strong> slowly bring the<br />
sail in to it’s final trimmed position. Now look forward along the foot of the sail at the point where it<br />
passes the shrouds. The sail should be between 3-6 inches outside of the shroud in this condition.<br />
Likewise, if you look up to your spreader the sail should be about the same distance outboard of the
<strong>Neil</strong> <strong>Pryde</strong> <strong>Sails</strong> International<br />
354 Woodmont Road #18<br />
Milford, CT 06460<br />
203-874-6984<br />
admin@neilprydesails.com<br />
spreader. Boats with double spreaders rigs, trim to the top spreader <strong>and</strong> not the middle one. 1 If the sail is<br />
further in distance out at the foot than at the spreader, ease the sheet out <strong>and</strong> move the car aft one hole<br />
(usually between 2-3 inches). Bring the sheet back in <strong>and</strong> check the settings until you have this equal<br />
balance. Conversely, if the initial setting had the sail tight at the foot <strong>and</strong> further outboard at the spreader,<br />
move the car forward one hole <strong>and</strong> check your settings. Once this is established, make a mark on the track<br />
or deck at the front of the car (see photo) with a permanent marker or sticky dots. This then will be our<br />
base point.<br />
2. <strong>Adjusting</strong> the overall shape (fullness) of the sail.<br />
In certain conditions the lead position is used to add shape to or<br />
flatten out the shape of the headsail. Think of this like an<br />
accelerator pedal...if you need more power (going faster) move<br />
the lead forward, stepping on the gas. This will make the bottom<br />
of the sail fuller (further away from the shroud base) giving the<br />
sailplan more power in light air conditions or when<br />
reaching/running. On a typical 36 foot boat you will on need to<br />
move the lead forward 2-3 inches or one hole forward to increase<br />
the fullness of the sail quite a bit, two holes or six inches forward<br />
should produce a very powerful light air shape.<br />
Conversely, if you move the lead aft, the sail will be sheeted tighter along the foot, flattening the sail.<br />
Dot on track, marking the front of genoa car<br />
This will reduce the amount of power the sail generates (backing off the accelerator <strong>and</strong> slowing down)<br />
<strong>and</strong> help the boat perform better in windier conditions. In most cases though, as the breeze increases you<br />
will want a smaller sail in addition to a flatter sail so you will take a turn or two up on the furling drum,<br />
reducing the sail area, reducing the power.<br />
Moving the lead further forward than 6-8 inches indicates that you are no longer sailing upwind <strong>and</strong> have<br />
entered the reaching mode. In reaching conditions, the genoa sheet will now be eased as the sail is being<br />
adjusted to wind angle <strong>and</strong> not for upwind work. Reaching is generally a point to point activity…so the<br />
boat is sailed on a steady heading…at this time the trim emphasis<br />
moves from getting the sail trimmed closely to the rig to the luff tell<br />
tails. Here the proper sheet trim is accomplished by watching the<br />
lower <strong>and</strong> forward most tell tail. If the weather tell tail st<strong>and</strong>s up<br />
more that 45 0 than the sheet should come in, if the leeward tell tail<br />
st<strong>and</strong>s up vertically, the sheet should be eased. If you find yourself<br />
sailing lower than 50 0 , than it’s time to consider going to an<br />
asymmetric cruising spinnaker for optimum performance.<br />
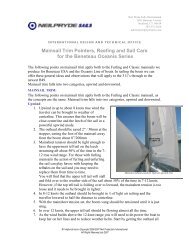
3/ 3/ ,89 ,89 ,89 ,89 #0013 #0013 #0013 #0013 90 90 90 90 0,/8, 0,/8, 0,/8, 0,/8,<br />
The need to reef your headsail is dependent on several factors, all of<br />
which will vary from boat to boat <strong>and</strong> sailor to sailor, but the basic<br />
concept is this: as a boat becomes overpowered because of<br />
increasing wind strength, the sail area needs to be reduced, keeping<br />
the boat balanced (reducing excessive helm), <strong>and</strong> sailing on her lines<br />
(not excessively heeled) both of which will make the sailing safe <strong>and</strong><br />
comfortable.<br />
Genoa furled to first reef mark<br />
1 It could be said that getting the sail finely tuned to be equidistant from both (or 3) spreaders requires both a good sailmaker <strong>and</strong> a new sail. As<br />
sails age <strong>and</strong> stretch, this is one of the first places they start to show their age. So target the top spreader as your trim point.
<strong>Neil</strong> <strong>Pryde</strong> <strong>Sails</strong> International<br />
354 Woodmont Road #18<br />
Milford, CT 06460<br />
203-874-6984<br />
admin@neilprydesails.com<br />
Generally, the need to shorten sail will become apparent when either the above conditions are<br />
encountered but you may also find the need to reef when sailing shorth<strong>and</strong>ed (making sail h<strong>and</strong>ling<br />
easier) or in situations where forward visibility is needed, such as entering a crowded anchorage.<br />
A top notch furling genoa will be equipped with head <strong>and</strong> tack reefing patches <strong>and</strong> reefing marks (see<br />
photo). The additional reefing patches help to re-enforce the sail at times when it is reefed <strong>and</strong> the reefing<br />
marks are designed to facilitate quick <strong>and</strong> easy reefing in conjunction with preset genoa leads. Using this<br />
system will save time in reefing set up <strong>and</strong> also ensure reproducible results with a minimum of fuss.<br />
The first step is to furl the headsail to your first furling mark. 2 It is not important that the mark faces aft or<br />
to the side...but you should make a mental note <strong>and</strong> do it the same hereon. In furling the sail you have<br />
effectively shortened it, pulling it forward towards the bow. This means that your genoa car will need to<br />
move forward as well. The distance will vary from sail to sail, but move it at least 12” / 300mm. The<br />
genoa sheet must not be under tension while you make this adjustment otherwise it will be virtually<br />
impossible to move. Once this has been moved forward, bring in the genoa <strong>and</strong> check the trim as you did<br />
above. The sail should set in the same manner...being equidistant from both the spreader <strong>and</strong> the shrouds<br />
at the foot of the sail an if it doesn’t adjust the lead accordingly. Once you have the location of the genoa<br />
car finalized, make two marks at the front of the car at this point.<br />
Carry out this same procedure for the 2nd <strong>and</strong> third marks (if you have three). In setting up the last mark,<br />
we are going to assume it is quite windy <strong>and</strong> in these conditions you should have the foot closer to the<br />
shroud than at the spreader. In fact, the foot should probably touch the shroud while the sail at the<br />
spreader is 6-10” away. This setting will flatten out the lower section of the sail (less power) <strong>and</strong> allow<br />
the top to be more open which also reduces the power.<br />
Now you can duplicate the marks on the opposite genoa track. Do this with a tape measure, measuring the<br />
finished marks from the end of the track or by counting ‘holes’ or bolt heads from one end or the other.<br />
Make note of the distances <strong>and</strong> take your marker or stickers <strong>and</strong> set up the other track in the same fashion.<br />
The beauty of this exercise is this: the next time you go sailing <strong>and</strong> decide to reef your headsail, you can<br />
move the car forward to the first mark (on the lazy sheet side) <strong>and</strong> then do a nice slow tack, furling the<br />
headsail to the first mark as you go through the tack. As you sheet in, the jib lead <strong>and</strong> sail trim will be<br />
perfect, with little thought <strong>and</strong> a minimum of anxiety. Once sheeted in remember to move the old lead<br />
forward as well.<br />
Bob Pattison has been sailmaking since the late 70’s <strong>and</strong> currently is the Technical Director for <strong>Neil</strong> <strong>Pryde</strong> <strong>Sails</strong> Int.<br />
2 A lot of sailmakers put these marks at incremental distances based on the L.P. So the first reef mark is say a 140% <strong>and</strong> the second a 130%. The<br />
reality is that as the sail furls, not only does it shorten along the foot/L.P.; it also shortens at the head <strong>and</strong> tack. This means a reef mark that is, say<br />
at 100% L.P. will in fact have the area of about a full hoist 90% jib. For this reason, I choose to use them as relative guides <strong>and</strong> not steadfast<br />
percentages. The important thing is reducing area to a comfortable <strong>and</strong> safe size, not to a known percentage!