Alive Cubs Manual - WowWee
Alive Cubs Manual - WowWee
Alive Cubs Manual - WowWee

Create successful ePaper yourself
Turn your PDF publications into a flip-book with our unique Google optimized e-Paper software.
Battery details / Battery installation / Important battery information<br />
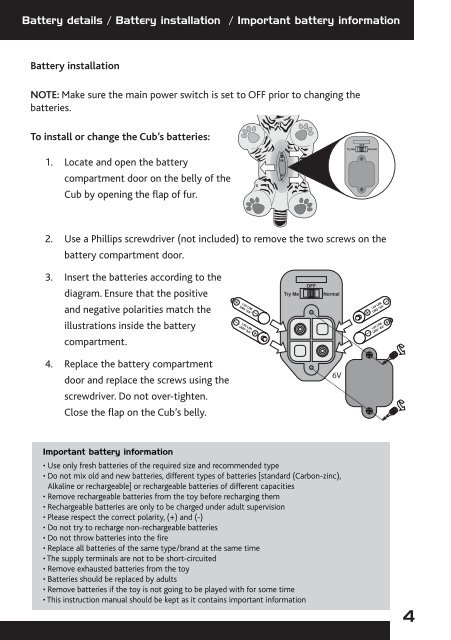
Battery installation<br />
NOTE: Make sure the main power switch is set to OFF prior to changing the<br />
batteries.<br />
To install or change the Cub’s batteries:<br />
1. Locate and open the battery<br />
compartment door on the belly of the<br />
Cub by opening the flap of fur.<br />
2. Use a Phillips screwdriver (not included) to remove the two screws on the<br />
battery compartment door.<br />
3. Insert the batteries according to the<br />
diagram. Ensure that the positive<br />
and negative polarities match the<br />
illustrations inside the battery<br />
compartment.<br />
4. Replace the battery compartment<br />
door and replace the screws using the<br />
screwdriver. Do not over-tighten.<br />
Close the flap on the Cub’s belly.<br />
1.5V LR6<br />
UM3 “AA”<br />
1.5V LR6<br />
UM3 “AA”<br />
Important battery information<br />
• Use only fresh batteries of the required size and recommended type<br />
• Do not mix old and new batteries, different types of batteries [standard (Carbon-zinc),<br />
Alkaline or rechargeable] or rechargeable batteries of different capacities<br />
• Remove rechargeable batteries from the toy before recharging them<br />
• Rechargeable batteries are only to be charged under adult supervision<br />
• Please respect the correct polarity, (+) and (-)<br />
• Do not try to recharge non-rechargeable batteries<br />
• Do not throw batteries into the fire<br />
• Replace all batteries of the same type/brand at the same time<br />
• The supply terminals are not to be short-circuited<br />
• Remove exhausted batteries from the toy<br />
• Batteries should be replaced by adults<br />
• Remove batteries if the toy is not going to be played with for some time<br />
• This instruction manual should be kept as it contains important information<br />
OFF<br />
Try Me Normal<br />
6V<br />
OFF<br />
Try Me Normal<br />
1.5V LR6<br />
UM3 “AA”<br />
1.5V LR6<br />
UM3 “AA”<br />
4