
You also want an ePaper? Increase the reach of your titles
YUMPU automatically turns print PDFs into web optimized ePapers that Google loves.
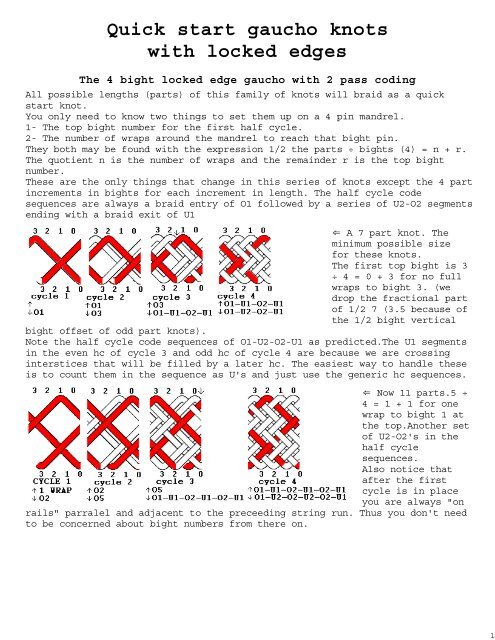
<strong>Quick</strong> <strong>start</strong> <strong>gaucho</strong> <strong>knots</strong><br />
<strong>with</strong> <strong>locked</strong> <strong>edges</strong><br />
The 4 bight <strong>locked</strong> edge <strong>gaucho</strong> <strong>with</strong> 2 pass coding<br />
All possible lengths (parts) of this family of <strong>knots</strong> will braid as a quick<br />
<strong>start</strong> knot.<br />
You only need to know two things to set them up on a 4 pin mandrel.<br />
1- The top bight number for the first half cycle.<br />
2- The number of wraps around the mandrel to reach that bight pin.<br />
They both may be found <strong>with</strong> the expression 1/2 the parts ÷ bights (4) = n + r.<br />
The quotient n is the number of wraps and the remainder r is the top bight<br />
number.<br />
These are the only things that change in this series of <strong>knots</strong> except the 4 part<br />
increments in bights for each increment in length. The half cycle code<br />
sequences are always a braid entry of O1 followed by a series of U2-O2 segments<br />
ending <strong>with</strong> a braid exit of U1<br />
⇐ A 7 part knot. The<br />
minimum possible size<br />
for these <strong>knots</strong>.<br />
The first top bight is 3<br />
÷ 4 = 0 + 3 for no full<br />
wraps to bight 3. (we<br />
drop the fractional part<br />
of 1/2 7 (3.5 because of<br />
the 1/2 bight vertical<br />
bight offset of odd part <strong>knots</strong>).<br />
Note the half cycle code sequences of O1-U2-O2-U1 as predicted.The U1 segments<br />
in the even hc of cycle 3 and odd hc of cycle 4 are because we are crossing<br />
interstices that will be filled by a later hc. The easiest way to handle these<br />
is to count them in the sequence as U's and just use the generic hc sequences.<br />
⇐ Now 11 parts.5 ÷<br />
4 = 1 + 1 for one<br />
wrap to bight 1 at<br />
the top.Another set<br />
of U2-O2's in the<br />
half cycle<br />
sequences.<br />
Also notice that<br />
after the first<br />
cycle is in place<br />
you are always "on<br />
rails" parralel and adjacent to the preceeding string run. Thus you don't need<br />
to be concerned about bight numbers from there on.<br />
1
RED grid.<br />
1 ↑bottom pin 0 to top pin 5<br />
2 ↓top pin 5 O1 to bottom pin 4<br />
3 ↑bottom pin 4 O1 to top pin 2<br />
4 ↓top pin 2 O3 to bottom pin 1<br />
5 ↑bottom pin 1 O3 to top pin 6<br />
6 ↓top pin 6 O4 to bottom pin 5<br />
7 ↑bottom pin 5 O4 to top pin 3<br />
8 ↓top pin 3 O4 U1 O1 to bottom pin 2<br />
⇐Two more increments in length <strong>with</strong> the top bight pin<br />
and wraps for the first cycle calculated and<br />
highlighted.<br />
You may see a pattern here in that each 4 part<br />
increment changes the top bight pin between pins 3 and<br />
1. The first cycle always terminates at bight 3 at the<br />
bottom bight boundary.<br />
These can serve as a check of the process to catch any<br />
error.<br />
A word about the mandrel size.<br />
The optimum circumference is (1.4 X the string width)<br />
X the bights (4). This is just an approximation and<br />
can vary as much as 50% if needed.<br />
The minimum spacing between bight boundaries is (1.4 X<br />
string width)X (parts ÷ 2).<br />
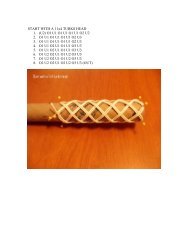
Eleven parts<br />
The rest of the knot (The white leads in the right grid)<br />
9 ↑bottom pin 2 O4 U1 O1 to top pin 0<br />
10 ↓top pin 0 O2 U1 O2 U1 O1 to bottom pin 6<br />
11 ↑bottom pin 6 O2 U1 O2 U1 O1 to top pin 4<br />
12 ↓top pin 4 U1 O2 U1 O2 U2 O1 to bottom pin 3<br />
13 ↑bottom pin 3 U1 O2 U1 O2 U2 O1 to top pin 1<br />
14 ↓top pin 1 U1 O2 U2 O2 U2 O1 to bottom pin 0<br />
⇐11 parts X 7 bights.<br />
The left grid is the first eight half<br />
cycles on the mandrel. Notice that the<br />
first Under Xing is at the end of the<br />
eighth half cycle (the black arrow.)<br />
A run list is below.(The first U Xing<br />
is at the end of hc 8.)<br />
2
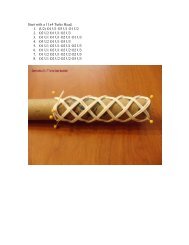
11 X 15<br />
The quick<strong>start</strong> sequence.The free runs give us more than half the knot.<br />
Again the rest of the knot in white.<br />
↑ bottom pin 0 to top pin 5<br />
↓ top pin 5 to bottom pin 11<br />
↑ bottom pin 11 to top pin 1<br />
↓ top pin 1 O1 to bottom pin 7<br />
↑ bottom pin 7 O1 to top pin 12<br />
↓ top pin 12 O2 to bottom pin 3<br />
↑ bottom pin 3 O2 to top pin 8<br />
↓ top pin 8 O2 to bottom pin 14<br />
↑ bottom pin 14 O2 to top pin 4<br />
↓ top pin 4 O3 to bottom pin 10<br />
↑ bottom pin 10 O3 to top pin 0<br />
↓ top pin 0 O4 to bottom pin 6<br />
↑ bottom pin 6 O4 to top pin 11<br />
↓ top pin 11 O5 to bottom pin 2<br />
↑ bottom pin 2 O5 to top pin 7<br />
↓ top pin 7 O5 to bottom pin 13<br />
↑ bottom pin 13 O5 to top pin 3<br />
↓ top pin 3 O1 U1 O4 to bottom pin 9<br />
↑ bottom pin 9 O1 U1 O4 to top pin 14<br />
↓ top pin 14 O1 U1 O2 U1 O2 to bottom pin<br />
5<br />
↑ bottom pin 5 O1 U1 O2 U1 O2 to top pin<br />
10<br />
↓ top pin 10 O1 U1 O2 U1 O2 U1 to bottom<br />
pin 1<br />
↑ bottom pin 1 O1 U1 O2 U1 O2 U1 to top<br />
pin 6<br />
↓ top pin 6 O1 U1 O2 U1 O2 U1 to bottom<br />
pin 12<br />
↑ bottom pin 12 O1 U1 O2 U1 O2 U1 to top<br />
pin 2<br />
↓ top pin 2 O1 U2 O2 U1 O2 U1 to bottom pin 8<br />
↑ bottom pin 8 O1 U2 O2 U1 O2 U1 to top pin 13<br />
↓ top pin 13 O1 U2 O2 U2 O2 U1 to bottom pin 4<br />
↑ bottom pin 4 O1 U2 O2 U2 O2 U1 to top pin 9<br />
↓ top pin 9 O1 U2 O2 U2 O2 U1 to bottom pin 0<br />
3
The quick<strong>start</strong> part<br />
The rest of the knot. (In white.)<br />
A variation<br />
⇐ If you look at the second part of the<br />
single string grid above you see the<br />
begining of a symetric color pattern.<br />
If you <strong>start</strong> a new string at pin seven <strong>with</strong><br />
a contrasting color and finish the knot as<br />
a partial interweave it produces this color<br />
pattern.(This is one half cycle past the<br />
center of the knot)<br />
This basic idea works <strong>with</strong> most of these<br />
<strong>knots</strong>.<br />
15 X 11<br />
↑ bottom pin 0 to top pin 7<br />
↓ top pin 7 O1 to bottom pin 4<br />
↑ bottom pin 4 O1 to top pin 0<br />
↓ top pin 0 O2 to bottom pin 8<br />
↑ bottom pin 8 O2 to top pin 4<br />
↓ top pin 4 O4 to bottom pin 1<br />
↑ bottom pin 1 O4 to top pin 8<br />
↓ top pin 8 O5 to bottom pin 5<br />
↑ bottom pin 5 O5 to top pin 1<br />
↓ top pin 1 O6 to bottom pin 9<br />
↑ bottom pin 9 O6 to top pin 5<br />
↓ top pin 5 O6 U1 O1 to bottom pin 2<br />
↑ bottom pin 2 O6 U1 O1 to top pin 9<br />
↓ top pin 9 O4 U1 O2 U1 O1 to bottom pin 6<br />
↑ bottom pin 6 O4 U1 O2 U1 O1 to top pin 2<br />
↓ top pin 2 O2 U1 O2 U1 O2 U1 O1 to bottom pin 10<br />
↑ bottom pin 10 O2 U1 O2 U1 O2 U1 O1 to top pin 6<br />
↓ top pin 6 U1 O2 U1 O2 U1 O2 U2 O1 to bottom pin 3<br />
↑ bottom pin 3 U1 O2 U1 O2 U1 O2 U2 O1 to top pin 10<br />
↓ top pin 10 U1 O2 U1 O2 U2 O2 U2 O1 to bottom pin 7<br />
↑ bottom pin 7 U1 O2 U1 O2 U2 O2 U2 O1 to top pin 3<br />
↓ top pin 3 U1 O2 U2 O2 U2 O2 U2 O1 to bottom pin 1<br />
4