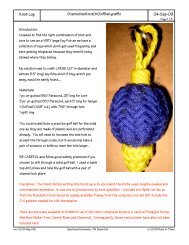
A Rainbow Pineapple Knot Type 1, 8 Pass 42p48b (7p6b base ...
A Rainbow Pineapple Knot Type 1, 8 Pass 42p48b (7p6b base ...
A Rainbow Pineapple Knot Type 1, 8 Pass 42p48b (7p6b base ...

You also want an ePaper? Increase the reach of your titles
YUMPU automatically turns print PDFs into web optimized ePapers that Google loves.
A <strong>Rainbow</strong> <strong>Pineapple</strong> <strong>Knot</strong><br />
<strong>Type</strong> 1, 8 <strong>Pass</strong> <strong>42p48b</strong> (<strong>7p6b</strong> <strong>base</strong> Turk’s Head)<br />
A tutorial for a novice by a novice<br />
Materials:<br />
(a) 8 plait nylon “chalk line” approx 1.5mm dia, dyed using Jacquard Acid<br />
dies………1.Jet black (639) – Base TH<br />
2. Scarlet (609)<br />
3. Pumpkin Orange (605)<br />
4. Yellow Sun (601)<br />
5. Emerald (629)<br />
6. Royal Blue (625)<br />
7. Navy Blue (626)<br />
8. Violet (614)<br />
(b) Starter Mandrel: 100mm (4”)dia cardboard post tube and map pins<br />
Final mount: Wooden elliptical bead 40mm x 25mm, although a 25mm<br />
ball may have been big enough !<br />
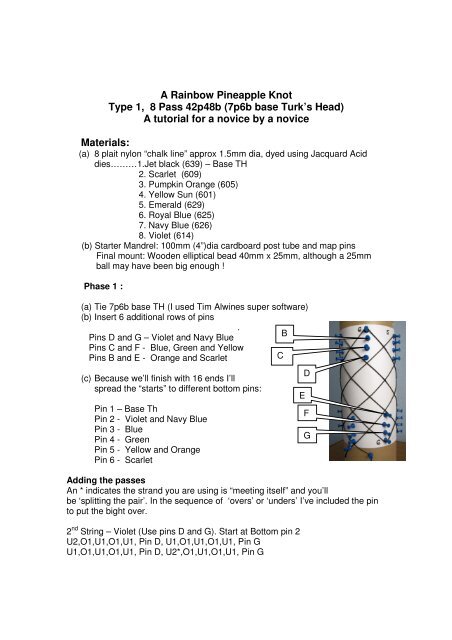
Phase 1 :<br />
(a) Tie <strong>7p6b</strong> <strong>base</strong> TH (I used Tim Alwines super software)<br />
(b) Insert 6 additional rows of pins<br />
Pins D and G – Violet and Navy Blue<br />
Pins C and F - Blue, Green and Yellow<br />
Pins B and E - Orange and Scarlet<br />
(c) Because we’ll finish with 16 ends I’ll<br />
spread the “starts” to different bottom pins:<br />
Pin 1 – Base Th<br />
Pin 2 - Violet and Navy Blue<br />
Pin 3 - Blue<br />
Pin 4 - Green<br />
Pin 5 - Yellow and Orange<br />
Pin 6 - Scarlet<br />
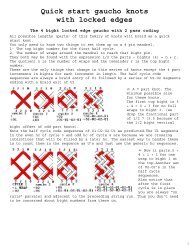
Adding the passes<br />
An * indicates the strand you are using is “meeting itself” and you’ll<br />
be ‘splitting the pair’. In the sequence of ‘overs’ or ‘unders’ I’ve included the pin<br />
to put the bight over.<br />
2 nd String – Violet (Use pins D and G). Start at Bottom pin 2<br />
U2,O1,U1,O1,U1, Pin D, U1,O1,U1,O1,U1, Pin G<br />
U1,O1,U1,O1,U1, Pin D, U2*,O1,U1,O1,U1, Pin G<br />
.<br />
C<br />
B<br />
E<br />
D<br />
F<br />
G
U2*,O1,U1,O1,U1, Pin D, U2*,O2*,U1,O1,U1, Pin G<br />
U2*,O2*,U1,O1,U1, Pin D, U2*,O2*,U1,O1,U1, Pin G<br />
U2*,O2*,U2*,O1,U1, Pin D, U2*,O2*,U2*,O2*,U1, Pin G<br />
U2*,O2*,U2*,O2*,U1, Pin D, U2*,O2*,U2*,O2*,U1, Pin G<br />
3 rd String – Navy Blue (Use Pins D and G). Start at Bottom pin 2<br />
U4,O2,U2,O2,U1, Pin D, U1,O2,U2,O2,U2, Pin G<br />
U2,O2,U2,O2,U1, Pin D, U2*,O2,U2,O2,U2, Pin G<br />
U3*,O2,U2,O2,U1, Pin D, U2*,O3*,U2,O2,U2, Pin G<br />
U3*,O3*,U2,O2,U1, Pin D, U2*,O3*,U3*, O2,U2, Pin G<br />
U3*,O3*,U3*,O2,U1, Pin D, U2*,O3*,U3*,O3*,U2, Pin G<br />
U3*,O3*,U3*,O3*,U1, Pin D, U2*,O3*,U3*,O3*,U2, Pin G<br />
Green : Basic Turk’s Head<br />
Pink : 2 nd <strong>Pass</strong><br />
Blue : 3 rd <strong>Pass</strong><br />
These 3 colours are only used<br />
for this diagram. Using the black<br />
violet and navy blue wouldn’t<br />
be clear enough<br />
Once you’ve completed the 3 rd String, use the above diagram to compare with<br />
your mandrel that you’ve interpreted the instructions correctly. If necessary<br />
correct any errors now.<br />
4 th String – Blue (Use Pins C and F). Start at Bottom Pin 3<br />
U6,O3,U3,O3,U1, Pin C, U1,O3,U3,O3,U3, Pin F<br />
U3,O3,U3,O3,U1, Pin C, U2*,O3,U3,O3,U3, Pin F<br />
U4*,O3,U3,O3,U1, Pin C, U2*,O4*,U3,O3,U3, Pin F<br />
U4*,O4*,U3,O3,U1, Pin C, U2*,O4*,U4*,O3,U3, Pin F<br />
U4*,O4*,U4*,O3,U1, Pin C, U2*,O4*,U4*,O4*,U3, Pin F<br />
U4*,O4*,U4*,O4*,U1, Pin C, U2*,O4*,U4*,O4*,U3, Pin F<br />
5 th String – Green (Use Pins C and F). Start at Bottom Pin 4<br />
U8,O4,U4,O4,U1, Pin C, U1,O4,U4,O4,U4, Pin F<br />
U4,O4,U4,O4,U1, Pin C, U2*,O4,U4,O4,U4, Pin F<br />
U5*,O4,U4,O4,U1, Pin C, U2*,O5*,U4,O4,U4, Pin F<br />
U5*,O5*,U4,O4,U1, Pin C, U2*,O5*,U5*,O4,U4, Pin F<br />
U5*,O5*,U5*,O4,U1, Pin C, U2*,O5*,U5*,O5*,U4, Pin F<br />
U5*,O5*,U5*,O5*,U1, Pin C, U2*,O5*,U5*,O5*,U4, Pin F
6 th String – Yellow (Use Pins C and F). Start at Bottom Pin 5<br />
U10,O5,U5,O5,U1, Pin C, U1,O5,U5,O5,U5, Pin F<br />
U5,O5,U5,O5,U1, Pin C, U2*,O5,U5,O5,U5, Pin F<br />
U6*,O5,U5,O5,U1, Pin C, U2*, O6*,U5,O5,U5, Pin F<br />
U6*,O6*,U5,O5,U1, Pin C, U2*,O6*,U6*,O5,U5, Pin F<br />
U6*,O6*,U6*,O5,U1, Pin C, U2*,O6*,U6*,O6*,U5, Pin F<br />
U6*,O6*,U6*,O6*,U1, Pin C, U2*,O6*,U6*,O6*U5, Pin F<br />
7 th String – Orange (Use Pins B and E). Start at Bottom Pin 5<br />
U12,O6,U6,O6,U1, Pin B, U1,O6,U6,O6,U6, Pin E<br />
U6,O6,U6,O6,U1, Pin B, U2*,O6,U6,O6,U6, Pin E<br />
U7*,O6,U6,O6,U1, Pin B, U2*,O7*,U6,O6,U6, Pin E<br />
U7*,O7*,U6,O6,U1, Pin B, U2*,O7*,U7*,O6,U6, Pin E<br />
U7*,O7*,U7*,O6,U1, Pin B, U2*,O7*,U7*,O7*,U6, Pin E<br />
U7*,O7*,U7*,O7*,U1, Pin B, U2*,O7*,U7*,O7*,U6, Pin E<br />
8 th String – Red (Use Pins B and E). Start at Bottom Pin 6<br />
U14,O7,U7,O7,U1, Pin B, U1,O7,U7,O7,U7, Pin E<br />
U7,O7,U7,O7,U1, Pin B, U2*,O7,U7,O7,U7, Pin E<br />
U8*,O7,U7,O7,U1, Pin B, U2*,O8*,U7,O7,U7, Pin E<br />
U8*,O8*,U7,O7,U1, Pin B, U2*,O8*,U8*,O7,U7, Pin E<br />
U8*,O8*,U8*,O7,U1, Pin B, U2*,O8*,U8*,O8*,U7, Pin E<br />
U8*,O8*,U8*,O8*,U1, Pin B, U2*,O8*,U8*,O8*,U7, Pin E<br />
A panoramic photograph of the completed 8 strings :<br />
Phase 2 – Reducing the work down to final size<br />
To keep the strings in their correct positions relative to each other :<br />
Carefully remove ONLY Row D pins
First the VIOLET thread put an overhand knot about 2” from the running end.<br />
Now take out the slack, also taking out any surplus from the running end, working<br />
it back towards the standing end.<br />
Now do the NAVY BLUE thread<br />
Carefully remove ONLY Row E pins<br />
Work out the slack from the RED thread then the ORANGE thread.<br />
Carefully remove ONLY Row C pins<br />
Work out slack from the BLUE, then GREEN then YELLOW threads<br />
Carefully remove ONLY Row F pins<br />
Work out slack from the YELLOW then GREEN then BLUE threads<br />
Carefully remove ONLY Row B pins<br />
Work out slack from ORANGE then RED threads<br />
Carefully remove Row G pins<br />
Work out slack from NAVY BLUE then VIOLET threads<br />
At this time I didn’t take out any slack from the Base Turks Head<br />
Have your next downsize mandrel ready – it could be a smaller post tube, a<br />
bottle (empty) or even a drinks can.<br />
This is a picture after further tidying up but showing<br />
elastic bands holding the Base TH without<br />
interfering with work on the other strings.<br />
The picture above is the first view of the work on a smaller<br />
mandrel………..DON’T PANIC !<br />
Find the knotted end of the VIOLET thread and gently take out some of the slack.<br />
Follow this by the NAVY BLUE being aware that it lies alongside<br />
the Violet thread. Do this for all the threads in their correct sequence.<br />
Finally you can take some slack out of the Base TH<br />
DON’T overtighten at this stage, and threads may need some nudging to<br />
position.
This particular PK would suit a 1” dia bar as the final mount ….or even a bead.<br />
Finally there are 16 ends to dispose of. Cutting them within say ½” and tucking<br />
the ends under the knot seems obvious…………but I’d certainly welcome advice<br />
on this ….and on my whole approach to making this knot<br />
I can only imagine some of the derisory mutterings !<br />
Just a brief note on the panorama photo :<br />
Stand the mandrel on the work table, making sure table is level and the mandrel<br />
is cut square to the vertical.<br />
I stuck a piece of paper on the table and drew around the mandrel.<br />
Most digital cameras have panorama settings these days. I set the camera on a<br />
tripod using ‘Closeup’ in daylight<br />
I took 12 shots moving the mandrel around within the drawn circle.<br />
!2 shots gave good overlap…………<br />
I cropped each of the pictures (see example below) then used “Arcsoft<br />
Panorama” to stitch them together<br />
You’ve got this far ? Then good for you and ‘Diolch yn fawr’ – Welsh ‘Thank you’