Download PDF instructions for Victor Garden Tools Electric
Download PDF instructions for Victor Garden Tools Electric
Download PDF instructions for Victor Garden Tools Electric

Create successful ePaper yourself
Turn your PDF publications into a flip-book with our unique Google optimized e-Paper software.
<strong>Electric</strong> Chainsaw 9226 Instructions<br />
Contents<br />
Symbols 1<br />
Parts 1<br />
Warning 2<br />
Residual Risks 2<br />
Assembly 3<br />
Fitting guide bar and chain 3<br />
Be<strong>for</strong>e Use 3<br />
Setting the chain tension 3<br />
Filling with Oil 3<br />
Checking the self-lubrication system is functioning 3<br />
Operation 4<br />
Starting & Stopping the chainsaw 4<br />
Operating the chainsaw 4<br />
Power cord positioning 4<br />
Avoiding kickback 4<br />
Avoiding pull-in 4<br />
Avoiding pushback 4<br />
Chain brake 5<br />
Avoiding jamming the chainsaw 5<br />
Intended/Not intended use 5<br />
Bucking & Limbing 5<br />
Bucking techniques 5<br />
Bucking using a sawhorse 5<br />
Felling Trees 6<br />
Sharpening the Chain 6<br />
Troubleshooting 7<br />
Technical In<strong>for</strong>mation 7<br />
Cleaning & Maintenance 8<br />
Storage 8<br />
Disposal 8<br />
Packaging 8<br />
EC Declaration of Con<strong>for</strong>mity 8<br />
1<br />
SYMBOLS<br />
Read the instruction manual carefully.<br />
Denotes risk of personal injury, loss of<br />
life, or damage to the tool in case of<br />
non-observance.<br />
Contact of the guide bar tip with any<br />
object should be avoided. Tip contact<br />
may cause the guide bar to move<br />
suddenly upward and backwards,<br />
which may cause serious injury to user.<br />
Two hands are always to be<br />
used in operation of the chain<br />
saw.<br />
WARNING: To reduce the risk of<br />
electric shock do NOT expose unit to<br />
water or operate unit on wet ground<br />
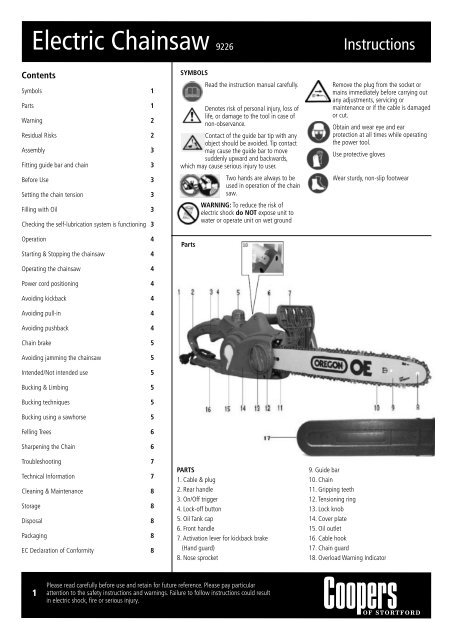
Parts<br />
PARTS<br />
1. Cable & plug<br />
2. Rear handle<br />
3. On/Off trigger<br />
4. Lock-off button<br />
5. Oil Tank cap<br />
6. Front handle<br />
7. Activation lever <strong>for</strong> kickback brake<br />
(Hand guard)<br />
8. Nose sprocket<br />
Please read carefully be<strong>for</strong>e use and retain <strong>for</strong> future reference. Please pay particular<br />
attention to the safety <strong>instructions</strong> and warnings. Failure to follow <strong>instructions</strong> could result<br />
in electric shock, fire or serious injury.<br />
Remove the plug from the socket or<br />
mains immediately be<strong>for</strong>e carrying out<br />
any adjustments, servicing or<br />
maintenance or if the cable is damaged<br />
or cut.<br />
Obtain and wear eye and ear<br />
protection at all times while operating<br />
the power tool.<br />
Use protective gloves<br />
Wear sturdy, non-slip footwear<br />
9. Guide bar<br />
10. Chain<br />
11. Gripping teeth<br />
12. Tensioning ring<br />
13. Lock knob<br />
14. Cover plate<br />
15. Oil outlet<br />
16. Cable hook<br />
17. Chain guard<br />
18. Overload Warning Indicator
WARNING<br />
• Chainsaws are potentially dangerous tools. Professional training is<br />
recommended be<strong>for</strong>e first use.<br />
• If you are not familiar with chainsaws and the felling of trees, it is<br />
recommended that you obtain further more detailed <strong>instructions</strong> and<br />
in<strong>for</strong>mation regarding chain-sawing in addition to reading this manual fully.<br />
We also recommend that inexperienced chainsaw users practice cutting logs<br />
on a saw-horse or log cradle be<strong>for</strong>e attempting to fell a tree.<br />
• Keep work area clean.<br />
• Do NOT start cutting until you have a clear work area, secure footing and a<br />
planned, clear escape path from the falling tree or limb.<br />
• Use extreme caution when cutting small size brush and saplings because the<br />
slender material may catch the saw chain and be whipped toward you or pull<br />
you off balance.<br />
• Do NOT operate a chainsaw at height in a tree or on a ladder unless<br />
specifically trained to do so.<br />
• When cutting a limb that is under tension, be alert <strong>for</strong> spring back so that you<br />
will not be struck when the tension in the wood fibres is released.<br />
• Do NOT expose the chainsaw to rain.<br />
• Do NOT use the chainsaw in damp or wet conditions.<br />
• Do NOT use the chainsaw in presence of flammable liquids or gases.<br />
• Prevent body contact with grounded surfaces. For example: metal pipes, wire<br />
fences. Risk of electric shock.<br />
• Keep children, bystanders and pets away from the work area, and power cable.<br />
• When not in use, chainsaws should be stored in a dry, secure location – well<br />
out of the reach of children.<br />
• Always fit the chain guard when not in use.<br />
• Never <strong>for</strong>ce the chainsaw - it will do the job better and safer when used<br />
correctly.<br />
• Only suitable <strong>for</strong> use to cut wood with a diameter smaller than the length of<br />
the guide bar.<br />
• Do NOT use chainsaw <strong>for</strong> cutting plastic, masonry, non-wood building<br />
materials.<br />
• Do NOT use the chainsaw <strong>for</strong> any use other than the intended use described<br />
in these <strong>instructions</strong>.<br />
• Make sure you are suitably dressed when using the chainsaw with correct<br />
standard Personal Protective Equipment.<br />
• Do NOT wear loose clothing or jewellery that can get caught in moving parts.<br />
Heavy duty gloves and sturdy non-slip work boots are recommended when<br />
working outdoors.<br />
• Wear a hairnet to contain long hair which can get caught in moving parts.<br />
• Always wear suitable head, ear and eye protection.<br />
• Carry the chainsaw by the front handle with the saw stopped, your finger off<br />
the trigger and the guide bar and saw chain to your rear.<br />
• Periodically inspect chainsaw power cable and any extension cables used <strong>for</strong><br />
damage. Do NOT use if damaged in any way. If the supply cord needs<br />
replacing, the task must be carried out by an authorised service centre.<br />
• Keep cord clear of the chain and operator at all times. Never carry saw by the<br />
cord or pull it to disconnect from the socket. Keep cord away from oil and<br />
sharp edges.<br />
• Always clean after use and replace worn parts when per<strong>for</strong>mance becomes<br />
reduced.<br />
• Follow <strong>instructions</strong> <strong>for</strong> lubricating and changing accessories.<br />
• Keep handles dry, clean and free from oil and grease.<br />
• Disconnect chainsaw when not in use, be<strong>for</strong>e servicing or cleaning, and when<br />
changing accessories and attachments, such as saw chain and guard.<br />
• Only use extension cords intended <strong>for</strong> outdoor use.<br />
• Stay alert, watch what you are doing. Always use common sense.<br />
• Do NOT operate chainsaw when you are tired.<br />
• Keep all parts of the body away from the chain when the chainsaw is switched<br />
on.<br />
• Be<strong>for</strong>e you start the saw, make sure the saw chain is not in contact with<br />
anything.<br />
• Always check <strong>for</strong> damaged parts be<strong>for</strong>e use. Do NOT use if any part is<br />
damaged in any way. Check <strong>for</strong> alignment of moving parts, binding of moving<br />
parts, breakage of parts, mounting and any other conditions that may affect<br />
operation. Any part that is damaged should be properly repaired or replaced by<br />
an authorised service centre unless otherwise indicated elsewhere in this<br />
instruction manual.<br />
• Regularly check that all the fixings are secure as vibrations in use may cause<br />
them to loosen over time.<br />
• When servicing, use only identical replacement parts.<br />
• Do NOT use the chainsaw if the switch does not turn it on and off.<br />
• Do NOT operate a chainsaw that is damaged, improperly adjusted, or is not<br />
completely and securely assembled. Be sure that the saw chain stops moving<br />
when the trigger is released be<strong>for</strong>e using to cut wood.<br />
• Guard against kickback.<br />
• Only use replacement bars and chains specified by the manufacturer or the<br />
equivalent.<br />
• Connect chainsaw to correct voltage, that is, be sure that the voltage supplied<br />
is the same as that specified on the rating label of the tool.<br />
• For outdoor domestic use only.<br />
RESIDUAL RISKS<br />
Despite the above warnings and due to the nature of the product, there remains<br />
a residual risk, which cannot be prevented when using a chainsaw. The following<br />
potential hazards might apply:<br />
• Contact with exposed saw teeth of the saw chain (cutting hazards)<br />
• Access to the rotating saw chain (cutting hazards)<br />
• Un<strong>for</strong>eseen, abrupt movement of the guide bar (cutting hazards)<br />
• Parts flung out from the saw chain (cutting/injection hazards)<br />
• Wood splinter ejection<br />
• Inhalation of wood particles and dust - there may be health risks caused by<br />
breathing in dust, especially dust generated from sawing oak, beech and MDF.<br />
• Skin contact with the lubricating oil<br />
• Loss of hearing, if ear protection is not worn<br />
INTENDED/UNINTENDED USE<br />
When using the chainsaw, the user must arrange to use personal protective<br />
equipment according to the manual. Parts of the intended use are detailed in the<br />
manual’s safety warnings and references <strong>for</strong> use by those who work with the<br />
chain saw or maintain it, there<strong>for</strong>e the user must be familiar with the manual.<br />
Only use original or approved spare parts (e.g. guide bar; saw chain).<br />
2
ASSEMBLY<br />
FITTING THE GUIDE BAR AND CHAIN<br />
• Place the chainsaw on its<br />
side so it is on a secure mat<br />
to avoid any oil damage or<br />
to the surface beneath.<br />
Tension bolt<br />
• Place the guide bar over the<br />
tension bolt and then place<br />
the chain links around the<br />
drive sprocket in a 45º angle<br />
and then slowly pull the guide<br />
bar down so it fits neatly over<br />
the guide bar plate.<br />
BEFORE USE<br />
• With the chainsaw unplugged, check the chainsaw and cable are in good<br />
working order be<strong>for</strong>e starting the chainsaw.<br />
• Make sure that the chain lubrication is working and check the oil level.<br />
• Check the chain tension and the operation of the chain brake.<br />
SETTING THE CHAIN<br />
TENSION<br />
• The <strong>Electric</strong> Chainsaw is<br />
fitted with a tool-less<br />
tensioning system.<br />
• Loosen the lock knob by<br />
turning it anti-clockwise<br />
approximately 1-2 turns.<br />
• Check that all chain links<br />
lie correctly in the tracks<br />
of the guide bar.<br />
• Press the tension ring in and turn in a clockwise direction until the correct<br />
chain tension is reached.<br />
• The correct tension is reached when, in the middle of the bar, the chain can<br />
only be raised by approximately 3-4mm.<br />
3<br />
Screw Locking knob Guide bar<br />
• Using a Phillips head<br />
screwdriver remove the<br />
screw directly below the<br />
locking knob.<br />
• Loosen and remove the<br />
locking knob by twisting<br />
anti-clockwise. Remove the<br />
cover so you can access the<br />
drive sprocket and tension<br />
bolt.<br />
Drive sprocket Screw Locking knob<br />
• You may need to adjust<br />
some of the chain links so<br />
they all pass through the<br />
groove in the guide bar.<br />
• Replace the cover and secure<br />
the screw below the locking<br />
knob.<br />
• Place the chain in the groove<br />
of the guide bar. Pay<br />
attention to the correct<br />
running direction as<br />
indicated on the guide bar.<br />
• Replace the locking knob by<br />
twisting in a clockwise<br />
motion (do not over tighten<br />
as this will restrict you from<br />
adjusting the tension of the<br />
chain).<br />
Tension disc<br />
• So the chain will fit around<br />
the guide bar and the drive<br />
sprocket you will need to<br />
release the tension in the<br />
chain. This is easily done by<br />
turning the tension disc in an<br />
anti-clockwise motion until<br />
you can no longer turn it any<br />
further.<br />
Tension ring<br />
• To adjust the tension of the<br />
chain simply turn the tension<br />
ring in a clockwise motion.<br />
FILLING WITH OIL<br />
• The <strong>Electric</strong> Chainsaw will arrive to you without chain oil in the tank. Do NOT<br />
use the chainsaw without correct grade chain oil in or with an oil level below<br />
the minimum level indicated.<br />
• When re-filling chain oil, always switch off and unplug be<strong>for</strong>e refilling.<br />
• Remove oil tank cap and fill the tank with chain oil. Replace cap and tighten<br />
securely.<br />
• The self-lubricating system only activates when the chainsaw is switched on.<br />
• Periodically check the oil level and top up if necessary.<br />
• Use good quality, fresh chain oil, to prolong the life of moving parts.<br />
• Do NOT use old oil as this may contain impurities.<br />
• Ensure that dirt does not get into the oil tank during the re-filling process.<br />
CHECKING THE SELF-LUBRICATION SYSTEM IS FUNCTIONING<br />
Check the self-lubrication system is working correctly by pointing the tip of the<br />
saw towards a piece of paper placed on the ground. The chainsaw must be<br />
switched on. If a patch of oil appears and becomes larger, then the selflubrication<br />
system is working. If there is no oil on the paper, even though the oil<br />
tank is full, then the self-lubrication system is not working.<br />
If the self-lubrication system is not working, remove the chain and guide bar<br />
and clean out the oil ways of the chainsaw and guide bar. On reassembly, if<br />
the self-lubrication system is still not working, please take it to an authorised<br />
service centre.
OPERATION<br />
STARTING & STOPPING THE CHAINSAW<br />
• Remove the chain guard.<br />
• With the chainsaw unplugged, release the chain brake by pulling the front<br />
hand guard firmly towards the back of the electric chain saw until a click is<br />
heard. To check the chain brake has been released you should be able to move<br />
the chain by hand.<br />
• Connect the cable to the power supply.<br />
• Ensure the brake is working efficiently; check its operation every time you use<br />
the chainsaw be<strong>for</strong>e cutting any wood.<br />
• WARNING: The on/off switch must never be depressed be<strong>for</strong>e pulling back the<br />
front hand guard.<br />
• Hold the electric chainsaw by its grips with both hands.<br />
• To start the chainsaw, push the lock-off button <strong>for</strong>ward and squeeze the<br />
trigger (ON/OFF) towards the handle. Release the lock-off button.<br />
• To stop the chainsaw, release the trigger (ON/OFF)<br />
• WARNING: Hold the electric chainsaw with both hands until the chain is<br />
completely still.<br />
• The chain will continue to move <strong>for</strong> a short time after the trigger is released<br />
while it decelerates to a stop. This is normal.<br />
OPERATING THE CHAINSAW<br />
When operating the chainsaw, always:<br />
• Run the chainsaw motor at full speed. This is safer, as there is less chance of<br />
pull-in (refer to Avoiding Pull-in section) or kick-back (refer to Avoiding<br />
Kickback section).<br />
• Position your body to the left of the chainsaw so if it kicks back uncontrollably,<br />
it goes over your right shoulder, keeping the guide bar and chain on the line<br />
furthest from the body.<br />
• Keep a firm grip with your left hand on the front handle, with your thumb<br />
securely below the handle. The swivel of the wrist in a kick-back situation will<br />
activate the chain brake.<br />
• Make sure the chain is tensioned correctly.<br />
POWER CABLE POSITIONING<br />
• During use, the chainsaw power cable will be<br />
continually pulled as it is moved from one<br />
position to another.<br />
• There is a cable hook on the housing of the<br />
chainsaw to prevent the electrical connection loosening and the power cable<br />
releasing itself from the socket on the chainsaw.<br />
• Note: The support is <strong>for</strong> the extension cord, and not the cable from the<br />
chainsaw.<br />
• To fit the power cable to the hook, make a tight loop in the power cable,<br />
approximately 300mm from the socket on the chainsaw.<br />
• Fit the loop into the rectangular recess at the rear of the chainsaw and over<br />
the hook, ensuring the loop is securely in place.<br />
• To seat the cable firmly, gently pull one of the two lengths of extension cable<br />
on the right hand side of the chainsaw.<br />
• When the cable is correctly seated, insert the chainsaw plug into the socket of<br />
the extension cable.<br />
AVOIDING KICKBACK<br />
Kickback may occur when the nose or tip of the guide bar touches an object, or<br />
when the wood closes in and pinches the saw chain in the cut. Tip contact in<br />
some cases may cause a very fast reverse reaction, kicking the guide bar up and<br />
back towards the operator. Pinching the saw chain along the top of the guide bar<br />
may push the guide bar rapidly back towards the operator. Either of these<br />
reactions may cause you to lose control of the saw and that could result in<br />
serious injury to user. The following precautions should be followed to minimize<br />
kickback:<br />
• Always be aware of the position of the upper quadrant of the blade tip<br />
(shaded area).<br />
• Never engage the upper quadrant of the guide bar with the wood you are<br />
cutting.<br />
• Do NOT let the nose of the guide bar make contact with a log, branch, ground<br />
or other obstruction.<br />
• Always cut back bushes, vegetation and clear any obstructing debris be<strong>for</strong>e<br />
attempting a cut that might trigger a kickback.<br />
• Hold the chain saw firmly with both hands when the motor is running. Use a<br />
firm grip with thumbs and fingers encircling the chain saw handles.<br />
• Do NOT over reach.<br />
• Ensure a firm footing and good balance at all times.<br />
• Do NOT cut above shoulder height.<br />
• Use devices such as low kickback chain, guide bar nose guard, chain brakes<br />
and special guide bars that reduce the risks associated with kickback.<br />
AVOIDING PULL-IN<br />
Pull-in can occur when the bottom of the chain is used <strong>for</strong> cutting and is stopped<br />
suddenly by hitting a <strong>for</strong>eign object or getting pinched. This pulls the chainsaw<br />
<strong>for</strong>wards and may cause the user to lose control. Pull-in can also occur when the<br />
chain is not running at full speed when contact is made with the wood and if the<br />
bumper spike is not held securely against the wood being cut.<br />
• Ensure the chain is rotating at full speed and the bumper spike is in correctly<br />
positioned when making a cut.<br />
AVOIDING PUSHBACK<br />
Pushback can occur when the top of the chain is used <strong>for</strong> cutting and is stopped<br />
suddenly by hitting a <strong>for</strong>eign object or getting pinched. This pulls the chainsaw<br />
towards the user and may cause the user to lose control.<br />
• Take care not to twist the chainsaw as it is removed when bucking from<br />
underneath the log.<br />
• Do NOT cut more than one log at any one time.<br />
• Be aware of situations that may cause the chain to pinch or pull.<br />
4
CHAIN BRAKE<br />
• If kick back<br />
occurs, the chain<br />
brake will be<br />
activated via the<br />
front hand guard.<br />
The front hand<br />
guard is pushed<br />
<strong>for</strong>wards by the<br />
back of the hand and this causes the chain brake to stop the chain saw.<br />
• To be able to<br />
use the chainsaw<br />
again, you must<br />
first release the<br />
saw chain. Switch<br />
off the chainsaw,<br />
then push the<br />
front hand guard<br />
back into the<br />
vertical position<br />
until it locks in place The chain brake is now fully functional again.<br />
AVOIDING JAMMING THE CHAINSAW<br />
• Avoid cuts that will cause the chainsaw to jam in a tree trunk or limb.<br />
• Always cut into the compression wood first until the cut starts to close. Always<br />
make the compression cut beneath the log or limb if suspended from one end<br />
and on top if it is supported at both ends. Then cut from the other side<br />
towards the compression cut. Make a habit of using a wedge to prevent the<br />
compression cut jamming the chainsaw blade.<br />
BUCKING & LIMBING<br />
Bucking is cutting a fallen log into smaller lengths. Limbing is the removal of<br />
branches from a fallen tree. Make sure that you have a good, firm footing and<br />
stand uphill of the log when cutting on sloped ground. If possible, the log<br />
should be supported so that the end to be cut off is not resting on the ground. If<br />
the log is supported at both ends and you must cut in the middle, make a<br />
downward cut halfway through the log and then make the undercut. This will<br />
prevent the log from pinching<br />
the bar and chain. Be careful that<br />
the chain does not cut into the<br />
ground when bucking or limbing<br />
as this causes rapid dulling of the<br />
chain and can cause kickback to<br />
occur.<br />
WARNING: Do Not touch<br />
protruding branches with the bar<br />
tip to prevent kickback. Use the<br />
metal gripping teeth to secure<br />
the saw onto the wood, be<strong>for</strong>e<br />
starting to cut. Use the gripping<br />
teeth as a leverage point “X”<br />
while cutting, see right.<br />
Reset the gripping teeth at a lower point when sawing thicker logs by pulling<br />
the chain saw slightly backwards, until the gripping teeth release, and reposition<br />
at a lower level to continue sawing.<br />
WARNING: Do NOT remove the saw completely from the wood.<br />
Do NOT stand on the log you are cutting as the vibrations and cutting action<br />
could cause it to move, risking a fall.<br />
5<br />
BUCKING TECHNIQUES<br />
Log supported along entire length Cut up from beneath the buck being<br />
careful not to cut into the ground<br />
Log supported on one end, proceed First, make an insertion from beneath,<br />
as if using a saw-horse cutting up 1/3 of the buck diameter to<br />
avoid splintering. Secondly, cut from<br />
above the buck to meet the first insertion.<br />
Avoid pinching.<br />
Log supported on both ends Make a cut from above the buck of 1/3 of<br />
the buck diameter, equidistant between<br />
the supports at each end, to avoid<br />
splintering. Cut up from beneath to meet<br />
the first cut. Avoid pinching.<br />
Note: The best way to hold a log while bucking is to use a saw horse. When this<br />
is not possible, the log should be raised and supported by limb stumps or by<br />
using supporting logs. Ensure the log being cut is securely supported.<br />
BUCKING USING A SAWHORSE<br />
1. Hold the saw firmly with<br />
both hands and keep the<br />
saw to the right of your<br />
body while cutting.<br />
2. Keep the left arm as straight<br />
as possible.<br />
3. Keep weight on both feet.<br />
The chainsaw should only be<br />
used when the buck has<br />
sturdy, reliable support. The<br />
machine should be held to the<br />
right of the body, at a safe<br />
distance.<br />
The chain needs to be moving at full speed be<strong>for</strong>e coming into contact with the<br />
wood. When this has been achieved, the machine should be fixed to the wood<br />
using dogs. During cutting this support should be used as a lever.<br />
• Hold the saw firmly with both hands and keep the saw to the right of your<br />
body while cutting.<br />
• Keep the left arm as straight as possible.<br />
• Keep weight on both feet.
FELLING TREES<br />
To fell a tree, observe all the safety regulations and proceed as follows:<br />
The chainsaw may be used to fell only trees with trunks which are smaller in<br />
diameter than the length of the guide bar. If the saw chain gets jammed, release<br />
it using a wooden wedge. Do not try to lever the saw out of the cut. When felling<br />
on a slope, always stand uphill of the tree.<br />
Check the tree <strong>for</strong> signs of damage or decay be<strong>for</strong>e felling. Decayed trees can<br />
split during felling and dead or loose branches could free themselves through the<br />
vibrations of the sawing action. Felling trees is dangerous and requires practice. If<br />
you are a beginner or inexperienced using chainsaws seek professional training.<br />
First determine the likely direction of fall using the following criteria:<br />
• The intended direction of fall<br />
• The wind direction and wind speed<br />
• The natural lean of the tree<br />
• Slope of the ground<br />
• Any surrounding tree or building which may obstruct, deflect or cause the<br />
falling tree to change direction.<br />
• Any other factors, such as uneven branch configuration which could cause the<br />
tree to be heavier on one side than the other.<br />
Once the direction of fall is determined, clear two escape routes. These should be<br />
in the opposite direction to the planned direction of fall and approximately at<br />
45° to the position of the undercut. Ensure that tools and equipment do not<br />
block the escape routes at any time.<br />
Further precautions to be taken when felling trees:<br />
• Take extra care when felling in the vicinity of power lines, railway lines and<br />
roads. If the tree felling is too dangerous to per<strong>for</strong>m due to these hazards, do<br />
NOT proceed with the felling and seek professional advice from a qualified<br />
arborist.<br />
• Always ensure a work area of 2½ tree lengths is clear of people around the<br />
tree.<br />
• Trees with large buttress roots may require the buttress root to be cut be<strong>for</strong>e<br />
felling. To do this cut vertically into the buttress root and then horizontally<br />
until the buttress root becomes loose and can be removed.<br />
Felling:<br />
• The chainsaw must be running be<strong>for</strong>e it comes into contact with the wood.<br />
Switch on the chainsaw. Saw a notch (remove a 45° wedge of trunk) up to ¼<br />
of the depth of the trunk into a low part of the tree trunk in the direction of<br />
the fall and then remove the loose piece.<br />
• Make a horizontal cut on the side opposite to the notch; ensuring<br />
approximately a tenth of the diameter of the trunk is not sawn, <strong>for</strong>ming a<br />
hinge which will allow the tree to fall in a controlled manner. Do NOT cut all<br />
the way through the hinge as this could de-stabilise the falling tree.<br />
• A wedge may need to be driven into the horizontal cut to aid the felling of the<br />
tree.<br />
• Always stand to the side of the falling tree, never behind it.<br />
• When the tree begins to fall, remove the chainsaw, switch the chainsaw off,<br />
call a warning of “Timber!”, and retreat through the cleared escape route.<br />
Beware of falling limbs as you retreat.<br />
• When the tree falls, watch the crown. Wait <strong>for</strong> the crown to stop moving. Do<br />
NOT continue to work under branches which have got stuck and possibly<br />
support the weight of the crown.<br />
SHARPENING THE CHAIN<br />
When the cleanness of cut deteriorates, it is recommended that the chain be<br />
replaced.<br />
However, it is possible to sharpen the existing chain if done carefully.<br />
To sharpen the chain refer to below and proceed as follows:<br />
• Disconnect from the mains supply<br />
• Always wear protective gloves.<br />
• Ensure the chain is correctly tensioned.<br />
• Engage the chain brake to lock the chain on the bar.<br />
• Use a round file whose diameter is 1.1 times the cutting tooth depth.<br />
• File at an angle perpendicular to the bar, and 38° to the direction of travel (A).<br />
• File each tooth from in towards out only.<br />
• Sharpen each tooth equally by using the same number of strokes.<br />
• Check the safety depth gauge height every 5th chain sharpening.<br />
• If the depth gauges are also trimmed it is essential that the original profile be<br />
restored.<br />
• Use a depth gauge-measuring instrument to check the height of the depth<br />
gauge. Depth gauge measuring jigs are available from most reputable tool<br />
merchants.<br />
A<br />
6
TROUBLESHOOTING<br />
Problem Cause Advice<br />
Motor does not run No electricity Check socket, switch, cables and plugs <strong>for</strong> damage. Any repair must be<br />
carried out by an authorised service agent.<br />
Worn carbon brushes Carbon brushes need replacing.<br />
Chain does not move Chain brake Check the chain brake and release if necessary.<br />
Poor cutting per<strong>for</strong>mance Blunt saw chain Sharpen or replace the saw chain.<br />
Chain tension Check chain tension.<br />
Saw chain fitted incorrectly Check saw chain direction<br />
Chain jumps off guide bar Chain tension Check chain tension.<br />
Chain works with difficulty Chain tension Check chain tension.<br />
Chain becomes hot Chain lubricant Check oil level. Check chain lubrication.<br />
7<br />
TECHNICAL INFORMATION<br />
Nominal Voltage 230V~50Hz<br />
Chain Saw CS9518BE23LS<br />
Rated Power 2200W<br />
Length of Bar 460mm<br />
Tool-less Chain Tensioning (SDS) YES<br />
Chain Speed 13 m/s<br />
Front Brake Time 0.15 sec<br />
Oil Tank Capacity 300 ml<br />
Noise Level 107 dB<br />
Vibration 1.5 m/s2<br />
Net Weight 5.3 kg<br />
Protection Class Double Insulation
CLEANING & MAINTENANCE<br />
WARNING - Always ensure that the tool is switched off and the<br />
plug is removed from the mains socket be<strong>for</strong>e any adjustments or<br />
maintenance are undertaken.<br />
• Always keep the air holes clean on the electric chainsaw body.<br />
They can become clogged with dust during use and this can<br />
cause the motor the other fundamental parts of the electric<br />
chainsaw to over heat. It is recommended that this is carried out<br />
after every use.<br />
• Do NOT operate the chainsaw with the air intake on the ground<br />
as this will draw <strong>for</strong>eign particles into the motor area and<br />
damage the windings of the motor.<br />
• Regularly check to see if any dust or <strong>for</strong>eign matter has entered<br />
the grills near the motor and around the on/off switch. Use a<br />
soft brush to remove any accumulated dust. Wear safety glasses<br />
and a dust mask whilst cleaning.<br />
• Wipe the chainsaw housing with a soft damp cloth. A mild<br />
detergent can be used but do not use any abrasive or alcoholbased<br />
cleaning agents.<br />
• Water must never come into contact with the chainsaw. Do NOT<br />
get wet.<br />
• Never use caustic agents to clean plastic parts.<br />
• Turn the guide bar periodically to use both sides and to generate<br />
even wear.<br />
• Clean the guide bar and oil holes periodically.<br />
• The chainsaw should be periodically serviced to check the correct<br />
operation of the chain, chain drive, motor and brake. This should<br />
be done by an authorised service centre.<br />
• Deburr the race sides periodically with a flat file.<br />
• The bar needs to be evened with a flat file if one of the races is<br />
higher than another and then smoothed with a file and fine<br />
sandpaper. If races are considerably worn, check that the height<br />
is always greater than the chain’s transmission links so that the<br />
latter do not touch the bottom. Replace the bar if this should<br />
occur.<br />
STORAGE<br />
• Replace the electric chainsaw blade cover and store in a dry<br />
place. Do not store in damp places.<br />
• If storing <strong>for</strong> an extended period, remove the chain and guide<br />
bar and protect with anti-corrosion oil be<strong>for</strong>e storing.<br />
DISPOSAL<br />
Waste electric products should not be disposed of with<br />
household waste. Please recycle where facilities exist. Check<br />
with your local Authority or retailer <strong>for</strong> recycling advice.<br />
PACKAGING<br />
• Dispose of packaging at your local recycling centre.<br />
• Dispose of paper and carton separately from plastic bags at your<br />
local recycling centre.<br />
• Dispose of item at the end of its lifespan at your local authorised<br />
household waste recycling centre.<br />
8<br />
EC DECLARATION OF CONFORMITY<br />
In accordance with EN ISO 17050-1:2004<br />
We The Enterprise Department Ltd.<br />
Of 11 Bridge Street, Bishop’s Stort<strong>for</strong>d, Hert<strong>for</strong>dshire, UK. CM23 2JU<br />
in accordance with the following Directive(s):<br />
2006/95/EC The Low Voltage Directive<br />
2006/42/EC<br />
hereby declare that:<br />
<strong>Electric</strong> Chainsaw<br />
The Machinery Directive<br />
Model number: 9226<br />
Batch Number: 16676<br />
is in con<strong>for</strong>mity with the applicable requirements of the following documents<br />
Ref. No. Title Edition date<br />
BS EN 60745-1 Safety of Hand-Held Motor-Operated <strong>Electric</strong> <strong>Tools</strong> 2009<br />
General requirements<br />
BS EN 60745-2-13 Safety of Hand-Held Motor-Operated <strong>Electric</strong> <strong>Tools</strong> 2009<br />
– Particular requirements <strong>for</strong> chainsaws<br />
The Low Voltage Directive 2006<br />
I hereby declare that the equipment named above has been designed to comply with<br />
the relevant sections of the above referenced specifications. The unit complies with all<br />
applicable Essential Requirements of the Directives.<br />
Mr. Stuart Fowler<br />
Imports Director<br />
27.06.2012<br />
RETURNS OR FAULTS<br />
Please do not return<br />
this item <strong>for</strong> any reason<br />
without first calling the<br />
Customer Service number<br />
0844 482 4400.