Hex Pummer Documentation - Solarbotics
Hex Pummer Documentation - Solarbotics
Hex Pummer Documentation - Solarbotics

You also want an ePaper? Increase the reach of your titles
YUMPU automatically turns print PDFs into web optimized ePapers that Google loves.
The<br />
<strong>Hex</strong><strong>Pummer</strong><br />
A Complete BEAM Solar-Powered<br />
Night Light Kit Inside<br />
This nocturnal BEAM device charges up all day, and<br />
trickles power out all night long as “PUMMs” of<br />
light. That means it drives each of its four ultrabright<br />
LEDs by turning on strong, then slowly<br />
decaying away. It’s a very smooth, non-digital solarpowered<br />
light show that turns itself on in the dark!<br />
Document Revision: January 8th, 2007<br />
®<br />
®<br />
Ltd.<br />
©<br />
Skill Level:<br />
Beginner<br />
(Soldering Req’d)<br />
2 hrs
This page left intentionally blank
HEX PUMMER - TABLE OF CONTENTS<br />
Table of Contents . . . . . . . . . . . . . . . . . . . . . . . . . . . . . . . . . . . . . (i)<br />
Parts List / Tools Req’d . . . . . . . . . . . . . . . . . . . . . . . . . . . . . . . . . (ii)<br />
Introduction . . . . . . . . . . . . . . . . . . . . . . . . . . . . . . . . . . . . . . . . . . 1<br />
Circuit Schematic and Theory. . . . . . . . . . . . . . . . . . . . . . . . . . . 2-3<br />
Construction<br />
Electronics Assembly / Steps 1 - 3 . . . . . . . . . . . . . . . . . . . . . 4<br />
Electronics Assembly / Steps 4 - 5 . . . . . . . . . . . . . . . . . . . . . 5<br />
Electronics Assembly / Steps 6 - 7 . . . . . . . . . . . . . . . . . . . . . 6<br />
Electronics Assembly / Steps 8 - 9 . . . . . . . . . . . . . . . . . . . . . 7<br />
Testing and Operation . . . . . . . . . . . . . . . . . . . . . . . . . . . . . . . . . . 8<br />
Lesson in Soldering. . . . . . . . . . . . . . . . . . . . . . . . . . . . . . . . . . . . . 9<br />
<strong>Hex</strong> <strong>Pummer</strong> Modifications . . . . . . . . . . . . . . . . . . . . . . . . . . . . . 10<br />
<strong>Hex</strong> <strong>Pummer</strong> Display . . . . . . . . . . . . . . . . . . . . . . . . . . . . . . . . . . 11<br />
(i)
HEX PUMMER - PARTS LIST<br />
1 - <strong>Hex</strong>agon Shaped <strong>Hex</strong> <strong>Pummer</strong> Printed Circuit Board (PCB)<br />
4 - Clear Ultra-bright LEDs (clear, light-bulb-looking things)<br />
1 - SCC3733 37x33mm Solarcell<br />
2 - ‘AAA’ Rechargeable Batteries<br />
1 - Chunk of foam double-sided sticky-tape (aka: DSST) for securing the solarcell<br />
1 - 74HCT240 Octal Buffer IC Chip (bug-looking thing)<br />
4 - 0.47µF Monolythic capacitors<br />
2 - 1000µF Electrolytic capacitors (can-thing with two legs coming out one side)<br />
1 - Germanium Diode (little glass thing with two leads)<br />
1 - 100k Resistor (R1) (colored Brown / Black / Yellow / Gold)<br />
4 - 1.0M Resistors (R2, R3, R5, R7) (colored Brown / Black / Green / Gold)<br />
1 - 2.2M Resistor (R8) (colored Red / Red / Green / Gold)<br />
1 - 3.6M Resistor (R6) (colored Orange / Blue / Green / Gold)<br />
1 - 4.3M Resistor (R4) (colored Yellow / Orange / Green / Gold)<br />
1 - ‘AAA’ Battery Holder<br />
1 - Length of solarcell twisted hookup wire<br />
1 - Suction cup & hook<br />
1 - Set of instructions (if you can’t find these, you’re in deep trouble - seeing that you are<br />
reading it right now!)<br />
Tools Required:<br />
- SAFETY GLASSES. We can’t stress this enough. AT ALL TIMES wear safety glasses while<br />
soldering and working on this kit. Eye injuries ain’t worth the risk...<br />
- Soldering iron & necessary accessories (electronics solder, damp sponge, soldering iron holder)<br />
- Set of fine side-cutters or snips for trimming leads and wires<br />
- Wire strippers to prepare the solarcell wires for soldering<br />
- Glue or double-sided sticky tape for mounting the solarcell (epoxy is best; hot-glue acceptable)<br />
- Needle-nose or fine-tip pliers (or technically known as “grabber-nabbers”)<br />
- Blue-nosed, three-limbed Bolivian tiger-moth (optional)<br />
- A sense of humor. You’re in for a lot of bad jokes...<br />
We strongly suggest you inventory the parts in your kit to make sure you have all the parts listed. If<br />
anything is missing, contact <strong>Solarbotics</strong> Ltd. For replacement parts information.<br />
Disclaimer of Liability<br />
<strong>Solarbotics</strong> Ltd. Is not responsible for any special, incidental, or consequential damages resulting<br />
from any breach of warranty, or under any legal theory, including lost profits, downtime, good-will,<br />
damage to or replacement of equipment or property, and any costs or recovering of any material or<br />
goods associated with the assembly or use of this product. <strong>Solarbotics</strong> Ltd reserves the right to<br />
make substitutions and changes to this product without prior notice.<br />
(ii)
HEX PUMMER - INTRODUCTION<br />
Just in case you’re new to the field of BEAM robotics, let’s go through the basics: BEAM is an<br />
acronym for the four fundamentals of building relatively simple robots.<br />
Biology - Steal the best ideas that mother nature has come up with so far. Can’t beat several<br />
million years of development for inspiration.<br />
Electronics - Since we can’t (easily) use biochemistry to build our devices, we’ll use simple,<br />
effective electronics to fulfill our needs. You will rarely find anything as complicated as a<br />
microprocessor in a BEAM robot, as we strive to get the most performance out of as little silicon as<br />
possible. You will often find a solarcell glommed onto the top of many BEAM devices, and though<br />
much less powerful than batteries, they will last for years. This gives solar-powered BEAM devices<br />
very long lifetimes where they won’t require you watching over their battery status.<br />
Aesthetics - Just another word for “Coolness”. If it looks clean, lean, and slick, chances are that it<br />
was well built and will last much longer than a device lacking aesthetic appeal.<br />
Mechanics - Clever mechanical design of a robot can make it very effective, much more so than a<br />
clumsy design that needs additional electronics to overcome its mechanical limitations. Many<br />
BEAM robots are often built out of “recycled technology”, otherwise known as techno-scrap (like<br />
that broken walkman in your junk-drawer).<br />
With that out of the way, let’s get onto the workings of the <strong>Hex</strong> <strong>Pummer</strong>.<br />
<strong>Hex</strong> <strong>Pummer</strong> Behavior<br />
We call this a <strong>Hex</strong> <strong>Pummer</strong> because, well, um, you see...I use it to cast evil spells on unwitting<br />
Prince and Princesses (You know, a “hex” - it’s an evil spell....aw, just forget it...). Really poor jokes<br />
aside, it’s because it’s in the shape of a hexagon, a six-sided geometric shape. We experimented<br />
with several shapes - squares, triangles, truncated tetrahedrons, but nothing had the same<br />
efficiency in shape as the hexagon. If you get six of these together, you can make a “<strong>Pummer</strong><br />
Plate”. Or string them in rows, or parallel lines. Believe me, this is the coolest shape.<br />
“<strong>Pummer</strong>” - I’ll bet that’s a word you’ve never come across before. It’s a term coined by Mark<br />
Tilden (the Father of BEAM technology) to describe the action of a special type of BLIFNAR<br />
(technical term for “Blinky LIght For No Apparent Reason”). If you had to describe what this little<br />
light did, you could say “It exhibits a rapid turn-on action followed by a moderate decay of<br />
millicandela output”. OR you could say “If you could hear this light, it would say ‘PUMmmmm’”.<br />
Besides, it’s much easier to refer to this as a “<strong>Pummer</strong>” than as a “Device exhibiting a rapid turnon<br />
action (*YAWN*...stretch) followed by a moderate decay of (wake me when you<br />
finish...Zzznnfzzzz...) millicandela output”.<br />
Technically, we’re using what is called a pair of “Grounded Bicore Oscillators” in “charge-pump”<br />
configuration. This means we’re using one chip to power two pummers, each of which use a<br />
simple circuit arrangement to charge up power from the storage batteries to a point where they can<br />
make the LEDs (the lights) illuminate in brilliant pulses that slowly die away. If you’ve ever listened<br />
to a camera flash charge up, it makes a climbing, buzzing noise. Camera flashes need very high<br />
voltages (near 300 volts!), and they use just a 6 volt source to do it. We’re doing the same thing,<br />
but in a much smaller scale.<br />
(1)
2 x ‘AAA’ NiCad<br />
Batteries<br />
R2<br />
R4<br />
R3<br />
D1<br />
C1<br />
E<br />
Note: the E means “Enable Low”, which<br />
means it turns on when it receives a zero volt signal<br />
HEX PUMMER - CIRCUIT AND THEORY<br />
C2<br />
R6<br />
C3 C4 R8<br />
LED3<br />
LED1<br />
R7<br />
R1<br />
C6<br />
(1000µF)<br />
LED2<br />
C5 (1000µF)<br />
LED4<br />
Solarcell<br />
R1 sets the “dark turn-on threshold”. Decrease it if you want to turn on earlier (in more light), or increase it so it has<br />
to be near pitch black before it activates.<br />
R2 & R4 set how long the LEDs actually turn on; R6 & R8 set how long much time between pulses. Increase R6 & R8 if<br />
you want slower plulses.<br />
R3 & R7 “slave” the two sets together. Omit these if you want a more random pumm behavior.<br />
(2)
HEX PUMMER - CIRCUIT AND THEORY<br />
Stage 1 - Initial charge path<br />
Stage 2 - Outputs flip polarity (+ turns to -, - turns to +)<br />
(3)<br />
+<br />
-<br />
-<br />
Charge stored<br />
across capacitor<br />
+ -<br />
+<br />
Discharge blocked<br />
by diode<br />
The operation of this circuit is based around a common circuit arrangement called a “voltage doubler”. The<br />
part of the circuit in gray is the oscillator (extra output buffers used in the circuit diagram above not shown),<br />
with outputs that flip voltage polarity about every ½ second. The trick to the voltage doubler is in the diode<br />
& capacitor arrangement.<br />
At stage 1, the oscillator output is so that the capacitor charges up through the diode. Since an uncharged<br />
capacitor looks the same electronically as a piece of wire, the vast majority of the current flow goes to it,<br />
rather than out the output line.<br />
When the polarities swap (stage 2), the capacitor’s charge now sits “on top” of the switched voltage output<br />
of the oscillator, like stacking two batteries in series, plus to minus, plus to minus. And (for example) what<br />
happens when you stack two 1.5V batteries like this? You get twice the voltage - 3V! With the circuit we<br />
have here, we’re taking the approximately 2.4V from the power in the nicad batteries, and boosting them<br />
up near 4.8V.<br />
You’ll notice that this charge-pump diagram uses a diode. In the actual circuit, this is replaced by the LEDs<br />
1 & 3, and can be easily replaced by regular diodes for just 2 LED operation.<br />
Since there is a diode blocking the capacitor from discharging back into the oscillator, this doubled voltage<br />
is forced out the output line. In this case, the doubled voltage is pushed through a LED, which causes the<br />
brilliant blast of light you see. If you have an oscilloscope (regular voltmeters are too slow), you can<br />
measure the voltage doubling yourself by measuring the voltage output at the ground side of the C5 or C6<br />
capacitor. Take out LED2/4 first, otherwise it’ll eat up the voltage before you can measure it.
- BATT +<br />
- BATT +<br />
R1<br />
SC<br />
R5<br />
R1<br />
SC<br />
R5<br />
LED1<br />
D1<br />
LED2<br />
LED1<br />
D1<br />
LED2<br />
+ C6<br />
+ C5<br />
In<br />
R2 R3<br />
C2 C4<br />
C1<br />
74HCT240<br />
C3<br />
LED3<br />
R6<br />
R7<br />
(C) <strong>Solarbotics</strong> 2000<br />
+ C6<br />
+ C5<br />
In<br />
R2 R3<br />
C2 C4<br />
C1<br />
74HCT240<br />
C3<br />
LED3<br />
R6<br />
R7<br />
(C) <strong>Solarbotics</strong> 2000<br />
LED4<br />
Out<br />
LED4<br />
Out<br />
R4<br />
R8<br />
R4<br />
R8<br />
<strong>Hex</strong> <strong>Pummer</strong> 1.1<br />
<strong>Hex</strong> <strong>Pummer</strong> 1.1<br />
<strong>Hex</strong> <strong>Pummer</strong> 1.1<br />
<strong>Hex</strong> <strong>Pummer</strong> 1.1<br />
HEX PUMMER - ASSEMBLY<br />
Assembly of a <strong>Pummer</strong> is a pretty straight-forward procedure. Follow the steps, and nobody will<br />
get hurt. With a little luck, you may come out with a mastery of the black art of electronics<br />
assembly!<br />
If you’re not familiar with soldering, first take a look at the short tutorial on page 8. Take your<br />
time, follow the step numbers, and check off each box as you complete the steps. Just like back in<br />
grade 1, right? But this time, the crayons are HOT! BE CAREFUL!<br />
2<br />
1<br />
Mount the Chip to the PCB<br />
Install 0.47µF Capacitors<br />
3<br />
74HCT240<br />
0.47µF<br />
Installing Resistors<br />
Step 1: Let’s start with the 74HCT240 chip. Why? Well, everybody likes<br />
to play with the chip first, so lets get it out of the way before you lean<br />
on it and stab your hand with 20 itty-bitty chip leg/stabbers.<br />
When installing the chip, make sure the little dot and notch on the end<br />
of it match the picture layout of the 74HCT240 on the printed circuit<br />
board (PCB). Flip the circuit board over, and solder the legs in place. It<br />
helps to fold over 2 or 3 of the chip’s legs poking through to hold it in<br />
place while soldering.<br />
Step 2: Install the four 0.47µF capacitors in the positions labeled C1,<br />
C2, C3, and C4. They won’t be labeled<br />
“0.47µF” (that’d be too easy). Rather,<br />
they’re marked with the industry<br />
standard number “474” (47 * 10^4<br />
picofarads, if you must know).<br />
These capacitors don’t care which way<br />
they get installed. Jam them in, solder<br />
them on, and clip off the excess leads<br />
poking off the bottom.<br />
R1 - 100k<br />
Resistor Value Band 1 Band 2 Band 3 Band 4<br />
100k Brown Black Yellow Gold<br />
1.0 Meg Brown Black Green Gold<br />
2.2 Meg Red Red Green Gold<br />
3.6 Meg Orange Blue Green Gold<br />
4.3 Meg Yellow Orange Green Gold<br />
R2, R3, R7 - 1.0 Meg<br />
R4 - 4.3 Meg<br />
R8 - 2.2 Meg<br />
R6 - 3.6 Meg<br />
R5 (Optional<br />
Slave) - 1.0 Meg<br />
(4)<br />
The <strong>Hex</strong> <strong>Pummer</strong> after steps 1 & 2<br />
Step 3: Installing the resistors is a pretty straightforward<br />
process. They don’t care which way the<br />
go in, just as long as they’re soldered in the<br />
proper spot. Identify them by colour, using the<br />
resistor table.<br />
Note: Installation of resistors R3 & R7 are optional.<br />
If installed, they guarantee the sequence<br />
in which the LEDs pumm. If not installed, LEDs<br />
1&2 will beat out of rhythm with LEDs 3&4,<br />
which can be actually kinda nice to look at. If you<br />
like things to be a little random and chaotic, leave<br />
R3 & R7 out.<br />
After all resistors are installed, trim off the excess<br />
component lead from the underside.<br />
You don’t have to install R5 unless if you’re<br />
connecting your <strong>Pummer</strong> to another one. More<br />
about that later...
- BATT +<br />
4<br />
Note flat mark goes<br />
near LED text, ON<br />
OTHER SIDE!<br />
- BATT +<br />
R1<br />
R1<br />
SC<br />
R5<br />
SC<br />
R5<br />
LED1<br />
D1<br />
LED2<br />
LED1<br />
D1<br />
LED2<br />
5b<br />
+ C6<br />
+ C5<br />
Install the Diode at postion ‘D1’<br />
5a<br />
In<br />
R2 R3<br />
C2 C4<br />
C1<br />
74HCT240<br />
C3<br />
LED3<br />
R6<br />
R7<br />
(C) <strong>Solarbotics</strong> 2000<br />
+ C6<br />
In<br />
LED4<br />
Out<br />
R2 R3<br />
C2 C4<br />
C1<br />
74HCT240<br />
+ C5<br />
C3<br />
R6<br />
R7<br />
(C) <strong>Solarbotics</strong> 2000<br />
Out<br />
Install LEDs<br />
on OTHER SIDE!<br />
Closeup of LED installation<br />
LED3<br />
LED4<br />
R4<br />
R8<br />
R4<br />
R8<br />
<strong>Hex</strong> <strong>Pummer</strong> 1.1<br />
<strong>Hex</strong> <strong>Pummer</strong> 1.1<br />
<strong>Hex</strong> <strong>Pummer</strong> 1.1<br />
<strong>Hex</strong> <strong>Pummer</strong> 1.1<br />
HEX PUMMER - ASSEMBLY (CONT’D)<br />
Step 4: The diode you are installing here is a special type - it’s a called a<br />
“germanium” diode. This is a “deluxe” version of a diode, that lets your<br />
<strong>Pummer</strong> work longer than if just a regular diode was used.<br />
UNLIKE the resistors, the diode does care which way it goes in. Take a close<br />
look at it - one end of the glass cylinder has a stripe on it. This is called the<br />
“cathode” (yeah, like you really care. You just want to know which way to<br />
put it in right? Sigh... and all the work I<br />
go through for you... ).<br />
Bend the diode’s legs down, right close<br />
to the glass body of the diode. Insert<br />
the diode with the stripe on the body<br />
matching the stripe on the circuit board.<br />
Now, the holes may be a little close, so<br />
don’t use too much force to put it in -<br />
you don’t want to break it!<br />
The diode installation<br />
Step 5: Now it’s time to install the LEDs (the Light Emitting Diodes). This<br />
requires a bit of attention to how they go in - LEDs don’t operate when put<br />
in backwards. Take a close look at the collar around the edge of the LED.<br />
You’ll see a flat spot near one of the legs. This is the “cathode” (I’ll bet you<br />
still don’t care about cathodes...), and place it on the circuit board so it<br />
matches the flat spot on the LED symbol on the circuit board. Repeat this<br />
four times at the places marked “LED1” through “LED4”.<br />
IMPORTANT:<br />
Mount them on the OTHER SIDE of the circuit board. The<br />
other side is what will be the front, where you will want to see the lights<br />
blinks!<br />
Your <strong>Pummer</strong> kit may come with LEDs of different colours. In general, the<br />
LEDs may be red, green, orange, or yellow, but since they’re called “waterclear”,<br />
you won’t know until you light the LEDs up. DO NOT find out by<br />
connecting them directly to a battery! If<br />
you MUST know what the colour is,<br />
charge up one of the 1000µF capacitors<br />
with one or two 1.5V batteries (connect<br />
it for about 1 second), then touch the<br />
LED legs to the capacitor legs - LED<br />
cathode to the capacitor leg nearest the<br />
stripe mark on it’s body. It will pulse<br />
quickly and die. You remember how to<br />
tell which LED leg is the cathode, don’t LEDs installed on UNDERSIDE of Circuit Board<br />
you?<br />
(5)
1000uF<br />
- BATT +<br />
R1<br />
1000uF<br />
SC<br />
R5<br />
LED1<br />
D1<br />
LED2<br />
RU6715<br />
+ C6<br />
+ C5<br />
In<br />
R2 R3<br />
C2 C4<br />
C1<br />
6<br />
74HCT240<br />
C3<br />
LED3<br />
R6<br />
R7<br />
© <strong>Solarbotics</strong> 2000<br />
LED4<br />
Install the<br />
main capacitors<br />
Out<br />
R4<br />
R8<br />
HEX PUMMER - ASSEMBLY (CONT’D)<br />
<strong>Hex</strong> <strong>Pummer</strong> 1.1<br />
<strong>Hex</strong> <strong>Pummer</strong> 1.1<br />
Installing the power capacitors C5 capacitor installation<br />
Step 6: Time for the main power storage capacitors. These hold the<br />
charge-pumped power, and release them in a burst to the LEDs, giving<br />
them their blast of light. These capacitors are polarity sensitive - putting<br />
them in backwards is a no-no!<br />
Identify the negative leg of the capacitor by the stripe on the body of the capacitor.<br />
Alternately, the longer leg is the positive leg. Anyways, put the capacitor in with the longer leg through the hole<br />
nearest the ‘+’, in positions C4 and C5.<br />
Do this for the top and bottom capacitors, and snip off the excess lead from underneath.<br />
NOTE:<br />
SOLDER TO THESE PADS<br />
ON OTHER SIDE!<br />
- BATT +<br />
R1<br />
SC<br />
R5<br />
LED1<br />
D1<br />
LED2<br />
Install the<br />
solarcell<br />
negative (’-’, the square pad), red to positive (’+’, the round<br />
pad)). SOLDER THESE WIRES TO THE PADS ON THE OTHER<br />
SIDE. It’s not an absolute necessity, but it will make mounting<br />
your solarcell easier, as the other side is where it will be!<br />
If you want to make your installation a bit neater, trim the wire<br />
back so it just pokes out about 2cm (about 3/4”) from the<br />
solarcell before soldering it on. it’ll mount much cleaner to the<br />
circuit board when you glue the solarcell down.<br />
+ C6<br />
+ C5<br />
7<br />
In<br />
R2 R3<br />
C2 C4<br />
C1<br />
74HCT240<br />
C3<br />
LED3<br />
R6<br />
R7<br />
(C) <strong>Solarbotics</strong> 2000<br />
LED4<br />
Out<br />
R4<br />
R8<br />
<strong>Hex</strong> <strong>Pummer</strong> 1.1<br />
<strong>Hex</strong> <strong>Pummer</strong> 1.1<br />
Step 7: The solarcell in your kit is pretty robust, but I<br />
wouldn’t use it to scrape the scum off your bathroom tile,<br />
ok? It’s epoxy-encapsulated for protection and long life -<br />
treat it nice, and it’ll be nice back to you.<br />
Find the twisted-pair wire (black & red) and strip off the<br />
ends so a bit of wire is exposed. I mean just a bit, like<br />
3~5mm (that’s about 1/8” ~1/4” to our ‘merican friends).<br />
Solder these ends to the solarcell, black to negative (-),<br />
red to positive (+).<br />
After you have the wires attached to the solarcell, you can<br />
strip and solder the other ends to the pads in the box<br />
labeled “SC” (for “Solar Cell” - clever, eh?). Again, black to<br />
(6)<br />
Solarcell installation
- BATT +<br />
- BATT +<br />
R1<br />
R1<br />
SC<br />
R5<br />
SC<br />
R5<br />
LED1<br />
D1<br />
LED2<br />
LED1<br />
D1<br />
LED2<br />
+ C6<br />
+ C5<br />
In<br />
R2 R3<br />
C2 C4<br />
C1<br />
74HCT240<br />
C3<br />
LED3<br />
R6<br />
R7<br />
© <strong>Solarbotics</strong> 2000<br />
+ C6<br />
+ C5<br />
In<br />
LED4<br />
Out<br />
R2 R3<br />
C2 C4<br />
C1<br />
74HCT240<br />
C3<br />
8<br />
9<br />
LED3<br />
R6<br />
R7<br />
© <strong>Solarbotics</strong> 2000<br />
LED4<br />
Out<br />
Install the<br />
battery holder<br />
R4<br />
R8<br />
R4<br />
R8<br />
<strong>Hex</strong> <strong>Pummer</strong> 1.1<br />
Install the<br />
batteries<br />
<strong>Hex</strong> <strong>Pummer</strong> 1.1<br />
<strong>Hex</strong> <strong>Pummer</strong> 1.1 <strong>Hex</strong> <strong>Pummer</strong> 1.1<br />
HEX PUMMER - ASSEMBLY (CONT’D)<br />
Step 8: Slap that bad-boy battery holder<br />
down in the only place it’ll fit - the<br />
position labeled ‘BATT’ (clever, these<br />
labels, eh?). Install it so that it sits<br />
directly down on top of the 74HCT240<br />
chip, then solder it in place (flip the<br />
whole thing over to solder).<br />
These battery-holder leads are pretty<br />
strong, and will be the only support they<br />
need. If you wish, you can glue the<br />
holder to the ‘240 chip for additional<br />
support later.<br />
Step 9: Now for the question of the<br />
century: what do you put in a battery<br />
holder? (”Ummm... turkey leftovers?”)<br />
(sigh...)<br />
Take your rechargeable batteries and<br />
stick them in the way the holder has<br />
labeled.<br />
(7)<br />
Battery holder installation closeup<br />
Battery-holder installation<br />
The battery installation<br />
Step 10: Assuming that your <strong>Pummer</strong> is showing signs of life, the only<br />
thing left to do now is to glue down your solarcell to the other side of the<br />
PCB. We personally like double-sided foam sticky-tape, but epoxy or hotglue<br />
works well in a pinch. Cut the tape in half, and put two pads on the<br />
back of the solarcell. Test fit it, and if all looks good, peel off the backing<br />
and stick’er down!<br />
Alternately, you can use a stiffer wire for your solarcell attachments, and<br />
make it do double-duty as an adjustable solarcell-holder. A bit harder to<br />
work with, but if you want that solarcell pointing someplace else other<br />
than straight up, this answer works well.
HEX PUMMER - TESTING & OPERATION<br />
Your <strong>Hex</strong> <strong>Pummer</strong> is now officially complete. Great. You’ve put the batteries in; now what? Well, if<br />
your batteries arrived with any sort of charge, you should be able to cover up the solarcell, and see<br />
the LEDs start to operate. Nothing happening? Try standing in a closet. Still nothing? Are you<br />
standing in the closet without your <strong>Pummer</strong>? Leave the closet, and go get the <strong>Hex</strong> <strong>Pummer</strong>, and<br />
try again!<br />
If your device isn’t operating after finishing assembly, you’ll most likely have batteries that need to<br />
charge up. A quick charge in sunlight or under a halogen or incandescent lamp 30cm away (1 foot)<br />
for about a ½ hour should give you some results. If you aren’t that patient, you can even use<br />
(gasp!) regular AAA batteries to power it up. Regular batteries will run this device for many days,<br />
up to weeks at a time (but of course, they won’t recharge). Remember, you have to trick the <strong>Hex</strong><br />
<strong>Pummer</strong> into believing it’s dark - cover the solarcell to test the operation.<br />
If your device still fails to cooperate, recheck your installation. LED 1 & 2 work together, as do LED<br />
3 & 4, so if either one of the LEDs in each pair are wrong, that pair will fail totally. Also make sure<br />
your solder job is neat, tidy, and clean of flux. If you are using water-soluble flux, you must wash<br />
off your circuit board. Use some hot water and an old toothbrush to clean the flux-gunk out from<br />
between the solder joints, top and bottom. Then blow out the water under the chip, and leave it dry<br />
(hey - why not under a nice, warm, nicad-recharging light?).<br />
Like any other Nicad battery, they like to go through complete charge/discharge cycles.<br />
Fortunately, the <strong>Hex</strong> <strong>Pummer</strong> (for the most part) does exactly this. It take approximately four hours<br />
of direct sunlight for the batteries to fully charge. That means even if you place your <strong>Hex</strong> <strong>Pummer</strong><br />
in a location where it gets<br />
only reflected light, or sees<br />
only overcast daylight, it will<br />
most likely store up enough<br />
energy to Pumm when it<br />
gets dark.<br />
The great thing about the<br />
<strong>Hex</strong> <strong>Pummer</strong> design is that<br />
it uses practically any<br />
amount of energy to Pumm<br />
the LEDs to some degree.<br />
Even on a very weak<br />
charge, you can still see the<br />
LEDs weakly doing their<br />
Pumm-thing. In truth, you<br />
will see the most intense<br />
operation during the first<br />
hour of operation, which will<br />
slowly decrease in intensity<br />
for the remainder of the<br />
night.<br />
Volts<br />
2.7<br />
2.5<br />
2.3<br />
2.1<br />
1.9<br />
1.7<br />
1.5<br />
Activation:<br />
6:33pm<br />
Recharge<br />
starts at:<br />
8:11am<br />
<strong>Hex</strong> <strong>Pummer</strong> 3-Day Operation<br />
Activation:<br />
5:17pm<br />
12:41 AM<br />
2:35 AM<br />
4:29 AM<br />
6:23 AM<br />
8:17 AM<br />
10:11 AM<br />
12:05 PM<br />
1:59 PM<br />
3:53 PM<br />
5:47 PM<br />
7:41 PM<br />
9:35 PM<br />
11:29 PM<br />
1:23 AM<br />
2:17 AM<br />
4:11 AM<br />
6:05 AM<br />
7:59 AM<br />
9:53 AM<br />
11:47 AM<br />
1:41 PM<br />
3:35 PM<br />
5:29 PM<br />
7:23 PM<br />
9:17 PM<br />
11:11 PM<br />
1:05 AM<br />
2:59 AM<br />
4:53 AM<br />
6:47 AM<br />
8:41 AM<br />
10:35 AM<br />
12:29 PM<br />
2:23 PM<br />
4:17 PM<br />
6:11 PM<br />
8:05 PM<br />
9:59 PM<br />
11:53 PM<br />
1:37 AM<br />
3:31 AM<br />
(8)<br />
Recharge<br />
starts at:<br />
7:11am<br />
Time<br />
Activation:<br />
5:27pm<br />
Recharge<br />
starts at:<br />
7:15am
HEX PUMMER - LESSON IN SOLDERING<br />
Soldering! If you have never soldered before, it could be<br />
an intimidating concept. After all, you’re being asked to take<br />
a scalding-hot piece of metal, and use it to melt metal onto<br />
delicate electronic components!<br />
It is actually a pretty straight-forward process. We’ve taught<br />
8-year old kids to solder (with supervision), so there’s no<br />
reason why you can’t wrap your head around this skill.<br />
The trick is heat. Heat is good. Too often, new students are<br />
scared by the concept of all this heat in a small space. Well,<br />
what is really hot to you and me (the soldering iron), is<br />
actually just a sunny day at the beach for the components.<br />
A successful solder connection can almost be guaranteed if<br />
you remember you are heating two pieces of metal, not just<br />
one. Here’s the basic procedure:<br />
1) Put the component leg through the solder pad hole (snugged up close)<br />
2) Wipe off the tip of the soldering iron on a damp sponge so it’s shiny and clean. It transfers heat better<br />
when it’s clean.<br />
2) Holding the soldering iron like a pencil (not at the tip! Hot metal, remember?), jam the tip into the<br />
corner where the leg comes through the hole. This means the soldering iron tip is heating both the leg<br />
and the solder pad.<br />
3) Count to 4. This heats up the parts.<br />
4) While keeping the soldering iron in place, add solder to the other side of the leg. At this point, both the<br />
leg and pad will be hot enough that they will melt the solder into a nice connection. You’ll probably notice<br />
some yellow or clear goop appear when you solder. Don’t worry, this is flux, and it is in the solder to help<br />
make a good, clean connection.<br />
Do NOT treat the soldering iron like a brush. That is, DON’T melt solder to the tip, and then try to smear<br />
it onto the connection. You’re a electronics enthusiast, not a painter!<br />
X<br />
X<br />
Bad & Good Solder Joints<br />
<br />
PN<br />
2222<br />
Solder flecks<br />
Bad<br />
No flow from leg to pad<br />
Bad<br />
Solder “bridge” across pads<br />
Good<br />
Flows from leg to pad<br />
1. Insert component<br />
2. Wipe soldering iron tip on damp sponge<br />
3. Stick iron tip into corner of leg & pad<br />
4. Count to 4<br />
5. Add solder<br />
6. Remove iron<br />
Solder<br />
Soldering Iron<br />
(hold here!)<br />
Solder Pad<br />
Circuit Board<br />
Component Leg<br />
If you mess up, don’t worry. You can reheat the solder and<br />
bang it loose with a quick snap onto a pad of paper<br />
(please use eye protection at all times). If you get two<br />
solder pads fused together, use the soldering iron like a<br />
pen, and “draw” a line between the pads. The solder will<br />
remelt, and flow off to the sides.<br />
The final check for any solder joint is the “wiggle test”.<br />
Firmly grip each component and gently rock it side-toside.<br />
Any movement of the component legs on the other<br />
side of the board means the joint isn’t firm, no matter how<br />
good it looks. Reheat and apply more solder to the joint.<br />
One of the most common errors is to accidently "bridge" the pads between<br />
components. Make sure that there aren't any tiny flecks of solder or wire<br />
between the pads.<br />
(9)
HEX PUMMER - MODIFICATIONS<br />
2 LED Operation - Now, why would you want to run only two of the<br />
four LEDs? Well, two take half as much power. That means you’ll<br />
get much brighter <strong>Pummer</strong>s running for longer than if all four were<br />
in operation.<br />
If you want to convert your <strong>Hex</strong> <strong>Pummer</strong> into dual-LED operation,<br />
R1<br />
R2<br />
C2<br />
R3<br />
C4<br />
you simply replace the LEDs at positions LED1 and LED3 with<br />
R4<br />
diodes (diode bar closest the flat spot on the LED picture). Regular<br />
1N914 or 1N4148 silicon diodes (the most common types) will work<br />
just fine, but you will get a little more performance if you can use<br />
74HCT240<br />
Diodes instead of LEDs for 2-LED operation<br />
“germanium” type diodes (1N34). They’re somewhat more expensive (around $1 each), but if you want<br />
to squeeze every last erg of energy out of your <strong>Hex</strong> <strong>Pummer</strong>, that’s what you want to use.<br />
Slaving Operation - If you happen to have more than one <strong>Hex</strong> <strong>Pummer</strong>, you can connect them together<br />
and get the lights operate in sequence. Rather than having a collection of LEDs firing off at<br />
random times, you can have a smooth series of Pumms across<br />
several <strong>Hex</strong> <strong>Pummer</strong>s. In theory, there is no limit to how many you<br />
can link up, or what shape you can build with your <strong>Hex</strong> <strong>Pummer</strong>s.<br />
Remember resistor pad R5? We didn’t install anything there during<br />
assembly, as it’s only needed for slaving one <strong>Hex</strong> <strong>Pummer</strong> to another.<br />
If you are going to now slave two together, you have to install<br />
that 1.0 Meg resistor on one of the pummers.<br />
You have a ‘Master’ <strong>Hex</strong> <strong>Pummer</strong> that sets the beat for all the ‘Slave’<br />
<strong>Pummer</strong>s that follow it. Each of the slaves need this resistor installed<br />
at position R5.<br />
Once you have soldered in the slaving R5 resistor, you can now link<br />
up the master to the slave.<br />
1) Voltage Ground Connection: Simply make an electrical connection<br />
from one square pad on one <strong>Hex</strong> <strong>Pummer</strong> to the square pad on<br />
the other <strong>Hex</strong> <strong>Pummer</strong>. This connects the “ground” lines, which give<br />
the two devices a common voltage reference point. In the picture, the<br />
ground is soldered to the wire that is actually tying the two <strong>Pummer</strong>s<br />
together.<br />
2) Signal Connection: Just run a wire from the pad labeled “Out” on<br />
the master to the pad “In” on the slave. That’s it! Now your <strong>Pummer</strong>s<br />
are set up to coordinate the sequence they now activate their LEDs!<br />
(10)<br />
Diodes<br />
- BATT +<br />
SC<br />
LED1<br />
D1<br />
+ C6<br />
In<br />
LED3<br />
Installing the R5 slave resistor (1meg)<br />
Connecting master (top) to slave (bottom)<br />
<strong>Hex</strong> <strong>Pummer</strong> 1.1<br />
<strong>Hex</strong> <strong>Pummer</strong> 1.1
Outdoor-facing & Indoor-facing <strong>Hex</strong> <strong>Pummer</strong>s<br />
HEX PUMMER - DISPLAY<br />
Your <strong>Hex</strong> <strong>Pummer</strong> is now complete - now what do you do with it? Well, putting it on display is always<br />
a good idea. Do with it what you will - put it on your car rear dashboard (put blue LEDs in it - makes<br />
traffic line up behind you for miles!), hang it in your window, dangle it from your pets collar...I won’t tell<br />
anyone.<br />
Here’s some basic technique you can use to display your <strong>Hex</strong> <strong>Pummer</strong>.<br />
Feel free to expand on the concept!<br />
Facing outwards is easy - just hang the pummer so both the solarcell and<br />
LEDs point towards the great outdoors.<br />
Facing inwards requires a bit more work, as you want the solarcell<br />
pointing towards the best light source. The answer? Flip the side the<br />
solarcell is on! Just glue the solarcell down to the top of the battery<br />
holder, leaving the face with all the purrrrdy lights facing inwards.<br />
(11)<br />
Outwards facing LEDs<br />
Inwards-facing LEDs<br />
<strong>Hex</strong> <strong>Pummer</strong> free-standing
Liked the <strong>Hex</strong><strong>Pummer</strong>? Want more?<br />
There are several more kits <strong>Solarbotics</strong> offers for any skill level!<br />
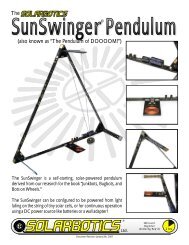
The SunSwinger Pendulum uses the unique<br />
BEAM "force-coil" circuit to drive this eyecatching<br />
window or desk ornament.<br />
Designed for solar power, it can also run<br />
from batteries or any 3V+ DC power supply<br />
(ideal for dark cubicles!).<br />
K PN Pendulum. . . . . . . . . $29.50USD/CAD<br />
Herbie the Mousebot is a 9-volt batterypowered<br />
robot that loves to chase flash light<br />
beams. If there are several Herbies in the<br />
same area, they can be configured to chase<br />
each other! These little robots are so quick,<br />
you have to run to keep up to them!<br />
K HM Herbie the Mousebot . . . . . . . . . . . . .<br />
$39.95USD/CAD<br />
The SolarSpeeder 2 Kit is a very quick<br />
Solaroller that can cover 3 meters (10 feet) in<br />
under 40 seconds in direct sunlight. Simple to<br />
construct and a blast to watch, this is a great<br />
kit for all beginners!<br />
K SS Solarspeeder . . . . . . . . $27.50USD/CAD<br />
Like the Mousebot, the K PP Photopopper<br />
seeks light and avoids obstacles but is solar<br />
powered! It’s pretty quick, covering a meter<br />
per minute (that’s 3.3 feet!). Newly upgraded<br />
with better electronics and gold circuit board!<br />
K PP Photopopper . . . . . . . $45.00USD/CAD<br />
®<br />
Ltd.<br />
201 35th Ave NE, Calgary, AB, Canada T2E 2K5<br />
N. America Toll Free: 1-866-276-2687<br />
Local / International: 403-232-6268<br />
Fax: 1-403-226-3741