Operator's Manual Model OBC Open Breast Array Coil for ... - Invivo
Operator's Manual Model OBC Open Breast Array Coil for ... - Invivo
Operator's Manual Model OBC Open Breast Array Coil for ... - Invivo

Create successful ePaper yourself
Turn your PDF publications into a flip-book with our unique Google optimized e-Paper software.
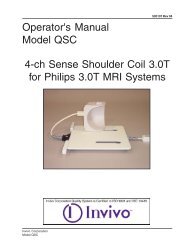
<strong>Operator's</strong> <strong>Manual</strong><br />
<strong>Model</strong> <strong>OBC</strong><br />
<strong>Invivo</strong> Corporation<br />
<strong>Model</strong> <strong>OBC</strong><br />
<strong>Open</strong> <strong>Breast</strong> <strong>Array</strong> <strong>Coil</strong> <strong>for</strong><br />
GE Signa System<br />
500018 Rev 07<br />
1
500018 Rev 07<br />
February 2000<br />
©2000 <strong>Invivo</strong> Corporation<br />
All rights reserved. No part of this publication may be reproduced, transmitted, transcribed, stored in a<br />
retrieval system, or translated into any language in any <strong>for</strong>m by any means without the written permission of<br />
<strong>Invivo</strong> Corporation.<br />
Licenses and Trademarks<br />
The <strong>Invivo</strong> logo is a registered trademark of <strong>Invivo</strong> Corporation.<br />
Signa System is a registered trademark of the General Electric Company.<br />
This manual describes the use and operation <strong>for</strong> the <strong>Open</strong> <strong>Breast</strong> <strong>Array</strong> <strong>Coil</strong> on G.E. Signa 1.5T and 1.0T<br />
MRI Systems.<br />
Proper per<strong>for</strong>mance of this coil is guaranteed only while the coil is being used on the MR system (hardware/<br />
software level) specified at the time of purchase. Upgrades or other modifications to the system software<br />
and/or hardware may affect compatibility. Prior to upgrading your MR system, please contact your <strong>Invivo</strong><br />
representative to discuss coil compatibility issues. Failure to do so may void your warranty.<br />
2<br />
Attention, Consult Accompanying<br />
Documents<br />
Type BF Equipment<br />
Class II Equipment<br />
Caution:<br />
Federal law restricts this device to sale,<br />
distribution, and use by or on the order of a<br />
physician.<br />
Introduction<br />
NOTICE:<br />
TRANSPORT AND STORE THIS PRODUCT UNDER<br />
THE FOLLOWING ENVIRONMENTAL CONDITIONS<br />
ONLY, FOR A PERIOD NOT EXCEEDING 4 WEEKS:<br />
AMBIENT TEMPERATURE OF -40°C to +60°C<br />
RELATIVE HUMIDITY OF 10% TO 100% (Non-<br />
Condensing)<br />
ATMOSPHERIC PRESSURE ON 765 hPa TO 1011 hPa<br />
WARNING: This product contains chemicals, including<br />
lead, known to the state of Cali<strong>for</strong>nia to cause birth<br />
defects or other reproductive harm. Wash hands after<br />
handling.<br />
This manual describes the safety precautions, features, use, and care of the<br />
<strong>Open</strong> <strong>Breast</strong> <strong>Array</strong> <strong>Coil</strong>, compatible with the GE Signa MRI System. Please<br />
review this manual thoroughly be<strong>for</strong>e using the device.<br />
If you have any questions or comments on this manual, or need any assistance<br />
with the use of the product, please contact your <strong>Invivo</strong> representative:<br />
1-800-524-1476<br />
<strong>Invivo</strong> Corporation<br />
<strong>Model</strong> <strong>OBC</strong>
Table of Contents<br />
Manufacturer:<br />
<strong>Invivo</strong> Corporation<br />
3545 SW 47th Avenue<br />
Gainesville, FL 32608<br />
U.S.A.<br />
Phone: (352) 336-0010<br />
Fax: (352) 336-1410<br />
Web: www.invivocorp.com<br />
E-mail: info@invivocorp.com<br />
<strong>Invivo</strong> Corporation<br />
<strong>Model</strong> <strong>OBC</strong><br />
500018 Rev 07<br />
<strong>Open</strong> <strong>Breast</strong> <strong>Array</strong> <strong>Coil</strong> Components....................................................... 4<br />
Chapter 1 - Patient Safety ......................................................................... 5<br />
Training ...................................................................................................... 5<br />
Indications ................................................................................................. 5<br />
Contraindications ....................................................................................... 5<br />
Precautions ................................................................................................ 5<br />
Cautions ..................................................................................................... 5<br />
Emergency Procedures ............................................................................. 7<br />
Technical Considerations .......................................................................... 7<br />
Chapter 2 - Quality Assurance .................................................................. 8<br />
Quality Assurance ..................................................................................... 8<br />
Chapter 3- Using the <strong>OBC</strong> <strong>Coil</strong> ................................................................. 9<br />
Positioning the <strong>Open</strong> <strong>Breast</strong> coil on the Patient Cradle ............................. 9<br />
Establishing the Patient LANDMARK ...................................................... 10<br />
Connecting the Cable .............................................................................. 10<br />
Field of View and Coverage ..................................................................... 10<br />
Selecting the Active <strong>Coil</strong>.......................................................................... 11<br />
Ramp and Sternum Pads ......................................................................... 11<br />
Chapter 4- Scanning ................................................................................ 12<br />
Auto Prescan ........................................................................................... 12<br />
Localizing With the GE Signa Body <strong>Coil</strong>.................................................. 12<br />
Using Autoshim...................................................................................12<br />
Suggested Scan Protocols ..................................................................... 13<br />
TI Time Check Procedure ........................................................................ 16<br />
5X Software ............................................................................................. 16<br />
SNR Imbalance in Bilateral <strong>Breast</strong> <strong>Coil</strong>s ................................................. 17<br />
Chapter 5- Installation and Maintenance ............................................... 19<br />
Config File In<strong>for</strong>mation............................................................................. 19<br />
Adding <strong>OBC</strong> Softkeys .............................................................................. 19<br />
Cleaning ................................................................................................... 21<br />
For Sales and Service<br />
in Europe:<br />
<strong>Invivo</strong> Germany GmbH<br />
Schweinfurter Strasse 28<br />
97076, Würzburg<br />
Germany<br />
Phone: +49 (0)931 359 76-0<br />
Fax: +49 (0)931 359 76-10<br />
Authorized Representative in Europe:<br />
GBM Authorised Representative Ltd.<br />
The White House, 2 Meadrow<br />
Godalming, Surrey GU7 3HN<br />
United Kingdom<br />
Phone: 44 (0) 7710 039721<br />
Fax: 44 1483 424 310<br />
Web: www.mba-gbm.com<br />
E-mail: martin.biggs@mba-gbm.com<br />
3
500018 Rev 07<br />
4<br />
<strong>Open</strong> <strong>Breast</strong> <strong>Array</strong> <strong>Coil</strong><br />
Components<br />
Your <strong>Open</strong> <strong>Breast</strong> <strong>Array</strong> <strong>Coil</strong> package consists of the following parts. Please inspect the package upon receipt<br />
to make sure all parts are present and in good order. Use this guide to refer to part names throughout this manual.<br />
Ramp Pad<br />
<strong>Operator's</strong><br />
<strong>Manual</strong><br />
Sternum Pad<br />
<strong>OBC</strong>-63-PA<br />
<strong>Invivo</strong> Corporation<br />
<strong>Model</strong> <strong>OBC</strong>
Chapter 1 - Patient Safety<br />
Training<br />
Quality<br />
Assurance<br />
Indications<br />
Contraindications<br />
Precautions<br />
Cautions<br />
<strong>Invivo</strong> Corporation<br />
<strong>Model</strong> <strong>OBC</strong><br />
500018 Rev 07<br />
This manual contains detailed in<strong>for</strong>mation on the setup, positioning and use of the<br />
<strong>Invivo</strong> Corporation coil. Read the insructions carefully and thoroughly be<strong>for</strong>e<br />
attempting to scan patients with the coil.<br />
The procedure described in the Quality Assurance Section of this manual should be<br />
per<strong>for</strong>med upon receipt of the coil to establish a baseline of coil per<strong>for</strong>mance. The<br />
procedure should be repeated at regular intervals.<br />
The coil is indicated <strong>for</strong> use, on the order of a physician, in conjunction with an MR<br />
scanner as an accessory to produce images of the breast.<br />
The operator should be aware of the following contraindications <strong>for</strong> use related to the<br />
strong magnetic field of the MR system:<br />
Scanning is contraindicated <strong>for</strong> patients who have electrically, magnetically or<br />
mechanically activated implants (<strong>for</strong> example. cardiac pacemakers). The<br />
magnetic and electromagnetic fields produced by the MR System and coil may<br />
interfere with the operations of these devices.<br />
Scanning patients with intracranial aneurysm clips is contraindicated.<br />
Precautions should be taken when scanning patients with the following conditions:<br />
Greater than normal potential <strong>for</strong> cardiac arrest<br />
Increased likelihood <strong>for</strong> developing seizures or claustrophobia<br />
Unconscious, heavily sedated, or confused physical or mental state<br />
Inability to maintain reliable communications<br />
The following general warning statements apply to scanning with a magnetic<br />
resonance system. For further details, review the warnings in your MR system<br />
Operators <strong>Manual</strong>.<br />
Do not cross or loop cables. Arcing and patient burns could result. Route<br />
cables out of the magnet so that they do not touch the patient.<br />
5
500018 Rev 07<br />
6<br />
Ensure that the patient does not <strong>for</strong>m a loop with any<br />
body parts. For breast coils in particular, patients are<br />
imaged lying prone with both arms extended above<br />
the head (superman). Do not allow patients to<br />
touch any part of the right hand or arm to any part<br />
of the left hand or arm. The loop <strong>for</strong>med by doing<br />
so could cause an RF burn at the point of contact.<br />
Use pads to ensure the patient’s hands do not<br />
touch any metal features of the patient table or<br />
cradle. Be sure to educate the patient accordingly<br />
and check the patient’s position immediately be<strong>for</strong>e<br />
the scan.<br />
Assure that the patient is not touching the bore. If necessary, place pads<br />
between the patient and the surface of the bore.<br />
If the patient complains of warming, tingling, stinging, or similar sensations,<br />
promptly stop the scan procedure, examine the patient, and contact the<br />
responsible physician be<strong>for</strong>e continuing the procedure. Pay special<br />
attention to very young, sedated, or other compromised patients who may<br />
not be able to communicate effectively.<br />
Patients with ferromagnetic metal should not be scanned because the<br />
magnetic field may interact with implanted surgical clips or other ferromagnetic<br />
materials.<br />
Persons with cardiac pacemakers or other implanted electronic devices<br />
should not enter the magnetic field zone delineated by the MR system<br />
manufacturer.<br />
There is a risk to scanning feverish or decompensated cardiac patients.<br />
Facial makeup should be removed be<strong>for</strong>e scanning because it may contain<br />
metal flakes which can cause skin and eye irritation. Permanent eyeliner<br />
tattoos may cause eye irritation due to ferromagnetic particles.<br />
Patients who work in environments in which there is a risk of having<br />
embedded metallic fragments in or near the eye should be carefully<br />
screened be<strong>for</strong>e undergoing an MR exam.<br />
<strong>Invivo</strong> Corporation<br />
<strong>Model</strong> <strong>OBC</strong>
Emergency<br />
Procedures<br />
Technical<br />
Considerations<br />
<strong>Invivo</strong> Corporation<br />
<strong>Model</strong> <strong>OBC</strong><br />
Visually inspect the cable insulator jackets,<br />
strain reliefs and connector boxes be<strong>for</strong>e<br />
each use. If the insulation is broken, or if the<br />
cable is frayed, immediately discontinue<br />
use of the device.<br />
500018 Rev 07<br />
In the unlikely event that a coil creates smoke, sparks, or makes an unusually loud<br />
noise, or if the patient requires emergency assistance:<br />
• Stop the scan if one is in progress.<br />
• Remove the patient from the scan room if medical treatment is needed.<br />
The coil and accessories require special conditions regarding<br />
electromagnetic compatibility. The coil must be installed and used in a<br />
shielded scan room provided with the MR magnet and system. The user<br />
must ensure that the scan room door is closed during system use. Failure<br />
to do so may cause reciprocal interference with portable and mobile RF<br />
communications equipment, affecting the per<strong>for</strong>mance of the MR coil and/<br />
or such equipment.<br />
The coil should only be used with the accessories specified in the operator’s<br />
manual.<br />
The use of accessories other than those specified in the operator’s manual<br />
may result in decreased ESD immunity of the coil or MR system, causing<br />
damage to the coil and/or system.<br />
The equipment should not be used with other coils or equipment present in<br />
the MR scanner except as specified in the Operator’s <strong>Manual</strong>.<br />
Tampering with the cable pins and connector may damage the connector<br />
and affect coil or system per<strong>for</strong>mance. Please verify that connector and<br />
pins are not damaged be<strong>for</strong>e use.<br />
7
500018 Rev 07<br />
Chapter 2 - Quality Assurance<br />
Quality<br />
Assurance<br />
8<br />
Using the 4.38-inch<br />
diameter sphere<br />
phantom, scan using<br />
the protocol shown.<br />
If the image appears as<br />
shown, the <strong>OBC</strong> coil is<br />
malfunctioning.<br />
Discontinue use of the<br />
coil and call your MR<br />
system service<br />
representative<br />
Be sure that you have chosen the correct coil, and activate the desired coil(s) from<br />
the menu selection on the surface coil screen. The coil(s) chosen must be<br />
R_BREAST, L_BREAST, or 2_BREAST.<br />
Position the <strong>Breast</strong> <strong>Coil</strong> in the center of the patient cradle. Place two phantom<br />
holders and two 4.38" diameter sphere phantoms (provided with your Signa<br />
System, part number 46-317586G1) in the left and right coil. Activate one of the<br />
above coil settings from your operator's console.<br />
Use the following spin echo sequence, TE=20 mS., TR=300 mS., 32 cm. FOV axial,<br />
5 mm. thick, 5 mm. spacing, 256x128, and one average or equivalent sequence.<br />
Scan using Auto Prescan. If Auto Prescan does not complete successfully, do not<br />
use the coil clinically. Upon completion of prescan, execute the scan. Window the<br />
scan as you normally would (window levels vary from system to system depending<br />
upon your hardware revision level). The scan should appear uni<strong>for</strong>m.<br />
If the image has signal voids, distortions, or black streaks, discontinue use of the<br />
coil. If the image is excessively noisy, repeat the scan using the GE 5-inch general<br />
purpose coil <strong>for</strong> 1.5T or an alternate coil <strong>for</strong> 1.0T supplied with your system. If the<br />
5-inch coil image or alternate coil image exhibits similar artifacts, the problem<br />
likely lies with the MRI system.<br />
Mode : Multi<br />
PSeq: ME<br />
TR: 300<br />
TE: 12.0 1/1<br />
256x128/1.0 NEX<br />
FOV: 14 cm.<br />
Thk: 10.0 mm .<br />
Imgs: 5/00:42<br />
<strong>Invivo</strong> Corporation<br />
<strong>Model</strong> <strong>OBC</strong>
Chapter 3 - Using the <strong>OBC</strong> <strong>Coil</strong><br />
Positioning<br />
the <strong>Open</strong><br />
<strong>Breast</strong> <strong>Coil</strong><br />
on the<br />
Patient<br />
Cradle<br />
Positioning<br />
the Patient<br />
<strong>Invivo</strong> Corporation<br />
<strong>Model</strong> <strong>OBC</strong><br />
500018 Rev 07<br />
The <strong>Open</strong> <strong>Breast</strong> <strong>Coil</strong> is designed <strong>for</strong> unilateral imaging of the left or right breast,<br />
or bilateral imaging of both breasts.<br />
The coil is designed to rest directly on the patient cradle. It is important that the<br />
coil lies directly on the patient cradle, since this will elevate the patient's breast<br />
to iso-center of the coronal scan plane. The Signa system with 4x software allows<br />
a scan offset in only one direction. Since the breast is already offset in the lateral<br />
direction, it is important that the anterior/posterior (A/P) location of the coil is at<br />
zero (in the coronal plane).<br />
If some <strong>for</strong>eign object (sheet, strap, etc.) is beneath the coil housing, the coil may<br />
move during the image acquisition, resulting in motion artifact. The coil must be<br />
placed on the patient cradle with the cable oriented into the magnet.<br />
The <strong>Open</strong> <strong>Breast</strong> coil is designed <strong>for</strong> feet-first exams only!<br />
Place the <strong>Open</strong> <strong>Breast</strong> <strong>Coil</strong> on<br />
the patient cradle with the cable<br />
directed towards the magnet.<br />
The <strong>Open</strong> <strong>Breast</strong> coil must be placed near the handle end of the patient cradle in<br />
order <strong>for</strong> the patient to enter the scanner feet first.<br />
Position the patient prone, centering breasts in the apertures of the coil. Use the<br />
open lateral side of the coil to visually center the breast in the coil. Adjust the<br />
cradle laterally so that a scanned breast may be placed in the center of the<br />
magnet. Ask the patient to move slightly superior or inferior until the breast is<br />
centered in the aperture. A pillow is best <strong>for</strong> supporting the patient's head and<br />
arms during the scan.<br />
Ensure that the patient does not <strong>for</strong>m a loop with any<br />
body parts. For breast coils in particular, patients are<br />
imaged lying prone with both arms extended above<br />
the head (superman). Do not allow patients to<br />
touch any part of the right hand or arm to any part<br />
of the left hand or arm. The loop <strong>for</strong>med by doing<br />
so could cause an RF burn at the point of contact.<br />
Use pads to ensure the patient’s hands do not<br />
touch any metal features of the patient table or<br />
cradle. Be sure to educate the patient accordingly<br />
and check the patient’s position immediately be<strong>for</strong>e<br />
the scan.<br />
9
500018 Rev 07<br />
Establishing<br />
the Patient<br />
LANDMARK<br />
Connecting<br />
the Cable<br />
Field of View<br />
and<br />
Coverage<br />
10<br />
Use the open lateral side of the coil to visually center the breast in the coil. Ask the<br />
patient to move slightly superior or inferior until the breast is centered in the<br />
aperture.<br />
The patient must be positioned feet first.<br />
The cable is connected to your system using a standard phased array plug. Plug<br />
the cable into the phased array port provided on your system.<br />
For unilateral imaging a FOV of 16 cm to 20 cm is suggested, depending upon<br />
breast size. The <strong>Open</strong> <strong>Breast</strong> coil aperture is 160 millimeters (16 cm) in<br />
diameter. If both coils are active, a field of view of 32 cm to 36 cm is<br />
suggested. You may use a smaller FOV if desired. It is recommended that the<br />
NO PHASE WRAP option be selected when establishing the scan parameters.<br />
See Chapter 3 <strong>for</strong> suggested scan protocols.<br />
<strong>Invivo</strong> Corporation<br />
<strong>Model</strong> <strong>OBC</strong>
Selecting the<br />
Active <strong>Coil</strong><br />
Ramp and<br />
Sternum<br />
Pads<br />
<strong>Invivo</strong> Corporation<br />
<strong>Model</strong> <strong>OBC</strong><br />
500018 Rev 07<br />
The breast imaging plat<strong>for</strong>m contains both a left breast coil and a right breast coil.<br />
One or both coil(s) can be active at any given time. To select the active coil(s),<br />
pick the proper selection from the coil selection screen on your plasma display.<br />
Set-up of the soft key selections <strong>for</strong> the <strong>Open</strong> <strong>Breast</strong> <strong>Array</strong> <strong>Coil</strong> are described in<br />
Chapter 4 of this manual.<br />
For patient com<strong>for</strong>t, a ramp pad and sternum pad have been provided. The ramp<br />
pad attaches to the <strong>OBC</strong>-63 PA <strong>Breast</strong> plat<strong>for</strong>m with velcro fasteners. The lower<br />
end of the ramp pad fits flush with GE Signa cradle pads.<br />
The sternum pad attaches to the top of the <strong>OBC</strong>-63 PA <strong>Breast</strong> plat<strong>for</strong>m with<br />
velcro fasteners. Center the sternum pad openings over the apertures of the<br />
breast plat<strong>for</strong>m and secure.<br />
If ramp or sternum pad become soiled, they may be cleaned easily with a solution<br />
of 30% isopropyl alcohol and 70% tap water.<br />
11
500018 Rev 07<br />
Chapter 4 - Scanning<br />
Auto Prescan<br />
Localizing<br />
With the<br />
Body <strong>Coil</strong><br />
IMPORTANT!<br />
Using<br />
Autoshim<br />
12<br />
Generally, the Signa System auto prescan will function normally when used with<br />
the open breast array coil. If auto prescan returns the message "auto prescan<br />
failed to complete normally", then manual prescan may be required to acquire the<br />
image. Consult your GE Signa operator's manual <strong>for</strong> manual prescan procedures.<br />
If a TR DRIVER FAULT occurs, then reseat the cable and try again. If the fault<br />
recurs, then it is likely the wrong coil selection was chosen at the coil menu. If<br />
the problem persists, call your GE Service Representative.<br />
The open breast array coil is designed to allow the Signa body coil to be used at<br />
any time while the open breast coil is in the scanner. This allows a large FOV (40<br />
cm) body coil localizer, which is helpful in determining the left or right offset<br />
required <strong>for</strong> imaging the breast.<br />
AUTOSHIM is a feature of 5X software AUTOPRESCAN to improve image<br />
quality. It does this by improving the magnetic field homogeneity within the FOV<br />
selected. The improvement in image quality is often dramatic when the selected<br />
FOV is far off center, and when acquiring FSE or T2 weighted scans.<br />
It is only recommended that autoshim be selected when operating this coil in the<br />
unilateral mode. For use in the bilateral mode, turn autoshim off. To use<br />
AUTOSHIM with the <strong>Open</strong> <strong>Breast</strong> <strong>Array</strong> <strong>Coil</strong> in the unilateral mode, use the<br />
following procedure:<br />
1. Begin a new exam.<br />
2. Choose L_BREAST or R_BREAST as the coil selection after it has been<br />
programmed on your system. This is a 1-channel selection.<br />
3. Make sure AUTOSHIM is selected.<br />
4. Run AUTOPRESCAN.<br />
5. Carry out a series of images <strong>for</strong> scout purposes, if desired. All subsequent<br />
scans will use these autoshim settings.<br />
6. When switching to the other breast, repeat steps 2-5.<br />
<strong>Invivo</strong> Corporation<br />
<strong>Model</strong> <strong>OBC</strong>
Suggested<br />
Scan<br />
Protocols<br />
<strong>Invivo</strong> Corporation<br />
<strong>Model</strong> <strong>OBC</strong><br />
3. Axial T2 FSE - Water Suppressed<br />
500018 Rev 07<br />
The following sagittal scan protocols have yielded good results when used with the open<br />
breast array coil . Of course, your site may have developed your own protocols which you<br />
prefer to use.<br />
1. Coronal / Localizer<br />
Figure FOV from #1 above * Only use one side of the coil.<br />
Turn off one side of the breast coil <strong>for</strong> any suppression<br />
sequence.<br />
18-20 cm.<br />
2D, FSE, Sat(w), NP, SPF, approx. 17-23 slices<br />
16 echo train, 1 echo, 170 TE, 4000 TR<br />
6mm, 1.0 gap<br />
256/256, 4 NEX Frequency A/P<br />
Center Frequency = FAT<br />
Suggested Scan Protocols<br />
<strong>Breast</strong> Implants/Leakage<br />
2D, MPGR, no options<br />
90 degree flip, 1 echo, minimum TE, 300 -400 TR<br />
40 FOV, 5mm, 2mm gap<br />
256/128, 1 NEX, Freq R/L, S/I P60/A20<br />
Center Frequency = Water<br />
From this figure out FOV <strong>for</strong> remaining sequences<br />
2. Axial/Sagittal T2 FSE<br />
Use graphic prescription and split slices to cover both breasts<br />
2D, FSE, NP, SPF, Grx<br />
TR 4000<br />
TE 170 1 echo, 16 echo train<br />
18-20 FOV, 5MM, 0.5 gap<br />
256/256, 2 NEX, Frequency A/P<br />
Center Frequency = Water<br />
13
500018 Rev 07<br />
14<br />
4. This scan is used to get a better FAT SAT <strong>for</strong> the axial<br />
T1 FAT SAT.<br />
Use one side of the breast coil only! Uneven FAT suppression<br />
can result if both coils are receiving signal in the same<br />
acquisition.<br />
T1 Axial/Sagittal FAT SAT<br />
2D, SE, SAT(F), No Phase Wrap, Grx<br />
1 echo, TE minimum full, TR 300<br />
FOV (from #1) - One side only! , 6mm thick/ 1 mm skip<br />
256/192, 1 NEX, Frequency R/L<br />
Center Frequency = Water<br />
5. When Fat and H 2 O signal are both removed <strong>for</strong><br />
silicone visualization<br />
FIR - with water - SAT<br />
IR, SAT(W) , No Phase Wrap, Grx<br />
Fast 8ETL , TE: 60, TR: 5000-7000<br />
FOV: 20 cm. , 6mm thick / 1mm skip<br />
256/192, 2 NEX<br />
TI time around 140-170, check under manual prescan.<br />
(Procedure <strong>for</strong> checking the TI time <strong>for</strong> each patient is listed on<br />
page 15 of this manual).<br />
Gadolinium Contrast Study<br />
T1 with & without Fat SAT. One Side Only!<br />
2D, SE, NP, (SAT/F)<br />
TR 600, TE minimum full, 20 cm FOV<br />
6mm slice thickness, 1mm gap<br />
256/192 2NEX, frequency A/P<br />
Center Frequency = Water<br />
Make sure scan parameters are identical <strong>for</strong> comparison<br />
with and without gadolinium<br />
<strong>Invivo</strong> Corporation<br />
<strong>Model</strong> <strong>OBC</strong>
<strong>Invivo</strong> Corporation<br />
<strong>Model</strong> <strong>OBC</strong><br />
Gadolinium Contrast Protocol<br />
FSPGR Multiphase<br />
Fast SPGR<br />
Pick two locations that show pathology<br />
2 Locations per aquisition / Interleaved 32 Phases<br />
TR: Min., TE: Min., FLIP: 35<br />
256x192 2-4 NEX<br />
22 cm. FOV<br />
500018 Rev 07<br />
Want scan time to be 3-5 min. long.<br />
Load each location separately into paging loop, 32 images in each.<br />
Watch uptake of gadolinium in selected slices.<br />
15
500018 Rev 07<br />
TI Time<br />
check<br />
4X Software<br />
5X Software<br />
16<br />
Procedure <strong>for</strong> checking TI time <strong>for</strong> inversion recovery to find correct TI time on<br />
4X Signa using manual prescan.<br />
Run Auto Prescan.<br />
Go into manual Prescan. Select CFA Fine. Type in "MIP(=modify image parameter).<br />
Type in a TI time value of 200 and look <strong>for</strong> the fat peak to grow (Peak on the right)<br />
Let the system have two passes and step down TI time in increments of ten. Let<br />
system make two complete knocking revolutions <strong>for</strong> each incremental drop of ten<br />
in the TI time (i.e. 190...180..170). Keep dropping TI time in increments of ten until<br />
the fat peak gets as flat as possible.<br />
The TI time number that you find that makes the fat peak as flat as possible will<br />
be used in the TI Time page in the protocol. Exit manual prescan. Go back to<br />
your protocol, and insert this patient's TI time value. Make sure that you haven't<br />
lost any slices because of the new TI time insertion.<br />
Go to the scan page to proceed with scan. Select Auto Prescan, then scan.<br />
Procedure <strong>for</strong> checking TI time <strong>for</strong> inversion recovery to find correct TI time on<br />
5X Signa using manual prescan.<br />
Run Auto Prescan.<br />
Go into manual Prescan. Select CFA Fine. Type in "mrsp(=modify real time<br />
system parameter).<br />
Type in a TI time value of 200 and look <strong>for</strong> the fat peak growth (peak on the right).<br />
Let the system have two passes and step-down TI time in increments of ten. Let<br />
the system make two complete knocking revolutions <strong>for</strong> each incremental drop of<br />
ten in the TI time (i.e. 190...180..170). Keep dropping TI time in increments of ten<br />
until the fat peak gets as flat as possible.<br />
The TI time number that you find that makes the fat peak as flat as possible will<br />
be used in the TI Time page in the protocol. Exit manual prescan. Go back to<br />
your protocol and insert this patient's TI time value. Make sure that you haven't<br />
lost any slices because of the new TI time insertion.<br />
Go to the scan page to proceed with the scan. Select Auto Prescan, then scan.<br />
<strong>Invivo</strong> Corporation<br />
<strong>Model</strong> <strong>OBC</strong>
SNR<br />
Imbalance in<br />
Bilateral<br />
<strong>Breast</strong> <strong>Coil</strong>s<br />
<strong>Invivo</strong> Corporation<br />
<strong>Model</strong> <strong>OBC</strong><br />
by Randy Duensing, 6/4/99<br />
500018 Rev 07<br />
It has been shown that a linear coil produces considerable asymmetry when<br />
placed on a conducting sample (1-3). Linear body coils and linear surface coils<br />
show this effect. The basic rationale can be demonstrated with a simple model in<br />
which we employ the principal of reciprocity. Assume a surface coil is being<br />
driven near a lossy dielectric sample.<br />
field from<br />
coil<br />
field from<br />
induced<br />
currrent<br />
field from<br />
coil<br />
field from<br />
induced<br />
currrent<br />
Because the sample (biological tissue) has a complex permittivity, the current<br />
induced in the sample will not be perfectly out of phase from the coil source<br />
current. The NMR signal is sensitive to the net rotating magnetic field at any<br />
given point. In an unrealistic but simple and explanatory example, assume that<br />
the induced field is equal to the source field at the locations at which the drawn<br />
field lines cross, that the field lines are perpendicular at that point and that the<br />
induced current is 90 degrees out of phase with the source current. The result<br />
would be complete quadrature (root two higher SNR) on one side of the coil and<br />
complete anti-quadrature (zero SNR) at the other side of the coil. Of course the<br />
imbalance is usually much less than this with only partial quadrature effects. We<br />
see that although the coil is bilaterally symmetric and the sample is bilaterally<br />
symmetric, that the NMR signal is not bilaterally symmetric due to the rotating<br />
nature of the physical phenomenon. To confirm that the source of visualized<br />
imbalance is not due to coil imbalance, one can reverse the coil in the magnet<br />
and still the SNR will be higher on the same side of the magnet even though the<br />
coil has been reversed.<br />
17
500018 Rev 07<br />
18<br />
A phased array coil is generally made up of linear elements, each of which<br />
demonstrates spin sensitivity corresponding to the physical requirements of the<br />
NMR phenomenon and a lossy dielectric sample. The reconstruction algorithm<br />
employed <strong>for</strong> multiple channels maintains the SNR of each loop and there<strong>for</strong>e keeps<br />
the imbalance described above. The argument can be extended to multiple coils<br />
and on a breast coil, the effect can be quite noticeable. Consider the figure below<br />
which demonstrates the area of expected gain and loss with respect to two breasts.<br />
weaker<br />
brighter<br />
weaker<br />
brighter<br />
In addition to the surface coil effect locally in each breast, there is also a common<br />
mode induced current which extends throughout the body. This results in some<br />
overall SNR imbalance in addition to the local SNR patterns in each breast. Again,<br />
one can confirm that the difference in the two sides is primarily due to induced<br />
current and the NMR phenomenon by reversing the coil in the magnet. One finds<br />
that the coil on the opposite side now appears to be weaker, when it was stronger in<br />
the other orientation.<br />
1. Comparison of Linear and Circular Polarization <strong>for</strong> Magnetic Resonance Imaging, Glover, et al,<br />
Journal of Magnetic Resonance 64, 255-270 (1985)<br />
2. The Modification of the RF Field Distribution of Surface <strong>Coil</strong>s by Weakly Conducting Saline<br />
Samples, Hanstock et al, Magnetic Resonance in Medicine 7, 204-209 (1988)<br />
Local Intensity Shift Artifact, Peter Wardenier, P. 1175, 1988 SMRM proceedings<br />
<strong>Invivo</strong> Corporation<br />
<strong>Model</strong> <strong>OBC</strong>
<strong>Invivo</strong> Corporation<br />
<strong>Model</strong> <strong>OBC</strong><br />
Cable Loss(float):<br />
<strong>Coil</strong> Loss (float):<br />
Recon Scale<br />
1.5T LX 1.5T Genesis<br />
60 cm.<br />
1.5T Genesis<br />
55 cm.<br />
1.05<br />
1.0T LX<br />
500018 Rev 07<br />
Chapter 5 - Installation and<br />
Maintenance<br />
Config File<br />
In<strong>for</strong>mation<br />
Adding a<br />
Softkey <strong>for</strong><br />
the <strong>Open</strong><br />
<strong>Breast</strong> <strong>Array</strong><br />
<strong>Coil</strong><br />
The configurations below are used <strong>for</strong> programming soft keys <strong>for</strong> the open breast<br />
array coil on the plasma display console. The selections are, in order, right<br />
breast, left breast, both breasts. Programming can easily be per<strong>for</strong>med by your<br />
GE service engineer.<br />
Unilateral imaging is preferred when using FAT SAT, WATER SAT, or SILICONE<br />
SAT, since the saturation pulse sequences generally will not work well when the<br />
FOV encompasses both breasts, due to body coil inhomogeneities. By programming<br />
a plasma key <strong>for</strong> left breast and right breast, you are assured of using the<br />
appropriate channel <strong>for</strong> applying a saturation pulse during manual or auto<br />
prescan.<br />
Softkeys <strong>for</strong> the <strong>OBC</strong> <strong>Coil</strong> may be added on the LX console by accessing the Config<br />
File Manager from the Utilities window in the Service Desktop Manager area of your<br />
operator's screen.<br />
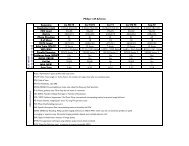
The screen is case sensitive; be sure to enter values as shown. The following<br />
in<strong>for</strong>mation needs to be entered into the config file at the prompts on the screen:<br />
<strong>Coil</strong>Name (8 characters or less): R_BREAST<br />
korecName (4 characters or less): Enter a space return<br />
<strong>Coil</strong>Type (1-Head 2-Body 3-Surface): 3 enter<br />
Extremity <strong>Coil</strong> (yes, no): no<br />
1.05<br />
1.72<br />
1.05<br />
1.72<br />
1.56 1.56<br />
0.313<br />
1.56<br />
1.24<br />
0.549<br />
1.0T Genesis<br />
60 cm.<br />
1.24<br />
0.549<br />
1.282 1.282<br />
Linear vs Quadrature (0 or l): 1<br />
Multiple Receiver <strong>Coil</strong>? [yes, no]: yes<br />
Number of Receivers: 2<br />
Starting Receiver ID (integer): 2<br />
Ending Receiver ID (integer): 3<br />
Multi-<strong>Coil</strong> PortEnable (an integer): 2<br />
Multi-<strong>Coil</strong> ErrorEnable (an integer): 2<br />
Additional Transmit Attenuation (An integer from 1 to 100, units are tenths of dB): 0<br />
Number Fast Receiver: 0<br />
Starting Fast Receiver: 4<br />
Ending Fast Receiver: 4<br />
Fast TG Start TA: 90<br />
Fast TG Start RG: 12<br />
Multi-<strong>Coil</strong> Recon Enable: 0<br />
19
500018 Rev 07<br />
20<br />
<strong>Coil</strong>Name (8 characters or less): L_BREAST<br />
korecName (4 characters or less): Enter a space return<br />
<strong>Coil</strong>Type (1-Head 2-Body 3-Surface): 3 enter<br />
Extremity <strong>Coil</strong> (yes, no): no<br />
Cable Loss(float):<br />
<strong>Coil</strong> Loss (float):<br />
Recon Scale<br />
1.5T LX 1.5T Genesis<br />
60 cm.<br />
1.05<br />
1.72<br />
1.05<br />
1.72<br />
1.56 1.56<br />
1.5T Genesis<br />
55 cm.<br />
1.05<br />
0.313<br />
1.56<br />
1.0T LX<br />
1.24<br />
0.549<br />
1.0T Genesis<br />
60 cm.<br />
1.24<br />
0.549<br />
1.282 1.282<br />
Linear vs Quadrature (0 or l): 1<br />
Multiple Receiver <strong>Coil</strong>? [yes, no]: yes<br />
Number of Receivers: 2<br />
Starting Receiver ID (integer): 0<br />
Ending Receiver ID (integer): 1<br />
Multi-<strong>Coil</strong> PortEnable (an integer): 4<br />
Multi-<strong>Coil</strong> ErrorEnable (an integer): 4<br />
Additional Transmit Attenuation (An integer from 1 to 100, units are tenths of dB): 0<br />
Number Fast Receiver: 0<br />
Starting Fast Receiver: 4<br />
Ending Fast Receiver: 4<br />
Fast TG Start TA: 90<br />
Fast TG Start RG: 12<br />
Multi-<strong>Coil</strong> Recon Enable: 0<br />
<strong>Coil</strong>Name (8 characters or less): 2_BREAST<br />
korecName (4 characters or less): Enter a space return<br />
<strong>Coil</strong>Type (1-Head 2-Body 3-Surface): 3 enter<br />
Extremity <strong>Coil</strong> (yes, no): no<br />
Cable Loss(float):<br />
<strong>Coil</strong> Loss (float):<br />
Recon Scale<br />
1.5T LX 1.5T Genesis 1.5T Genesis 1.0T LX 1.0T Genesis<br />
1.05<br />
1.05<br />
1.72<br />
1.72<br />
1.56 1.56<br />
1.05<br />
0.313<br />
1.56<br />
1.24<br />
1.24<br />
0.549<br />
0.549<br />
1.282 1.282<br />
Linear vs Quadrature (0 or l): 1<br />
Multiple Receiver <strong>Coil</strong>? [yes, no]: yes<br />
Number of Receivers: 4<br />
Starting Receiver ID (integer): 0<br />
Ending Receiver ID (integer): 3<br />
Multi-<strong>Coil</strong> PortEnable (an integer): 6<br />
Multi-<strong>Coil</strong> ErrorEnable (an integer): 6<br />
Additional Transmit Attenuation (An integer from 1 to 100, units are tenths of dB): 0<br />
Number Fast Receiver: 0<br />
Starting Fast Receiver: 4<br />
Ending Fast Receiver: 4<br />
Fast TG Start TA: 90<br />
Fast TG Start RG: 12<br />
Multi-<strong>Coil</strong> Recon Enable: 0<br />
<strong>Invivo</strong> Corporation<br />
<strong>Model</strong> <strong>OBC</strong>
Cleaning<br />
<strong>Invivo</strong> Corporation<br />
<strong>Model</strong> <strong>OBC</strong><br />
500018 Rev 07<br />
After changing the configuration file, the Signa system must be shut down<br />
and rebooted.<br />
Refer to the following GE Service Documentation to assure the most current<br />
config in<strong>for</strong>mation.<br />
-2124201-3 (5.X)<br />
-2160623-3 (8.X)<br />
The <strong>Open</strong> <strong>Breast</strong> <strong>Array</strong> coil, Sternum pad, and Ramp pad may be cleaned by<br />
wiping the items with a cloth dampened with a solution of 30% isopropyl alcohol<br />
and 70% tap water. Do not pour any cleaning solution directly on the coil!<br />
Let coil housing and pads dry be<strong>for</strong>e use.<br />
21
500018 Rev 07<br />
22<br />
<strong>Invivo</strong> Corporation<br />
<strong>Model</strong> <strong>OBC</strong>