SOLON SOLbond Seam.
SOLON SOLbond Seam.
SOLON SOLbond Seam.

You also want an ePaper? Increase the reach of your titles
YUMPU automatically turns print PDFs into web optimized ePapers that Google loves.
<strong>SOLON</strong> <strong>SOLbond</strong> <strong>Seam</strong> installation manual 25<br />
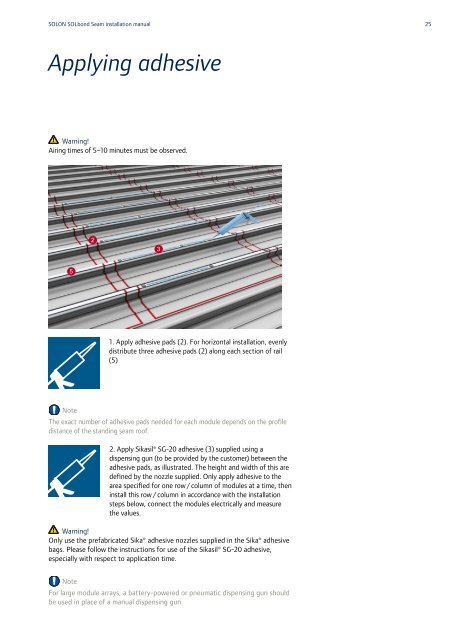
Applying adhesive<br />
Warning!<br />
Airing times of 5–10 minutes must be observed.<br />
5<br />
Note<br />
1. Apply adhesive pads (2). For horizontal installation, evenly<br />
distribute three adhesive pads (2) along each section of rail<br />
(5)<br />
The exact number of adhesive pads needed for each module depends on the profile<br />
distance of the standing seam roof.<br />
2. Apply Sikasil® SG-20 adhesive (3) supplied using a<br />
dispensing gun (to be provided by the customer) between the<br />
adhesive pads, as illustrated. The height and width of this are<br />
defined by the nozzle supplied. Only apply adhesive to the<br />
area specified for one row / column of modules at a time, then<br />
install this row / column in accordance with the installation<br />
steps below, connect the modules electrically and measure<br />
the values.<br />
Warning!<br />
Only use the prefabricated Sika® adhesive nozzles supplied in the Sika® adhesive<br />
bags. Please follow the instructions for use of the Sikasil® SG-20 adhesive,<br />
especially with respect to application time.<br />
Note<br />
2<br />
3<br />
For large module arrays, a battery-powered or pneumatic dispensing gun should<br />
be used in place of a manual dispensing gun.