Table of Contents - OsteoMed
Table of Contents - OsteoMed
Table of Contents - OsteoMed

You also want an ePaper? Increase the reach of your titles
YUMPU automatically turns print PDFs into web optimized ePapers that Google loves.
9. Drill pilot hole using the appropriate drill size at the desired angle, within plus or minus<br />
10˚from perpendicular to the plate.<br />
WARNING: When placing additional screws, ensure that subsequent screw<br />
placement does not interfere with the other screws.<br />
Note: While the screw heads are designed to sit flush with the plate, screw head prominence<br />
will vary at severe angles. Screw head prominence may cause s<strong>of</strong>t tissue irritation.<br />
Note: Use irrigation when pilot drilling.<br />
10. Insert the depth gauge until it passes through the distal cortex. Retract the stem until the<br />
lip catches against the bone to determine measurement.<br />
11. Select the desired screw diameter and length accordingly. Verify the screw length with<br />
the gauge on the block. Insert the screw into the drilled hole to fixate the plate onto the<br />
bone. Fluoroscopy is recommended to ensure correct length and angulation.<br />
Tip: To engage the head <strong>of</strong> the screw onto the self-retaining screwdriver shaft, insert<br />
the driver straight into the screw head with force. To remove the driver tip from the<br />
screw, rock slightly from side to side and lift.<br />
12. Repeat steps 7 through 11 for remaining screw placement.<br />
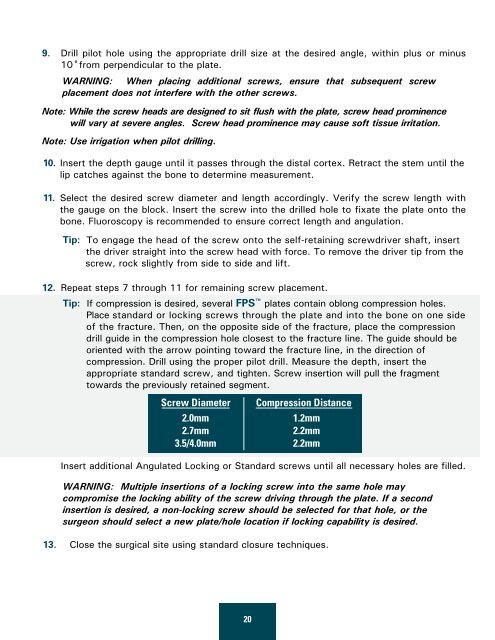
Tip: If compression is desired, several FPS plates contain oblong compression holes.<br />
Place standard or locking screws through the plate and into the bone on one side<br />
<strong>of</strong> the fracture. Then, on the opposite side <strong>of</strong> the fracture, place the compression<br />
drill guide in the compression hole closest to the fracture line. The guide should be<br />
oriented with the arrow pointing toward the fracture line, in the direction <strong>of</strong><br />
compression. Drill using the proper pilot drill. Measure the depth, insert the<br />
appropriate standard screw, and tighten. Screw insertion will pull the fragment<br />
towards the previously retained segment.<br />
Screw Diameter Compression Distance<br />
2.0mm 1.2mm<br />
2.7mm 2.2mm<br />
3.5/4.0mm 2.2mm<br />
Insert additional Angulated Locking or Standard screws until all necessary holes are filled.<br />
WARNING: Multiple insertions <strong>of</strong> a locking screw into the same hole may<br />
compromise the locking ability <strong>of</strong> the screw driving through the plate. If a second<br />
insertion is desired, a non-locking screw should be selected for that hole, or the<br />
surgeon should select a new plate/hole location if locking capability is desired.<br />
13. Close the surgical site using standard closure techniques.<br />
20