Table of Contents - OsteoMed
Table of Contents - OsteoMed
Table of Contents - OsteoMed

Create successful ePaper yourself
Turn your PDF publications into a flip-book with our unique Google optimized e-Paper software.
4. Select the appropriate plate corresponding to the template size.<br />
Plates can be used on the left or right side.<br />
5. Contour the plate to match the template. Plates can be cut with plate cutters if necessary.<br />
Refer to General Plating Preparation on p. 18-19 for detailed instructions.<br />
WARNING: Bend the plate using the plate benders provided to avoid deforming the screw<br />
holes. Bending across the plate holes may deform the screw holes and prevent the locking<br />
screw from fully seating. Bending the plate multiple times may weaken the plate and could<br />
result in implant failure.<br />
6. Place the plate over the fracture site. Temporarily fixate the plate to the bones using<br />
K-wires or Holding Taks .<br />
7. Select the appropriate drill guide and insert it into the first plate hole just inferior to<br />
the posterior facet <strong>of</strong> the calcaneus. Standard and angled drill guides are available.<br />
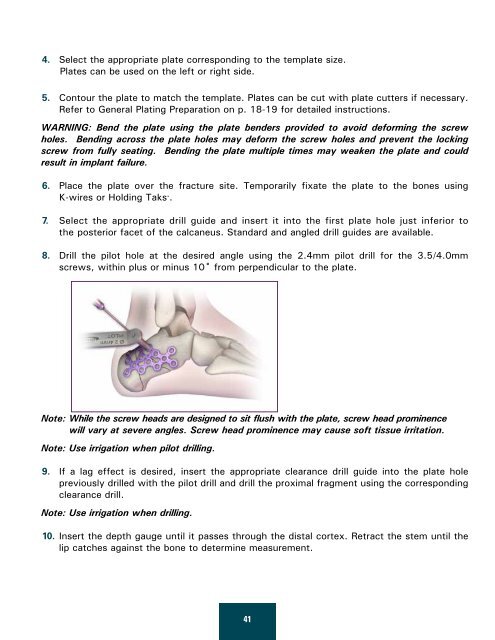
8. Drill the pilot hole at the desired angle using the 2.4mm pilot drill for the 3.5/4.0mm<br />
screws, within plus or minus 10˚ from perpendicular to the plate.<br />
Note: While the screw heads are designed to sit flush with the plate, screw head prominence<br />
will vary at severe angles. Screw head prominence may cause s<strong>of</strong>t tissue irritation.<br />
Note: Use irrigation when pilot drilling.<br />
9. If a lag effect is desired, insert the appropriate clearance drill guide into the plate hole<br />
previously drilled with the pilot drill and drill the proximal fragment using the corresponding<br />
clearance drill.<br />
Note: Use irrigation when drilling.<br />
10. Insert the depth gauge until it passes through the distal cortex. Retract the stem until the<br />
lip catches against the bone to determine measurement.<br />
41